towing FORD F450 SUPER DUTY 2017 Owners Manual
[x] Cancel search | Manufacturer: FORD, Model Year: 2017, Model line: F450 SUPER DUTY, Model: FORD F450 SUPER DUTY 2017Pages: 642, PDF Size: 12.35 MB
Page 7 of 642
Bed Ramps....................................................265
Towing
Towing a Trailer............................................268
Trailer Reversing Aids.................................269
Trailer Sway Control....................................277
Recommended Towing Weights............277
Essential Towing Checks...........................281
Towing the Vehicle on Four Wheels......289
Driving Hints
Breaking-In.....................................................292
Economical Driving.....................................292
Driving Through Water...............................293
Floor Mats.......................................................293
Snowplowing................................................294
Roadside Emergencies
Roadside Assistance..................................297
Hazard Flashers...........................................298
Fuel Shutoff - 6.2L/6.8L...........................298
Fuel Shutoff - 6.7L Diesel.........................298
Jump Starting the Vehicle........................299
Post-Crash Alert System..........................302
Transporting the Vehicle...........................302
Towing Points...............................................303
Customer Assistance
Getting the Services You Need..............305
In California (U.S. Only)............................306
The Better Business Bureau (BBB) AutoLine Program (U.S. Only)......................307
Utilizing the Mediation/ArbitrationProgram (Canada Only)......................308
Getting Assistance Outside the U.S. andCanada.......................................................308
Ordering Additional Owner'sLiterature....................................................309
Reporting Safety Defects (U.S.Only).............................................................310
Reporting Safety Defects (CanadaOnly).............................................................310
Fuses
Fuse Specification Chart............................312
Changing a Fuse..........................................320
Maintenance
General Information....................................322
Opening and Closing the Hood..............322
Under Hood Overview - 6.2L...................323
Under Hood Overview - 6.7L Diesel......324
Under Hood Overview - 6.8L..................326
Engine Oil Dipstick - 6.2L/6.8L...............327
Engine Oil Dipstick - 6.7L Diesel.............327
Engine Oil Check - 6.2L/6.8L...................327
Engine Oil Check - 6.7L Diesel................328
Changing the Engine Oil and OilFilter..............................................................329
Changing the Coalescer FilterElement......................................................330
Oil Change Indicator Reset.......................331
Engine Coolant Check - 6.2L/6.8L........332
Engine Coolant Check - 6.7L Diesel......336
Automatic Transmission FluidCheck...........................................................340
Transfer Case Fluid Check........................343
Brake Fluid Check........................................343
Power Steering Fluid Check....................344
Washer Fluid Check....................................344
Draining the Fuel Filter Water Trap - 6.7LDiesel...........................................................345
Fuel Filter - 6.2L/6.8L................................346
Changing the 12V Battery.........................346
Checking the Wiper Blades.....................348
Changing the Wiper Blades.....................348
Adjusting the Headlamps........................349
Changing a Bulb..........................................350
Bulb Specification Chart...........................353
Changing the Engine Air Filter - 6.2L/6.8L...............................................................356
4
Super Duty (TFE) Canada/United States of America, enUSA, Edition date: 201710, Second Printing
Table of Contents
Page 79 of 642
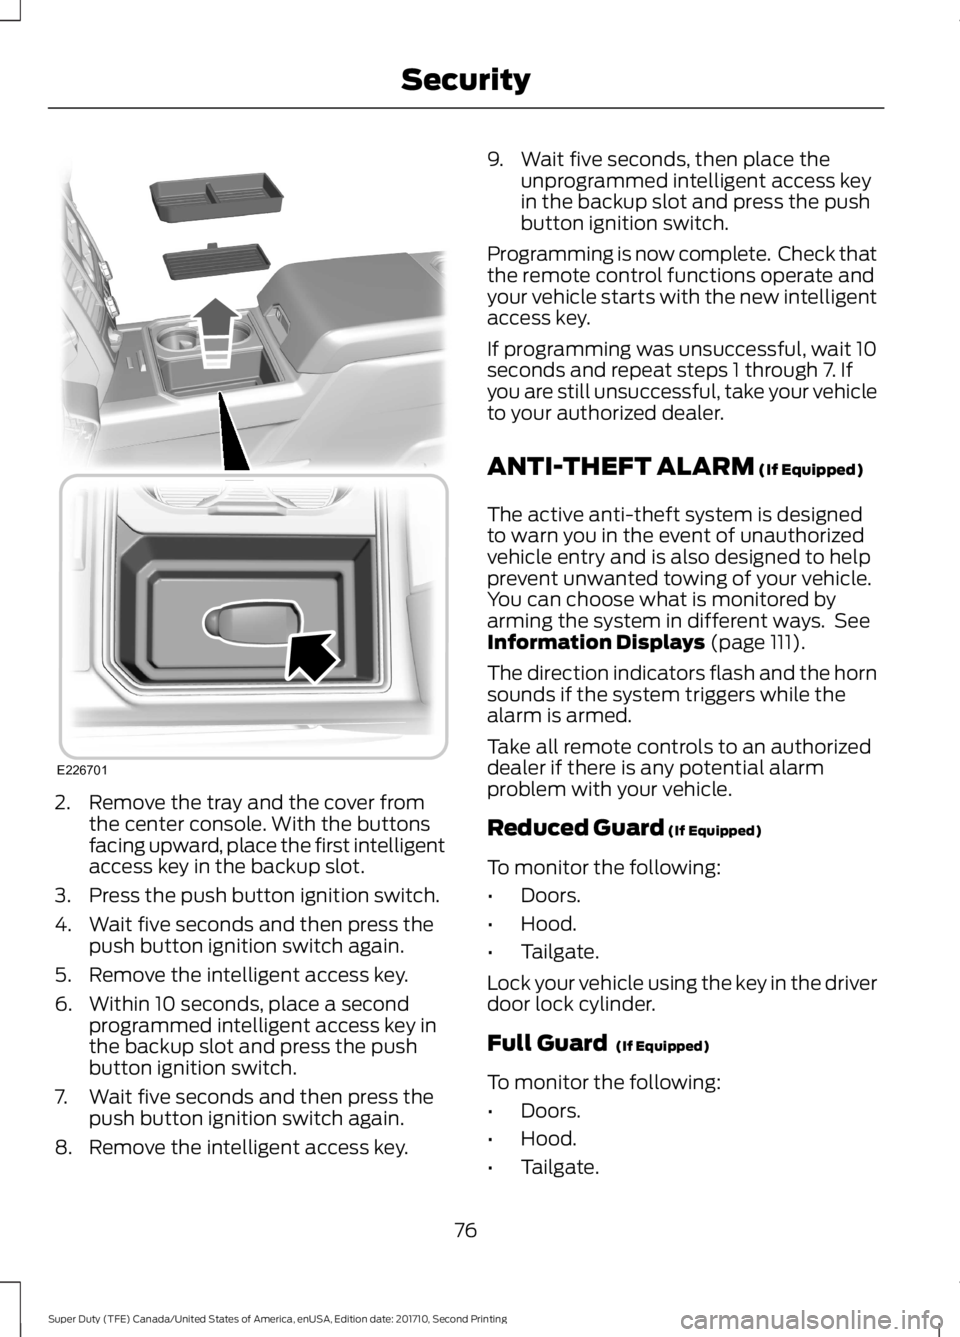
2. Remove the tray and the cover fromthe center console. With the buttonsfacing upward, place the first intelligentaccess key in the backup slot.
3. Press the push button ignition switch.
4. Wait five seconds and then press thepush button ignition switch again.
5. Remove the intelligent access key.
6. Within 10 seconds, place a secondprogrammed intelligent access key inthe backup slot and press the pushbutton ignition switch.
7. Wait five seconds and then press thepush button ignition switch again.
8. Remove the intelligent access key.
9. Wait five seconds, then place theunprogrammed intelligent access keyin the backup slot and press the pushbutton ignition switch.
Programming is now complete. Check thatthe remote control functions operate andyour vehicle starts with the new intelligentaccess key.
If programming was unsuccessful, wait 10seconds and repeat steps 1 through 7. Ifyou are still unsuccessful, take your vehicleto your authorized dealer.
ANTI-THEFT ALARM (If Equipped)
The active anti-theft system is designedto warn you in the event of unauthorizedvehicle entry and is also designed to helpprevent unwanted towing of your vehicle.You can choose what is monitored byarming the system in different ways. SeeInformation Displays (page 111).
The direction indicators flash and the hornsounds if the system triggers while thealarm is armed.
Take all remote controls to an authorizeddealer if there is any potential alarmproblem with your vehicle.
Reduced Guard (If Equipped)
To monitor the following:
•Doors.
•Hood.
•Tailgate.
Lock your vehicle using the key in the driverdoor lock cylinder.
Full Guard (If Equipped)
To monitor the following:
•Doors.
•Hood.
•Tailgate.
76
Super Duty (TFE) Canada/United States of America, enUSA, Edition date: 201710, Second Printing
SecurityE226701
Page 80 of 642
•Movement inside your vehicle.
•Change in vehicle inclination, forexample, unwanted towing.
Lock your vehicle using the remote controlor the power door lock control with theaccompanying door open and then closeall doors.
Note:Do not choose full monitor mode ifmovement within the vehicle is likely tooccur or when the vehicle is in transport.
Note:For correct operation of the interiormotion detection system, make sure allwindows are closed prior to arming thesystem. This helps prevent accidental alarmactivation due to external influences andmake sure of correct interior motiondetection. Additionally, the interior motionsensing system will not arm if any door isajar.
Arming the Alarm
The alarm is ready to arm when there isnot a key in the ignition. Lock your vehicleto arm the alarm.
The direction indicators flash once afteryou lock your vehicle. This indicates thealarm is in the pre-armed mode. It fullyarms after 20 seconds.
Disarming the Alarm
Disarm the alarm by any of the followingactions:
•Press the power door unlock buttonwithin the 20-second pre-armed mode.
•Unlock the doors with the remotecontrol or keyless entry keypad.
•Switch the ignition on or start yourvehicle.
•Use a key in the driver door lockcylinder to unlock your vehicle, thenswitch the ignition on within 12seconds.
Note:Pressing the panic button on theremote control stops the horn and directionindicators, but will not disarm the system.
77
Super Duty (TFE) Canada/United States of America, enUSA, Edition date: 201710, Second Printing
Security
Page 100 of 642
Telescoping Mirrors
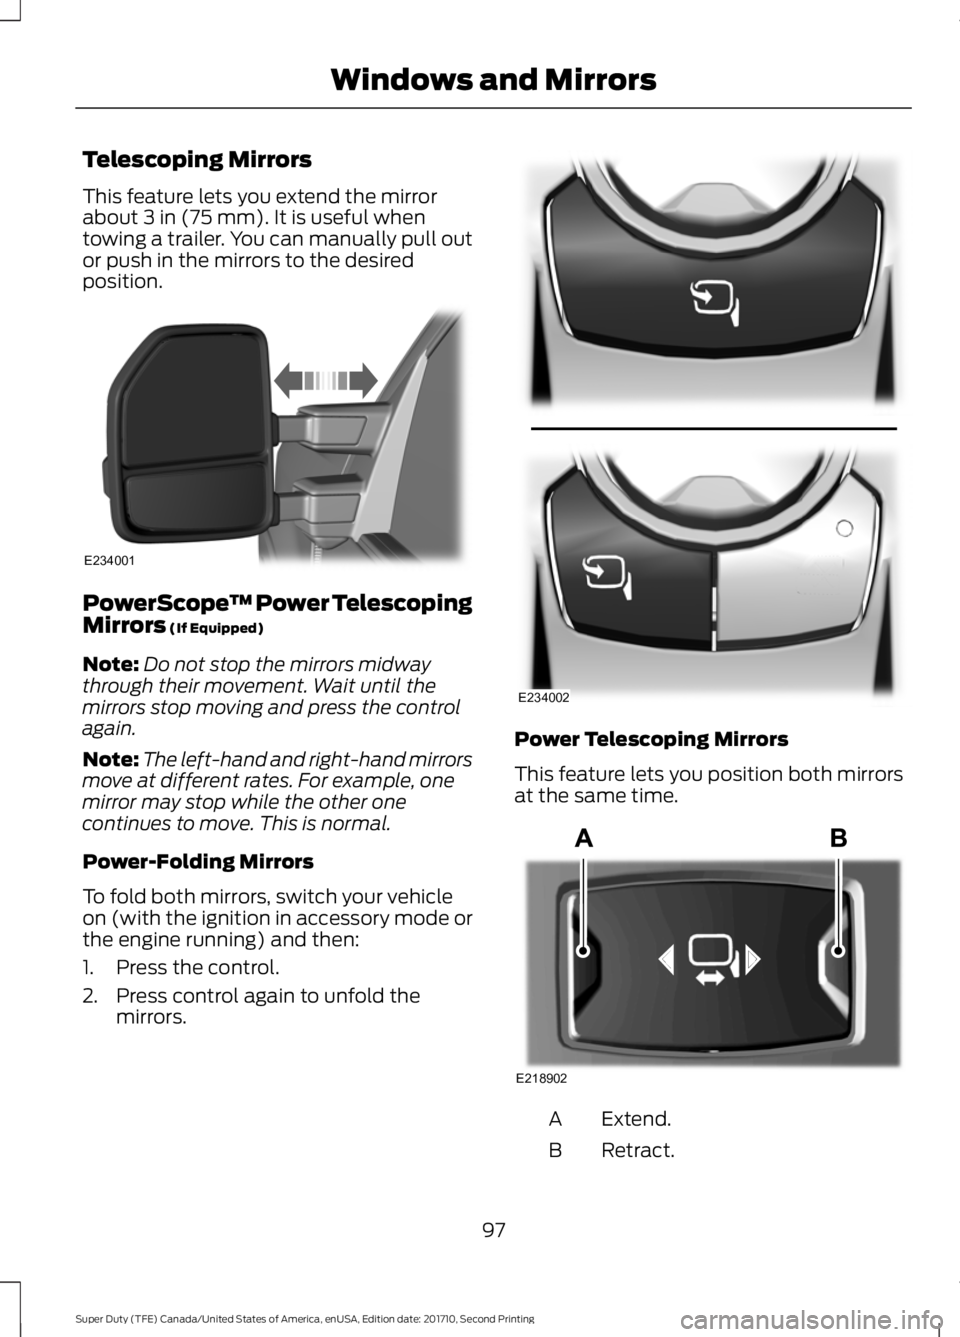
This feature lets you extend the mirrorabout 3 in (75 mm). It is useful whentowing a trailer. You can manually pull outor push in the mirrors to the desiredposition.
PowerScope™ Power TelescopingMirrors (If Equipped)
Note:Do not stop the mirrors midwaythrough their movement. Wait until themirrors stop moving and press the controlagain.
Note:The left-hand and right-hand mirrorsmove at different rates. For example, onemirror may stop while the other onecontinues to move. This is normal.
Power-Folding Mirrors
To fold both mirrors, switch your vehicleon (with the ignition in accessory mode orthe engine running) and then:
1. Press the control.
2. Press control again to unfold themirrors.
Power Telescoping Mirrors
This feature lets you position both mirrorsat the same time.
Extend.A
Retract.B
97
Super Duty (TFE) Canada/United States of America, enUSA, Edition date: 201710, Second Printing
Windows and MirrorsE234001 E234002 E218902
Page 101 of 642
To adjust your mirrors, make sure youswitch your vehicle on (with the ignition inaccessory mode or the engine running) andthen press the adjustment control toposition the mirrors.
Note:Moving the mirrors 10 or more timeswithin one minute, or repeated folding,unfolding and telescoping of the mirrorswhile holding the control down during fulltravel, may disable the system to protectthe motors from overheating. Waitapproximately three minutes with thevehicle running, and up to 10 minutes withthe vehicle off, for the system to reset andfor function to return to normal.
Loose Mirror
If your power-folding mirrors are manuallyfolded, they may not work properly evenafter you re-position them. You need toreset them if:
•The mirrors vibrate when you drive.
•The mirrors feel loose.
•The mirrors do not stay in the folded orunfolded position.
•One of the mirrors is not in its normaldriving position.
To reset the power-fold feature, use thepower-folding mirror control to fold andunfold the mirrors. You may hear a loudnoise as you reset the power-foldingmirrors. This sound is normal. Repeat thisprocess as needed each time the mirrorsare manually folded.
Heated Exterior Mirrors (If Equipped)
See Heated Windows and Mirrors (page150).
Memory Mirrors (If Equipped)
You can save and recall the mirrorpositions through the memory function.See Memory Function (page 157).
Direction Indicator Mirrors (If Equipped)
While the vehicle is running, theforward-facing portion of the appropriatemirror housing blinks when you switch onthe direction indicator.
Puddle Lamps (If Equipped)
The lamps on the bottom part of the mirrorhousing light when you use yourtransmitter to unlock the doors or whenyou open a door.
Clearance Lamps (If Equipped)
The lower, outer part of the mirror housingslight when you switch the headlamps orparking lamps on.
Spot Lamps (If Equipped)
The area lights are on the forward-facingportion of the mirror housing. You canswitch them on and off by using thecontrols located on the instrument panel.See Lighting (page 86).
Trailer Towing Camera System (If
Equipped)
See Rear View Camera (page 232).
Blind Spot Information System (If
Equipped)
See Blind Spot Information System(page 249).
INTERIOR MIRROR
WARNING
Do not adjust the mirror when yourvehicle is moving.
98
Super Duty (TFE) Canada/United States of America, enUSA, Edition date: 201710, Second Printing
Windows and Mirrors
Page 108 of 642
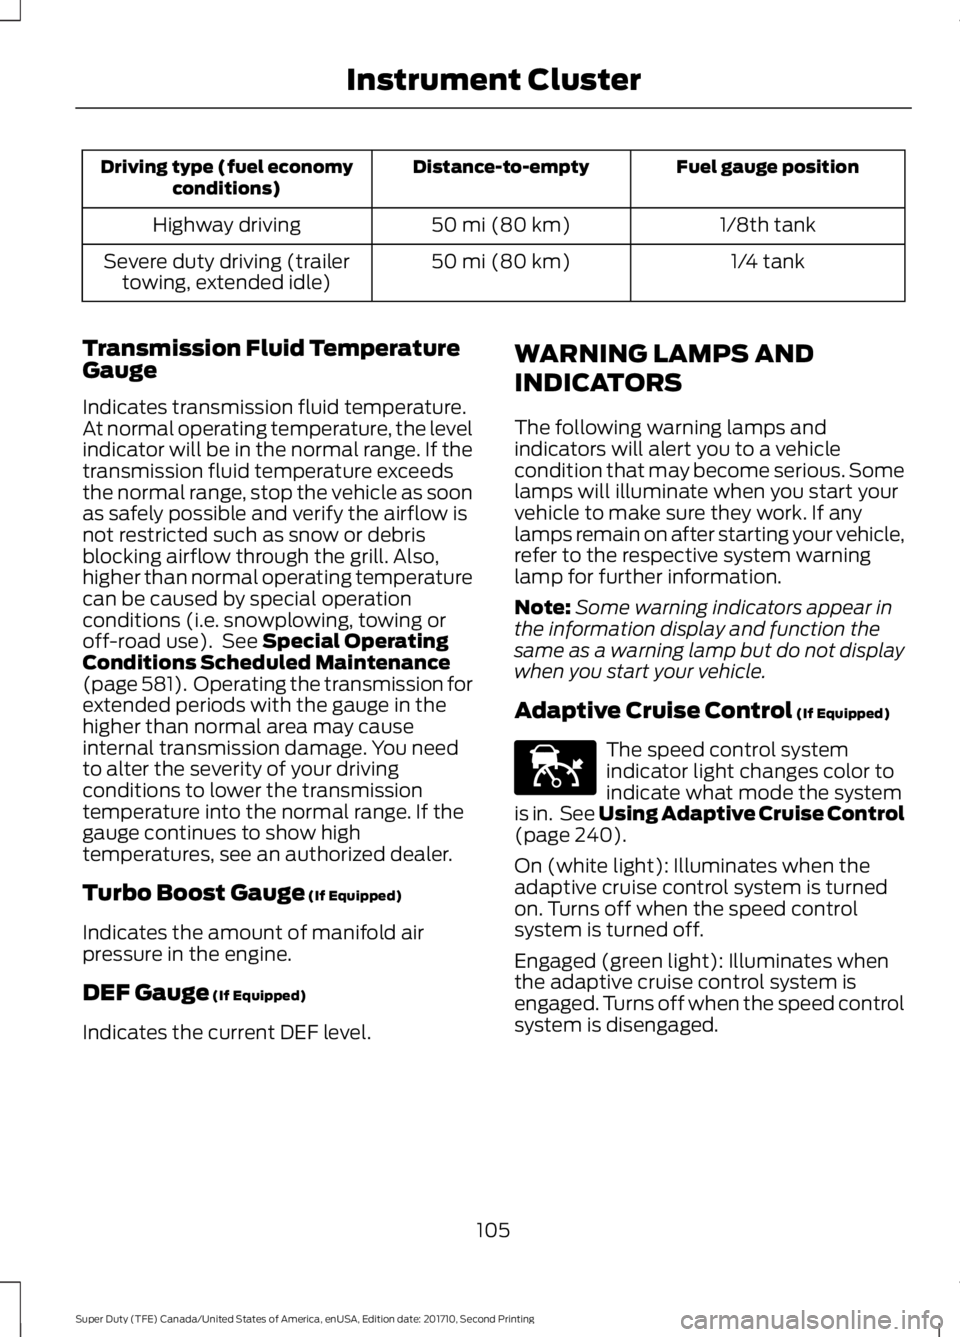
Fuel gauge positionDistance-to-emptyDriving type (fuel economyconditions)
1/8th tank50 mi (80 km)Highway driving
1/4 tank50 mi (80 km)Severe duty driving (trailertowing, extended idle)
Transmission Fluid TemperatureGauge
Indicates transmission fluid temperature.At normal operating temperature, the levelindicator will be in the normal range. If thetransmission fluid temperature exceedsthe normal range, stop the vehicle as soonas safely possible and verify the airflow isnot restricted such as snow or debrisblocking airflow through the grill. Also,higher than normal operating temperaturecan be caused by special operationconditions (i.e. snowplowing, towing oroff-road use). See Special OperatingConditions Scheduled Maintenance(page 581). Operating the transmission forextended periods with the gauge in thehigher than normal area may causeinternal transmission damage. You needto alter the severity of your drivingconditions to lower the transmissiontemperature into the normal range. If thegauge continues to show hightemperatures, see an authorized dealer.
Turbo Boost Gauge (If Equipped)
Indicates the amount of manifold airpressure in the engine.
DEF Gauge (If Equipped)
Indicates the current DEF level.
WARNING LAMPS AND
INDICATORS
The following warning lamps andindicators will alert you to a vehiclecondition that may become serious. Somelamps will illuminate when you start yourvehicle to make sure they work. If anylamps remain on after starting your vehicle,refer to the respective system warninglamp for further information.
Note:Some warning indicators appear inthe information display and function thesame as a warning lamp but do not displaywhen you start your vehicle.
Adaptive Cruise Control (If Equipped)
The speed control systemindicator light changes color toindicate what mode the systemis in. See Using Adaptive Cruise Control(page 240).
On (white light): Illuminates when theadaptive cruise control system is turnedon. Turns off when the speed controlsystem is turned off.
Engaged (green light): Illuminates whenthe adaptive cruise control system isengaged. Turns off when the speed controlsystem is disengaged.
105
Super Duty (TFE) Canada/United States of America, enUSA, Edition date: 201710, Second Printing
Instrument ClusterE144524
Page 118 of 642
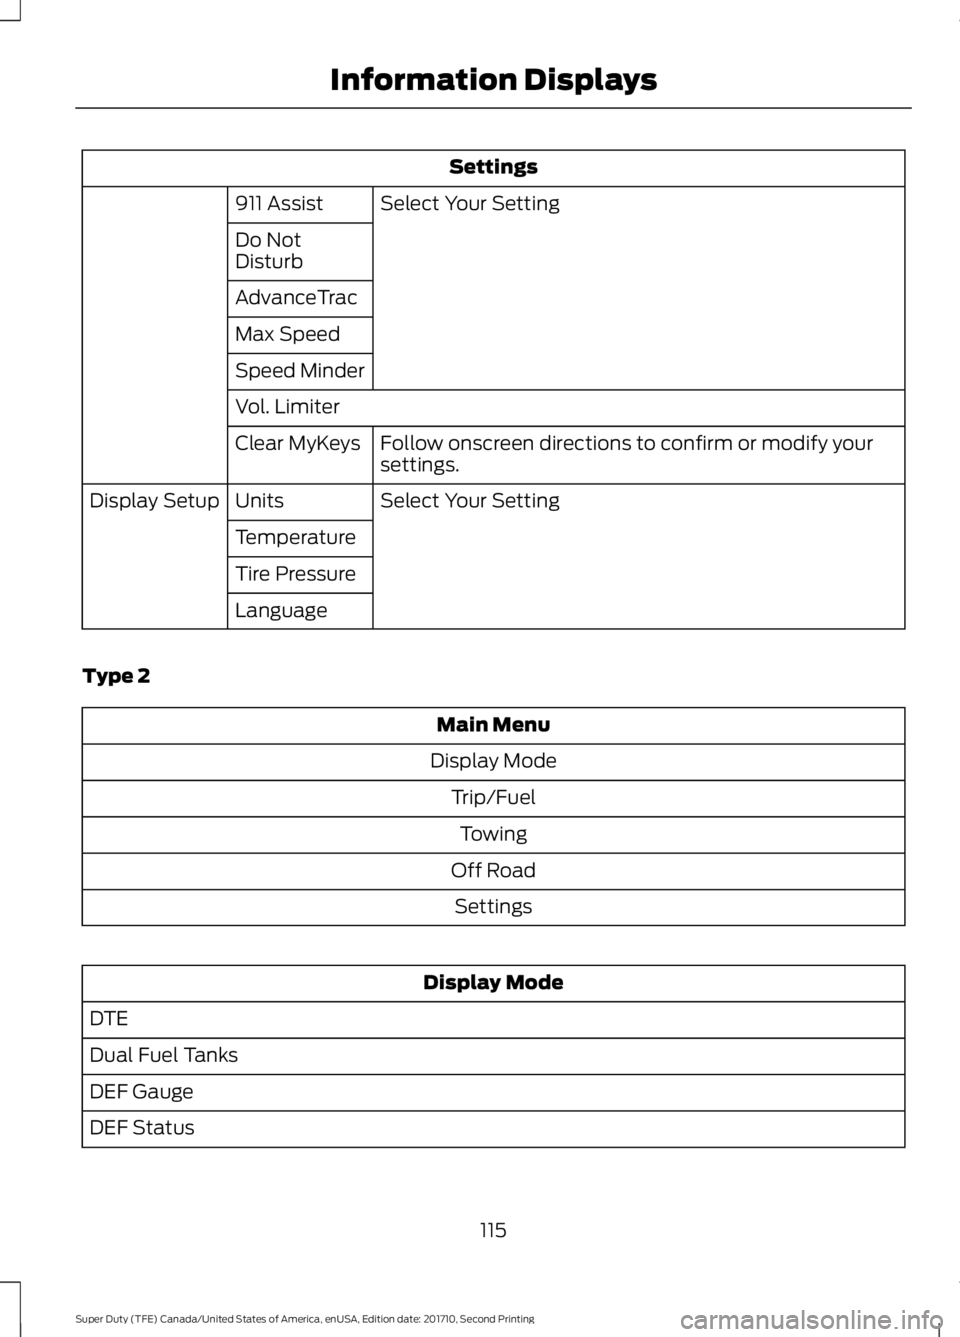
Settings
Select Your Setting911 Assist
Do NotDisturb
AdvanceTrac
Max Speed
Speed Minder
Vol. Limiter
Follow onscreen directions to confirm or modify yoursettings.Clear MyKeys
Select Your SettingUnitsDisplay Setup
Temperature
Tire Pressure
Language
Type 2
Main Menu
Display Mode
Trip/Fuel
Towing
Off Road
Settings
Display Mode
DTE
Dual Fuel Tanks
DEF Gauge
DEF Status
115
Super Duty (TFE) Canada/United States of America, enUSA, Edition date: 201710, Second Printing
Information Displays
Page 120 of 642
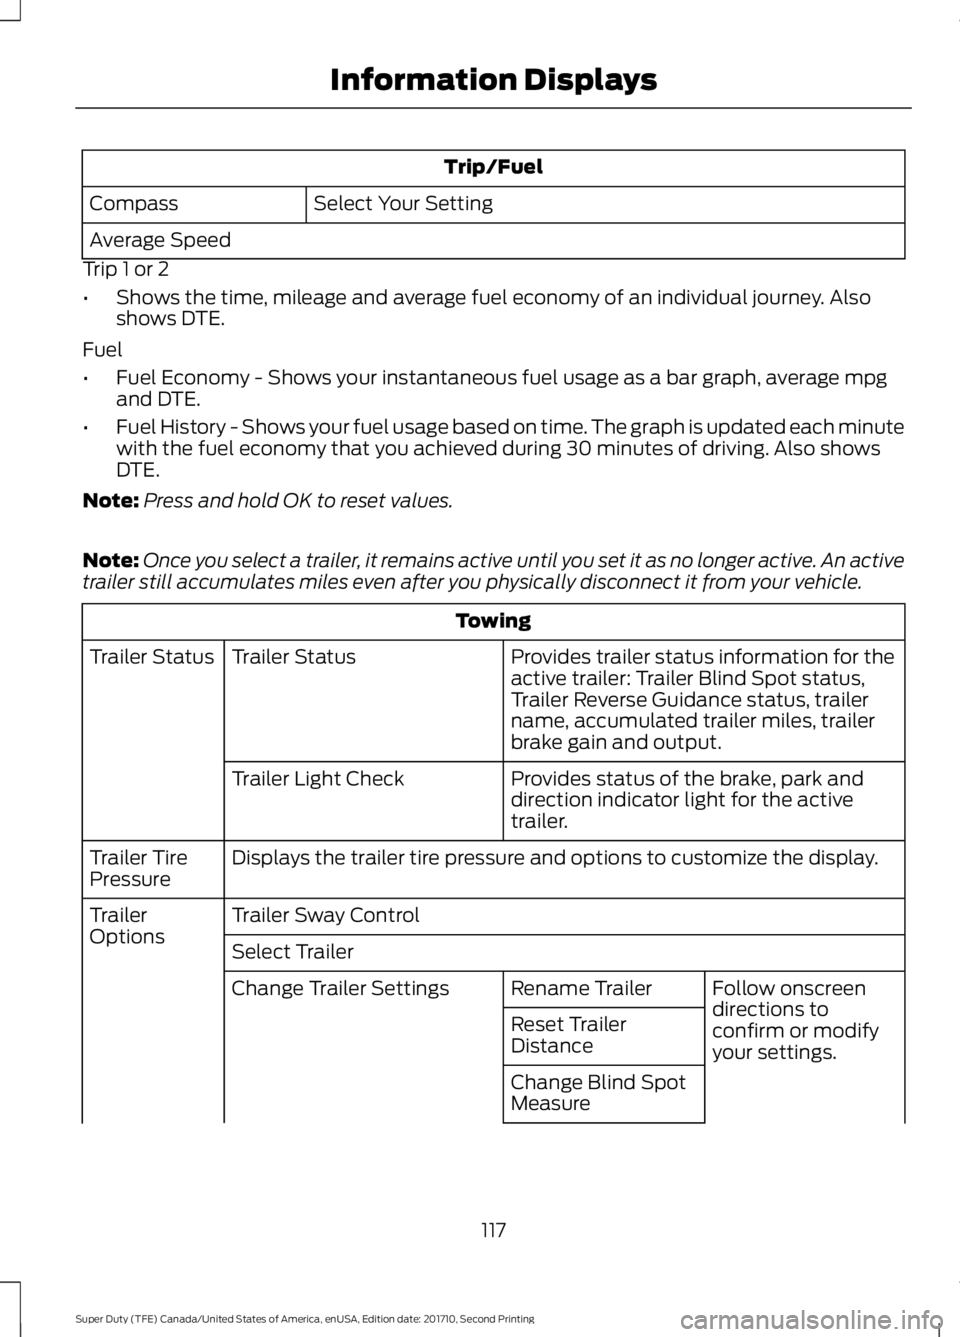
Trip/Fuel
Select Your SettingCompass
Average Speed
Trip 1 or 2
•Shows the time, mileage and average fuel economy of an individual journey. Alsoshows DTE.
Fuel
•Fuel Economy - Shows your instantaneous fuel usage as a bar graph, average mpgand DTE.
•Fuel History - Shows your fuel usage based on time. The graph is updated each minutewith the fuel economy that you achieved during 30 minutes of driving. Also showsDTE.
Note:Press and hold OK to reset values.
Note:Once you select a trailer, it remains active until you set it as no longer active. An activetrailer still accumulates miles even after you physically disconnect it from your vehicle.
Towing
Provides trailer status information for theactive trailer: Trailer Blind Spot status,Trailer Reverse Guidance status, trailername, accumulated trailer miles, trailerbrake gain and output.
Trailer StatusTrailer Status
Provides status of the brake, park anddirection indicator light for the activetrailer.
Trailer Light Check
Displays the trailer tire pressure and options to customize the display.Trailer TirePressure
Trailer Sway ControlTrailerOptionsSelect Trailer
Follow onscreendirections toconfirm or modifyyour settings.
Rename TrailerChange Trailer Settings
Reset TrailerDistance
Change Blind SpotMeasure
117
Super Duty (TFE) Canada/United States of America, enUSA, Edition date: 201710, Second Printing
Information Displays
Page 121 of 642
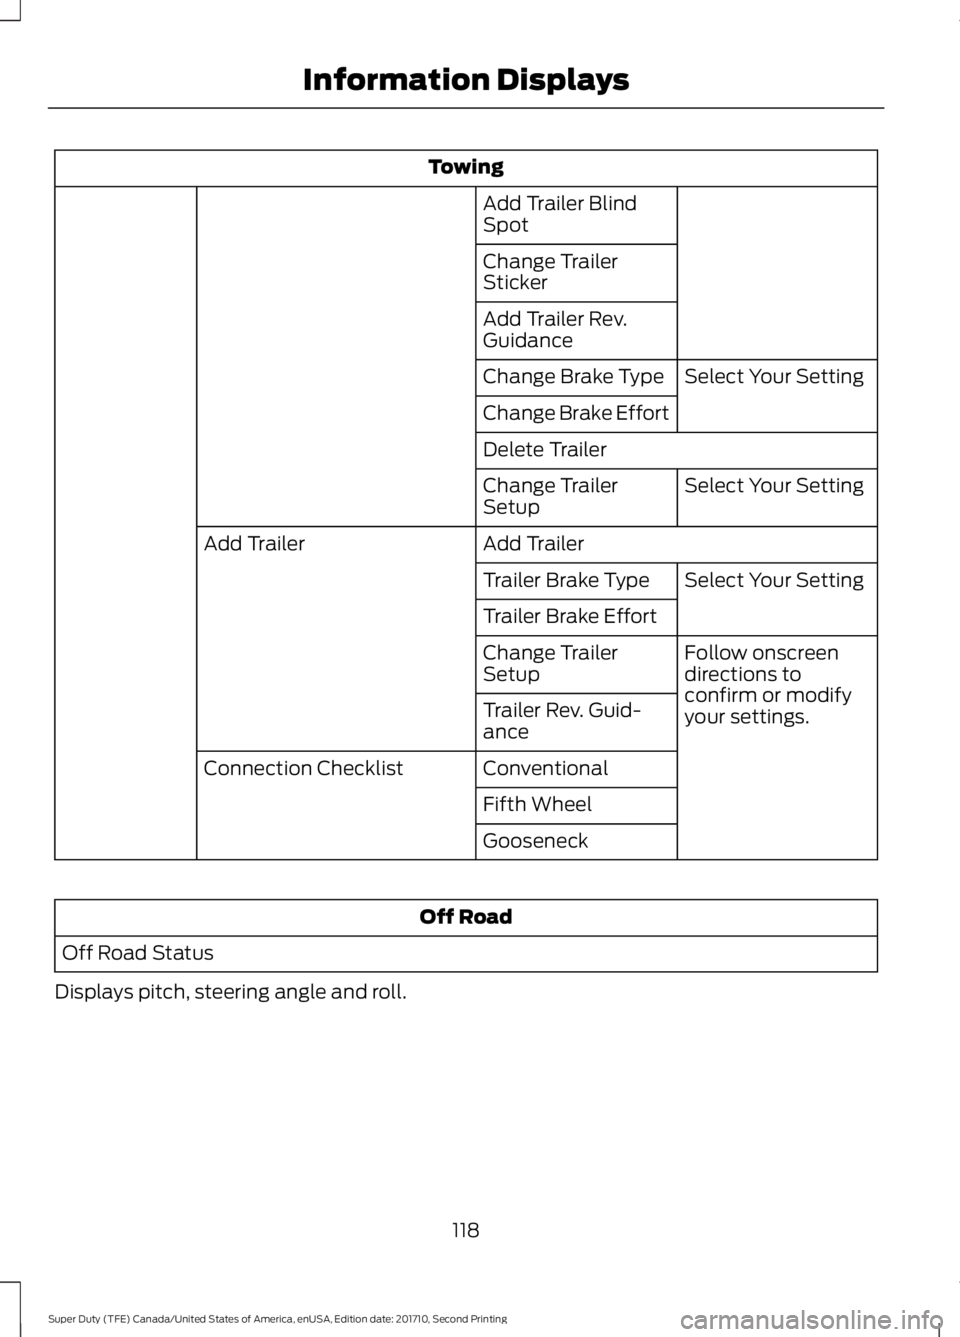
Towing
Add Trailer BlindSpot
Change TrailerSticker
Add Trailer Rev.Guidance
Select Your SettingChange Brake Type
Change Brake Effort
Delete Trailer
Select Your SettingChange TrailerSetup
Add TrailerAdd Trailer
Select Your SettingTrailer Brake Type
Trailer Brake Effort
Follow onscreendirections toconfirm or modifyyour settings.
Change TrailerSetup
Trailer Rev. Guid-ance
ConventionalConnection Checklist
Fifth Wheel
Gooseneck
Off Road
Off Road Status
Displays pitch, steering angle and roll.
118
Super Duty (TFE) Canada/United States of America, enUSA, Edition date: 201710, Second Printing
Information Displays
Page 124 of 642
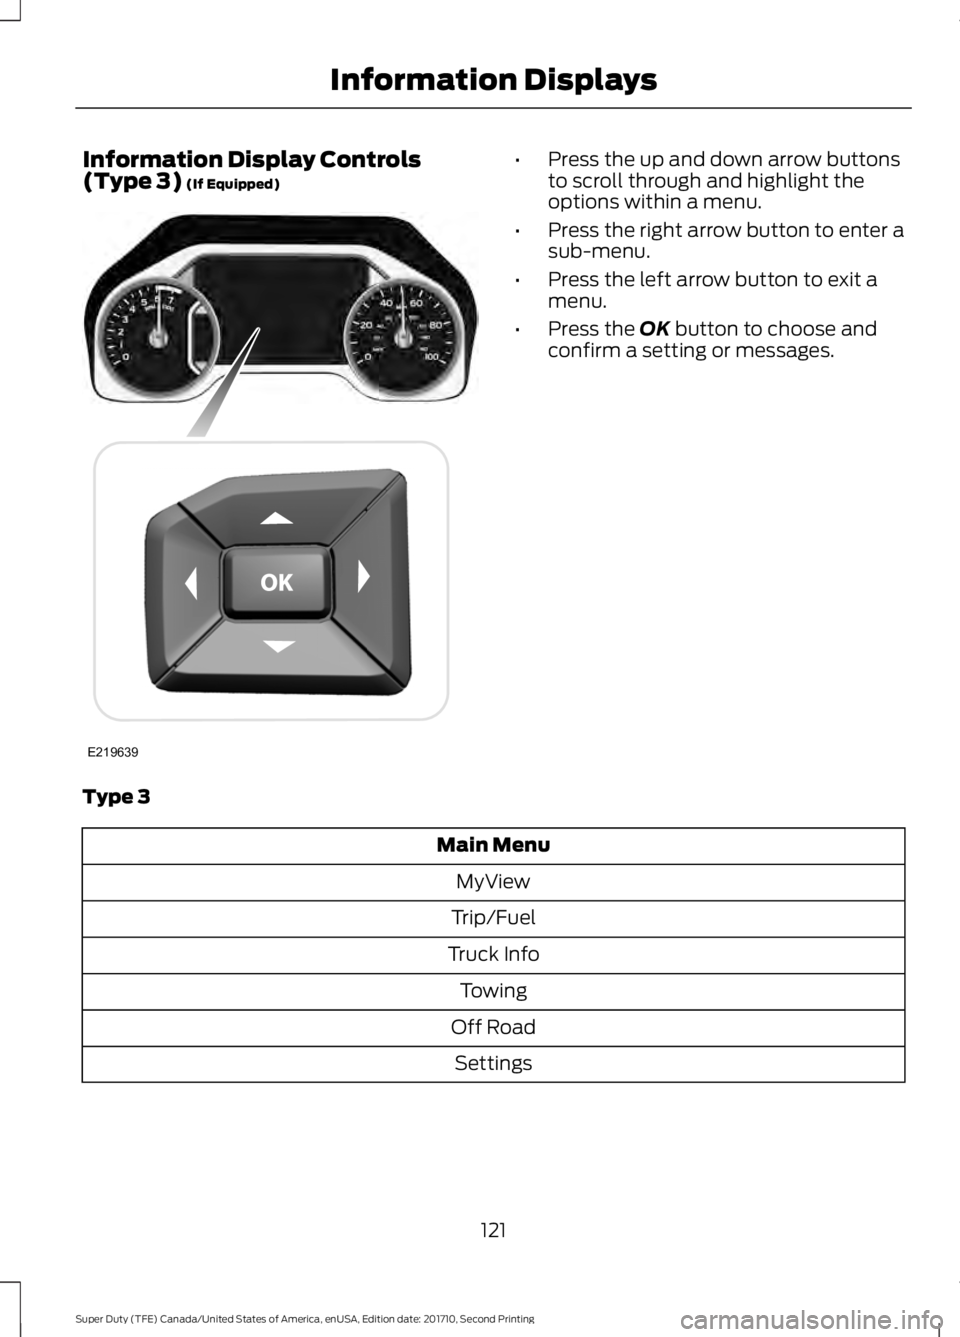
Information Display Controls(Type 3) (If Equipped)•Press the up and down arrow buttonsto scroll through and highlight theoptions within a menu.
•Press the right arrow button to enter asub-menu.
•Press the left arrow button to exit amenu.
•Press the OK button to choose andconfirm a setting or messages.
Type 3
Main Menu
MyView
Trip/Fuel
Truck Info
Towing
Off Road
Settings
121
Super Duty (TFE) Canada/United States of America, enUSA, Edition date: 201710, Second Printing
Information DisplaysE219639