mirror FORD F650 2002 10.G Owners Manual
[x] Cancel search | Manufacturer: FORD, Model Year: 2002, Model line: F650, Model: FORD F650 2002 10.GPages: 256, PDF Size: 1.75 MB
Page 1 of 256
Introduction 3
Congratulations 3
Safety and environment protection 4
Symbol glossary 6
Instrument Cluster 9
Gauges 16
Entertainment Systems 20
AM/FM stereo 20
AM/FM stereo cassette 20
AM/FM stereo cassette with CD 31
AM/FM stereo with CD 39
Climate Controls 56
Heater only 56
Manual heating and air conditioning 57
Lights 61
Headlamps 61
Driver Controls 68
Windshield wiper/washer control 68
Steering wheel adjustment 69
Power windows 74
Mirrors 75
Locks and Security 84
Keys 84
Locks 84
Anti-theft system 84
Seating and Safety Restraints 88
Seating 88
Safety restraints 93
Child restraints 102
Table of Contents
1
Page 73 of 256
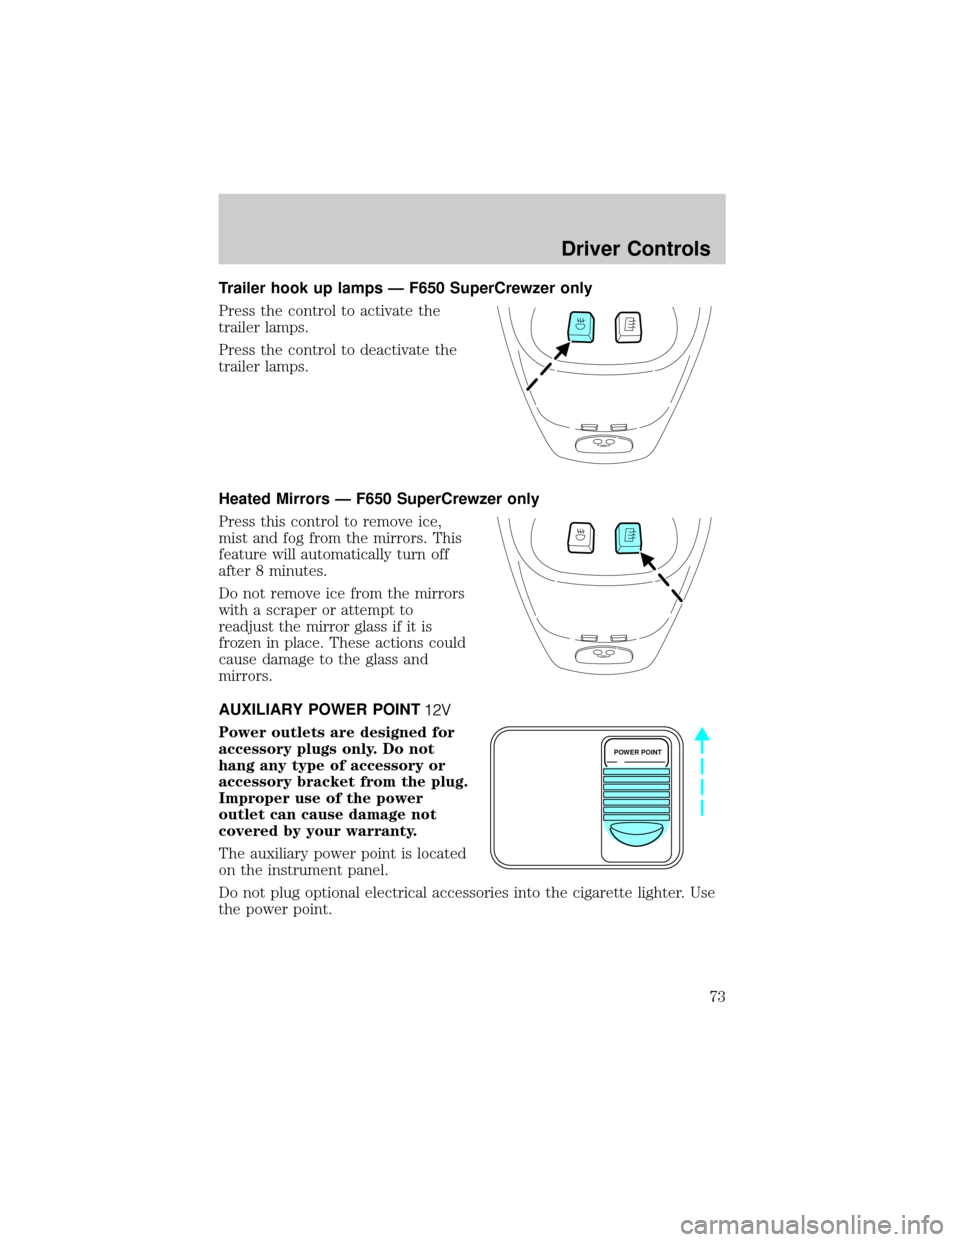
Trailer hook up lamps Ð F650 SuperCrewzer only
Press the control to activate the
trailer lamps.
Press the control to deactivate the
trailer lamps.
Heated Mirrors Ð F650 SuperCrewzer only
Press this control to remove ice,
mist and fog from the mirrors. This
feature will automatically turn off
after 8 minutes.
Do not remove ice from the mirrors
with a scraper or attempt to
readjust the mirror glass if it is
frozen in place. These actions could
cause damage to the glass and
mirrors.
AUXILIARY POWER POINT
Power outlets are designed for
accessory plugs only. Do not
hang any type of accessory or
accessory bracket from the plug.
Improper use of the power
outlet can cause damage not
covered by your warranty.
The auxiliary power point is located
on the instrument panel.
Do not plug optional electrical accessories into the cigarette lighter. Use
the power point.
POWER POINT
Driver Controls
73
Page 75 of 256
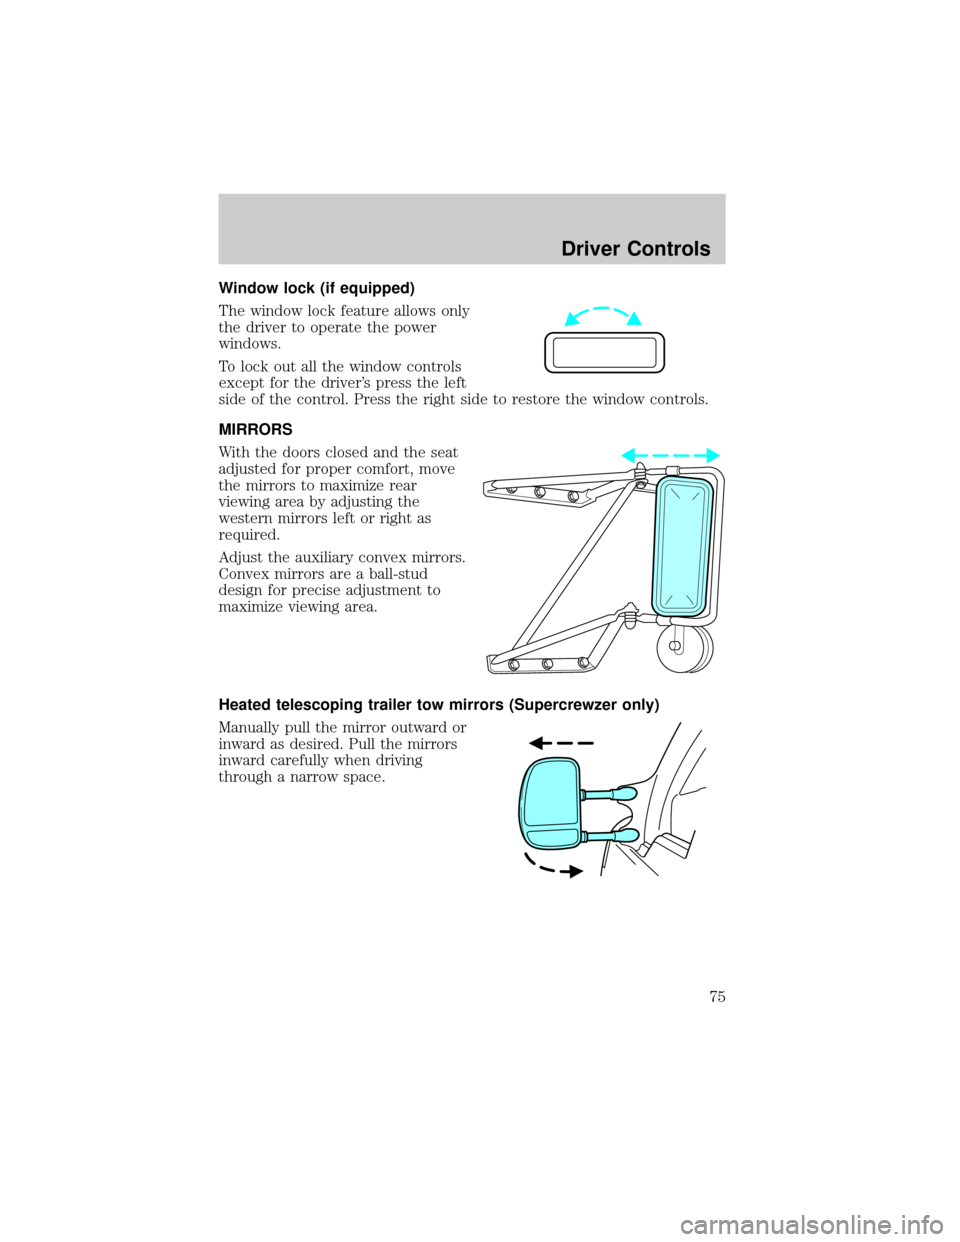
Window lock (if equipped)
The window lock feature allows only
the driver to operate the power
windows.
To lock out all the window controls
except for the driver's press the left
side of the control. Press the right side to restore the window controls.
MIRRORS
With the doors closed and the seat
adjusted for proper comfort, move
the mirrors to maximize rear
viewing area by adjusting the
western mirrors left or right as
required.
Adjust the auxiliary convex mirrors.
Convex mirrors are a ball-stud
design for precise adjustment to
maximize viewing area.
Heated telescoping trailer tow mirrors (Supercrewzer only)
Manually pull the mirror outward or
inward as desired. Pull the mirrors
inward carefully when driving
through a narrow space.
Driver Controls
75
Page 76 of 256
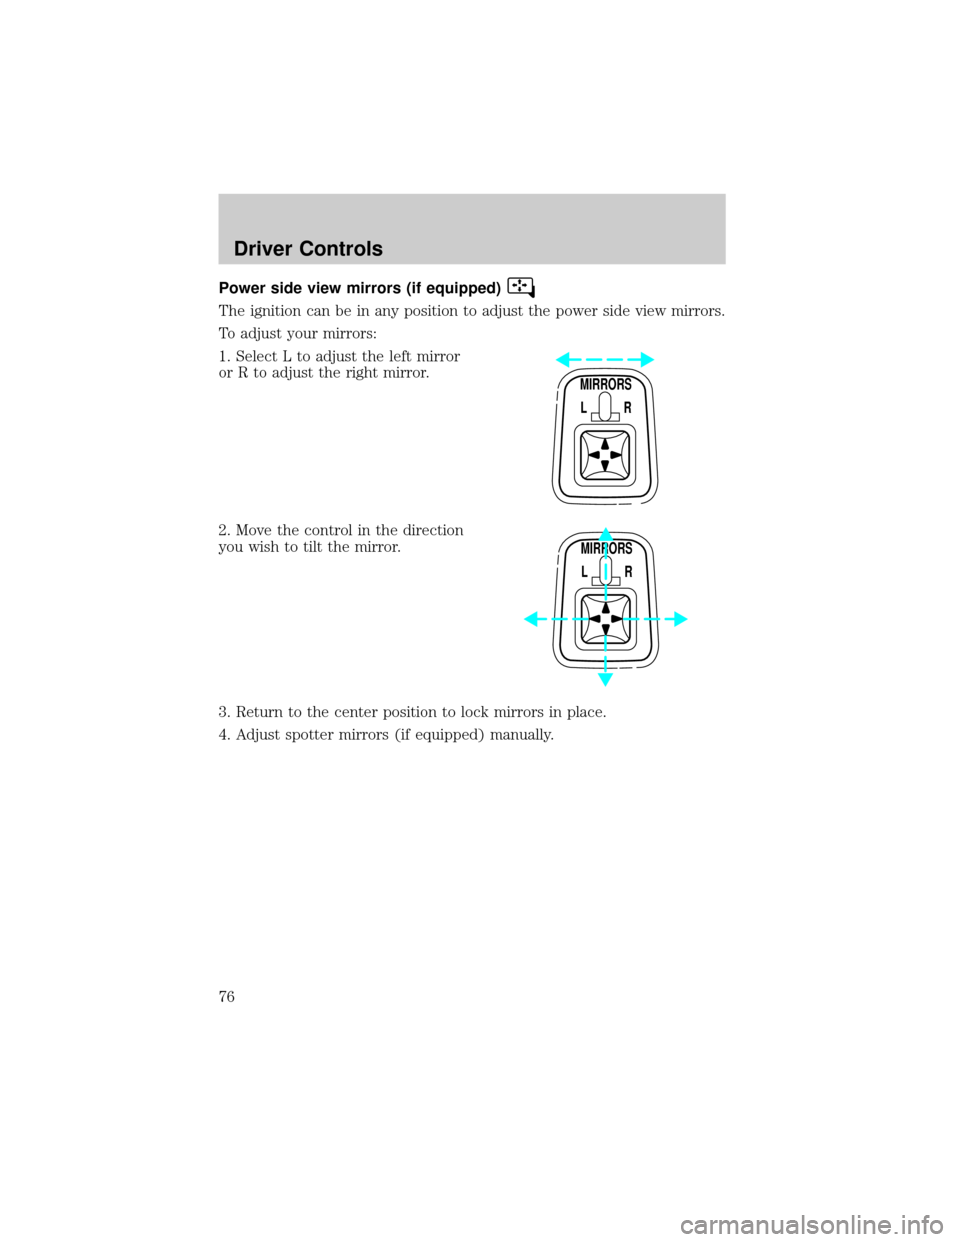
Power side view mirrors (if equipped)
The ignition can be in any position to adjust the power side view mirrors.
To adjust your mirrors:
1. Select L to adjust the left mirror
or R to adjust the right mirror.
2. Move the control in the direction
you wish to tilt the mirror.
3. Return to the center position to lock mirrors in place.
4. Adjust spotter mirrors (if equipped) manually.
MIRRORS
L R
MIRRORS
L R
Driver Controls
76
Page 146 of 256
BACKING UP
To avoid the possibility of personal injury while backing the
vehicle, always be sure your vehicle's path is clear.
Before backing your vehicle, be sure you can do so safely. If anything
behind the cab limits your view, do not rely on mirrors alone to assure
that your intended path is clear. If other persons are in the vicinity, have
someone standing well behind the vehicle and outside your intended
path - visible through an exterior mirror - guide you as you back up.
Although OSHA or other governmental regulations may require use of an
electrical or mechanical back-up alarm to warn bystanders, such an
alarm does not assure that the intended path is clear.
An electrical back-up alarm, if installed, is connected to the back-up
lamp circuit.
TWO SPEED REAR AXLE
General Information
A 2±speed axle allows the vehicle operator to selectLow Rangefor good
starting and pulling power. The operator may also selectHigh Range
which allows for greater road speed and economy.
High or Low Range can also be used to provide additional steps between
transmission gear ratios when either gradeability or economy are a
driving factor.
Axle upshift
Brake Torque
In any type of shift, you must brake torque your vehicle. This is done by
releasing the accelerator, because torque creates a binding action on the
sliding clutch gear. This binding must be relieved in order for the shift to
take place.
Axle upshifts transmission gears may be abrupt, causing the truck to
jerk. Using the clutch with the accelerator will smooth the shift.
In order to shift from LOW to HIGH,
²Pull the axle shift accelerator up.
²Release the accelerator.
Driving
146
Page 154 of 256
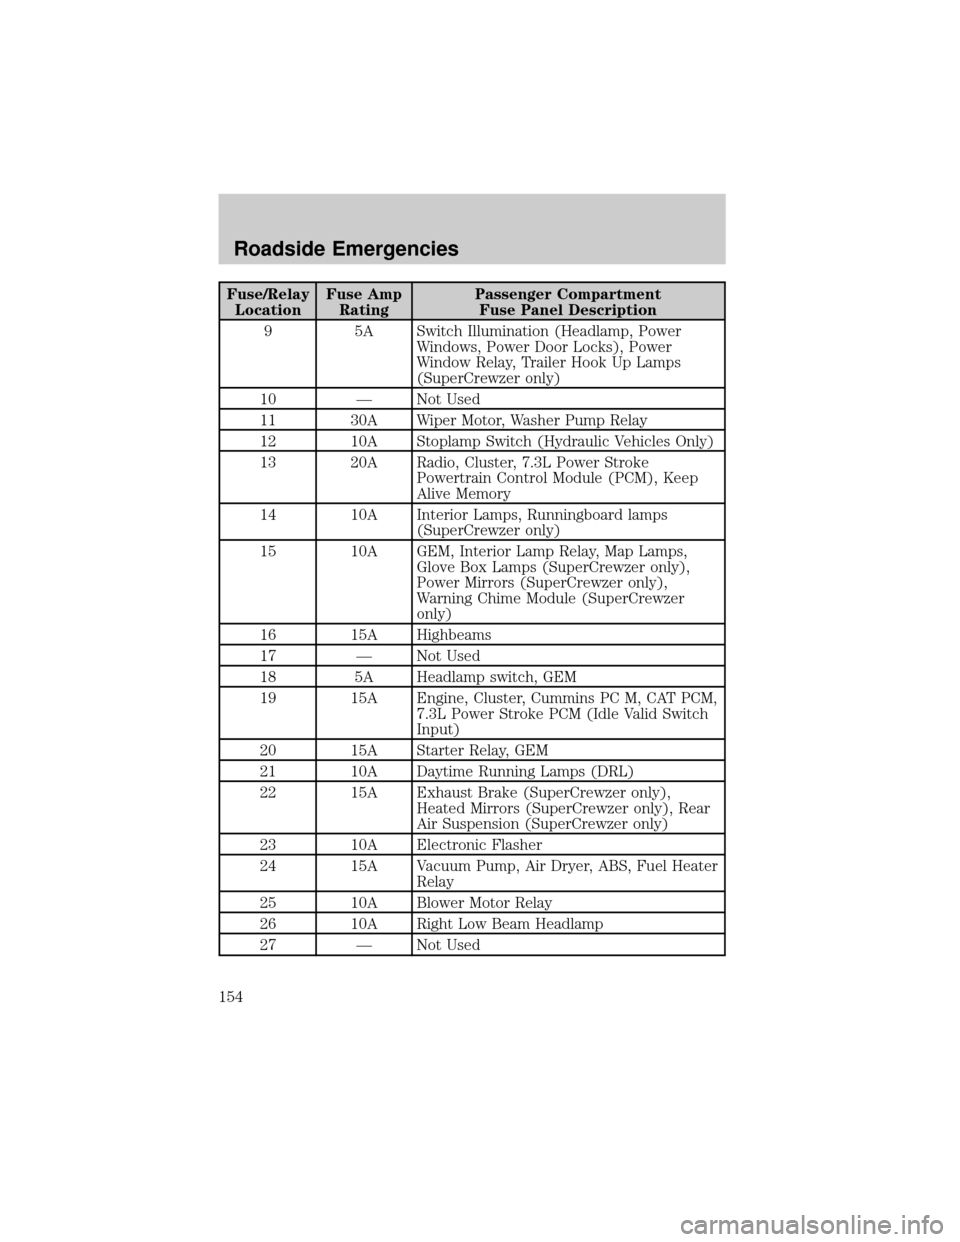
Fuse/Relay
LocationFuse Amp
RatingPassenger Compartment
Fuse Panel Description
9 5A Switch Illumination (Headlamp, Power
Windows, Power Door Locks), Power
Window Relay, Trailer Hook Up Lamps
(SuperCrewzer only)
10 Ð Not Used
11 30A Wiper Motor, Washer Pump Relay
12 10A Stoplamp Switch (Hydraulic Vehicles Only)
13 20A Radio, Cluster, 7.3L Power Stroke
Powertrain Control Module (PCM), Keep
Alive Memory
14 10A Interior Lamps, Runningboard lamps
(SuperCrewzer only)
15 10A GEM, Interior Lamp Relay, Map Lamps,
Glove Box Lamps (SuperCrewzer only),
Power Mirrors (SuperCrewzer only),
Warning Chime Module (SuperCrewzer
only)
16 15A Highbeams
17 Ð Not Used
18 5A Headlamp switch, GEM
19 15A Engine, Cluster, Cummins PC M, CAT PCM,
7.3L Power Stroke PCM (Idle Valid Switch
Input)
20 15A Starter Relay, GEM
21 10A Daytime Running Lamps (DRL)
22 15A Exhaust Brake (SuperCrewzer only),
Heated Mirrors (SuperCrewzer only), Rear
Air Suspension (SuperCrewzer only)
23 10A Electronic Flasher
24 15A Vacuum Pump, Air Dryer, ABS, Fuel Heater
Relay
25 10A Blower Motor Relay
26 10A Right Low Beam Headlamp
27 Ð Not Used
Roadside Emergencies
154
Page 174 of 256
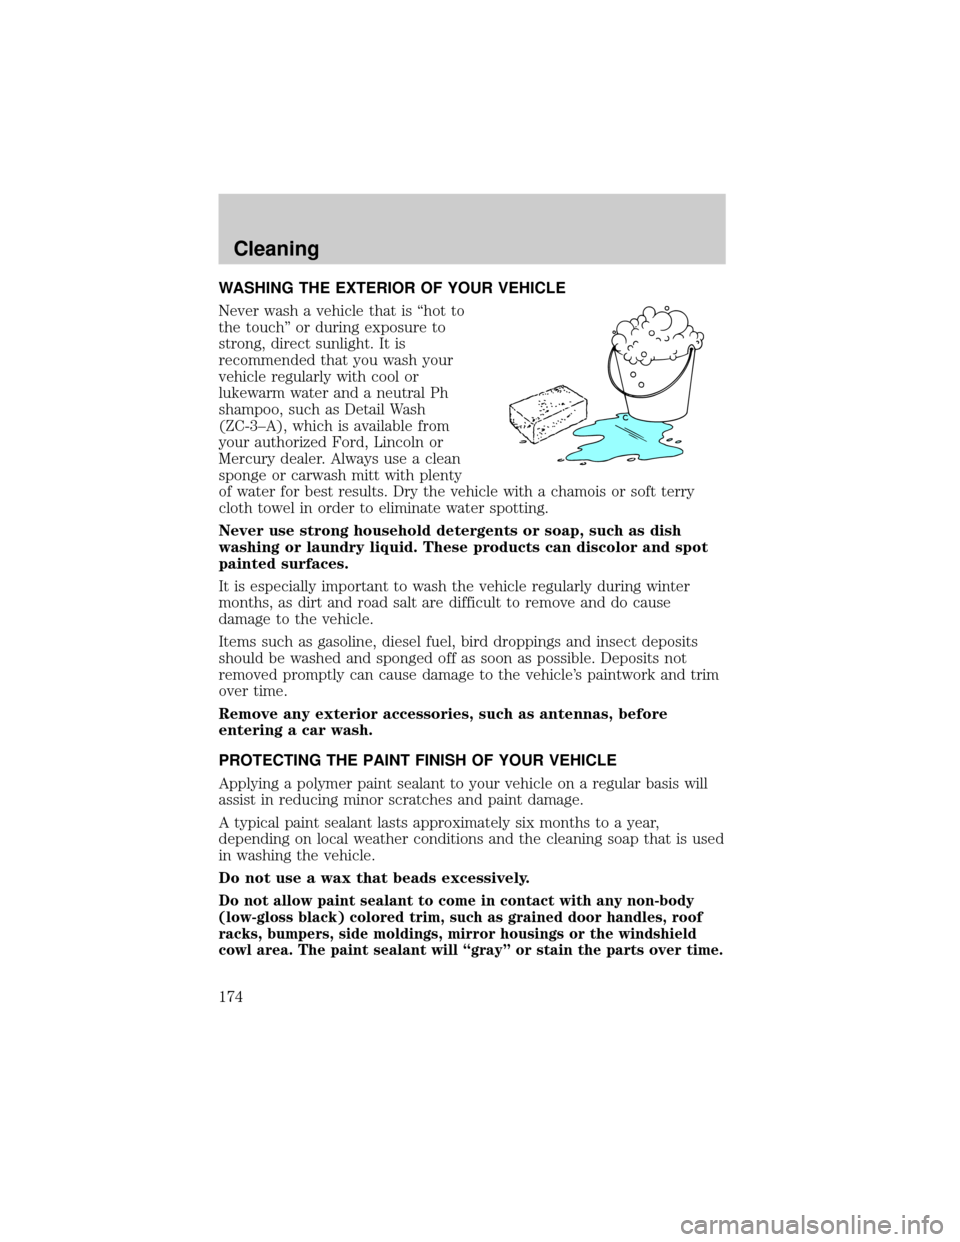
WASHING THE EXTERIOR OF YOUR VEHICLE
Never wash a vehicle that is ªhot to
the touchº or during exposure to
strong, direct sunlight. It is
recommended that you wash your
vehicle regularly with cool or
lukewarm water and a neutral Ph
shampoo, such as Detail Wash
(ZC-3±A), which is available from
your authorized Ford, Lincoln or
Mercury dealer. Always use a clean
sponge or carwash mitt with plenty
of water for best results. Dry the vehicle with a chamois or soft terry
cloth towel in order to eliminate water spotting.
Never use strong household detergents or soap, such as dish
washing or laundry liquid. These products can discolor and spot
painted surfaces.
It is especially important to wash the vehicle regularly during winter
months, as dirt and road salt are difficult to remove and do cause
damage to the vehicle.
Items such as gasoline, diesel fuel, bird droppings and insect deposits
should be washed and sponged off as soon as possible. Deposits not
removed promptly can cause damage to the vehicle's paintwork and trim
over time.
Remove any exterior accessories, such as antennas, before
entering a car wash.
PROTECTING THE PAINT FINISH OF YOUR VEHICLE
Applying a polymer paint sealant to your vehicle on a regular basis will
assist in reducing minor scratches and paint damage.
A typical paint sealant lasts approximately six months to a year,
depending on local weather conditions and the cleaning soap that is used
in washing the vehicle.
Do not use a wax that beads excessively.
Do not allow paint sealant to come in contact with any non-body
(low-gloss black) colored trim, such as grained door handles, roof
racks, bumpers, side moldings, mirror housings or the windshield
cowl area. The paint sealant will ªgrayº or stain the parts over time.
Cleaning
174
Page 179 of 256

CLEANING THE INSIDE WINDOWS
Use Ultra Clear Spray Glass Cleaner (E4AZ-19C507±AA) for the inside
windows if they become fogged.
To clean, use two lint-free, soft towels, folded into a pad-shape. Mist the
glass completely with cleaner, and use one of the towels to evenly agitate
the surface. Use the other towel to remove the residue.
WASHING MIRRORS, MIRROR HOUSINGS AND REFLECTIVE
SURFACES
Do not clean mirrors, mirror housings or reflective surfaces with
abrasive materials or a dry cloth.
Use a soft cloth and Detail Wash (ZC-3±A) mixed with water in order to
clean the mirror housing. Use Glass Cleaner (E4AZ-19C507±AA) in order
to clean the reflective mirror surface.
Use care when removing ice from outside mirrors as you may damage
the reflective surface.
CLEANING AND MAINTAINING THE SAFETY BELTS
Clean the safety belts with Extra Strength Upholstery Cleaner
(E8AZ-19523±AA), available from your authorized Ford, Lincoln or
Mercury dealer.
Do not use bleach, dye or any other solvent to clean the belts, as
these actions may weaken the belt webbing.
UNDERBODY
Flush the complete underside of your vehicle frequently. Keep body and
door drain holes free from packed dirt.
Cleaning
179
Page 237 of 256
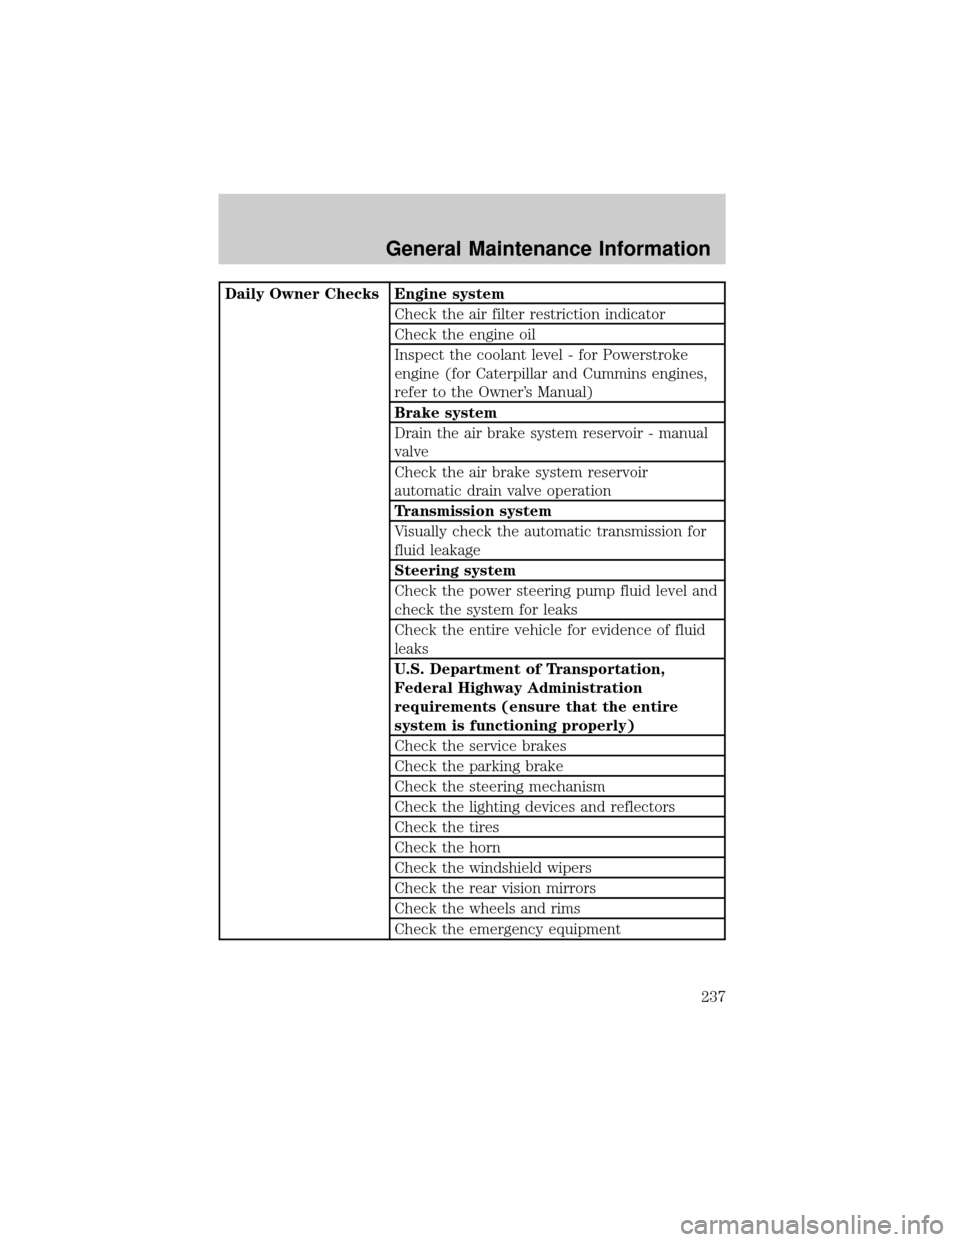
Daily Owner Checks Engine system
Check the air filter restriction indicator
Check the engine oil
Inspect the coolant level - for Powerstroke
engine (for Caterpillar and Cummins engines,
refer to the Owner's Manual)
Brake system
Drain the air brake system reservoir - manual
valve
Check the air brake system reservoir
automatic drain valve operation
Transmission system
Visually check the automatic transmission for
fluid leakage
Steering system
Check the power steering pump fluid level and
check the system for leaks
Check the entire vehicle for evidence of fluid
leaks
U.S. Department of Transportation,
Federal Highway Administration
requirements (ensure that the entire
system is functioning properly)
Check the service brakes
Check the parking brake
Check the steering mechanism
Check the lighting devices and reflectors
Check the tires
Check the horn
Check the windshield wipers
Check the rear vision mirrors
Check the wheels and rims
Check the emergency equipment
General Maintenance Information
237
Page 251 of 256

I
Ignition
removing the key ....................145
Infant seats
(see Safety seats) .....................103
Instrument panel
cleaning ...................................177
cluster ......................................178
lighting up panel and
interior .......................................62
J
Jump-starting your vehicle ......164
K
Keys
key in ignition chime ...............15
removing from the ignition ....145
L
Lamps ..........................................73
bulb replacement
specifications chart ..................64
cargo lamps ...............................62
daytime running light ...............61
fog lamps ...................................62
headlamps .................................61
headlamps, flash to pass ..........61
instrument panel, dimming .....62
interior lamps ...........................63
replacing bulbs ...................63±67
Lane change indicator
(see Turn signal) ........................63
Lights, warning and
indicator ..................................9, 14anti-lock brakes
(ABS) ..........................11±12, 114
brake ....................................11±12
charging system ........................13
check coolant ......................12±13
high beam .................................15
safety belt .................................12
service engine soon ....................9
turn signal indicator .................14
Lubricant specifications ...........222
M
Maintenance and Care ..............233
Manual transmission .................141
Mirrors .........................................75
heated ........................................73
side view mirrors (power) .......76
O
Odometer .....................................19
P
Panic alarm feature, remote
entry system ................................85
Parking brake ............115, 118, 122
Power distribution box
(see Fuses) ...............................155
Power door locks ........................84
Power mirrors .............................76
Power steering ..................130±131
fluid, checking and adding ....205
Power Windows ...........................74
Index
251