tow FORD F650 2011 12.G Owners Manual
[x] Cancel search | Manufacturer: FORD, Model Year: 2011, Model line: F650, Model: FORD F650 2011 12.GPages: 290, PDF Size: 1.96 MB
Page 2 of 290
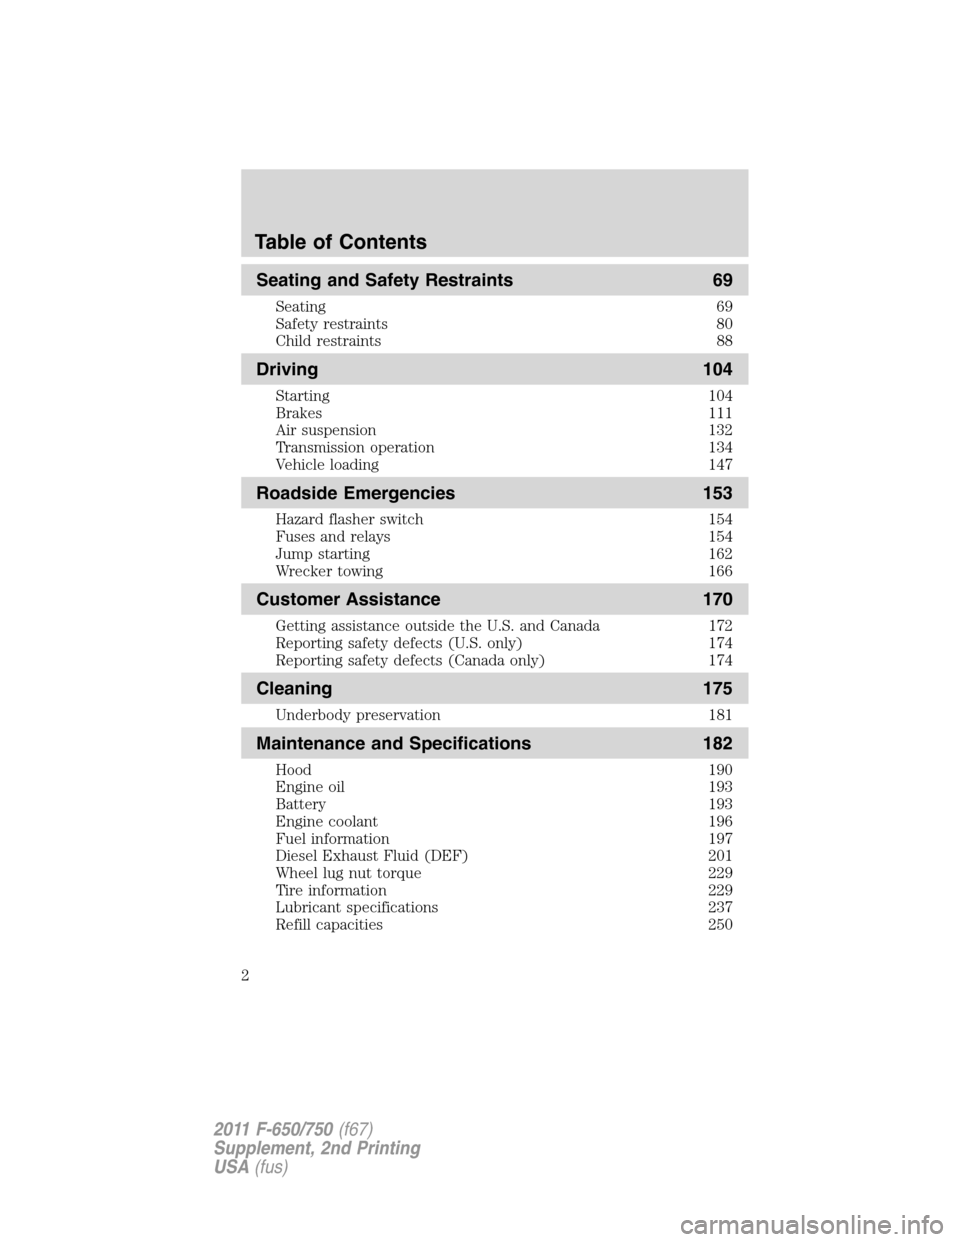
Seating and Safety Restraints 69
Seating 69
Safety restraints 80
Child restraints 88
Driving 104
Starting 104
Brakes 111
Air suspension 132
Transmission operation 134
Vehicle loading 147
Roadside Emergencies 153
Hazard flasher switch 154
Fuses and relays 154
Jump starting 162
Wrecker towing 166
Customer Assistance 170
Getting assistance outside the U.S. and Canada 172
Reporting safety defects (U.S. only) 174
Reporting safety defects (Canada only) 174
Cleaning 175
Underbody preservation 181
Maintenance and Specifications 182
Hood 190
Engine oil 193
Battery 193
Engine coolant 196
Fuel information 197
Diesel Exhaust Fluid (DEF) 201
Wheel lug nut torque 229
Tire information 229
Lubricant specifications 237
Refill capacities 250
Table of Contents
2
2011 F-650/750(f67)
Supplement, 2nd Printing
USA(fus)
Page 5 of 290
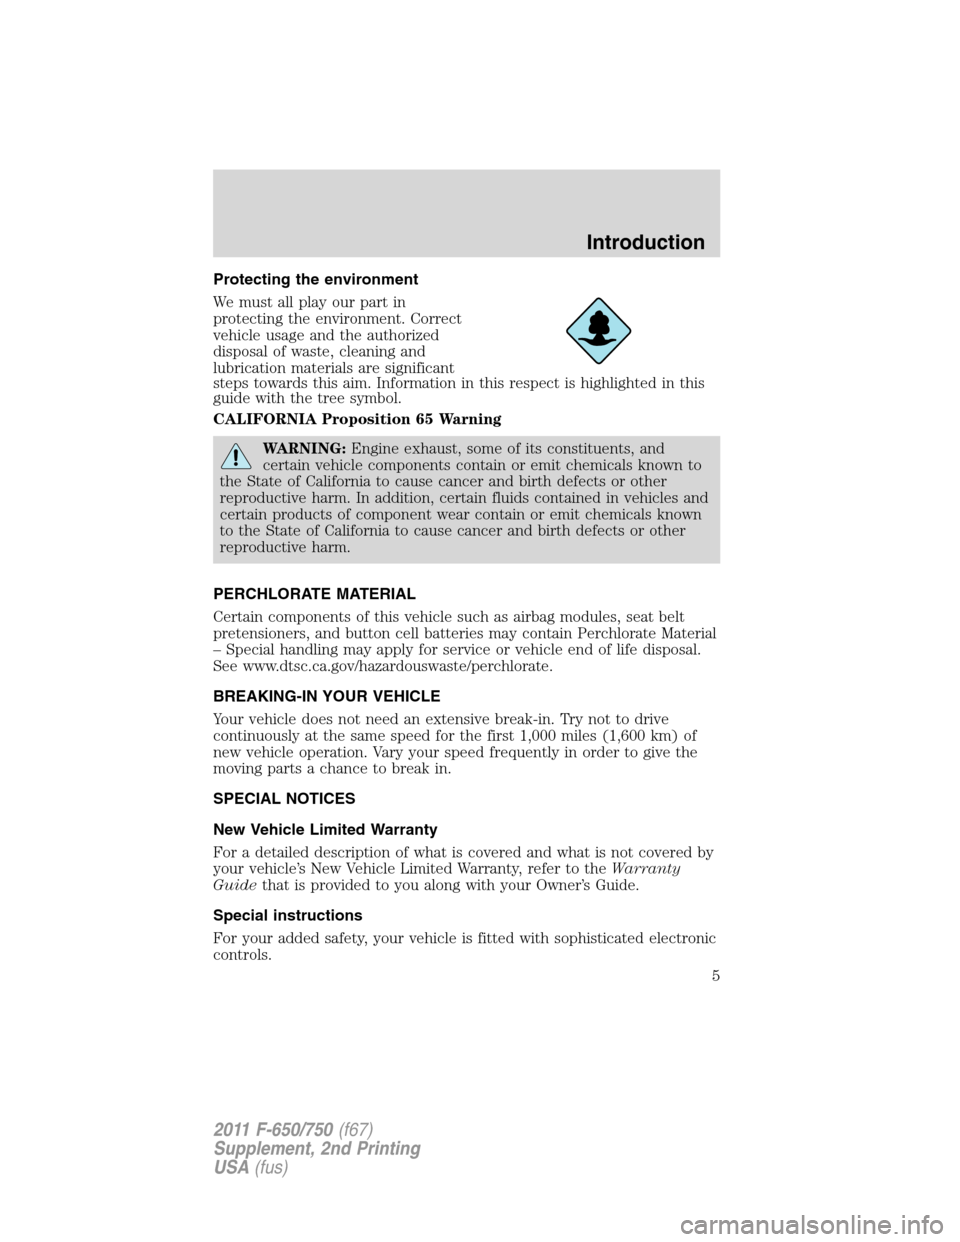
Protecting the environment
We must all play our part in
protecting the environment. Correct
vehicle usage and the authorized
disposal of waste, cleaning and
lubrication materials are significant
steps towards this aim. Information in this respect is highlighted in this
guide with the tree symbol.
CALIFORNIA Proposition 65 Warning
WARNING:Engine exhaust, some of its constituents, and
certain vehicle components contain or emit chemicals known to
the State of California to cause cancer and birth defects or other
reproductive harm. In addition, certain fluids contained in vehicles and
certain products of component wear contain or emit chemicals known
to the State of California to cause cancer and birth defects or other
reproductive harm.
PERCHLORATE MATERIAL
Certain components of this vehicle such as airbag modules, seat belt
pretensioners, and button cell batteries may contain Perchlorate Material
– Special handling may apply for service or vehicle end of life disposal.
See www.dtsc.ca.gov/hazardouswaste/perchlorate.
BREAKING-IN YOUR VEHICLE
Your vehicle does not need an extensive break-in. Try not to drive
continuously at the same speed for the first 1,000 miles (1,600 km) of
new vehicle operation. Vary your speed frequently in order to give the
moving parts a chance to break in.
SPECIAL NOTICES
New Vehicle Limited Warranty
For a detailed description of what is covered and what is not covered by
your vehicle’s New Vehicle Limited Warranty, refer to theWarranty
Guidethat is provided to you along with your Owner’s Guide.
Special instructions
For your added safety, your vehicle is fitted with sophisticated electronic
controls.
Introduction
5
2011 F-650/750(f67)
Supplement, 2nd Printing
USA(fus)
Page 17 of 290
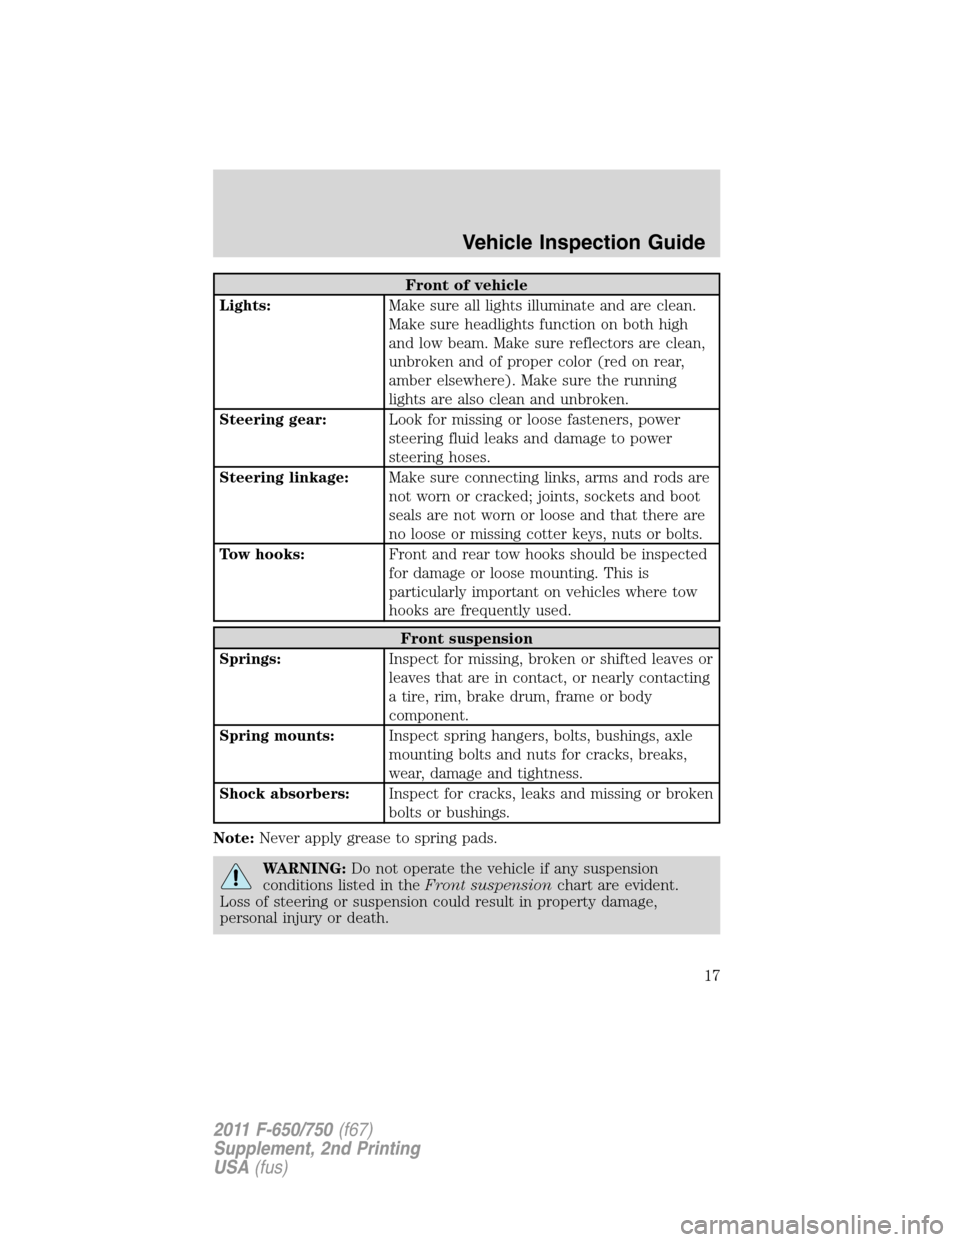
Front of vehicle
Lights:Make sure all lights illuminate and are clean.
Make sure headlights function on both high
and low beam. Make sure reflectors are clean,
unbroken and of proper color (red on rear,
amber elsewhere). Make sure the running
lights are also clean and unbroken.
Steering gear:Look for missing or loose fasteners, power
steering fluid leaks and damage to power
steering hoses.
Steering linkage:Make sure connecting links, arms and rods are
not worn or cracked; joints, sockets and boot
seals are not worn or loose and that there are
no loose or missing cotter keys, nuts or bolts.
Tow hooks:Front and rear tow hooks should be inspected
for damage or loose mounting. This is
particularly important on vehicles where tow
hooks are frequently used.
Front suspension
Springs:Inspect for missing, broken or shifted leaves or
leaves that are in contact, or nearly contacting
a tire, rim, brake drum, frame or body
component.
Spring mounts:Inspect spring hangers, bolts, bushings, axle
mounting bolts and nuts for cracks, breaks,
wear, damage and tightness.
Shock absorbers:Inspect for cracks, leaks and missing or broken
bolts or bushings.
Note:Never apply grease to spring pads.
WARNING:Do not operate the vehicle if any suspension
conditions listed in theFront suspensionchart are evident.
Loss of steering or suspension could result in property damage,
personal injury or death.
Vehicle Inspection Guide
17
2011 F-650/750(f67)
Supplement, 2nd Printing
USA(fus)
Page 47 of 290
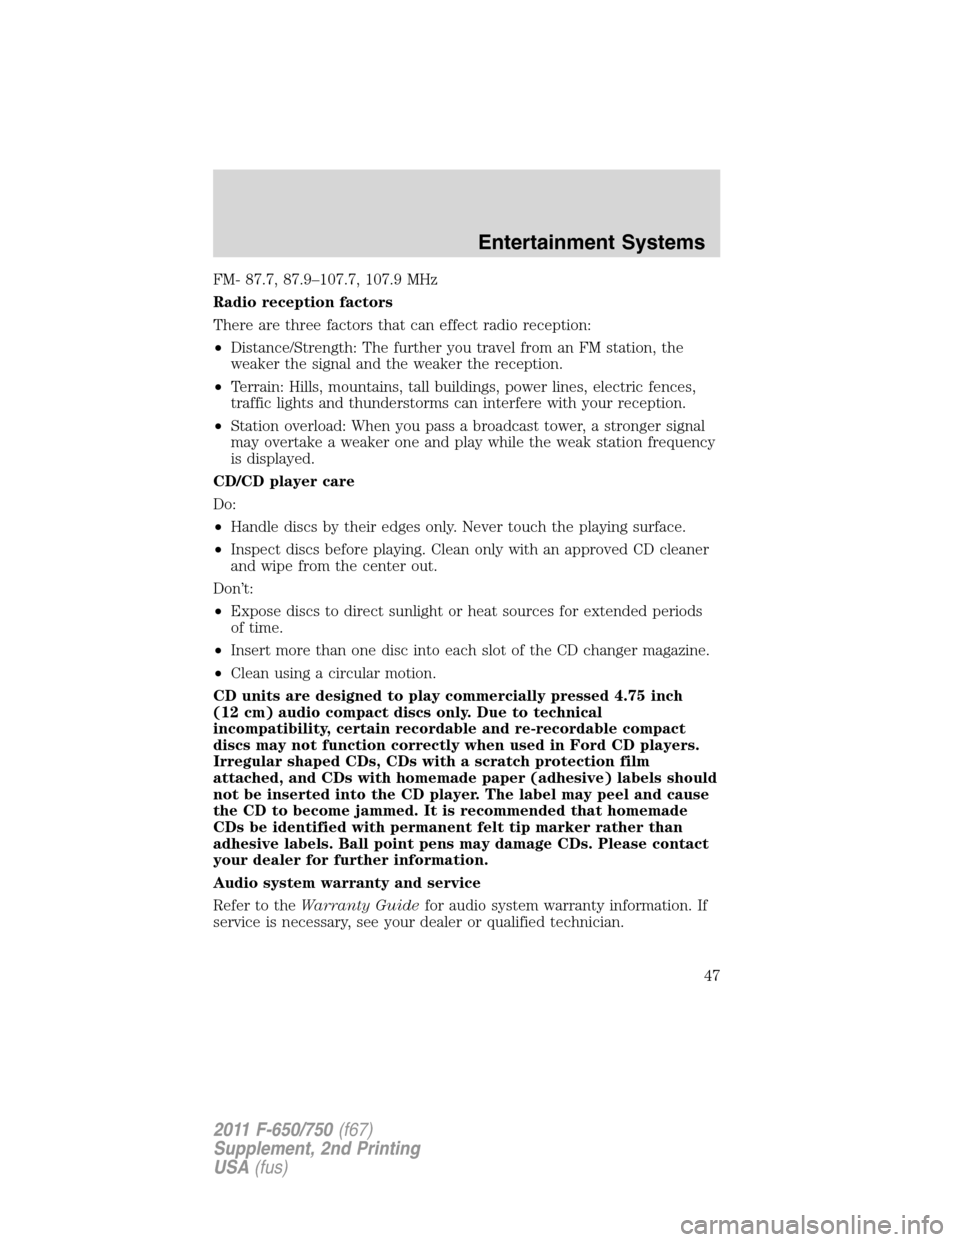
FM- 87.7, 87.9–107.7, 107.9 MHz
Radio reception factors
There are three factors that can effect radio reception:
•Distance/Strength: The further you travel from an FM station, the
weaker the signal and the weaker the reception.
•Terrain: Hills, mountains, tall buildings, power lines, electric fences,
traffic lights and thunderstorms can interfere with your reception.
•Station overload: When you pass a broadcast tower, a stronger signal
may overtake a weaker one and play while the weak station frequency
is displayed.
CD/CD player care
Do:
•Handle discs by their edges only. Never touch the playing surface.
•Inspect discs before playing. Clean only with an approved CD cleaner
and wipe from the center out.
Don’t:
•Expose discs to direct sunlight or heat sources for extended periods
of time.
•Insert more than one disc into each slot of the CD changer magazine.
•Clean using a circular motion.
CD units are designed to play commercially pressed 4.75 inch
(12 cm) audio compact discs only. Due to technical
incompatibility, certain recordable and re-recordable compact
discs may not function correctly when used in Ford CD players.
Irregular shaped CDs, CDs with a scratch protection film
attached, and CDs with homemade paper (adhesive) labels should
not be inserted into the CD player. The label may peel and cause
the CD to become jammed. It is recommended that homemade
CDs be identified with permanent felt tip marker rather than
adhesive labels. Ball point pens may damage CDs. Please contact
your dealer for further information.
Audio system warranty and service
Refer to theWarranty Guidefor audio system warranty information. If
service is necessary, see your dealer or qualified technician.
Entertainment Systems
47
2011 F-650/750(f67)
Supplement, 2nd Printing
USA(fus)
Page 50 of 290
For maximum cooling performance (MAX A/C):
•Select MAX A/C.
(Panel) and(panel/floor) modes:
•Move the temperature control to the coolest setting.
•Select A/C and
(recirculated air). Use recirculated air with A/C
to provide colder airflow.
•Set the fan to the highest speed initially, then adjust to maintain
comfort.
To aid in side window defogging/demisting in cold weather:
1. Select
(panel/floor).
2. Select A/C.
3. Adjust the temperature control to maintain comfort.
4. Set the fan speed to the highest setting.
5. Direct the outer instrument panel vents towards the side windows.
To increase airflow to the outer instrument panel vents, close the vents
located in the middle of the instrument panel.
Climate Controls
50
2011 F-650/750(f67)
Supplement, 2nd Printing
USA(fus)
Page 51 of 290
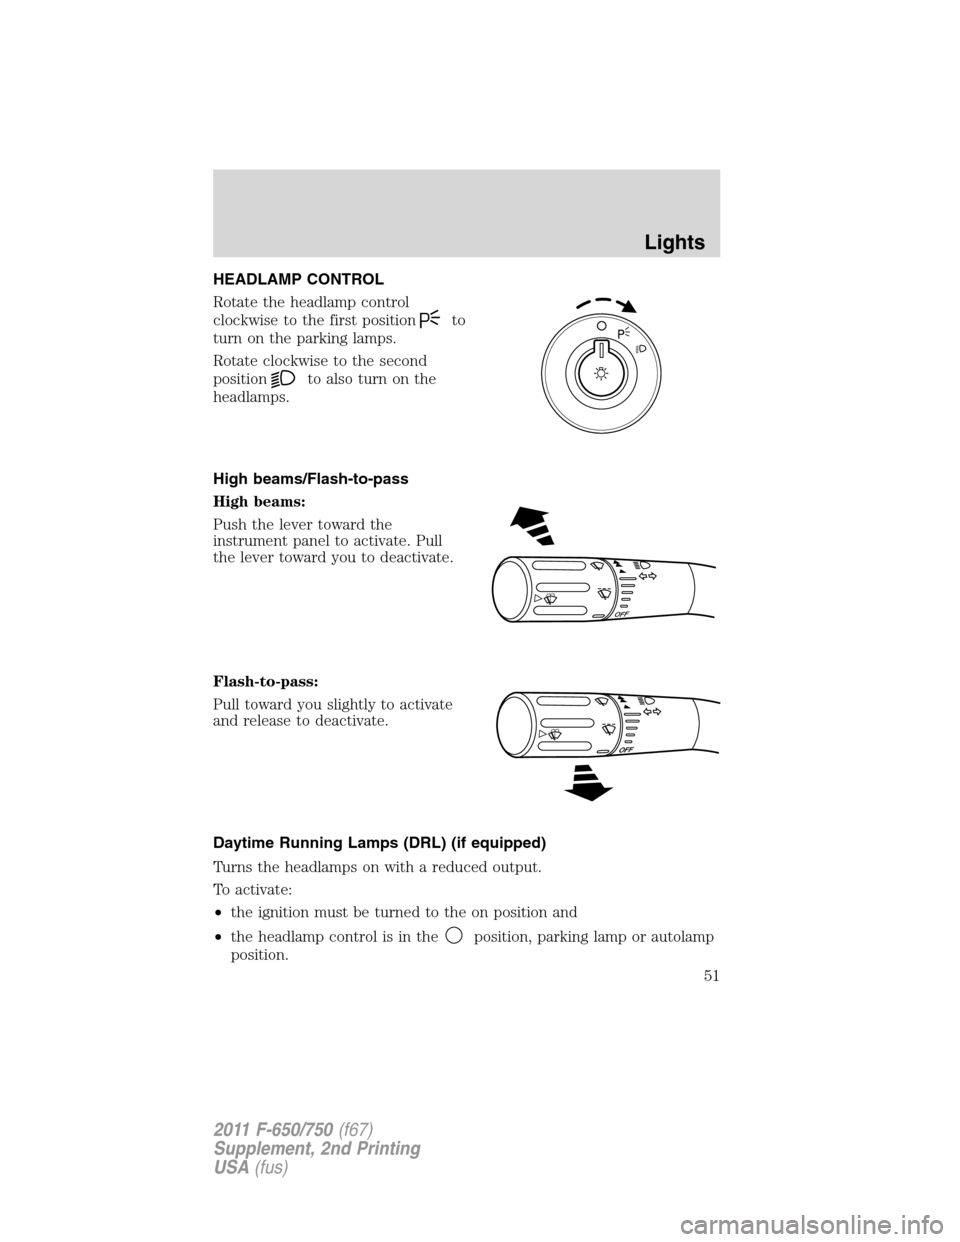
HEADLAMP CONTROL
Rotate the headlamp control
clockwise to the first position
to
turn on the parking lamps.
Rotate clockwise to the second
position
to also turn on the
headlamps.
High beams/Flash-to-pass
High beams:
Push the lever toward the
instrument panel to activate. Pull
the lever toward you to deactivate.
Flash-to-pass:
Pull toward you slightly to activate
and release to deactivate.
Daytime Running Lamps (DRL) (if equipped)
Turns the headlamps on with a reduced output.
To activate:
•the ignition must be turned to the on position and
•the headlamp control is in the
position, parking lamp or autolamp
position.
OFF
Lights
51
2011 F-650/750(f67)
Supplement, 2nd Printing
USA(fus)
Page 56 of 290
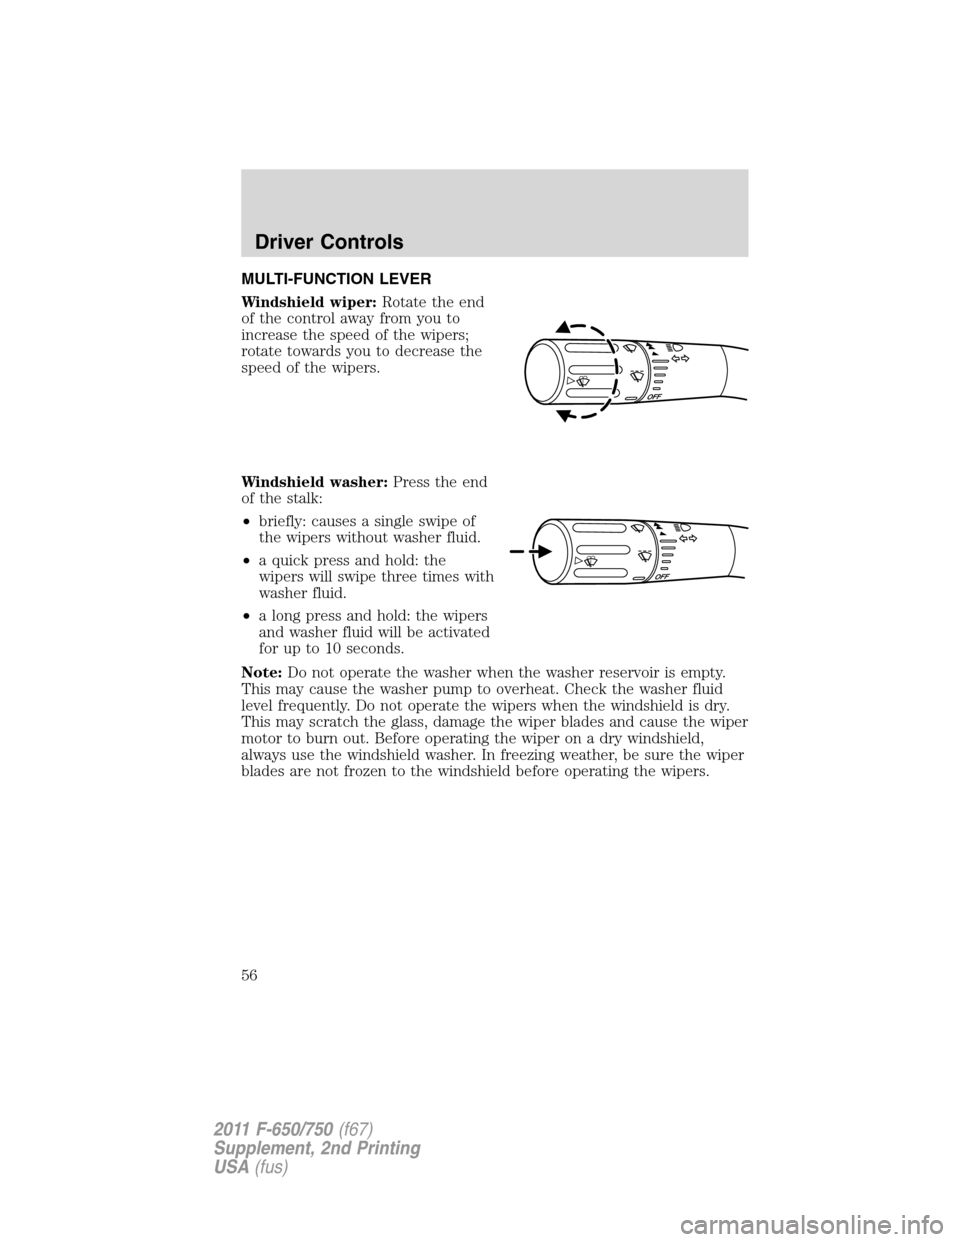
MULTI-FUNCTION LEVER
Windshield wiper:Rotate the end
of the control away from you to
increase the speed of the wipers;
rotate towards you to decrease the
speed of the wipers.
Windshield washer:Press the end
of the stalk:
•briefly: causes a single swipe of
the wipers without washer fluid.
•a quick press and hold: the
wipers will swipe three times with
washer fluid.
•a long press and hold: the wipers
and washer fluid will be activated
for up to 10 seconds.
Note:Do not operate the washer when the washer reservoir is empty.
This may cause the washer pump to overheat. Check the washer fluid
level frequently. Do not operate the wipers when the windshield is dry.
This may scratch the glass, damage the wiper blades and cause the wiper
motor to burn out. Before operating the wiper on a dry windshield,
always use the windshield washer. In freezing weather, be sure the wiper
blades are not frozen to the windshield before operating the wipers.
Driver Controls
56
2011 F-650/750(f67)
Supplement, 2nd Printing
USA(fus)
Page 63 of 290
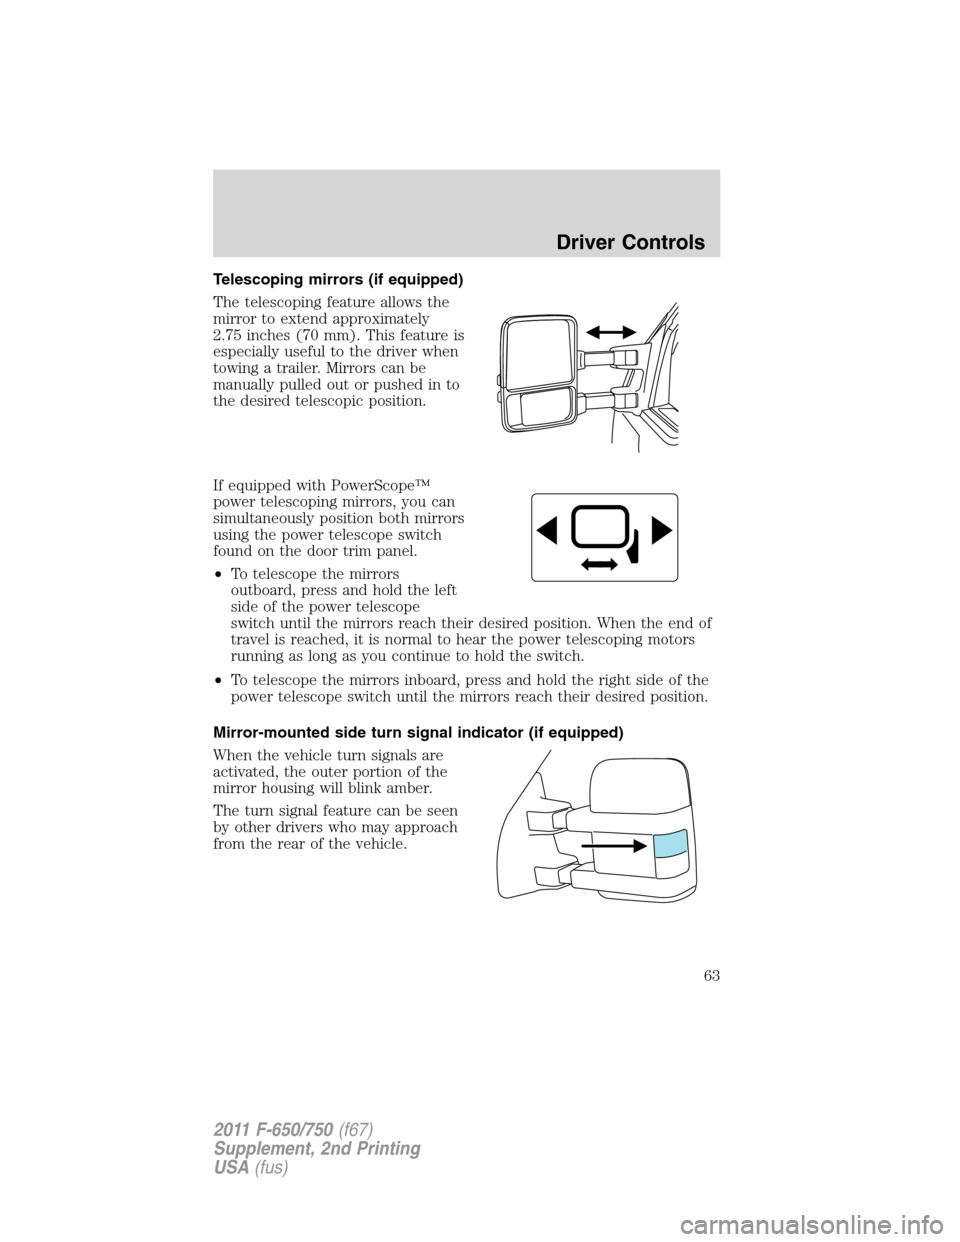
Telescoping mirrors (if equipped)
The telescoping feature allows the
mirror to extend approximately
2.75 inches (70 mm). This feature is
especially useful to the driver when
towing a trailer. Mirrors can be
manually pulled out or pushed in to
the desired telescopic position.
If equipped with PowerScope™
power telescoping mirrors, you can
simultaneously position both mirrors
using the power telescope switch
found on the door trim panel.
•To telescope the mirrors
outboard, press and hold the left
side of the power telescope
switch until the mirrors reach their desired position. When the end of
travel is reached, it is normal to hear the power telescoping motors
running as long as you continue to hold the switch.
•To telescope the mirrors inboard, press and hold the right side of the
power telescope switch until the mirrors reach their desired position.
Mirror-mounted side turn signal indicator (if equipped)
When the vehicle turn signals are
activated, the outer portion of the
mirror housing will blink amber.
The turn signal feature can be seen
by other drivers who may approach
from the rear of the vehicle.
Driver Controls
63
2011 F-650/750(f67)
Supplement, 2nd Printing
USA(fus)
Page 75 of 290
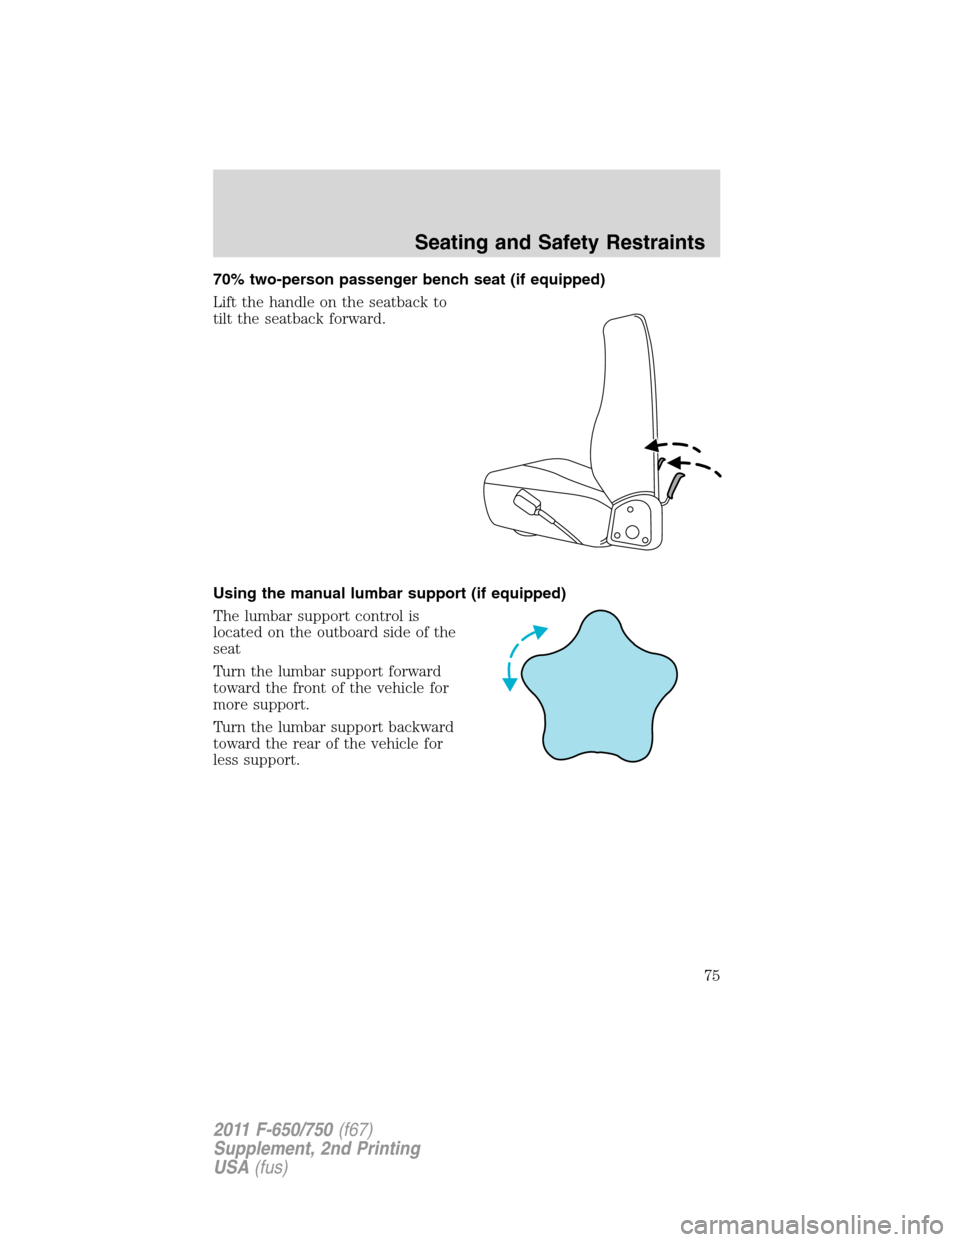
70% two-person passenger bench seat (if equipped)
Lift the handle on the seatback to
tilt the seatback forward.
Using the manual lumbar support (if equipped)
The lumbar support control is
located on the outboard side of the
seat
Turn the lumbar support forward
toward the front of the vehicle for
more support.
Turn the lumbar support backward
toward the rear of the vehicle for
less support.
Seating and Safety Restraints
75
2011 F-650/750(f67)
Supplement, 2nd Printing
USA(fus)
Page 77 of 290
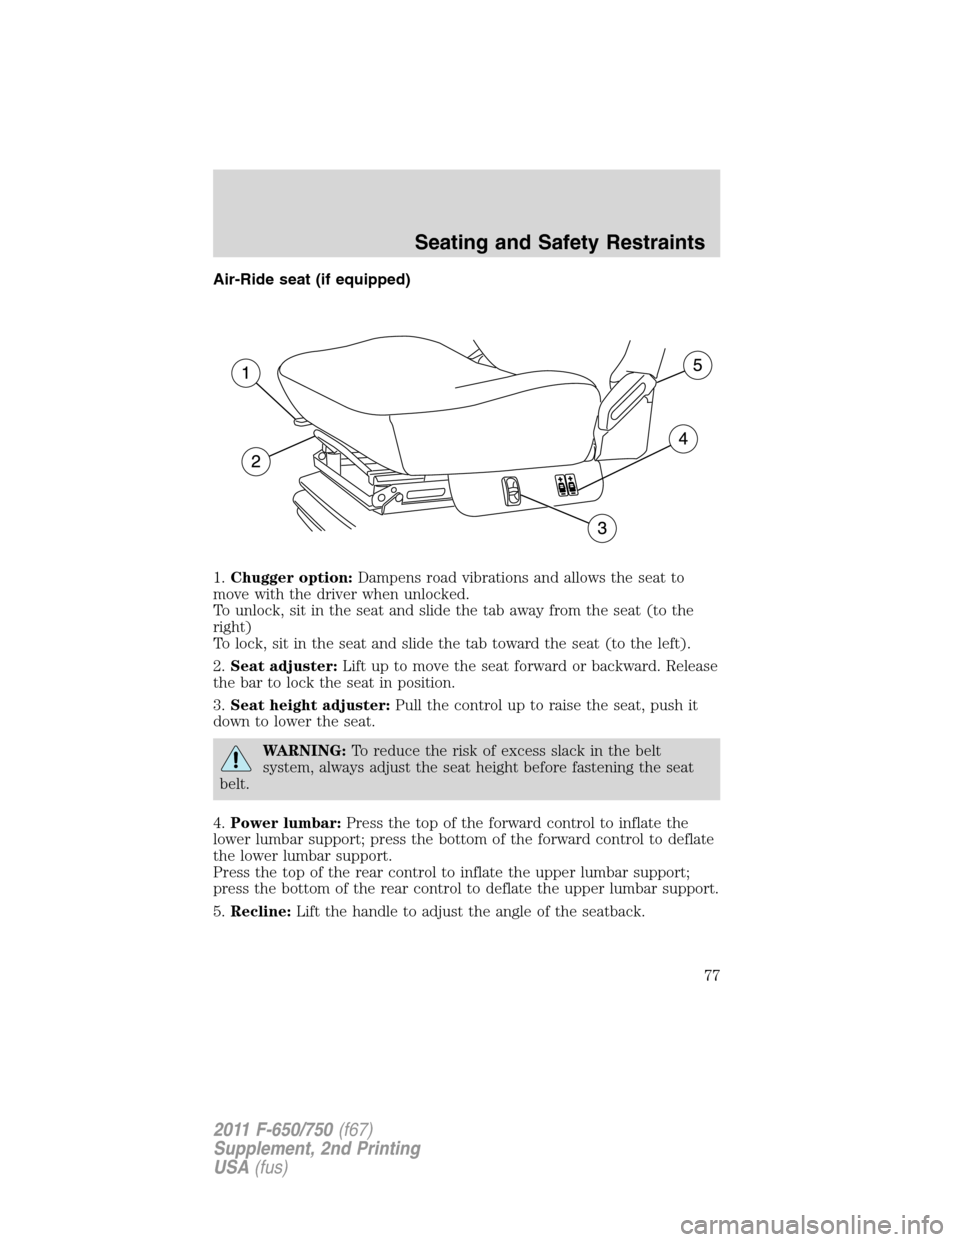
Air-Ride seat (if equipped)
1.Chugger option:Dampens road vibrations and allows the seat to
move with the driver when unlocked.
To unlock, sit in the seat and slide the tab away from the seat (to the
right)
To lock, sit in the seat and slide the tab toward the seat (to the left).
2.Seat adjuster:Lift up to move the seat forward or backward. Release
the bar to lock the seat in position.
3.Seat height adjuster:Pull the control up to raise the seat, push it
down to lower the seat.
WARNING:To reduce the risk of excess slack in the belt
system, always adjust the seat height before fastening the seat
belt.
4.Power lumbar:Press the top of the forward control to inflate the
lower lumbar support; press the bottom of the forward control to deflate
the lower lumbar support.
Press the top of the rear control to inflate the upper lumbar support;
press the bottom of the rear control to deflate the upper lumbar support.
5.Recline:Lift the handle to adjust the angle of the seatback.
Seating and Safety Restraints
77
2011 F-650/750(f67)
Supplement, 2nd Printing
USA(fus)