brakes FORD F650 2016 13.G Owners Manual
[x] Cancel search | Manufacturer: FORD, Model Year: 2016, Model line: F650, Model: FORD F650 2016 13.GPages: 379, PDF Size: 4.8 MB
Page 5 of 379
Warning Lamps and Indicators................58
Audible Warnings and Indicators..............61
Information Displays
General Information......................................62
Information Messages.................................64
Climate Control
Manual Climate Control
..............................70
Hints on Controlling the Interior Climate............................................................71
Heated Exterior Mirrors
.................................72
Seats
Sitting in the Correct Position....................73
Head Restraints
...............................................73
Manual Seats
...................................................75
Power Seats
.....................................................76
Rear Seats
.........................................................78
Front Seat Armrest........................................79
Rear Seat Armrest.........................................80
Auxiliary Power Points
Auxiliary Power Points..................................81
Storage Compartments
Overhead Console
.........................................83
Starting and Stopping the Engine
General Information
.....................................84
Ignition Switch
................................................84
Starting a Gasoline Engine.........................85
Starting a Diesel Engine..............................86
Diesel Particulate Filter................................87
Switching Off the Engine............................88
Engine Idle Shutdown..................................88
Engine Block Heater
.....................................88 Fuel and Refueling
Safety Precautions
........................................90
Fuel Quality - Gasoline.................................91
Fuel Quality - Diesel......................................92
Running Out of Fuel - 6.8L.........................95
Running Out of Fuel - 6.7L Diesel............95
Selective Catalytic Reduction System...........................................................95
Refueling - 6.8L
............................................100
Refueling - 6.7L Diesel
.................................101
Fuel Consumption.......................................102
Emission Control System - 6.8L.............103
Emission Control System - 6.7L Diesel............................................................105
Fuel Tank Selector Switch..........................112
Transmission
Automatic Transmission.............................113
Power Take-Off
...............................................117
Rear Axle
General Information
.....................................118
Limited Slip Differential..............................118
Electronic Locking Differential.................118
2-Speed Rear Axle........................................119
Brakes
General Information
....................................120
Hints on Driving With Anti-Lock Brakes...........................................................120
Parking Brake
...................................................121
Full Power Brake...........................................124
Air Brakes.........................................................125
Exhaust Brake................................................126
Trailer Brakes..................................................128
Traction Control
Principle of Operation.................................132
Using Traction Control - Vehicles With: Air Brakes
.....................................................132
2
F650750 (TBC), enUSA, First Printing Table of Contents
Page 6 of 379
Using Traction Control - Vehicles With:
Hydraulic Brakes.......................................132
Cruise Control
Principle of Operation.................................134
Using Cruise Control
....................................134
Driving Aids
Steering............................................................136
Load Carrying
Load Limit........................................................137
Air Suspension
...............................................138
Towing
Towing a Trailer.............................................140
Recommended Towing Weights.............141
Essential Towing Checks...........................142
Transporting the Vehicle............................143
Fifth Wheel Operation
................................144
Driving Hints
Breaking-In.....................................................146
General Driving Points................................146
Economical Driving
......................................147
Cold Weather Precautions
........................148
Driving Through Water...............................150
Roadside Emergencies
Roadside Assistance
....................................151
Hazard Warning Flashers...........................152
Fuel Shutoff....................................................152
Jump Starting the Vehicle
.........................153
Customer Assistance
Getting the Services You Need
...............156
In California (U.S. Only)
..............................157
The Better Business Bureau (BBB) Auto Line Program (U.S. Only)......................158 Utilizing the Mediation/Arbitration
Program (Canada Only)
........................158
Getting Assistance Outside the U.S. and Canada.........................................................159
Ordering Additional Owner's Literature.....................................................160
Reporting Safety Defects (U.S. Only).............................................................160
Reporting Safety Defects (Canada Only)..............................................................161
Fuses
Fuse Specification Chart...........................162
Changing a Fuse...........................................170
Vehicle Inspection Guide
Vehicle Inspection Information.................171
Maintenance
General Information....................................180
Opening and Closing the Hood................181
Under Hood Overview - 6.8L...................183
Under Hood Overview - 6.7L Diesel......184
Engine Oil Dipstick - 6.8L..........................185
Engine Oil Dipstick - 6.7L Diesel.............185
Engine Oil Check - 6.8L
..............................185
Engine Oil Check - 6.7L Diesel.................186
Changing the Engine Oil and Oil Filter..............................................................188
Changing the Coalescer Filter Element.......................................................189
Oil Change Indicator Reset.......................190
Engine Coolant Check - 6.8L
...................190
Engine Coolant Check - 6.7L Diesel.......195
Automatic Transmission Fluid Check...........................................................200
Brake Fluid Check.........................................201
Power Steering Fluid Check.....................202
Washer Fluid Check....................................202
Draining the Fuel Filter Water Trap - 6.7L Diesel
...........................................................203
3
F650750 (TBC), enUSA, First Printing Table of Contents
Page 36 of 379
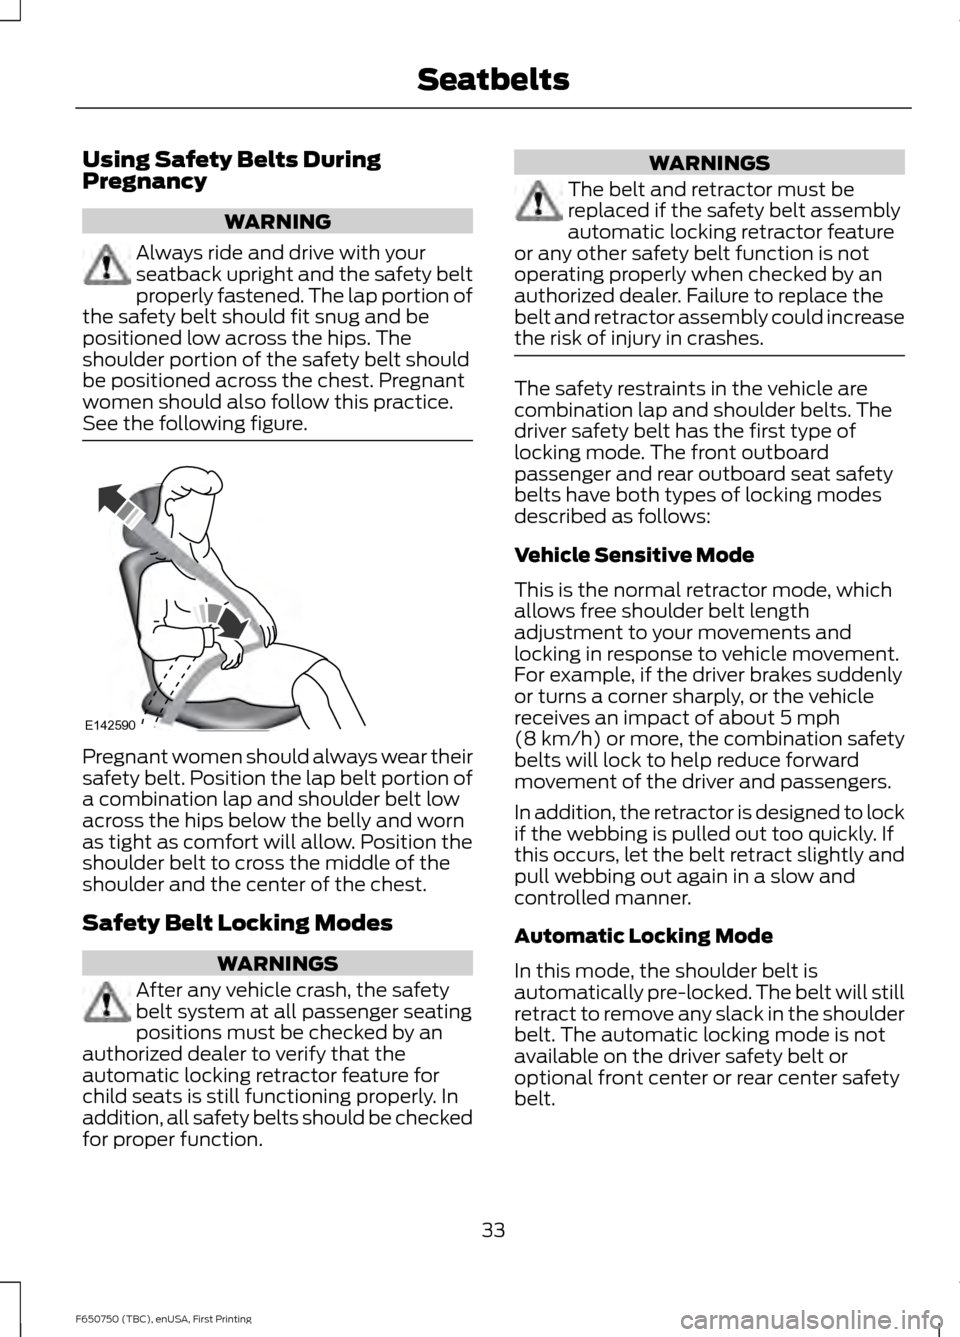
Using Safety Belts During
Pregnancy
WARNING
Always ride and drive with your
seatback upright and the safety belt
properly fastened. The lap portion of
the safety belt should fit snug and be
positioned low across the hips. The
shoulder portion of the safety belt should
be positioned across the chest. Pregnant
women should also follow this practice.
See the following figure. Pregnant women should always wear their
safety belt. Position the lap belt portion of
a combination lap and shoulder belt low
across the hips below the belly and worn
as tight as comfort will allow. Position the
shoulder belt to cross the middle of the
shoulder and the center of the chest.
Safety Belt Locking Modes
WARNINGS
After any vehicle crash, the safety
belt system at all passenger seating
positions must be checked by an
authorized dealer to verify that the
automatic locking retractor feature for
child seats is still functioning properly. In
addition, all safety belts should be checked
for proper function. WARNINGS
The belt and retractor must be
replaced if the safety belt assembly
automatic locking retractor feature
or any other safety belt function is not
operating properly when checked by an
authorized dealer. Failure to replace the
belt and retractor assembly could increase
the risk of injury in crashes. The safety restraints in the vehicle are
combination lap and shoulder belts. The
driver safety belt has the first type of
locking mode. The front outboard
passenger and rear outboard seat safety
belts have both types of locking modes
described as follows:
Vehicle Sensitive Mode
This is the normal retractor mode, which
allows free shoulder belt length
adjustment to your movements and
locking in response to vehicle movement.
For example, if the driver brakes suddenly
or turns a corner sharply, or the vehicle
receives an impact of about 5 mph
(8 km/h) or more, the combination safety
belts will lock to help reduce forward
movement of the driver and passengers.
In addition, the retractor is designed to lock
if the webbing is pulled out too quickly. If
this occurs, let the belt retract slightly and
pull webbing out again in a slow and
controlled manner.
Automatic Locking Mode
In this mode, the shoulder belt is
automatically pre-locked. The belt will still
retract to remove any slack in the shoulder
belt. The automatic locking mode is not
available on the driver safety belt or
optional front center or rear center safety
belt.
33
F650750 (TBC), enUSA, First Printing SeatbeltsE142590
Page 88 of 379
STARTING A GASOLINE
ENGINE
When you start the engine, the idle speed
increases, this helps to warm up the
engine. If the engine idle speed does not
slow down automatically, have your
vehicle checked by an authorized dealer.
Before starting the engine check the
following:
•
Make sure all occupants have fastened
their safety belts.
• Make sure the headlamps and
electrical accessories are off.
• Make sure the parking brake is on.
• Make sure the transmission is in park
(P) or neutral (N).
• Turn the ignition key to the on position.
Note: Do not touch the accelerator pedal.
1. Fully press the brake pedal.
2. Turn the key to the start position to start the engine. Release the key when
the engine starts.
Note: The engine may continue cranking
for up to 15 seconds or until it starts.
Note: If you cannot start the engine on the
first try, wait for a short period and try again.
Failure to Start
If you cannot start the engine after three
attempts, wait 10 seconds and follow this
procedure:
1. Fully press the brake pedal.
2. Fully press the accelerator pedal and hold it there.
3. Start the engine.
Stopping the Engine When Your
Vehicle is Stationary
1. Shift into park (P) or neutral (N). 2. Turn the key to the off position.
3. Apply the parking brake.
Stopping the Engine When Your
Vehicle is Moving WARNING
Switching off the engine when the
vehicle is still moving will result in a
loss of brake and steering assistance.
The steering will not lock, but higher effort
will be required. When the ignition is
switched off, some electrical circuits,
including air bags, warning lamps and
indicators may also be off. If the ignition
was turned off accidentally, you can shift
into neutral (N) and re-start the engine. 1. Put the transmission into neutral (N)
and use the brakes to bring your vehicle
to a safe stop.
2. When your vehicle has stopped, shift into park (P) or neutral (N) and switch
the ignition off.
3. Apply the parking brake.
Guarding Against Exhaust Fumes WARNING
If you smell exhaust fumes inside
your vehicle, have your vehicle
checked by your authorized dealer
immediately. Do not drive your vehicle if
you smell exhaust fumes. Carbon
monoxide is present in exhaust fumes.
Take precautions to avoid its dangerous
effects. Important Ventilating Information
If you stop your vehicle and then leave the
engine idling for long periods of time, we
recommend that you do one of the
following:
85
F650750 (TBC), enUSA, First Printing Starting and Stopping the Engine
Page 119 of 379
Brake-Shift Interlock (If Equipped)
WARNINGS
Do not drive your vehicle until you
verify that the brake lamps are
working.
When doing this procedure, you will
be taking your vehicle out of park
which means your vehicle can roll
freely. To avoid unwanted vehicle
movement, always fully set the parking
brake prior to doing this procedure. Use
wheel chocks if appropriate. If the parking brake is fully released,
but the brake warning lamp remains
illuminated, the brakes may not be
working properly. See your authorized
dealer. Your vehicle is equipped with a brake-shift
interlock feature that prevents the
gearshift lever from moving from park (P)
when the ignition is in the 3 (on) position
and the brake pedal is not pressed.
If you cannot move the gearshift lever out
of park (P) position with the ignition in the
4 (on) position and the brake pedal
pressed, a malfunction may have occurred.
It is possible that a fuse has blown or your
vehicle
’s brake lamps are not operating
properly. See
Fuse Specification Chart
(page 162).
If the fuse is not blown and the brake
lamps are working properly, the following
procedure allows you to move the gearshift
lever from park (P):
1. Apply the parking brake. Switch the ignition key to 1 (off), then remove the
key.
2. Move the steering column to the full down and full rearward position
(toward the driver ’s seat).
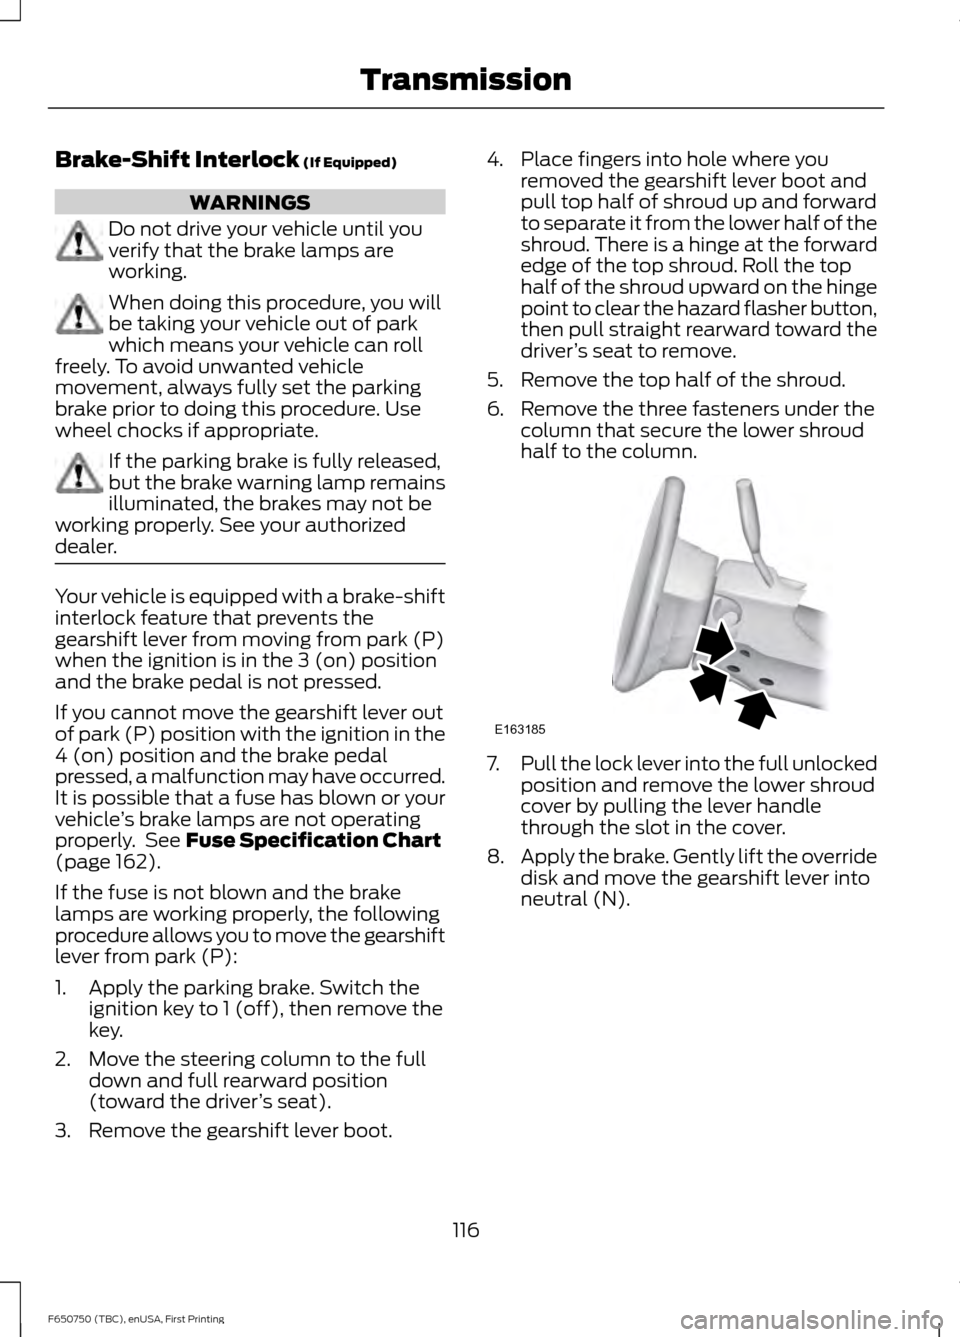
3. Remove the gearshift lever boot. 4. Place fingers into hole where you
removed the gearshift lever boot and
pull top half of shroud up and forward
to separate it from the lower half of the
shroud. There is a hinge at the forward
edge of the top shroud. Roll the top
half of the shroud upward on the hinge
point to clear the hazard flasher button,
then pull straight rearward toward the
driver ’s seat to remove.
5. Remove the top half of the shroud.
6. Remove the three fasteners under the column that secure the lower shroud
half to the column. 7.
Pull the lock lever into the full unlocked
position and remove the lower shroud
cover by pulling the lever handle
through the slot in the cover.
8. Apply the brake. Gently lift the override
disk and move the gearshift lever into
neutral (N).
116
F650750 (TBC), enUSA, First Printing TransmissionE163185
Page 121 of 379
GENERAL INFORMATION
WARNING
Exceeding these ratings by
overloading can cause component
failure resulting in property damage,
personal injury or death. Fluid Temperature
If the operating temperature exceeds
250°F (121°C), the rate of axle lubrication
oxidation increases and shortens the life
of the lubricant and seals, requiring axle
lubrication changes to become more
frequent to preserve the axle. Do not
consistently run extreme pressure (EP)
lubricants above
250°F (121°C).
Axle Conversions WARNING
When operating a loaded vehicle, the
driver must keep all adjustable axles
on the ground at all times, supporting
their share of the vehicle ’s load. Failure to
do so can overload other axles, tires,
wheels, springs, steering components,
brakes and frames, resulting in early
component failure, loss of vehicle control,
possible property damage and personal
injury. We do not recommend, or approve,
performing axle conversions. However, we
understand that, on occasion, others install
aftermarket add-on axles on the truck
chassis that allow operator control for
weight transfer from other axles (such as
air lift axles). LIMITED SLIP DIFFERENTIAL WARNING
If both wheels are not raised off the
ground, the one wheel that is not
raised may pull the vehicle off its
support, possibly resulting in personal
injury. This axle provides added traction on
slippery surfaces, particularly when one
wheel is on a poor traction surface. Under
normal conditions, the limited-slip axle
functions like a standard rear axle. The axle
may exhibit a slight noise or vibration
during tight turns with low vehicle speed.
This is normal behavior and indicates the
axle is working.
Both wheels must be raised off the ground
should it be necessary to operate one
wheel with your vehicle stationary.
ELECTRONIC LOCKING
DIFFERENTIAL
Driver-Controlled Locking
Differential
Note:
Never use the differential lock at
vehicle speeds above
25 mph (40 km/h).
Some drive axles have a driver-controlled
differential lock. The differential lock can
lock or unlock the differential when your
vehicle is moving or stopped. When extra
traction is required, the differential lock
provides full power to both wheels.
When you lock the differential, your
vehicle ’s turning radius increases
(under-steer).
Take care to avoid sudden accelerations
when both drive wheels are on a slippery
surface.
118
F650750 (TBC), enUSA, First Printing Rear Axle
Page 122 of 379
WARNING
Sudden accelerations on slippery
surfaces could cause the wheels to
spin, the vehicle to turn sideways on
a crowned road surface or in a turn,
possibly resulting in loss of vehicle control
and personal injury. Activating the Locking Differential
You can lock and unlock the differential
when your vehicle is moving at a constant
speed of less than 25 mph (40 km/h) and
while the wheels are not slipping. Do not
lock the differential when your vehicle is
traveling down steep grades and when
traction is minimal.
The differential lock and differential lock
light automatically disengage at speeds
above 25 mph (40 km/h). The differential
lock remains off until either you restart your
vehicle or you turn the differential lock
switch off then back on.
Servicing a Vehicle with a Locking
Differential
Turn the engine off and raise all drive
wheels of the locker differential axle in
order to prevent your vehicle from moving
when servicing the wheels, tires or brakes.
Axles equipped with a driver-controlled
differential deliver power to both wheels
even when only one wheel is on the ground. WARNING
Failure to raise all drive wheels with
this type of differential could cause
the vehicle to move unexpectedly,
resulting in property damage, personal
injury or death. 2-SPEED REAR AXLE
(If Equipped)
WARNING
Never shift a two-speed axle when
descending a steep grade as this
may cause loss of vehicle control and
result in personal injury. Note:
Do not shift between ranges when
the speed control is on.
A two-speed rear axle allows the driver to
select a low range for greater pulling power
and a high range for greater road speed
and fuel economy. You can also use these
ranges to provide extra steps between
transmission shifts when driving on steep
grades or fuel economy may be factors.
Axle Shifting Note:
Do not shift the axle to LOW when
your vehicle is moving. Use LOW when you
drive a fully loaded vehicle on a severe grade
or in congested traffic. Use HIGH for all
normal driving conditions with a lightly
loaded or partially loaded vehicle.
Note: The axle is set to HIGH by default.
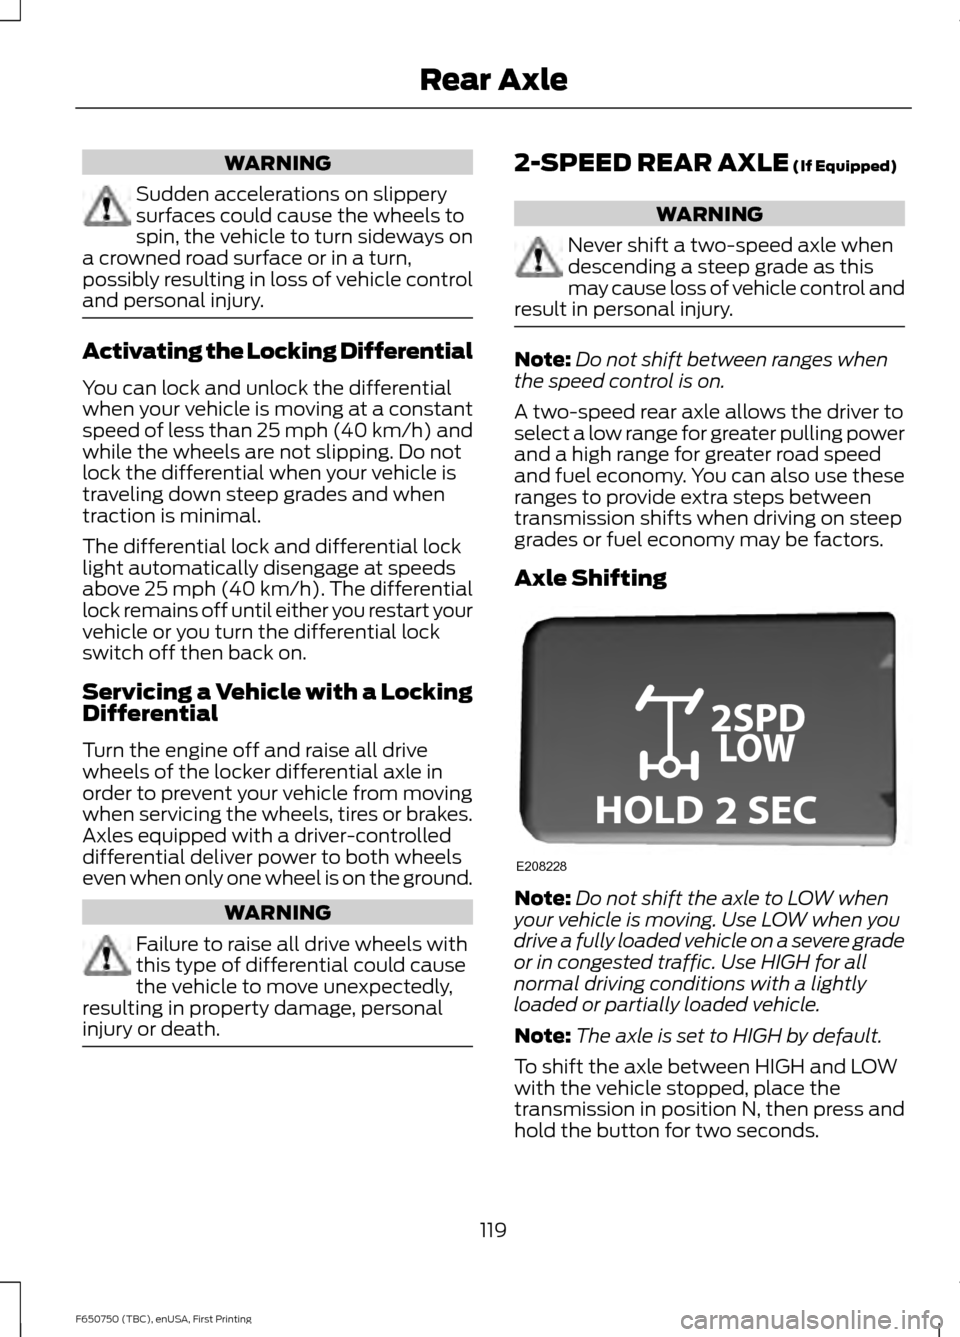
To shift the axle between HIGH and LOW
with the vehicle stopped, place the
transmission in position N, then press and
hold the button for two seconds.
119
F650750 (TBC), enUSA, First Printing Rear AxleE208228
Page 123 of 379
GENERAL INFORMATION
WARNINGS
Do not drive with your foot resting on
the brake pedal. This results in
abnormally high brake temperatures,
excessive lining wear and increased
stopping distance. Continuous application of the brakes
causes the brakes to overheat,
resulting in temporary loss of braking.
Note:
Occasional brake noise is normal. If
a metal-to-metal, continuous grinding or
continuous squeal sound is present, the
brake linings may be worn-out. Have the
system checked by an authorized dealer. If
your vehicle has continuous vibration or
shudder in the steering wheel while braking,
have it checked by an authorized dealer.
All standard equipment brakes are
self-adjusting. Automatic adjustment,
when required, occurs whenever you apply
and release the brakes during forward or
reverse operation.
Know the required stopping distances for
all driving conditions you may encounter.
For longer brake lining life, take full
advantage of engine braking power when
coming to a stop. See Warning Lamps and
Indicators (page 58).
Wet brakes result in reduced braking
efficiency. Gently press the brake pedal a
few times when driving from a car wash or
standing water to dry the brakes.
If brakes do not grip well:
• Check brake adjustment.
• Check brake linings for excessive wear.
• Check system air pressure on vehicle
equipped with air brakes. •
Let the brakes cool if you have been
using them excessively, as in mountain
driving or after several fast, high-speed
stops.
• If you have been driving through deep
water, gently apply the brakes several
times while your vehicle is moving
slowly.
Anti-lock Brake System
This system helps you maintain steering
control during emergency stops by keeping
the brakes from locking. This lamp momentarily
illuminates when you turn the
ignition on. If the light does not
illuminate during start up, remains on or
flashes, the system may be disabled. Have
the system checked by an authorized
dealer. If the system is disabled, normal
braking is still effective. If the
brake warning lamp illuminates
when you release the parking brake, have
the system checked by an authorized
dealer. If you connect a PLC trailer with
the ignition on, the trailer ABS
light also illuminates. If the light
fails to illuminate, if it remains on after you
start the vehicle or continues to flash, have
the system serviced immediately.
HINTS ON DRIVING WITH
ANTI-LOCK BRAKES
Note: When the system is operating, the
brake pedal may pulse and may travel
further. Maintain pressure on the brake
pedal. You may also hear a noise from the
system. This is normal.
120
F650750 (TBC), enUSA, First Printing BrakesE209041 E209041 E210335
Page 124 of 379
The anti-lock braking system will not
eliminate the risks when:
•
You drive too closely to the vehicle in
front of you.
• Your vehicle is hydroplaning.
• You take corners too fast.
• The road surface is poor.
PARKING BRAKE
Hydraulic Brakes WARNINGS
Do not use the gearshift selector in
place of the parking brake. Always
set the parking brake fully AND make
sure the transmission is in park (P) or
neutral (N). Use of wheel chocks is also
recommended in hilly or off-road usage.
Unexpected and possible sudden vehicle
movement may occur if these precautions
are not taken. If the parking brake is fully released
but the parking brake warning lamp
remains illuminated, the brakes may
not be working properly. See your dealer
or a qualified service technician. Apply the parking brake whenever the
vehicle is parked. To set the parking brake,
pull the handle up until it snaps into the
locked position.
When the parking brake is out of
adjustment, seek service immediately.
The parking brake warning lamp
in the instrument cluster
illuminates, and remains
illuminated (when you switch on the
ignition), until you release the parking
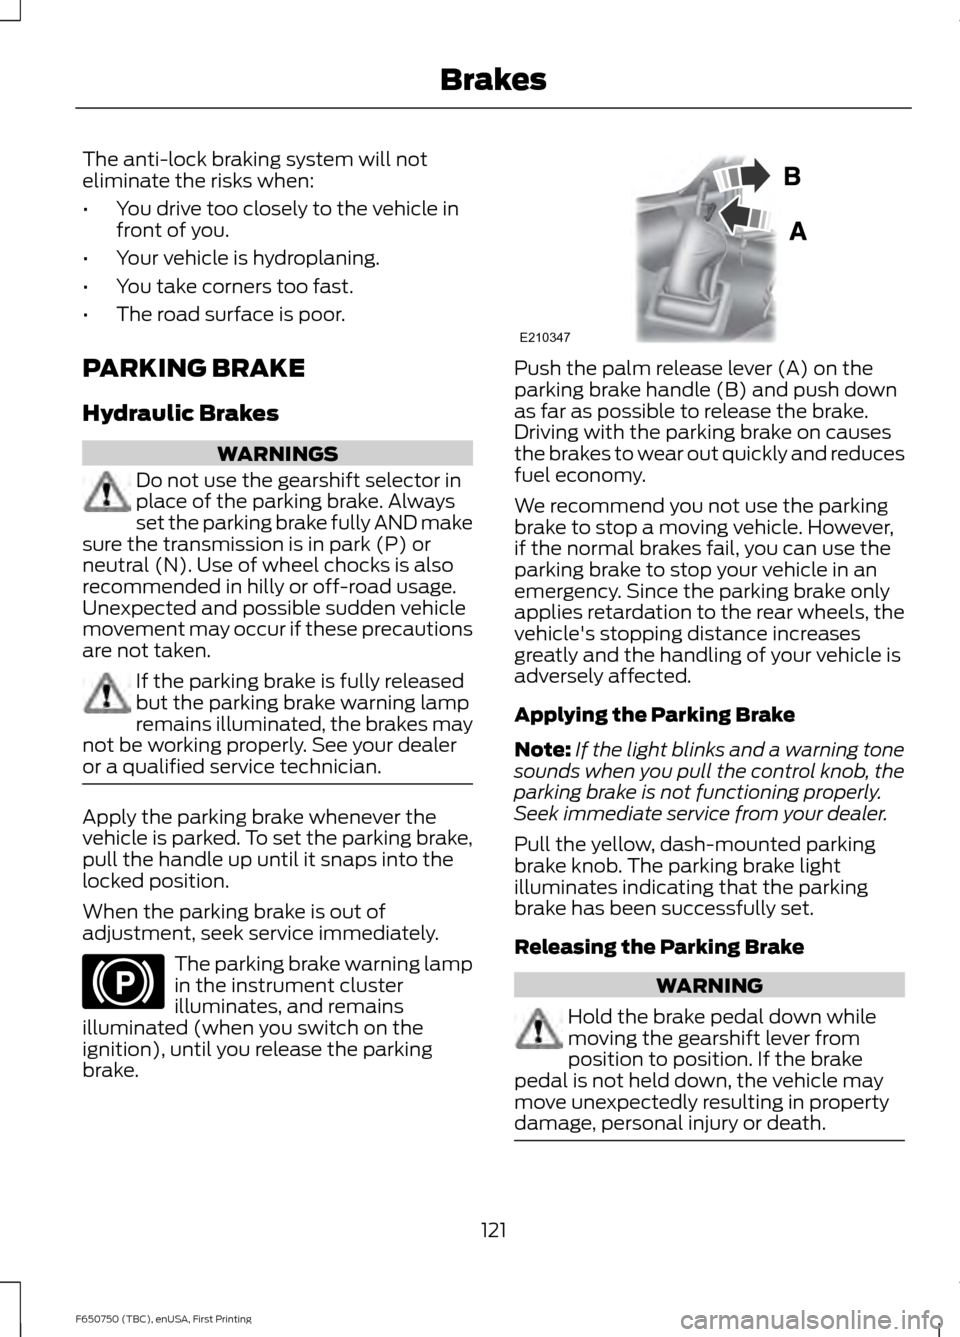
brake. Push the palm release lever (A) on the
parking brake handle (B) and push down
as far as possible to release the brake.
Driving with the parking brake on causes
the brakes to wear out quickly and reduces
fuel economy.
We recommend you not use the parking
brake to stop a moving vehicle. However,
if the normal brakes fail, you can use the
parking brake to stop your vehicle in an
emergency. Since the parking brake only
applies retardation to the rear wheels, the
vehicle's stopping distance increases
greatly and the handling of your vehicle is
adversely affected.
Applying the Parking Brake
Note:
If the light blinks and a warning tone
sounds when you pull the control knob, the
parking brake is not functioning properly.
Seek immediate service from your dealer.
Pull the yellow, dash-mounted parking
brake knob. The parking brake light
illuminates indicating that the parking
brake has been successfully set.
Releasing the Parking Brake WARNING
Hold the brake pedal down while
moving the gearshift lever from
position to position. If the brake
pedal is not held down, the vehicle may
move unexpectedly resulting in property
damage, personal injury or death. 121
F650750 (TBC), enUSA, First Printing BrakesE210346 E210347
Page 125 of 379
Note:
Read and understand the following
steps and perform them whenever you
prepare to drive the vehicle.
Note: The parking brake does not disengage
unless sufficient system air pressure is
available.
1. Press and hold the service brake pedal
while the engine is running.
2. Select the appropriate drive gear.
3. Push and hold the yellow dash-mounted parking brake knob until
the parking brake light turns off, then
release.
Parking Brake Light Illumination due
to Low Air Pressure
If the air pressure becomes too low at any
time during vehicle operation, the parking
brake may apply and the parking brake
light turns on.
If the parking brake applies due to low air
pressure, immediate service is required to
the parking brake system.
Parking Brake Warning System
If the parking brake light blinks and a tone
sounds when pulling the yellow control
knob out, this indicates the parking brake
is not functioning properly. Seek service for
the parking brake immediately.
With the ignition key not in the run position:
• A tone sounds if the parking brake
remains released (or in an unknown
state). The tone stops after
approximately 8 minutes or until the
parking brake is applied. Seek service
for the parking brake immediately. Diesel engines: Parking brake light
operation (the light only works when the
ignition key is in the run position):
• On:
Parking brake applied.
• Off:
Parking brake released and no
faults or malfunctions detected.
• Blink and tone:
Parking brake
released (or in an unknown state) and
faults or malfunctions detected.
Releasing Spring Manually WARNINGS
Do not attempt to disassemble the
parking brake chamber under any
circumstances. The high spring load
may cause serious injury. Block the wheels to help prevent the
vehicle from moving.
Unexpected and possibly sudden
vehicle movement may occur if these
precautions are not taken.
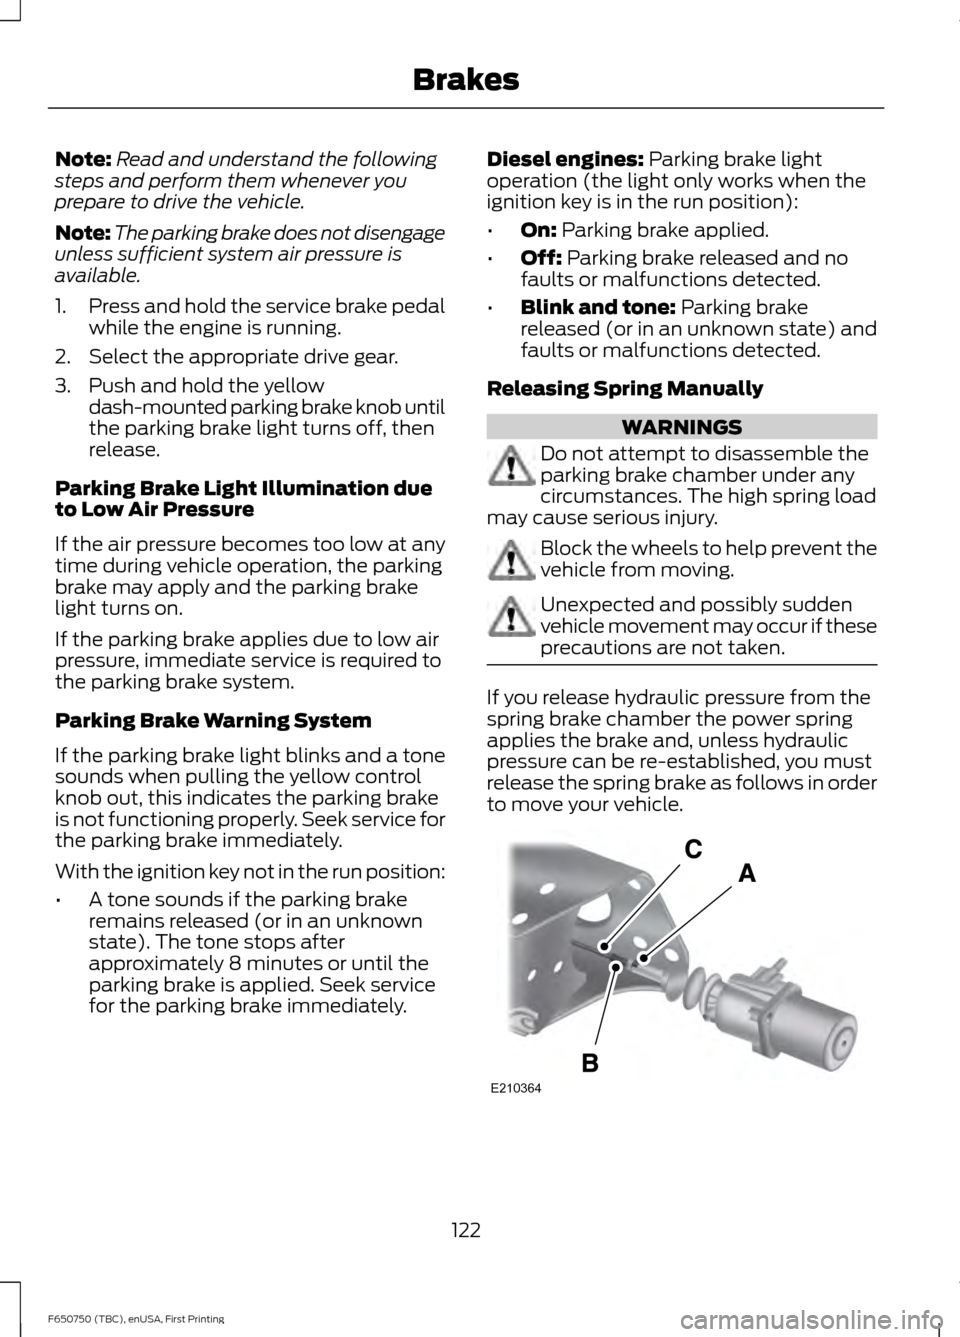
If you release hydraulic pressure from the
spring brake chamber the power spring
applies the brake and, unless hydraulic
pressure can be re-established, you must
release the spring brake as follows in order
to move your vehicle.
122
F650750 (TBC), enUSA, First Printing BrakesE210364