warning light FORD F650/750 2019 User Guide
[x] Cancel search | Manufacturer: FORD, Model Year: 2019, Model line: F650/750, Model: FORD F650/750 2019Pages: 387, PDF Size: 4.78 MB
Page 55 of 387
POWER WINDOWS (IF EQUIPPED)
WARNING:
Do not leave children
unattended in your vehicle and do not
let them play with the power windows.
Failure to follow this instruction could
result in personal injury. WARNING:
When closing the
power windows, verify they are free of
obstruction and make sure that children
and pets are not in the proximity of the
window openings. Note:
You may hear a pulsing noise when
just one of the windows is open. Lower the
opposite window slightly to reduce this
noise.
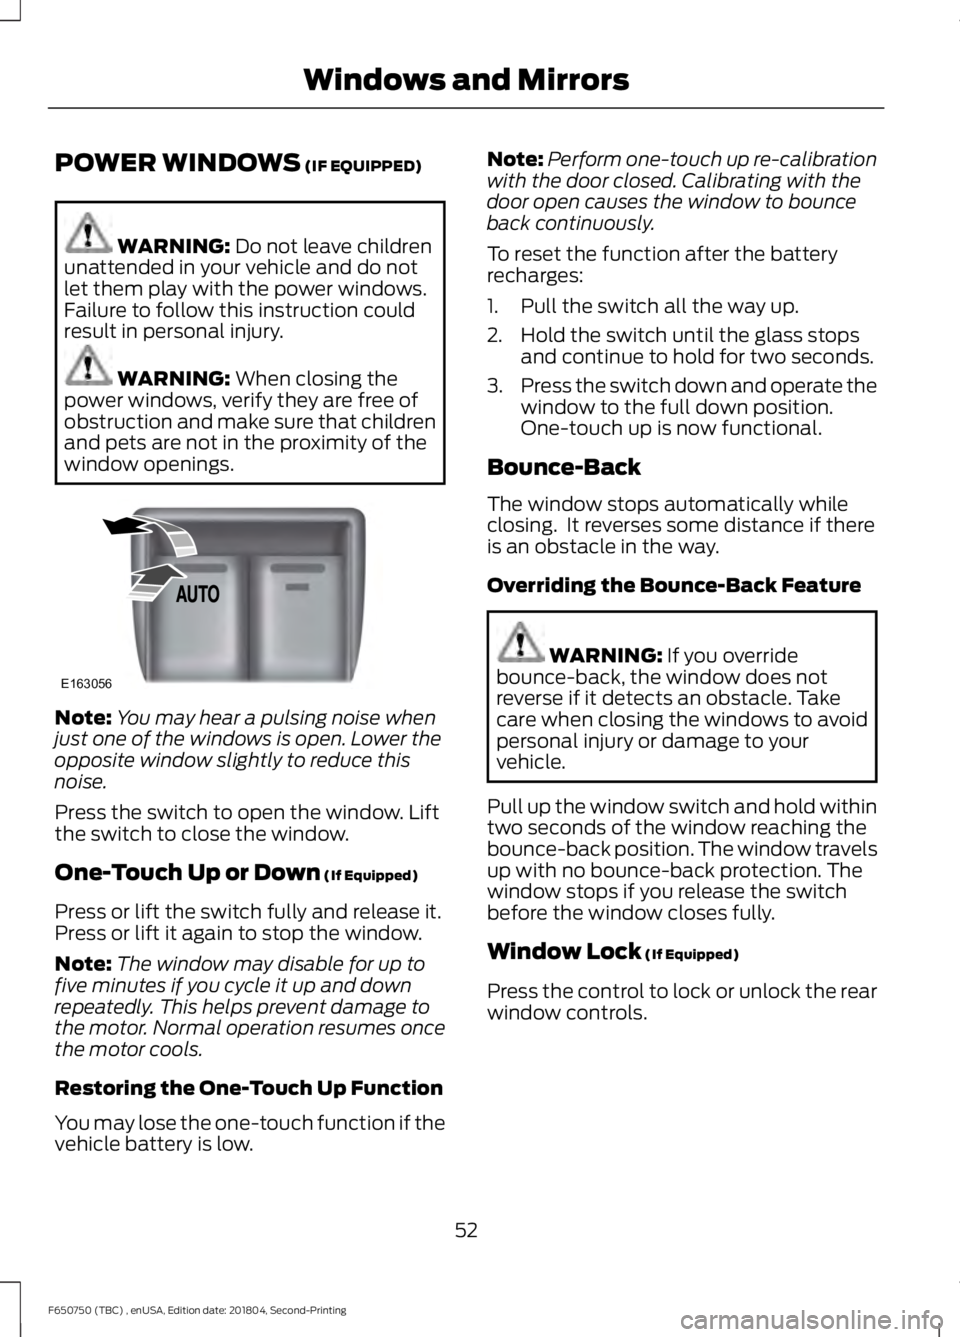
Press the switch to open the window. Lift
the switch to close the window.
One-Touch Up or Down
(If Equipped)
Press or lift the switch fully and release it.
Press or lift it again to stop the window.
Note: The window may disable for up to
five minutes if you cycle it up and down
repeatedly. This helps prevent damage to
the motor. Normal operation resumes once
the motor cools.
Restoring the One-Touch Up Function
You may lose the one-touch function if the
vehicle battery is low. Note:
Perform one-touch up re-calibration
with the door closed. Calibrating with the
door open causes the window to bounce
back continuously.
To reset the function after the battery
recharges:
1. Pull the switch all the way up.
2. Hold the switch until the glass stops and continue to hold for two seconds.
3. Press the switch down and operate the
window to the full down position.
One-touch up is now functional.
Bounce-Back
The window stops automatically while
closing. It reverses some distance if there
is an obstacle in the way.
Overriding the Bounce-Back Feature WARNING:
If you override
bounce-back, the window does not
reverse if it detects an obstacle. Take
care when closing the windows to avoid
personal injury or damage to your
vehicle.
Pull up the window switch and hold within
two seconds of the window reaching the
bounce-back position. The window travels
up with no bounce-back protection. The
window stops if you release the switch
before the window closes fully.
Window Lock
(If Equipped)
Press the control to lock or unlock the rear
window controls.
52
F650750 (TBC) , enUSA, Edition date: 201804, Second-Printing Windows and MirrorsE163056
Page 60 of 387
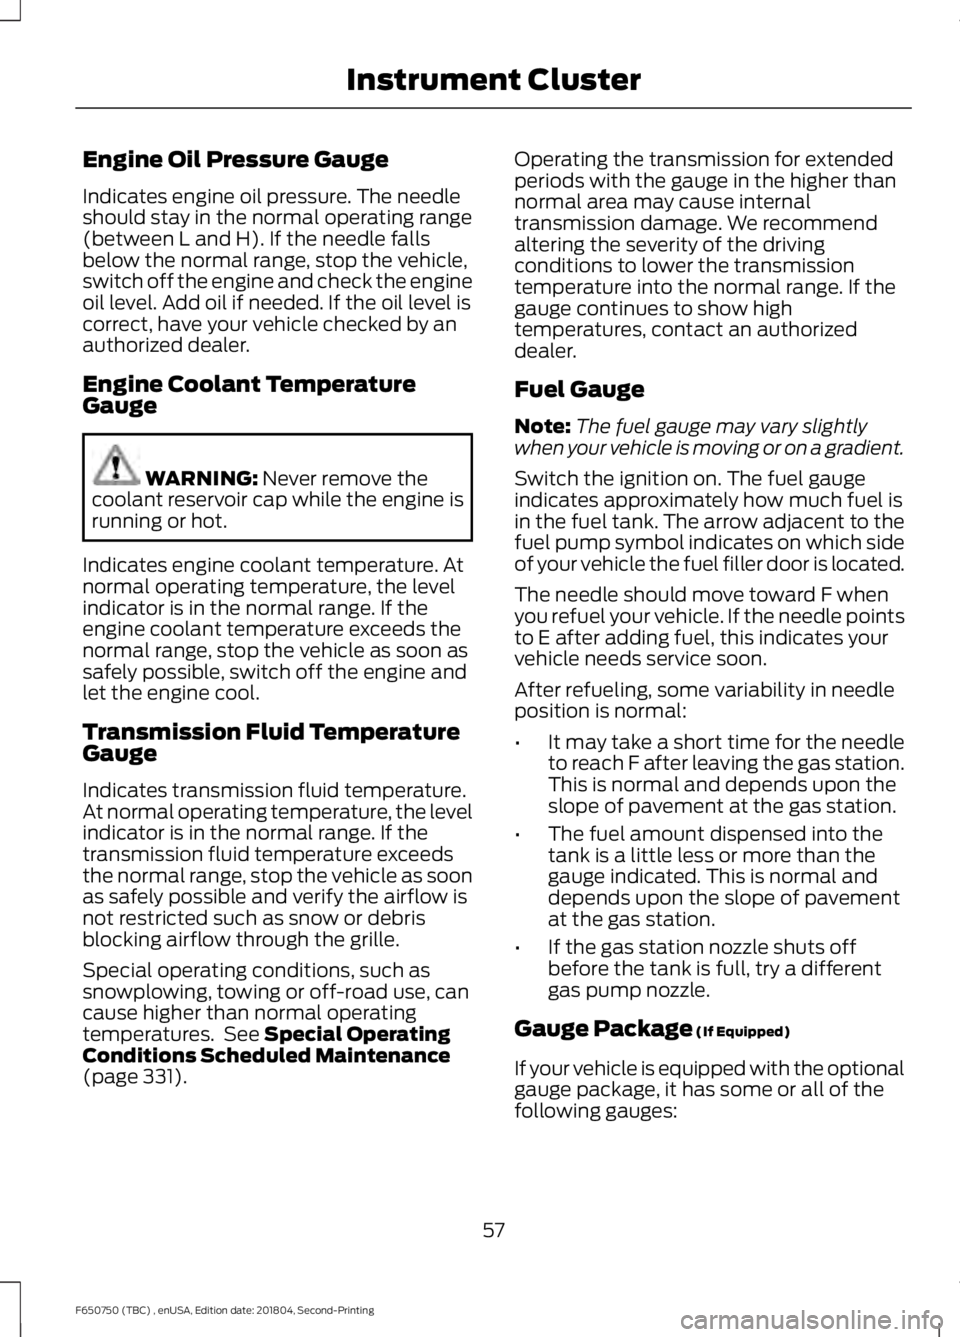
Engine Oil Pressure Gauge
Indicates engine oil pressure. The needle
should stay in the normal operating range
(between L and H). If the needle falls
below the normal range, stop the vehicle,
switch off the engine and check the engine
oil level. Add oil if needed. If the oil level is
correct, have your vehicle checked by an
authorized dealer.
Engine Coolant Temperature
Gauge
WARNING: Never remove the
coolant reservoir cap while the engine is
running or hot.
Indicates engine coolant temperature. At
normal operating temperature, the level
indicator is in the normal range. If the
engine coolant temperature exceeds the
normal range, stop the vehicle as soon as
safely possible, switch off the engine and
let the engine cool.
Transmission Fluid Temperature
Gauge
Indicates transmission fluid temperature.
At normal operating temperature, the level
indicator is in the normal range. If the
transmission fluid temperature exceeds
the normal range, stop the vehicle as soon
as safely possible and verify the airflow is
not restricted such as snow or debris
blocking airflow through the grille.
Special operating conditions, such as
snowplowing, towing or off-road use, can
cause higher than normal operating
temperatures. See
Special Operating
Conditions Scheduled Maintenance
(page
331). Operating the transmission for extended
periods with the gauge in the higher than
normal area may cause internal
transmission damage. We recommend
altering the severity of the driving
conditions to lower the transmission
temperature into the normal range. If the
gauge continues to show high
temperatures, contact an authorized
dealer.
Fuel Gauge
Note:
The fuel gauge may vary slightly
when your vehicle is moving or on a gradient.
Switch the ignition on. The fuel gauge
indicates approximately how much fuel is
in the fuel tank. The arrow adjacent to the
fuel pump symbol indicates on which side
of your vehicle the fuel filler door is located.
The needle should move toward F when
you refuel your vehicle. If the needle points
to E after adding fuel, this indicates your
vehicle needs service soon.
After refueling, some variability in needle
position is normal:
• It may take a short time for the needle
to reach F after leaving the gas station.
This is normal and depends upon the
slope of pavement at the gas station.
• The fuel amount dispensed into the
tank is a little less or more than the
gauge indicated. This is normal and
depends upon the slope of pavement
at the gas station.
• If the gas station nozzle shuts off
before the tank is full, try a different
gas pump nozzle.
Gauge Package
(If Equipped)
If your vehicle is equipped with the optional
gauge package, it has some or all of the
following gauges:
57
F650750 (TBC) , enUSA, Edition date: 201804, Second-Printing Instrument Cluster
Page 62 of 387
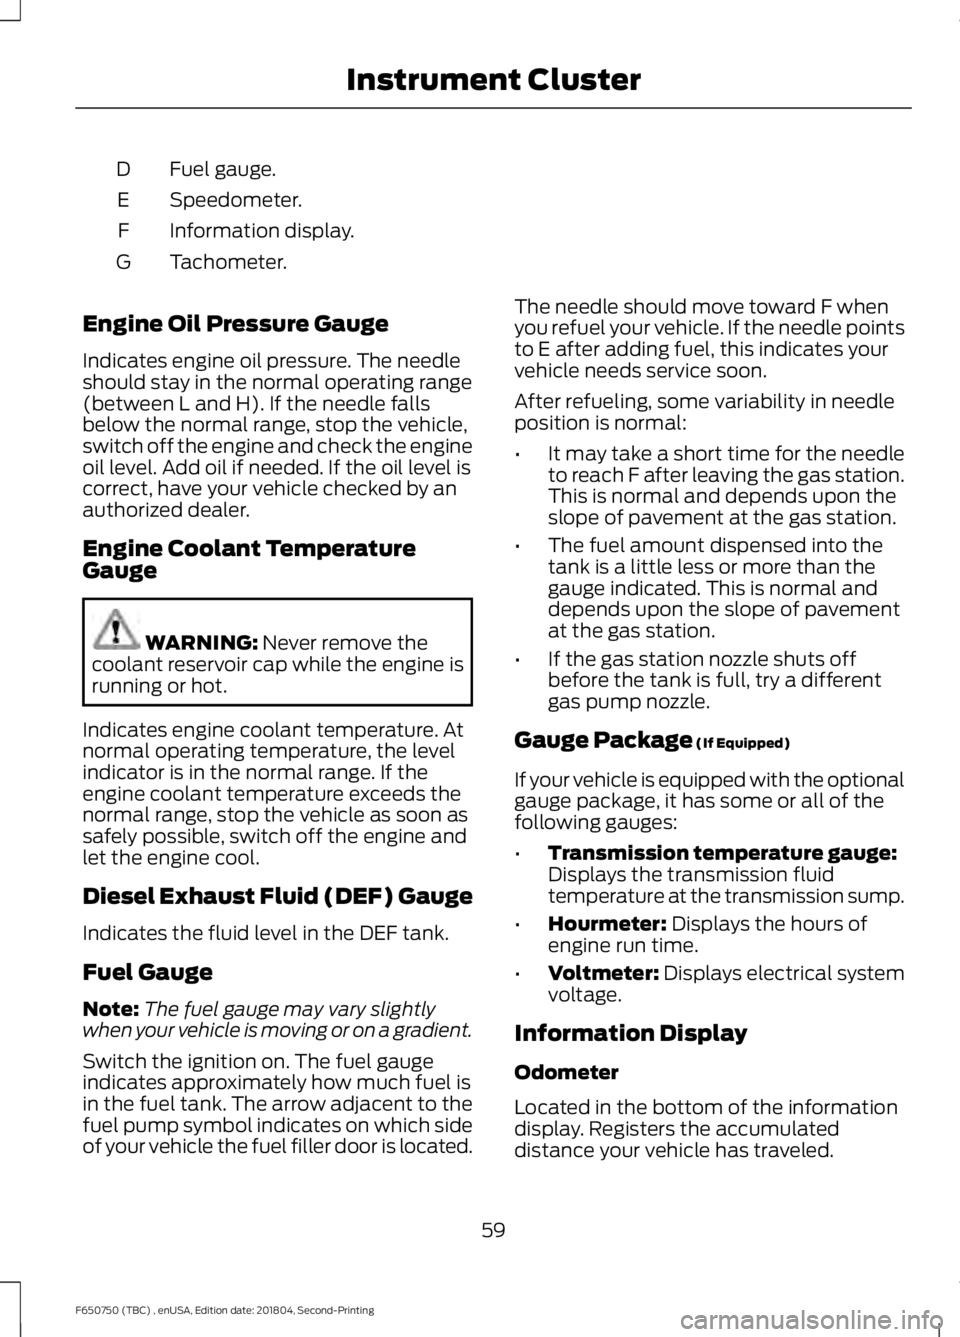
Fuel gauge.
D
Speedometer.
E
Information display.
F
Tachometer.
G
Engine Oil Pressure Gauge
Indicates engine oil pressure. The needle
should stay in the normal operating range
(between L and H). If the needle falls
below the normal range, stop the vehicle,
switch off the engine and check the engine
oil level. Add oil if needed. If the oil level is
correct, have your vehicle checked by an
authorized dealer.
Engine Coolant Temperature
Gauge WARNING: Never remove the
coolant reservoir cap while the engine is
running or hot.
Indicates engine coolant temperature. At
normal operating temperature, the level
indicator is in the normal range. If the
engine coolant temperature exceeds the
normal range, stop the vehicle as soon as
safely possible, switch off the engine and
let the engine cool.
Diesel Exhaust Fluid (DEF) Gauge
Indicates the fluid level in the DEF tank.
Fuel Gauge
Note: The fuel gauge may vary slightly
when your vehicle is moving or on a gradient.
Switch the ignition on. The fuel gauge
indicates approximately how much fuel is
in the fuel tank. The arrow adjacent to the
fuel pump symbol indicates on which side
of your vehicle the fuel filler door is located. The needle should move toward F when
you refuel your vehicle. If the needle points
to E after adding fuel, this indicates your
vehicle needs service soon.
After refueling, some variability in needle
position is normal:
•
It may take a short time for the needle
to reach F after leaving the gas station.
This is normal and depends upon the
slope of pavement at the gas station.
• The fuel amount dispensed into the
tank is a little less or more than the
gauge indicated. This is normal and
depends upon the slope of pavement
at the gas station.
• If the gas station nozzle shuts off
before the tank is full, try a different
gas pump nozzle.
Gauge Package
(If Equipped)
If your vehicle is equipped with the optional
gauge package, it has some or all of the
following gauges:
• Transmission temperature gauge:
Displays the transmission fluid
temperature at the transmission sump.
• Hourmeter:
Displays the hours of
engine run time.
• Voltmeter:
Displays electrical system
voltage.
Information Display
Odometer
Located in the bottom of the information
display. Registers the accumulated
distance your vehicle has traveled.
59
F650750 (TBC) , enUSA, Edition date: 201804, Second-Printing Instrument Cluster
Page 63 of 387
Trip Computer
See General Information (page 64).
Vehicle Settings and Personalization
See
General Information (page 64).
WARNING LAMPS AND
INDICATORS
The following warning lamps and
indicators alert you to a vehicle condition
that may become serious. Some lamps
illuminate when you start your vehicle to
make sure they work. If any lamps remain
on after starting your vehicle, refer to the
respective system warning lamp for further
information.
Note: Some warning indicators appear in
the information display and operate the
same as a warning lamp but do not
illuminate when you start your vehicle.
Anti-Lock Braking System If it illuminates when you are
driving, this indicates a
malfunction. Your vehicle
continues to have normal braking without
the anti-lock brake system function. Have
your vehicle checked as soon as possible.
Automatic Regeneration Control
(If Equipped) Illuminates when you switch it
off.
Battery If it illuminates while driving, it
indicates a malfunction. Switch
off all unnecessary electrical
equipment and have the system checked
by an authorized dealer immediately. Brake System WARNING:
Driving your vehicle
with the warning lamp on is dangerous.
A significant decrease in braking
performance may occur. It may take you
longer to stop your vehicle. Have your
vehicle checked as soon as possible.
Driving extended distances with the
parking brake engaged can cause brake
failure and the risk of personal injury. Indicates low brake fluid level or
a brake system malfunction.
Have the system checked
immediately by an authorized dealer.
Check Fuel Cap Illuminates when you may not
have properly installed the fuel
cap. Continued driving with this
light on may cause the Service engine soon
warning indicator to come on.
Check Suspension
(If Equipped) Illuminates when you press the
air suspension dump switch.
Cruise Control
(If Equipped) Illuminates when you switch on
this feature. See
Using Cruise
Control (page 138).
Diesel Exhaust Fluid
(If Equipped) Illuminates with the key in the
ON position, when the fluid is
contaminated or the level falls
below
1.0 gal (3.8 L). Refill the tank or, at
a minimum, add at least 1.0 gal (3.8 L) in
the tank.
60
F650750 (TBC) , enUSA, Edition date: 201804, Second-Printing Instrument Cluster E208811 E209041 E208808 E71340 E163176
Page 64 of 387
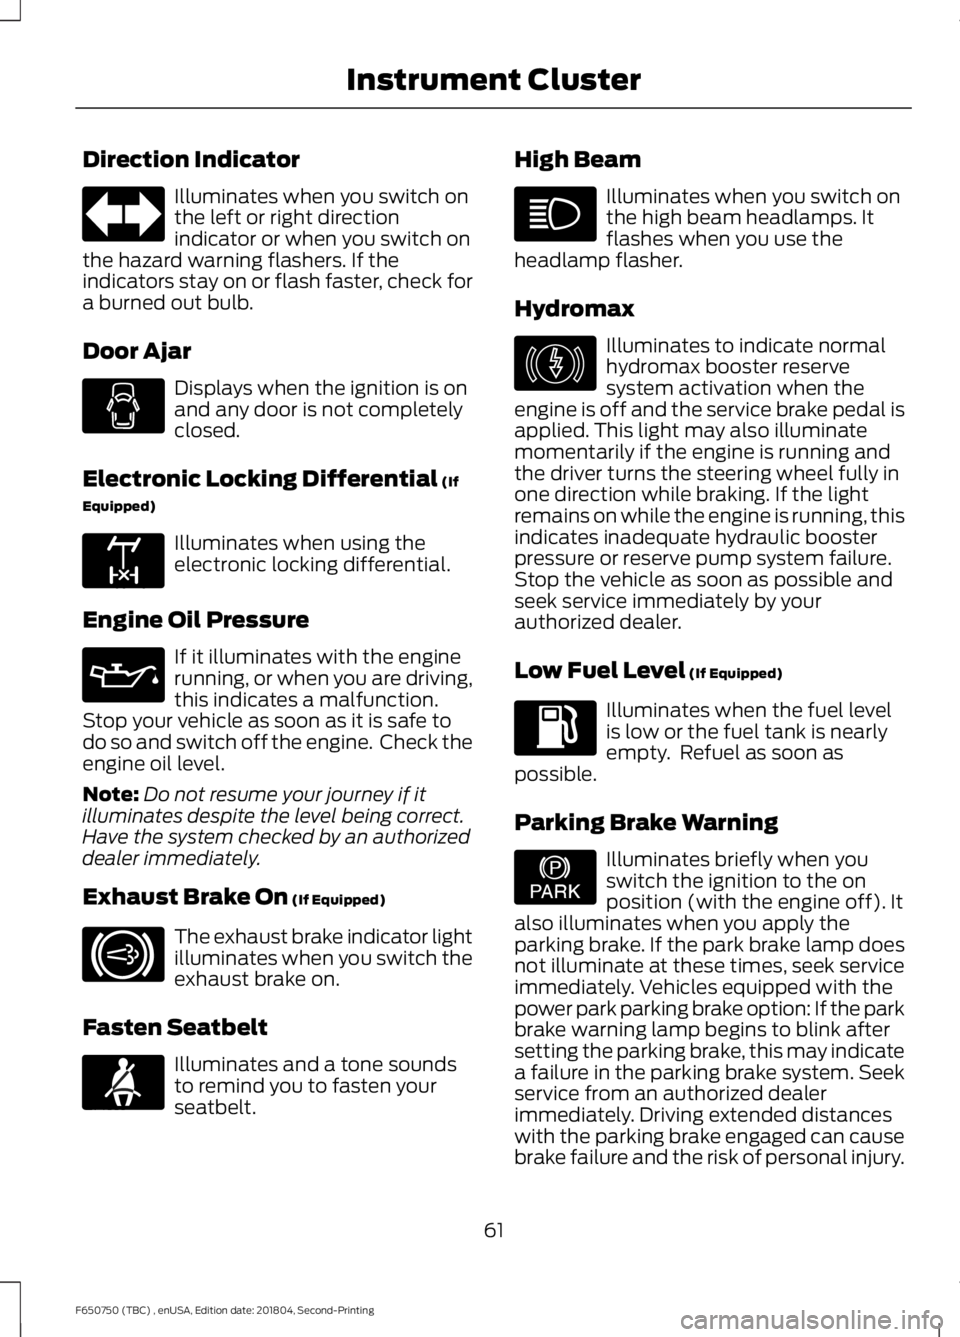
Direction Indicator
Illuminates when you switch on
the left or right direction
indicator or when you switch on
the hazard warning flashers. If the
indicators stay on or flash faster, check for
a burned out bulb.
Door Ajar Displays when the ignition is on
and any door is not completely
closed.
Electronic Locking Differential (If
Equipped) Illuminates when using the
electronic locking differential.
Engine Oil Pressure If it illuminates with the engine
running, or when you are driving,
this indicates a malfunction.
Stop your vehicle as soon as it is safe to
do so and switch off the engine. Check the
engine oil level.
Note: Do not resume your journey if it
illuminates despite the level being correct.
Have the system checked by an authorized
dealer immediately.
Exhaust Brake On
(If Equipped) The exhaust brake indicator light
illuminates when you switch the
exhaust brake on.
Fasten Seatbelt Illuminates and a tone sounds
to remind you to fasten your
seatbelt. High Beam Illuminates when you switch on
the high beam headlamps. It
flashes when you use the
headlamp flasher.
Hydromax Illuminates to indicate normal
hydromax booster reserve
system activation when the
engine is off and the service brake pedal is
applied. This light may also illuminate
momentarily if the engine is running and
the driver turns the steering wheel fully in
one direction while braking. If the light
remains on while the engine is running, this
indicates inadequate hydraulic booster
pressure or reserve pump system failure.
Stop the vehicle as soon as possible and
seek service immediately by your
authorized dealer.
Low Fuel Level
(If Equipped) Illuminates when the fuel level
is low or the fuel tank is nearly
empty. Refuel as soon as
possible.
Parking Brake Warning Illuminates briefly when you
switch the ignition to the on
position (with the engine off). It
also illuminates when you apply the
parking brake. If the park brake lamp does
not illuminate at these times, seek service
immediately. Vehicles equipped with the
power park parking brake option: If the park
brake warning lamp begins to blink after
setting the parking brake, this may indicate
a failure in the parking brake system. Seek
service from an authorized dealer
immediately. Driving extended distances
with the parking brake engaged can cause
brake failure and the risk of personal injury.
61
F650750 (TBC) , enUSA, Edition date: 201804, Second-Printing Instrument Cluster E163170 E171217 E71880 E146190 E208810
Page 66 of 387
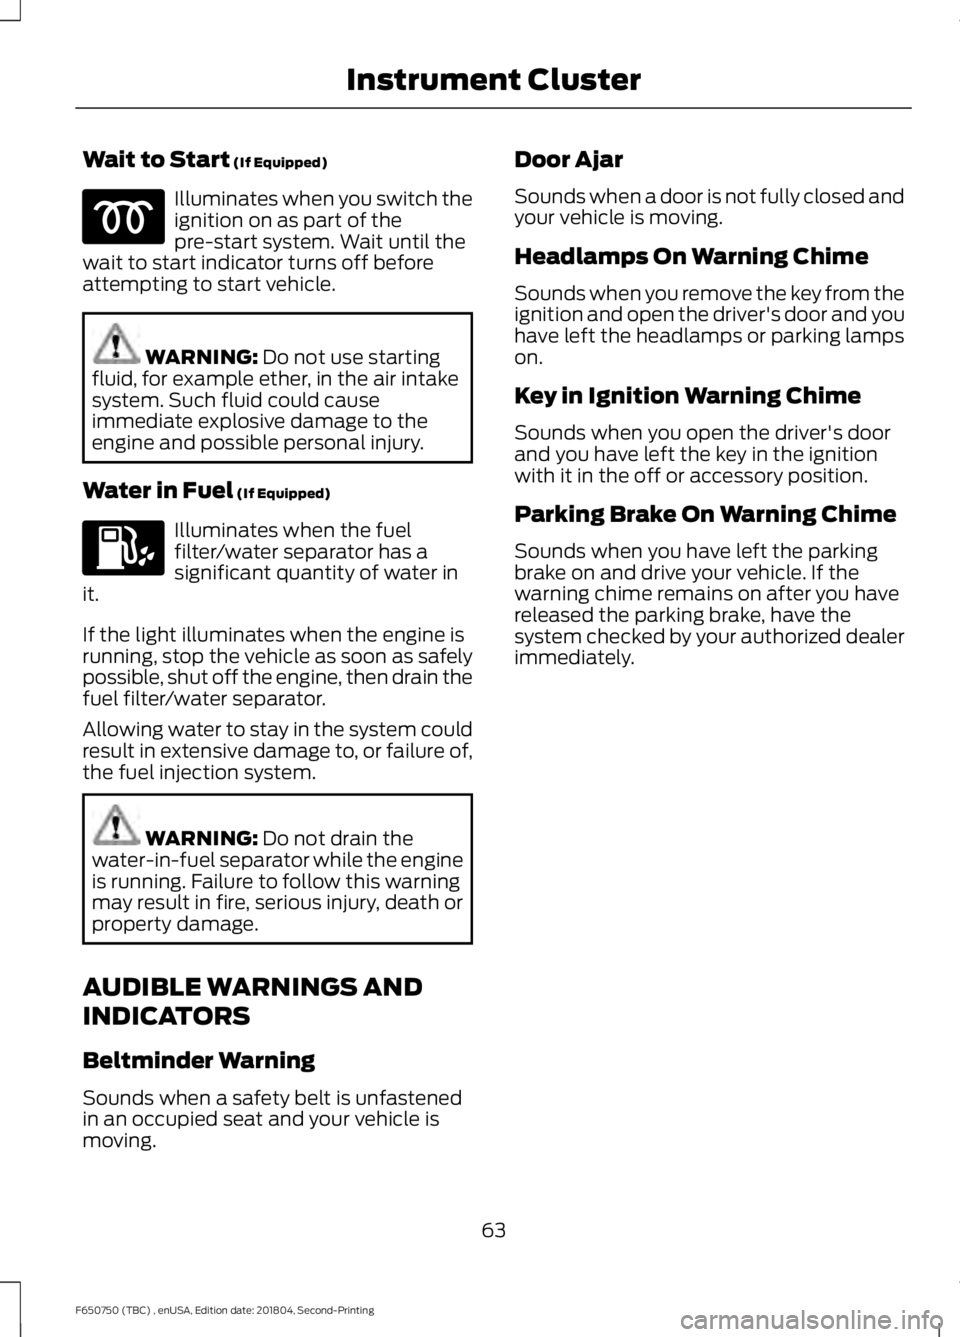
Wait to Start (If Equipped)
Illuminates when you switch the
ignition on as part of the
pre-start system. Wait until the
wait to start indicator turns off before
attempting to start vehicle. WARNING:
Do not use starting
fluid, for example ether, in the air intake
system. Such fluid could cause
immediate explosive damage to the
engine and possible personal injury.
Water in Fuel
(If Equipped) Illuminates when the fuel
filter/water separator has a
significant quantity of water in
it.
If the light illuminates when the engine is
running, stop the vehicle as soon as safely
possible, shut off the engine, then drain the
fuel filter/water separator.
Allowing water to stay in the system could
result in extensive damage to, or failure of,
the fuel injection system. WARNING:
Do not drain the
water-in-fuel separator while the engine
is running. Failure to follow this warning
may result in fire, serious injury, death or
property damage.
AUDIBLE WARNINGS AND
INDICATORS
Beltminder Warning
Sounds when a safety belt is unfastened
in an occupied seat and your vehicle is
moving. Door Ajar
Sounds when a door is not fully closed and
your vehicle is moving.
Headlamps On Warning Chime
Sounds when you remove the key from the
ignition and open the driver's door and you
have left the headlamps or parking lamps
on.
Key in Ignition Warning Chime
Sounds when you open the driver's door
and you have left the key in the ignition
with it in the off or accessory position.
Parking Brake On Warning Chime
Sounds when you have left the parking
brake on and drive your vehicle. If the
warning chime remains on after you have
released the parking brake, have the
system checked by your authorized dealer
immediately.
63
F650750 (TBC) , enUSA, Edition date: 201804, Second-Printing Instrument Cluster
Page 67 of 387
GENERAL INFORMATION
WARNING: Driving while
distracted can result in loss of vehicle
control, crash and injury. We strongly
recommend that you use extreme
caution when using any device that may
take your focus off the road. Your
primary responsibility is the safe
operation of your vehicle. We
recommend against the use of any
hand-held device while driving and
encourage the use of voice-operated
systems when possible. Make sure you
are aware of all applicable local laws
that may affect the use of electronic
devices while driving.
You can control various systems on your
vehicle using the information display
controls on the steering wheel. The
information display provides the
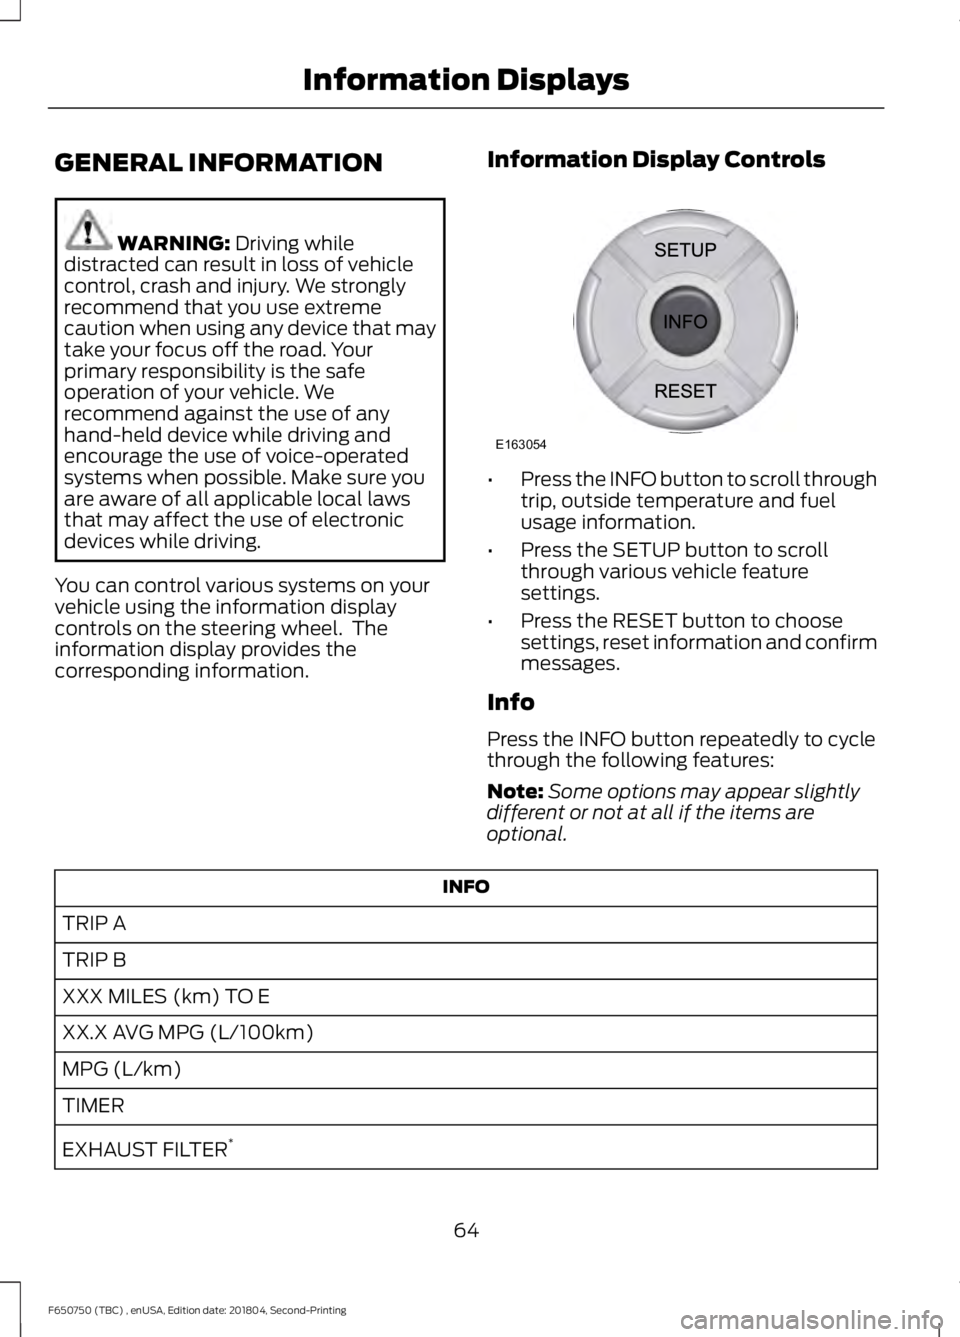
corresponding information. Information Display Controls •
Press the INFO button to scroll through
trip, outside temperature and fuel
usage information.
• Press the SETUP button to scroll
through various vehicle feature
settings.
• Press the RESET button to choose
settings, reset information and confirm
messages.
Info
Press the INFO button repeatedly to cycle
through the following features:
Note: Some options may appear slightly
different or not at all if the items are
optional. INFO
TRIP A
TRIP B
XXX MILES (km) TO E
XX.X AVG MPG (L/100km)
MPG (L/km)
TIMER
EXHAUST FILTER *
64
F650750 (TBC) , enUSA, Edition date: 201804, Second-Printing Information DisplaysE163054
Page 71 of 387
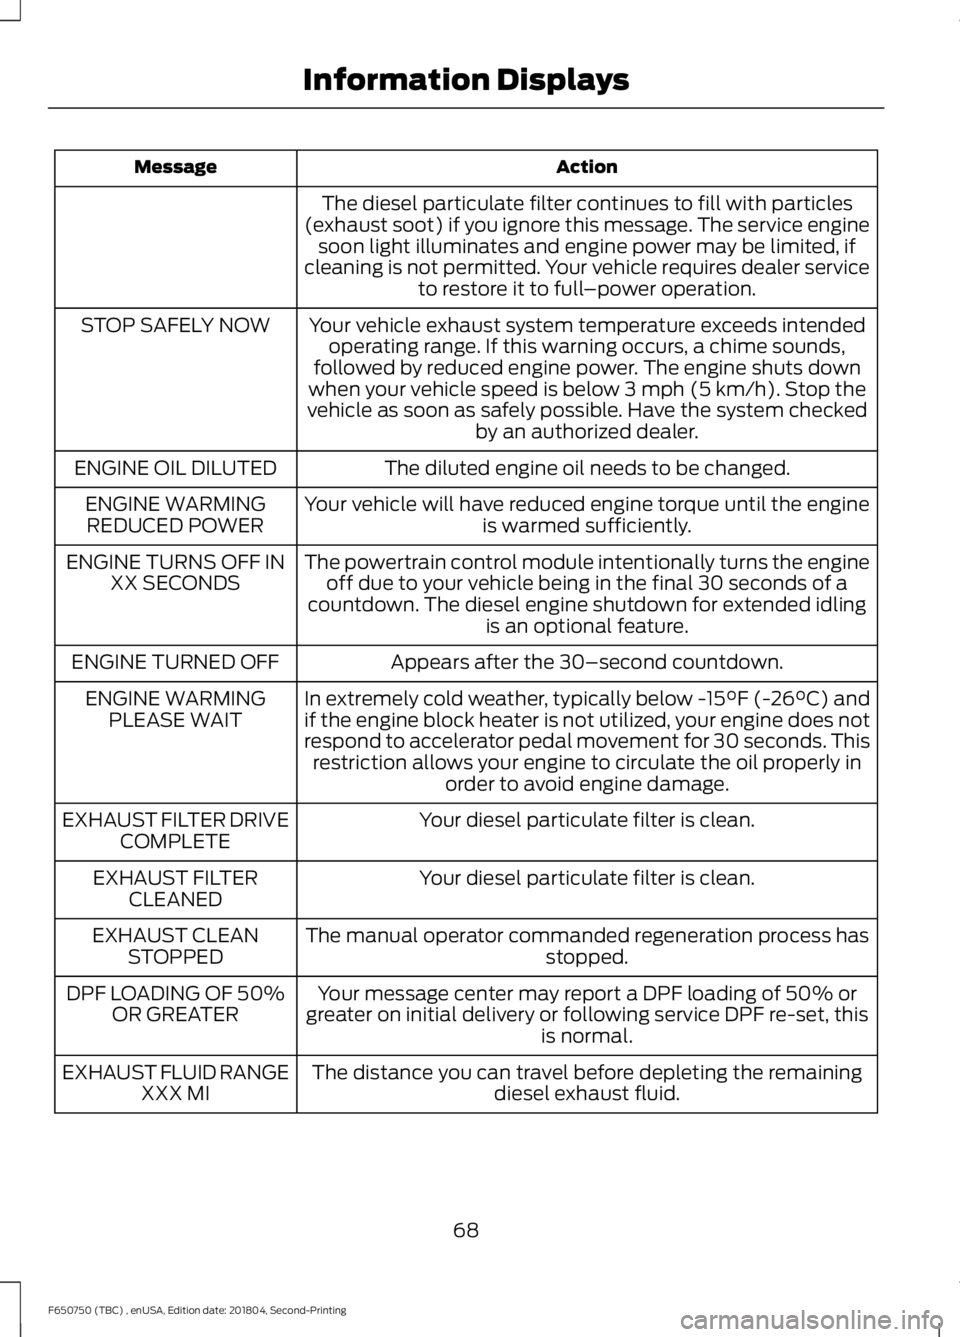
Action
Message
The diesel particulate filter continues to fill with particles
(exhaust soot) if you ignore this message. The service engine soon light illuminates and engine power may be limited, if
cleaning is not permitted. Your vehicle requires dealer service to restore it to full –power operation.
Your vehicle exhaust system temperature exceeds intended operating range. If this warning occurs, a chime sounds,
followed by reduced engine power. The engine shuts down
when your vehicle speed is below 3 mph (5 km/h). Stop the
vehicle as soon as safely possible. Have the system checked by an authorized dealer.
STOP SAFELY NOW
The diluted engine oil needs to be changed.
ENGINE OIL DILUTED
Your vehicle will have reduced engine torque until the engineis warmed sufficiently.
ENGINE WARMING
REDUCED POWER
The powertrain control module intentionally turns the engineoff due to your vehicle being in the final 30 seconds of a
countdown. The diesel engine shutdown for extended idling is an optional feature.
ENGINE TURNS OFF IN
XX SECONDS
Appears after the 30–second countdown.
ENGINE TURNED OFF
In extremely cold weather, typically below -15°F (-26°C) and
if the engine block heater is not utilized, your engine does not
respond to accelerator pedal movement for 30 seconds. Thisrestriction allows your engine to circulate the oil properly in order to avoid engine damage.
ENGINE WARMING
PLEASE WAIT
Your diesel particulate filter is clean.
EXHAUST FILTER DRIVE
COMPLETE
Your diesel particulate filter is clean.
EXHAUST FILTER
CLEANED
The manual operator commanded regeneration process has stopped.
EXHAUST CLEAN
STOPPED
Your message center may report a DPF loading of 50% or
greater on initial delivery or following service DPF re-set, this is normal.
DPF LOADING OF 50%
OR GREATER
The distance you can travel before depleting the remainingdiesel exhaust fluid.
EXHAUST FLUID RANGE
XXX MI
68
F650750 (TBC) , enUSA, Edition date: 201804, Second-Printing Information Displays
Page 78 of 387
SITTING IN THE CORRECT
POSITION
WARNING: Do not recline the
seatback as this can cause the occupant
to slide under the safety belt, resulting
in serious injury in the event of a crash. WARNING:
Do not place objects
higher than the seatback to reduce the
risk of serious injury in the event of a
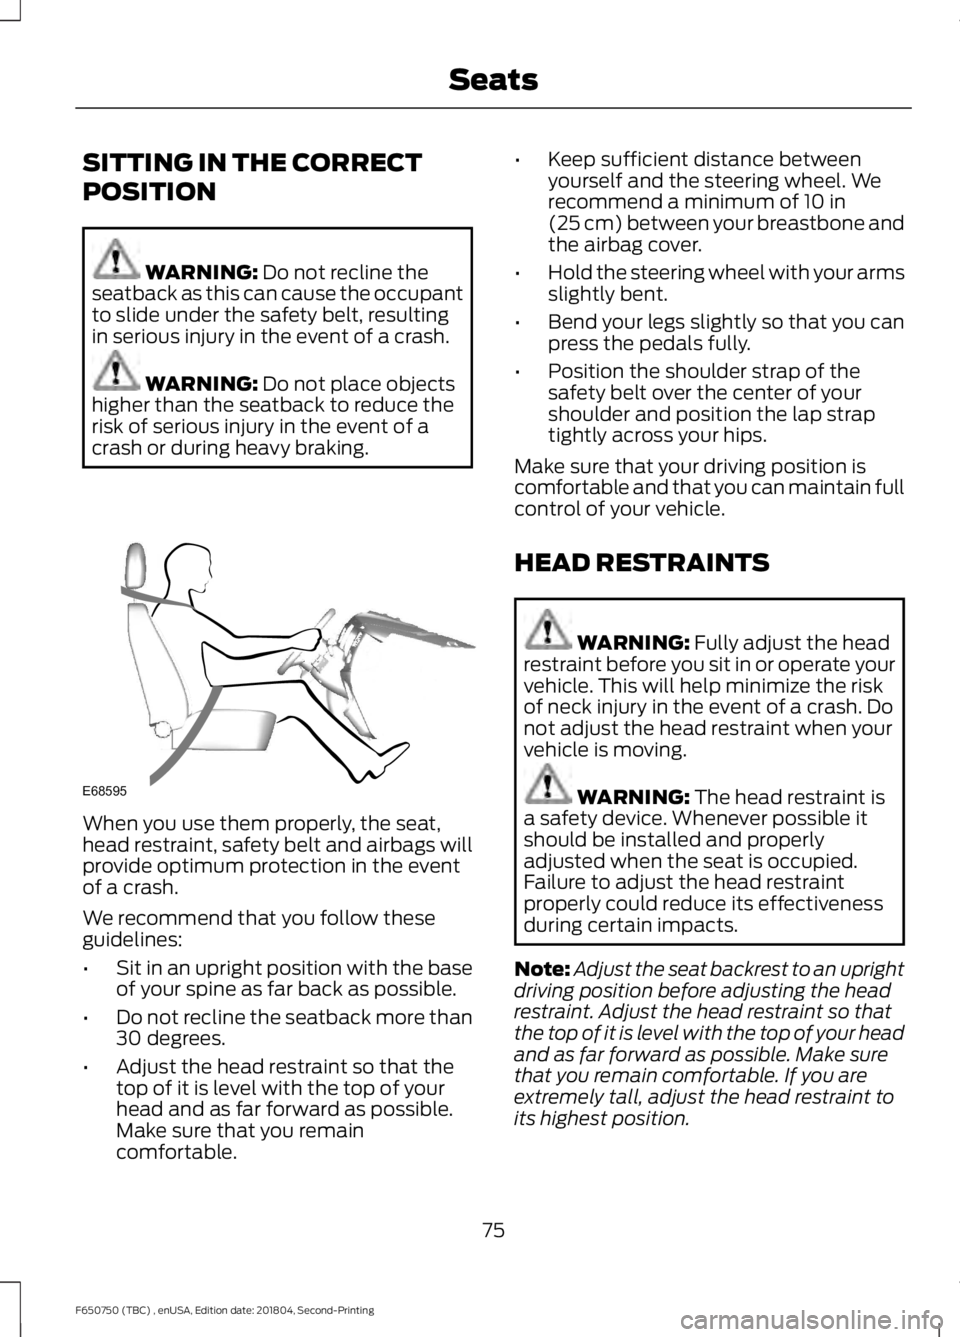
crash or during heavy braking. When you use them properly, the seat,
head restraint, safety belt and airbags will
provide optimum protection in the event
of a crash.
We recommend that you follow these
guidelines:
•
Sit in an upright position with the base
of your spine as far back as possible.
• Do not recline the seatback more than
30 degrees.
• Adjust the head restraint so that the
top of it is level with the top of your
head and as far forward as possible.
Make sure that you remain
comfortable. •
Keep sufficient distance between
yourself and the steering wheel. We
recommend a minimum of
10 in
(25 cm) between your breastbone and
the airbag cover.
• Hold the steering wheel with your arms
slightly bent.
• Bend your legs slightly so that you can
press the pedals fully.
• Position the shoulder strap of the
safety belt over the center of your
shoulder and position the lap strap
tightly across your hips.
Make sure that your driving position is
comfortable and that you can maintain full
control of your vehicle.
HEAD RESTRAINTS WARNING:
Fully adjust the head
restraint before you sit in or operate your
vehicle. This will help minimize the risk
of neck injury in the event of a crash. Do
not adjust the head restraint when your
vehicle is moving. WARNING:
The head restraint is
a safety device. Whenever possible it
should be installed and properly
adjusted when the seat is occupied.
Failure to adjust the head restraint
properly could reduce its effectiveness
during certain impacts.
Note: Adjust the seat backrest to an upright
driving position before adjusting the head
restraint. Adjust the head restraint so that
the top of it is level with the top of your head
and as far forward as possible. Make sure
that you remain comfortable. If you are
extremely tall, adjust the head restraint to
its highest position.
75
F650750 (TBC) , enUSA, Edition date: 201804, Second-Printing SeatsE68595
Page 86 of 387
12 Volt DC Power Point
WARNING: Do not plug optional
electrical accessories into the cigar
lighter socket. Incorrect use of the cigar
lighter can cause damage not covered
by the vehicle warranty, and can result
in fire or serious injury.
Note: When you switch the ignition on, you
can use the socket to power 12 volt
appliances with a maximum current rating
of 15 amps.
If the power supply does not work after you
switch the ignition off, switch the ignition
on.
Note: Do not hang any accessory from the
accessory plug.
Note: Do not use the power point over the
vehicle capacity of 12 volt DC 180 watts or
a fuse may blow.
Note: Always keep the power point caps
closed when not in use.
Do not insert objects other than an
accessory plug into the power point. This
damages the power point and may blow
the fuse.
Run the vehicle for full capacity use of the
power point.
To prevent the battery from running out of
charge:
• Do not use the power point longer than
necessary when the vehicle is not
running.
• Do not leave devices plugged in
overnight or when you park your vehicle
for extended periods. Locations
Power points may be in the following
locations:
•
On the instrument panel (two
locations).
• Inside the front under-seat storage
compartment.
• Inside the rear under-seat storage
compartment.
110 Volt AC Power Point
(If Equipped) WARNING: Do not keep electrical
devices plugged in the power point
whenever the device is not in use. Do not
use any extension cord with the 110 volt
AC power point, since it will defeat the
safety protection design. Doing so may
cause the power point to overload due
to powering multiple devices that can
reach beyond the 150 watt load limit and
could result in fire or serious injury.
Note: The power point turns off when you
switch the ignition off, or when the battery
voltage drops below 11 volts.
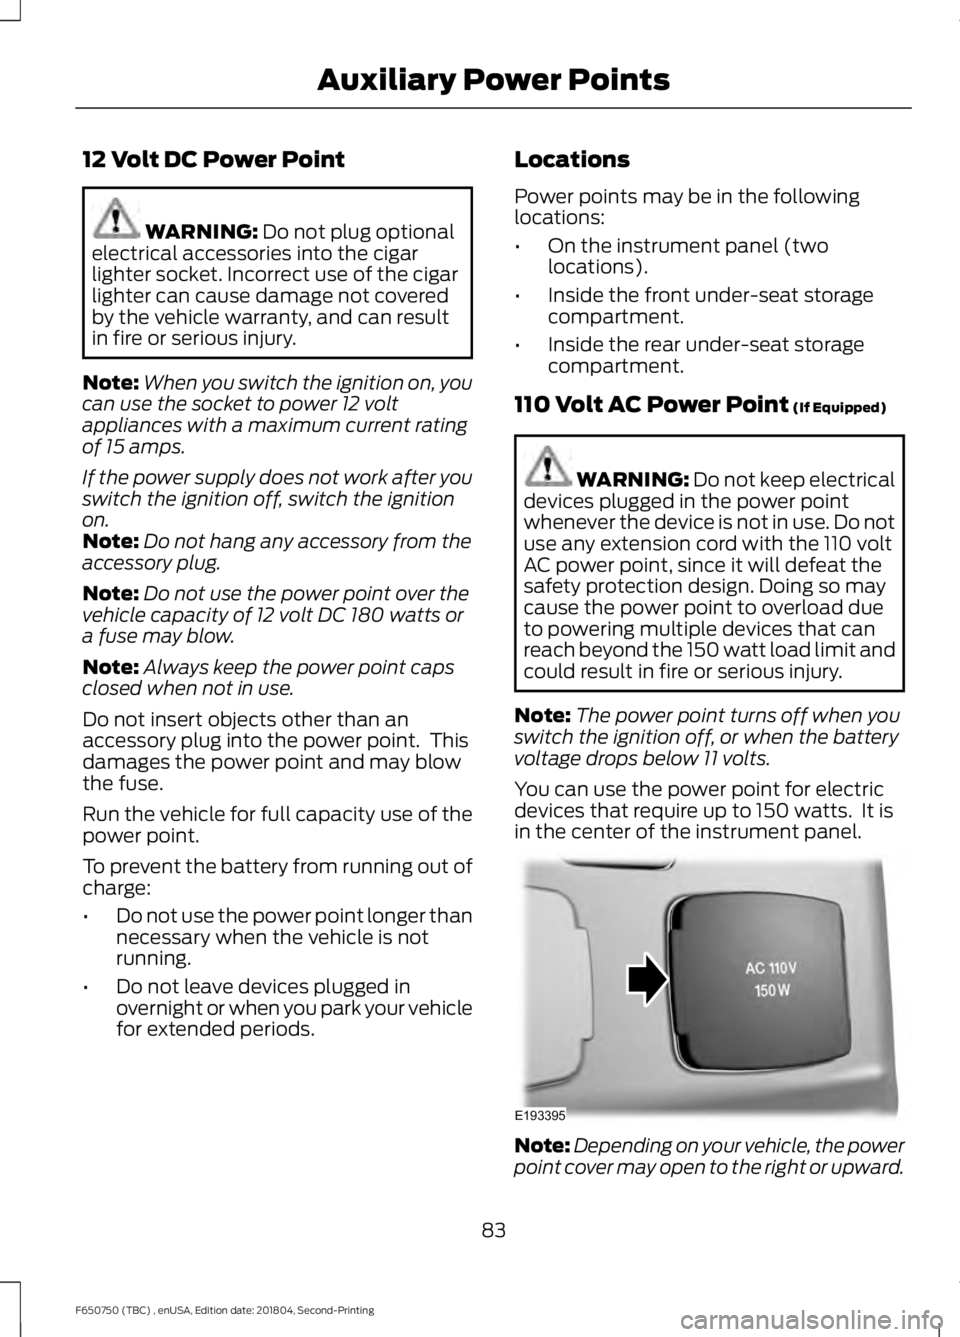
You can use the power point for electric
devices that require up to 150 watts. It is
in the center of the instrument panel. Note:
Depending on your vehicle, the power
point cover may open to the right or upward.
83
F650750 (TBC) , enUSA, Edition date: 201804, Second-Printing Auxiliary Power PointsE193395