torque FORD F650/750 2019 Owners Manual
[x] Cancel search | Manufacturer: FORD, Model Year: 2019, Model line: F650/750, Model: FORD F650/750 2019Pages: 387, PDF Size: 4.78 MB
Page 10 of 387
ABOUT THIS MANUAL
Thank you for choosing Ford. We
recommend that you take some time to
get to know your vehicle by reading this
manual. The more that you know about
your vehicle, the greater the safety and
pleasure you will get from driving it.
WARNING: Driving while
distracted can result in loss of vehicle
control, crash and injury. We strongly
recommend that you use extreme
caution when using any device that may
take your focus off the road. Your
primary responsibility is the safe
operation of your vehicle. We
recommend against the use of any
hand-held device while driving and
encourage the use of voice-operated
systems when possible. Make sure you
are aware of all applicable local laws
that may affect the use of electronic
devices while driving.
Note: Always use and operate your vehicle
in line with all applicable laws and
regulations.
Note: Pass on this manual when selling
your vehicle. It is an integral part of your
vehicle. Note:
Your vehicle ’s powertrain control
systems can detect and store information
about vehicle modifications that increase
horsepower and torque output such as
whether or not performance-enhancing
powertrain components commonly referred
to as performance chips have been used.
This information will stay in the system ’s
memory and cannot be erased even if the
modification is removed. Ford Motor
Company, Ford of Canada, Ford of Mexico
and service or repair facilities can retrieve
this information when servicing your vehicle.
Ford Motor Company may use this
information to determine if your warranty
covers any needed repairs.
Note: Some aftermarket products may
cause severe engine/transmission and/or
exhaust system damage; refer to your
warranty information for more information.
Your new diesel engine will feel, drive and
function somewhat differently than a
gasoline engine. Therefore it is very
important that you read and thoroughly
familiarize yourself and others operating
the vehicle with this guide. There is a
special procedure for turning off the diesel
engine. See
Starting a Diesel Engine
(page 88). It is important to read and
understand this material in order to
maintain the best service life for your
engine.
Ford may discontinue models or change
specifications without any notice and
without incurring obligations.
Note: Either Ford Motor Company or an
authorized Ford dealer may have originally
sold this incomplete vehicle to a vehicle
modifier who upfitted it. As a result, some
of the options and features on this vehicle
may differ from what we describe in this
manual.
This manual may qualify the location of a
component as left-hand side or right-hand
side. The side is determined when facing
forward in the seat.
7
F650750 (TBC) , enUSA, Edition date: 201804, Second-Printing Introduction
Page 71 of 387
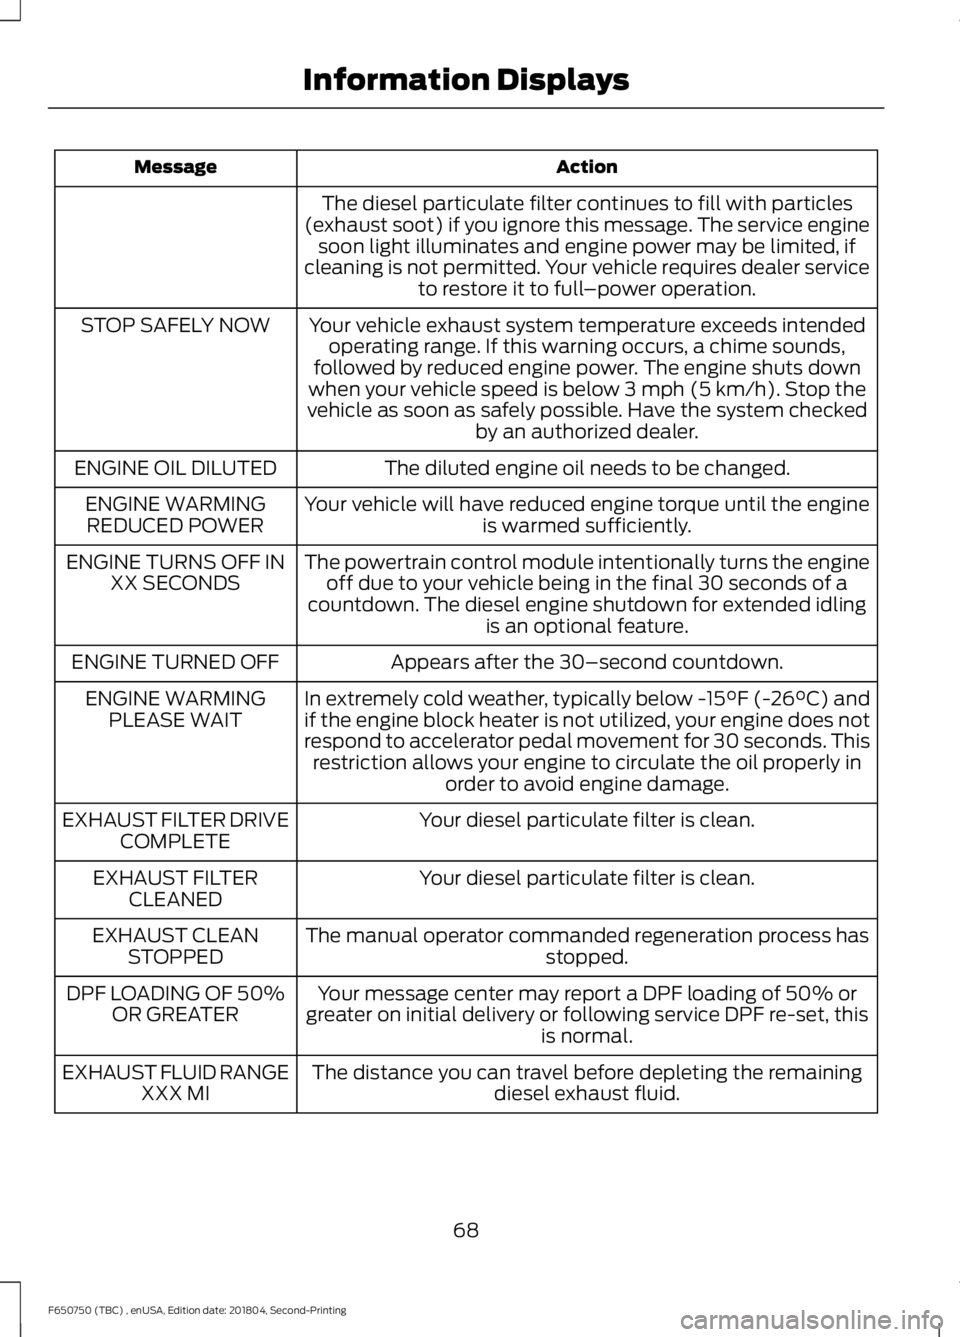
Action
Message
The diesel particulate filter continues to fill with particles
(exhaust soot) if you ignore this message. The service engine soon light illuminates and engine power may be limited, if
cleaning is not permitted. Your vehicle requires dealer service to restore it to full –power operation.
Your vehicle exhaust system temperature exceeds intended operating range. If this warning occurs, a chime sounds,
followed by reduced engine power. The engine shuts down
when your vehicle speed is below 3 mph (5 km/h). Stop the
vehicle as soon as safely possible. Have the system checked by an authorized dealer.
STOP SAFELY NOW
The diluted engine oil needs to be changed.
ENGINE OIL DILUTED
Your vehicle will have reduced engine torque until the engineis warmed sufficiently.
ENGINE WARMING
REDUCED POWER
The powertrain control module intentionally turns the engineoff due to your vehicle being in the final 30 seconds of a
countdown. The diesel engine shutdown for extended idling is an optional feature.
ENGINE TURNS OFF IN
XX SECONDS
Appears after the 30–second countdown.
ENGINE TURNED OFF
In extremely cold weather, typically below -15°F (-26°C) and
if the engine block heater is not utilized, your engine does not
respond to accelerator pedal movement for 30 seconds. Thisrestriction allows your engine to circulate the oil properly in order to avoid engine damage.
ENGINE WARMING
PLEASE WAIT
Your diesel particulate filter is clean.
EXHAUST FILTER DRIVE
COMPLETE
Your diesel particulate filter is clean.
EXHAUST FILTER
CLEANED
The manual operator commanded regeneration process has stopped.
EXHAUST CLEAN
STOPPED
Your message center may report a DPF loading of 50% or
greater on initial delivery or following service DPF re-set, this is normal.
DPF LOADING OF 50%
OR GREATER
The distance you can travel before depleting the remainingdiesel exhaust fluid.
EXHAUST FLUID RANGE
XXX MI
68
F650750 (TBC) , enUSA, Edition date: 201804, Second-Printing Information Displays
Page 143 of 387
STEERING
To help prevent damage to the power
steering system:
•
Do not hold the steering wheel at its
furthest turning points for more than
three to five seconds when the engine
is running.
• Avoid continuously steering back and
forth with elevated engine RPM as this
may overheat the system. If trying to
free a stuck vehicle, pause between
attempts to allow the power steering
system to cool or seek assistance.
Typical steering and driving maneuvers
allow the system to cool.
• Do not operate the vehicle if the power
steering pump fluid level is below the
MIN mark on the reservoir.
• Some noise is normal during operation.
If excessive, check for low power
steering pump fluid level before
seeking service by your dealer.
• Heavy or uneven efforts may be caused
by low power steering fluid. Check for
low power steering pump fluid level
before seeking service by your dealer.
• Do not fill the power steering pump
reservoir above the MAX mark on the
reservoir, as this may result in leaks
from the reservoir.
If the power steering system breaks down
or if you switch off the engine, you can
steer the vehicle manually, but it takes
more effort.
Operating the steering system excessively
at an elevated engine RPM (>1200 rpm)
for more than 2 minutes can result in
steering system damage from overheating.
Move the steering wheel to the full left
position then full right position at idle
speed, or stop using the system for 2
minutes to allow the system to cool down. If the power steering system exhibits heavy
or uneven efforts, check for the following
before seeking service from your dealer:
•
An improperly inflated tire.
• Overloading of front suspension.
• Uneven vehicle loading.
• Binding suspension components.
If the power steering system wanders or
pulls, check for:
• An improperly inflated tire.
• Uneven vehicle loading.
• Uneven tire wear.
• Loose or worn suspension
components.
• Loose or worn steering components.
• Improper vehicle alignment.
• High crosswinds.
If you service or replace any steering
components, install new fasteners. Many
fasteners have thread adhesive coatings,
or have prevailing torque features, which
you cannot re-use. Do not re-use a bolt or
nut. Torque fasteners to specifications.
A high crown in the road or high crosswinds
may also make the steering seem to
wander or pull.
140
F650750 (TBC) , enUSA, Edition date: 201804, Second-Printing Driving Aids
Page 230 of 387
SUSPENSION SYSTEM
INSPECTION
Note:
Do not adjust air suspension height
to any setting other than the specified
setting. Altering the height setting changes
the driveline angle and may result in
unwarrantable component damage, such
as transmission component damage.
Verify drive axle air suspension height and
height control valve performance at engine
oil change intervals.
Periodically check:
• Condition of spring leaves for evidence
of fatigue, bending or breakage.
• Condition of suspension mounting
brackets and bushings.
• Torque rod mounting fasteners for
tightness.
• For proper suspension alignment.
Maintain proper alignment at all times.
• U-bolts. After the chassis has been
operating under load for 1,000 mi
(1,600 km) or six months (whichever
comes first), the U-bolt nuts must be
re-torqued. Re-torque the U-bolt nuts
every
37,000 mi (60,000 km)
thereafter. Clean and lubricate the
U-bolt and nut threads and seats to
make sure a like new condition when
re-torqueing. See
Spring U-Bolt
Check (page 228).
FRAME AND TOW HOOK
INSPECTION
Your vehicle's chassis is manufactured
with frame rails of either HSLA steel or
heat-treated steel. Handle each in a
specific manner to make sure maximum
service life. Consult the service manual or
an authorized dealer before attempting
frame repair or modification. It is important, particularly on vehicles that
use tow hooks frequently, to inspect the
front and rear tow hooks for damage or a
loose mounting.
REAR AXLE FLUID CHECK
Your rear axle may have an optional
synthetic lubricant that allows the use of
extended service intervals. A tag on the
filler plug identifies the use of the synthetic
lubricant.
Only use a lubricant that meets
manufacturer specifications. Only use a
lubricant that meets manufacturer
specifications. Use of a non-approved rear
axle lubricant may cause internal axle
component damage. See Capacities and
Specifications
(page 261).
Checking the Fluid Level
1. Park your vehicle on level ground.
2. Set the parking brake and shift into position neutral (N) or park (P). Turn
the engine off.
3. Clean any dirt from around the axle filler plug.
4. Remove the filler plug and inspect the lubricant level. It should be at the
bottom of the filler plug opening.
5. Add lubricant, if necessary, through the
filler plug opening.
6. Clean and install the filler plug securely.
Changing the Fluid
Note: Drain the rear axle while the lubricant
is warm.
1. Park your vehicle on level ground.
2. Set the parking brake and shift into position neutral (N) or park (P). Turn
the engine off.
3. Clean any dirt from around the axle filler and drain plugs.
227
F650750 (TBC) , enUSA, Edition date: 201804, Second-Printing Maintenance
Page 231 of 387
4.
Remove the filler and drain plugs. Drain
the lubricant into a suitable container.
Dispose of all used automotive fluids
in a responsible manner following your
local authorized standards.
5. Clean and install the drain plug securely.
6. Add lubricant through the filler plug opening.
7. Clean and install the filler plug securely.
SPRING U-BOLT CHECK
Check and tighten the U-bolt nuts after
your vehicle has been operated under load
for 1,000 mi (1,600 km) or six months,
whichever occurs first.
Check and tighten the U-bolt nuts every
37,000 mi (60,000 km)
.
Check and tighten the U-bolt nuts with
your vehicle at curb height and unloaded.
Inspect the U-bolt threads for rust and
debris. Clean the threads if contaminated.
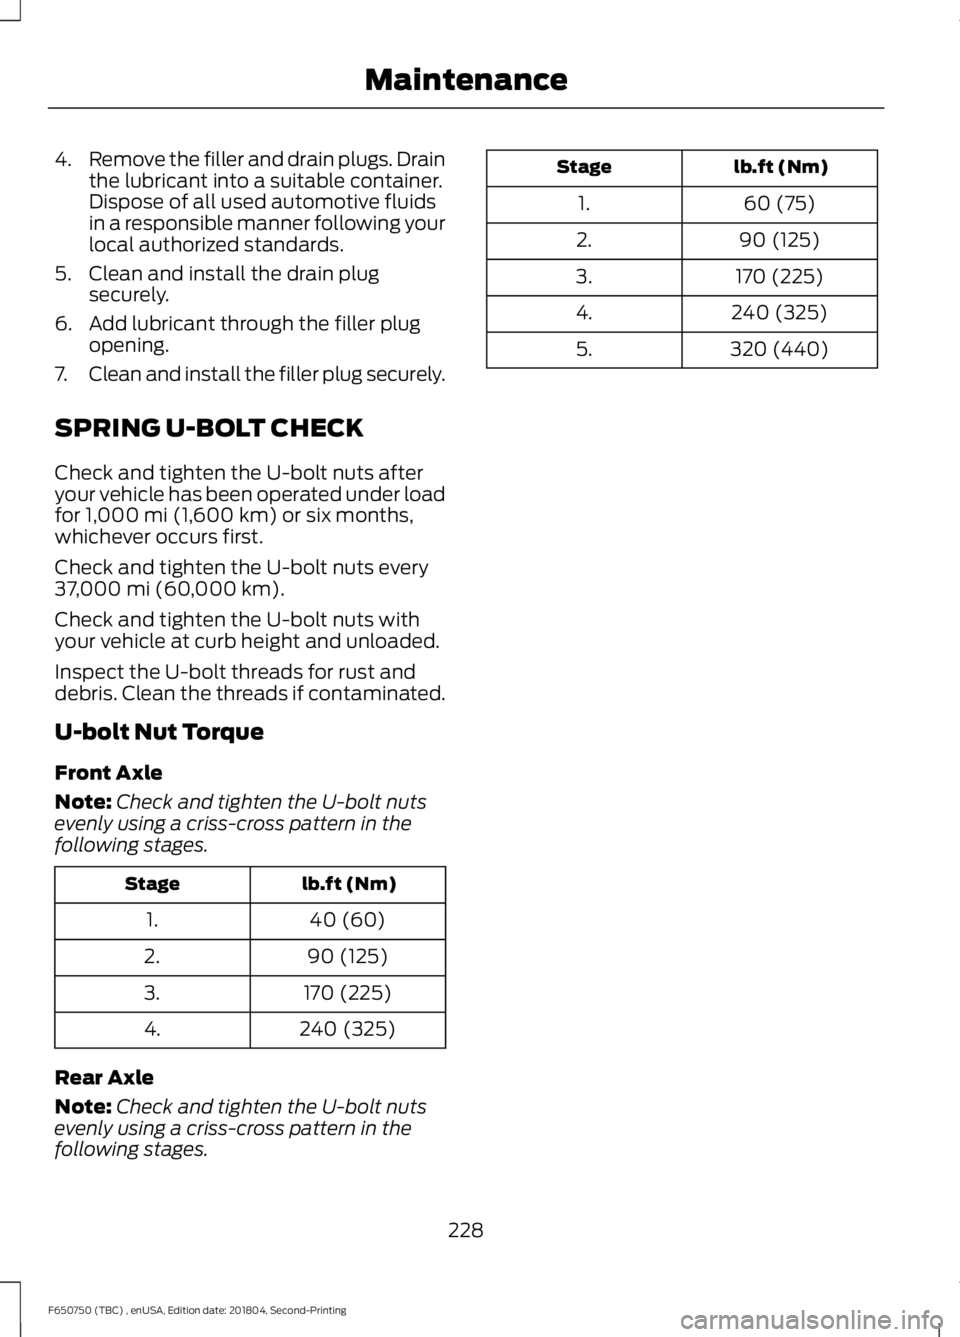
U-bolt Nut Torque
Front Axle
Note: Check and tighten the U-bolt nuts
evenly using a criss-cross pattern in the
following stages. lb.ft (Nm)
Stage
40 (60)
1.
90 (125)
2.
170 (225)
3.
240 (325)
4.
Rear Axle
Note: Check and tighten the U-bolt nuts
evenly using a criss-cross pattern in the
following stages. lb.ft (Nm)
Stage
60 (75)
1.
90 (125)
2.
170 (225)
3.
240 (325)
4.
320 (440)
5.
228
F650750 (TBC) , enUSA, Edition date: 201804, Second-Printing Maintenance
Page 255 of 387
WARNING: Never get underneath
a vehicle that is supported only by a jack.
If the vehicle slips off the jack, you or
someone else could be seriously injured. WARNING:
Do not attempt to
change a tire on the side of the vehicle
close to moving traffic. Pull far enough
off the road to avoid the danger of being
hit when operating the jack or changing
the wheel.
Note: Passengers should not remain in the
vehicle when the vehicle is being jacked.
Park on a level surface, set the parking
brake and activate the hazard flashers. 1.
Turn the engine off and block the wheel
that is diagonally opposite of the flat
tire using a wheel chock.
2. Loosen each wheel lug nut ½ turn counterclockwise, but do not remove
them until the wheel is raised off the
ground. 3.
Replace the flat tire with the spare tire,
making sure the valve stem is facing
outward on all front and inboard rear
wheels. If you are replacing the
outboard wheel, the valve stem must
be facing inward. Reinstall the lug nuts
until the wheel is snug against the hub.
Do not fully tighten the lug nuts until
the wheel has been lowered.
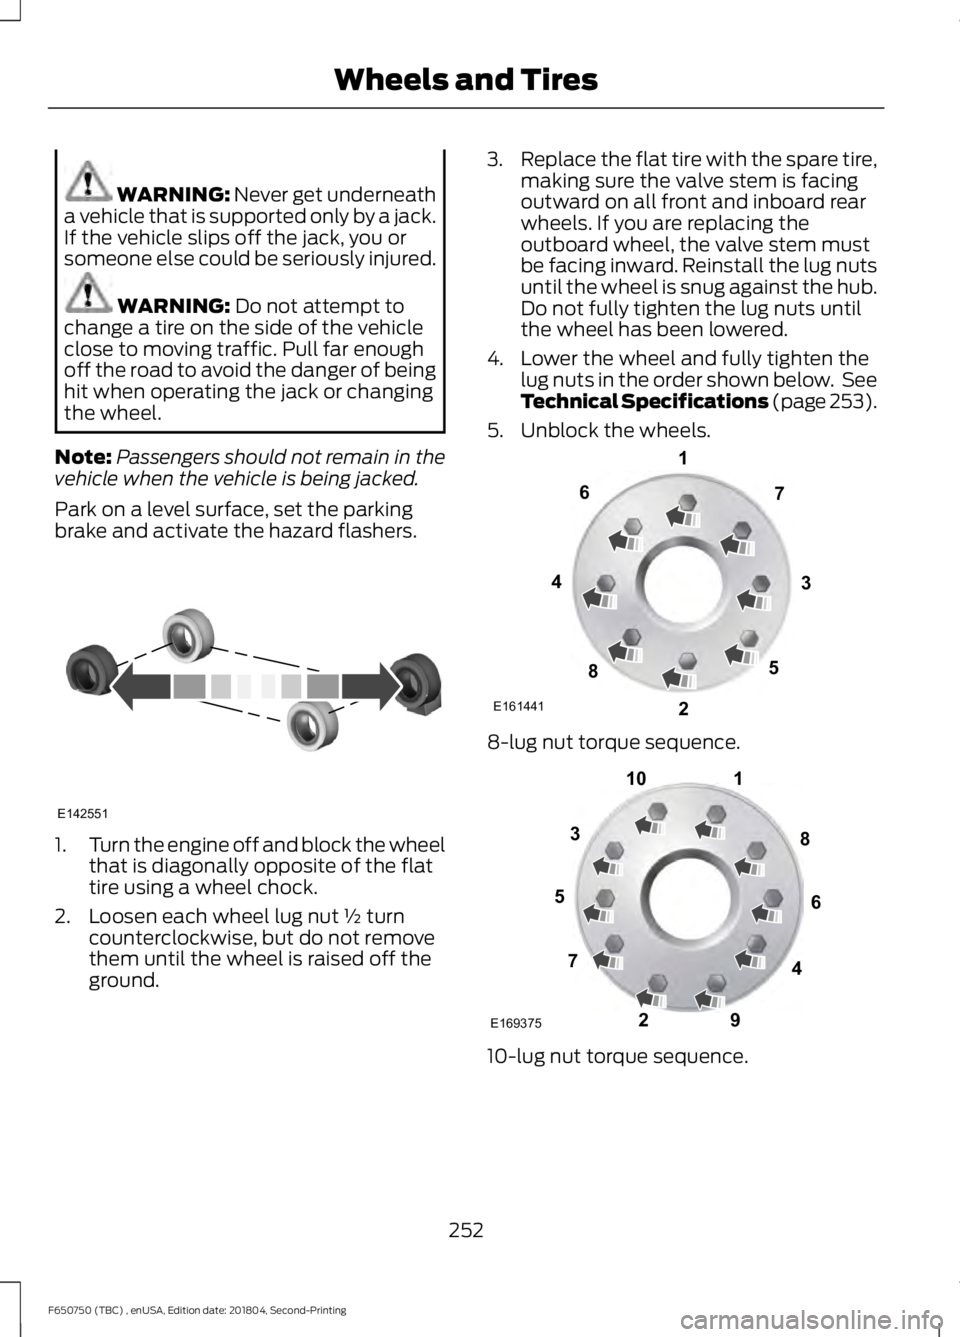
4. Lower the wheel and fully tighten the lug nuts in the order shown below. See
Technical Specifications (page 253).
5. Unblock the wheels. 8-lug nut torque sequence.
10-lug nut torque sequence.
252
F650750 (TBC) , enUSA, Edition date: 201804, Second-Printing Wheels and TiresE142551 E161441
13
4
27
6
5
8 1
2
3
4
5
6
7 8
9
10
E169375
Page 256 of 387
TECHNICAL SPECIFICATIONS
Wheel Lug Nut Torque Specifications
WARNING: When you install a wheel, always remove any corrosion, dirt or foreign
materials present on the mounting surfaces of the wheel or the surface of the wheel
hub, brake drum or brake disc that contacts the wheel. Make sure to secure any fasteners
that attach the rotor to the hub so they do not interfere with the mounting surfaces of
the wheel. Installing wheels without correct metal-to-metal contact at the wheel
mounting surfaces can cause the wheel nuts to loosen and the wheel to come off while
your vehicle is in motion, resulting in loss of vehicle control, personal injury or death. lb.ft (Nm)
1
Bolt size
450–500 lb.ft (610–678 Nm)
M22 x 1.5
1 Torque specifications are for nut and bolt threads free of dirt and rust. Use only Ford
recommended replacement fasteners.
On vehicles equipped with single rear wheels, retighten the lug nuts to the specified torque
at 100 miles (160 kilometers) after any wheel disturbance (such as tire rotation, changing
a flat tire, wheel removal).
On vehicles equipped with dual rear wheels, retighten the lug nuts to the specified torque
at 100 miles (160 kilometers) and again at 500 miles (800 kilometers) of new vehicle
operation and after any wheel disturbance (such as tire rotation, changing a flat tire,
wheel removal).
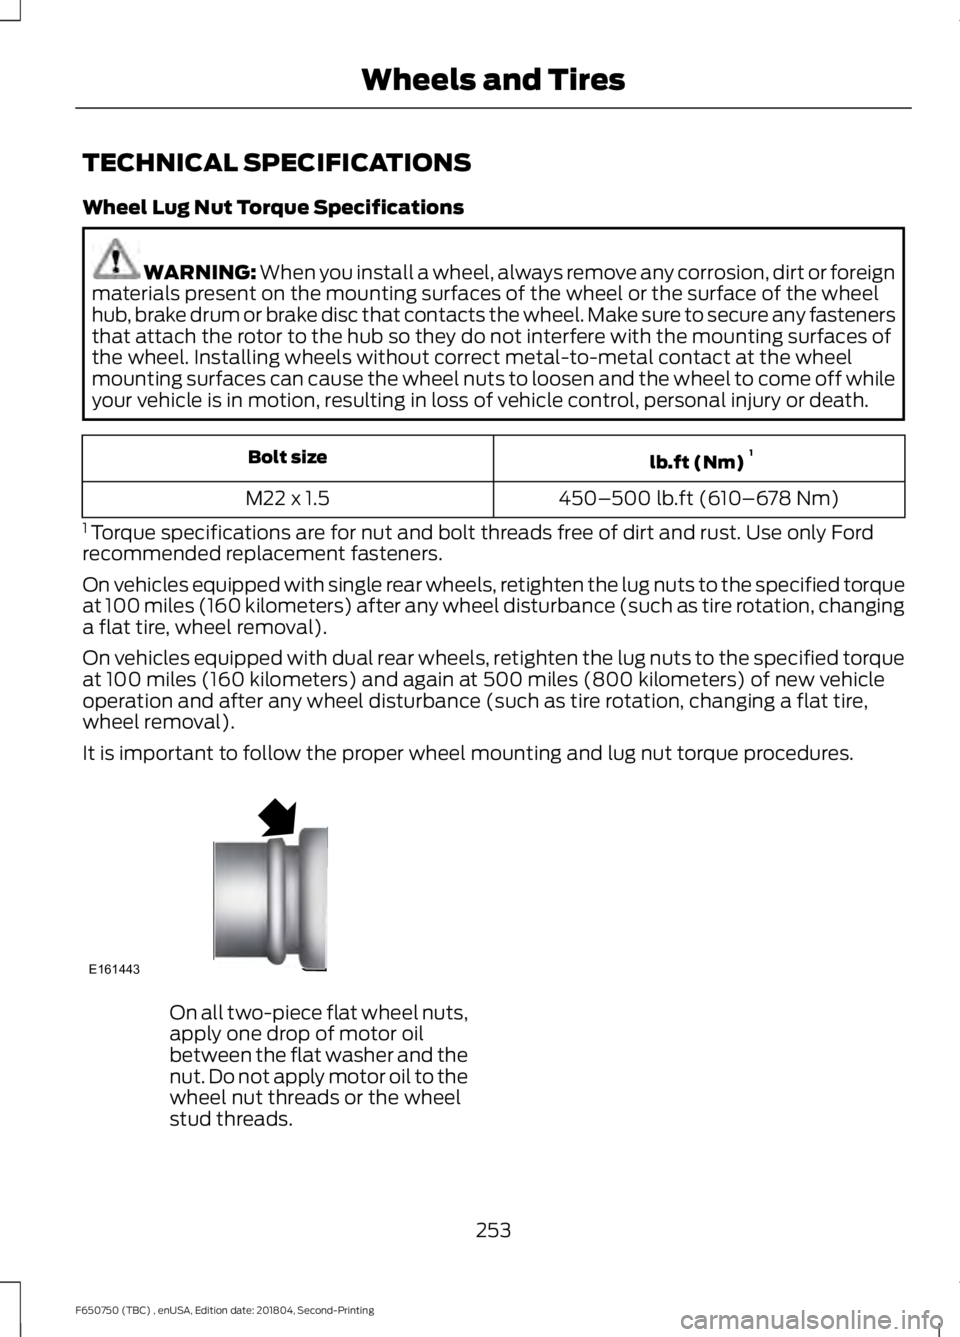
It is important to follow the proper wheel mounting and lug nut torque procedures. On all two-piece flat wheel nuts,
apply one drop of motor oil
between the flat washer and the
nut. Do not apply motor oil to the
wheel nut threads or the wheel
stud threads.
253
F650750 (TBC) , enUSA, Edition date: 201804, Second-Printing Wheels and TiresE161443
Page 328 of 387
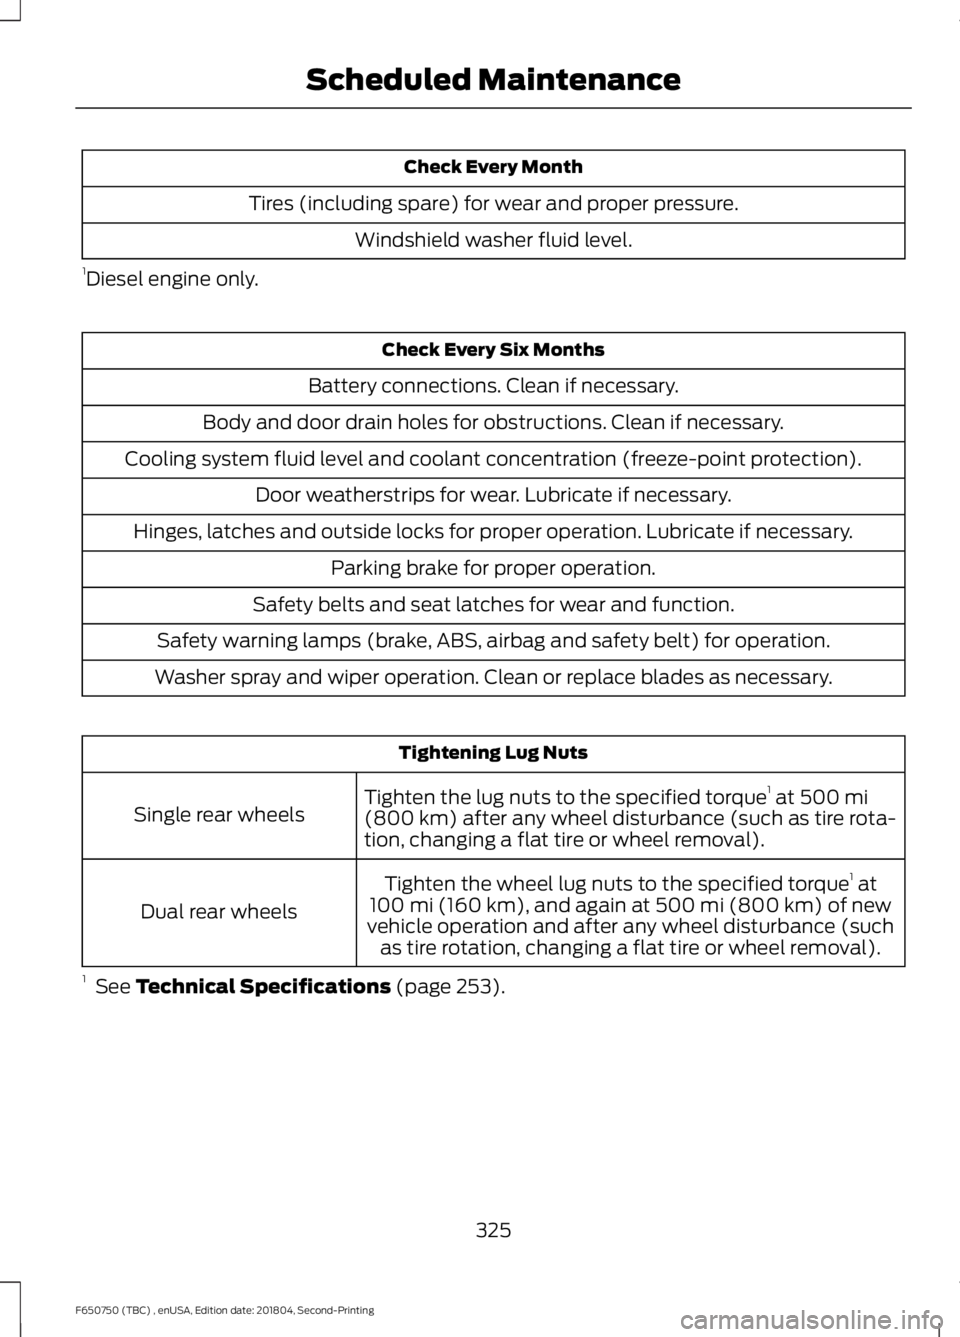
Check Every Month
Tires (including spare) for wear and proper pressure. Windshield washer fluid level.
1 Diesel engine only. Check Every Six Months
Battery connections. Clean if necessary.
Body and door drain holes for obstructions. Clean if necessary.
Cooling system fluid level and coolant concentration (freeze-point protection). Door weatherstrips for wear. Lubricate if necessary.
Hinges, latches and outside locks for proper operation. Lubricate if necessary. Parking brake for proper operation.
Safety belts and seat latches for wear and function.
Safety warning lamps (brake, ABS, airbag and safety belt) for operation.
Washer spray and wiper operation. Clean or replace blades as necessary. Tightening Lug Nuts
Tighten the lug nuts to the specified torque 1
at 500 mi
(800 km) after any wheel disturbance (such as tire rota-
tion, changing a flat tire or wheel removal).
Single rear wheels
Tighten the wheel lug nuts to the specified torque 1
at
100 mi (160 km)
, and again at 500 mi (800 km) of new
vehicle operation and after any wheel disturbance (such as tire rotation, changing a flat tire or wheel removal).
Dual rear wheels
1 See
Technical Specifications (page 253).
325
F650750 (TBC) , enUSA, Edition date: 201804, Second-Printing Scheduled Maintenance
Page 385 of 387
Selective Catalytic Reductant System -
Diesel.............................................................105
Contaminated Diesel Exhaust Fluid or Inoperative Selective Catalytic Reduction
System.............................................................. 109
Diesel Exhaust Fluid Guidelines and Information...................................................... 108
Diesel Exhaust Fluid Level.............................. 105
Diesel Exhaust Fluid Warning Messages and Vehicle Operations............................... 107
Filling the Diesel Exhaust Fluid Tank..........105
Sitting in the Correct Position....................75
Snow Chains See: Using Snow Chains.................................. 251
Spare Wheel See: Changing a Road Wheel......................... 251
Special Notices................................................14
Fleet Telematics Modem.................................... 14
FordPass Connect................................................. 14
New Vehicle Limited Warranty......................... 14
Special Instructions.............................................. 14
Special Operating Conditions Scheduled Maintenance................................................331
Diesel Engine....................................................... 334
Exceptions............................................................ 339
Gasoline Engines................................................. 331
Speed Control See: Cruise Control............................................ 138
Spring U-Bolt Check...................................228 U-bolt Nut Torque............................................. 228
Stability Control
............................................135
Principle of Operation....................................... 135
Starter Switch See: Ignition Switch............................................ 86
Starting a Diesel Engine..............................88 ........................................................................\
............ 88
Cold Weather Starting....................................... 89
Diesel Engine Fast Start Glow Plug System................................................................ 88
Starting a Gasoline Engine.........................87 Failure to Start....................................................... 87
Guarding Against Exhaust Fumes.................. 87
Important Ventilating Information................88
Stopping the Engine When Your Vehicle is Moving................................................................. 87
Stopping the Engine When Your Vehicle is Stationary........................................................... 87Starting and Stopping the Engine...........86
General Information........................................... 86
Steering............................................................140
Steering System Inspection.....................226 Hydraulic System............................................... 226
Steering Column Joint Bolts.......................... 226
Steering Wheel
...............................................46
Storage Compartments..............................85
Sun Visors.........................................................55 Slide-on-rod........................................................... 55
Suspension System Inspection
..............227
Switching Off the Engine............................89
Symbols Glossary...........................................10
SYNC™............................................................287
General Information.......................................... 287
SYNC™ Troubleshooting
...........................312
T
Technical Specifications See: Capacities and Specifications............255
The Better Business Bureau (BBB) Auto Line Program (U.S. Only)........................162
Tire Care
..........................................................236
Glossary of Tire Terminology......................... 236
Information Contained on the Tire Sidewall............................................................ 236
Tires See: Wheels and Tires..................................... 236
Towing a Trailer
.............................................144
Load Placement................................................. 144
Towing..............................................................144
Traction Control
............................................133
Principle of Operation....................................... 133
Trailer Brakes
..................................................129
Trailer Air Supply and Parking Brake
Modular Controls........................................... 129
Trailer Brake Hand Control.............................. 129
Transmission Code Designation............260
Transmission...................................................115
Transporting the Vehicle
...........................158
U
Under Hood Overview - 6.7L Diesel
.............................................................190
Under Hood Overview - 6.8L....................191
USB Port
.........................................................285
382
F650750 (TBC) , enUSA, Edition date: 201804, Second-Printing Index