headlamp FORD F650/750 2021 User Guide
[x] Cancel search | Manufacturer: FORD, Model Year: 2021, Model line: F650/750, Model: FORD F650/750 2021Pages: 390, PDF Size: 5.16 MB
Page 97 of 390
III (start) - Cranks the engine.
STARTING A GASOLINE
ENGINE
(IF EQUIPPED)
When you start the engine, the idle speed
increases, this helps to warm up the
engine. If the engine idle speed does not
slow down automatically, have your
vehicle checked by an authorized dealer.
Before starting the engine check the
following:
• Make sure all occupants have fastened
their safety belts.
• Make sure the headlamps and
electrical accessories are off.
• Make sure the parking brake is on.
• Make sure the transmission is in park
(P) or neutral (N).
• Turn the ignition key to the on position.
Note: Do not touch the accelerator pedal.
1. Fully press the brake pedal.
2. Turn the key to the start position to start the engine. Release the key when
the engine starts.
Note: The engine may continue cranking
for up to 15 seconds or until it starts.
Note: If you cannot start the engine on the
first try, wait for a short period and try again.
Failure to Start
If you cannot start the engine after three
attempts, wait 10 seconds and follow this
procedure:
1. Fully press the brake pedal.
2. Fully press the accelerator pedal and hold it there.
3. Start the engine. Stopping the Engine When Your
Vehicle is Stationary
1. Shift into park (P) or neutral (N).
2. Turn the key to the off position.
3. Apply the parking brake.
Stopping the Engine When Your
Vehicle is Moving
WARNING:
Switching off the
engine when the vehicle is still moving
will result in a loss of brake and steering
assistance. The steering will not lock, but
higher effort will be required. When the
ignition is switched off, some electrical
circuits, including air bags, warning lamps
and indicators may also be off. If the
ignition was turned off accidentally, you
can shift into neutral (N) and re-start the
engine.
1. Put the transmission into neutral (N) and use the brakes to bring your vehicle
to a safe stop.
2. When your vehicle has stopped, shift into park (P) or neutral (N) and switch
the ignition off.
3. Apply the parking brake.
Guarding Against Exhaust Fumes WARNING:
If you smell exhaust
fumes inside your vehicle, have your
vehicle checked by your authorized
dealer immediately. Do not drive your
vehicle if you smell exhaust fumes.
Carbon monoxide is present in exhaust
fumes. Take precautions to avoid its
dangerous effects.
94
F650750 (TBC) , enUSA, Edition date: 202010, Second-Printing Starting and Stopping the Engine
Page 98 of 390
Important Ventilating Information
If you stop your vehicle and then leave the
engine idling for long periods of time, we
recommend that you do one of the
following:
•
Open the windows at least 1 in (3 cm).
• Set your climate control to outside air.
STARTING A DIESEL ENGINE (IF
EQUIPPED)
Read all starting instructions carefully
before you start your vehicle.
Diesel Engine Fast Start Glow Plug
System
The diesel engine glow system consists of:
• Eight glow plugs (one per cylinder)
• Glow Plug Control Module
• Engine Coolant Temperature sensor
• Barometric pressure sensor
• Environmental temperature sensor
The powertrain and glow plug control
modules electronically control the glow
plug system. After you switch the ignition
on the glow plug control module
immediately energizes the glow plugs. The
glow plug control module using the engine
coolant temperature, barometric pressure
sensor and environmental temperature
sensor will determine how long the glow
plugs stay energized. The required time for
the glow plugs to be energized decreases
as the coolant temperature, barometric
pressure and environmental temperature
increase. Before starting the engine, check the
following:
•
Make sure all occupants fasten their
seatbelt.
• Make sure the headlamps and
electrical accessories are off.
• Make sure the parking brake is on.
• Make sure the transmission is in park
(P) or neutral (N).
• Turn the ignition key to the on position.
Note: Do not press the accelerator during
starting.
Cold Weather Starting WARNING: Do not use starting
fluid, for example ether, in the air intake
system. Such fluid could cause
immediate explosive damage to the
engine and possible personal injury. WARNING:
Do not mix diesel with
gasoline, gasohol or alcohol. This could
cause an explosion.
We recommend using the engine block
heater for starting when the ambient
temperature is at or below
-9°F (-23°C)
See Engine Block Heater (page 97).
When operating in cold weather, you can
use Motorcraft® cetane improvers or
non-alcohol-based cetane improvers from
a reputable manufacturer as needed.
Do not crank the engine for more than 10
seconds as starter damage may occur. If
the engine fails to start, turn the key to the
off position and wait 30 seconds before
trying again.
95
F650750 (TBC) , enUSA, Edition date: 202010, Second-Printing Starting and Stopping the Engine
Page 162 of 390
Gray: Indicates that the system is
temporarily unable to provide a warning
on the indicated side(s). This may be
because:
• Your vehicle is below the activation
speed.
• The direction indicator is active.
• Your vehicle is in a dynamic maneuver.
• The road has no or poor lane markings
in the camera field-of-view.
• The camera is obscured or unable to
detect the lane markings due to
environmental, traffic or vehicle
conditions. For example, significant sun
angles, shadows, snow, heavy rain or
fog, following a large vehicle that is
blocking or shadowing the lane or poor
headlamp illumination. See Troubleshooting for additional
information.
Green
: Indicates that the system is
available or ready to provide a warning on
the indicated side(s).
Red
: Indicates that the system is providing
or has just provided a lane keeping alert
warning.
You can temporarily disable the system at
any time by doing the following:
• Quick braking.
• Fast acceleration.
• Using your direction indicator.
• Evasive steering maneuver.
• Driving too close to the lane markings.
Troubleshooting Why is the feature not available (line markings are gray) when I can see the lane markings
on the road?
Your vehicle speed is outside the operational range of the feature.
The sun is shining directly into the camera lens.
A quick intentional lane change has occurred.
Your vehicle stays too close to the lane markings.
Driving at high speeds in curves.
The last feature activation occurred a short time ago.
Ambiguous lane markings, for example in construction zones.
Rapid transition from light to dark, or from dark to light.
Sudden offset in lane markings.
ABS or AdvanceTrac ™ is active.
There is a camera blockage due to dirt, grime, fog, frost or water on the windshield.
You are driving too close to the vehicle in front of you.
Transitioning between no lane markings to lane markings or vice versa.
159
F650750 (TBC) , enUSA, Edition date: 202010, Second-Printing Driving Aids
Page 243 of 390
5. Turn the air conditioning (if equipped)
on and allow the engine to idle for at
least one minute.
6. Release the parking brake. With your foot on the brake pedal and with the
air conditioning on, put the vehicle in
drive (D) and allow the engine to idle
for at least one minute.
•If you do not allow the engine to
relearn its idle trim, the idle quality
of your vehicle may be adversely
affected until the idle trim is
eventually relearned.
7. Drive the vehicle to complete the relearning process
•The vehicle may need to be driven
10 mi (16 km) or more to relearn the
idle and fuel trim strategy along
with the ethanol content for flexible
fuel vehicles.
If the battery has been disconnected or a
new battery has been installed, the clock
and radio settings must be reset once the
battery is reconnected.
Always dispose of automotive
batteries in a responsible manner.
Follow your local authorized standards
for disposal. Call your local authorized
recycling center to find out more about
recycling automotive batteries.
Battery Management System (If
Equipped)
The battery management system (BMS)
monitors battery conditions and takes
actions to extend battery life. If excessive
battery drain is detected, the system may
temporarily disable certain electrical
features to protect the battery. Those
electrical accessories affected include the
rear defrost, heated/cooled seats, climate
control fan, heated steering wheel, audio
and navigation system. A message may be
shown in the information displays to alert the driver that battery protection actions
are active. These messages are only for
notification that an action is taking place,
and not intended to indicate an electrical
problem or that the battery requires
replacement.
Electrical accessory installation
To ensure proper operation of the BMS,
any electrical devices that are added to
the vehicle should not have their ground
connection made directly at the negative
battery post. A connection at the negative
battery post can cause inaccurate
measurements of the battery condition
and potential incorrect system operation.
Note:
Electrical or electronic accessories
added to the vehicle by the dealer or the
owner may adversely affect battery
performance and durability, and may also
affect the performance of other electrical
systems in the vehicle.
When a battery replacement is required,
the battery should only be replaced with
a Ford recommended replacement battery
which matches the electrical requirements
of the vehicle. After battery replacement,
or in some cases after charging the battery
with the external charger, the BMS requires
eight hours of vehicle sleep time (key off
with doors closed) to relearn the new
battery state of charge. Prior to relearning
the state of charge, the BMS may disable
electrical features (to protect the battery)
earlier than normal.
ADJUSTING THE HEADLAMPS
Vertical Aim Adjustment
The headlamps on your vehicle are
properly aimed at the assembly plant. If
your vehicle has been in an accident, the
alignment of your headlamps should be
checked by your authorized dealer.
240
F650750 (TBC) , enUSA, Edition date: 202010, Second-Printing Maintenance
Page 244 of 390
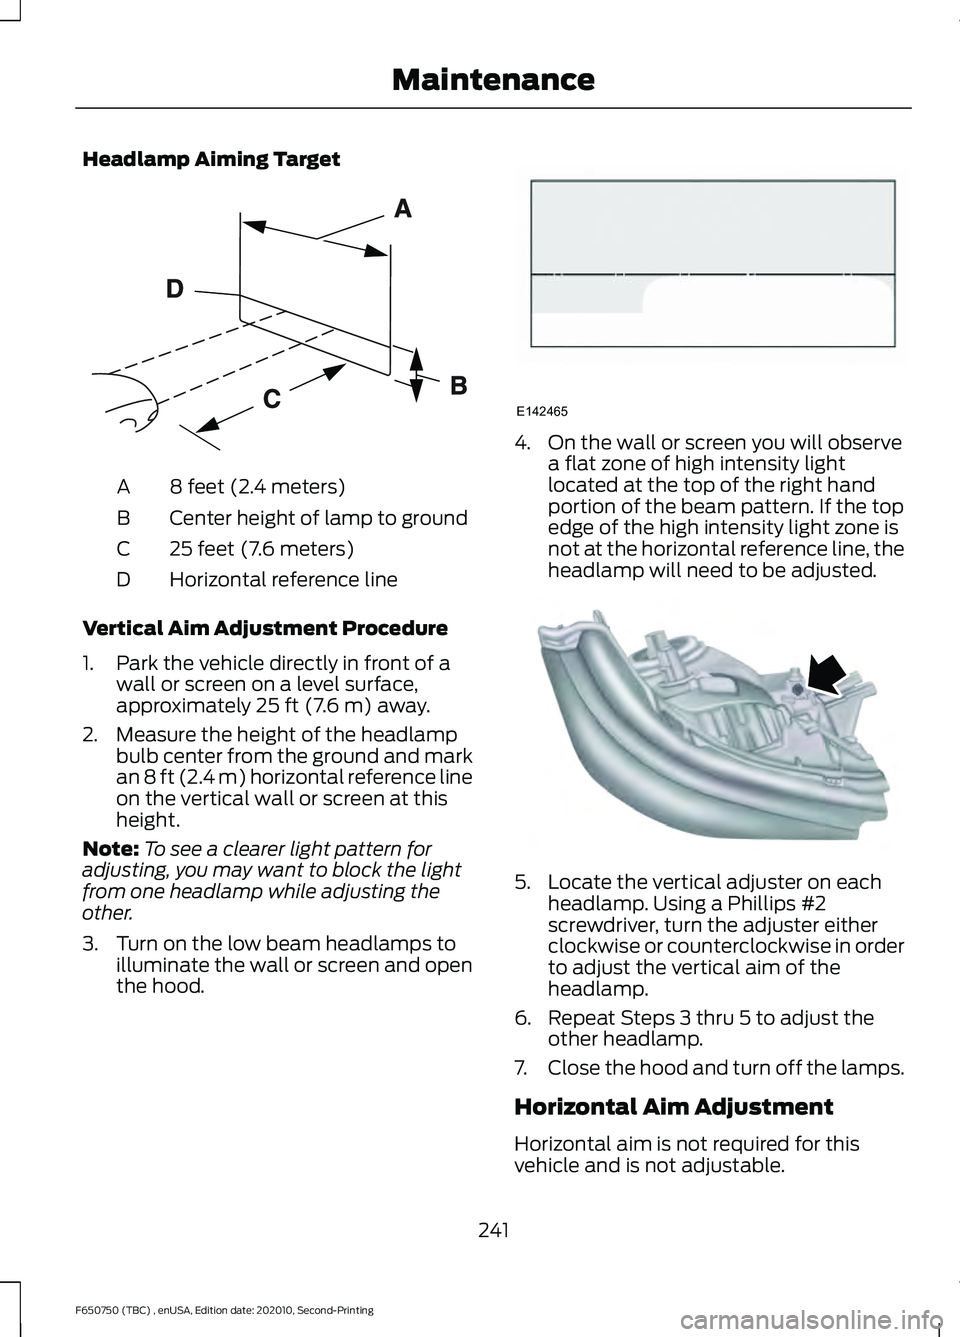
Headlamp Aiming Target
8 feet (2.4 meters)
A
Center height of lamp to ground
B
25 feet (7.6 meters)
C
Horizontal reference line
D
Vertical Aim Adjustment Procedure
1. Park the vehicle directly in front of a wall or screen on a level surface,
approximately 25 ft (7.6 m) away.
2. Measure the height of the headlamp bulb center from the ground and mark
an
8 ft (2.4 m) horizontal reference line
on the vertical wall or screen at this
height.
Note: To see a clearer light pattern for
adjusting, you may want to block the light
from one headlamp while adjusting the
other.
3. Turn on the low beam headlamps to illuminate the wall or screen and open
the hood. 4. On the wall or screen you will observe
a flat zone of high intensity light
located at the top of the right hand
portion of the beam pattern. If the top
edge of the high intensity light zone is
not at the horizontal reference line, the
headlamp will need to be adjusted. 5. Locate the vertical adjuster on each
headlamp. Using a Phillips #2
screwdriver, turn the adjuster either
clockwise or counterclockwise in order
to adjust the vertical aim of the
headlamp.
6. Repeat Steps 3 thru 5 to adjust the other headlamp.
7. Close the hood and turn off the lamps.
Horizontal Aim Adjustment
Horizontal aim is not required for this
vehicle and is not adjustable.
241
F650750 (TBC) , enUSA, Edition date: 202010, Second-Printing MaintenanceE142592 E142465 E163806
Page 246 of 390
Note:
Make sure that the wiper blade locks
into place. Lower the wiper arm and blade
back on the windshield. The wiper arms will
automatically return to their normal position
when you turn the ignition on.
• Replace wiper blades at least once per
year for optimum performance.
• You can improve poor wiper quality by
cleaning the wiper blades and the
windshield.
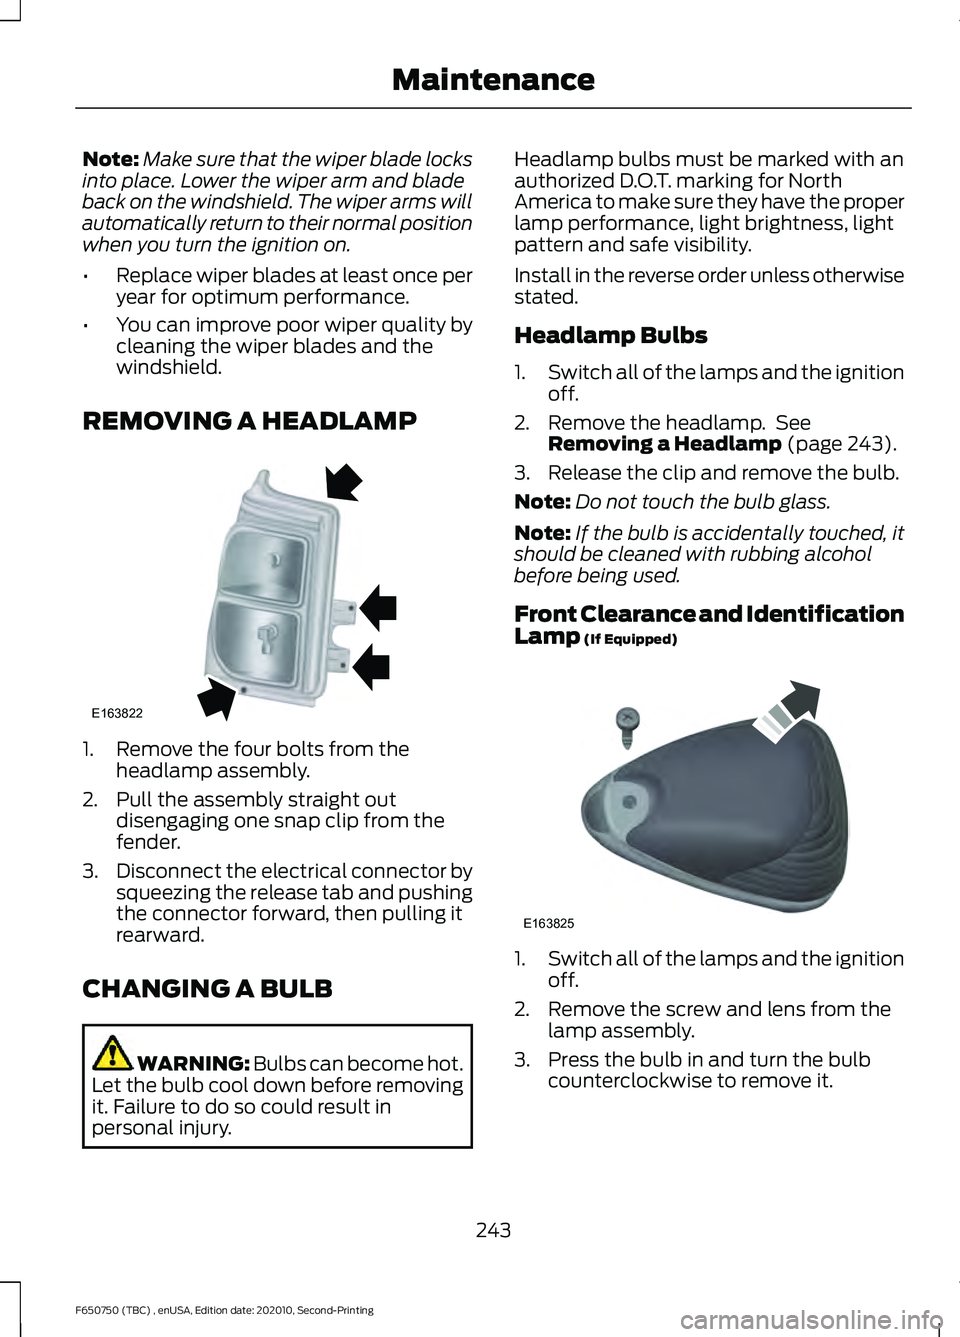
REMOVING A HEADLAMP 1. Remove the four bolts from the
headlamp assembly.
2. Pull the assembly straight out disengaging one snap clip from the
fender.
3. Disconnect the electrical connector by
squeezing the release tab and pushing
the connector forward, then pulling it
rearward.
CHANGING A BULB WARNING: Bulbs can become hot.
Let the bulb cool down before removing
it. Failure to do so could result in
personal injury. Headlamp bulbs must be marked with an
authorized D.O.T. marking for North
America to make sure they have the proper
lamp performance, light brightness, light
pattern and safe visibility.
Install in the reverse order unless otherwise
stated.
Headlamp Bulbs
1.
Switch all of the lamps and the ignition
off.
2. Remove the headlamp. See Removing a Headlamp (page 243).
3. Release the clip and remove the bulb.
Note: Do not touch the bulb glass.
Note: If the bulb is accidentally touched, it
should be cleaned with rubbing alcohol
before being used.
Front Clearance and Identification
Lamp
(If Equipped) 1.
Switch all of the lamps and the ignition
off.
2. Remove the screw and lens from the lamp assembly.
3. Press the bulb in and turn the bulb counterclockwise to remove it.
243
F650750 (TBC) , enUSA, Edition date: 202010, Second-Printing MaintenanceE163822 E163825
Page 259 of 390
CLEANING THE EXTERIOR
Wash your vehicle regularly with cool or
lukewarm water and a neutral pH
shampoo, we recommend Motorcraft
Detail Wash.
•
Never use strong household detergents
or soap, for example dish washing or
laundry liquid. These products can
discolor and spot painted surfaces.
• Never wash your vehicle when it is hot
to the touch, or during strong or direct
sunlight.
• Dry your vehicle with a chamois or soft
terry cloth towel to eliminate water
spotting.
• Immediately remove fuel spillages, bird
droppings, insect deposits and road tar.
These may cause damage to your
vehicle ’s paintwork or trim over time.
We recommend Motorcraft Bug and
Tar Remover.
• Remove any exterior accessories, for
example antennas, before entering a
car wash.
• When filling with AdBlue®, remove any
residue on painted surfaces
immediately.
Note: Suntan lotions and insect repellents
can damage painted surfaces. If these
substances come in contact with your
vehicle, wash the affected area as soon as
possible.
Cleaning the Headlamps
Note: Do not scrape the headlamp lenses
or use abrasives, alcoholic solvents or
chemical solvents to clean them.
Note: Do not wipe the headlamps when
they are dry. Exterior Chrome Parts
•
Apply a high quality-cleaning product
to bumpers and other chrome parts.
Follow the manufacturer ’s instructions.
We recommend Motorcraft Custom
Bright Metal Cleaner.
• Do not apply the cleaning product to
hot surfaces. Do not leave the cleaning
product on chrome surfaces longer
than the time recommended.
• Using non-recommended cleaners can
result in severe and permanent
cosmetic damage.
Note: Never use abrasive materials, for
example steel wool or plastic pads as they
can scratch the chrome surface.
Note: Do not use chrome cleaner, metal
cleaner or polish on wheels or wheel covers.
Exterior Plastic Parts
For routine cleaning we recommend
Motorcraft Detail Wash. If tar or grease
spots are present, we recommend
Motorcraft Bug and Tar Remover.
Stripes or Graphics (If Equipped)
Hand washing your vehicle is preferred
however, pressure washing may be used
under the following conditions:
• Do not use water pressure higher than
2,000 psi (14,000 kPa)
.
• Do not use water hotter than
179°F
(82°C).
• Use a spray with a
40° wide spray
angle pattern.
• Keep the nozzle at a
12 in (305 mm)
distance and 90° angle to your
vehicle's surface.
Note: Holding the pressure washer nozzle
at an angle to the vehicle's surface may
damage graphics and cause the edges to
peel away from the vehicle's surface.
256
F650750 (TBC) , enUSA, Edition date: 202010, Second-Printing Vehicle Care
Page 308 of 390
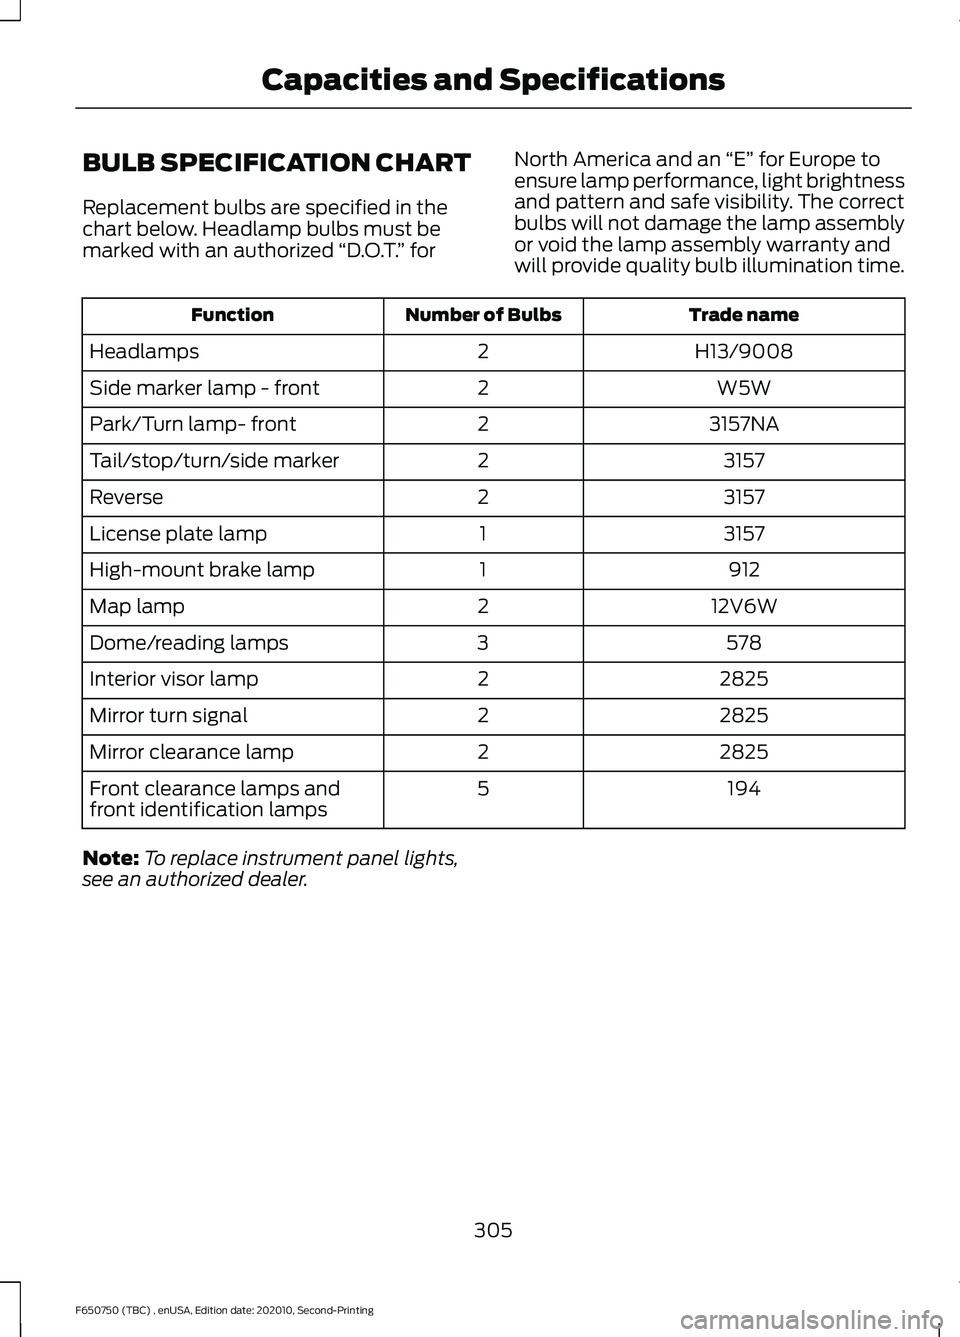
BULB SPECIFICATION CHART
Replacement bulbs are specified in the
chart below. Headlamp bulbs must be
marked with an authorized
“D.O.T.” for North America and an
“E” for Europe to
ensure lamp performance, light brightness
and pattern and safe visibility. The correct
bulbs will not damage the lamp assembly
or void the lamp assembly warranty and
will provide quality bulb illumination time. Trade name
Number of Bulbs
Function
H13/9008
2
Headlamps
W5W
2
Side marker lamp - front
3157NA
2
Park/Turn lamp- front
3157
2
Tail/stop/turn/side marker
3157
2
Reverse
3157
1
License plate lamp
912
1
High-mount brake lamp
12V6W
2
Map lamp
578
3
Dome/reading lamps
2825
2
Interior visor lamp
2825
2
Mirror turn signal
2825
2
Mirror clearance lamp
194
5
Front clearance lamps and
front identification lamps
Note: To replace instrument panel lights,
see an authorized dealer.
305
F650750 (TBC) , enUSA, Edition date: 202010, Second-Printing Capacities and Specifications
Page 380 of 390
2
2-Speed Rear Axle.......................................129
Axle Shifting......................................................... 129
A
A/C See: Climate Control........................................... 79
About This Manual
...........................................7
Diesel Engine Information................................... 8
Minor Troubleshooting Guide............................ 9
Warnings.................................................................... 8
ABS See: Brakes........................................................... 130
ABS driving hints See: Hints on Driving With Anti-Lock
Brakes.................................................................. 131
Accessories.....................................................315
Accessories See: Replacement Parts
Recommendation............................................. 17
ACC See: Using Adaptive Cruise Control............148
Adjusting the Headlamps........................240 Horizontal Aim Adjustment............................ 241
Vertical Aim Adjustment................................ 240
Adjusting the Steering Wheel
....................52
Air Brakes.........................................................135
Air Chamber Stroke Indication...................... 135
Cam Brakes - Automatic Slack Adjusters........................................................... 136
Emergency Air Brake......................................... 136
Air Conditioning See: Climate Control........................................... 79
Air Filter See: Changing the Engine Air Filter - 6.7L
Diesel.................................................................. 221
See: Changing the Engine Air Filter - 7.3L...................................................................... 223
Air Induction System Inspection............247 Chassis-mounted Charge Air Cooler..........247
Air Suspension
..............................................169
Air Suspension Dump Button........................ 169
Connecting and Disconnecting a Trailer with Air Suspension and Air Suspension
Dump Button.................................................. 169
Suspension Conversions................................. 169System Indicator Light.....................................
169
Appendices....................................................348
At a Glance
........................................................22
Audible Warnings and Indicators.............69 Headlamps On Warning Chime..................... 69
Key in Ignition Warning Chime........................ 69
Parking Brake On Warning Chime.................69
Audio System
................................................307
General Information......................................... 307
Audio Unit
.......................................................307
Accessing the Sound Settings..................... 308
Accessing the System Settings................... 308
Adjusting the Volume...................................... 308
Changing Radio Stations............................... 308
Pausing or Playing Media............................... 308
Returning to the Previous Screen...............308
Scrolling Through the Menu Options........308
Selecting a Menu Option............................... 309
Selecting Media................................................. 308
Selecting the Radio.......................................... 309
Setting a Memory Preset............................... 309
Switching the Audio Unit On and Off........309
Using a Cell Phone........................................... 309
Using Seek, Fast Forward and Reverse............................................................. 309
Autolamps........................................................56 Windshield Wiper Activated
Headlamps........................................................ 56
Automatic High Beam Control..................57 Automatic High Beam Indicator..................... 58
Switching the System On and Off.................57
Automatic Transmission............................122 Brake-Shift Interlock......................................... 125
If Your Vehicle Gets Stuck in Mud or Snow................................................................... 126
Progressive Range Selection - PRS.............125
Understanding the Shift Positions of a 6– Speed Automatic Transmission.........122
Understanding Your SelectShift™ Automatic Transmission............................. 123
Automatic Transmission Fluid Check............................................................236
Transmission Fluid Level................................. 236
Auxiliary Power Points
.................................89
110 Volt AC Power Point.................................... 89
12 Volt DC Power Point...................................... 89
Locations................................................................ 89
377
F650750 (TBC) , enUSA, Edition date: 202010, Second-Printing Index
Page 381 of 390
Auxiliary Switches........................................315
Upfitter Interface Module................................ 316
Axle Inspection..............................................251
Front Axle............................................................... 251
B
Battery See: Changing the 12V Battery..................... 239
Bonnet Lock See: Opening and Closing the Hood...........213
Booster Seats
..................................................32
Types of Booster Seats...................................... 33
Brake Fluid Check.........................................237 Brake Fluid Service Interval............................ 238
Brakes...............................................................130 General Information.......................................... 130
Brake System Inspection..........................248 Air Brakes.............................................................. 249
Driveline Parking Brake..................................... 251
Hydraulic Brakes................................................ 250
Breaking-In......................................................179
Bulb Specification Chart
..........................305
C
Canceling the Set Speed...........................155
Capacities and Specifications - 6.7L Diesel
............................................................288
Air Conditioning System................................. 288
Alternative Engine Oil for Biodiesel Fuel Blends (B20 Max)......................................... 291
Alternative Engine Oil for Extremely Cold Climates............................................................ 291
Alternative Engine Oil for Severe Duty Service............................................................... 292
Alternative Rear Axle Fluid for Severe Duty Service.............................................................. 296
Automatic Transmission................................ 288
Diesel Exhaust Fluid (DEF) Tank.................293
Engine Coolant................................................... 289
Engine Oil............................................................. 290
Front Wheel Bearing Oil.................................. 295
Fuel Tank............................................................... 292
Grease.................................................................... 293
Hydraulic Brake System.................................. 293
Locks...................................................................... 294
Power Steering System................................... 294Rear Axle...............................................................
295
Washer Reservoir............................................... 296
Capacities and Specifications - 7.3L..................................................................297
Air Conditioning System.................................. 297
Alternative Engine Oil for Extremely Cold Climates.......................................................... 300
Alternative Rear Axle Fluid for Severe Duty Service.............................................................. 304
Automatic Transmission................................ 298
Engine Coolant................................................... 299
Engine Oil............................................................. 299
Front Wheel Bearing Oil.................................. 303
Fuel Tank............................................................... 301
Grease..................................................................... 301
Hydraulic Brake System................................... 301
Locks...................................................................... 302
Power Steering System................................... 302
Rear Axle............................................................... 303
Washer Reservoir.............................................. 304
Capacities and Specifications
.................281
Car Wash See: Cleaning the Exterior.............................. 256
Catalytic Converter
.......................................110
On-Board Diagnostics (OBD-II)...................... 111
Readiness for Inspection and Maintenance (I/M) Testing...................................................... 111
Changing a Bulb
...........................................243
Brake Lamp, Rear Lamp, Rear Direction
Indicator, License Plate Lamp and
Reverse Lamp................................................ 244
Front Clearance and Identification Lamp.................................................................. 243
Headlamp Bulbs................................................ 243
Changing a Fuse...........................................201 Fuses....................................................................... 201
Changing a Road Wheel............................277 Tire Change Procedure..................................... 277
Changing the 12V Battery.........................239 Battery Management System (If
Equipped)....................................................... 240
Changing the Engine Air Filter - 6.7L Diesel..............................................................221
Air Filter Replacement...................................... 222
Air Filter Restriction Gauge.............................. 221
Changing the Engine Air Filter - 7.3L..................................................................223
378
F650750 (TBC) , enUSA, Edition date: 202010, Second-Printing Index