brake fluid FORD F650/750 2021 Owner's Manual
[x] Cancel search | Manufacturer: FORD, Model Year: 2021, Model line: F650/750, Model: FORD F650/750 2021Pages: 390, PDF Size: 5.16 MB
Page 241 of 390
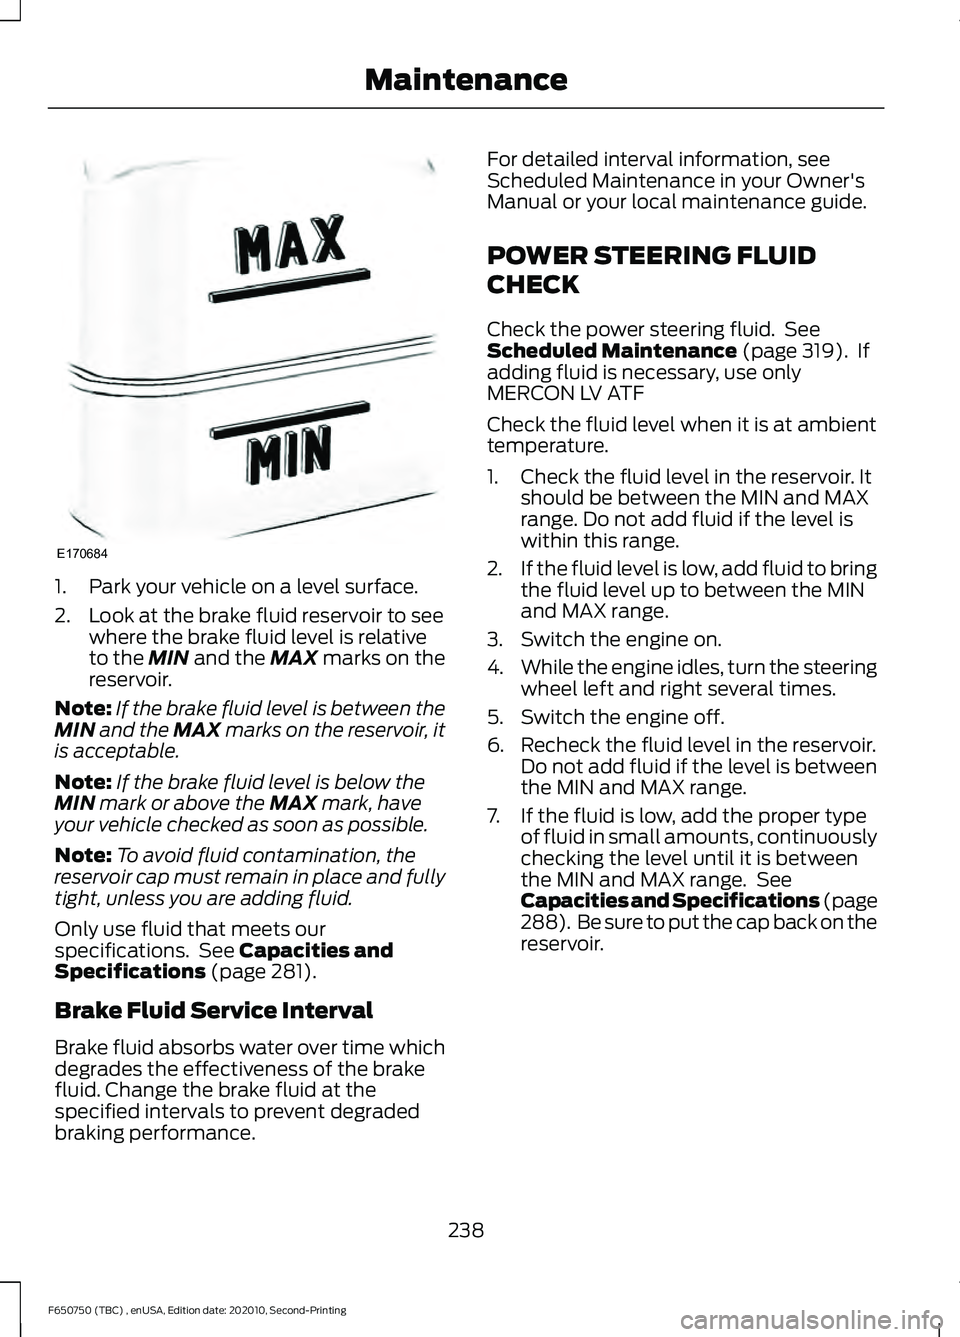
1. Park your vehicle on a level surface.
2. Look at the brake fluid reservoir to see
where the brake fluid level is relative
to the MIN and the MAX marks on the
reservoir.
Note: If the brake fluid level is between the
MIN
and the MAX marks on the reservoir, it
is acceptable.
Note: If the brake fluid level is below the
MIN
mark or above the MAX mark, have
your vehicle checked as soon as possible.
Note: To avoid fluid contamination, the
reservoir cap must remain in place and fully
tight, unless you are adding fluid.
Only use fluid that meets our
specifications. See
Capacities and
Specifications (page 281).
Brake Fluid Service Interval
Brake fluid absorbs water over time which
degrades the effectiveness of the brake
fluid. Change the brake fluid at the
specified intervals to prevent degraded
braking performance. For detailed interval information, see
Scheduled Maintenance in your Owner's
Manual or your local maintenance guide.
POWER STEERING FLUID
CHECK
Check the power steering fluid. See
Scheduled Maintenance
(page 319). If
adding fluid is necessary, use only
MERCON LV ATF
Check the fluid level when it is at ambient
temperature.
1. Check the fluid level in the reservoir. It should be between the MIN and MAX
range. Do not add fluid if the level is
within this range.
2. If the fluid level is low, add fluid to bring
the fluid level up to between the MIN
and MAX range.
3. Switch the engine on.
4. While the engine idles, turn the steering
wheel left and right several times.
5. Switch the engine off.
6. Recheck the fluid level in the reservoir. Do not add fluid if the level is between
the MIN and MAX range.
7. If the fluid is low, add the proper type of fluid in small amounts, continuously
checking the level until it is between
the MIN and MAX range. See
Capacities and Specifications (page
288). Be sure to put the cap back on the
reservoir.
238
F650750 (TBC) , enUSA, Edition date: 202010, Second-Printing MaintenanceE170684
Page 253 of 390

Air Dryer
Climactic conditions affect performance
of desiccant or after-cooler type air dryers.
You must establish a maintenance
schedule for each specific operation.
The use of an air dryer on a vehicle does
not eliminate the need to drain the air
reservoirs periodically.
Inspect for moisture in the air system by
opening reservoirs, draincocks or valves
and checking for presence of water. The
presence of small amounts of water due
to condensation is normal and is not an
indication that the dryer is not functioning
properly.
Replace or rebuild the desiccant cartridge
when you determine that the desiccant is
contaminated and does not have adequate
water absorption capacity. The desiccant
change interval may vary. A general
recommendation is to replace the
desiccant every 12 months (yearly). If
experience has shown that extended or
shortened life has resulted for a particular
installation, then the yearly interval can be
increased or decreased accordingly.
Draining the Air Brake Reservoir
WARNING: Failure to drain air
brake reservoirs can result in a reduction
or loss of braking ability due to fluid
accumulation in the reservoir and/or
possible freeze-up during cold weather.
Completely drain all the air brake reservoirs
daily by opening the draincock at the ends
of the tanks. (Where accessible.
Pull-chains are used when the drains are
undercab or otherwise inaccessible.) Close
the draincock after draining. Manually drain any air tanks equipped with automatic
moisture ejector valves, as required, to
maintain a dry air system. Contact an
authorized dealer if you are unsure of the
air reservoir locations or the draining
procedure.
Hydraulic Brakes
Establish a regular schedule for periodic
cleaning, lubrication and adjustment
inspection based on vehicle use. Exact
maintenance intervals are difficult to
predetermine due to vehicle applications
and operating conditions. If you are
uncertain of the proper schedule for your
vehicle, contact an authorized dealer.
Regular inspections should include:
•
Checking the brake lining (every service
interval). Establish inspection intervals
that provide for lining replacement
before damage to the disc occurs.
Excessive lining wear may expose the
backing plate to the disc causing
scoring of the disc faces. A qualified
technician should perform this
250
F650750 (TBC) , enUSA, Edition date: 202010, Second-Printing Maintenance
Page 254 of 390
inspection and keep to instructions
provided by the service manual.
Hydraulic brake systems are
power-assisted. There is a great
reduction in braking capabilities
without engine assist.
• Proper fluid level. The level should be
at the bottom edge of the ring on each
reservoir fill port. Do not fill the master
cylinder to the top of the reservoir. If
fluid level requires attention to
maintain a proper master cylinder level,
this is an indication of either severe
operation (pad wear) or fluid leakage.
A more frequent and thorough brake
inspection is required.
• Brake lines, hoses and fittings. Repair
or replace brake line tubes, hoses or
fittings as required. Inspect these
components every 4,000 mi
(6,000 km) for the following.
• Lines for kinks, dents, corrosion or
rupture.
• Hoses for abrasions, kinks, soft
spots or rupture, collapse, cracks,
twists or loose frame supports.
When replacing a hose, be sure
there is adequate clearance to the
hose to avoid an abrasion to the
new hose.
• All connections for leaks.
Driveline Parking Brake WARNING: Use wheel chocks and
exercise caution when inspecting under
the vehicle. A vehicle roll-away could
result in property damage, personal injury
or death.
A qualified technician should adjust the
parking brake and keep to the instructions
in the service manual. AXLE INSPECTION
Front Axle
Maintaining the front axle alignment to
specifications is very important. A qualified
technician should check and maintain the
alignment.
Regular inspections should include:
•
Toe-in inspection and adjustment (if
necessary), particularly with radial
tires.
• Checking for proper tightness of axle
mounting U-bolt nuts, attaching or
mounting bolts and nuts.
• Checking the axle for damage, binding,
worn parts and adequate lubrication.
• Checking the kingpins for excessive
wear. Also, perform this check during
other scheduled maintenance, for
example as tire rotation or service,
wheel bearing service and alignment.
See the workshop manual for proper
procedures.
Toe-in
It is essential to maintain correct toe-in
and tire pressure for optimum tire wear.
Inspecting steer axle tires in the first
3,000– 10,000 mi (5,000– 16,000 km)
generally shows if tires are wearing
normally.
Rapid outside shoulder wear on both tires
indicates too much toe-in.
Rapid inside shoulder wear on both tires
indicates too much toe-out.
In P&D-type service, there can be a
left-to-right steer tire tread life differential
up to 40% depending on routes and other
variables.
251
F650750 (TBC) , enUSA, Edition date: 202010, Second-Printing Maintenance
Page 256 of 390

•
For proper suspension alignment.
Maintain proper alignment at all times.
• U-bolts. After the chassis has been
operating under load for 1,000 mi
(1,600 km) or six months (whichever
comes first), the U-bolt nuts must be
re-torqued. Re-torque the U-bolt nuts
every
37,000 mi (60,000 km)
thereafter. Clean and lubricate the
U-bolt and nut threads and seats to
make sure a like new condition when
re-torqueing. See
Spring U-Bolt
Check (page 253).
FRAME AND TOW HOOK
INSPECTION
Your vehicle's chassis is manufactured
with frame rails of either HSLA steel or
heat-treated steel. Handle each in a
specific manner to make sure maximum
service life. Consult the service manual or
an authorized dealer before attempting
frame repair or modification.
It is important, particularly on vehicles that
use tow hooks frequently, to inspect the
front and rear tow hooks for damage or a
loose mounting.
REAR AXLE FLUID CHECK
Your rear axle may have an optional
synthetic lubricant that allows the use of
extended service intervals. A tag on the
filler plug identifies the use of the synthetic
lubricant.
Only use a lubricant that meets
manufacturer specifications. Use of a
non-approved rear axle lubricant may
cause internal axle component damage.
See
Capacities and Specifications
(page 288).
Checking the Fluid Level
1. Park your vehicle on level ground. 2. Set the parking brake and shift into
position neutral (N) or park (P). Turn
the engine off.
3. Clean any dirt from around the axle filler plug.
4. Remove the filler plug and inspect the lubricant level. It should be at the
bottom of the filler plug opening.
5. Add lubricant, if necessary, through the
filler plug opening.
6. Clean and install the filler plug securely.
Changing the Fluid
Note: Drain the rear axle while the lubricant
is warm.
1. Park your vehicle on level ground.
2. Set the parking brake and shift into position neutral (N) or park (P). Turn
the engine off.
3. Clean any dirt from around the axle filler and drain plugs.
4. Remove the filler and drain plugs. Drain
the lubricant into a suitable container.
Dispose of all used automotive fluids
in a responsible manner following your
local authorized standards.
5. Clean and install the drain plug securely.
6. Add lubricant through the filler plug opening.
7. Clean and install the filler plug securely.
SPRING U-BOLT CHECK
Check and tighten the U-bolt nuts after
your vehicle has been operated under load
for
1,000 mi (1,600 km) or six months,
whichever occurs first.
Check and tighten the U-bolt nuts every
37,000 mi (60,000 km)
.
Check and tighten the U-bolt nuts with
your vehicle at curb height and unloaded.
253
F650750 (TBC) , enUSA, Edition date: 202010, Second-Printing Maintenance
Page 263 of 390

Note:
Using non-recommended cleaners,
harsh cleaning products, chrome wheel
cleaners or abrasive materials could
damage wheel rims and covers.
VEHICLE STORAGE
If you plan on storing your vehicle for 30
days or more, read the following
maintenance recommendations to make
sure your vehicle stays in good operating
condition.
We engineer and test all motor vehicles
and their components for reliable, regular
driving. Under various conditions,
long-term storage may lead to degraded
engine performance or failure unless you
use specific precautions to preserve engine
components.
General
• Store all vehicles in a dry, ventilated
place.
• Protect from sunlight, if possible.
• If vehicles are stored outside, they
require regular maintenance to protect
against rust and damage.
Body
• Wash your vehicle thoroughly to
remove dirt, grease, oil, tar or mud from
exterior surfaces, rear-wheel housing
and the underside of front fenders.
• Periodically wash your vehicle if it is
stored in exposed locations.
• Touch-up exposed or primed metal to
prevent rust.
• Cover chrome and stainless steel parts
with a thick coat of auto wax to prevent
discoloration. Re-wax as necessary
when you wash your vehicle.
• Lubricate all hood, door and luggage
compartment hinges and latches with
a light grade oil. •
Cover interior trim to prevent fading.
• Keep all rubber parts free from oil and
solvents.
Engine
• Change the engine oil and filter prior to
storage because used engine oil
contains contaminates which may
cause engine damage.
• Start the engine every 15 days for a
minimum of 15 minutes. Run at fast
idle with the climate controls set to
defrost until the engine reaches normal
operating temperature.
• With your foot on the brake, shift
through all the gears while the engine
is running.
• We recommend that you change the
engine oil before you use your vehicle
again.
Fuel system
• Fill the fuel tank with high-quality fuel
until the first automatic shutoff of the
fuel pump nozzle.
Cooling system
• Protect against freezing temperatures.
• When removing your vehicle from
storage, check coolant fluid level.
Confirm that there are no cooling
system leaks and that fluid is at the
recommended level.
Disconnecting Your 12 Volt Battery
• Check and recharge as necessary. Keep
connections clean.
• If storing your vehicle for more than 30
days without recharging the battery,
we recommend that you disconnect
the battery cables to maintain battery
charge for quick starting.
260
F650750 (TBC) , enUSA, Edition date: 202010, Second-Printing Vehicle Care
Page 264 of 390

Note:
It is necessary to reset memory
features if you disconnect the battery
cables.
Brakes
• Make sure the brakes and parking brake
release fully.
Tires
• Maintain recommended air pressure.
Miscellaneous
• Make sure all linkages, cables, levers
and pins under your vehicle are covered
with grease to prevent rust.
• Move vehicles at least 25 ft (7.5 m)
every 15 days to lubricate working parts
and prevent corrosion.
Removing Vehicle From Storage
When your vehicle is ready to come out of
storage, do the following:
• Wash your vehicle to remove any dirt
or grease film build-up on window
surfaces.
• Check windshield wipers for any
deterioration.
• Check under the hood for any foreign
material that may have collected
during storage such as mice or squirrel
nests.
• Check the exhaust for any foreign
material that may have collected
during storage.
• Check tire pressures and set tire
inflation per the Tire Label.
• Check brake pedal operation. Drive
your vehicle
15 ft (4.5 m) back and
forth to remove rust build-up. •
Check fluid levels (including coolant,
oil and gas) to make sure there are no
leaks, and fluids are at recommended
levels.
• If you remove the battery, clean the
battery cable ends and check for
damage.
Contact an authorized dealer if you have
any concerns or issues.
261
F650750 (TBC) , enUSA, Edition date: 202010, Second-Printing Vehicle Care
Page 291 of 390

CAPACITIES AND
SPECIFICATIONS - 6.7L DIESEL
Use oil and fluid that meets the defined
specification and viscosity grade.
If you do not use oil and fluid that meets
the defined specification and viscosity
grade, it could result in:
•
Component damage that your vehicle
warranty does not cover.
• Longer engine cranking periods.
• Increased emission levels.
• Reduced engine performance. •
Reduced fuel economy.
• Reduced brake performance.
Note: We recommend an engine block
heater at temperatures below – 10°F
(– 23°C).
Air Conditioning System WARNING: The air conditioning
refrigerant system contains refrigerant
under high pressure. Only qualified
personnel should service the air
conditioning refrigerant system. Opening
the air conditioning refrigerant system
can cause personal injury.
Capacities Refrigerant Oil
Refrigerant
Variant
3.38 fl oz (100 ml)
26.49 oz (0.751 kg)
All.
Materials Specification
Name
WSH-M17B19-A
Motorcraft® R-134a Refrigerant(U.S.)
R-134a Refrigerant / Frigorigène R-134a(Canada)
YN-19(U.S.)
CYN-19-R(Canada)
WSH-M1C231-B
Motorcraft® PAG Refrigerant Compressor Oil(U.S.)
Motorcraft® PAG Refrigerant Compressor Oil / Huile
PAG pour compresseur frigorifique Motor-
craft®(Canada)
YN-12-D(U.S. & Canada)
Automatic Transmission
Note: Only use MERCON LV transmission
fluid for automatic transmissions that
require MERCON LV transmission fluid. The
use of any other fluid could cause
transmission damage.
288
F650750 (TBC) , enUSA, Edition date: 202010, Second-Printing Capacities and Specifications
Page 296 of 390

Diesel Exhaust Fluid (DEF) Tank
Capacities
Quantity
Variant
8.0 gal (30.2 L)
All.
Materials Specification
Name
WSS-M99C130-A
Motorcraft® Diesel Exhaust Fluid(U.S.)
Motorcraft® Diesel Exhaust Fluid / Fluide pour
échappement diesel Motorcraft®(Canada)
PM-27-GAL,PM-27-JUG(U.S.)
CPM-27-J(Canada)
Grease
Materials Specification
Name
ESA-M1C75-B
Motorcraft® Premium Long-Life Grease(U.S.)
Motorcraft® Premium Long-Life Grease / Graisse
longue durée de qualité première Motor-
craft®(Canada)
XG-1-E1(U.S. & Canada)
ESB-M1C93-B
Motorcraft® Multi-Purpose Grease Spray(U.S.)
Motorcraft® Multi-Purpose Grease Spray / Graisse
tout usage en aérosol Motorcraft®(Canada)
XL-5-A(U.S. & Canada)
Hydraulic Brake System
Note: We recommend using DOT 5.1 Motor
Vehicle Brake Fluid or equivalent meeting
WSS-M6C65-A3. Use of any fluid other than
the recommended fluid could cause
reduced brake performance and not meet
our performance standards. Keep brake fluid
clean and dry. Contamination with dirt,
water, petroleum products or other
materials could result in brake system
damage and possible failure.
293
F650750 (TBC) , enUSA, Edition date: 202010, Second-Printing Capacities and Specifications
Page 297 of 390

Materials
Specification
Name
WSS-M6C65-A3
Motorcraft® DOT 5.1 Motor Vehicle Brake Fluid(U.S.)
Motorcraft® DOT 5.1 Motor Vehicle Brake Fluid /
Liquide de frein automobile DOT 5.1 Motor-
craft®(Canada)
PM-21(U.S. & Canada)
Power Steering System
Capacities Quantity
Variant
5.2 qt (4.9 L)
With air brakes.
6.1 qt (5.8 L)
With hydraulic brakes.
Materials Specification
Name
WSS-M2C938-AMERCON® LV,
Motorcraft® MERCON® LV Automatic Transmission
Fluid(U.S.)
Motorcraft® MERCON® LV Automatic Transmission
Fluid / Huile pour boîte automatique MERCON® LV
Motorcraft®(Canada)
XT-10-QLVC(U.S.)
CXT-10-LV6(Canada)
Locks
Materials Specification
Name
-
Motorcraft® Penetrating and Lock Lubricant(U.S.)
Motorcraft® Penetrating Fluid / Liquide dégrippant
Motorcraft®(Canada)
XL-1(U.S.)
CXC-51-A(Canada)
294
F650750 (TBC) , enUSA, Edition date: 202010, Second-Printing Capacities and Specifications
Page 300 of 390

Materials
Specification
Name
WSS-M14P19-A
Motorcraft® Premium Windshield Wash Concen-
trate with Bitterant(U.S.)
Motorcraft® Premium Quality Windshield Washer
Fluid / Liquide lave-glace de haute qualité Motor-
craft®(Canada)
ZC-32-B2(U.S.)
CXC-37-A/B/D/F(Canada)
CAPACITIES AND
SPECIFICATIONS - 7.3L
Use oil and fluid that meets the defined
specification and viscosity grade.
If you do not use oil and fluid that meets
the defined specification and viscosity
grade, it could result in:
• Component damage that your vehicle
warranty does not cover.
• Longer engine cranking periods.
• Increased emission levels. •
Reduced engine performance.
• Reduced fuel economy.
• Reduced brake performance.
Air Conditioning System WARNING: The air conditioning
refrigerant system contains refrigerant
under high pressure. Only qualified
personnel should service the air
conditioning refrigerant system. Opening
the air conditioning refrigerant system
can cause personal injury.
Capacities Refrigerant Oil
Refrigerant
Variant
4.06 fl oz (120 ml)
26.46 oz (0.75 kg)
All.
297
F650750 (TBC) , enUSA, Edition date: 202010, Second-Printing Capacities and Specifications