check engine FORD F750 2000 10.G Owner's Manual
[x] Cancel search | Manufacturer: FORD, Model Year: 2000, Model line: F750, Model: FORD F750 2000 10.GPages: 208, PDF Size: 1.08 MB
Page 145 of 208
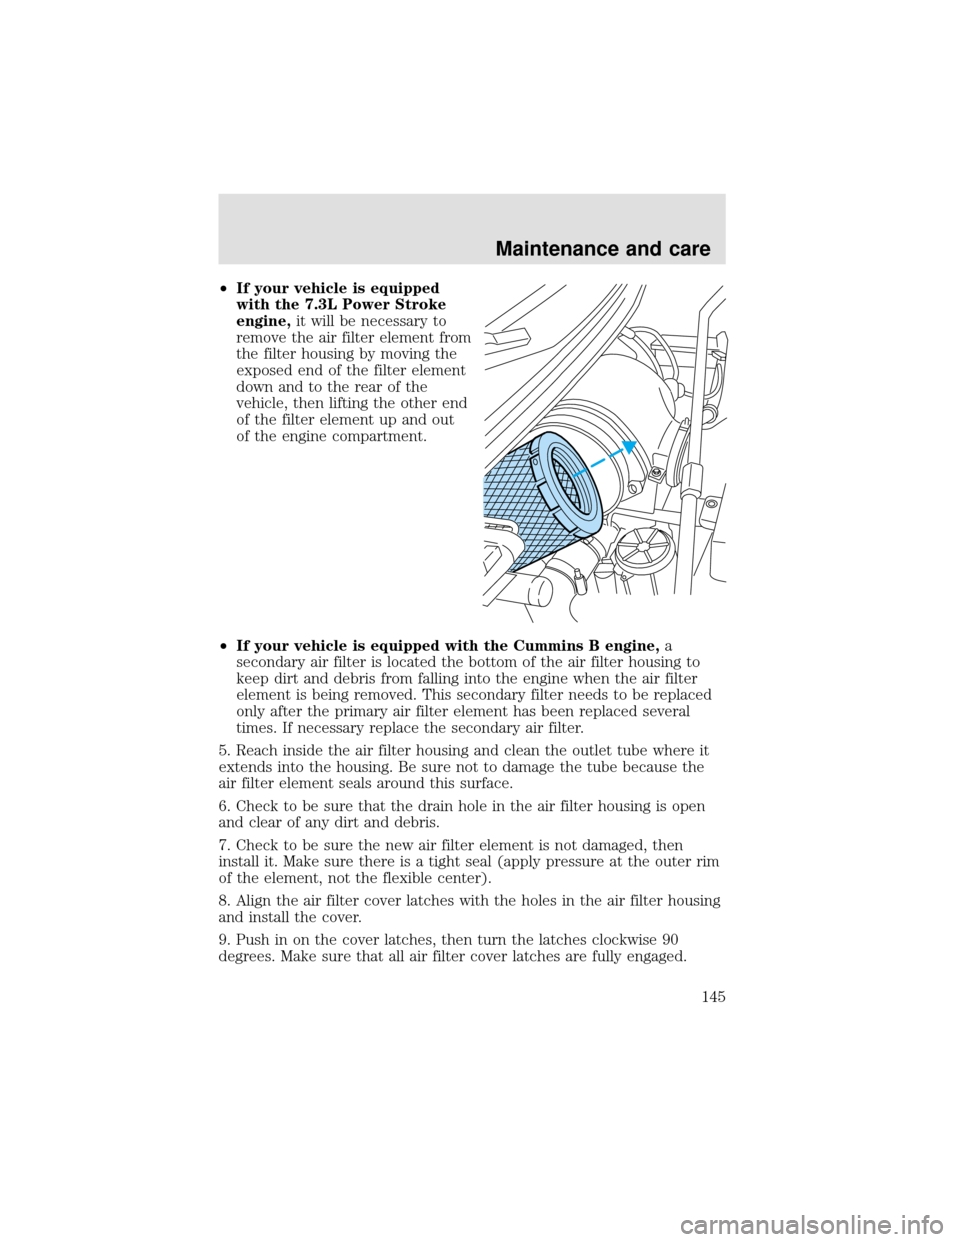
•If your vehicle is equipped
with the 7.3L Power Stroke
engine,it will be necessary to
remove the air filter element from
the filter housing by moving the
exposed end of the filter element
down and to the rear of the
vehicle, then lifting the other end
of the filter element up and out
of the engine compartment.
•If your vehicle is equipped with the Cummins B engine,a
secondary air filter is located the bottom of the air filter housing to
keep dirt and debris from falling into the engine when the air filter
element is being removed. This secondary filter needs to be replaced
only after the primary air filter element has been replaced several
times. If necessary replace the secondary air filter.
5. Reach inside the air filter housing and clean the outlet tube where it
extends into the housing. Be sure not to damage the tube because the
air filter element seals around this surface.
6. Check to be sure that the drain hole in the air filter housing is open
and clear of any dirt and debris.
7. Check to be sure the new air filter element is not damaged, then
install it. Make sure there is a tight seal (apply pressure at the outer rim
of the element, not the flexible center).
8. Align the air filter cover latches with the holes in the air filter housing
and install the cover.
9. Push in on the cover latches, then turn the latches clockwise 90
degrees. Make sure that all air filter cover latches are fully engaged.
Maintenance and care
145
Page 147 of 208
SERVICING YOUR WHEELS AND TIRES
Wheel assembly
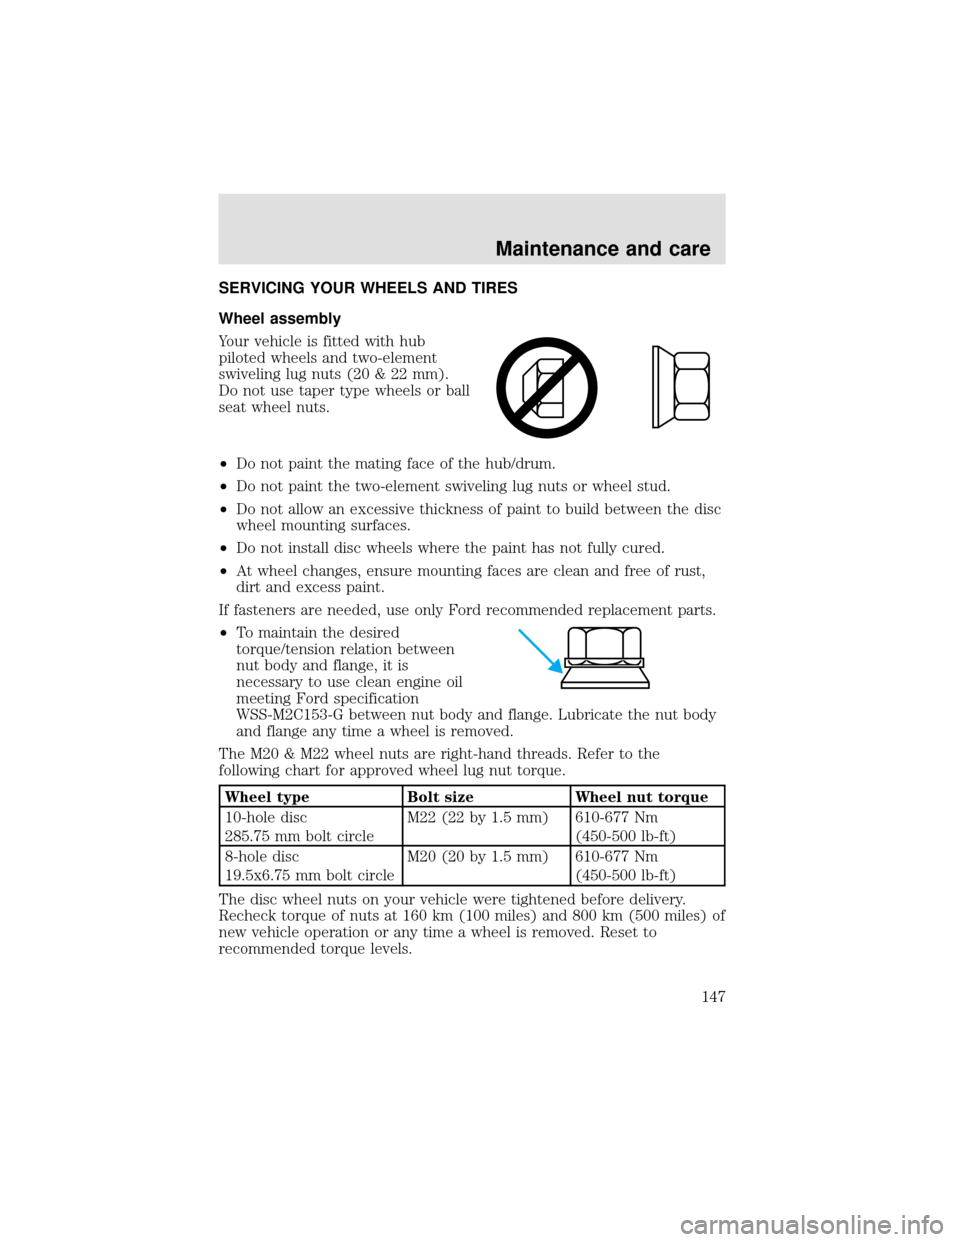
Your vehicle is fitted with hub
piloted wheels and two-element
swiveling lug nuts (20 & 22 mm).
Do not use taper type wheels or ball
seat wheel nuts.
•Do not paint the mating face of the hub/drum.
•Do not paint the two-element swiveling lug nuts or wheel stud.
•Do not allow an excessive thickness of paint to build between the disc
wheel mounting surfaces.
•Do not install disc wheels where the paint has not fully cured.
•At wheel changes, ensure mounting faces are clean and free of rust,
dirt and excess paint.
If fasteners are needed, use only Ford recommended replacement parts.
•To maintain the desired
torque/tension relation between
nut body and flange, it is
necessary to use clean engine oil
meeting Ford specification
WSS-M2C153-G between nut body and flange. Lubricate the nut body
and flange any time a wheel is removed.
The M20 & M22 wheel nuts are right-hand threads. Refer to the
following chart for approved wheel lug nut torque.
Wheel type Bolt size Wheel nut torque
10-hole disc
285.75 mm bolt circleM22 (22 by 1.5 mm) 610-677 Nm
(450-500 lb-ft)
8-hole disc
19.5x6.75 mm bolt circleM20 (20 by 1.5 mm) 610-677 Nm
(450-500 lb-ft)
The disc wheel nuts on your vehicle were tightened before delivery.
Recheck torque of nuts at 160 km (100 miles) and 800 km (500 miles) of
new vehicle operation or any time a wheel is removed. Reset to
recommended torque levels.
Maintenance and care
147
Page 155 of 208
Draining the fuel filter/water separator—Cummins B engine
Refer to your engine operator’s manual for service procedures.
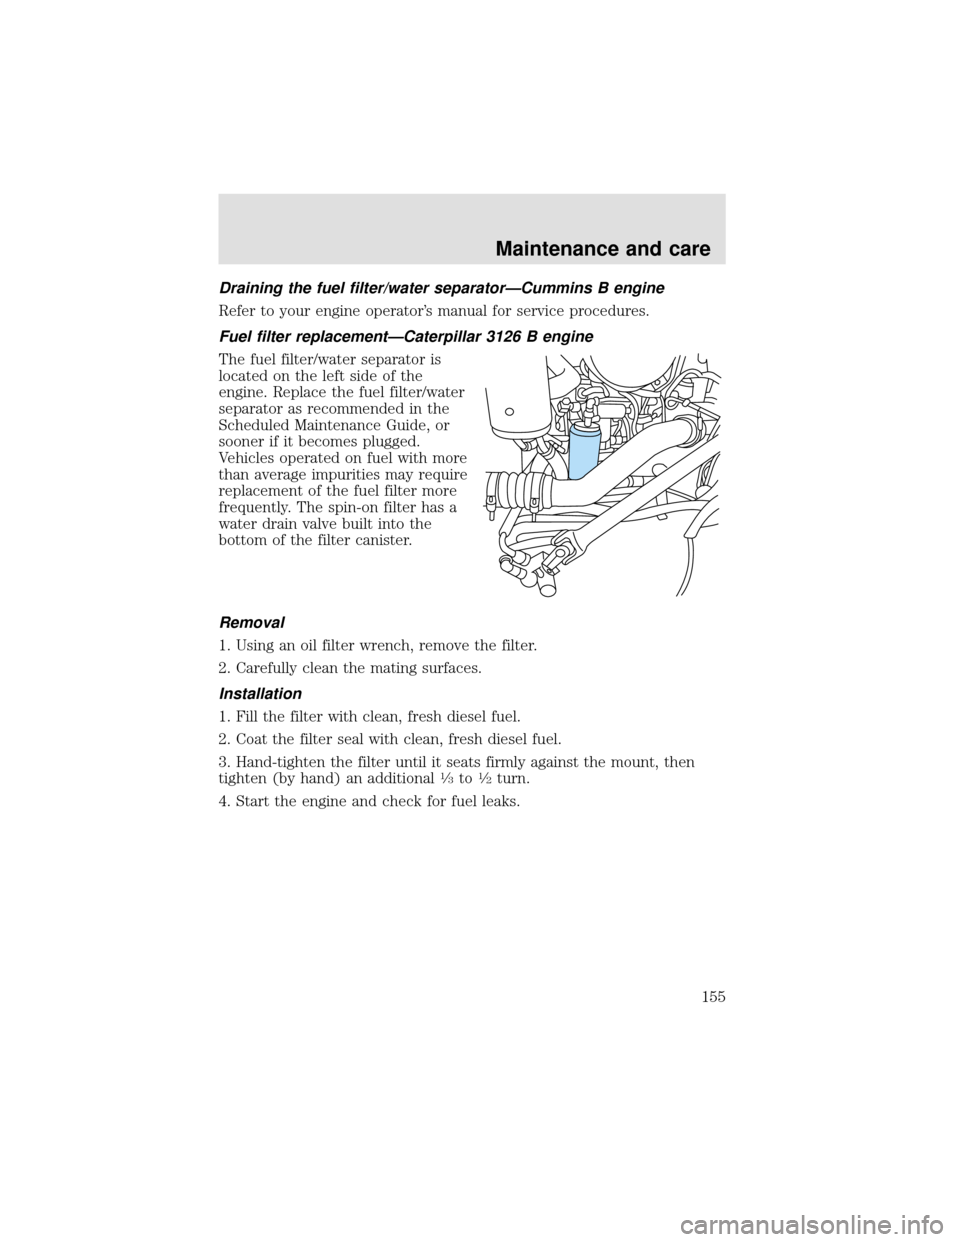
Fuel filter replacement—Caterpillar 3126 B engine
The fuel filter/water separator is
located on the left side of the
engine. Replace the fuel filter/water
separator as recommended in the
Scheduled Maintenance Guide, or
sooner if it becomes plugged.
Vehicles operated on fuel with more
than average impurities may require
replacement of the fuel filter more
frequently. The spin-on filter has a
water drain valve built into the
bottom of the filter canister.
Removal
1. Using an oil filter wrench, remove the filter.
2. Carefully clean the mating surfaces.
Installation
1. Fill the filter with clean, fresh diesel fuel.
2. Coat the filter seal with clean, fresh diesel fuel.
3. Hand-tighten the filter until it seats firmly against the mount, then
tighten (by hand) an additional
1⁄3to1⁄2turn.
4. Start the engine and check for fuel leaks.
Maintenance and care
155
Page 157 of 208
Installation
The engine will not run properly if the fuel filter is not installed
in housing.
1. Apply a coating of clean diesel fuel to the new bevel gasket and install
it onto the fuel filter housing.
2. Install the new fuel filter element onto the cap. Place the new fuel
filter element and cap into the fuel filter housing. Allow fuel to soak into
the fuel filter element.
3. Tighten cap onto the fuel filter housing until cap contacts the housing.
4. Start the engine and check for fuel leaks.
After changing the fuel filter, the engine will purge the trapped air as it
runs. Engine may run roughly and smoke until the air is completely
eliminated.
Fuel filter replacement—Cummins B engine
Refer to your engine operator’s manual for service intervals and
procedures.
ESSENTIALS OF GOOD FUEL ECONOMY
Measuring techniques
Your best source of information about actual fuel economy is you, the
driver. You must gather information as accurately and consistently as
possible. Fuel expense, frequency of fillups or fuel gauge readings are
NOT accurate as a measure of fuel economy. We do not recommend
taking fuel economy measurements during the first 1 600 km (1 000
miles) of driving (engine break-in period). You will get a more accurate
measurement after 3 000 km–5 000 km (2 000 miles-3 000 miles).
The advertised fuel capacity of the fuel tank(s) on your vehicle is equal
to the rated refill capacity of the fuel tank(s) as listed inFuel Tank
Capacitiesin theCapacities and Specificationschapter. The
advertised capacity is the amount of the Indicated Capacity and the
Empty Reserve combined. Indicated Capacity is the difference in the
amount of fuel in a full tank and a tank when the fuel gauge indicates
empty. Empty Reserve is the small amount of usable fuel remaining in
the fuel tank after the fuel gauge indicates empty.
Maintenance and care
157
Page 163 of 208
AIMING THE HEADLAMPS
The headlamps on your vehicle are properly aimed at the assembly plant.
If your vehicle has been in an accident the alignment of your headlamps
should be checked by a qualified service technician.
MINOR TROUBLESHOOTING GUIDE
Diesel engine
For troubleshooting information, refer to the diesel engine operator’s
manual.
If engine won’t crank
For troubleshooting information, refer to the engine operator’s manual.
If engine cranks but won’t start
For troubleshooting information, refer to the engine operator’s manual.
If engine runs hot
For troubleshooting information, refer to the engine operator’s manual.
If fuses burn out
Burned-out or“blown-out”fuses or circuit breaker tripping (if equipped)
usually indicate an electrical short circuit, although a fuse may
occasionally fail from vibration. Insert a second fuse or reset the breaker
(if equipped). If this fuse immediately burns out or the breaker (if
equipped) trips and you cannot locate the fuse, return your vehicle to
your dealer for a circuit check.
If lamp bulbs burn out
Repeated lamp burn-out usually indicates a loose connection, either at
the lamp socket, the system ground or a malfunctioning voltage
regulator. If examination does not indicate the cause of the trouble,
return your vehicle to your dealer for inspection.
If headlamps flash on and off
If headlamps flash on and off at regular intervals, the system circuit
breaker (if equipped) is operating, indicating a short circuit or overload.
Take your vehicle to your dealer for a circuit check.
Maintenance and care
163
Page 168 of 208
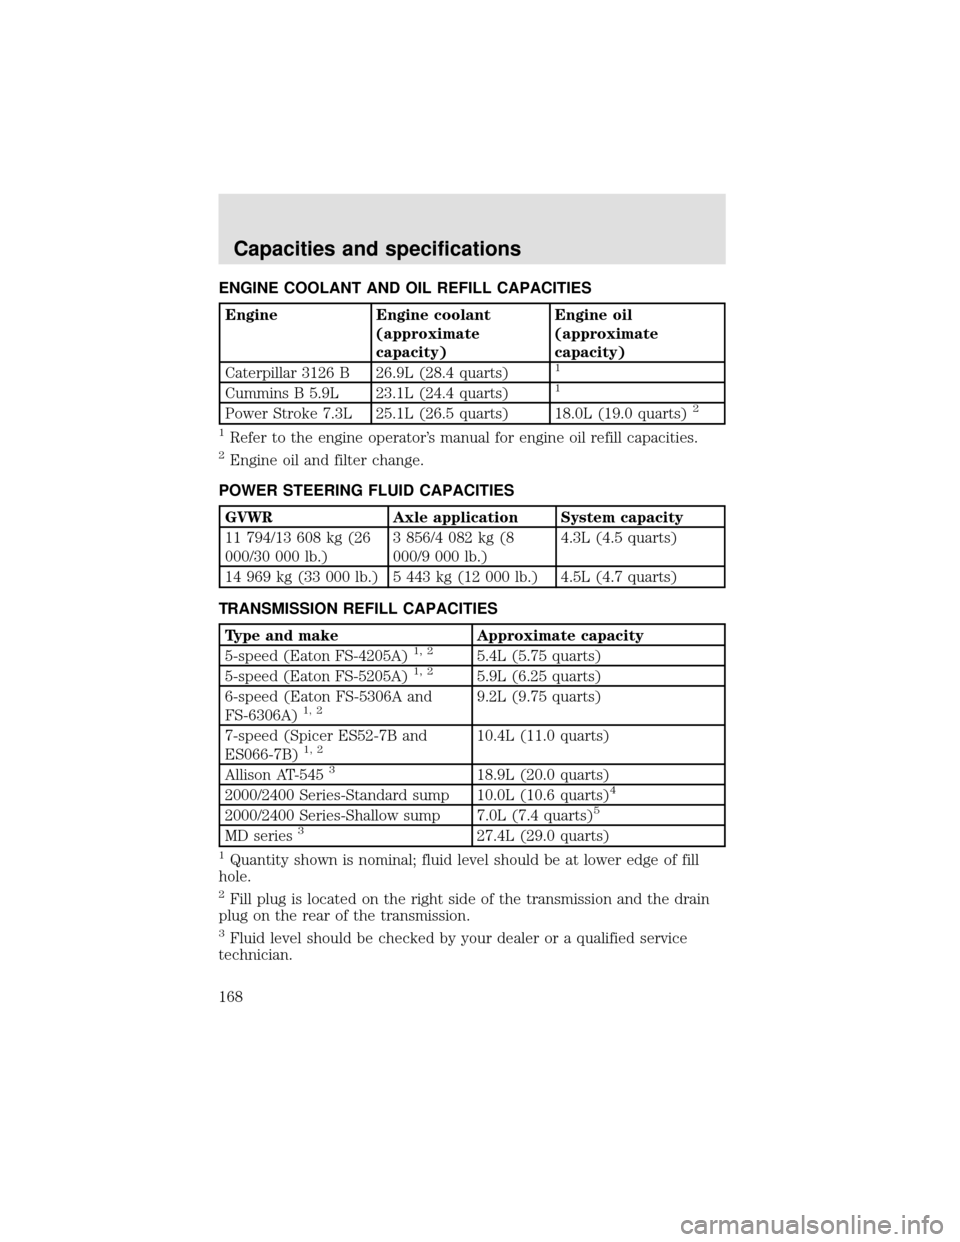
ENGINE COOLANT AND OIL REFILL CAPACITIES
Engine Engine coolant
(approximate
capacity)Engine oil
(approximate
capacity)
Caterpillar 3126 B 26.9L (28.4 quarts)
1
Cummins B 5.9L 23.1L (24.4 quarts)1
Power Stroke 7.3L 25.1L (26.5 quarts) 18.0L (19.0 quarts)2
1
Refer to the engine operator’s manual for engine oil refill capacities.
2Engine oil and filter change.
POWER STEERING FLUID CAPACITIES
GVWR Axle application System capacity
11 794/13 608 kg (26
000/30 000 lb.)3 856/4 082 kg (8
000/9 000 lb.)4.3L (4.5 quarts)
14 969 kg (33 000 lb.) 5 443 kg (12 000 lb.) 4.5L (4.7 quarts)
TRANSMISSION REFILL CAPACITIES
Type and make Approximate capacity
5-speed (Eaton FS-4205A)1, 25.4L (5.75 quarts)
5-speed (Eaton FS-5205A)1, 25.9L (6.25 quarts)
6-speed (Eaton FS-5306A and
FS-6306A)
1, 29.2L (9.75 quarts)
7-speed (Spicer ES52-7B and
ES066-7B)
1, 210.4L (11.0 quarts)
Allison AT-545
318.9L (20.0 quarts)
2000/2400 Series-Standard sump 10.0L (10.6 quarts)4
2000/2400 Series-Shallow sump 7.0L (7.4 quarts)5
MD series327.4L (29.0 quarts)
1Quantity shown is nominal; fluid level should be at lower edge of fill
hole.
2Fill plug is located on the right side of the transmission and the drain
plug on the rear of the transmission.
3Fluid level should be checked by your dealer or a qualified service
technician.
Capacities and specifications
168
Page 175 of 208
GENERAL MAINTENANCE INFORMATION
The Scheduled Maintenance Services listed in this section are required
because they are considered essential to the life and performance of
your vehicle.
Ford Motor Company recommends you perform the Owner Maintenance
Services listed in this section. These services are matters of day-to-day
care that are important to the proper operation of your vehicle. In
addition to the conditions described in the Owner Maintenance Checklist,
be alert for any unusual noise, vibration or other indication that your
vehicle may need service and attend to it promptly.
Use only recommended fuels, lubricants, fluids and service parts
conforming to Ford specifications. Motorcraft parts are designed and
built for best performance in your vehicle. Using these parts for
replacement is your assurance that Ford-Built quality stays in your
vehicle.
SCHEDULED MAINTENANCE
The maintenance or replacement of the emission control devices (or
systems) in your new Ford Motor Company vehicle (or engine) may be
performed at your expense. These services may be performed by any
automotive repair establishment or individual using automotive parts
equivalent to those with which your vehicle or engine was originally
equipped. If any parts other than Ford, Motorcraft, or Ford authorized,
remanufactured parts are used for maintenance replacements (or for the
service) of components effecting the emission control, the owner should
be assured that such parts are warranted by their manufacturer to be
equivalent to genuine Ford Motor Company Parts in performance and
durability. Please consult your warranty information booklet for complete
warranty information.
Authorized dealer maintenance
Your authorized dealer specializes in knowing all about Ford Motor
Company vehicles rather than knowing a little about all makes.
There are Ford or Ford of Canada dealer service shops ready to serve
you wherever you drive in the U.S. or Canada. They stock Ford and
Motorcraft parts, and Ford Chemicals and lubricants. You can be
confident that these meet the same exacting design and quality
standards as those used to build the vehicle originally. Dealer Service
Technicians have available training in the latest product developments
and service techniques.
General maintenance information
175
Page 178 of 208
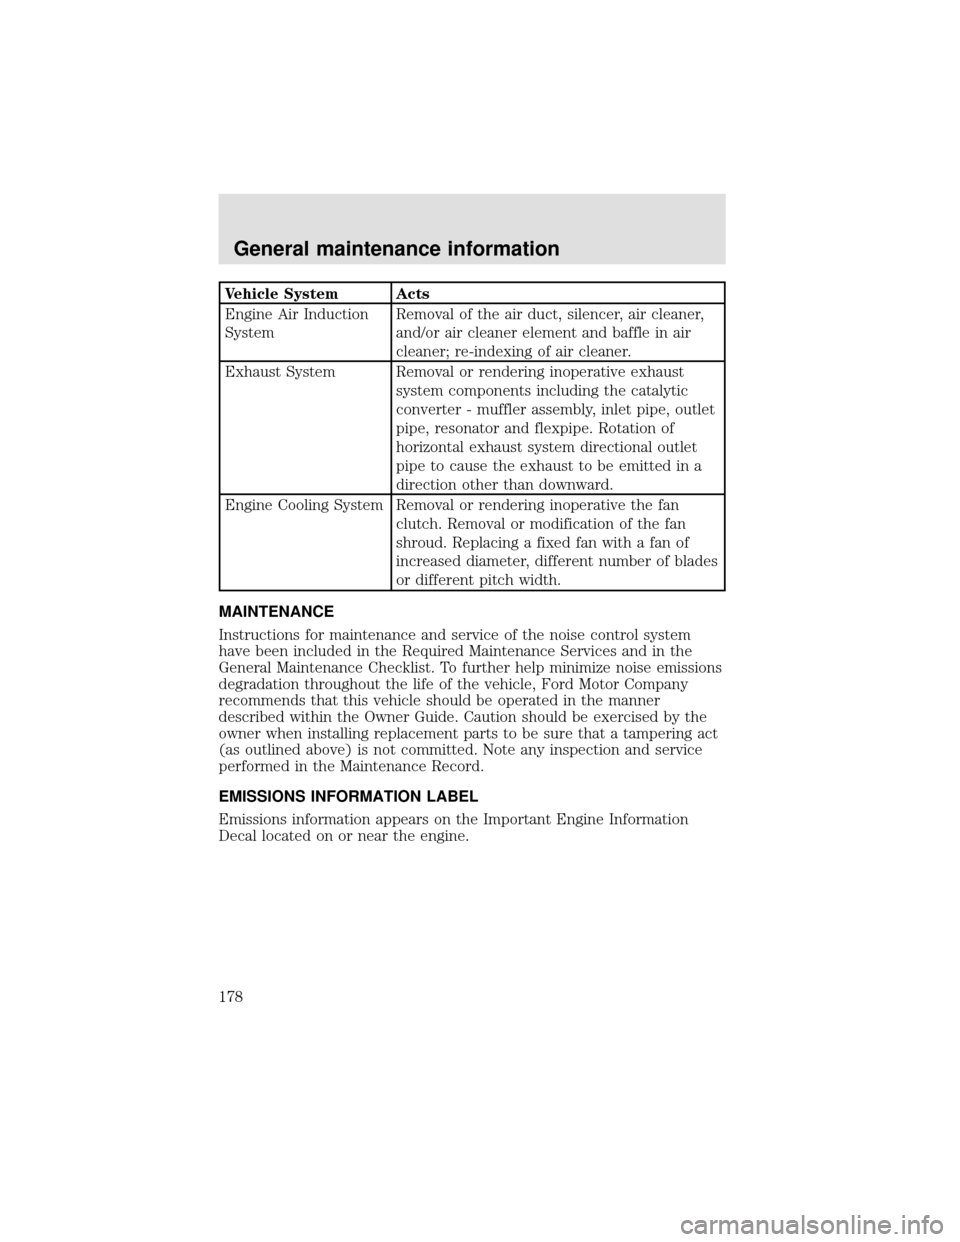
Vehicle System Acts
Engine Air Induction
SystemRemoval of the air duct, silencer, air cleaner,
and/or air cleaner element and baffle in air
cleaner; re-indexing of air cleaner.
Exhaust System Removal or rendering inoperative exhaust
system components including the catalytic
converter - muffler assembly, inlet pipe, outlet
pipe, resonator and flexpipe. Rotation of
horizontal exhaust system directional outlet
pipe to cause the exhaust to be emitted in a
direction other than downward.
Engine Cooling System Removal or rendering inoperative the fan
clutch. Removal or modification of the fan
shroud. Replacing a fixed fan with a fan of
increased diameter, different number of blades
or different pitch width.
MAINTENANCE
Instructions for maintenance and service of the noise control system
have been included in the Required Maintenance Services and in the
General Maintenance Checklist. To further help minimize noise emissions
degradation throughout the life of the vehicle, Ford Motor Company
recommends that this vehicle should be operated in the manner
described within the Owner Guide. Caution should be exercised by the
owner when installing replacement parts to be sure that a tampering act
(as outlined above) is not committed. Note any inspection and service
performed in the Maintenance Record.
EMISSIONS INFORMATION LABEL
Emissions information appears on the Important Engine Information
Decal located on or near the engine.
General maintenance information
178
Page 182 of 208
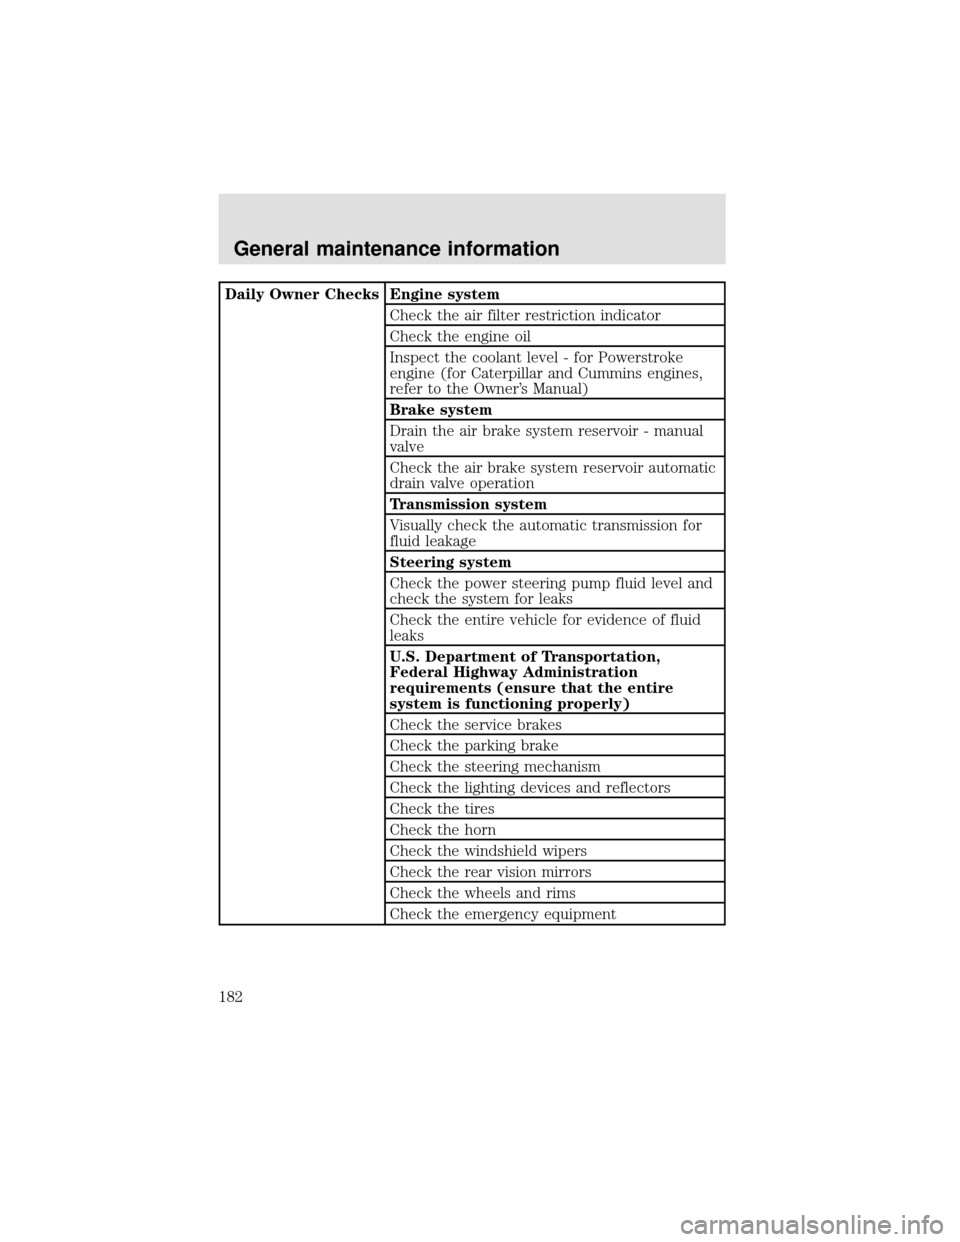
Daily Owner Checks Engine system
Check the air filter restriction indicator
Check the engine oil
Inspect the coolant level - for Powerstroke
engine (for Caterpillar and Cummins engines,
refer to the Owner’s Manual)
Brake system
Drain the air brake system reservoir - manual
valve
Check the air brake system reservoir automatic
drain valve operation
Transmission system
Visually check the automatic transmission for
fluid leakage
Steering system
Check the power steering pump fluid level and
check the system for leaks
Check the entire vehicle for evidence of fluid
leaks
U.S. Department of Transportation,
Federal Highway Administration
requirements (ensure that the entire
system is functioning properly)
Check the service brakes
Check the parking brake
Check the steering mechanism
Check the lighting devices and reflectors
Check the tires
Check the horn
Check the windshield wipers
Check the rear vision mirrors
Check the wheels and rims
Check the emergency equipment
General maintenance information
182
Page 183 of 208
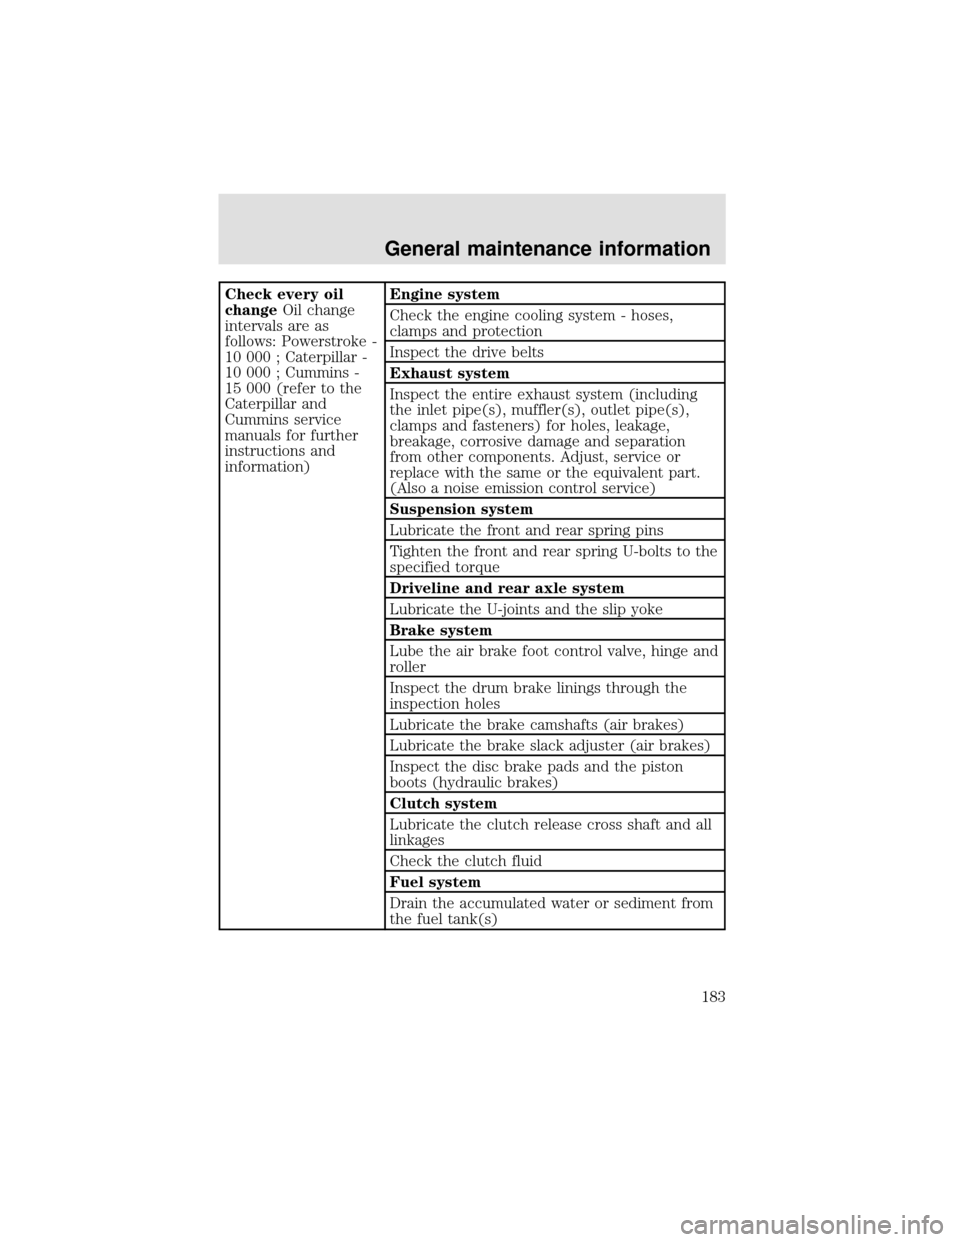
Check every oil
changeOil change
intervals are as
follows: Powerstroke -
10 000 ; Caterpillar -
10 000 ; Cummins -
15 000 (refer to the
Caterpillar and
Cummins service
manuals for further
instructions and
information)Engine system
Check the engine cooling system - hoses,
clamps and protection
Inspect the drive belts
Exhaust system
Inspect the entire exhaust system (including
the inlet pipe(s), muffler(s), outlet pipe(s),
clamps and fasteners) for holes, leakage,
breakage, corrosive damage and separation
from other components. Adjust, service or
replace with the same or the equivalent part.
(Also a noise emission control service)
Suspension system
Lubricate the front and rear spring pins
Tighten the front and rear spring U-bolts to the
specified torque
Driveline and rear axle system
Lubricate the U-joints and the slip yoke
Brake system
Lube the air brake foot control valve, hinge and
roller
Inspect the drum brake linings through the
inspection holes
Lubricate the brake camshafts (air brakes)
Lubricate the brake slack adjuster (air brakes)
Inspect the disc brake pads and the piston
boots (hydraulic brakes)
Clutch system
Lubricate the clutch release cross shaft and all
linkages
Check the clutch fluid
Fuel system
Drain the accumulated water or sediment from
the fuel tank(s)
General maintenance information
183