tow FORD F750 2002 10.G User Guide
[x] Cancel search | Manufacturer: FORD, Model Year: 2002, Model line: F750, Model: FORD F750 2002 10.GPages: 256, PDF Size: 1.75 MB
Page 93 of 256

RETURNING THE SEAT TO UPRIGHT
Always latch the vehicle seat to the floor, whether the seat is
occupied or empty. If not latched, the seat may cause injury
during a sudden stop.
1. Lift/rotate the seatback toward the rear of the vehicle and make sure
it latches securely.
2. Lift/rotate the lower seat cushion to its seating position.
SAFETY RESTRAINTS
Safety restraints precautions
Always drive and ride with your seatback upright and the lap
belt snug and low across the hips.
To reduce the risk of injury, make sure children sit where they
can be properly restrained.
All occupants of the vehicle, including the driver, should always
properly wear their seat belts.
Never let a passenger hold a child on his or her lap while the
vehicle is moving. The passenger cannot protect the child from
injury in a collision.
It is extremely dangerous to ride in a cargo area, inside or
outside of a vehicle. In a collision, people riding in these areas
are more likely to be seriously injured or killed. Do not allow people to
ride in any area of your vehicle that is not equipped with seats and
safety belts. Be sure everyone in your vehicle is in a seat and using a
safety belt properly.
In a rollover crash, an unbelted person is significantly more likely
to die than a person wearing a seat belt.
Seating and Safety Restraints
93
Page 123 of 256

tank for connection to an outside air supply. The valve permits the
system to be recharged with air from an outside source, releasing the
spring-actuated parking brakes. The vehicle may then be towed in an
emergency.
An outside air source can be used only if the protected system is in
operating condition. If air pressure cannot be restored in the protected
air system, the spring-actuated brakes must be released manually.
Releasing spring brake manually
Do not attempt to disassemble the parking brake chamber under
any circumstances. The high spring load may cause serious
injury if the chamber clamps are removed.
If air pressure is released from the spring brake chamber the power
spring applies the brake and, unless air pressure can be re-established,
the spring brake must be released as follows in order to move the
vehicle.
Block the wheels to prevent the vehicle from moving.
Unexpected and possibly sudden vehicle movement may occur if
these precautions are not taken.
Impact wrenches should not be used as they may damage the piston and
prevent proper caging of the spring. Do not apply more than 68 Nm (50
lb-ft) torque to the release bolt nut.
1. Remove the stud tool and nut
from the carrying pocket on the
brake chamber assembly.
2. Remove the access plug from the
end of the spring chamber.
3. Insert the release stud through
the opening in the chamber and into
the spring pressure plate.
Driving
123
Page 145 of 256
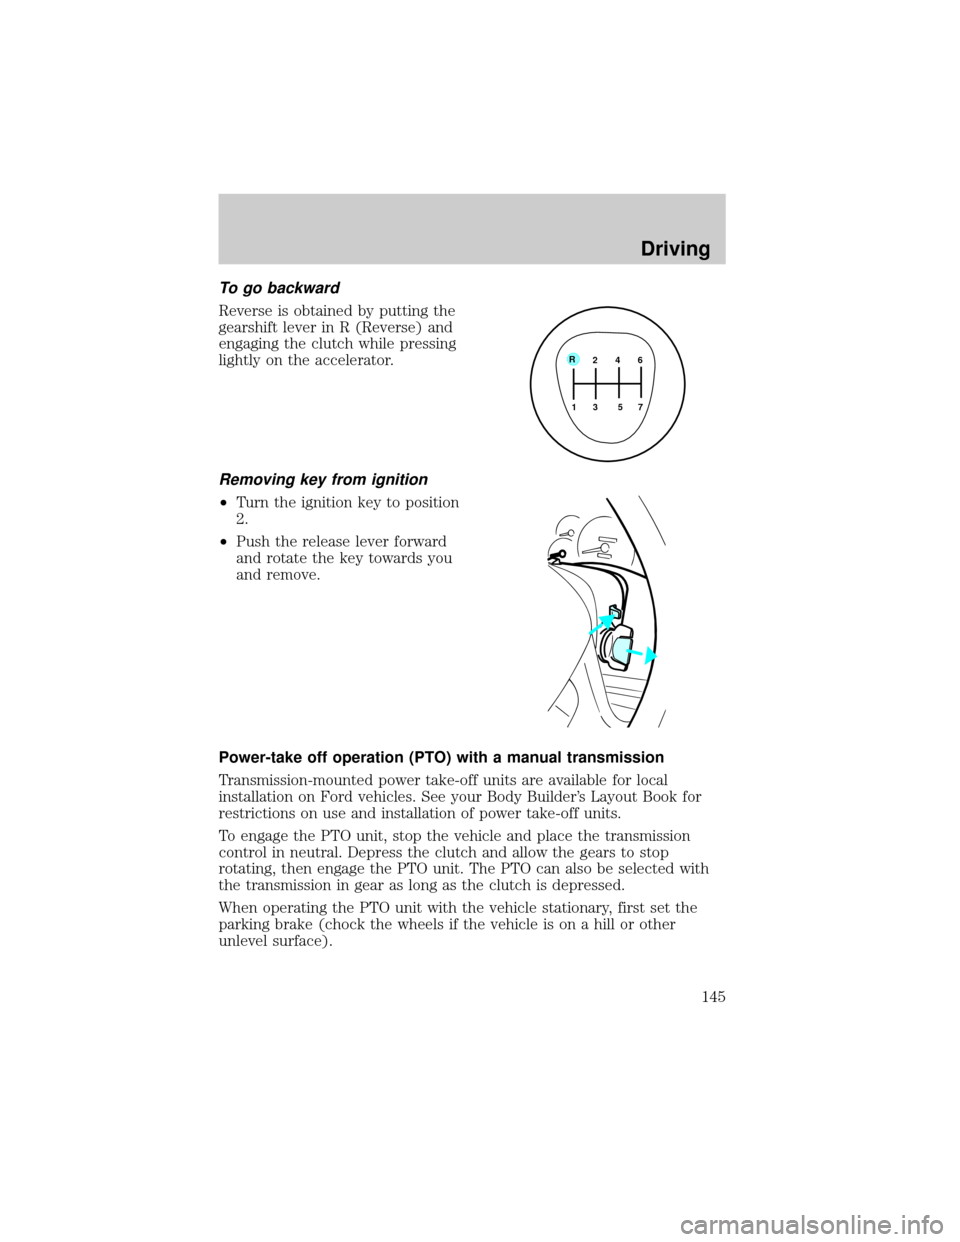
To go backward
Reverse is obtained by putting the
gearshift lever in R (Reverse) and
engaging the clutch while pressing
lightly on the accelerator.
Removing key from ignition
²Turn the ignition key to position
2.
²Push the release lever forward
and rotate the key towards you
and remove.
Power-take off operation (PTO) with a manual transmission
Transmission-mounted power take-off units are available for local
installation on Ford vehicles. See your Body Builder's Layout Book for
restrictions on use and installation of power take-off units.
To engage the PTO unit, stop the vehicle and place the transmission
control in neutral. Depress the clutch and allow the gears to stop
rotating, then engage the PTO unit. The PTO can also be selected with
the transmission in gear as long as the clutch is depressed.
When operating the PTO unit with the vehicle stationary, first set the
parking brake (chock the wheels if the vehicle is on a hill or other
unlevel surface).
2 4 6
3 5 7
1 R
Driving
145
Page 150 of 256

GETTING ROADSIDE ASSISTANCE
To fully assist you should you have a vehicle concern, Ford offers a
complimentary roadside assistance program. This program is separate
from the New Vehicle Limited Warranty. The service is available:
²24±hours, seven days a week
²for the New Vehicle Limited Warranty period (U.S.) of two years
(unlimited miles)
Roadside assistance will cover:
²jump-starts
²lock-out assistance
²towing to the nearest Ford Motor Company dealership, or towing to
your selling dealership if within 56 km (35 miles). Even non-warranty
related tows, like accidents or getting stuck in the mud or snow, are
covered (some exclusions apply, such as impound towing or
repossession).
USING ROADSIDE ASSISTANCE
Complete the roadside assistance identification card and place it in your
wallet for quick reference. This card is found in the Owner Guide
portfolio in the glove compartment.
To receive roadside assistance in the United States, call 1-800-241-3673.
If you need to arrange roadside assistance for yourself, Ford will
reimburse a reasonable amount. To obtain information about
reimbursement, call 1-800-241-3673.
HAZARD FLASHER
Use only in an emergency to warn traffic of vehicle breakdown,
approaching danger, etc. The hazard flashers can be operated when the
ignition is off.
Roadside Emergencies
150
Page 158 of 256

Fuse/Relay
LocationFuse Amp
RatingPower Distribution Box Description
115 40A** Ignition Switch (JB fuses 5, 8, 9, 11, 21)
116 30A** Body Builder Prep
117 20A** 7.3L Power Stroke PCM
118 30A** IDM (7.3L Power Stroke only)
119/120 60A** Hydraulic ABS, Air Brake Trailer Tow Fuse
Block
121/122 60A** Hydromax Motor, Air Brake Trailer Tow
Fuse Block
201 Ð Washer Pump Relay
202 Ð Wiper Speed Relay
203 Ð Wiper Run/Park Relay
204 Ð 7.3L Power Stroke Neutral Start Relay,
Stoplamp Relay (CAT and Cummins only)
205 Ð Right Hand Stop/Turn Relay
206 Ð Left Hand Stop/Turn Relay
207 Ð Shift Modulator Relay (CAT and Power
Stroke only), Cummins VP-44 Relay, A/C
High Pressure Relay (SuperCrewzer only
208 Ð Backup Lamps Relay
209 Ð Stop Lamps Relay, Foglamps Relay
(SuperCrewzer only)
301 Ð Fuel Heater Relay (CAT and Cummins
only)/7.3L Power Stroke PCM Relay
302 Ð Park Lamps Relay
303 Ð Blower Motor Relay
304 Ð Air ABS Relay
401 Ð Not Used
501 Ð Not Used
502 Ð Not Used
503 Diode 7.3L Power Stroke PCM Diode
* Mini Fuses ** Maxi Fuses
Roadside Emergencies
158
Page 159 of 256

Relays
The relay box is located on the rear crossmember.
Air Brake Trailer Tow Relays (if equipped)
The relays are coded as follows:
Fuse/Relay
LocationFuse Amp
RatingDescription
1 30A** Trailer Tow Run Feed
2 30A** Trailer Tow Park/Marker Lamps
3 30A** Trailer Tow Stop Lamps
4 30A** Trailer Tow Turn/Stop Lamps
5 Ð Not Used
R1 Ð Trailer Tow Run Relay
R2 Ð Trailer Tow Stop Lamp relay
R3 Ð Trailer Tow Park/Marker Lamp Relay
R4 Ð Trailer Tow Park/Marker Lamp Relay
R5 Ð Not Used
R6 Ð Not Used
R7 Ð Trailer Tow Left Turn/Stop Lamp Relay
R8 Ð Trailer Tow Right Turn/Stop Lamp Relay
** Maxi Fuse
Roadside Emergencies
159
Page 163 of 256

3. After starting, run the engine at about 1,000 RPM for 3±5 minutes.
Do not operate the starter longer than 30 seconds. Wait at least
two minutes between starting attempts to allow the starter to
cool. If the engine does not start after several attempts, call for
road service.
Removing the jumper cables
1. Remove the ground connection
from the disabled vehicle first,
followed by the cable on the
negative (-) battery terminal of the
booster vehicle.
2. Remove the cable from the
positive (+) terminal of the
discharged battery and then from
the positive (+) terminal of the
booster battery.
3. After the disabled vehicle has
been started, allow it to idle for a
while so the engine can ªrelearnº its
idle conditions.
WRECKER TOWING
Always unload your vehicle before towing it. The recommended method
of towing is with the drive wheels off the ground.
Before towing, make sure:
²the parking brake is released.
²if air pressure has been lost, to release the brakes manually.
Improper towing of the vehicle will not allow sufficient lubrication of the
transmission which may cause serious damage to internal transmission
components. Always follow the outlined towing procedures.
42
3
1
Roadside Emergencies
163
Page 164 of 256
²To tow a vehicle on the front wheels,the steering wheel must be
in the straight ahead position. Secure the steering wheel with a
holding device (such as provided by a towing company).
²To tow a vehicle on the rear wheels,it will be necessary to remove
the drive axles or disconnect the driveshaft. If the drive axles are
removed, the ends of the axle housing must be sealed to prevent the
loss of axle lubricant during towing.
²To tow a vehicle with an inoperative rear axle,the rear wheels
must be raised onto a dolly or tow the vehicle on the front wheels.
²If your vehicle is equipped with tow hooks,chains must be
fastened directly to the tow hooks on the vehicle.
²If your vehicle is not equipped with tow hooks,chains must be
routed under the bottom edge of the bumper with a protection bar to
protect the bumper, and attached to the vehicle chassis. Under no
circumstances is the vehicle to be lifted or towed by attaching chains
directly to the bumper.
Raising the vehicle
Never lift the vehicle by the bumper. When raising the vehicle, attach
chains to or place the jack(s) directly beneath the main structural
members of the vehicle.
Push-starting your vehicle
Avoid attempting to start a vehicle by pushing. Instead, use jumper
cables as described underJump starting your vehiclein this chapter.
Vehicles with an automatic transmission cannot be started by pushing.
Roadside Emergencies
164
Page 174 of 256
WASHING THE EXTERIOR OF YOUR VEHICLE
Never wash a vehicle that is ªhot to
the touchº or during exposure to
strong, direct sunlight. It is
recommended that you wash your
vehicle regularly with cool or
lukewarm water and a neutral Ph
shampoo, such as Detail Wash
(ZC-3±A), which is available from
your authorized Ford, Lincoln or
Mercury dealer. Always use a clean
sponge or carwash mitt with plenty
of water for best results. Dry the vehicle with a chamois or soft terry
cloth towel in order to eliminate water spotting.
Never use strong household detergents or soap, such as dish
washing or laundry liquid. These products can discolor and spot
painted surfaces.
It is especially important to wash the vehicle regularly during winter
months, as dirt and road salt are difficult to remove and do cause
damage to the vehicle.
Items such as gasoline, diesel fuel, bird droppings and insect deposits
should be washed and sponged off as soon as possible. Deposits not
removed promptly can cause damage to the vehicle's paintwork and trim
over time.
Remove any exterior accessories, such as antennas, before
entering a car wash.
PROTECTING THE PAINT FINISH OF YOUR VEHICLE
Applying a polymer paint sealant to your vehicle on a regular basis will
assist in reducing minor scratches and paint damage.
A typical paint sealant lasts approximately six months to a year,
depending on local weather conditions and the cleaning soap that is used
in washing the vehicle.
Do not use a wax that beads excessively.
Do not allow paint sealant to come in contact with any non-body
(low-gloss black) colored trim, such as grained door handles, roof
racks, bumpers, side moldings, mirror housings or the windshield
cowl area. The paint sealant will ªgrayº or stain the parts over time.
Cleaning
174
Page 177 of 256
WASHING THE EXTERIOR LAMPS
In order to avoid scratching the plastic lamps, do not use dry
paper towels, non-approved chemical solvents or abrasive
cleaners.
Use a soft cloth and a solution of Triple Clean (EOAZ-19526±AA), mixed
properly with water, in order to remove bug residue. If tar or grease
spots are present, clean with Extra Strength Tar and Road Oil Removal
(B7A-19520±AA).
CLEANING THE WINDSHIELD, WIPER BLADES AND REAR
WINDOW
If the wiper does not wipe properly, substances on the windshield, rear
window or the wiper blades may be the cause. These may include hot
wax treatments used by commercial car washes, tree sap, or other
organic contamination.
Do not clean the windshield or rear window glass with abrasives,
as they may cause scratches.
Do not use fuel, kerosene, or paint thinner to clean the
windshield, rear window or the wiper blades as damage may
occur.
Clean the outside of the windshield or rear window with a non-abrasive
cleaner such as Ultra Clear Spray Glass Cleaner (E4AZ-19C507±AA),
available from your authorized Ford, Lincoln or Mercury dealer. If after
cleaning the glass surface, the water sheets from the glass (e.g., does not
bead), then the window is clean.
The windshield, rear window and wiper blades should be cleaned
regularly. Wiper blades can be cleaned with isopropyl (rubbing) alcohol
or windshield washer solution. Be sure to replace wiper blades when
they appear worn or do not function properly.
CLEANING THE INSTRUMENT PANEL
Clean the instrument panel with a damp cloth, then dry with a dry cloth.
Avoid cleaners or polish that increase the gloss of the upper portion of
the instrument panel. The dull finish in this area helps protect the driver
from undesirable windshield reflection.
Cleaning
177