oil level FORD F750 2004 11.G Owners Manual
[x] Cancel search | Manufacturer: FORD, Model Year: 2004, Model line: F750, Model: FORD F750 2004 11.GPages: 264, PDF Size: 1.47 MB
Page 7 of 264
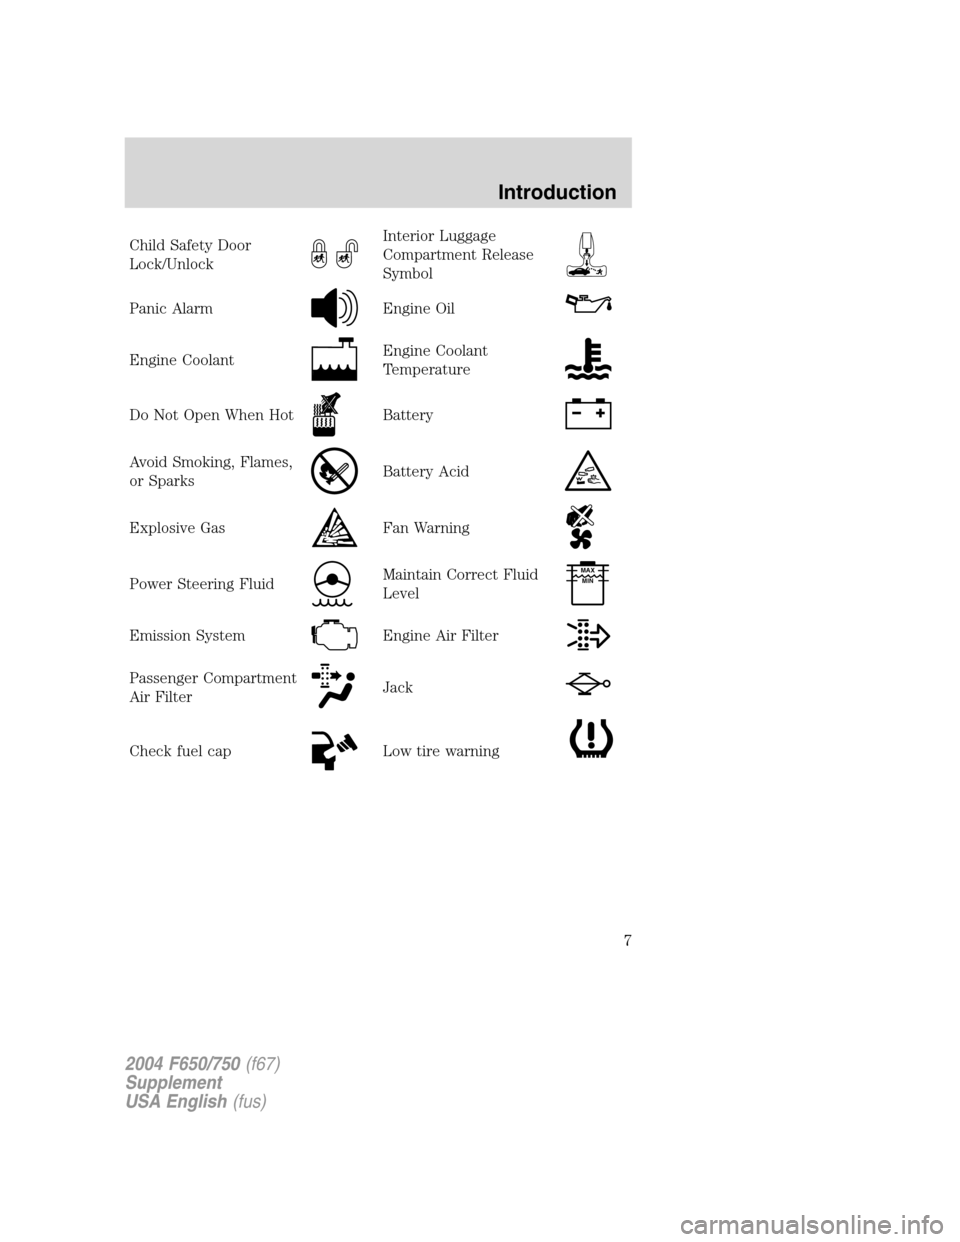
Child Safety Door
Lock/UnlockInterior Luggage
Compartment Release
Symbol
Panic AlarmEngine Oil
Engine CoolantEngine Coolant
Temperature
Do Not Open When HotBattery
Avoid Smoking, Flames,
or SparksBattery Acid
Explosive GasFan Warning
Power Steering FluidMaintain Correct Fluid
LevelMAX
MIN
Emission SystemEngine Air Filter
Passenger Compartment
Air FilterJack
Check fuel capLow tire warning
2004 F650/750(f67)
Supplement
USA English(fus)
Introduction
7
Page 9 of 264
To be sure your vehicle is ready to operate, conduct a pre-trip inspection
at the beginning of each work period. Follow the steps listed in this
section to assure a proper vehicle inspection procedure. The pages in
this section may be produced locally and used on a regular basis.
VEHICLE INSPECTION INFORMATION
Note:Always make sure the parking brake is applied before starting the
engine.
Engine compartment (with engine stopped)
Engine oil level:Use the engine oil dipstick to verify that the
engine oil level is between the FULL and ADD
marks.
Engine coolant
level:Look through the plastic reservoir or the clear
sight glass on the reservoir, depending upon
vehicle equipment, and make sure the fluid is
within the minimum and maximum fluid level
range as marked on the reservoir.Do not
remove pressure cap until the coolant has
cooled.
Power steering fluid:Verify that the fluid level is between the full
and refill marks.
Brake fluid (master
cylinder):Remove the master cylinder caps and inspect
the fluid level. The full mark is at the bottom
of the opening of the port ring.
Hydraulic clutch
fluid:Check for adequate amount of hydraulic clutch
fluid. Fluid level should be at the step of the
reservoir; refer toClutch fluid/linkage
adjustmentsin theMaintenance and
specificationschapter.
Fan, alternator,
water pump/drive
belt:Press belt to test that it is snug. Check for
frays, cracks, loose fibers or visible signs of
wear. If it deflects more than 1.25 cm–2cm
(1/2–3/4 inch), slippage is probably excessive.
Air compressor:Check belts (if equipped). Same for water
pump.
Refrigerant
compressor:Check belts (if equipped). Same for water
pump.
2004 F650/750(f67)
Supplement
USA English(fus)
Vehicle inspection guide
Vehicle inspection guide
9
Page 14 of 264
Front brakes
Hoses:Checked for cracked, worn or frayed hoses.
Make sure all couplings are secured.
Chambers:Make sure brake chambers are not cracked or
dented and that they are securely mounted.
Slack adjuster:Check for broken, loose or missing parts; the
angle between the push rod and adjuster arm
should be approximately 90 degrees when the
brakes are applied. When pulled by hand, the
push rod should not move more than
approximately 2.5 cm (one inch).
Drum:Make sure there are no cracks, dents or holes
and no loose or missing bolts. Make sure brake
linings are not worn or dangerously thin or
contaminated by lubricant.
Front wheels
Rims:Check for damaged or bent rims. Rims should
not have welding repairs and no rust trails that
indicate it is loose on the wheel.
Lug nuts:Make sure all lug nuts are present and not
loose (look for rust trails around the lug nuts).
There should be no cracks radiating from the
lug bolt holes or distortion of the bolt holes.
Hub oil seal:Check wheel hub oil seal for leaks, and if sight
glass if present, check to see that the oil level
is adequate.
Oil-lubricated front
wheel bearing:If the hubcap has a transparent window, check
for proper lubrication level. If the hubcap does
not have a transparent window, remove the
rubber fill-plug and check for proper level.
If a wheel must be changed, obtain expert tire service help.
Mounting and un-mounting of tires should only be performed by
a qualified technician using necessary safety procedures and
equipment, otherwise the result could be property damage, personal
injury or death.
2004 F650/750(f67)
Supplement
USA English(fus)
Vehicle inspection guide
14
Page 26 of 264
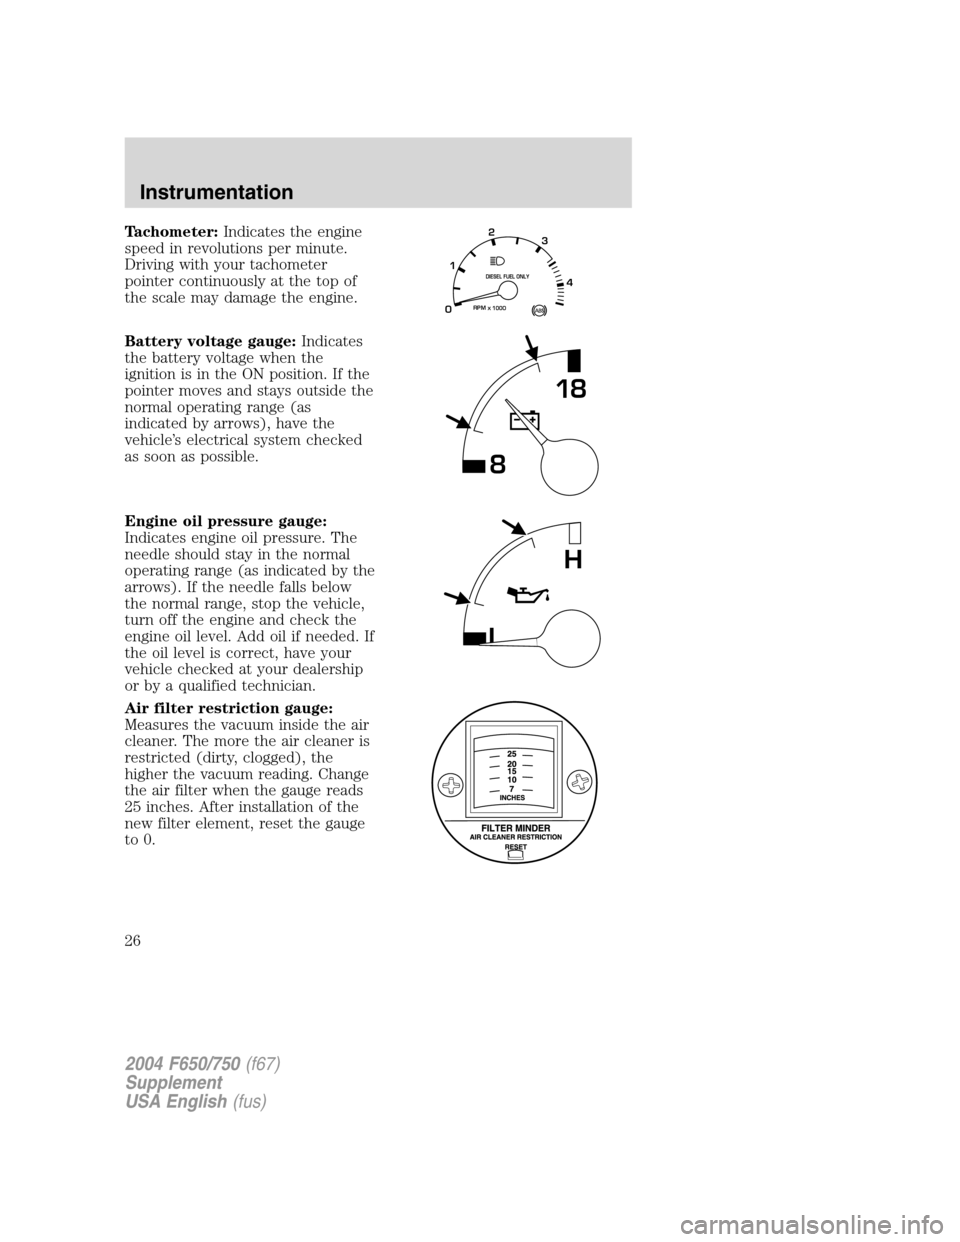
Tachometer:Indicates the engine
speed in revolutions per minute.
Driving with your tachometer
pointer continuously at the top of
the scale may damage the engine.
Battery voltage gauge:Indicates
the battery voltage when the
ignition is in the ON position. If the
pointer moves and stays outside the
normal operating range (as
indicated by arrows), have the
vehicle’s electrical system checked
as soon as possible.
Engine oil pressure gauge:
Indicates engine oil pressure. The
needle should stay in the normal
operating range (as indicated by the
arrows). If the needle falls below
the normal range, stop the vehicle,
turn off the engine and check the
engine oil level. Add oil if needed. If
the oil level is correct, have your
vehicle checked at your dealership
or by a qualified technician.
Air filter restriction gauge:
Measures the vacuum inside the air
cleaner. The more the air cleaner is
restricted (dirty, clogged), the
higher the vacuum reading. Change
the air filter when the gauge reads
25 inches. After installation of the
new filter element, reset the gauge
to 0.
RPM1000
DIESEL FUEL ONLY
X012
3
4
818
L
H
2004 F650/750(f67)
Supplement
USA English(fus)
Instrumentation
26
Page 88 of 264
•If your vehicle is equipped with a water-fuel separator, drain it daily.
Fill the fuel tank at the end of daily operation to prevent condensation
in the fuel system.
•Make sure you use proper cold weather engine oil and that it is at its
proper level.
•At temperatures of–20°C(–4°F) or below, it is recommended that you
use a crankcase-mounted coolant heater to improve cold engine
starting.
•If operating in arctic temperatures of–29°C (-20°F) or lower, consult
your truck dealer for information about special cold weather
equipment and precautions.
Note:Idling in cold weather will not heat the engine to its normal
operating temperature. Long periods of idling in cold weather can cause
a buildup of heavy deposits of carbon and rust on valve stems causing
them to stick which, in turn, can cause valvetrain damage.
The following cold weather idling guidelines must be followed:
•Avoid idling the engine for more than 10 minutes at a time.
•Use a minimum of 45 Cetane Diesel fuel or use Cetane Index
improvers from a reputable manufacturer.
•Maintain a minimum idle of 1250 RPM by using the hand throttle.
Always make sure that the parking brake is applied and the
transmission is in neutral before applying the hand throttle.
•Maintain the engine cooling system properly.
•Do not shut the engine down after an extensive idling period (10
minutes or more). Drive the vehicle under load for several miles at
normal operating temperatures to burn off any accumulated carbon
and varnish.
•Consider using an engine block heater, approved winter fronts and/or
radiator shutters where conditions warrant.
Winter fronts
The use of winter fronts, or other air-restrictive devices mounted in front
of the radiator on vehicles with chassis-mounted charge air coolers, are
not recommended unless extremely cold weather conditions exist. Air
flow restriction can cause high exhaust temperatures, power loss,
excessive fan usage and a reduction in fuel economy. If you insist on
using a winter front, the device should have a permanent opening of at
least 774 sq. cm (120 sq in.) directly in line with the fan hub.
2004 F650/750(f67)
Supplement
USA English(fus)
Driving
88
Page 166 of 264
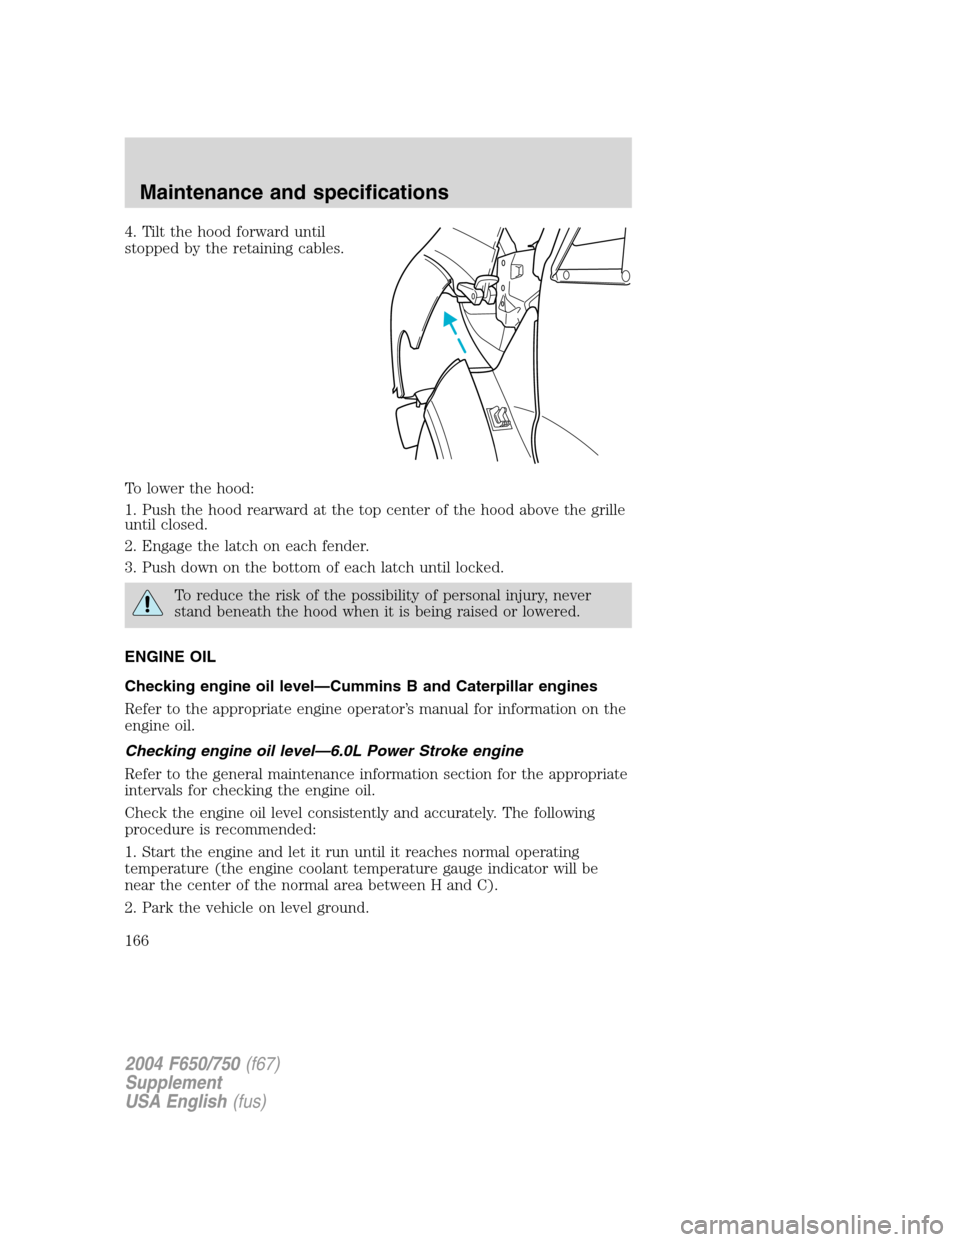
4. Tilt the hood forward until
stopped by the retaining cables.
To lower the hood:
1. Push the hood rearward at the top center of the hood above the grille
until closed.
2. Engage the latch on each fender.
3. Push down on the bottom of each latch until locked.
To reduce the risk of the possibility of personal injury, never
stand beneath the hood when it is being raised or lowered.
ENGINE OIL
Checking engine oil level—Cummins B and Caterpillar engines
Refer to the appropriate engine operator’s manual for information on the
engine oil.
Checking engine oil level—6.0L Power Stroke engine
Refer to the general maintenance information section for the appropriate
intervals for checking the engine oil.
Check the engine oil level consistently and accurately. The following
procedure is recommended:
1. Start the engine and let it run until it reaches normal operating
temperature (the engine coolant temperature gauge indicator will be
near the center of the normal area between H and C).
2. Park the vehicle on level ground.
2004 F650/750(f67)
Supplement
USA English(fus)
Maintenance and specifications
166
Page 167 of 264
3. Set the parking brake and shift into N (Neutral) (automatic
transmission) or 1 (First) (manual transmission).
4. Turn off the engine and wait a few minutes for the oil to drain
completely into the oil pan.
5. Open the hood. Protect yourself from engine heat.
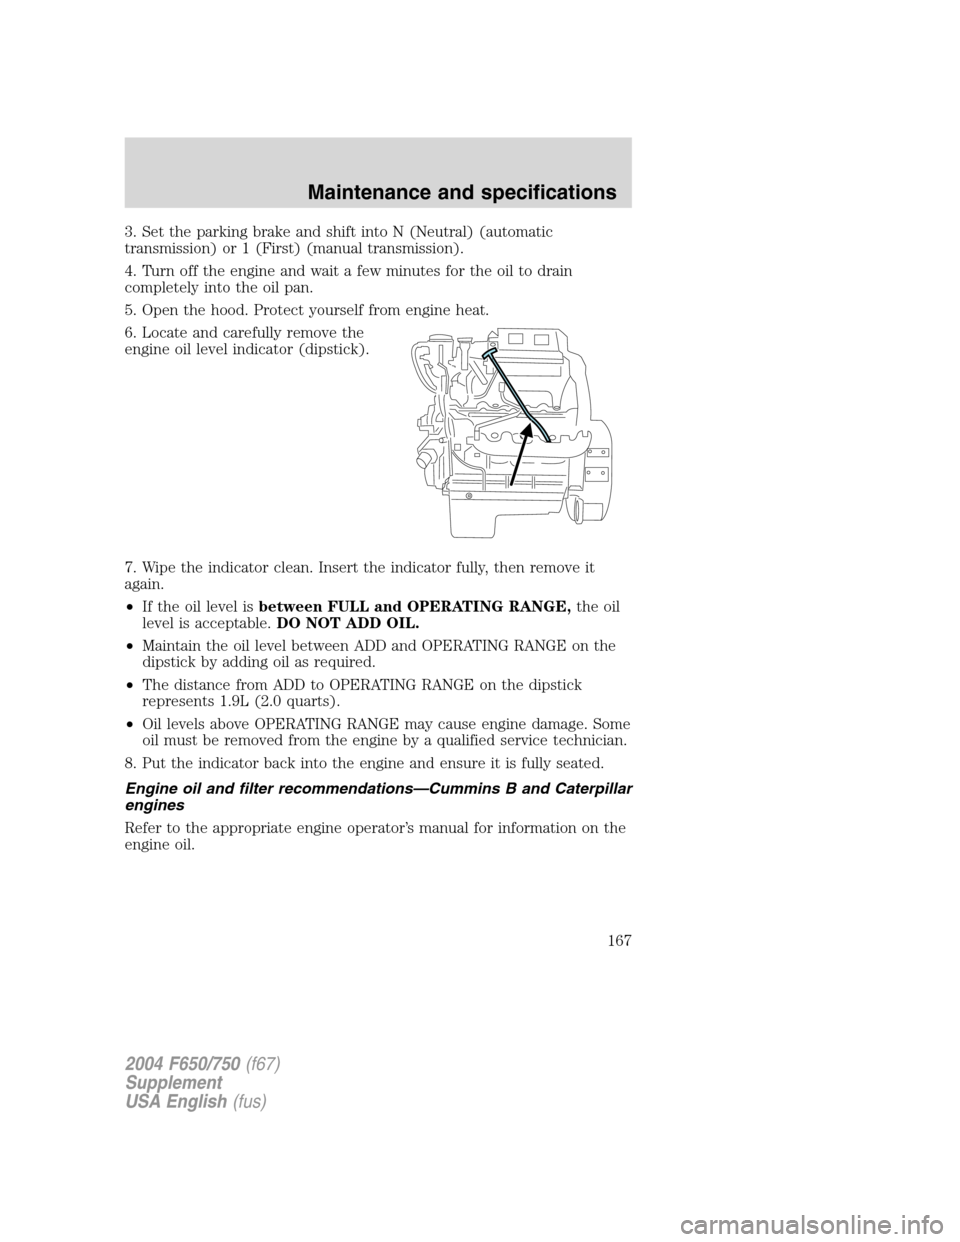
6. Locate and carefully remove the
engine oil level indicator (dipstick).
7. Wipe the indicator clean. Insert the indicator fully, then remove it
again.
•If the oil level isbetween FULL and OPERATING RANGE,the oil
level is acceptable.DO NOT ADD OIL.
•Maintain the oil level between ADD and OPERATING RANGE on the
dipstick by adding oil as required.
•The distance from ADD to OPERATING RANGE on the dipstick
represents 1.9L (2.0 quarts).
•Oil levels above OPERATING RANGE may cause engine damage. Some
oil must be removed from the engine by a qualified service technician.
8. Put the indicator back into the engine and ensure it is fully seated.
Engine oil and filter recommendations—Cummins B and Caterpillar
engines
Refer to the appropriate engine operator’s manual for information on the
engine oil.
2004 F650/750(f67)
Supplement
USA English(fus)
Maintenance and specifications
167
Page 194 of 264
Cooling System
•Check the fan for damage to blades; replace, if damaged, with the
recommended parts. Inspect for fan to shroud interference, and any
damage to shroud such as cracks and holes.
•The fan ratio should not be changed and the fan spacer dimensions
and positions should not be altered.
•Inspect the fan clutch for proper operation, make sure that the fan is
disengaged when cooling of the engine is not required.
•Check for proper operation of radiator shutters, if equipped. The
shutters should be open during normal operating temperatures.
Engine and Driveline System
•Transmission Enclosure:inspect for cracks, holes, and tears. Clean
any deposits such as oil, dirt, and stones.
•Engine valve covers and block covers are made to damp out engine
mechanical noise and, if needed, should be replaced with
recommended parts. Check for mechanical isolations.
Exhaust System
•Inspect the exhaust system for leaks at various joint connections and
tighten the clamps.
•Do a visual inspection for cracks or holes in the muffler and tail pipe.
•Always use the recommended parts when items need to be replaced.
•The tail pipe elbow or offset tail pipe orientation must not be changed
from the standard position as originally received.
•To avoid abnormal changes in vehicle sound levels, it is necessary for
the owner to perform inspections and necessary maintenance at the
intervals shown in theGeneral Maintenance Informationsection.
CHASSIS-MOUNTED CHARGE AIR COOLER
Inspect charge air cooler daily
With the engine off, visually inspect the charge air cooler core assembly
for debris and clogging of external fins. Prior to engine operation,
remove any debris blocking the core.
•Turbocharger-to-charge air cooler
•Charge air cooler-to-intake manifold pipe
•Mounting bracket
•Chassis-mounted charge air cooler core
2004 F650/750(f67)
Supplement
USA English(fus)
Maintenance and specifications
194
Page 199 of 264
6. Clean and install the drain plug securely.
7. Add enough lubricant through the filler plug opening so that the
lubricant level is up to the bottom of the opening.
8. Clean and install the filler plug securely.
WHEELS
General
Wheel bearings should be inspected, lubricated and adjusted at regular
intervals. This is especially important if operating in deep sand, mud, or
water. Refer toLubricant specificationsin this chapter.
Oil lubricated front wheel bearings
During normal vehicle duty cycle, the lube and air inside the hub/wheel
cavity expands and if not vented, causes pressure build-up that could
cause accelerated seal wear.
There are two venting methods:
•a slit or small hole in the rubber check vent or
•the window
You can use either of these methods to prevent pressure build-up.
Normal maintenance
Over a period of time, if not routinely cleaned, a slight film of oil can
collect dirt around the rubber fill plug and face, which could appear to
be a leak. Routine cleaning ensures that the lube level can be easily
observed through the clear window as intended. In situations where the
window is clean on the outside but discolored on the inside, the lube
level may be checked by inserting a finger through the rubber check
vent hole.
The specified lube level for a clear window type hubcaps is from the
minimum line to + 5/16 inch above the minimum line.
If the lube level should suddenly drop dramatically below the minimum
level, see the Service Manual for diagnostic procedure.
2004 F650/750(f67)
Supplement
USA English(fus)
Maintenance and specifications
199
Page 229 of 264
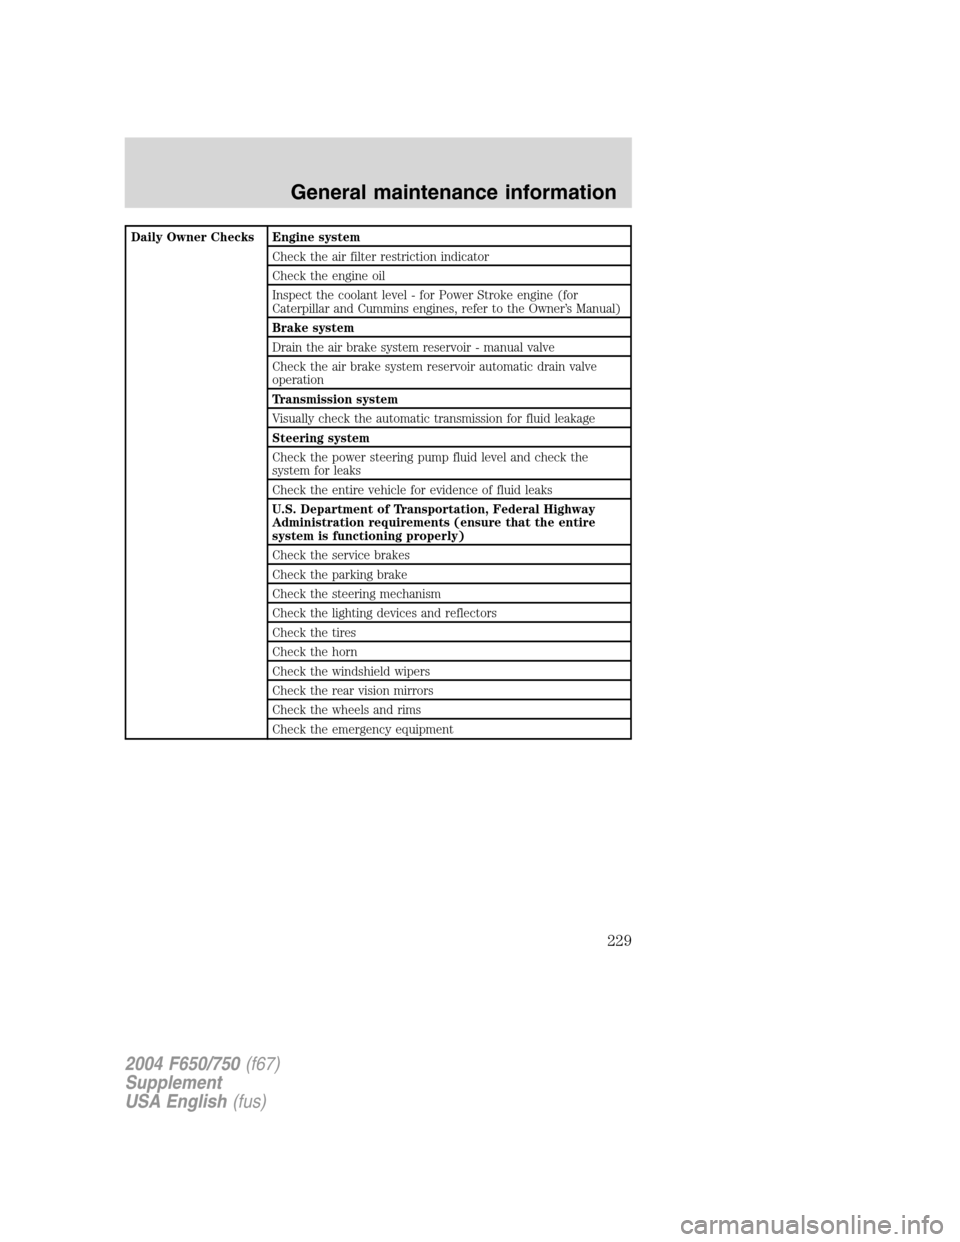
Daily Owner Checks Engine system
Check the air filter restriction indicator
Check the engine oil
Inspect the coolant level - for Power Stroke engine (for
Caterpillar and Cummins engines, refer to the Owner’s Manual)
Brake system
Drain the air brake system reservoir - manual valve
Check the air brake system reservoir automatic drain valve
operation
Transmission system
Visually check the automatic transmission for fluid leakage
Steering system
Check the power steering pump fluid level and check the
system for leaks
Check the entire vehicle for evidence of fluid leaks
U.S. Department of Transportation, Federal Highway
Administration requirements (ensure that the entire
system is functioning properly)
Check the service brakes
Check the parking brake
Check the steering mechanism
Check the lighting devices and reflectors
Check the tires
Check the horn
Check the windshield wipers
Check the rear vision mirrors
Check the wheels and rims
Check the emergency equipment
2004 F650/750(f67)
Supplement
USA English(fus)
General maintenance information
229