light FORD F750 2005 11.G Owners Manual
[x] Cancel search | Manufacturer: FORD, Model Year: 2005, Model line: F750, Model: FORD F750 2005 11.GPages: 272, PDF Size: 1.5 MB
Page 1 of 272
Introduction 4
Congratulations 4
Safety and environment protection 5
Symbol glossary 8
Vehicle inspection guide 11
Instrumentation 21
Warning and control lights 21
Gauges 26
Entertainment systems 30
AM/FM stereo 30
AM/FM stereo cassette 32
AM/FM stereo cassette with CD 35
AM/FM stereo with CD 39
Climate controls 44
Heater only 44
Manual heating and air conditioning 45
Lights 47
Headlamps 47
Turn signal control 48
Interior lamps 49
Bulb replacement 49
Driver controls 52
Windshield wiper/washer control 52
Steering wheel adjustment 53
Power windows 55
Mirrors 56
Speed control 58
Table of Contents
1
2005 F650/750(f67)
Supplement
USA English(fus)
Table of Contents
Page 5 of 272
SAFETY AND ENVIRONMENT PROTECTION
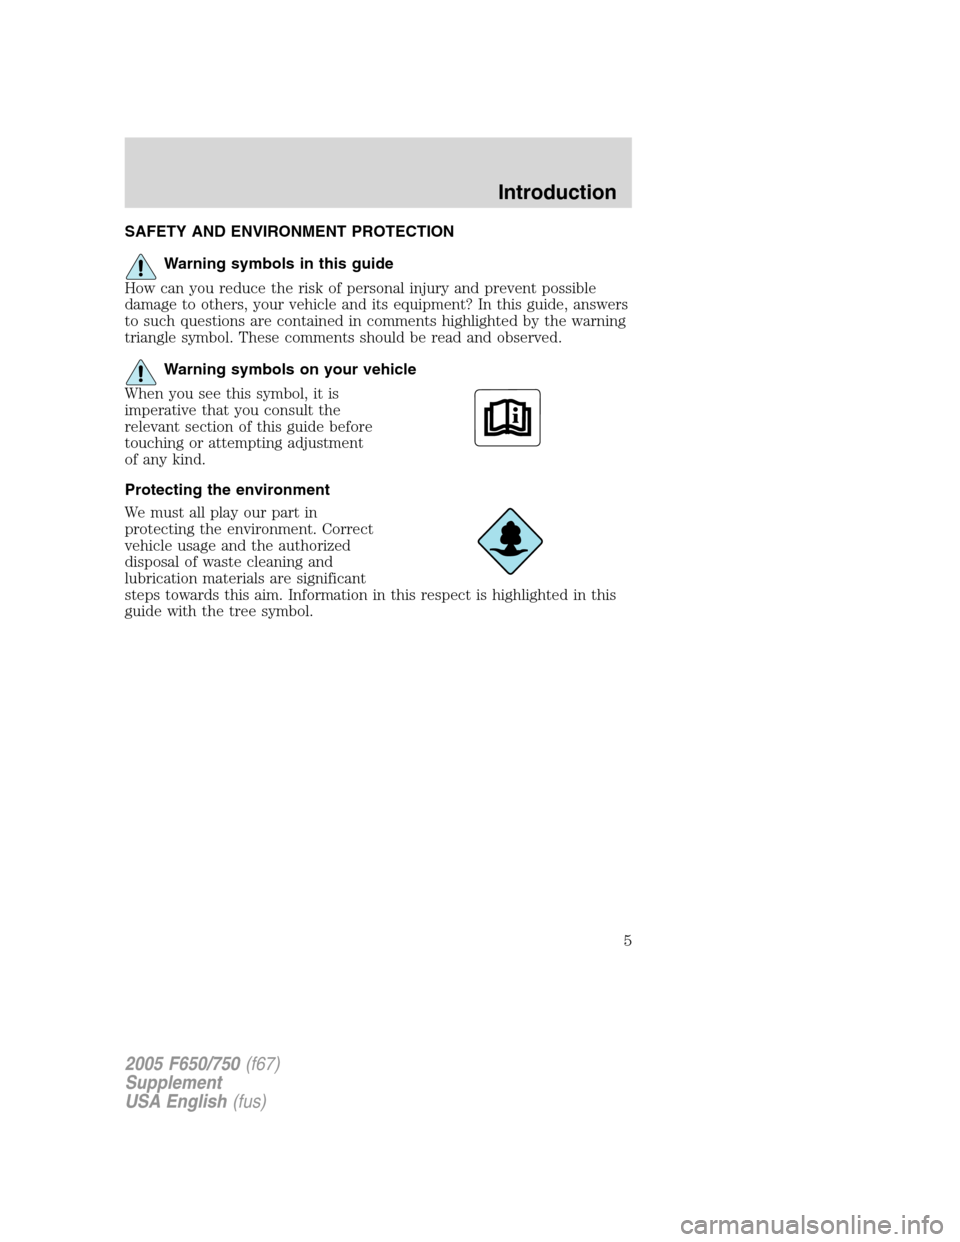
Warning symbols in this guide
How can you reduce the risk of personal injury and prevent possible
damage to others, your vehicle and its equipment? In this guide, answers
to such questions are contained in comments highlighted by the warning
triangle symbol. These comments should be read and observed.
Warning symbols on your vehicle
When you see this symbol, it is
imperative that you consult the
relevant section of this guide before
touching or attempting adjustment
of any kind.
Protecting the environment
We must all play our part in
protecting the environment. Correct
vehicle usage and the authorized
disposal of waste cleaning and
lubrication materials are significant
steps towards this aim. Information in this respect is highlighted in this
guide with the tree symbol.
2005 F650/750(f67)
Supplement
USA English(fus)
Introduction
5
Page 8 of 272
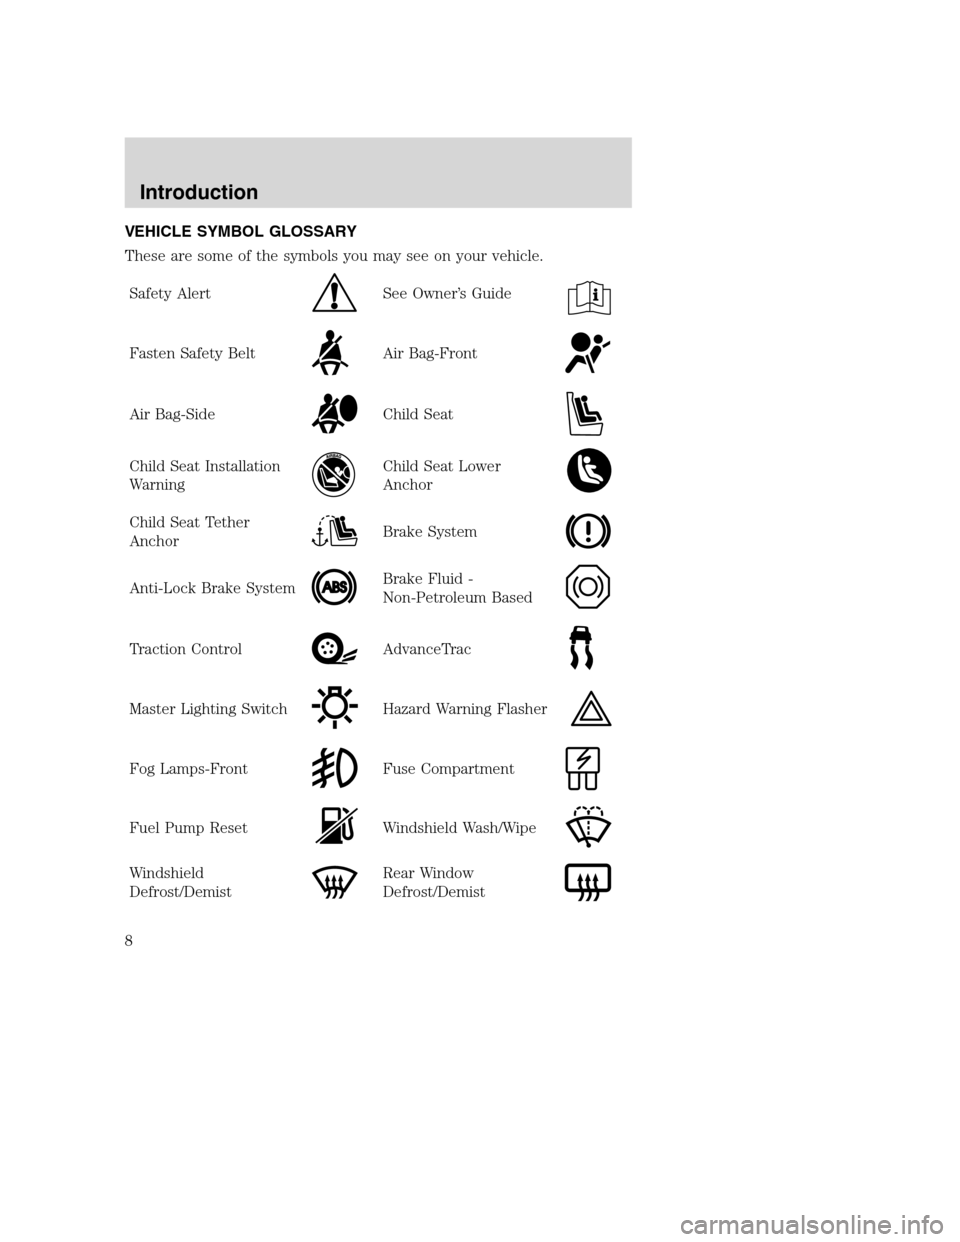
VEHICLE SYMBOL GLOSSARY
These are some of the symbols you may see on your vehicle.
Safety Alert
See Owner’s Guide
Fasten Safety BeltAir Bag-Front
Air Bag-SideChild Seat
Child Seat Installation
WarningChild Seat Lower
Anchor
Child Seat Tether
AnchorBrake System
Anti-Lock Brake SystemBrake Fluid -
Non-Petroleum Based
Traction ControlAdvanceTrac
Master Lighting SwitchHazard Warning Flasher
Fog Lamps-FrontFuse Compartment
Fuel Pump ResetWindshield Wash/Wipe
Windshield
Defrost/DemistRear Window
Defrost/Demist
Introduction
8
Page 12 of 272
Engine compartment (with engine stopped)
HVAC air inlet:Check for debris, leaves, etc. that may have
collected on the HVAC air inlet grille or inside
the exterior module as this may cause reduced
system performance.
HVAC fresh air filter
(if equipped):Periodically check the HVAC fresh air filter for
cleanliness.
Exercise great caution when working on vehicle equipped with
an automatic fan clutch. The fan starts in motion only after the
engine coolant reaches a predetermined temperature or the refrigerant
pressure (if equipped with air conditioning) reaches a predetermined
setting. The fan will start at these point with no advance warning.
Never reach near, or permit objects to protrude into, the fan blade
radius while the engine is running as this could result in vehicle
damage, personal injury or death.
Engine starting (parking brake applied)
Safety/Emergency
equipment:Prior to entering the cab, verify that the
vehicle is equipped with spare electrical fuses
(if used), three red reflective triangles, a
properly charged and rated fire extinguisher
and wheel chocks. Walk around the vehicle
and check that all steps and grab handles,
inside and out as well as behind, are tight and
clean. Use extreme caution and a three-point
stance at all times. Check door latches for
positive closing, latching and locking.
Starting the engine:Verify the parking brake is set. Depress the
clutch (if equipped with a manual
transmission) and verify the transmission is in
neutral. Vehicles equipped with an automatic
transmission should be in N (Neutral).
When the WAIT TO START indicator light in
the instrument cluster turns off, turn the key
to START.
Vehicle inspection guide
12
Page 14 of 272
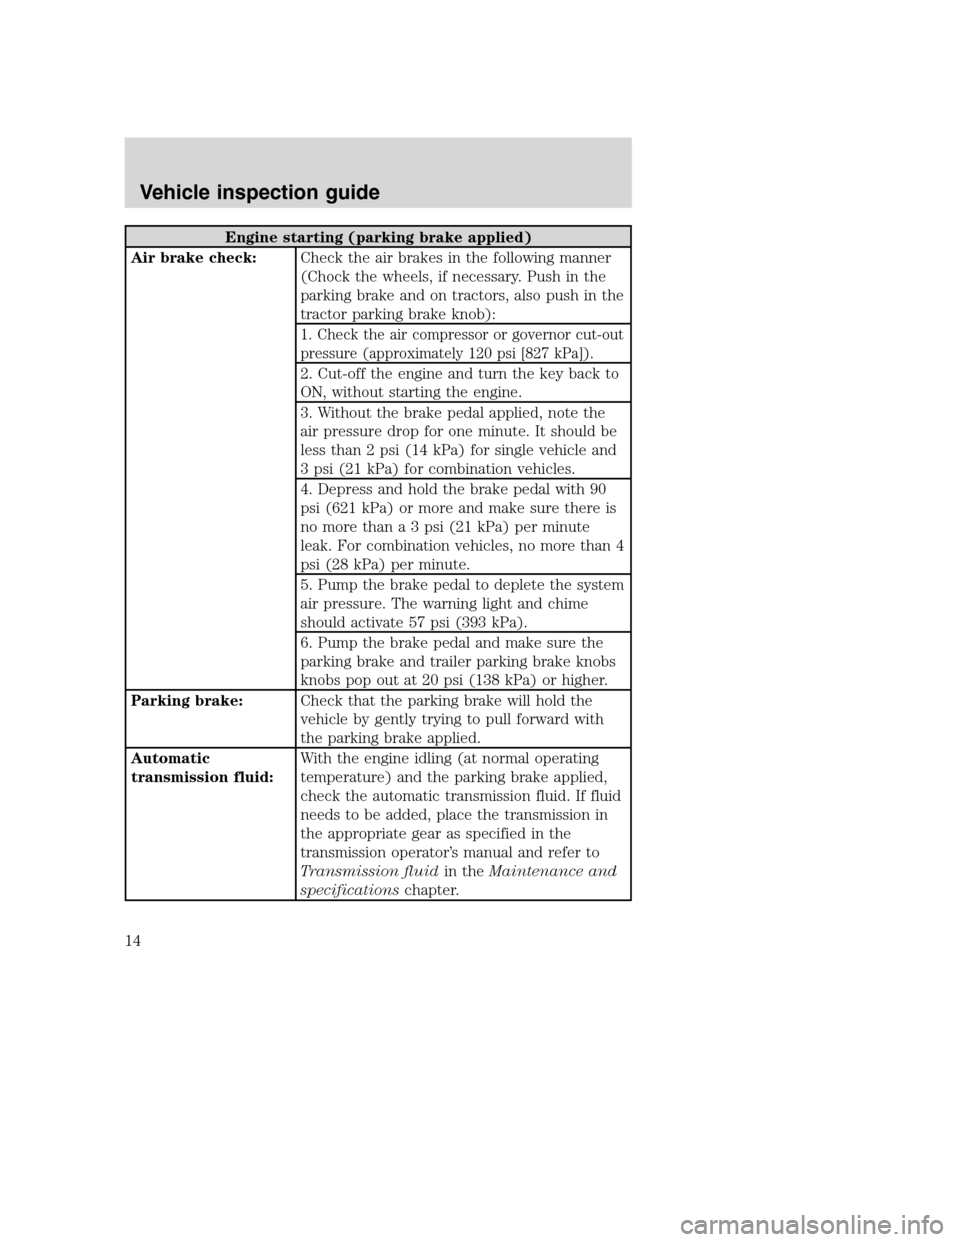
Engine starting (parking brake applied)
Air brake check:Check the air brakes in the following manner
(Chock the wheels, if necessary. Push in the
parking brake and on tractors, also push in the
tractor parking brake knob):
1. Check the air compressor or governor cut-out
pressure (approximately 120 psi [827 kPa]).
2. Cut-off the engine and turn the key back to
ON, without starting the engine.
3. Without the brake pedal applied, note the
air pressure drop for one minute. It should be
less than 2 psi (14 kPa) for single vehicle and
3 psi (21 kPa) for combination vehicles.
4. Depress and hold the brake pedal with 90
psi (621 kPa) or more and make sure there is
no more than a 3 psi (21 kPa) per minute
leak. For combination vehicles, no more than 4
psi (28 kPa) per minute.
5. Pump the brake pedal to deplete the system
air pressure. The warning light and chime
should activate 57 psi (393 kPa).
6. Pump the brake pedal and make sure the
parking brake and trailer parking brake knobs
knobs pop out at 20 psi (138 kPa) or higher.
Parking brake:Check that the parking brake will hold the
vehicle by gently trying to pull forward with
the parking brake applied.
Automatic
transmission fluid:With the engine idling (at normal operating
temperature) and the parking brake applied,
check the automatic transmission fluid. If fluid
needs to be added, place the transmission in
the appropriate gear as specified in the
transmission operator’s manual and refer to
Transmission fluidin theMaintenance and
specificationschapter.
Vehicle inspection guide
14
Page 15 of 272
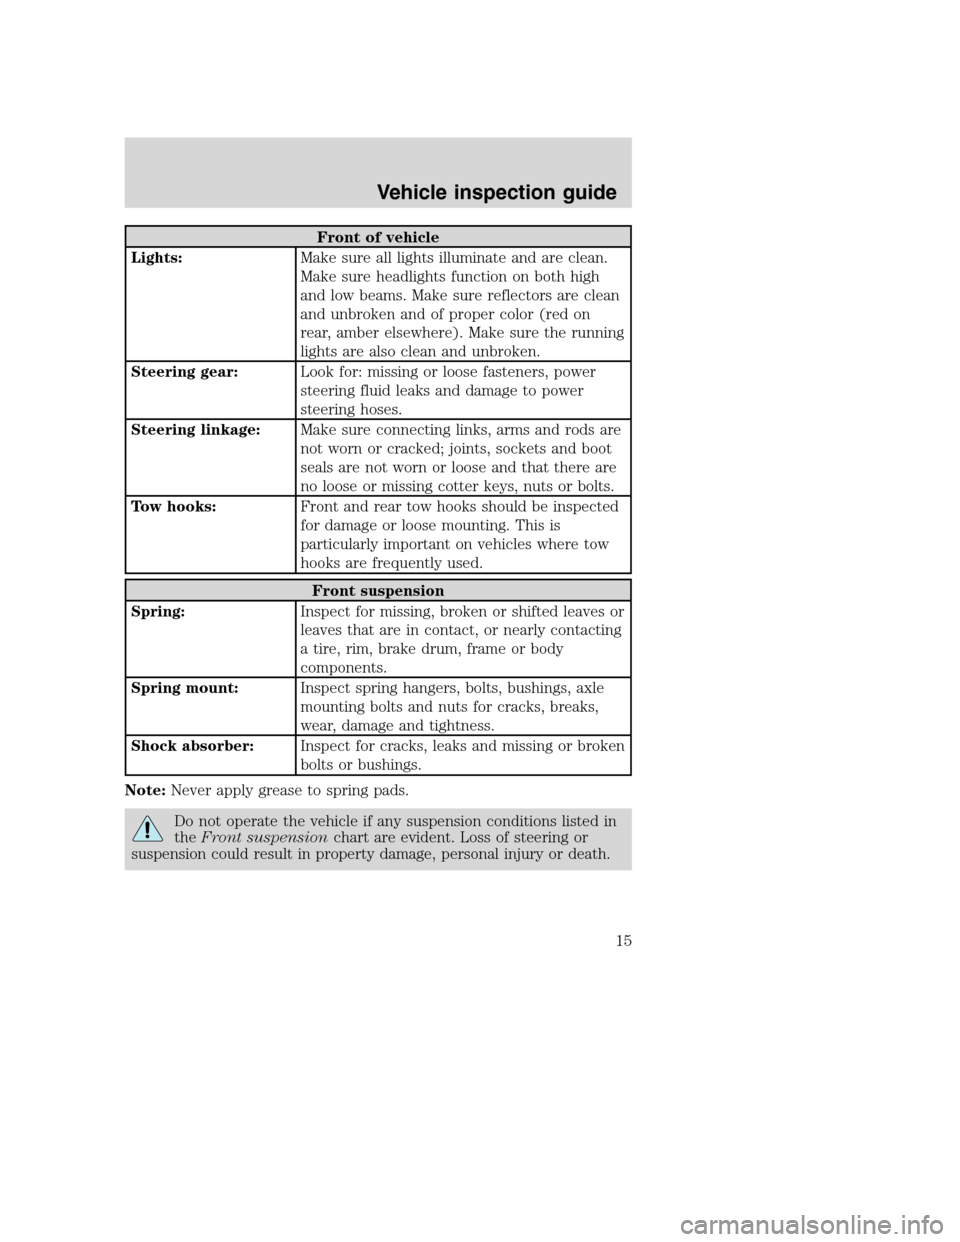
Front of vehicle
Lights:Make sure all lights illuminate and are clean.
Make sure headlights function on both high
and low beams. Make sure reflectors are clean
and unbroken and of proper color (red on
rear, amber elsewhere). Make sure the running
lights are also clean and unbroken.
Steering gear:Look for: missing or loose fasteners, power
steering fluid leaks and damage to power
steering hoses.
Steering linkage:Make sure connecting links, arms and rods are
not worn or cracked; joints, sockets and boot
seals are not worn or loose and that there are
no loose or missing cotter keys, nuts or bolts.
Tow hooks:Front and rear tow hooks should be inspected
for damage or loose mounting. This is
particularly important on vehicles where tow
hooks are frequently used.
Front suspension
Spring:Inspect for missing, broken or shifted leaves or
leaves that are in contact, or nearly contacting
a tire, rim, brake drum, frame or body
components.
Spring mount:Inspect spring hangers, bolts, bushings, axle
mounting bolts and nuts for cracks, breaks,
wear, damage and tightness.
Shock absorber:Inspect for cracks, leaks and missing or broken
bolts or bushings.
Note:Never apply grease to spring pads.
Do not operate the vehicle if any suspension conditions listed in
theFront suspensionchart are evident. Loss of steering or
suspension could result in property damage, personal injury or death.
Vehicle inspection guide
15
Page 18 of 272
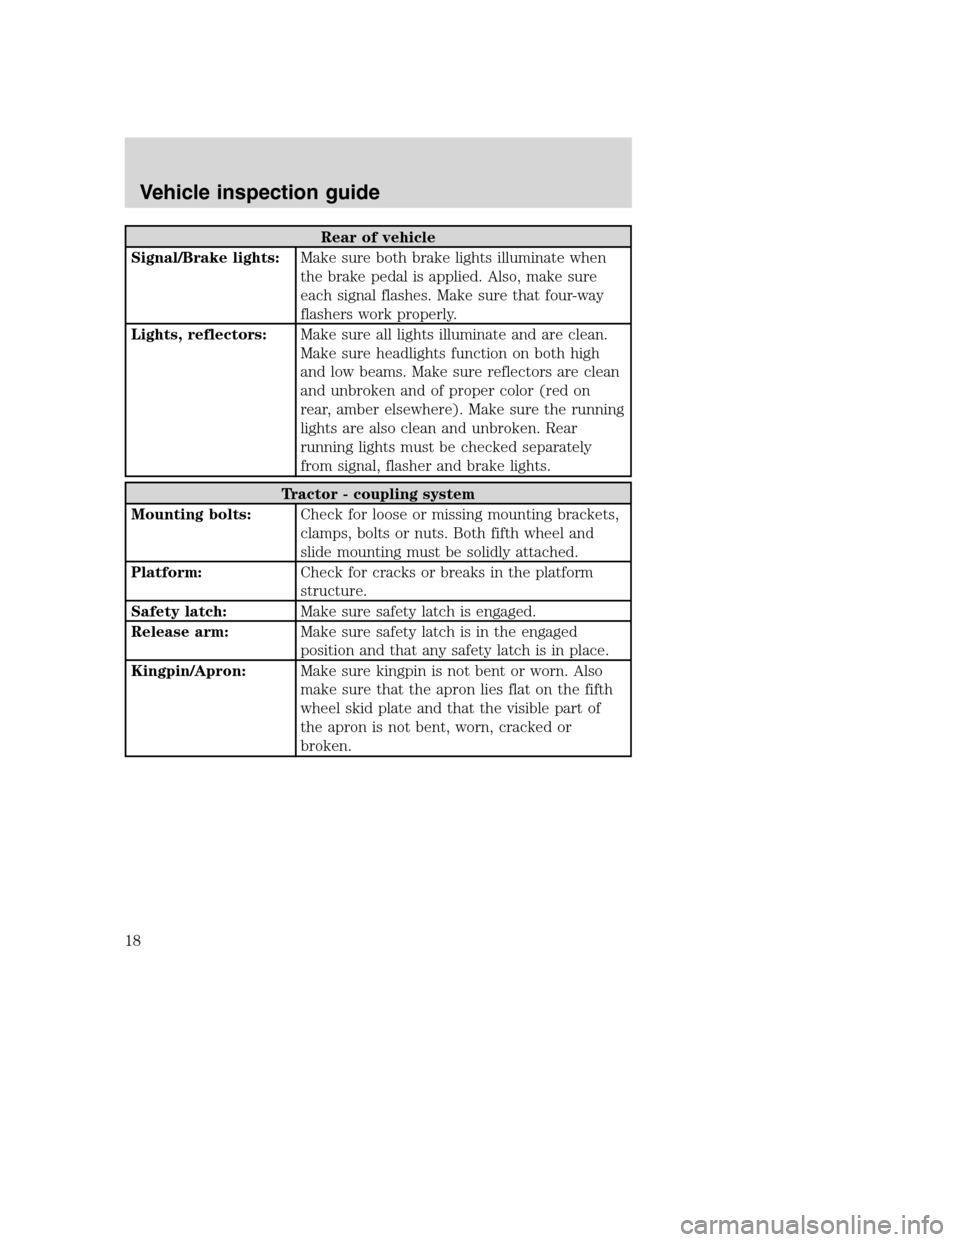
Rear of vehicle
Signal/Brake lights:Make sure both brake lights illuminate when
the brake pedal is applied. Also, make sure
each signal flashes. Make sure that four-way
flashers work properly.
Lights, reflectors:Make sure all lights illuminate and are clean.
Make sure headlights function on both high
and low beams. Make sure reflectors are clean
and unbroken and of proper color (red on
rear, amber elsewhere). Make sure the running
lights are also clean and unbroken. Rear
running lights must be checked separately
from signal, flasher and brake lights.
Tractor - coupling system
Mounting bolts:Check for loose or missing mounting brackets,
clamps, bolts or nuts. Both fifth wheel and
slide mounting must be solidly attached.
Platform:Check for cracks or breaks in the platform
structure.
Safety latch:Make sure safety latch is engaged.
Release arm:Make sure safety latch is in the engaged
position and that any safety latch is in place.
Kingpin/Apron:Make sure kingpin is not bent or worn. Also
make sure that the apron lies flat on the fifth
wheel skid plate and that the visible part of
the apron is not bent, worn, cracked or
broken.
Vehicle inspection guide
18
Page 20 of 272
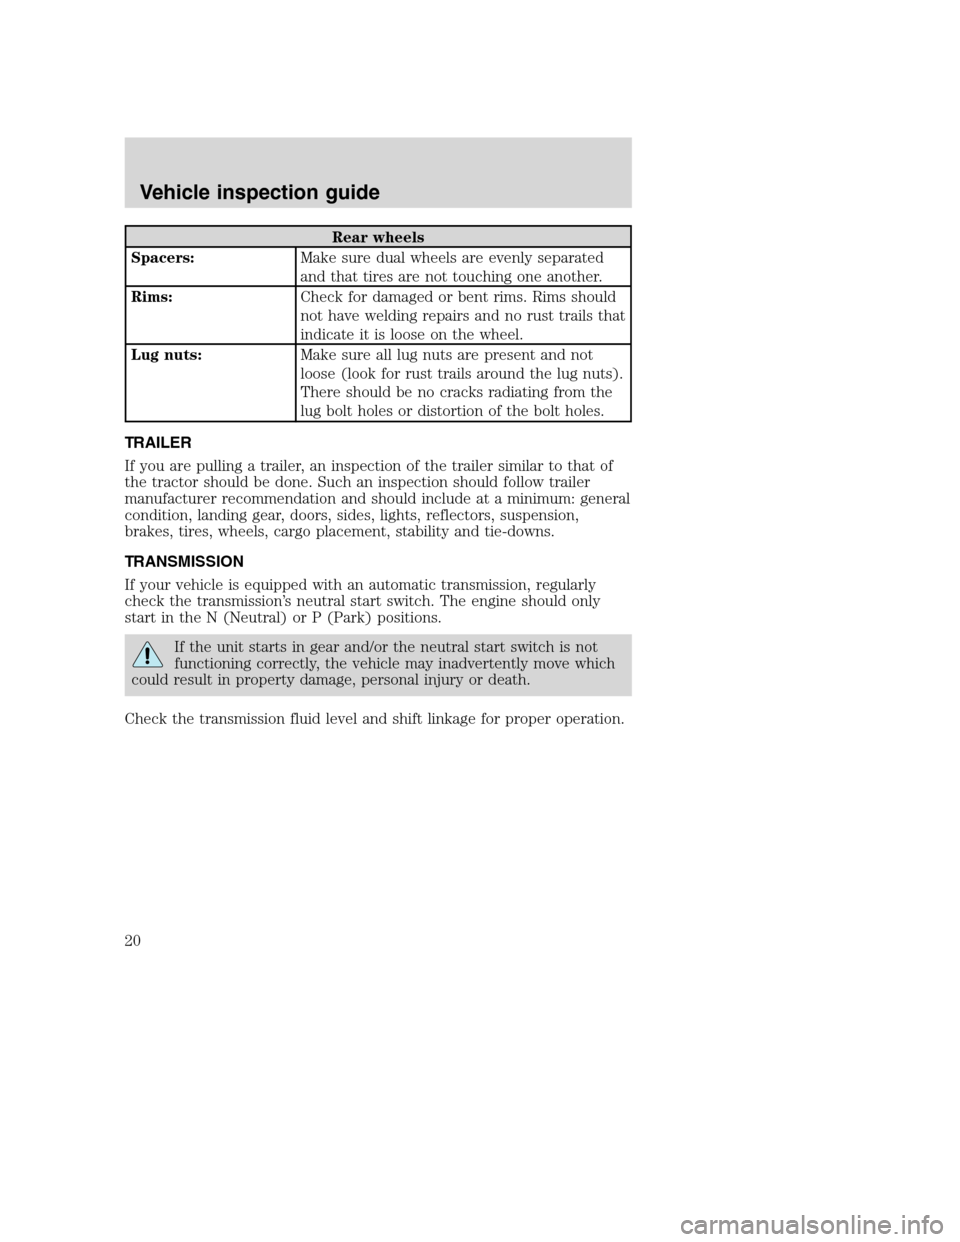
Rear wheels
Spacers:Make sure dual wheels are evenly separated
and that tires are not touching one another.
Rims:Check for damaged or bent rims. Rims should
not have welding repairs and no rust trails that
indicate it is loose on the wheel.
Lug nuts:Make sure all lug nuts are present and not
loose (look for rust trails around the lug nuts).
There should be no cracks radiating from the
lug bolt holes or distortion of the bolt holes.
TRAILER
If you are pulling a trailer, an inspection of the trailer similar to that of
the tractor should be done. Such an inspection should follow trailer
manufacturer recommendation and should include at a minimum: general
condition, landing gear, doors, sides, lights, reflectors, suspension,
brakes, tires, wheels, cargo placement, stability and tie-downs.
TRANSMISSION
If your vehicle is equipped with an automatic transmission, regularly
check the transmission’s neutral start switch. The engine should only
start in the N (Neutral) or P (Park) positions.
If the unit starts in gear and/or the neutral start switch is not
functioning correctly, the vehicle may inadvertently move which
could result in property damage, personal injury or death.
Check the transmission fluid level and shift linkage for proper operation.
Vehicle inspection guide
20
Page 21 of 272
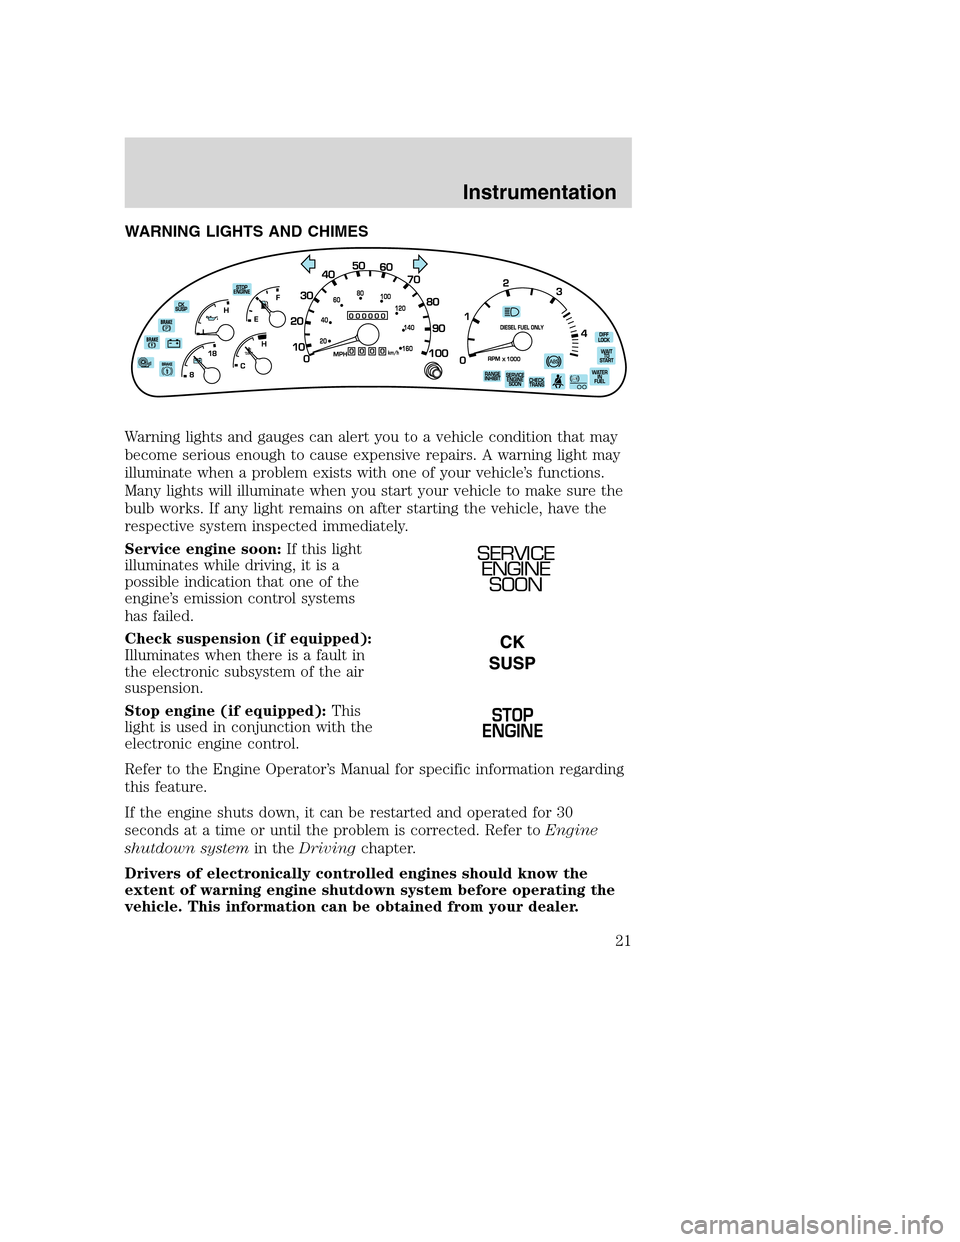
WARNING LIGHTS AND CHIMES
Warning lights and gauges can alert you to a vehicle condition that may
become serious enough to cause expensive repairs. A warning light may
illuminate when a problem exists with one of your vehicle’s functions.
Many lights will illuminate when you start your vehicle to make sure the
bulb works. If any light remains on after starting the vehicle, have the
respective system inspected immediately.
Service engine soon:If this light
illuminates while driving, it is a
possible indication that one of the
engine’s emission control systems
has failed.
Check suspension (if equipped):
Illuminates when there is a fault in
the electronic subsystem of the air
suspension.
Stop engine (if equipped):This
light is used in conjunction with the
electronic engine control.
Refer to the Engine Operator’s Manual for specific information regarding
this feature.
If the engine shuts down, it can be restarted and operated for 30
seconds at a time or until the problem is corrected. Refer toEngine
shutdown systemin theDrivingchapter.
Drivers of electronically controlled engines should know the
extent of warning engine shutdown system before operating the
vehicle. This information can be obtained from your dealer.
SERVICE
ENGINE
SOON
STOP
ENGINE
Instrumentation
Instrumentation
21
Page 22 of 272
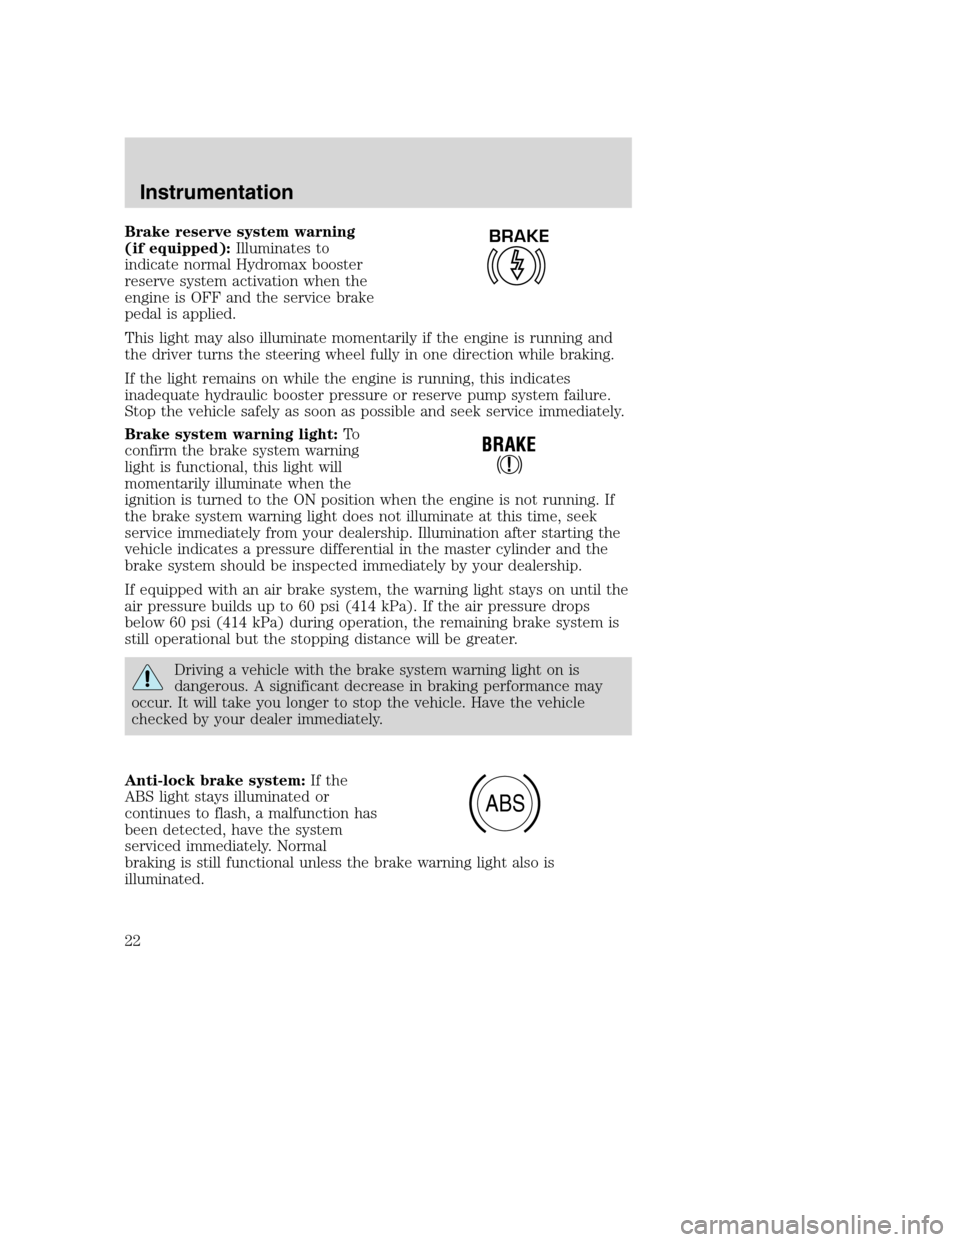
Brake reserve system warning
(if equipped):Illuminates to
indicate normal Hydromax booster
reserve system activation when the
engine is OFF and the service brake
pedal is applied.
This light may also illuminate momentarily if the engine is running and
the driver turns the steering wheel fully in one direction while braking.
If the light remains on while the engine is running, this indicates
inadequate hydraulic booster pressure or reserve pump system failure.
Stop the vehicle safely as soon as possible and seek service immediately.
Brake system warning light:To
confirm the brake system warning
light is functional, this light will
momentarily illuminate when the
ignition is turned to the ON position when the engine is not running. If
the brake system warning light does not illuminate at this time, seek
service immediately from your dealership. Illumination after starting the
vehicle indicates a pressure differential in the master cylinder and the
brake system should be inspected immediately by your dealership.
If equipped with an air brake system, the warning light stays on until the
air pressure builds up to 60 psi (414 kPa). If the air pressure drops
below 60 psi (414 kPa) during operation, the remaining brake system is
still operational but the stopping distance will be greater.
Driving a vehicle with the brake system warning light on is
dangerous. A significant decrease in braking performance may
occur. It will take you longer to stop the vehicle. Have the vehicle
checked by your dealer immediately.
Anti-lock brake system:If the
ABS light stays illuminated or
continues to flash, a malfunction has
been detected, have the system
serviced immediately. Normal
braking is still functional unless the brake warning light also is
illuminated.
BRAKE
ABS
Instrumentation
22