steering FORD F750 2016 13.G Owner's Manual
[x] Cancel search | Manufacturer: FORD, Model Year: 2016, Model line: F750, Model: FORD F750 2016 13.GPages: 379, PDF Size: 4.8 MB
Page 171 of 379

Protected components
Fuse amp rating
Fuse or relay number
Left front window motor.
30A
1
Upfitter relay #4.
15A
2
Right front window motor.
30A
3
Interior lamps.
10A
4
Not used.
—
5
Not used.
—
6
Power mirror switch.
7.5A
7
Not used.
—
8
Upfitter relay #3.
10A
9
Run/accessory customer access.
10A
10
Ford telematics battery feed.
10A
11
Interior lighting.
15A
12
Right turn and brake lamps.
15A
13
Left turn and brake lamps.
15A
14
Center high-mounted stop lamp.
15A
15
Backup lamps.
Right headlamp low beam.
10A
16
Left headlamp low beam.
10A
17
Powertrain control module wakeup.
10A
18
Brake shift interlock.
Not used.
—
19
Power door locks.
20A
20
Brake on/off switch.
10A
21
Horn.
20A
22
Instrument cluster.
15A
23
Diagnostic connector.
15A
24
Power fold mirror relay.
Steering wheel control module.
168
F650750 (TBC), enUSA, First Printing Fuses
Page 172 of 379

Protected components
Fuse amp rating
Fuse or relay number
Remote keyless entry.
Not used.
—
25
Steering wheel control module.
5A
26
Not used.
—
27
Ignition switch.
15A
28
GPS module.
20A
29
Radio.
SYNC.
Parking lamps.
15A
30
Trailer tow parking lamps relay coil.
Customer access trailer brake on/off
switch.
5A
31
Delayed accessory power.
15A
32
Driver and passenger door lock switch
illumination.
110v power inverter module.
Telescoping mirror switch.
Not used.
—
33
Ancillary translator module run/start.
10A
34
Tow/Haul run/start.
5A
35
Fuel tank select switch.
10A
36
Auxiliary heater.
10A
37
Delayed accessory power.
10A
38
AM/FM base radio.
Left and right headlamp high beam.
15A
39
Rear parking lamps.
10A
40
Clearance lamps.
Not used.
—
41
Ford telematics run/start.
5A
42
Power Distribution Box run/accessory
fuses.
10A
43
Wiper relay coil.
169
F650750 (TBC), enUSA, First Printing Fuses
Page 174 of 379
VEHICLE INSPECTION
INFORMATION
To make sure your vehicle is ready to
operate, conduct a pre-trip inspection at
the beginning of each work period. Follow
the steps listed in this section to verify a
proper vehicle inspection procedure.
WARNINGS
Exercise great caution when working
on a vehicle equipped with an
automatic fan clutch. The fan starts
in motion only after the engine coolant
reaches a predetermined temperature or
the refrigerant pressure (if equipped with
air conditioning) reaches a predetermined
setting. The fan starts at this point with no
advance warning. Never reach near, or
permit objects to protrude into, the fan
blade radius while the engine is running as
this could result in vehicle damage,
personal injury or death. WARNINGS
Do not operate the vehicle if any
suspension conditions listed in the
following charts are evident. Loss of
steering or suspension could result in
property damage, personal injury or death. If a wheel must be changed, obtain
expert tire service help. Mounting and
un-mounting of tires should only be
performed by a qualified technician using
necessary safety procedures and
equipment, otherwise the result could be
property damage, personal injury or death. Note:
Always make sure you apply the
parking brake before starting the engine. Engine compartment (with engine off)
Use the dipstick to verify the oil level is in the proper operating
range. See Engine Oil Dipstick (page 185).
Engine oil
Look through the plastic reservoir and verify the coolant level
is within the proper operating range. Do not remove the
pressure cap until the coolant has cooled. See
Engine
Coolant Check (page 190).
Engine coolant
Verify that the fluid level is in the proper operating range. See
Power Steering Fluid Check
(page 202).
Power steering fluid
Remove the master cylinder caps and inspect the fluid level.
See
Brake Fluid Check (page 201).
Brake fluid
171
F650750 (TBC), enUSA, First Printing Vehicle Inspection Guide
Page 176 of 379

Engine starting (with parking brake applied)
Check the gauge (diesel engine) or indicator light (gasoline
engine) to verify the alternator is charging.
Voltmeter
Inspect for excessive free play in the steering linkages. The
steering wheel should have less than 2 in (5 cm) of free play
at its rim.
Steering linkage free play
Verify the parking brake holds the vehicle by gently trying to
pull forward with the parking brake applied.
Parking brake
Verify operation using the following procedure. Chock the
wheels, if necessary. Push in the parking brake and, on
tractors, push in the tractor parking brake knob:
Air brakes
1. Verify the air compressor or governor cutout pressure is
approximately 120 psi (827 kPa).
2. Turn off the engine, and then turn the key back to the on
position (without starting the engine).
3. Without the brake pedal applied, note the air pressure drop
for one minute. It should be less than 2 psi (14 kPa) for single
vehicles and
3 psi (21 kPa) for combination vehicles.
4. Press and hold the brake pedal with
90 psi (621 kPa) or
more. Make sure there is no more than a 3 psi (21 kPa) per
minute leak for single vehicles and a 4 psi (28 kPa) minute
leak for combination vehicles.
5. Pump the brake pedal to deplete the system of air pressure.
The warning light and tone should turn on at 57 psi (393 kPa).
6. Pump the brake pedal and make sure the parking brake
and trailer parking brake knobs pop out at
20 psi (138 kPa)
or higher.
Verify that the fluid level is in the proper operating range. See
Automatic Transmission Fluid Check
(page 200).
Automatic transmission
fluid Front of vehicle
Verify all exterior lights illuminate and are clean.
Lights
Check headlights function on high and low beam.
Verify reflectors are clean, unbroken and of proper color (red
on rear, amber elsewhere).
173
F650750 (TBC), enUSA, First Printing Vehicle Inspection Guide
Page 177 of 379

Front of vehicle
Verify running lights are clean and unbroken.
Inspect for any missing or loose fasteners, power steering
fluid leaks and damage to power steering hoses.
Steering gear
Verify connecting links, arms and rods are not worn or cracked.
Steering linkage
Verify joints, sockets and boot seals are not worn or loose.
Verify cotter keys, nuts and bolts are not loose or missing.
Inspect front and rear tow hooks for damage or loose
mounting. This is particularly important on vehicles that use
them frequently.
Tow hooks Front suspension
Inspect for missing, broken or shifted leaves, or leaves that
may be in contact with (or nearly contacting) a tire, rim, brake
drum, frame or body component.
Springs
Note: Never apply grease to spring pads.
Make sure there the following items are properly tightened
and that there are no cracks, breaks, wear, damage to spring
hangers, bolts, bushings, axle mounting bolts, and nuts.
Spring mounts
Inspect for any cracks, leaks, or missing or broken bolts or
bushings.
Shock absorbers
174
F650750 (TBC), enUSA, First Printing Vehicle Inspection Guide
Page 183 of 379

GENERAL INFORMATION
WARNINGS
Making modifications to various
parts, components and systems of
the vehicle, such as brake and
steering systems, can adversely affect the
quality, reliability and operation of your
vehicle and could result in property
damage, personal injury or death. Such
modifications must be avoided. Failure to properly perform
maintenance and servicing
procedures could result in vehicle
damage, personal injury or death. Take care when performing any
maintenance, system check or
service on your vehicle. Some of the
materials may also be hazardous if used,
serviced or handled improperly and could
result in property damage, personal injury
or death. If the owner or operator of the vehicle is a
skilled technician and intends on
performing the vehicle maintenance and
service, he is strongly urged to purchase a
service manual.
Always use care when performing vehicle
maintenance, repairs or system checks.
Improper or incomplete service could result
in your vehicle not working properly which
may result in personal injury or damage to
your vehicle or equipment. It is the
operator
’s responsibility to see that your
vehicle receives proper care and
maintenance. If you have any questions
about performing service, have the service
done by a qualified technician.
To help you service your vehicle, we
provide scheduled maintenance
information which makes tracking routine
service easy. See Scheduled
Maintenance (page 314). If your vehicle requires professional service,
an authorized dealer can provide the
necessary parts and service. Check your
warranty information to find out which
parts and services are covered.
Use only recommended fuels, lubricants,
fluids and service parts conforming to
specifications. Motorcraft® parts are
designed and built to provide the best
performance in your vehicle.
Servicing Guidelines
WARNING
The use of inferior parts can
adversely affect the quality and
reliability of your vehicle and could
result in property damage, personal injury
or death. When servicing your vehicle:
•
Always wear safety glasses for eye
protection.
• Always set the parking brake or chock
the wheels.
• Always use support stands, not a jack,
when working under a raised vehicle.
• Always turn off the ignition unless a
procedure requires the engine to be
running.
• Always avoid contact with hot metal
parts. Allow the components to cool
before working with, or around, them.
• Always operate the engine in a
well-ventilated area.
• Do not wear loose-fitting clothing,
hanging jewelry, watches or rings.
• Do not smoke.
• Do not work on the brakes or the clutch
unless you take the proper precautions
to avoid inhaling friction material dust.
180
F650750 (TBC), enUSA, First Printing Maintenance
Page 186 of 379
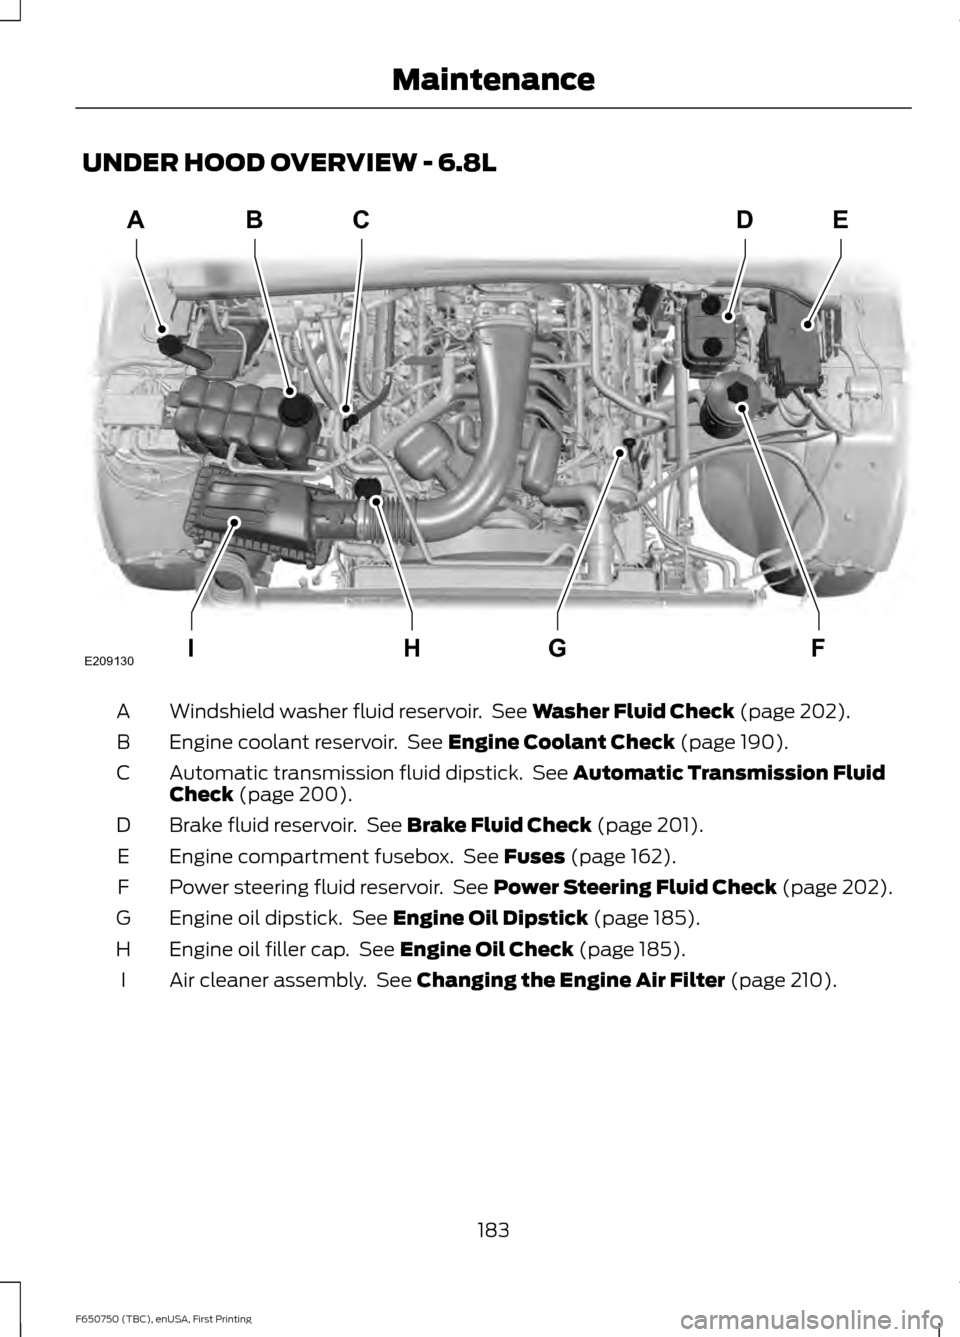
UNDER HOOD OVERVIEW - 6.8L
Windshield washer fluid reservoir. See Washer Fluid Check (page 202).
A
Engine coolant reservoir. See
Engine Coolant Check (page 190).
B
Automatic transmission fluid dipstick. See
Automatic Transmission Fluid
Check (page 200).
C
Brake fluid reservoir. See
Brake Fluid Check (page 201).
D
Engine compartment fusebox. See
Fuses (page 162).
E
Power steering fluid reservoir. See
Power Steering Fluid Check (page 202).
F
Engine oil dipstick. See
Engine Oil Dipstick (page 185).
G
Engine oil filler cap. See
Engine Oil Check (page 185).
H
Air cleaner assembly. See
Changing the Engine Air Filter (page 210).
I
183
F650750 (TBC), enUSA, First Printing MaintenanceABC
FGHI
DE
E209130
Page 187 of 379
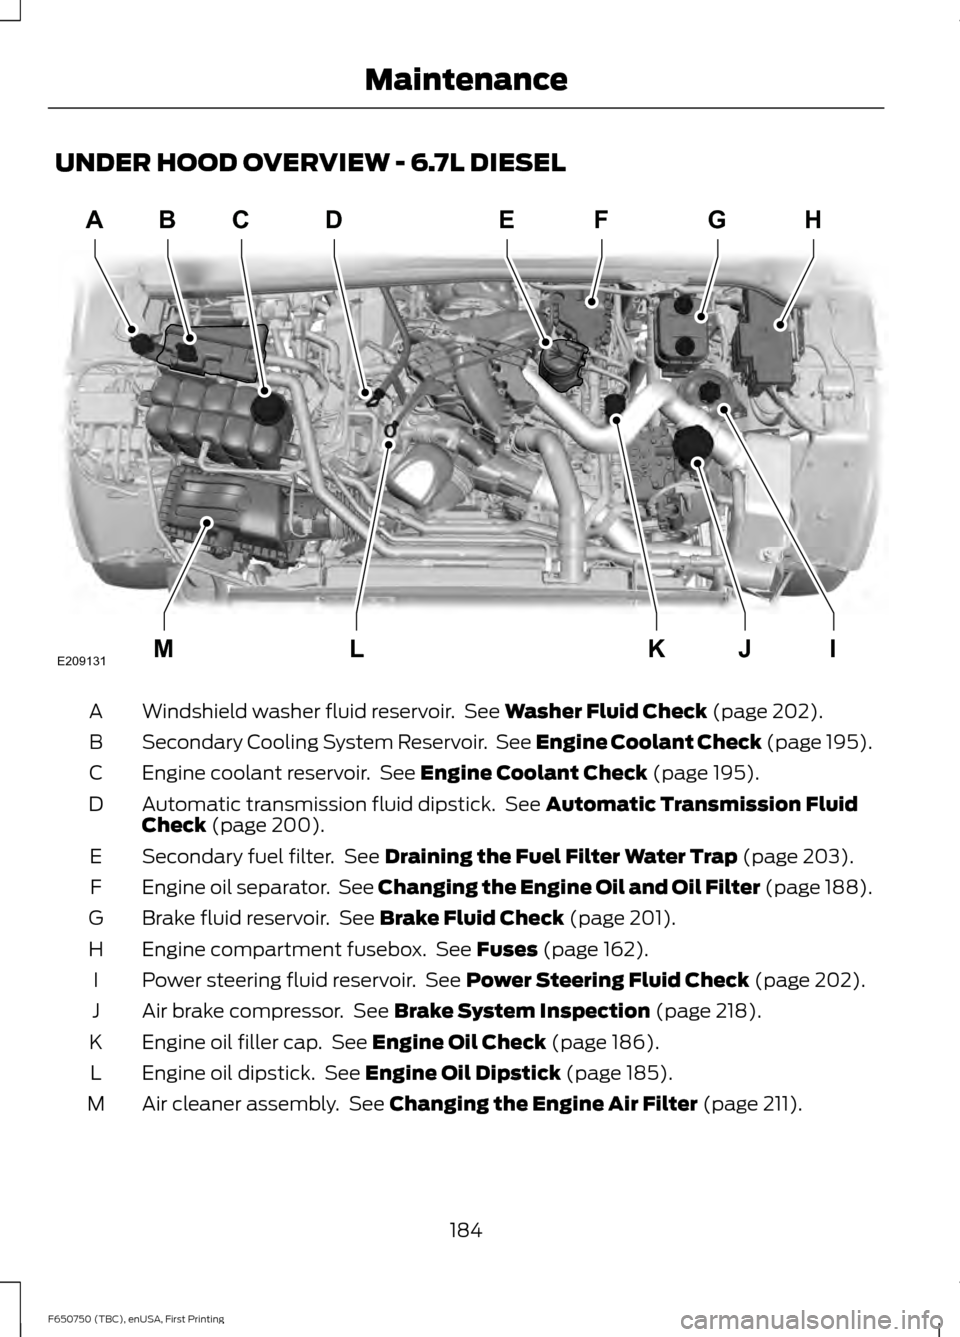
UNDER HOOD OVERVIEW - 6.7L DIESEL
Windshield washer fluid reservoir. See Washer Fluid Check (page 202).
A
Secondary Cooling System Reservoir. See Engine Coolant Check (page 195).
B
Engine coolant reservoir. See
Engine Coolant Check (page 195).
C
Automatic transmission fluid dipstick. See
Automatic Transmission Fluid
Check (page 200).
D
Secondary fuel filter. See
Draining the Fuel Filter Water Trap (page 203).
E
Engine oil separator. See Changing the Engine Oil and Oil Filter (page 188).
F
Brake fluid reservoir. See
Brake Fluid Check (page 201).
G
Engine compartment fusebox. See
Fuses (page 162).
H
Power steering fluid reservoir. See
Power Steering Fluid Check (page 202).
I
Air brake compressor. See
Brake System Inspection (page 218).
J
Engine oil filler cap. See
Engine Oil Check (page 186).
K
Engine oil dipstick. See
Engine Oil Dipstick (page 185).
L
Air cleaner assembly. See
Changing the Engine Air Filter (page 211).
M
184
F650750 (TBC), enUSA, First Printing MaintenanceABD
IJKLM
FEGH
E209131C
Page 193 of 379
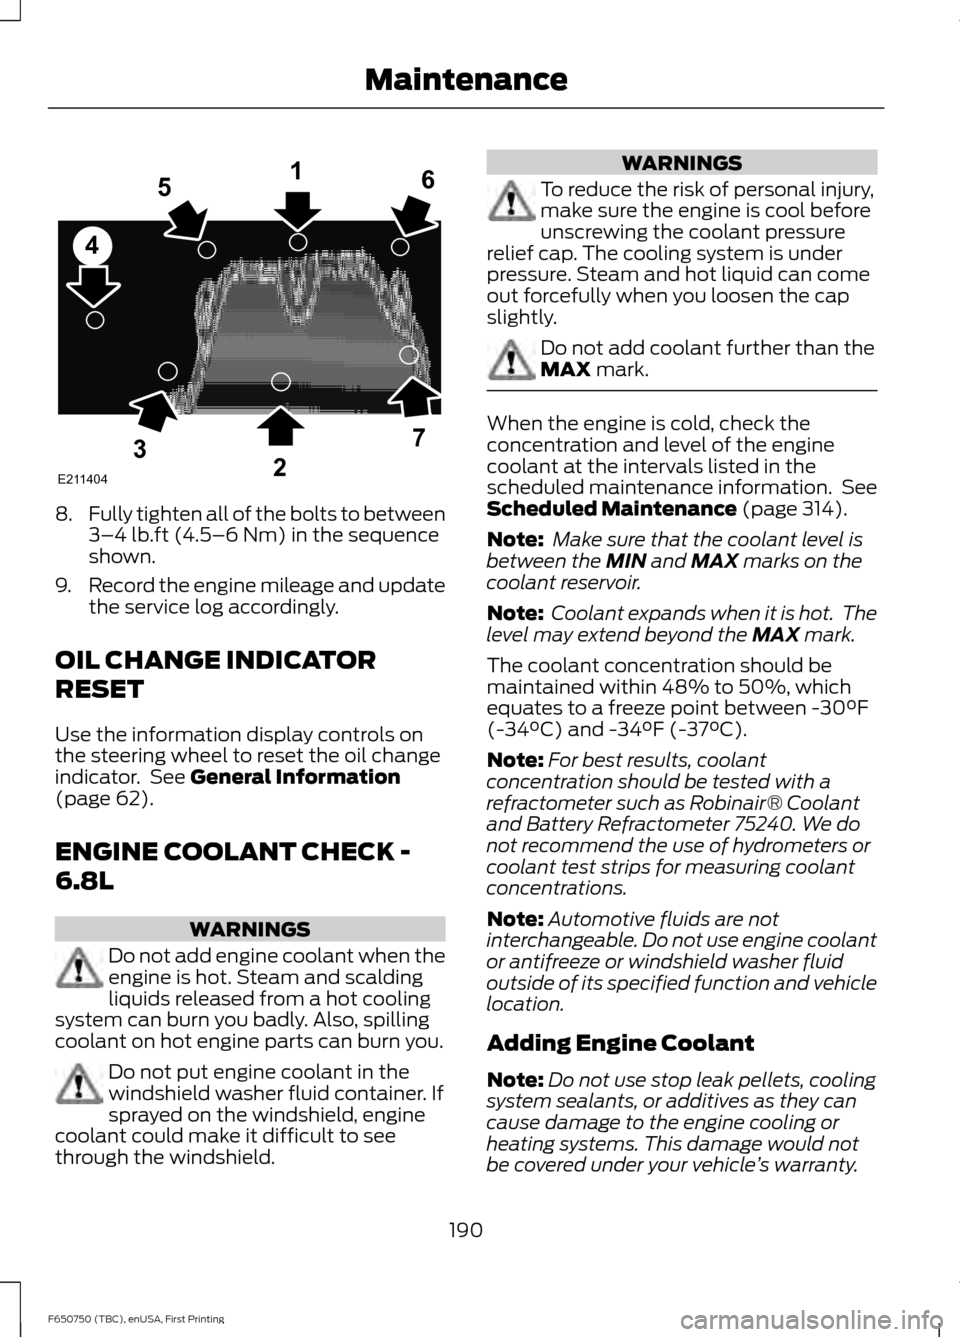
8.
Fully tighten all of the bolts to between
3–4 lb.ft (4.5–6 Nm) in the sequence
shown.
9. Record the engine mileage and update
the service log accordingly.
OIL CHANGE INDICATOR
RESET
Use the information display controls on
the steering wheel to reset the oil change
indicator. See
General Information
(page 62).
ENGINE COOLANT CHECK -
6.8L WARNINGS
Do not add engine coolant when the
engine is hot. Steam and scalding
liquids released from a hot cooling
system can burn you badly. Also, spilling
coolant on hot engine parts can burn you. Do not put engine coolant in the
windshield washer fluid container. If
sprayed on the windshield, engine
coolant could make it difficult to see
through the windshield. WARNINGS
To reduce the risk of personal injury,
make sure the engine is cool before
unscrewing the coolant pressure
relief cap. The cooling system is under
pressure. Steam and hot liquid can come
out forcefully when you loosen the cap
slightly. Do not add coolant further than the
MAX
mark.
When the engine is cold, check the
concentration and level of the engine
coolant at the intervals listed in the
scheduled maintenance information. See
Scheduled Maintenance
(page 314).
Note: Make sure that the coolant level is
between the
MIN and MAX marks on the
coolant reservoir.
Note: Coolant expands when it is hot. The
level may extend beyond the
MAX mark.
The coolant concentration should be
maintained within 48% to 50%, which
equates to a freeze point between -30°F
(-34°C) and -34°F (-37°C).
Note: For best results, coolant
concentration should be tested with a
refractometer such as Robinair® Coolant
and Battery Refractometer 75240. We do
not recommend the use of hydrometers or
coolant test strips for measuring coolant
concentrations.
Note: Automotive fluids are not
interchangeable. Do not use engine coolant
or antifreeze or windshield washer fluid
outside of its specified function and vehicle
location.
Adding Engine Coolant
Note: Do not use stop leak pellets, cooling
system sealants, or additives as they can
cause damage to the engine cooling or
heating systems. This damage would not
be covered under your vehicle ’s warranty.
190
F650750 (TBC), enUSA, First Printing MaintenanceE211404
165
4
32
7
Page 196 of 379
Engine-driven Cooling Fan (Fan
Clutch)
Your vehicle is equipped with an engine
driven cooling fan drive (also called a fan
clutch). This fan drive changes the fan
speed to match the vehicle
’s changing
cooling air flow requirements. Fan speed,
fan noise level and fuel consumption all
will increase based on the driving
conditions that include trailer towing, hill
climbing, heavy loads, high speed and high
ambient temperature, individually or in
combination.
The fan drive is designed to provide the
minimum fan speed (and resulting
minimum fan noise and fuel consumption)
required to meet the ever changing vehicle
cooling air flow requirements. You will hear
the amount of fan noise increasing and
decreasing as the engine power
requirements and vehicle driving conditions
change as you drive. This is to be expected
as being normal to the operation of your
vehicle. High levels of fan noise might also
be heard when your engine is first started,
and should normally decrease after driving
for a short time.
What You Should Know About Fail-
Safe Cooling
If the engine coolant supply is depleted,
this feature allows the vehicle to be driven
temporarily before incremental component
damage is incurred. The “fail-safe”
distance depends on ambient
temperatures, vehicle load and terrain.
How Fail-Safe Cooling Works
If the engine begins to overheat, the engine
coolant temperature gauge will move to
the red (hot) area and: The coolant temperature
warning light will illuminate. The service engine soon
indicator will illuminate.
If the engine reaches a preset
over-temperature condition, the engine
will automatically switch to alternating
cylinder operation. Each disabled cylinder
acts as an air pump and cools the engine.
When this occurs the vehicle will still
operate. However:
• The engine power will be limited.
• The air conditioning system will be
disabled.
Continued operation will increase the
engine temperature and the engine will
completely shut down, causing steering
and braking effort to increase.
Once the engine temperature cools, the
engine can be re-started. Take your vehicle
to an authorized dealer as soon as possible
to minimize engine damage.
When Fail-Safe Mode Is Activated WARNINGS
Fail-safe mode is for use during
emergencies only. Operate your
vehicle in fail-safe mode only as long
as necessary to bring your vehicle to rest
in a safe location and seek immediate
repairs. When in fail-safe mode, your
vehicle will have limited power, will not be
able to maintain high-speed operation, and
may completely shut down without
warning, potentially losing engine power,
power steering assist, and power brake
assist, which may increase the possibility
of a crash resulting in serious injury. Never remove the coolant reservoir
cap while the engine is running or hot.
193
F650750 (TBC), enUSA, First Printing Maintenance