brake light FORD F750 2016 13.G Owners Manual
[x] Cancel search | Manufacturer: FORD, Model Year: 2016, Model line: F750, Model: FORD F750 2016 13.GPages: 379, PDF Size: 4.8 MB
Page 15 of 379
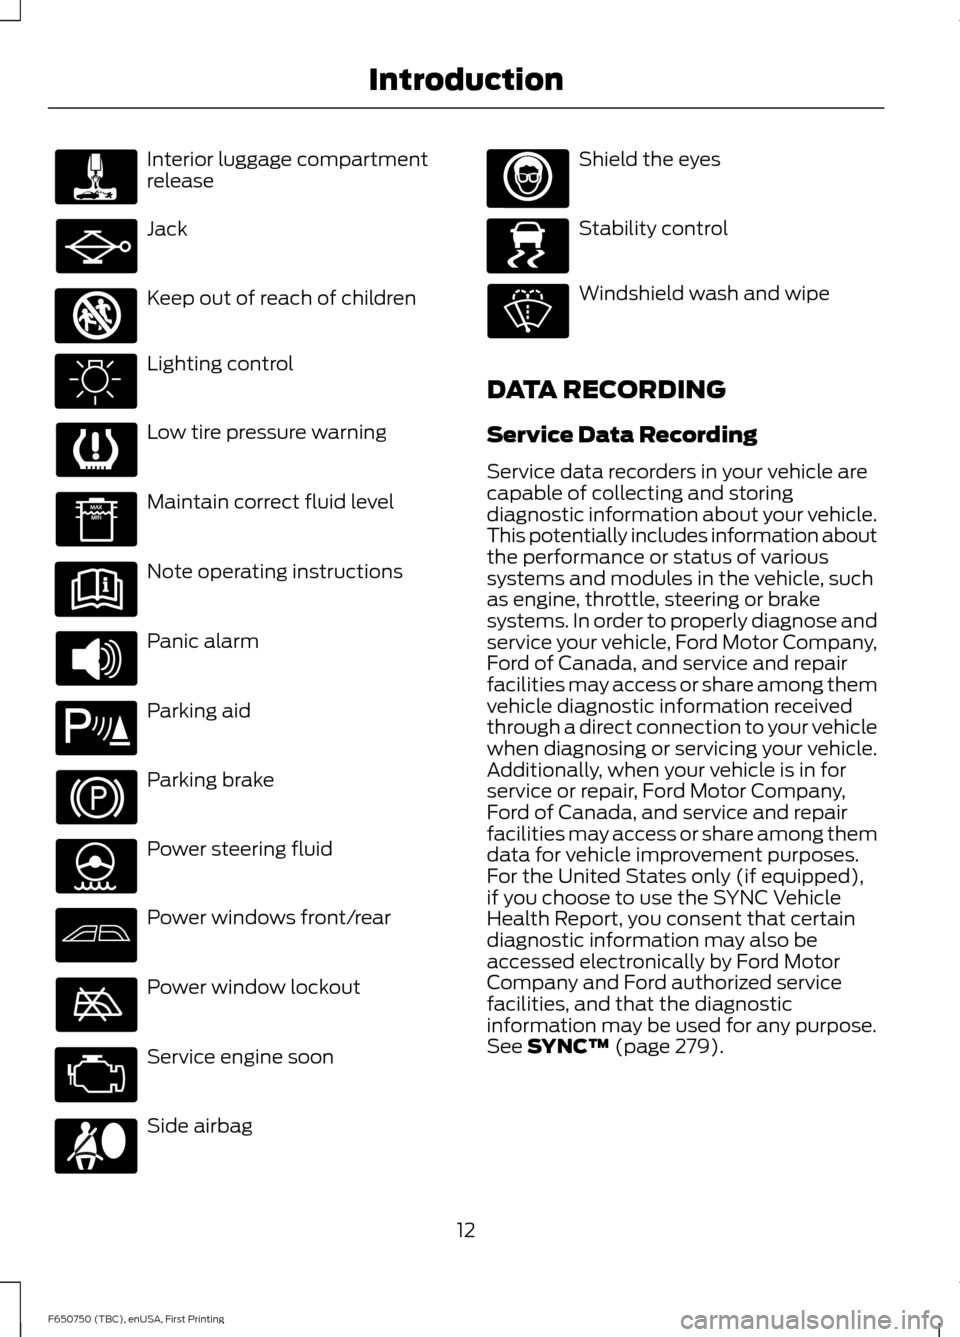
Interior luggage compartment
release
Jack
Keep out of reach of children
Lighting control
Low tire pressure warning
Maintain correct fluid level
Note operating instructions
Panic alarm
Parking aid
Parking brake
Power steering fluid
Power windows front/rear
Power window lockout
Service engine soon
Side airbag Shield the eyes
Stability control
Windshield wash and wipe
DATA RECORDING
Service Data Recording
Service data recorders in your vehicle are
capable of collecting and storing
diagnostic information about your vehicle.
This potentially includes information about
the performance or status of various
systems and modules in the vehicle, such
as engine, throttle, steering or brake
systems. In order to properly diagnose and
service your vehicle, Ford Motor Company,
Ford of Canada, and service and repair
facilities may access or share among them
vehicle diagnostic information received
through a direct connection to your vehicle
when diagnosing or servicing your vehicle.
Additionally, when your vehicle is in for
service or repair, Ford Motor Company,
Ford of Canada, and service and repair
facilities may access or share among them
data for vehicle improvement purposes.
For the United States only (if equipped),
if you choose to use the SYNC Vehicle
Health Report, you consent that certain
diagnostic information may also be
accessed electronically by Ford Motor
Company and Ford authorized service
facilities, and that the diagnostic
information may be used for any purpose.
See SYNC™ (page 279).
12
F650750 (TBC), enUSA, First Printing Introduction E161353 E139213 E167012 E138639
Page 36 of 379
Using Safety Belts During
Pregnancy
WARNING
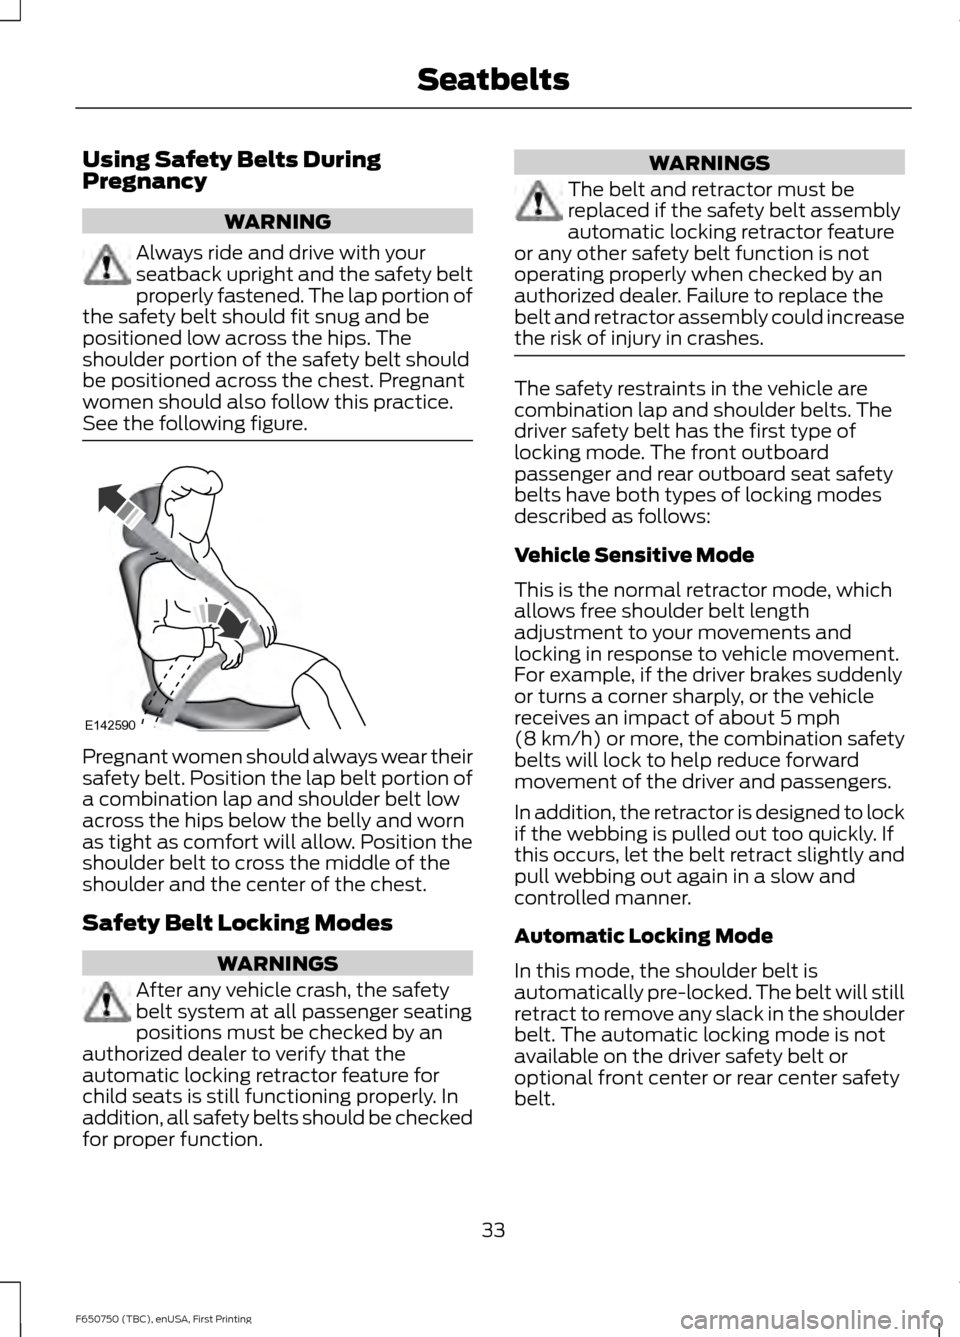
Always ride and drive with your
seatback upright and the safety belt
properly fastened. The lap portion of
the safety belt should fit snug and be
positioned low across the hips. The
shoulder portion of the safety belt should
be positioned across the chest. Pregnant
women should also follow this practice.
See the following figure. Pregnant women should always wear their
safety belt. Position the lap belt portion of
a combination lap and shoulder belt low
across the hips below the belly and worn
as tight as comfort will allow. Position the
shoulder belt to cross the middle of the
shoulder and the center of the chest.
Safety Belt Locking Modes
WARNINGS
After any vehicle crash, the safety
belt system at all passenger seating
positions must be checked by an
authorized dealer to verify that the
automatic locking retractor feature for
child seats is still functioning properly. In
addition, all safety belts should be checked
for proper function. WARNINGS
The belt and retractor must be
replaced if the safety belt assembly
automatic locking retractor feature
or any other safety belt function is not
operating properly when checked by an
authorized dealer. Failure to replace the
belt and retractor assembly could increase
the risk of injury in crashes. The safety restraints in the vehicle are
combination lap and shoulder belts. The
driver safety belt has the first type of
locking mode. The front outboard
passenger and rear outboard seat safety
belts have both types of locking modes
described as follows:
Vehicle Sensitive Mode
This is the normal retractor mode, which
allows free shoulder belt length
adjustment to your movements and
locking in response to vehicle movement.
For example, if the driver brakes suddenly
or turns a corner sharply, or the vehicle
receives an impact of about 5 mph
(8 km/h) or more, the combination safety
belts will lock to help reduce forward
movement of the driver and passengers.
In addition, the retractor is designed to lock
if the webbing is pulled out too quickly. If
this occurs, let the belt retract slightly and
pull webbing out again in a slow and
controlled manner.
Automatic Locking Mode
In this mode, the shoulder belt is
automatically pre-locked. The belt will still
retract to remove any slack in the shoulder
belt. The automatic locking mode is not
available on the driver safety belt or
optional front center or rear center safety
belt.
33
F650750 (TBC), enUSA, First Printing SeatbeltsE142590
Page 39 of 379
Then...
If...
The Belt-Minder feature will not activate.
You buckle your safety belt before you
switch the ignition switch on or less than 1- 2 minutes elapse after you switch the igni- tion on...
The Belt-Minder feature activates, the
safety belt warning light illuminates and a
warning tone sounds for six seconds every 25 seconds, repeating for about five
minutes or until you buckle the safety belt.
You do not buckle your safety belt before
your vehicle has reached at least 6 mph
(9.7 km/h) and 1-2 minutes elapse after you switch the ignition on...
The Belt-Minder feature activates, the
safety belt warning light illuminates and a
warning tone sounds for six seconds every 25 seconds, repeating for about five
minutes or until you buckle the safety belt.
The safety belt for the driver is unbuckled
for about one minute while the vehicle is traveling at least 6 mph (9.7 km/h) andmore than 1-2 minutes elapse after you switch the ignition on...
Deactivating and Activating the
Belt-Minder Feature (Driver Only) WARNING
While the system allows you to
deactivate it, this system is designed
to improve your chances of being
safely belted and surviving an accident.
We recommend you leave the system
activated for yourself and others who may
use the vehicle. To reduce the risk of injury,
do not deactivate or activate the system
while driving the vehicle. Read Steps 1 - 4 thoroughly before
proceeding with the programming
procedure.
Deactivate or activate the system by
performing the following procedure:
Before following the procedure, make sure
that:
•
The parking brake is set.
• The transmission is in park (P) (if
equipped) or neutral (N).
• The ignition is off. •
All vehicle doors are closed.
• The driver safety belt is unbuckled.
• The parking lamps and headlamps are
off.
1. Turn the ignition on. Do not start the engine.
2. Wait until the safety belt warning light turns off (about one or two minutes).
You must complete Steps 3–5 within
60 seconds after the safety belt
warning light turns off. If not
completed, you must repeat the
procedure.
3. Buckle then unbuckle the safety belt three times at a moderate speed,
ending with the safety belt in the
unbuckled state. After Step 4, the
safety belt warning light turns on for
three seconds.
4. Within seven seconds of the light turning on, buckle then unbuckle the
safety belt.
36
F650750 (TBC), enUSA, First Printing Seatbelts
Page 61 of 379
Trip Computer
See General Information (page 62).
Vehicle Settings and Personalization
See
General Information (page 62).
WARNING LAMPS AND
INDICATORS
The following warning lamps and
indicators alert you to a vehicle condition
that may become serious. Some lamps
illuminate when you start your vehicle to
make sure they work. If any lamps remain
on after starting your vehicle, refer to the
respective system warning lamp for further
information.
Note: Some warning indicators appear in
the information display and function the
same as a warning lamp but do not display
when you start your vehicle.
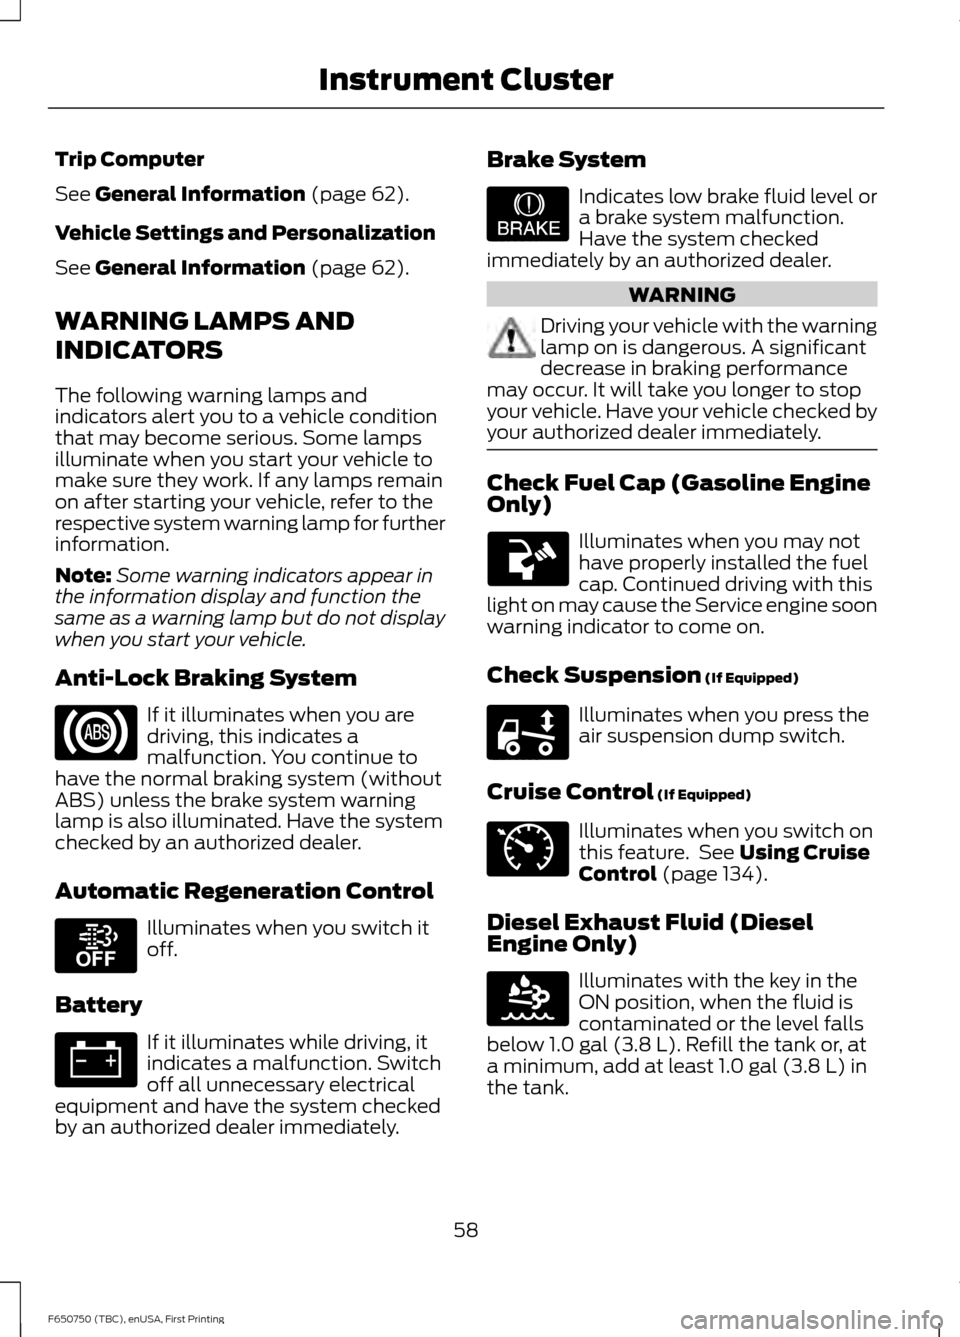
Anti-Lock Braking System If it illuminates when you are
driving, this indicates a
malfunction. You continue to
have the normal braking system (without
ABS) unless the brake system warning
lamp is also illuminated. Have the system
checked by an authorized dealer.
Automatic Regeneration Control Illuminates when you switch it
off.
Battery If it illuminates while driving, it
indicates a malfunction. Switch
off all unnecessary electrical
equipment and have the system checked
by an authorized dealer immediately. Brake System Indicates low brake fluid level or
a brake system malfunction.
Have the system checked
immediately by an authorized dealer. WARNING
Driving your vehicle with the warning
lamp on is dangerous. A significant
decrease in braking performance
may occur. It will take you longer to stop
your vehicle. Have your vehicle checked by
your authorized dealer immediately. Check Fuel Cap (Gasoline Engine
Only)
Illuminates when you may not
have properly installed the fuel
cap. Continued driving with this
light on may cause the Service engine soon
warning indicator to come on.
Check Suspension
(If Equipped) Illuminates when you press the
air suspension dump switch.
Cruise Control
(If Equipped) Illuminates when you switch on
this feature. See
Using Cruise
Control (page 134).
Diesel Exhaust Fluid (Diesel
Engine Only) Illuminates with the key in the
ON position, when the fluid is
contaminated or the level falls
below
1.0 gal (3.8 L). Refill the tank or, at
a minimum, add at least 1.0 gal (3.8 L) in
the tank.
58
F650750 (TBC), enUSA, First Printing Instrument Cluster E208811 E209041 E208808 E71340 E163176
Page 62 of 379
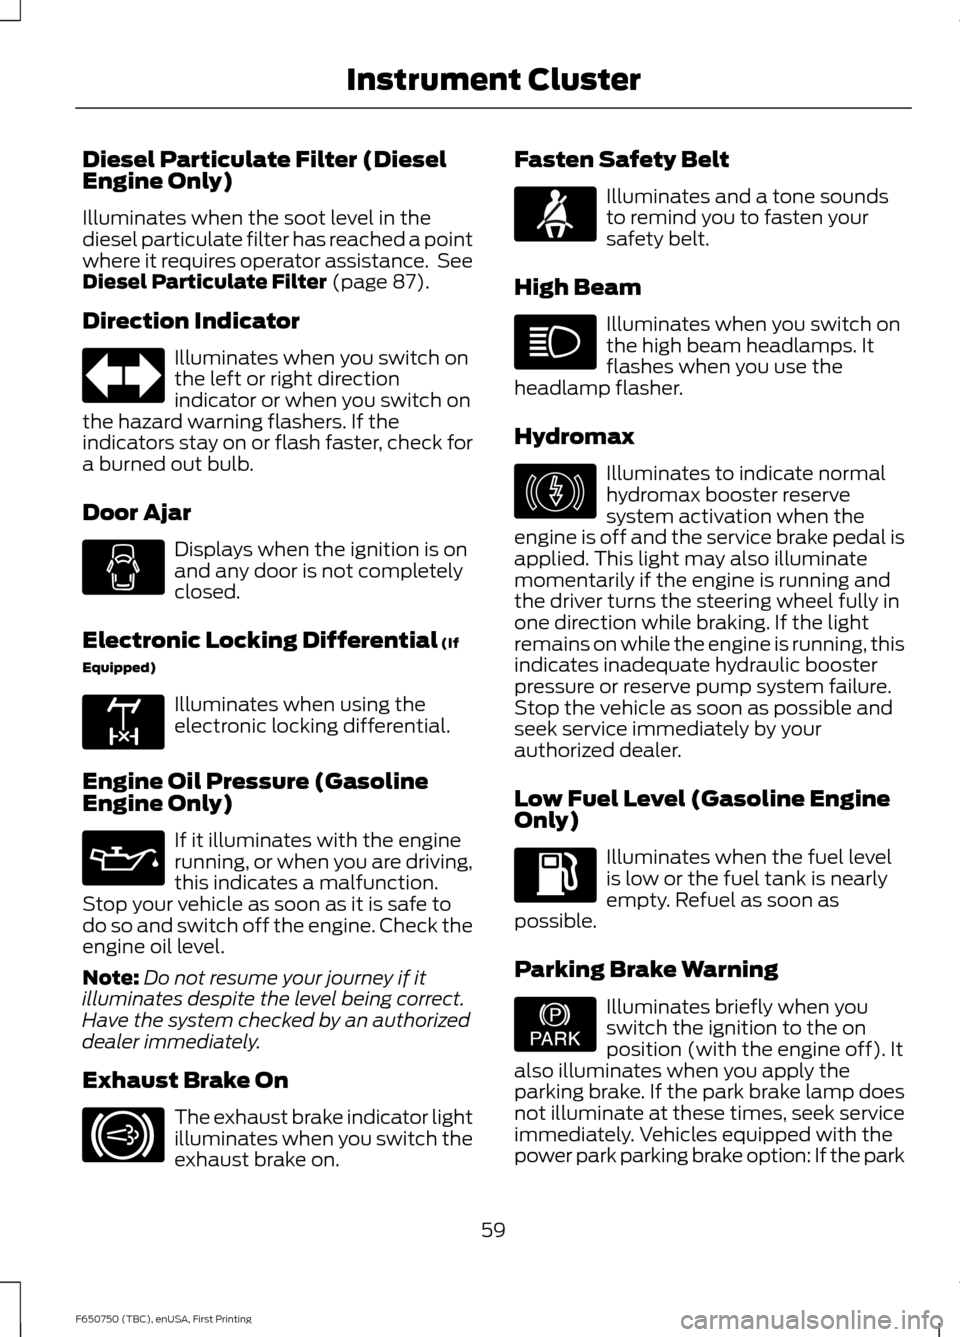
Diesel Particulate Filter (Diesel
Engine Only)
Illuminates when the soot level in the
diesel particulate filter has reached a point
where it requires operator assistance. See
Diesel Particulate Filter (page 87).
Direction Indicator Illuminates when you switch on
the left or right direction
indicator or when you switch on
the hazard warning flashers. If the
indicators stay on or flash faster, check for
a burned out bulb.
Door Ajar Displays when the ignition is on
and any door is not completely
closed.
Electronic Locking Differential
(If
Equipped) Illuminates when using the
electronic locking differential.
Engine Oil Pressure (Gasoline
Engine Only) If it illuminates with the engine
running, or when you are driving,
this indicates a malfunction.
Stop your vehicle as soon as it is safe to
do so and switch off the engine. Check the
engine oil level.
Note: Do not resume your journey if it
illuminates despite the level being correct.
Have the system checked by an authorized
dealer immediately.
Exhaust Brake On The exhaust brake indicator light
illuminates when you switch the
exhaust brake on. Fasten Safety Belt Illuminates and a tone sounds
to remind you to fasten your
safety belt.
High Beam Illuminates when you switch on
the high beam headlamps. It
flashes when you use the
headlamp flasher.
Hydromax Illuminates to indicate normal
hydromax booster reserve
system activation when the
engine is off and the service brake pedal is
applied. This light may also illuminate
momentarily if the engine is running and
the driver turns the steering wheel fully in
one direction while braking. If the light
remains on while the engine is running, this
indicates inadequate hydraulic booster
pressure or reserve pump system failure.
Stop the vehicle as soon as possible and
seek service immediately by your
authorized dealer.
Low Fuel Level (Gasoline Engine
Only) Illuminates when the fuel level
is low or the fuel tank is nearly
empty. Refuel as soon as
possible.
Parking Brake Warning Illuminates briefly when you
switch the ignition to the on
position (with the engine off). It
also illuminates when you apply the
parking brake. If the park brake lamp does
not illuminate at these times, seek service
immediately. Vehicles equipped with the
power park parking brake option: If the park
59
F650750 (TBC), enUSA, First Printing Instrument Cluster E163170 E171217 E146190 E208810
Page 63 of 379
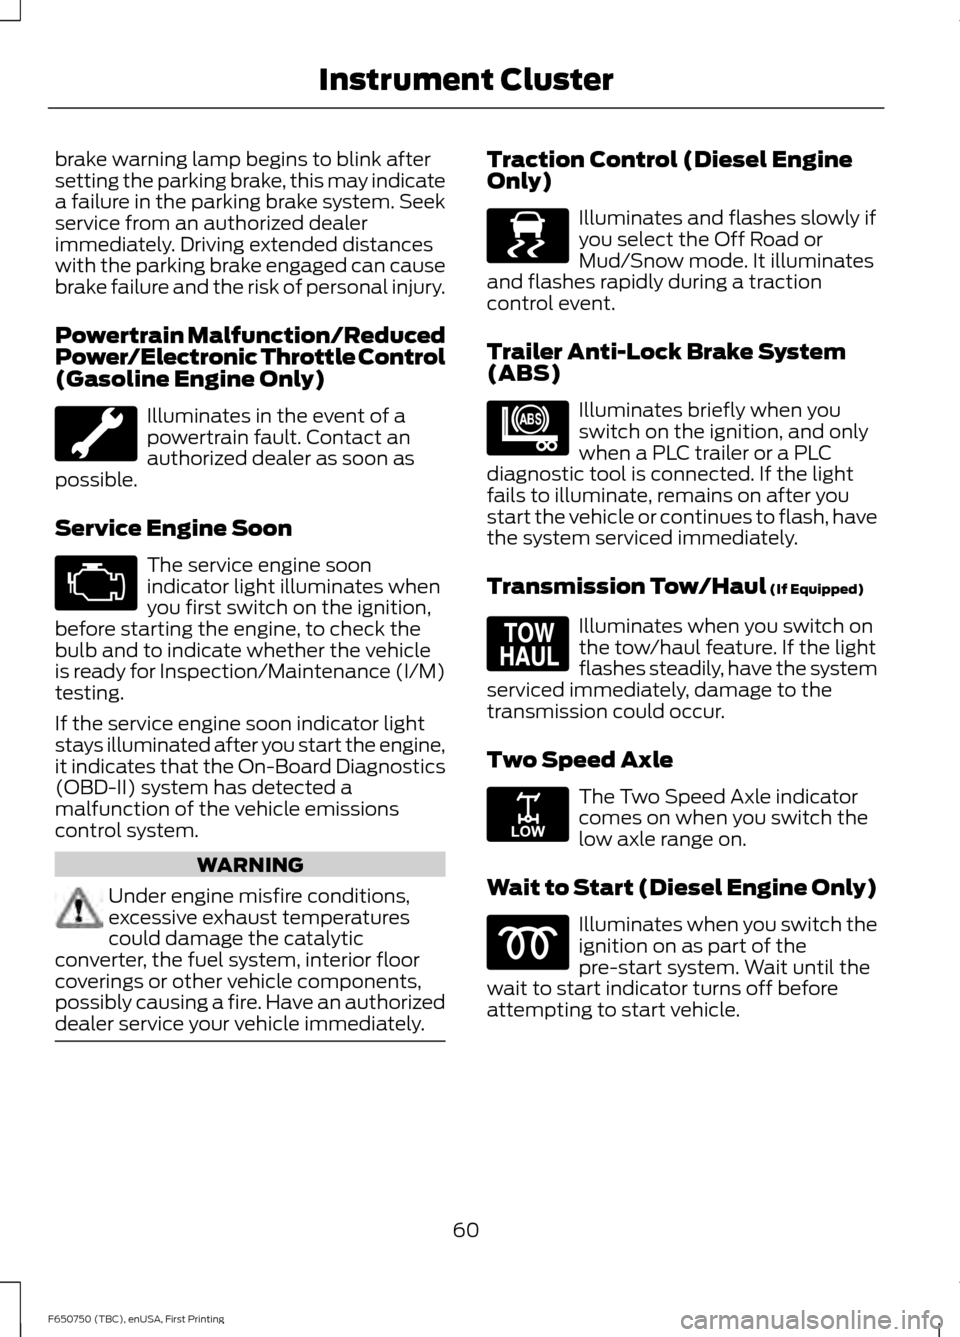
brake warning lamp begins to blink after
setting the parking brake, this may indicate
a failure in the parking brake system. Seek
service from an authorized dealer
immediately. Driving extended distances
with the parking brake engaged can cause
brake failure and the risk of personal injury.
Powertrain Malfunction/Reduced
Power/Electronic Throttle Control
(Gasoline Engine Only)
Illuminates in the event of a
powertrain fault. Contact an
authorized dealer as soon as
possible.
Service Engine Soon The service engine soon
indicator light illuminates when
you first switch on the ignition,
before starting the engine, to check the
bulb and to indicate whether the vehicle
is ready for Inspection/Maintenance (I/M)
testing.
If the service engine soon indicator light
stays illuminated after you start the engine,
it indicates that the On-Board Diagnostics
(OBD-II) system has detected a
malfunction of the vehicle emissions
control system. WARNING
Under engine misfire conditions,
excessive exhaust temperatures
could damage the catalytic
converter, the fuel system, interior floor
coverings or other vehicle components,
possibly causing a fire. Have an authorized
dealer service your vehicle immediately. Traction Control (Diesel Engine
Only)
Illuminates and flashes slowly if
you select the Off Road or
Mud/Snow mode. It illuminates
and flashes rapidly during a traction
control event.
Trailer Anti-Lock Brake System
(ABS) Illuminates briefly when you
switch on the ignition, and only
when a PLC trailer or a PLC
diagnostic tool is connected. If the light
fails to illuminate, remains on after you
start the vehicle or continues to flash, have
the system serviced immediately.
Transmission Tow/Haul (If Equipped) Illuminates when you switch on
the tow/haul feature. If the light
flashes steadily, have the system
serviced immediately, damage to the
transmission could occur.
Two Speed Axle The Two Speed Axle indicator
comes on when you switch the
low axle range on.
Wait to Start (Diesel Engine Only) Illuminates when you switch the
ignition on as part of the
pre-start system. Wait until the
wait to start indicator turns off before
attempting to start vehicle.
60
F650750 (TBC), enUSA, First Printing Instrument Cluster E138639 E209040 E161509 E208809
Page 66 of 379
TRIP A/B
Registers the distance of individual
journeys. Press and release the INFO
button until TRIP A/B appears in the
display (this represents the trip mode).
Press and hold the RESET button to reset.
XXX MILES (km) TO E
This displays an estimate of approximately
how far you can drive with the fuel
remaining in your tank under normal driving
conditions. Remember to turn the ignition
off when refueling to allow this feature to
detect the correct amount of added fuel.
The system calculates the distance to
empty by using a running average fuel
economy, which uses your recent driving
history of 500 miles (800 km).
This value is not the same as the average
fuel economy display. The running average
fuel economy resets to a factory default
value if the battery is disconnected.
XX.X AVG MPG (L/100km)
Average fuel economy displays your
average fuel economy in miles per gallon
or liters/100 km.
MPG (L/km)
Displays the instantaneous fuel economy
as a bar graph. Your vehicle must be
moving to calculate instantaneous fuel
economy. You cannot reset the
instantaneous fuel economy.
TIMER
Displays the trip elapsed drive time. Press
and release RESET to pause the timer.
Press and hold RESET to reset the timer.
EXHAUST FILTER
Displays information about the status of
the exhaust filter.
System Check and Vehicle Feature
Customization
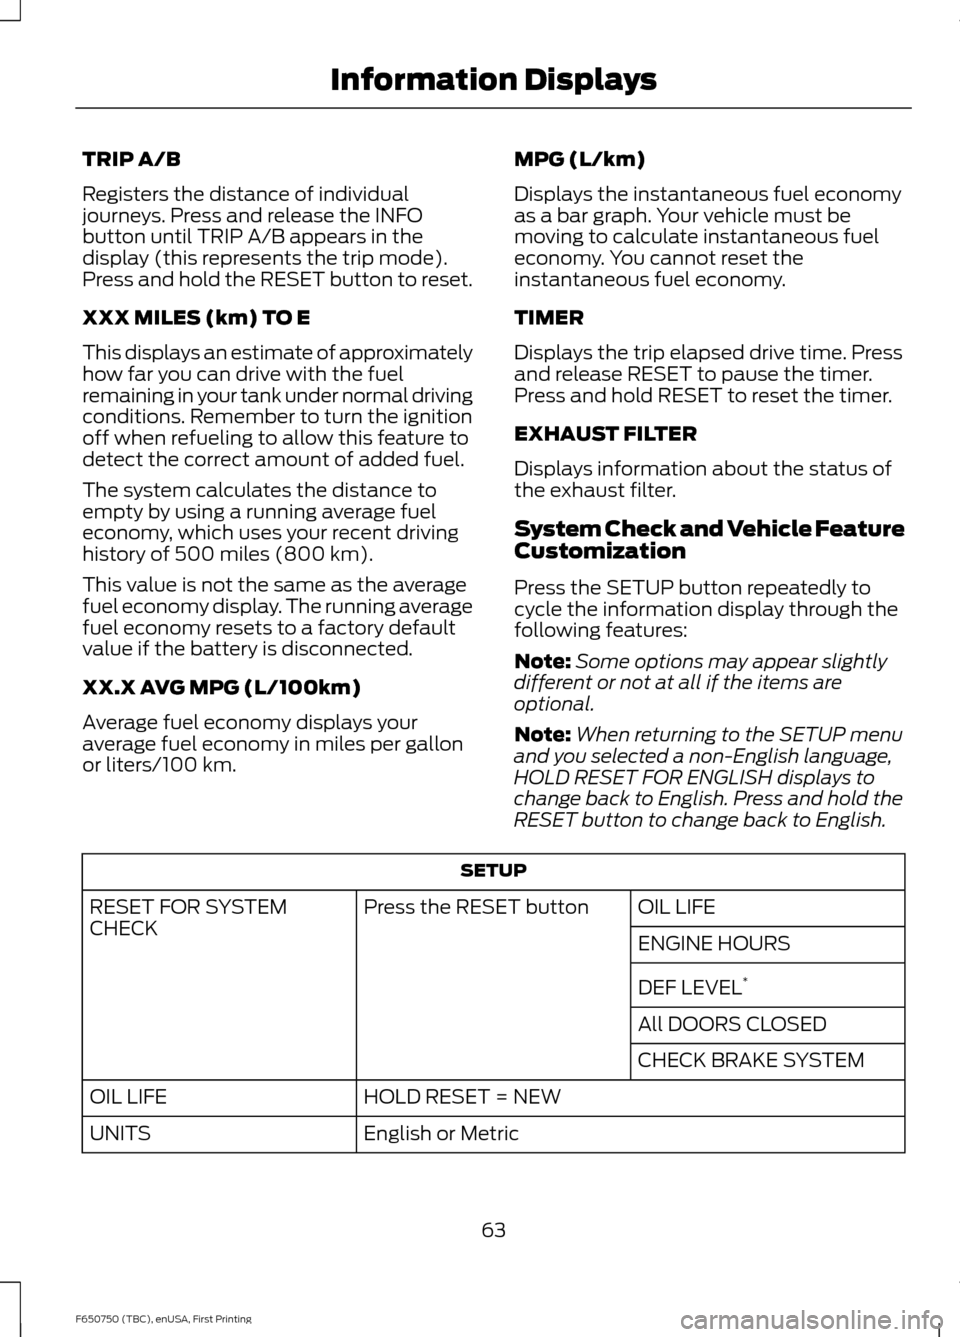
Press the SETUP button repeatedly to
cycle the information display through the
following features:
Note:
Some options may appear slightly
different or not at all if the items are
optional.
Note: When returning to the SETUP menu
and you selected a non-English language,
HOLD RESET FOR ENGLISH displays to
change back to English. Press and hold the
RESET button to change back to English. SETUP
OIL LIFE
Press the RESET button
RESET FOR SYSTEM
CHECK
ENGINE HOURS
DEF LEVEL*
All DOORS CLOSED
CHECK BRAKE SYSTEM
HOLD RESET = NEW
OIL LIFE
English or Metric
UNITS
63
F650750 (TBC), enUSA, First Printing Information Displays
Page 74 of 379
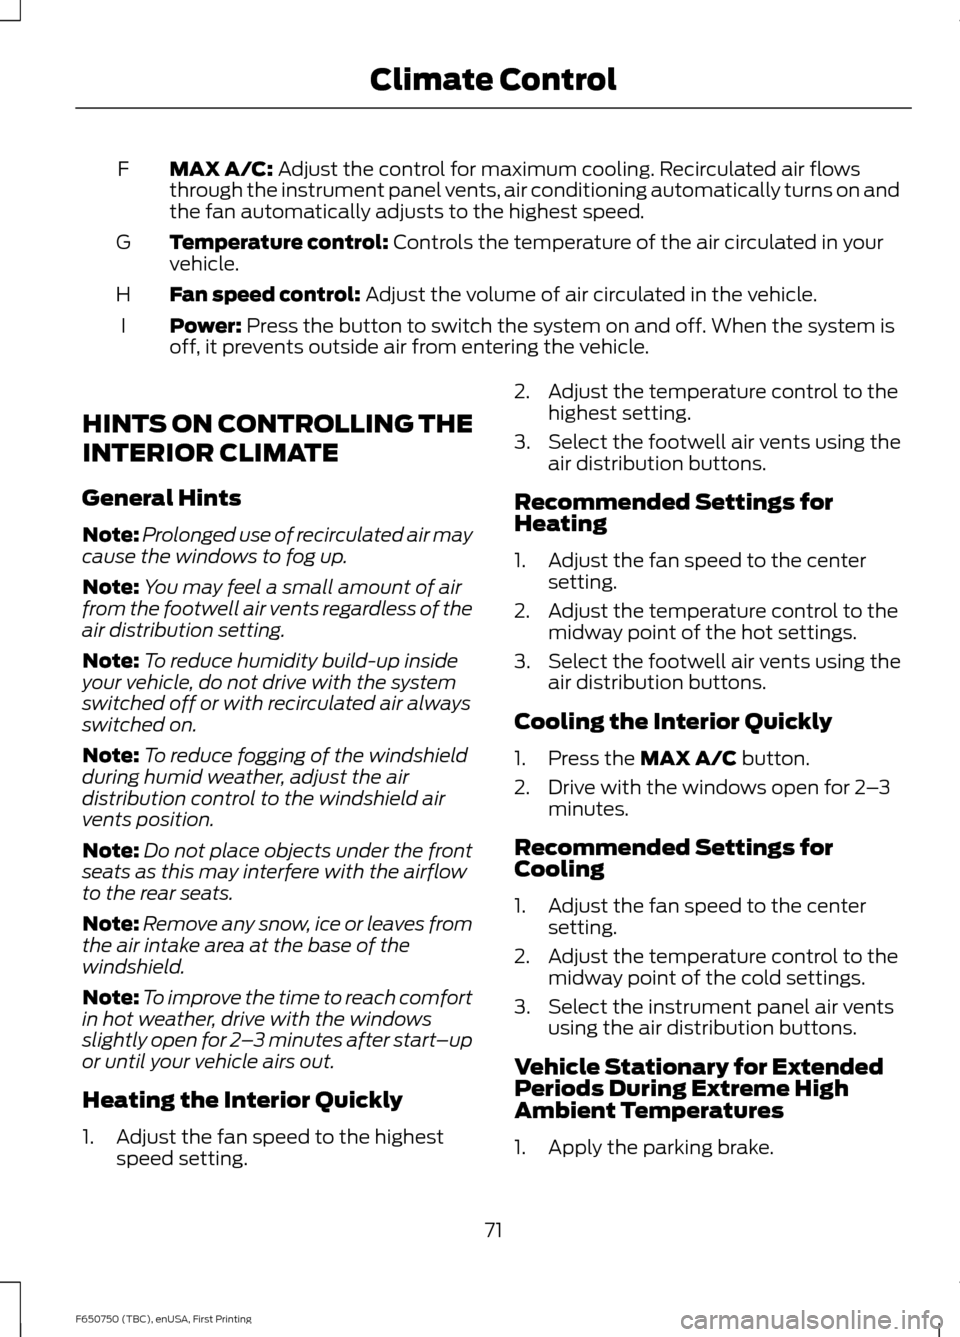
MAX A/C: Adjust the control for maximum cooling. Recirculated air flows
through the instrument panel vents, air conditioning automatically turns on and
the fan automatically adjusts to the highest speed.
F
Temperature control:
Controls the temperature of the air circulated in your
vehicle.
G
Fan speed control:
Adjust the volume of air circulated in the vehicle.
H
Power:
Press the button to switch the system on and off. When the system is
off, it prevents outside air from entering the vehicle.
I
HINTS ON CONTROLLING THE
INTERIOR CLIMATE
General Hints
Note: Prolonged use of recirculated air may
cause the windows to fog up.
Note: You may feel a small amount of air
from the footwell air vents regardless of the
air distribution setting.
Note: To reduce humidity build-up inside
your vehicle, do not drive with the system
switched off or with recirculated air always
switched on.
Note: To reduce fogging of the windshield
during humid weather, adjust the air
distribution control to the windshield air
vents position.
Note: Do not place objects under the front
seats as this may interfere with the airflow
to the rear seats.
Note: Remove any snow, ice or leaves from
the air intake area at the base of the
windshield.
Note: To improve the time to reach comfort
in hot weather, drive with the windows
slightly open for 2 –3 minutes after start –up
or until your vehicle airs out.
Heating the Interior Quickly
1. Adjust the fan speed to the highest speed setting. 2. Adjust the temperature control to the
highest setting.
3. Select the footwell air vents using the air distribution buttons.
Recommended Settings for
Heating
1. Adjust the fan speed to the center setting.
2. Adjust the temperature control to the midway point of the hot settings.
3. Select the footwell air vents using the air distribution buttons.
Cooling the Interior Quickly
1. Press the
MAX A/C button.
2. Drive with the windows open for 2 –3
minutes.
Recommended Settings for
Cooling
1. Adjust the fan speed to the center setting.
2. Adjust the temperature control to the midway point of the cold settings.
3. Select the instrument panel air vents using the air distribution buttons.
Vehicle Stationary for Extended
Periods During Extreme High
Ambient Temperatures
1. Apply the parking brake.
71
F650750 (TBC), enUSA, First Printing Climate Control
Page 111 of 379
Operator Commanded Regeneration
Precautions and Safe Exhaust Position
WARNING
Failure to comply with the following
instructions for Operator
Commanded Regeneration may
result in fire, serious injury, death or
property damage. Before you start operator commanded
regeneration, do the following:
•
Place your vehicle in Park (P) with the
parking brake set on stable, level
ground.
• You must park your vehicle outside of
any structure.
• Your vehicle must be 10– 15 feet (3–5
meters) away from any obstructions
and must be away from materials that
can easily combust or melt (for
example, paper, leaves, petroleum
products, fuels, plastics and other dry
organic material). •
Make sure there is a minimum of 1/8
tank of fuel.
• Make sure all fluids are at proper levels.
How to Start Operator Commanded
Regeneration WARNING
Stay clear of exhaust tip during
regeneration. You or others can be
burned.
Note:
You cannot use the Operator
Commanded Regeneration until the diesel
particulate filter load percentage has
reached 100% (Full). The diesel particulate
filter load percentage fluctuates up and
down when driving your vehicle due to active
and passive regenerations.
Note: During the use of Operator
Commanded Regeneration, you may
observe a light amount of white smoke. This
is normal. You cannot use the Operator
Commanded Regeneration if the
service engine soon light is
illuminated.
Information Display Procedure
Start with your vehicle engine and when fully warmed press the
Info button on
the steering wheel until the following message appears in the information display: Action and Description
Message
Press the Reset Button to switch the display to
Y to answer
yes to this prompt and then follow the prompts regarding
exhaust position as needed to initiate Operator Commanded
Regeneration. Be sure to understand each prompt. If you are
not sure what is being asked by each prompt, contact an
authorized dealer. The display confirms the operation has
started and when it has finished.
Exhaust filter at limit
Clean now
108
F650750 (TBC), enUSA, First Printing Fuel and Refueling
Page 113 of 379
Switching Automatic Regeneration Control On and Off
To switch Automatic Regeneration Control On and Off, press SETUP button on
steering wheel and then scroll to: Action and Description
Message
Select
Y or N to switch it On or Off.
Auto Exh.Clean
After you switch Automatic Regeneration Control off, one of the following warning
messages may be displayed:
The diesel particulate filter is full and you should
switch the automatic regeneration control on as
soon as possible.
Exhaust Filter Full Clean Soon
The diesel particulate filter is overloaded and you
must switch the automatic regeneration control on
as soon as possible.
Exhaust Filter Overloaded Clean
Now
You must clean the diesel particulate filter immedi-
ately. Failing to do so would cause the diesel
particulate filter to be blocked.
Exhaust filter at limit Clean now
How to Interrupt or Cancel Operator
Commanded Regeneration
If you need to cancel the Operator
Commanded Regeneration, pressing the
brake, accelerator, or shutting off the
vehicle stops the procedure. Depending on
the amount of time you allowed the
Operator Commanded Regeneration to
operate, soot may not have had sufficient
time to be eliminated, but the exhaust
system and exhaust gas may still be hot.
If you shut your vehicle off during Operator
Commanded Regeneration, you will notice
turbo flutter. This is a normal consequence
caused by shutting off a diesel engine
during boosted operation and is considered
normal. Filter Service and Maintenance
Over time, a slight amount of ash builds
up in the diesel particulate filter, which is
not removed during the regeneration
process. The filter may need to be removed
for ash cleaning at approximately 120,000
miles (193,000 km) or greater (actual
mileage can vary greatly depending upon
engine/vehicle operating conditions) and
replaced with a new or remanufactured
(ash cleaned) part. The filter may need to
be replaced at approximately 250,000
miles (400,000 km) depending upon
vehicle operating conditions.
In both cases, the engine control
system illuminates a service light
to inform you that your vehicle
requires service.
If there are any issues with the diesel
particulate filter system, the engine control
system illuminates a service light to inform
you that your vehicle requires service.
110
F650750 (TBC), enUSA, First Printing Fuel and Refueling