length FORD FESTIVA 1991 Service Manual
[x] Cancel search | Manufacturer: FORD, Model Year: 1991, Model line: FESTIVA, Model: FORD FESTIVA 1991Pages: 454, PDF Size: 9.53 MB
Page 29 of 454
Power brake push rod length is not adjustable.
Festiva
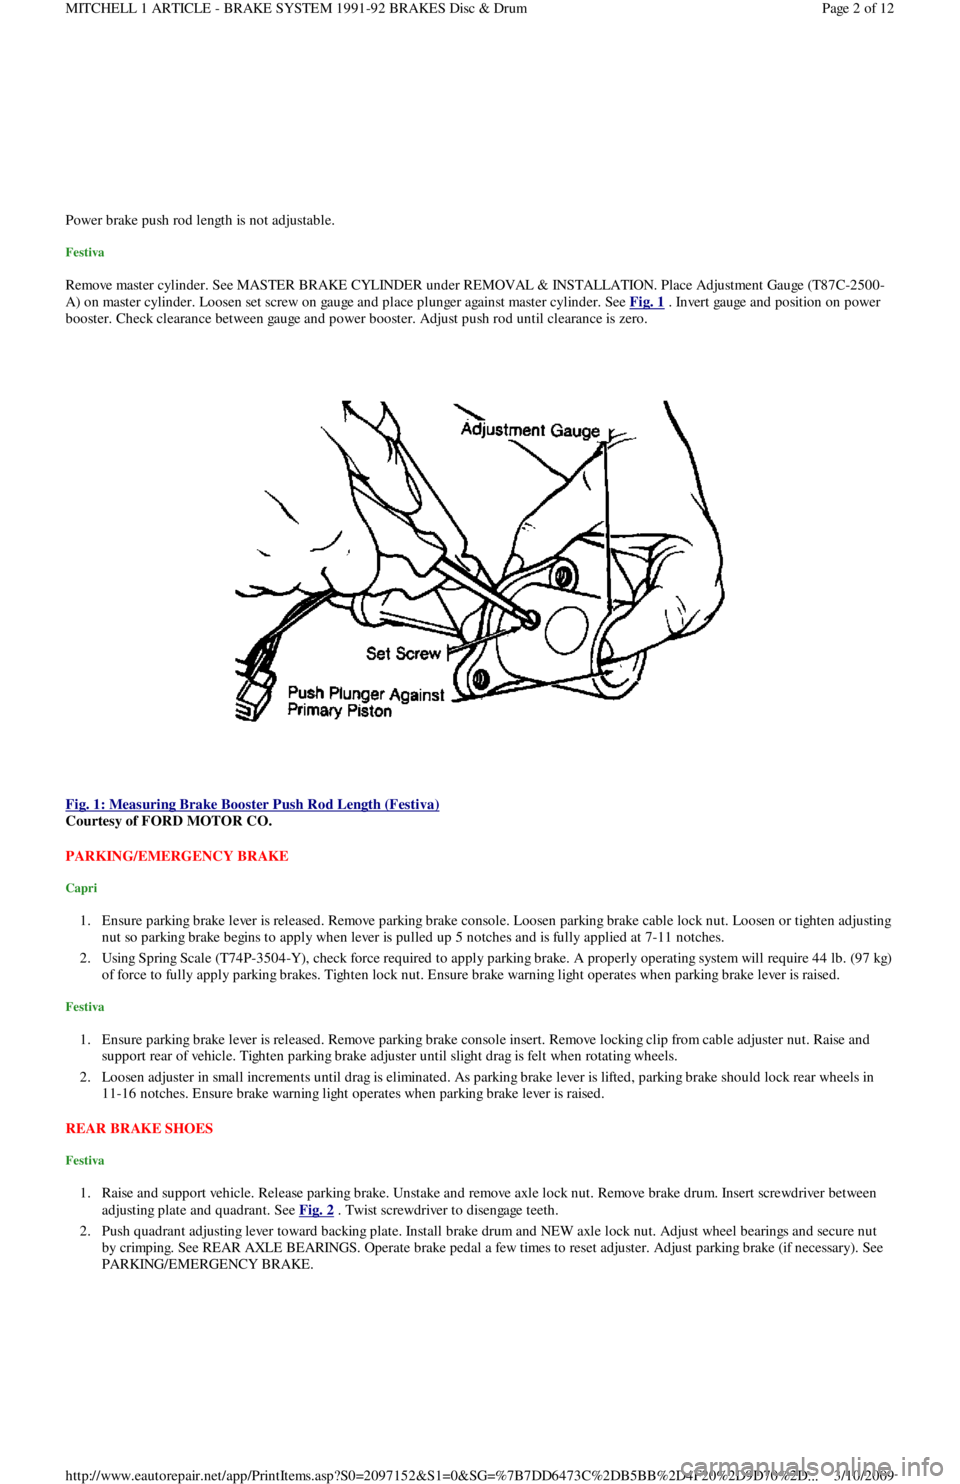
Remove master cylinder. See MASTER BRAKE CYLINDER under REMOVAL & INSTALLATION. Place Adjustment Gauge (T87C-2500-
A) on master cylinder. Loosen set screw on gauge and place plunger against master cylinder. See Fig. 1
. Invert gauge and position on power
booster. Check clearance between gauge and power booster. Adjust push rod until clearance is zero.
Fig. 1: Measuring Brake Booster Push Rod Length (Festiva)
Courtesy of FORD MOTOR CO.
PARKING/EMERGENCY BRAKE
Capri
1. Ensure parking brake lever is released. Remove parking brake console. Loosen parking brake cable lock nut. Loosen or tighten adjusting
nut so parking brake begins to apply when lever is pulled up 5 notches and is fully applied at 7-11 notches.
2. Using Spring Scale (T74P-3504-Y), check force required to apply parking brake. A properly operating system will require 44 lb. (97 kg)
of force to fully apply parking brakes. Tighten lock nut. Ensure brake warning light operates when parking brake lever is raised.
Festiva
1. Ensure parking brake lever is released. Remove parking brake console insert. Remove locking clip from cable adjuster nut. Raise and
support rear of vehicle. Tighten parking brake adjuster until slight drag is felt when rotating wheels.
2. Loosen adjuster in small increments until drag is eliminated. As parking brake lever is lifted, parking brake should lock rear wheels in
11-16 notches. Ensure brake warning light operates when parking brake lever is raised.
REAR BRAKE SHOES
Festiva
1. Raise and support vehicle. Release parking brake. Unstake and remove axle lock nut. Remove brake drum. Insert screwdriver between
adjusting plate and quadrant. See Fig. 2
. Twist screwdriver to disengage teeth.
2. Push quadrant adjusting lever toward backing plate. Install brake drum and NEW axle lock nut. Adjust wheel bearings and secure nut
by crimping. See REAR AXLE BEARINGS. Operate brake pedal a few times to reset adjuster. Adjust parking brake (if necessary). See
PARKING/EMERGENCY BRAKE.
Page 2 of 12 MITCHELL 1 ARTICLE - BRAKE SYSTEM 1991-92 BRAKES Disc & Drum
3/10/2009 http://www.eautorepair.net/app/PrintItems.asp?S0=2097152&S1=0&SG=%7B7DD6473C%2DB5BB%2D4F20%2D9D70%2D
...
Page 40 of 454
Back To Article
AXLE SHAFT S - FRONT
1988-93 Drive Axles - FWD Axle Shafts
DESCRIPTION & OPERATION
Axle shafts transfer power from transaxle to driving wheels. All axle shafts consist of a shaft with a flexible Constant Velocity (CV) joint at
each end. Inner CV joint is coupled to transaxle by splines. Outer CV joint is splined to hub assembly and secured by axle shaft nut.
Three different types of axle shaft CV joints are used: Double Offset Joint (DOJ) or Rzeppa type, Birfield Joint (BJ) and the Tripot Joint (TJ).
CV joint boots protect CV joints by maintaining proper lubrication and preventing contaminants from entering joint. Boots must be replaced
when signs of leakage or cracks are present. Inner CV joint may be disassembled and serviced. Outer CV joint boot may be replaced, but outer
Birfield CV joint must NOT be disassembled. It must be replaced as an assembly, if faulty.
To prevent torsional vibration and torque steer on turbocharged Capri vehicles, an intermediate shaft and conventional axle shaft are used on
the right side. Both shafts are of similar length and are supported by a bearing, which is attached to engine.
CV JOINT IDENTIFICATION
TROUBLE SHOOTING
REMOVAL, DISASSEMBLY, REASSEMBLY & INSTALLATION
FWD AXLE SHAFTS
Removal
1. Raise and support vehicle. Remove lower underbody splash shields. Drain transaxle fluid. Remove front wheels and loosen axle shaft
lock nut. On Capri, remove stabilizer bar-to-control arm attaching nuts, bolt, washers and bushings. On Festiva, remove stabilizer bar
attaching nuts and bracket. On all models, remove joint clamp bolt from lower control arm. Pry downward and separate steering knuckle
from ball joint, taking care not to damage ball joint dust boot.
2. On Capri turbo, remove bolts securing intermediate shaft bearing bracket to engine. On all models, slowly pry axle shaft from transaxle
using a flat-tip screwdriver or pry bar. Axle is held into transaxle by a circlip fitted to the end of the axle. Remove axle shaft from wheel
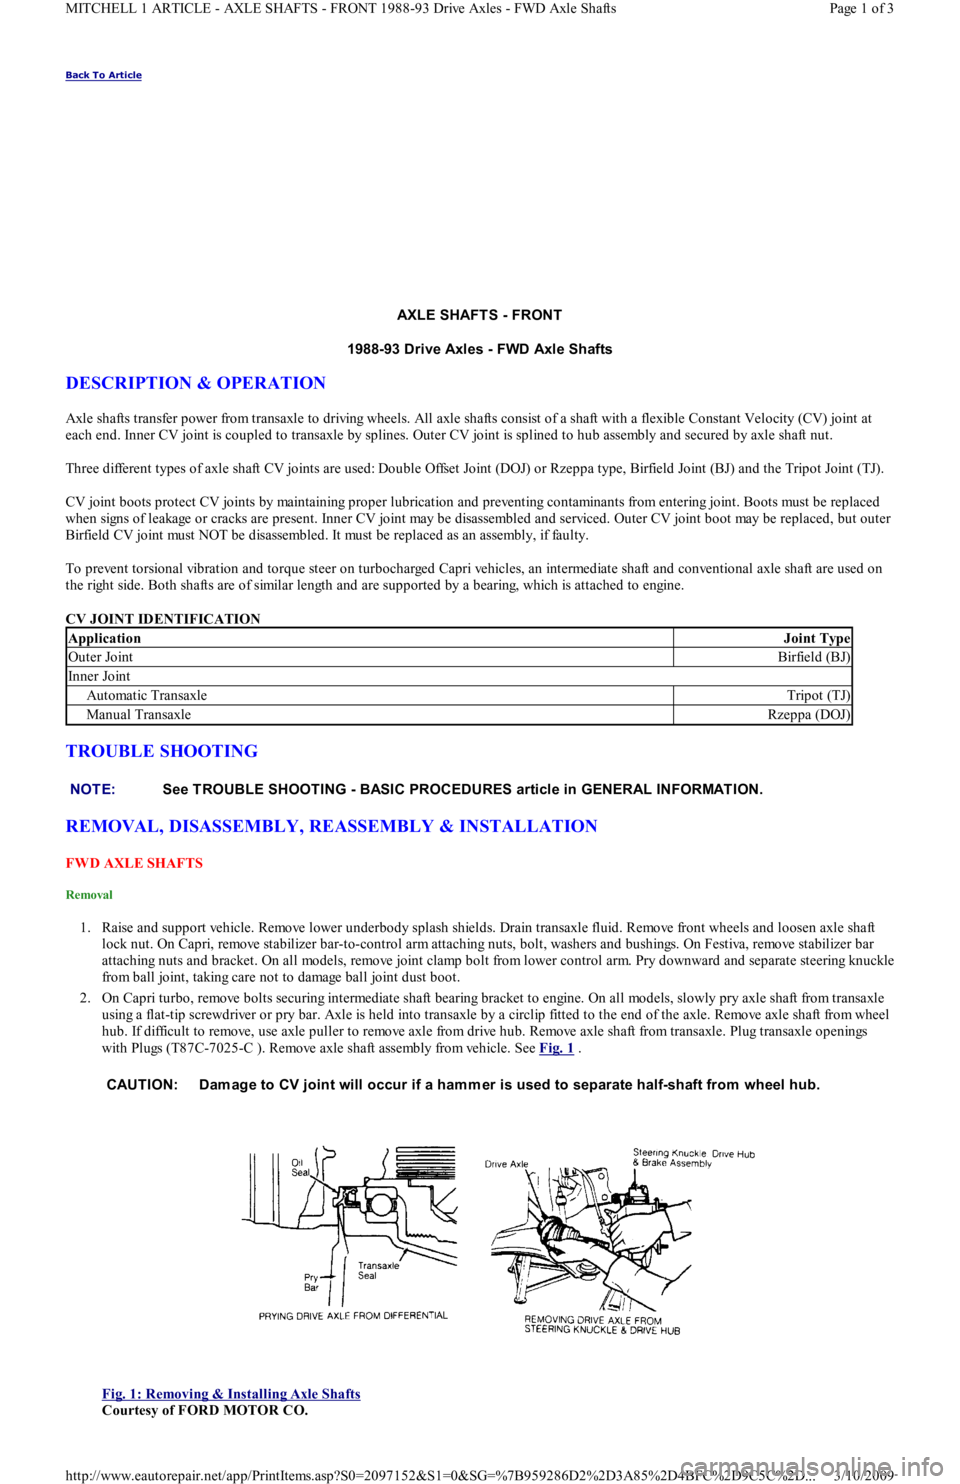
hub. If difficult to remove, use axle puller to remove axle from drive hub. Remove axle shaft from transaxle. Plug transaxle openings
with Plugs (T87C-7025-C ). Remove axle shaft assembly from vehicle. See Fig. 1
.
Fig. 1: Removing & Installing Axle Shafts
Courtesy of FORD MOTOR CO.
ApplicationJoint Type
Outer JointBirfield (BJ)
In n er Jo in t
Automatic TransaxleTripot (TJ)
Manual TransaxleRzeppa (DOJ)
NOTE:See TROUBLE SHOOTING - BASIC PROCEDURES article in GENERAL INFORMATION.
CAUTION: Dam age to CV joint will occur if a ham mer is used to separate half-shaft from wheel hub.
Page 1 of 3 MITCHELL 1 ARTICLE - AXLE SHAFTS - FRONT 1988-93 Drive Axles - FWD Axle Shafts
3/10/2009 http://www.eautorepair.net/app/PrintItems.asp?S0=2097152&S1=0&SG=%7B959286D2%2D3A85%2D4BFC%2D9C5C%2D
...
Page 41 of 454
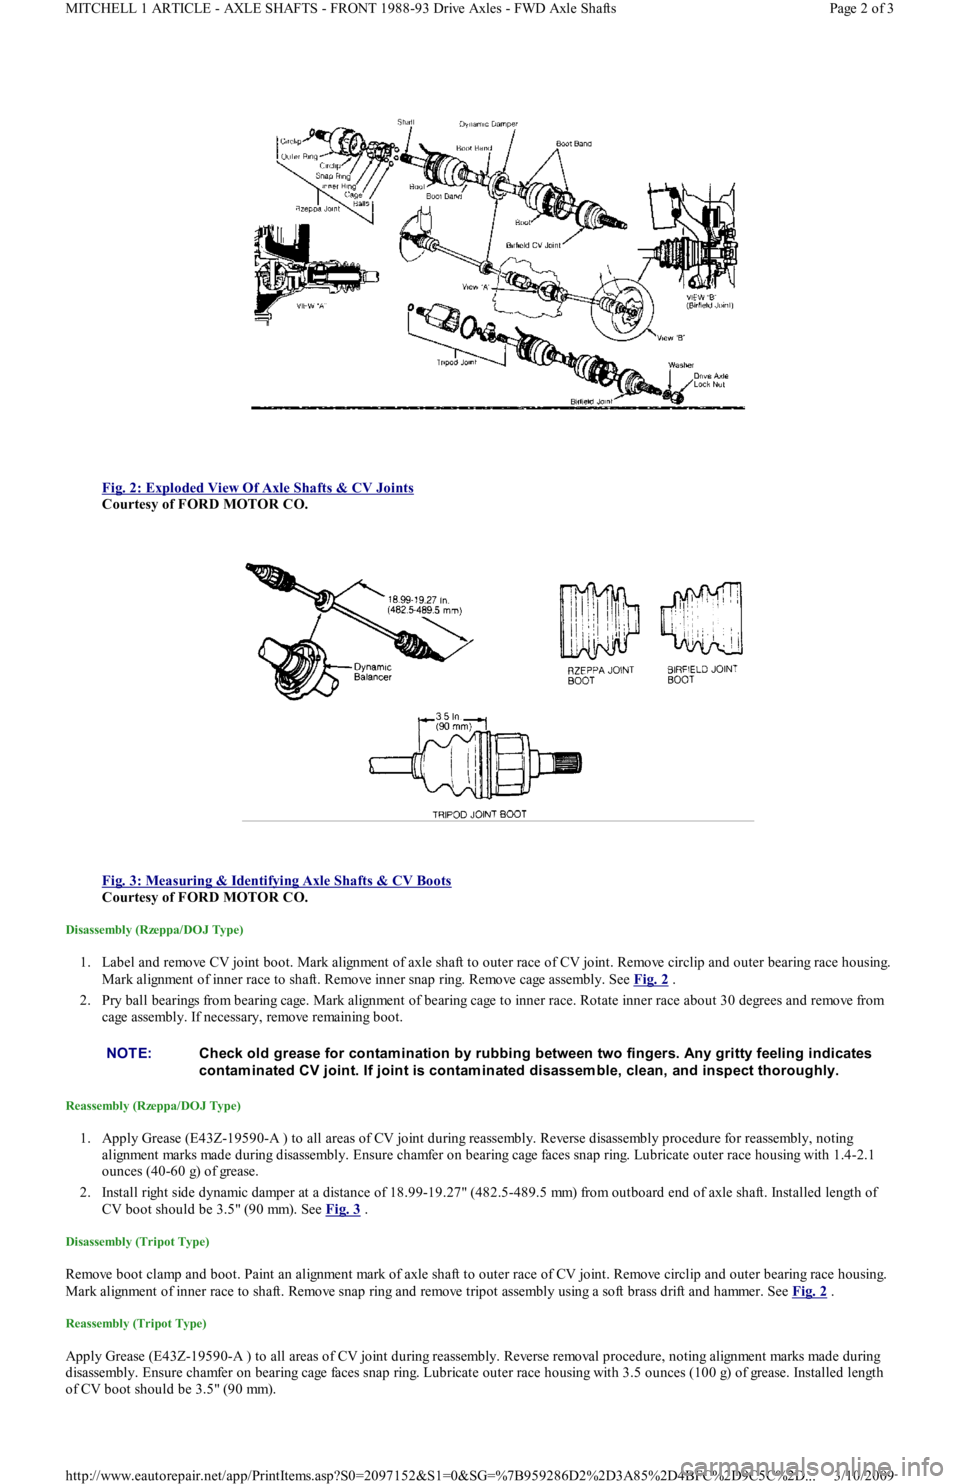
Fig. 2: Exploded View Of Axle Shafts & CV Joints
Courtesy of FORD MOTOR CO.
Fig. 3: Measuring & Identifying Axle Shafts & CV Boots
Courtesy of FORD MOTOR CO.
Disassembly (Rzeppa/DOJ Type)
1. Label and remove CV joint boot. Mark alignment of axle shaft to outer race of CV joint. Remove circlip and outer bearing race housing.
Mark alignment of inner race to shaft. Remove inner snap ring. Remove cage assembly. See Fig. 2
.
2. Pry ball bearings from bearing cage. Mark alignment of bearing cage to inner race. Rotate inner race about 30 degrees and remove from
cage assembly. If necessary, remove remaining boot.
Reassembly (Rzeppa/DOJ Type)
1. Apply Grease (E43Z-19590-A ) to all areas of CV joint during reassembly. Reverse disassembly procedure for reassembly, noting
alignment marks made during disassembly. Ensure chamfer on bearing cage faces snap ring. Lubricate outer race housing with 1.4-2.1
ounces (40-60 g) of grease.
2. Install right side dynamic damper at a distance of 18.99-19.27" (482.5-489.5 mm) from outboard end of axle shaft. Installed length of
CV boot should be 3.5" (90 mm). See Fig. 3
.
Disassembly (Tripot Type)
Remove boot clamp and boot. Paint an alignment mark of axle shaft to outer race of CV joint. Remove circlip and outer bearing race housing.
Mark alignment of inner race to shaft. Remove snap ring and remove tripot assembly using a soft brass drift and hammer. See Fig. 2
.
Reassembly (Tripot Type)
Apply Grease (E43Z-19590-A ) to all areas of CV joint during reassembly. Reverse removal procedure, noting alignment marks made during
disassembly. Ensure chamfer on bearing cage faces snap ring. Lubricate outer race housing with 3.5 ounces (100 g) of grease. Installed length
of CV boot should be 3.5" (90 mm).
NOTE:Check old grease for contam ination by rubbing between two fingers. Any gritty feeling indicates
contam inated CV joint. If joint is contam inated disassem ble, clean, and inspect thoroughly.
Page 2 of 3 MITCHELL 1 ARTICLE - AXLE SHAFTS - FRONT 1988-93 Drive Axles - FWD Axle Shafts
3/10/2009 http://www.eautorepair.net/app/PrintItems.asp?S0=2097152&S1=0&SG=%7B959286D2%2D3A85%2D4BFC%2D9C5C%2D
...
Page 56 of 454

SOLENOID TEST
Disconnect wiring and cables from solenoid. Using an ohmmeter, check for continuity between terminal "M" and body of starter solenoid. See
Fig. 1
. Continuity should exist. If continuity does not exist, replace solenoid.
ARMATURE TEST
1. Place armature in growler. Turn on growler and hold a piece of hacksaw blade over armature. Slowly rotate armature. If hacksaw blade
is attracted to core or if it vibrates, replace armature.
2. Remove armature from growler. Using an ohmmeter, check continuity between commutator and core. If continuity exists, replace
armature. Check continuity between commutator and shaft. If continuity exists, replace armature.
3. Check continuity between each commutator segment. If an open exists between any 2 segments, replace armature.
COMMUTATOR TEST
1. Clean surface of commutator and polish with No. 400 grit sandpaper (if required). If surface is scored, out of round or pitted, turn
commutator on a lathe.
2. Maximum commutator runout and minimum diameter of commutator must not exceed specification after turning. See STARTER
MOTOR SPECIFICATIONS table.
3. Commutator mica undercut depth should be .02-.03" (.5-.8 mm). If undercut depth is not within specification, undercut with a hacksaw
blade to standard depth.
BRUSH & SPRING TEST
1. Connect ohmmeter between positive brush holder and negative brush holder. If ohmmeter indicates continuity, brush holder assemb l y is
shorted and must be replaced.
2. Check brush length. See STARTER MOTOR SPECIFICATIONS
table. If brush length is less than specification, replace brushes.
3. Check spring tension. Spring tension should be 2.0-4.3 Lbs. (8.8-19.1 N.m). Ensure brushes move freely in holders.
FIELD COIL TEST
1. Connect ohmmeter between field lead and soldered portion of brush lead. If continuity does not exist, repair or replace field coil.
2. Check field coil for shorts to ground by connecting ohmmeter between field lead and starter housing. If continuity exists, repair or
replace field coil.
OVERHAUL
Fig. 6: Exploded View of Starter Motor Assembly
Courtesy of FORD MOTOR CO.
STARTER MOTOR SPECIFICATIONS
STARTER MOTOR SPECIFICATIONS NOTE:For exploded view of starter assem bly, see Fig. 6
.
ApplicationSpecification
Brush Length
Minimum.45" (11.5 mm)
New.67" (17 mm)
Brush Spring Force2.0-4.3 Lbs. (8.8-19.1
N.m)
Commutator
Runout.002" (.05 mm)
Min imu m Diamet er1.22" (31.0 mm)
Segment Depth.02-.03" (.5-.8 mm)
Pinion Gap.020-.080" (0.5-2.0
Page 5 of 6 MITCHELL 1 ARTICLE - STARTER 1991 ELECTRICAL Starters
3/10/2009 http://www.eautorepair.net/app/PrintItems.asp?S0=2097152&S1=0&SG=%7B7DD6473C%2DB5BB%2D4F20%2D9D70%2D
...
Page 63 of 454
Back To Article
GENERAL INFORMATION
Using Mitchell1's Wiring Diagram s
INTRODUCTION
Mitchell1(R) obtains wiring diagrams and technical service bulletins, containing wiring diagram changes, from the domestic and import
manufacturers. These are checked for accuracy and are all redrawn into a consistent format for easy use. All system wiring diagrams are
available in color format and may be viewed and or printed in color or black and white, depending on your program settings and available
printer hardware.
In the past, when cars were simpler, diagrams were simpler. All components were connected by wires, and diagrams seldom exceeded 4 pages
in length. Today, some wiring diagrams require more than 16 pages. It would be impractical to expect a service technician to trace a wire from
page 1 across every page to page 16.
Removing some of the wiring maze reduces eyestrain and time wasted searching across several pages. Today, the majority of Mitchell1(R)
diagrams follow a much improved format, which permits space for internal switch details, and component and ground locations.
Components shown with a dashed line instead of a solid line indicate not all circuits are shown in this particular diagram (circuits shown in
system diagrams are typically applicable to that system only). The remaining circuits connected to that component will be shown in the
appropriate system that they apply to.
Today, the wiring diagram necessary to support a given repair procedure is included within that article or a link is provided to the appropriate
SYSTEM WIRING DIAGRAM article. For example, the wiring diagram for a Ford EEC-IV system may be included in ENGINE
PERFORMANCE and WIRING DIAGRAMS articles for Ford Motor Co. The wiring diagram for a cruise control system may be included in
ACCESSORIES & EQUIPMENT section for the specific vehicle manufacturer, and the wiring diagram for an anti-lock brake system may be
included in BRAKES and WIRING DIAGRAMS for the specific manufacturer.
WIRING DIAGRAMS contains all wiring diagrams not included in STARTING & CHARGING SYSTEMS and ACCESSORIES &
EQUIPMENT. This includes: Data Link Connectors, Ground Distribution, Power Distribution, Engine Performance, Electric Cooling Fans,
Anti-Lock Brakes, Electronic Suspension and Electronic Steering wiring diagrams. The Data Link Connectors wiring diagrams show the
circuits by which the various on-board computers exchange information, and the diagnostic connectors used for diagnosis and their location.
The Ground Distribution wiring diagrams show all vehicle ground points, their location, and the components common to those ground points.
The Power Distribution wiring diagrams show the power feed circuits and the components common to those power feeds.
Wiring diagrams used to support the information in ACCESSORIES & EQUIPMENT are drawn in a "top-down" format. The diagrams are
drawn with the power source at the top of the diagram and the ground point at the bottom of the diagram. Component locations are identified
on the wiring diagrams. Any wires that do not connect directly to a component are identified on the diagram to indicate where they go.
WIRING DIAGRAM COLOR ABBREVIATIONS
COLOR ABBREVIATIONS
WIRING DIAGRAM SYMBOLS
ColorNormalOptional
BlackBLKBK
BlueBLUBU
BrownBRNBN
ClearCLRCR
Dark BlueDK BLUDK BU
Dark GreenDK GRNDK GN
GreenGRNGN
GrayGRYGY
Light BlueLT BLULT BU
Light GreenLT GRNLT GN
OrangeORGOG
PinkPNKPK
PurplePPLPL
RedREDRD
TanTANTN
VioletVIOVI
WhiteWHTWT
YellowYELYL
Page 1 of 6 MITCHELL 1 ARTICLE - GENERAL INFORMATION Using Mitchell1's Wiring Diagrams
3/10/2009 http://www.eautorepair.net/app/PrintItems.asp?S0=2097152&S1=0&SG=%7B959286D2%2D3A85%2D4BFC%2D9C5C%2D
...
Page 112 of 454
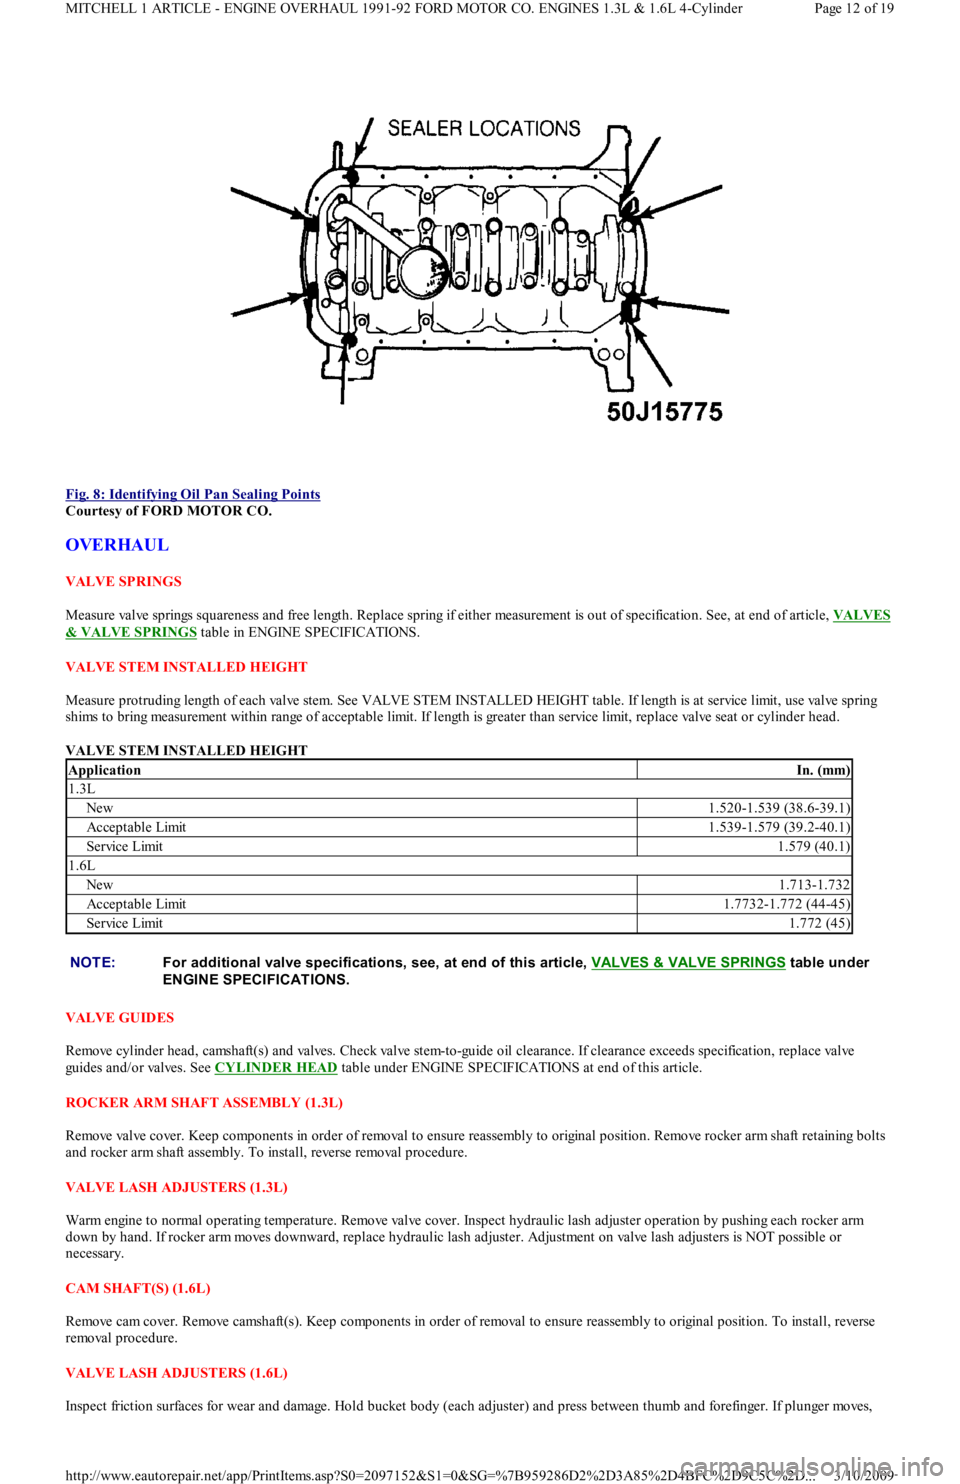
Fig. 8: Identifying Oil Pan Sealing Points
Courtesy of FORD MOTOR CO.
OVERHAUL
VALVE SPRINGS
Measure valve springs squareness and free length. Replace spring if either measurement is out of specification. See, at end of article, VALVES
& VALVE SPRINGS table in ENGINE SPECIFICATIONS.
VALVE STEM INSTALLED HEIGHT
Measure protruding length of each valve stem. See VALVE STEM INSTALLED HEIGHT table. If length is at service limit, use valve spring
shims to bring measurement within range of acceptable limit. If length is greater than service limit, replace valve seat or cylinder head.
VALVE STEM INSTALLED HEIGHT
VALVE GUIDES
Remove cylinder head, camshaft(s) and valves. Check valve stem-to-guide oil clearance. If clearance exceeds specification, replace valve
guides and/or valves. See CYLINDER HEAD
table under ENGINE SPECIFICATIONS at end of this article.
ROCKER ARM SHAFT ASSEMBLY (1.3L)
Remove valve cover. Keep components in order of removal to ensure reassembly to original position. Remove rocker arm shaft retaining bolts
and rocker arm shaft assembly. To install, reverse removal procedure.
VALVE LASH ADJUSTERS (1.3L)
Warm engine to normal operating temperature. Remove valve cover. Inspect hydraulic lash adjuster operation by pushing each rocker arm
down by hand. If rocker arm moves downward, replace hydraulic lash adjuster. Adjustment on valve lash adjusters is NOT possible or
necessary.
CAM SHAFT(S) (1.6L)
Remove cam cover. Remove camshaft(s). Keep components in order of removal to ensure reassembly to original position. To install, reverse
removal procedure.
VALVE LASH ADJUSTERS (1.6L)
Inspect friction surfaces for wear and damage. Hold bucket body (each adjuster) and press between thumb and forefinger. If plunge r mo ve s,
ApplicationIn. (mm)
1.3L
New1.520-1.539 (38.6-39.1)
Acceptable Limit1.539-1.579 (39.2-40.1)
Service Limit1.579 (40.1)
1.6L
New1.713-1.732
Acceptable Limit1.7732-1.772 (44-45)
Service Limit1.772 (45)
NOTE:For additional valve specifications, see, at end of this article, VALVES & VALVE SPRINGS
table under
ENGINE SPECIFICAT IONS.
Page 12 of 19 MITCHELL 1 ARTICLE - ENGINE OVERHAUL 1991-92 FORD MOTOR CO. ENGINES 1.3L & 1.6L 4-Cylinder
3/10/2009 http://www.eautorepair.net/app/PrintItems.asp?S0=2097152&S1=0&SG=%7B959286D2%2D3A85%2D4BFC%2D9C5C%2D
...
Page 117 of 454
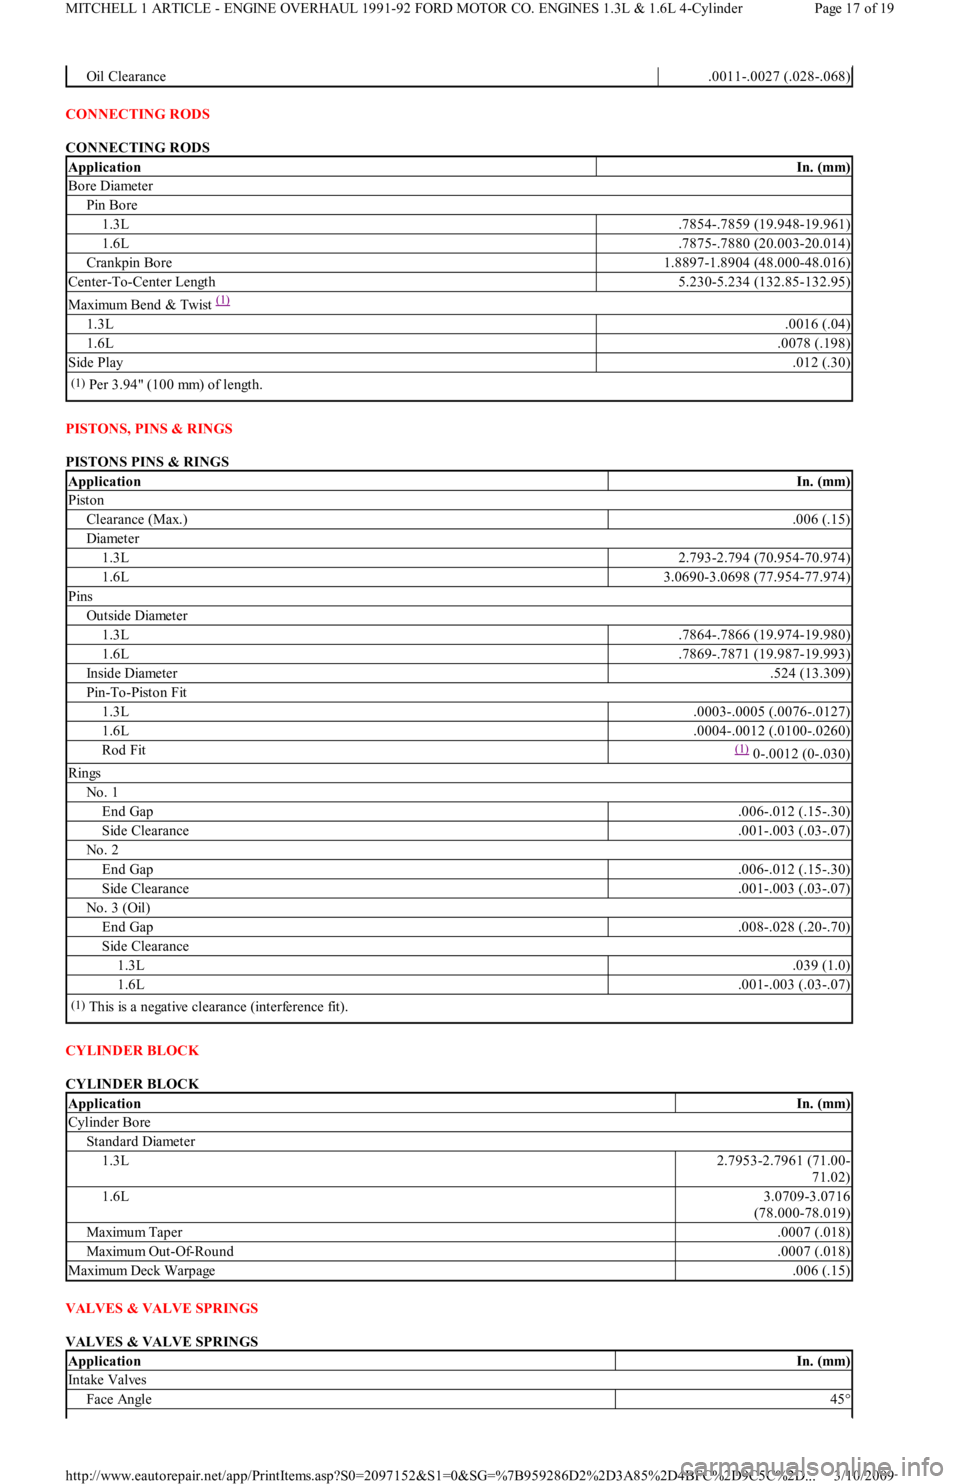
CONNECTING RODS
CONNECTING RODS
PISTONS, PINS & RINGS
PISTONS PINS & RINGS
CYLINDER BLOCK
CYLINDER BLOCK
VALVES & VALVE SPRINGS
VALVES & VALVE SPRINGS
Oil Clearance.0011-.0027 (.028-.068)
ApplicationIn. (mm)
Bore Diameter
Pin Bore
1.3L.7854-.7859 (19.948-19.961)
1.6L.7875-.7880 (20.003-20.014)
Crankpin Bore1.8897-1.8904 (48.000-48.016)
Center-To-Center Length5.230-5.234 (132.85-132.95)
Maximu m Ben d & Twist (1)
1.3L.0016 (.04)
1.6L.0078 (.198)
Side Play.012 (.30)
(1)Per 3.94" (100 mm) of length.
ApplicationIn. (mm)
Piston
Clearance (Max.).006 (.15)
Diameter
1.3L2.793-2.794 (70.954-70.974)
1.6L3.0690-3.0698 (77.954-77.974)
Pins
Outside Diameter
1.3L.7864-.7866 (19.974-19.980)
1.6L.7869-.7871 (19.987-19.993)
Inside Diameter.524 (13.309)
Pin-To-Piston Fit
1.3L.0003-.0005 (.0076-.0127)
1.6L.0004-.0012 (.0100-.0260)
Rod Fit(1) 0-.0012 (0-.030)
Rings
No. 1
End Gap.006-.012 (.15-.30)
Side Clearance.001-.003 (.03-.07)
No. 2
End Gap.006-.012 (.15-.30)
Side Clearance.001-.003 (.03-.07)
No. 3 (Oil)
End Gap.008-.028 (.20-.70)
Side Clearance
1.3L.039 (1.0)
1.6L.001-.003 (.03-.07)
(1)This is a negative clearance (interference fit).
ApplicationIn. (mm)
Cylinder Bore
Standard Diameter
1.3L2.7953-2.7961 (71.00-
71.02)
1.6L3.0709-3.0716
(78.000-78.019)
Maximu m Tap er.0007 (.018)
Maximu m Ou t -Of-Ro u n d.0007 (.018)
Maximu m Deck Warp age.006 (.15)
ApplicationIn. (mm)
In t ake Val ves
Face Angle45°
Page 17 of 19 MITCHELL 1 ARTICLE - ENGINE OVERHAUL 1991-92 FORD MOTOR CO. ENGINES 1.3L & 1.6L 4-Cylinder
3/10/2009 http://www.eautorepair.net/app/PrintItems.asp?S0=2097152&S1=0&SG=%7B959286D2%2D3A85%2D4BFC%2D9C5C%2D
...
Page 118 of 454
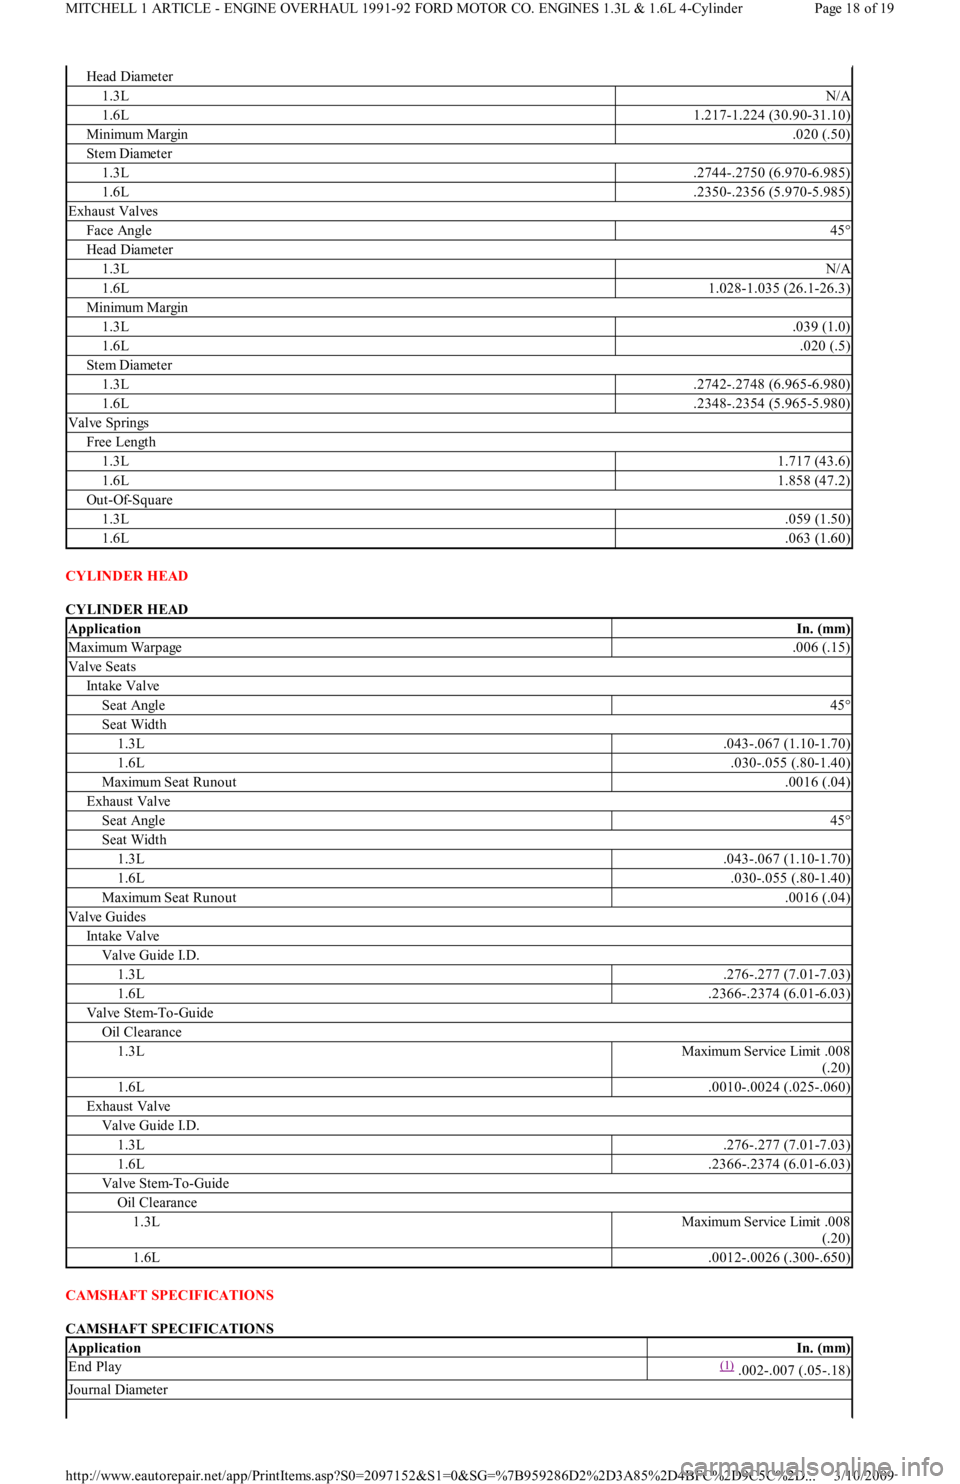
CYLINDER HEAD
CYLINDER HEAD
CAMSHAFT SPECIFICATIONS
CAMSHAFT SPECIFICATIONS
Head Diameter
1.3LN/A
1.6L1.217-1.224 (30.90-31.10)
Min imu m Margin.020 (.50)
Stem Diameter
1.3L.2744-.2750 (6.970-6.985)
1.6L.2350-.2356 (5.970-5.985)
Exhaust Valves
Face Angle45°
Head Diameter
1.3LN/A
1.6L1.028-1.035 (26.1-26.3)
Min imu m Margin
1.3L.039 (1.0)
1.6L.020 (.5)
Stem Diameter
1.3L.2742-.2748 (6.965-6.980)
1.6L.2348-.2354 (5.965-5.980)
Valve Springs
Free Length
1.3L1.717 (43.6)
1.6L1.858 (47.2)
Out-Of-Square
1.3L.059 (1.50)
1.6L.063 (1.60)
ApplicationIn. (mm)
Maximu m Warp age.006 (.15)
Valve Seats
Intake Valve
Seat Angle45°
Seat Width
1.3L.043-.067 (1.10-1.70)
1.6L.030-.055 (.80-1.40)
Maximu m Seat Ru n o u t.0016 (.04)
Exhaust Valve
Seat Angle45°
Seat Width
1.3L.043-.067 (1.10-1.70)
1.6L.030-.055 (.80-1.40)
Maximu m Seat Ru n o u t.0016 (.04)
Valve Guides
Intake Valve
Valve Guide I.D.
1.3L.276-.277 (7.01-7.03)
1.6L.2366-.2374 (6.01-6.03)
Valve Stem-To-Guide
Oil Clearance
1.3LMaximu m Service Limit .0 0 8
(.20)
1.6L.0010-.0024 (.025-.060)
Exhaust Valve
Valve Guide I.D.
1.3L.276-.277 (7.01-7.03)
1.6L.2366-.2374 (6.01-6.03)
Valve Stem-To-Guide
Oil Clearance
1.3LMaximu m Service Limit .0 0 8
(.20)
1.6L.0012-.0026 (.300-.650)
ApplicationIn. (mm)
End Play(1) .002-.007 (.05-.18)
Journal Diameter
Page 18 of 19 MITCHELL 1 ARTICLE - ENGINE OVERHAUL 1991-92 FORD MOTOR CO. ENGINES 1.3L & 1.6L 4-Cylinder
3/10/2009 http://www.eautorepair.net/app/PrintItems.asp?S0=2097152&S1=0&SG=%7B959286D2%2D3A85%2D4BFC%2D9C5C%2D
...
Page 124 of 454
SOLENOID TEST
Disconnect wiring and cables from solenoid. Using an ohmmeter, check for continuity between terminal "M" and body of starter solenoid. See
Fig. 1
. Continuity should exist. If continuity does not exist, replace solenoid.
ARMATURE TEST
1. Place armature in growler. Turn on growler and hold a piece of hacksaw blade over armature. Slowly rotate armature. If hacksaw blade
is attracted to core or if it vibrates, replace armature.
2. Remove armature from growler. Using an ohmmeter, check continuity between commutator and core. If continuity exists, replace
armature. Check continuity between commutator and shaft. If continuity exists, replace armature.
3. Check continuity between each commutator segment. If an open exists between any 2 segments, replace armature.
COMMUTATOR TEST
1. Clean surface of commutator and polish with No. 400 grit sandpaper (if required). If surface is scored, out of round or pitted, turn
commutator on a lathe.
2. Maximum commutator runout and minimum diameter of commutator must not exceed specification after turning. See STARTER
MOTOR SPECIFICATIONS table.
3. Commutator mica undercut depth should be .02-.03" (.5-.8 mm). If undercut depth is not within specification, undercut with a hacksaw
blade to standard depth.
BRUSH & SPRING TEST
1. Connect ohmmeter between positive brush holder and negative brush holder. If ohmmeter indicates continuity, brush holder assemb l y is
shorted and must be replaced.
2. Check brush length. See STARTER MOTOR SPECIFICATIONS
table. If brush length is less than specification, replace brushes.
3. Check spring tension. Spring tension should be 2.0-4.3 Lbs. (8.8-19.1 N.m). Ensure brushes move freely in holders.
FIELD COIL TEST
1. Connect ohmmeter between field lead and soldered portion of brush lead. If continuity does not exist, repair or replace field coil.
2. Check field coil for shorts to ground by connecting ohmmeter between field lead and starter housing. If continuity exists, repair or
replace field coil.
OVERHAUL
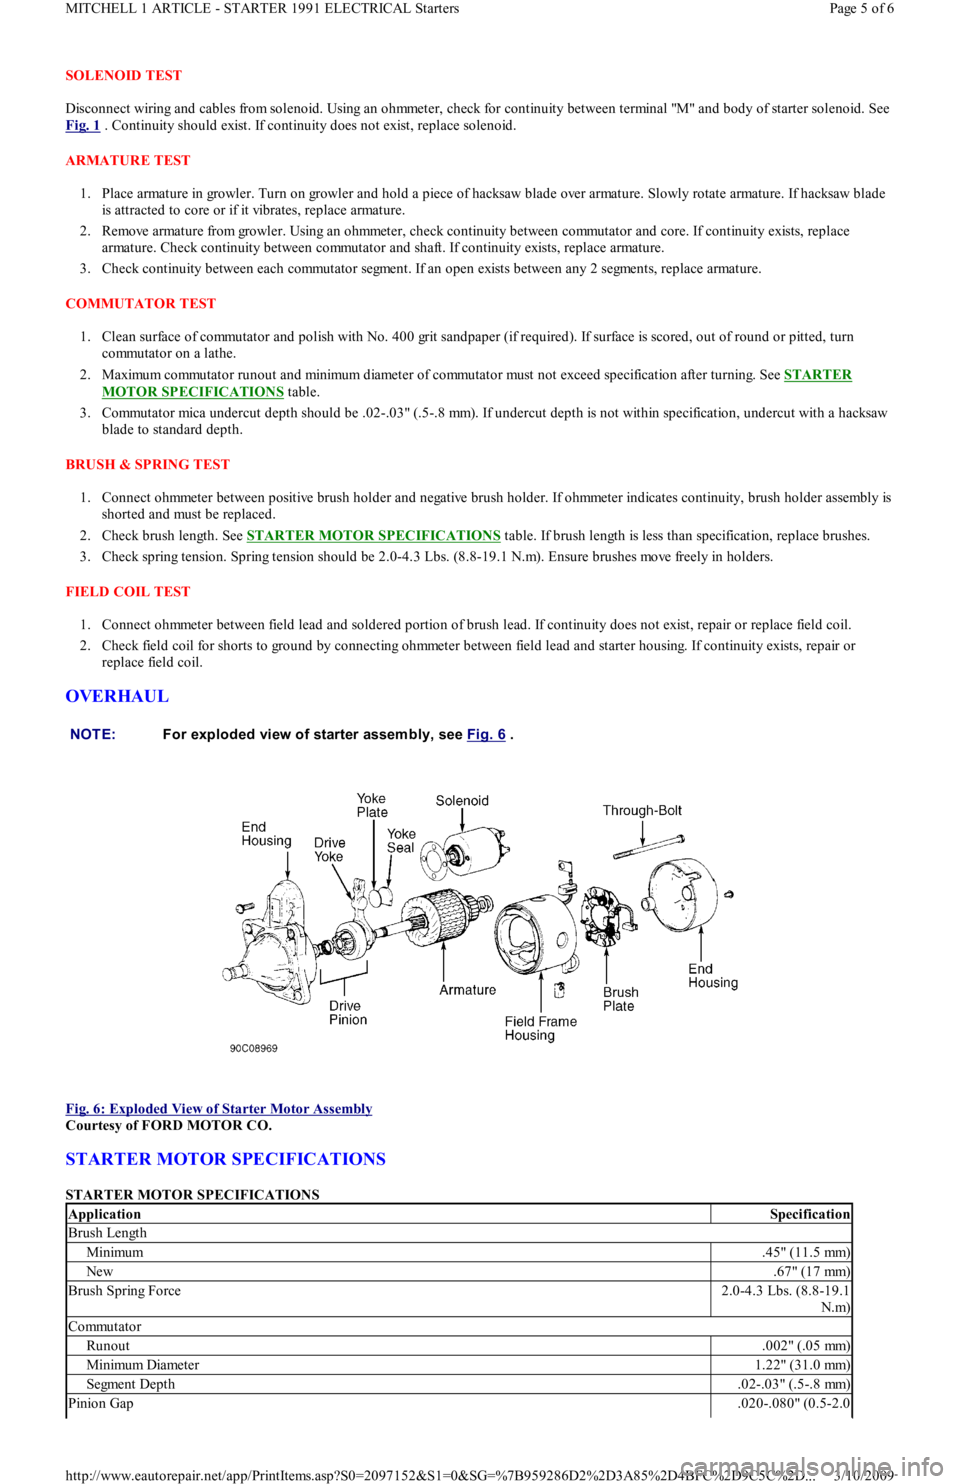
Fig. 6: Exploded View of Starter Motor Assembly
Courtesy of FORD MOTOR CO.
STARTER MOTOR SPECIFICATIONS
STARTER MOTOR SPECIFICATIONS NOTE:For exploded view of starter assem bly, see Fig. 6
.
ApplicationSpecification
Brush Length
Minimum.45" (11.5 mm)
New.67" (17 mm)
Brush Spring Force2.0-4.3 Lbs. (8.8-19.1
N.m)
Commutator
Runout.002" (.05 mm)
Min imu m Diamet er1.22" (31.0 mm)
Segment Depth.02-.03" (.5-.8 mm)
Pinion Gap.020-.080" (0.5-2.0
Page 5 of 6 MITCHELL 1 ARTICLE - STARTER 1991 ELECTRICAL Starters
3/10/2009 http://www.eautorepair.net/app/PrintItems.asp?S0=2097152&S1=0&SG=%7B959286D2%2D3A85%2D4BFC%2D9C5C%2D
...
Page 241 of 454
A "howling" or "whining" noise from the ring and pinion gear can be caused by an improper gear pattern, gear damage, or improper bearing
preload. It can occur at various speeds and driving conditions, or it can be continuous.
Before disassembling axle to diagnose and correct gear ke sure that tires, exhaust, and vehicle trim have been checked as possible causes.
Chuckle
This is a particular rattling noise that sounds like a stick against the spokes of a spinning bicycle wheel. It occurs while decelerating from 40
MPH and usually can be heard until vehicle comes to a complete stop. The frequency varies with the speed of the vehicle.
A chuckle that occurs on the driving phase is usually caused ive clearance due to differential gear wear, or by a damaged tooth on the coast
side of the pinion or ring gear. Even a very small tooth nick or a ridge on the edge of a gear tooth is enough the cause the noise.
This condition can be corrected simply by cleaning the gear tooth nick or ridge with a small grinding wheel. If either gear is damaged or scored
badly, the gear set must be replaced. If metal has broken loose, the carrier and housing must be cleaned to remove particles that could cause
damage.
Knock
This is very similar to a chuckle, though it may be louder, and occur on acceleration or deceleration. Knock can be caused by a gear tooth that
is damaged on the drive side of the ring and pinion gears. Ring gear bolts that are hitting the carrier casting can cause knock. Knock can also be
due to excessive end play in the axle shafts.
Clunk
Clunk is a metallic noise heard when an automatic transmission is engaged in Reverse or Drive, or when throttle is applied or released. It is
caused by backlash somewhere in the driveline, but not necessarily in the axle. To determine whether driveline clunk is caused by the axle,
check the total axle backlash as follows:
1. Raise vehicle on a frame or twinpost hoist so that drive wheels are free. Clamp a bar between axle companion flange and a part of the
frame or body so that flange cannot move.
2. On conventional drive axles, lock the left wheel to keep it from turning. On all models, turn the right wheel slowly until it is felt to be in
Drive condition. Hold a chalk marker on side of tire about 12" from center of wheel. Turn wheel in the opposite direction until it is
again felt to be in Drive condition.
3. Measure the length of the chalk mark, which is the total axle backlash. If backlash is one inch or less, drive axle is not the source of
clunk noise.
Bearing Whine
Bearing whine is a high-pitched sound similar to a whistle. It is usually caused by malfunctioning pinion bearings. Pinion bearings operate at
drive shaft speed. Roller wheel bearings may whine in a similar manner if they run completely dry of lubricant. Bearing noise will occur at all
driving speeds. This distinguishes it from gear whine, which usually comes and goes as speed changes.
Bearing Rumble
Bearing rumble sounds like marbles being tumbled. It is usually caused by a malfunctioning wheel bearing. The lower pitch is because the
wheel bearing turns at only about 1/3 of drive shaft speed.
Chatter On Turns
This is a condition where the entire front or rear of vehicle vibrates when vehicle is moving. The vibration is plainly felt as well as heard. Extra
differential thrust washers installed during axle repair can cause a condition of partial lock-up that creates this chatter.
Axle Shaft Noise
Axle shaft noise is similar to gear noise and pinion bearing whine. Axle shaft bearing noise will normally distinguish itself from gear noise by
occurring in all driving modes (Drive, cruise, coast and float), and will persist with transmission in Neutral while vehicle is moving at problem
speed.
If vehicle displays this noise condition, remove suspect parts, replace wheel seals and install a new set of bearings. Re-evaluate vehicle for
noise before removing any internal components.
Vibration
Vibration is a high-frequency trembling, shaking or grinding condition (felt or heard) that may be constant or variable in level and can occur
during the total operating speed range of the vehicle.
The types of vibrations that can be felt in the vehicle can d into 3 main groups:
Vibrations of various unbalanced rotating parts of the vehicle.
Resonance vibrations of the body and frame structures caused by rotating of unbalanced parts.
Tip-in moans of resonance vibrations from stressed engine or exhaust system mounts or driveline flexing modes.
DRIVE AXLE - RWD TROUBLE SHOOTING
NOTE:This is GENERAL inform ation. This article is not intended to be specific to any unique situation or
individual vehicle configuration. T he purpose of this T rouble Shooting inform ation is to provide a list
of com m on causes to problem sym ptom s. For m odel-specific T rouble Shooting, refer to SUBJECT ,
DIAGNOST IC, or T EST ING articles available in the section(s) you are accessing. For definitions of listed
noises or sounds, see DRIVE AXLE
- NOISE DIAGNOSIS under POWERTRAIN.
Page 28 of 36 MITCHELL 1 ARTICLE - GENERAL INFORMATION Trouble Shooting - Basic Procedures
3/10/2009 http://www.eautorepair.net/app/PrintItems.asp?S0=2097152&S1=0&SG=%7B9B990D68%2D660A%2D45E9%2D8F46%2DE
...