warning FORD FIESTA 2007 Owner's Manual
[x] Cancel search | Manufacturer: FORD, Model Year: 2007, Model line: FIESTA, Model: FORD FIESTA 2007Pages: 1226, PDF Size: 61.26 MB
Page 114 of 1226
204-01 -1 6 Front Suspension 204-01 -1 6
REMOVAL AND INSTALLATION
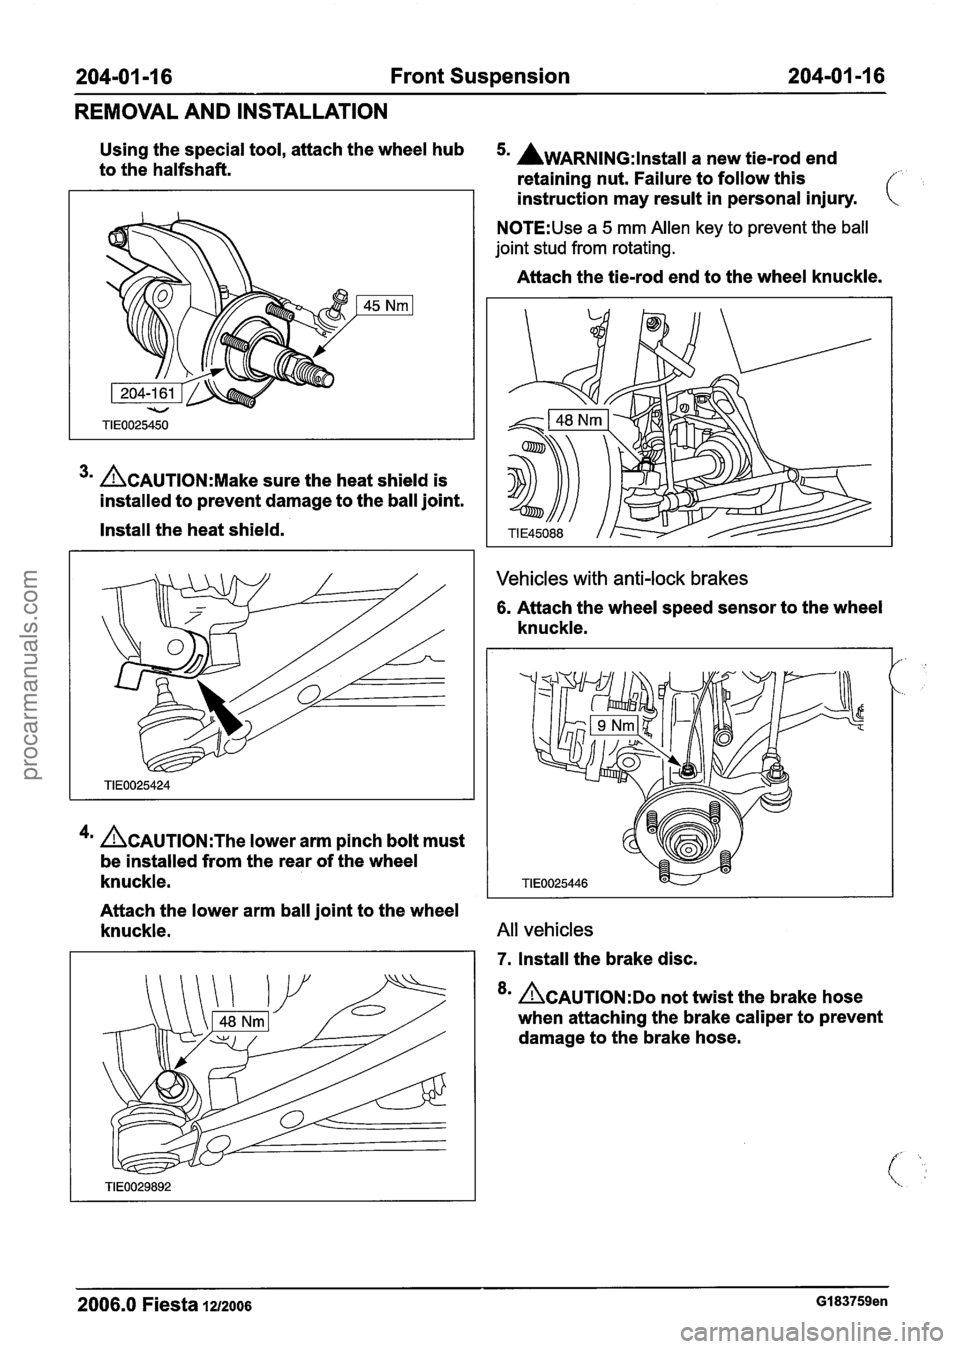
Using the special tool, attach the wheel hub 5. AWARNING:lnstall a new tie-rod end to the halfshaft.
retaining nut. Failure to follow this f
3m ACAUTION:M~~~ sure the heat shield is
installed to prevent damage to the ball joint.
Install the heat shield.
4m &AUTION:T~~ lower arm pinch bolt must
be installed from the rear of the wheel
knuckle. instruction
may result in personal injury.
N0TE:Use a 5 mm Allen key to prevent the ball
joint stud from rotating.
Attach the tie-rod end to the wheel knuckle.
Vehicles with anti-lock brakes
6. Attach the wheel speed sensor to the wheel
knuckle.
Attach the lower arm ball joint to the wheel
knuckle.
All vehicles
7. Install the brake disc.
8m &AUTION:DO not twist the brake hose
when attaching the brake caliper to prevent
damage to the brake hose.
2006.0 Fiesta 1212006 GI 83759en
procarmanuals.com
Page 115 of 1226
204-01 -1 7 Front Suspension 204-01 -1 7
REMOVAL AND INSTALLATION
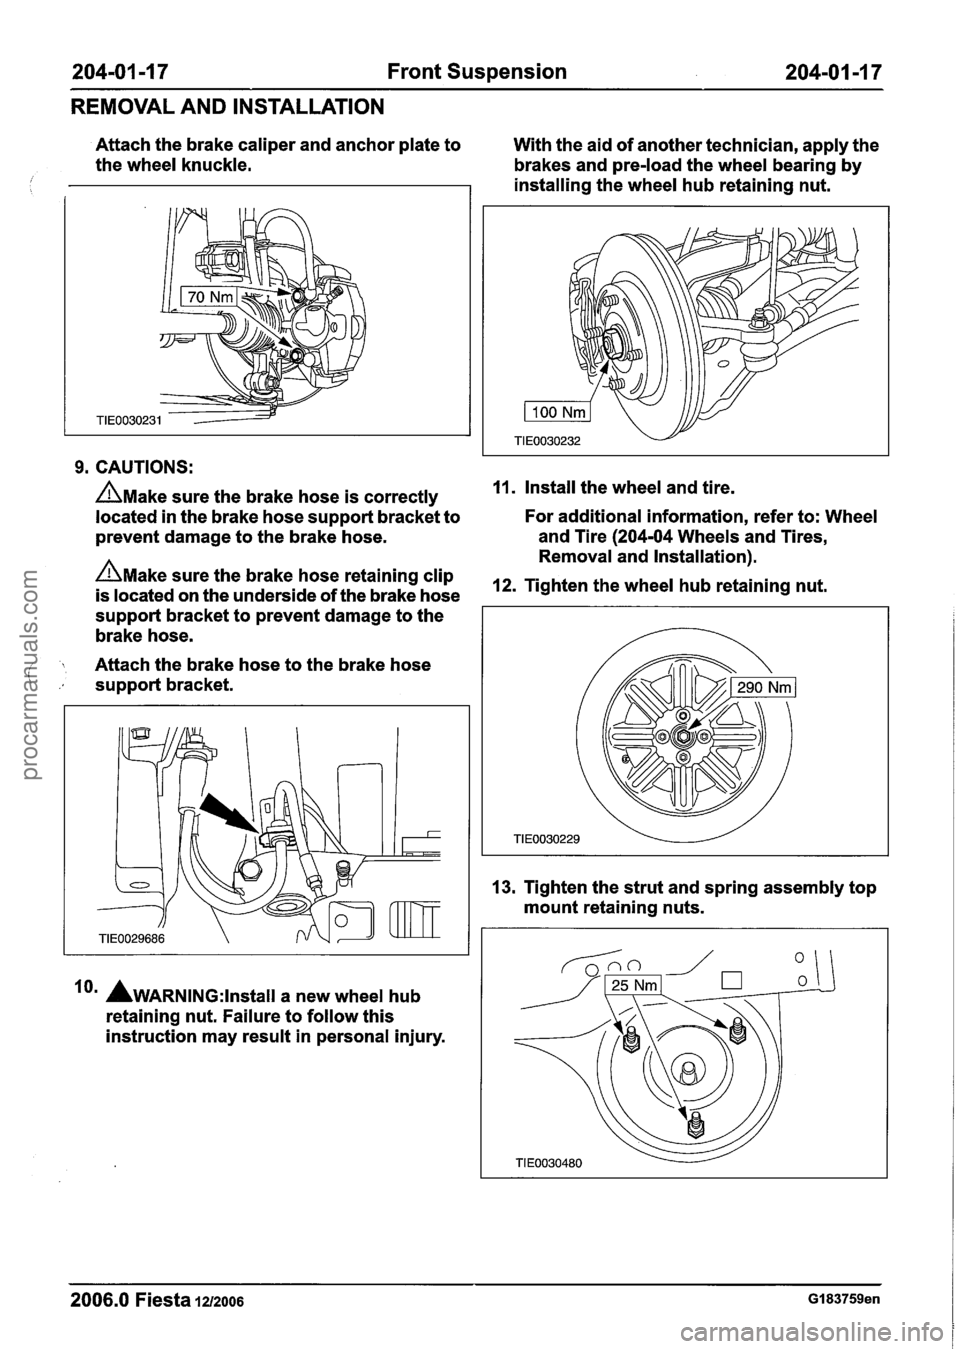
Attach the brake caliper and anchor plate to
With the aid of another technician, apply the
the wheel knuckle.
brakes and pre-load the wheel bearing by
/ 1 I installing the wheel hub retaining nut.
9. CAUTIONS:
AMake sure the brake hose is correctly 11. Install the wheel and tire.
located in the brake hose support bracket to For additional
information, refer to: Wheel
prevent damage to the brake hose.
A
and Tire (204-04 Wheels and Tires,
Removal and Installation).
AMake sure the brake hose retaining clip 12m Tighten the wheel hub retaining nut. is located on the underside of the brake hose
support bracket to prevent damage to the
brake hose.
j Attach the brake hose to the brake hose
support bracket.
lo' AwARNING:~~~~~~~ a new wheel hub
retaining nut. Failure to follow this
instruction may result in personal injury. 13.
Tighten the strut and spring assembly top
mount retaining nuts.
--
2006.0 Fiesta 1212006 GI 83759en
procarmanuals.com
Page 121 of 1226
204-01 -23 Front Suspension 204-01 -23
DISASSEMBLY AND ASSEMBLY
Front Strut and Spring Assembly(l4 783 4)
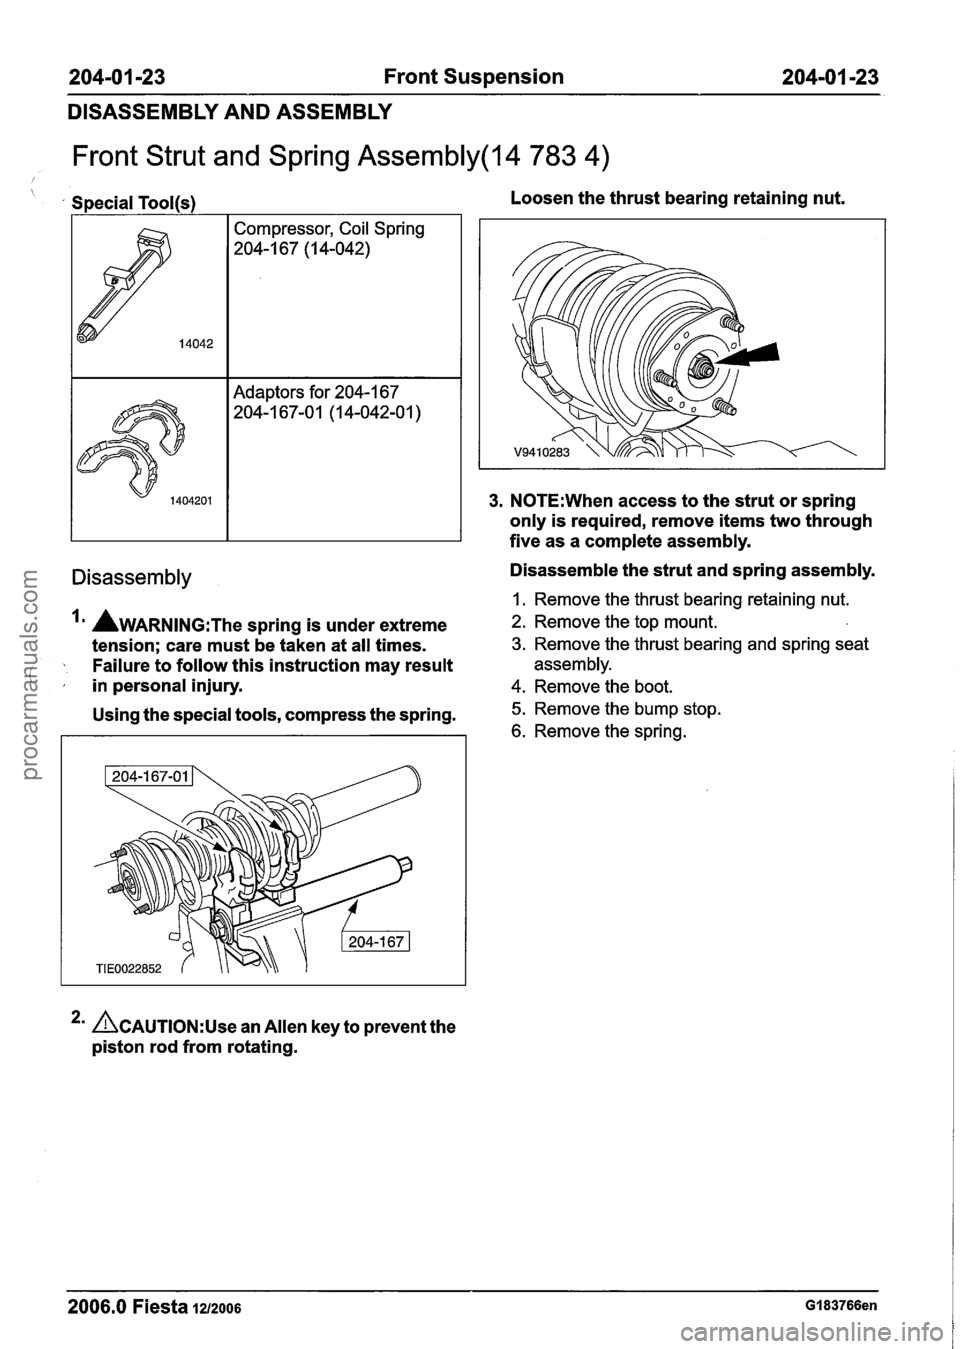
Special Tool(s) I Compressor, Coil Spring
204-1 67 (I 4-042)
Adaptors for 204-1 67
204-1 67-0 1 (1 4-042-0 1
)
Loosen the thrust bearing retaining nut.
3. N0TE:When access to the strut or spring
only is required, remove items two through
five as a complete assembly.
Disassembly Disassemble the strut and spring assembly.
I. Remove the thrust bearing retaining nut.
AWARNING:T~~ spring is under extreme 2. Remove the top mount.
tension; care must be taken at all times. 3. Remove the thrust bearing and spring seat
Failure to follow this instruction may result assembly.
( ,' in personal injury. 4. Remove the boot.
Using the special tools, compress the spring. 5. Remove the bump stop.
6. Remove the spring.
2' &AUTION:U~~ an Allen key to prevent the
piston rod from rotating.
2006.0 Fiesta 1212006 GI 83766en
procarmanuals.com
Page 130 of 1226
204-0218 Rear Suspension 204-02-8
REMOVAL AND INSTALLATION
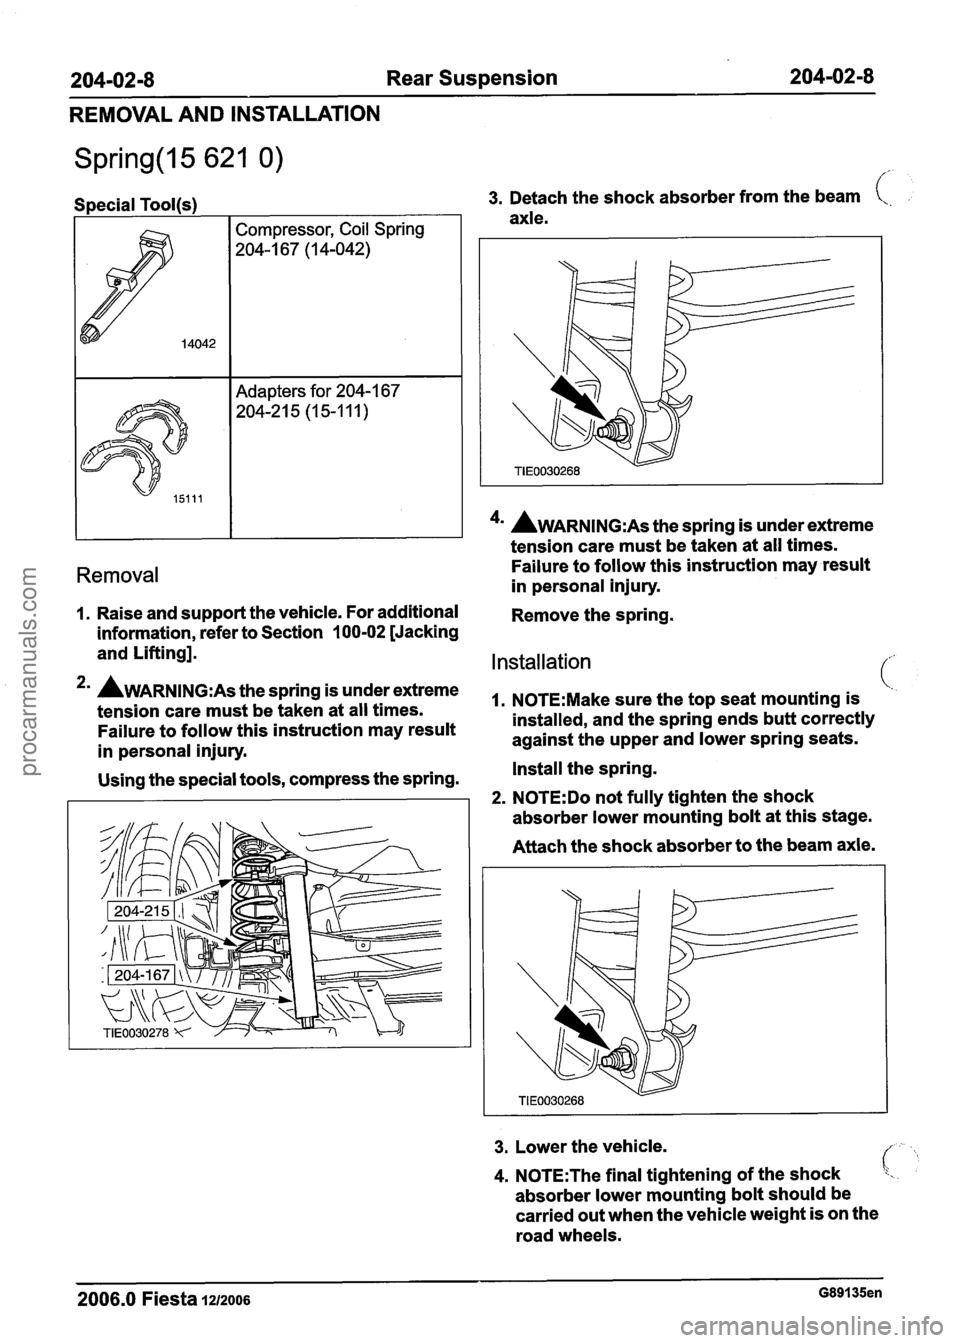
Special Tool(s) I I 3. Detach the shock absorber from the beam t,.
axle.
I I 1 4u AWARNING:A~ the spring is under extreme
tension care must
be taken at all times.
Removal Failure to follow this instruction may result
in personal injury.
1. Raise and support the vehicle. For additional
Remove the spring.
information, refer to Section
100-02 [Jacking
and Lifting].
Installation
2mA~~~~~~~:~~the~~ringis~nderextreme ~~~~~~:~~~~~~~~t~~t~~~~~tmo~~t~n~i~ (.
tension care must be taken at all times.
Failure to follow this instruction may result installed,
and the spring ends butt correctly
against the upper and lower spring seats.
in personal injury.
Using the special tools, compress the spring. Install
the spring.
2. N0TE:Do not fully tighten the shock
absorber lower mounting bolt at this stage.
Attach the shock absorber to the beam axle.
3. Lower the vehicle.
4. N0TE:The final tightening of the shock
absorber lower mounting bolt should be
carried out when the vehicle weight is on the
road wheels.
2006.0 Fiesta 1212006 G89135en
procarmanuals.com
Page 133 of 1226
204-02-1 1 Rear Suspension 204-02-1 1
REMOVAL AND INSTALLATION
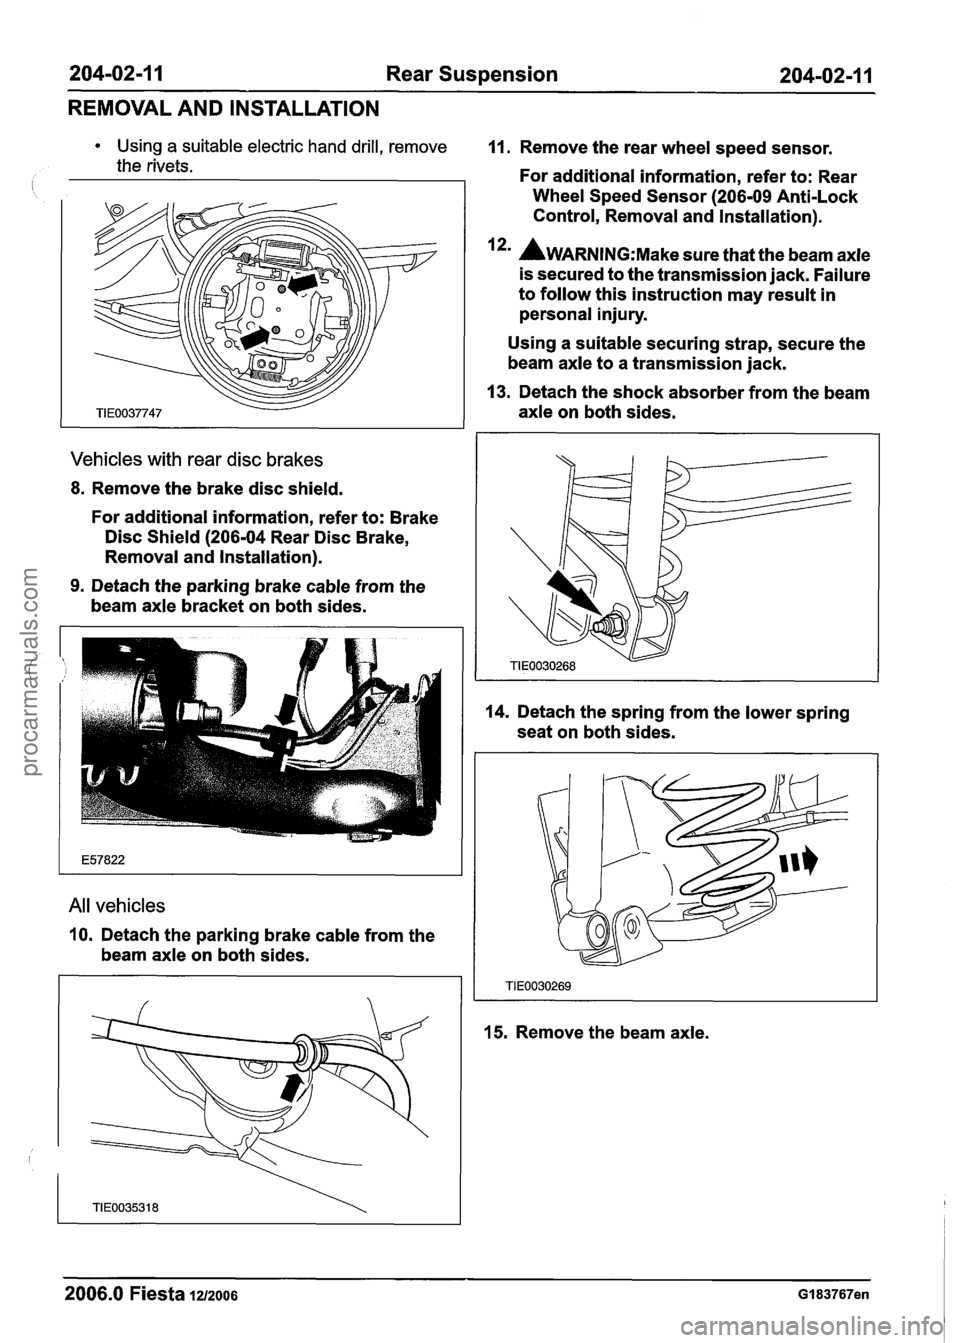
Using a suitable electric hand drill, remove
the rivets.
Vehicles with rear disc brakes
8. Remove the brake disc shield.
For additional information, refer to: Brake
Disc Shield
(206-04 Rear Disc Brake,
Removal and Installation).
9. Detach the parking brake cable from the
beam axle bracket on both sides.
All vehicles
10. Detach the parking brake cable from the
beam axle on both sides.
11. Remove the rear wheel speed sensor.
For additional information, refer to: Rear
Wheel Speed Sensor
(206-09 Anti-Lock
Control, Removal and Installation).
I*' AWARNING:M~~~ sure that the beam axle
is secured to the transmission jack. Failure
to follow this instruction may result in
personal injury.
Using a suitable securing strap, secure the
beam axle to a transmission jack.
13. Detach the shock absorber from the beam
axle on both sides.
14. Detach the spring from the lower spring
seat on both sides.
15. Remove the beam axle.
2006.0 Fiesta 1212006 GI 83767en
procarmanuals.com
Page 152 of 1226
204-04-8 Wheels and Tires 204-04-8
REMOVAL AND INSTALLATION
Wheel and Tire
Removal
A CAUTI0N:Do not use heat to loosen a
seized wheel nut. Heat may damage the
wheel and wheel hub.
I. Loosen the wheel nuts.
2. Raise and support the vehicle. For additional
information, refer to Section
100-02 [Jacking
and Lifting].
3. Remove the wheel and tire assembly.
Installation
AWARNING:R~~~~~ the corrosion or dirt
from the mounting surfaces of the wheel,
wheel hub, brake drum or brake disc, as this
may cause the wheel nuts to loosen and the
wheel to come off while the vehicle is in
motion. Failure to follow this instruction may
result in personal injury.
Clean the wheel hub and mounting surfaces.
2. install the wheel and tire assembly.
3. Lower the vehicle.
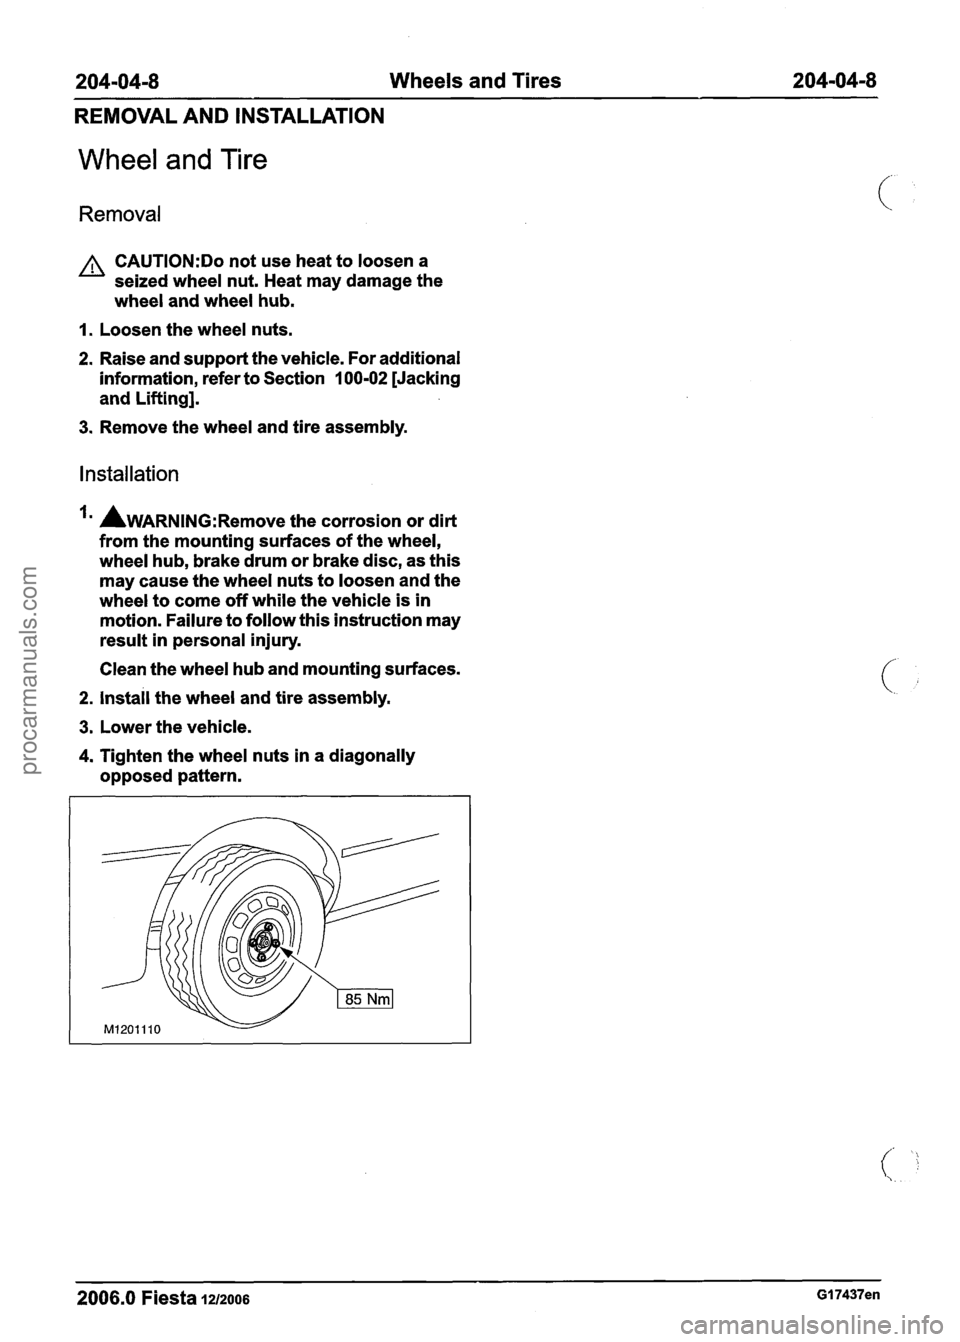
4. Tighten the wheel nuts in a diagonally
opposed pattern.
2006.0 Fiesta 1212006 GI 7437en
procarmanuals.com
Page 158 of 1226
205-04-6 Front Drive Halfshafts 205-04-6
REMOVAL AND INSTALLATION
Front Halfshaft LH(14 320 0)
I I Installer, Halfshaft
(%. .
1 All vehicles
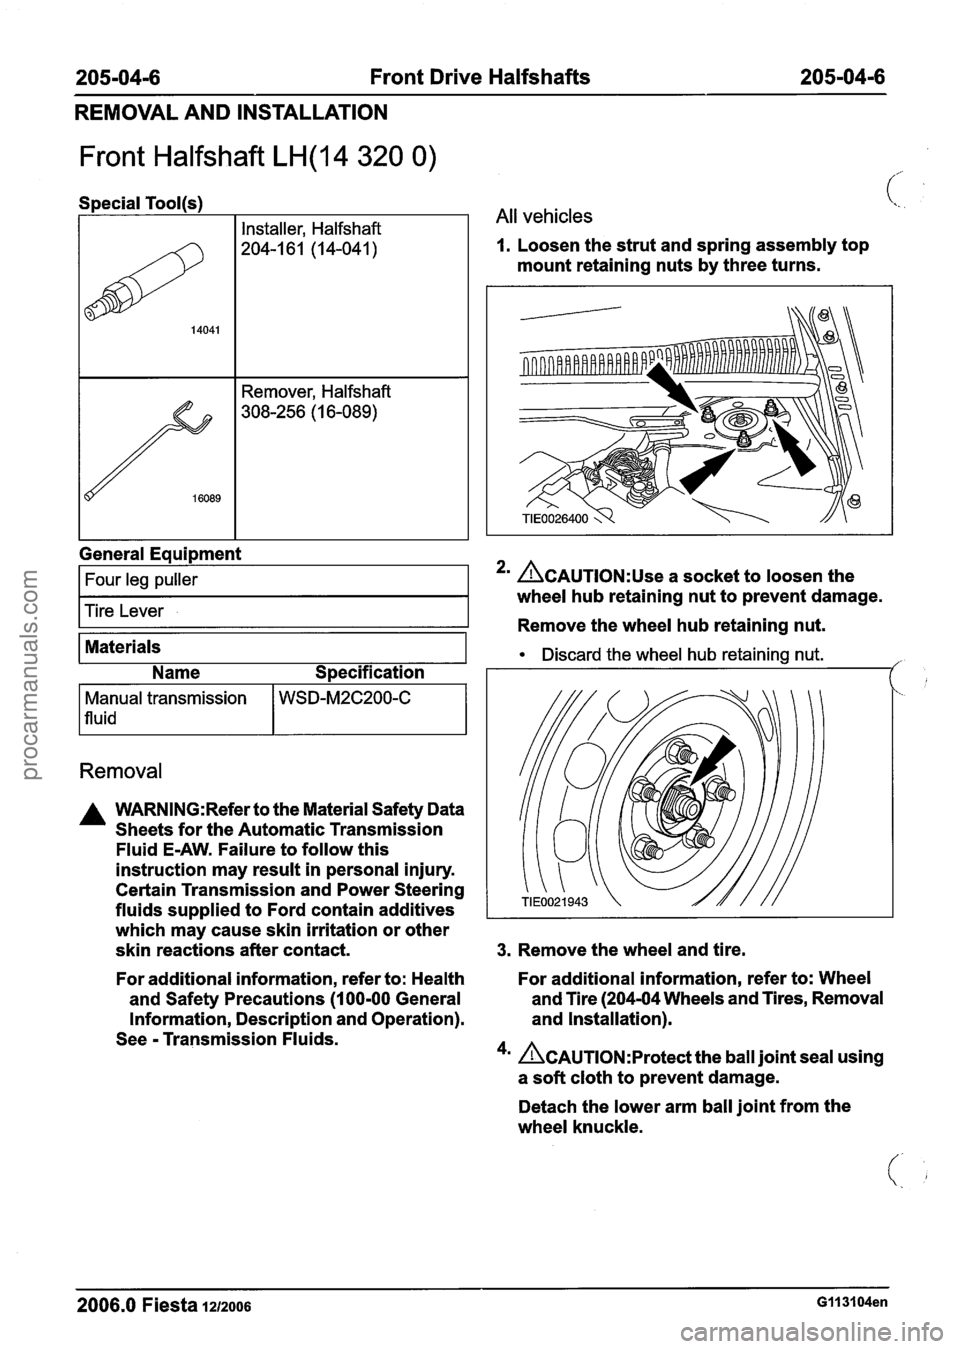
1. Loosen the strut and spring assembly top
mount retaining nuts by three turns.
General
Eaui~ment
I Four leg puller I
Tire Lever
Materials
Name Specification
Removal
Manual transmission
1 fluid
A WARNING:Refer to the Material Safety Data
Sheets for the Automatic Transmission
Fluid
E-AW. Failure to follow this
instruction may result in personal injury.
Certain Transmission and Power Steering
fluids supplied to Ford contain additives
which may cause skin irritation or other
skin reactions after contact.
WSD-M2C200-C
2' ACAUTION:~~~ a socket to loosen the
wheel hub retaining nut to prevent damage.
Remove the wheel hub retaining nut.
Discard the wheel hub retaining nut. ,'
3. Remove the wheel and tire.
For additional information, refer to: Health For
additional information, refer to: Wheel
and Safety Precautions
(1 00-00 General and
Tire (204-04 Wheels and Tires, Removal
Information, Description and Operation). and
Installation).
See
- Transmission Fluids.
4m Ac~u~10~:~rotect the ball joint seal using
a soft cloth to prevent damage.
Detach the lower arm ball joint from the
wheel knuckle.
2006.0 Fiesta IZIZOO~ G113104en
procarmanuals.com
Page 175 of 1226
206-00-3 Brake System - General Information 206-00-3
DIAGNOSIS AND TESTING
Brake System
The brakes system operates by transferring effort
applied to the brake pedal by the driver to the
brakes at each wheel.
The braking effort is distributed to each wheel,
using a hydraulic system. The system is assisted
using a vacuum brake booster that reduces pedal
effort and increases hydraulic pressure.
The parking brake operates on the rear wheels
and is applied using a hand operated control.
lnspection and Verification
N0TE:Before carrying out any diagnosis, make
sure that the brake system warning indicator is
functional.
1. Verify the customer concern.
2. Visually inspect for obvious signs of mechanical
damage.
3. If an obvious cause for an observed or reported
concern is found, correct the case (if possible)
before proceeding to the next step.
4. If the cause if not visually evident, verify the
symptom and refer to the Symptom Chart.
Visual lnspection Chart
Road Test
1.
Perform a road test to compare actual vehicle
braking performance with the performance
standards expected by the driver. The ability of the
test driver to make valid comparisons and detect
performance deficiencies will depend on
experience.
Mechanical
- Tire pressure
- Wheels and tires
- Fluid leak from brake line(s)
The driver should have a thorough knowledge of
the brake system operation and accepted general
performance guidelines to make good comparisons
, and detect performance concerns.
An experienced technician will always establish a
route that will be used for all brake diagnosis road
tests. The road selected will be reasonably smooth and level. Gravel
or bumpy roads are not suitable
because the surface does not allow the tires to grip
the road equally. Crowned roads should be avoided
because of the large amount of weight shifted to
the low set of wheels on this type of road. Once
the route is established and consistently used, the
road surface variable can be eliminated from the
test results.
Before a road test, get a complete description of
the customer concerns or suspected condition.
From the description, the technician will be able to
match possible causes with symptoms. Certain
components will be identified as possible sources
while others will be eliminated by the evidence.
More importantly, the customer description can
reveal unsafe conditions which should be checked
or corrected before a road test. The description will
also help form the basic approach to the road test
by narrowing the concern to specific components,
vehicle speed or conditions.
Begin the road test with a general brake
performance check. Using the description of the
concern, test the brakes at different vehicle speeds
using both light and heavy pedal pressure.
Determine if the concern is in the front or rear
braking system. First use the foot brake and then
the parking brake. If the condition
(i.e. pull,
vibration, pulsation) occurs only on operation of
the parking brake, the concern is in the rear brake
system.
If the condition occurs when the foot brake
is depressed, the concern is in the front brake
system.
Avoid locking the brakes and sliding the tires. This
condition will not indicate brake efficiency. A heavily
braked but turning wheel will stop the vehicle in a
shorter distance than locked wheels.
If the concern becomes evident during this check,
make sure it fits the description given before the
road test. If the concern is not evident, attempt to
duplicate the condition using the information from
the description.
If a concern exists, use the Brake System Symptom
Chart in order to isolate it to a specific sub-system
and condition description. From this description, a
list of possible sources can be used to further
narrow the cause to a specific component or
condition.
- -
2006.0 Fiesta 1212006 G28494en
procarmanuals.com
Page 177 of 1226
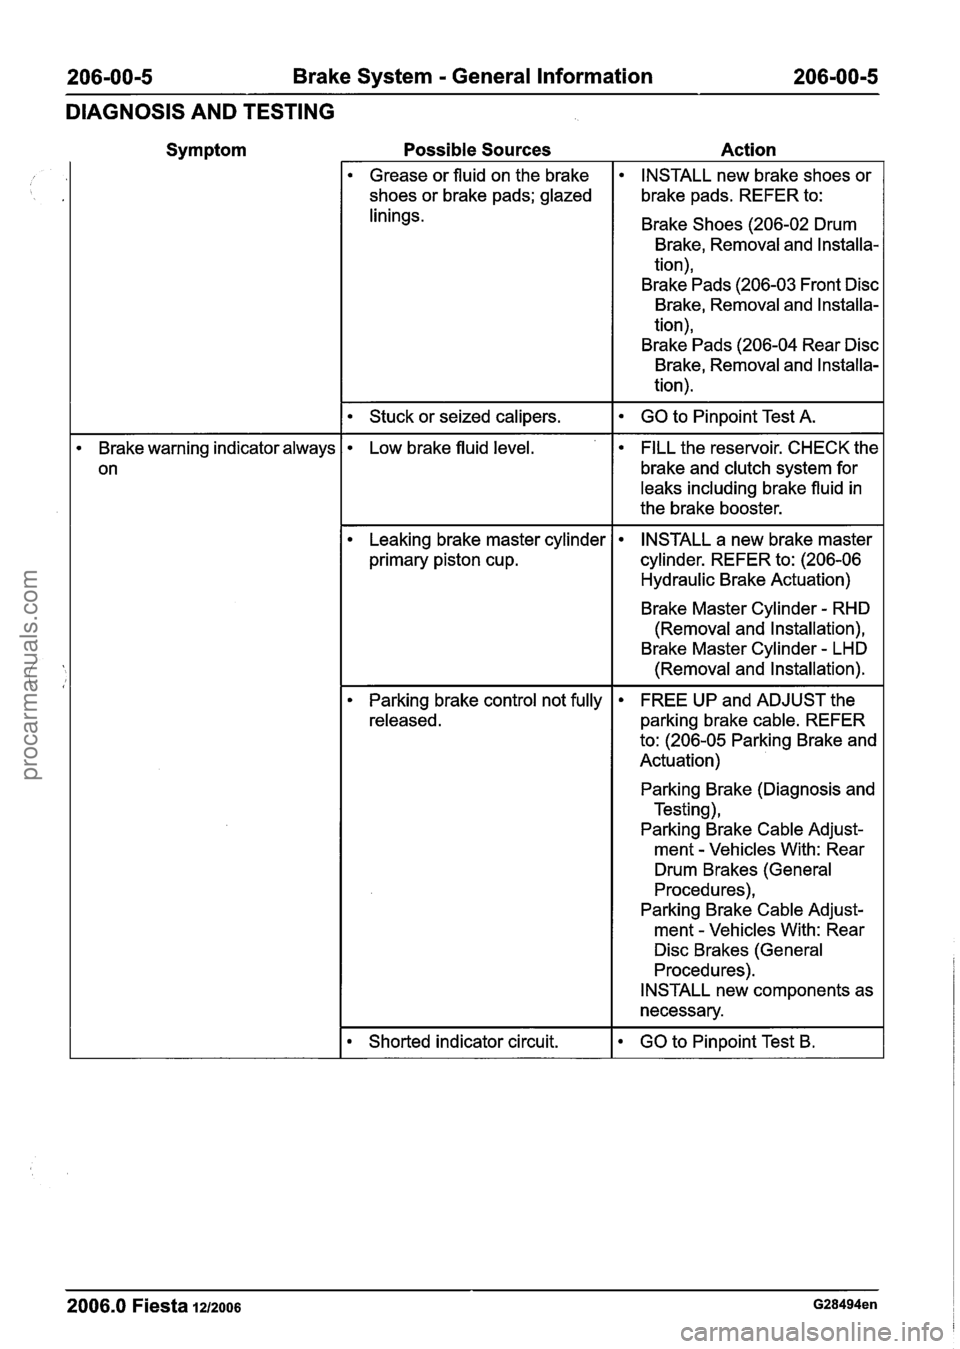
206-00-5 Brake System - General Information 206-00-5
DIAGNOSIS AND TESTING
Symptom Possible Sources
Action
Grease or fluid on the brake
shoes or brake pads; glazed
linings. INSTALL
new brake shoes or
brake pads. REFER to:
Brake Shoes (206-02 Drum Brake, Removal and Installa-
tion),
Brake Pads (206-03 Front Disc
Brake, Removal and Installa-
tion),
Brake Pads (206-04 Rear Disc Brake, Removal and Installa-
tion).
I Stuck or seized calipers. I GO to Pinpoint Test A. I
Brake warning indicator always
on Low
brake fluid level. FILL the reservoir. CHECK the
brake and clutch system for
leaks including brake fluid in
the brake booster.
--
Leaking brake master cylinder
primary piston cup. INSTALL a new brake master
cylinder. REFER to: (206-06
Hydraulic Brake Actuation)
Brake Master Cylinder
- RHD
(Removal and Installation),
Brake Master Cylinder
- LHD
(Removal and Installation).
Parking brake control not fully
released. FREE UP and
ADJUST the
parking brake cable. REFER
to: (206-05 Parking Brake and
Actuation)
Parking Brake (Diagnosis and Testing),
Parking Brake Cable Adjust-
ment
- Vehicles With: Rear
Drum Brakes (General
Procedures),
Parking Brake Cable Adjust-
ment
- Vehicles With: Rear
Disc Brakes (General
Procedures).
INSTALL new components as
necessary.
I Shorted indicator circuit. I GO to Pinpoint Test B. I
2006.0 Fiesta 12/2006 G28494en
procarmanuals.com
Page 184 of 1226
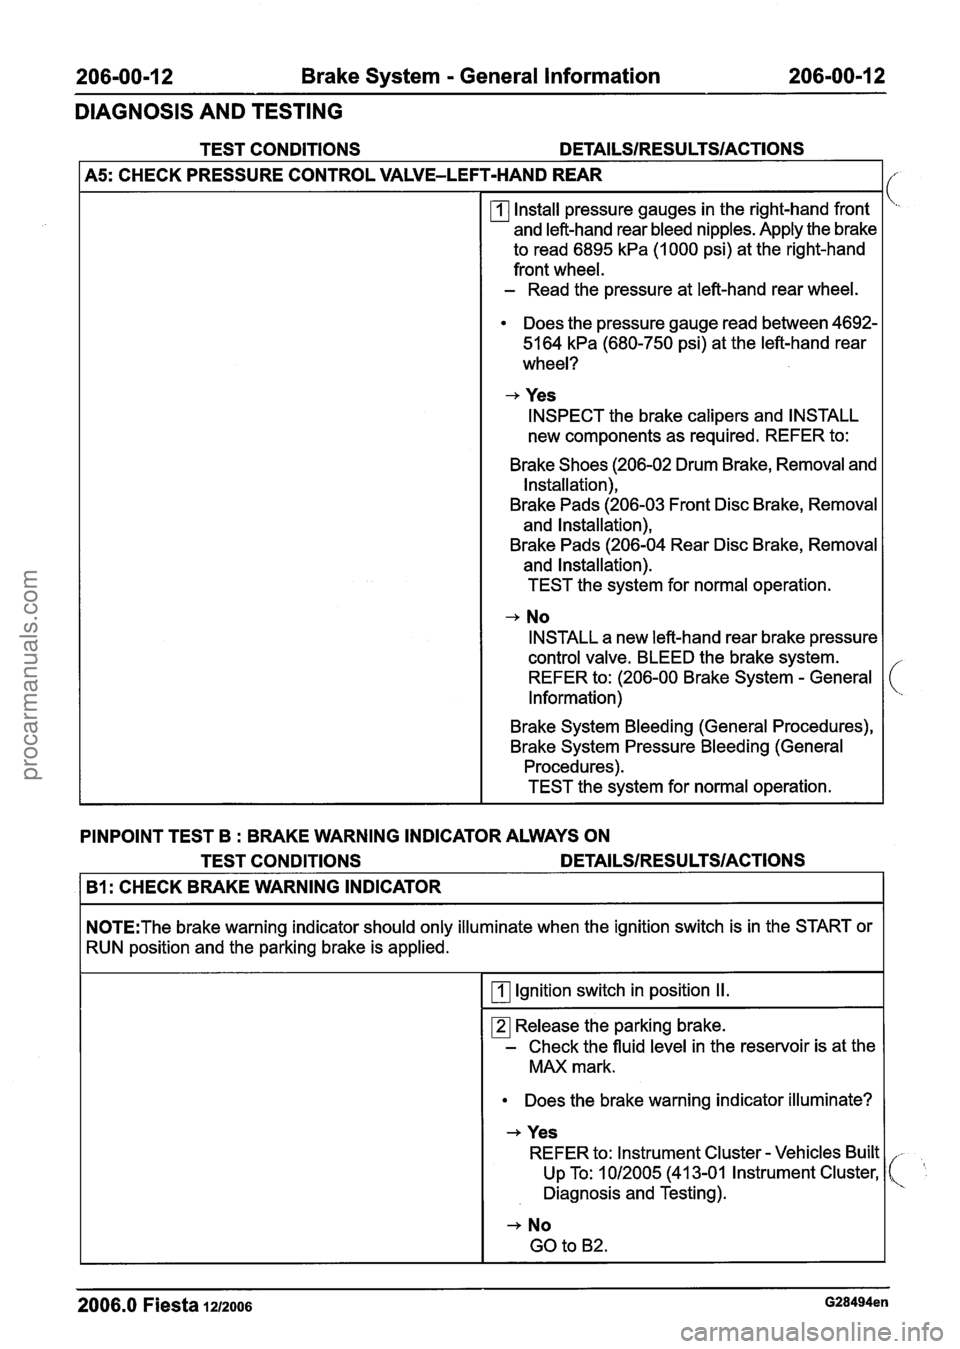
206=00-I 2 Brake System - General Information 206-00-1 2
DIAGNOSIS AND TESTING
TEST CONDITIONS
I A5: CHECK PRESSURE CONTROL VALVE-LEI T-HAND REAR I
Install pressure gauges in the right-hand front
and left-hand rear bleed nipples. Apply the brake
to read 6895
kPa (1000 psi) at the right-hand
front wheel.
- Read the pressure at left-hand rear wheel.
Does the pressure gauge read between 4692-
5164
kPa (680-750 psi) at the left-hand rear
wheel?
+ Yes
INSPECT the brake calipers and INSTALL
new components as required. REFER to:
Brake Shoes (206-02 Drum Brake, Removal and Installation),
Brake Pads (206-03 Front Disc Brake, Removal
and Installation),
Brake Pads (206-04 Rear Disc Brake, Removal
and Installation).
TEST the system for normal operation.
+ No
INSTALL a new left-hand rear brake pressure
control valve. BLEED the brake system.
REFER to: (206-00 Brake System
- General
Information)
Brake System Bleeding (General Procedures),
Brake System Pressure Bleeding (General Procedures).
TEST the system for normal operation.
PINPOINT TEST B
: BRAKE WARNING INDICATOR ALWAYS ON
TEST CONDITIONS
DETAILS/RESULTS/ACTIONS
I B1: CHECK BRAKE WARNING INDICATOR I
N0TE:The brake warning indicator should only illuminate when the ignition switch is in the START or
RUN position and the parking brake is applied.
I Ignition switch in position II.
Release the parking brake.
- Check the fluid level in the reservoir is at the
MAX mark.
Does the brake warning indicator illuminate?
+ Yes
REFER to: lnstrument Cluster
- Vehicles Built
Up To: 1 012005 (41 3-01 lnstrument Cluster,
Diagnosis and Testing).
2006.0 Fiesta 12/2006 G28494en
procarmanuals.com