warning light FORD FIESTA 2007 Owner's Guide
[x] Cancel search | Manufacturer: FORD, Model Year: 2007, Model line: FIESTA, Model: FORD FIESTA 2007Pages: 1226, PDF Size: 61.26 MB
Page 1191 of 1226
31 0-00-5 Fuel System - General Information 31 0-00-5
GENERAL PROCEDURES
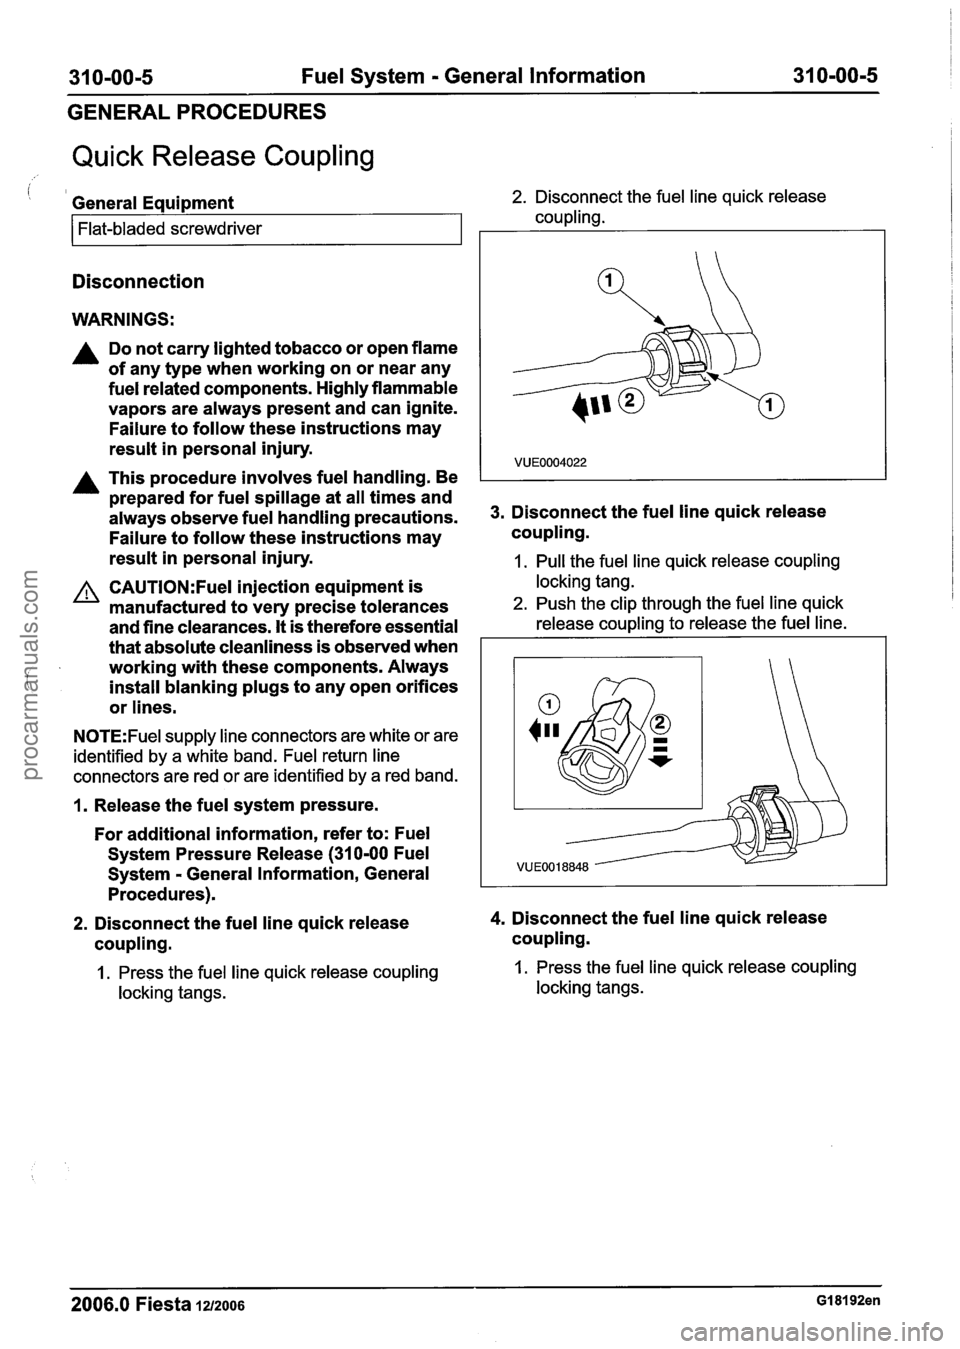
Quick Release Coupling
i 1 General Equipment 2. Disconnect the fuel line quick release
coupling.
Flat-bladed screwdriver
Disconnection
WARNINGS:
A Do not carry lighted tobacco or open flame
of any type when working on or near any
fuel related components. Highly flammable
vapors are always present and can ignite.
Failure to follow these instructions may
result in personal injury.
A This procedure involves fuel handling. Be
prepared for fuel spillage at all times and
always observe fuel handling precautions.
Failure to follow these instructions may
result in personal injury. 3.
Disconnect the fuel line quick release
coupling.
1. Pull the fuel line quick release coupling
CAUTI0N:Fuel injection equipment is locking tang.
manufactured to very precise tolerances 2. Push the clip through the fuel line quick
and fine clearances. It is therefore essential release coupling to release the fuel line.
that absolute cleanliness is observed when I
i
working with these components. Always
install blanking plugs to any open orifices
or lines.
N0TE:Fuel supply line connectors are white or are
identified by a white band. Fuel return line
connectors are red or are identified by a red band.
1. Release the fuel system pressure.
For additional information, refer to: Fuel
System Pressure Release (31
0-00 Fuel
Svstem - General Information, General
2. Disconnect the fuel line quick release 4. Disconnect the fuel line quick release
coupling. coupling.
1. Press the fuel line quick release coupling 1. Press the fuel line quick release coupling
locking tangs. locking tangs.
2006.0 Fiesta 1212006 GI 81 92en
procarmanuals.com
Page 1193 of 1226
31 0-00-7 Fuel System - General Information 31 0-00-7
GENERAL PROCEDURES
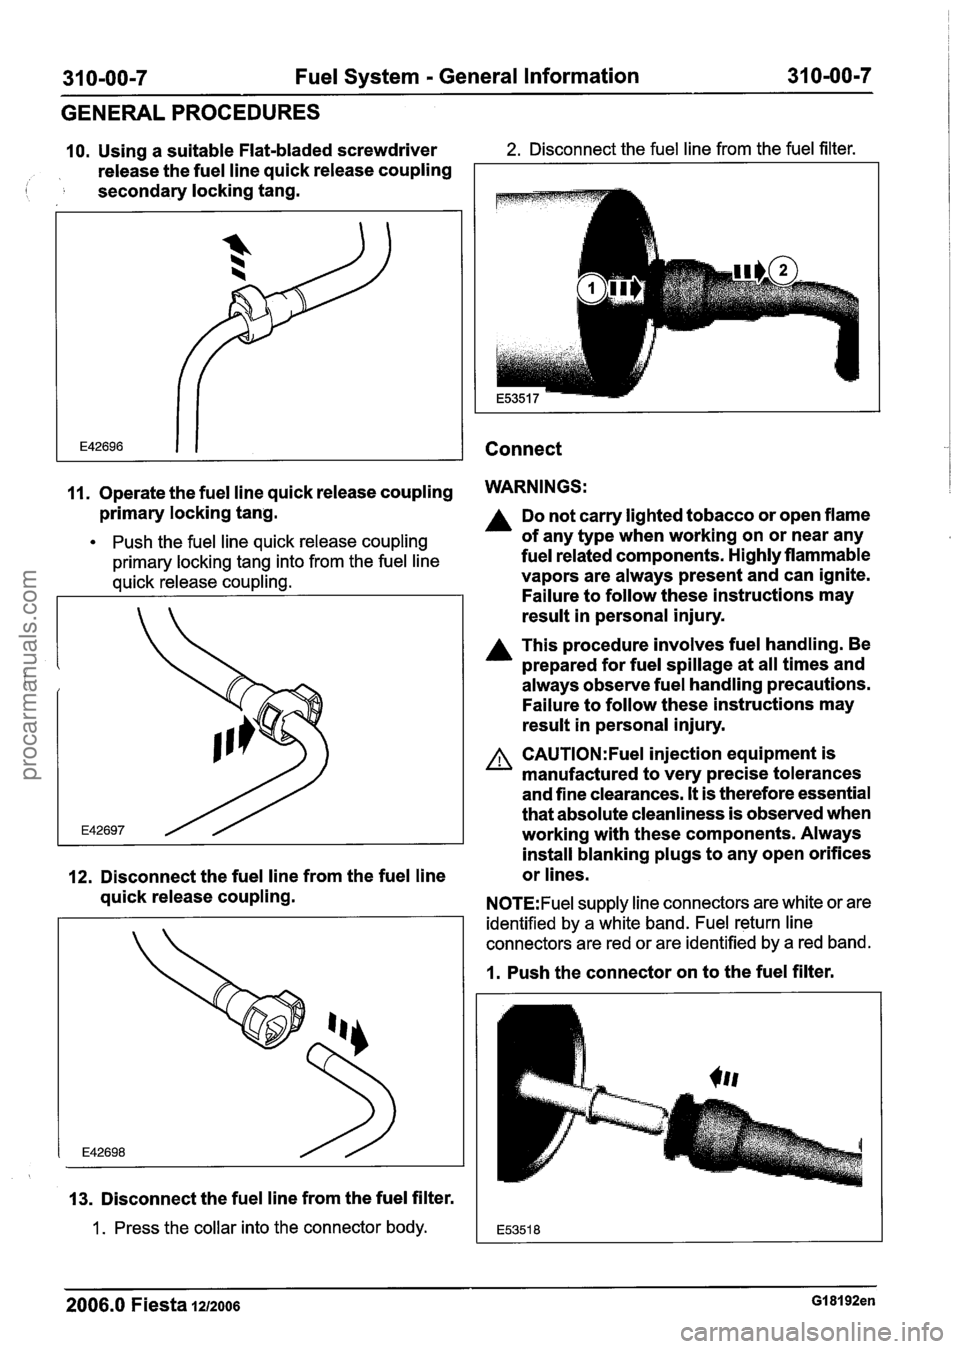
10. Using a suitable Flat-bladed screwdriver 2. Disconnect the fuel line from the fuel filter.
release the fuel line quick release coupling
( secondary locking tang.
Connect
11. Operate the fuel line quick release coupling WARNINGS:
primary locking tang.
Push the fuel line quick release coupling
primary locking tang into from the fuel line
quick release coupling.
12. Disconnect the fuel line from the fuel line
quick release coupling.
13. Disconnect the fuel line from the fuel filter.
1 . Press the collar into the connector body.
Do not carry lighted tobacco or open flame
of any type when working on or near any
fuel related components. Highly flammable
vapors are always present and can ignite.
Failure to follow these instructions may
result in personal injury.
A This procedure involves fuel handling. Be
prepared for fuel spillage at all times and
always observe fuel handling precautions.
Failure to follow these instructions may
result in personal injury.
A CAUTI0N:Fuel injection equipment is
manufactured to very precise tolerances
and fine clearances.
It is therefore essential
that absolute cleanliness is observed when
working with these components. Always
install blanking plugs to any open orifices
or lines.
N0TE:Fuel supply line connectors are white or are
identified by a white band. Fuel return line
connectors are red or are identified by a red band.
1. Push the connector on to the fuel filter.
2006.0 Fiesta 1212006 GI 81 92en
procarmanuals.com
Page 1196 of 1226
31 0-00-1 0 Fuel System - General Information 31 0-00-1 0
GENERALPROCEDURES
Fuel System Pressure Check - 2.OL Duratec-HE (M14)
Special Tool(s)
I Test Hose for 31 0-025
I I Test Hose for 31 0-025 1
General Equipment 1
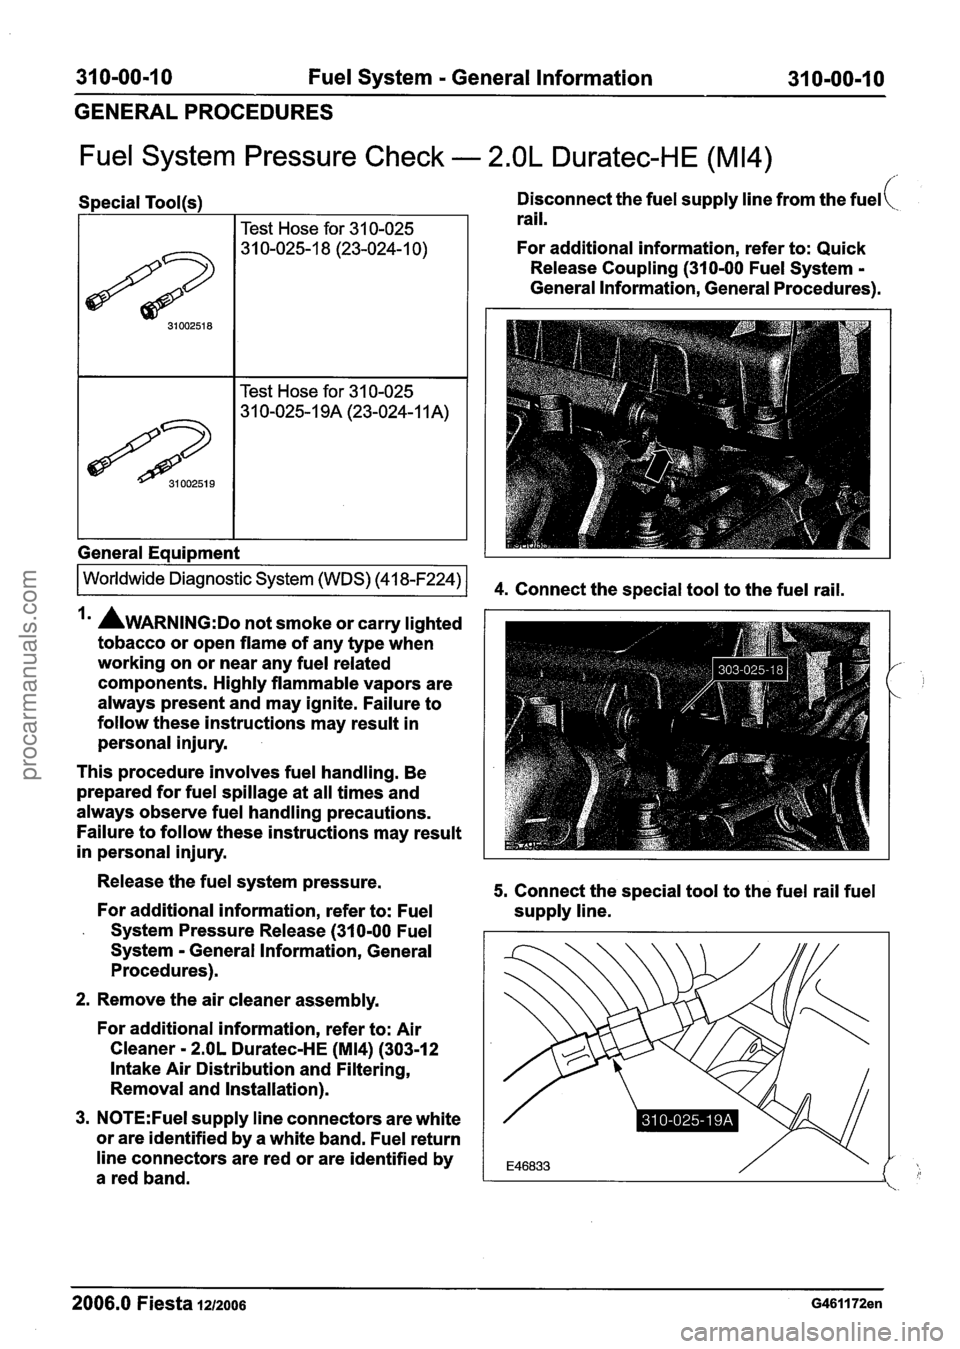
Disconnect the fuel supply line from the fuel(
rail.
For additional information, refer to: Quick
Release Coupling (310-00 Fuel System
-
General Information, General Procedures).
Irn AWARNING:D~ not smoke or carry lighted
tobacco or open flame of any type when
working on or near any fuel related
components. Highly flammable vapors are
always present and may ignite. Failure to
follow these instructions may result in
personal injury.
This procedure involves fuel handling. Be
prepared for fuel spillage at all times and
always observe fuel handling precautions.
Failure to follow these instructions may result
in personal injury.
Release the fuel system pressure.
For additional information, refer to: Fuel
- System Pressure Release (310-00 Fuel
System
- General Information, General
Procedures).
2. Remove the air cleaner assembly.
For additional information, refer to: Air
Cleaner
- 2.OL Duratec-HE (M14) (303-12
Intake Air Distribution and Filtering,
Removal and Installation).
3.
N0TE:Fuel supply line connectors are white
or are identified by a white band. Fuel return
line connectors are red or are identified by
a red band.
5. Connect the special tool to the fuel rail fuel
supply line.
- - -- - - -
2006.0 Fiesta 1212006 G461172en
procarmanuals.com
Page 1204 of 1226
31 0-01 -6 Fuel Tank and Lines 31 0-01 -6
REMOVAL AND INSTALLATION
Fuel Tank(23 554 0)
Special Tool(s)
I I Wrench, Sender Unit, Fuel
General Equipment
I Transmission jack I
Removal
All vehicles
WARNINGS:
A Do not smoke or carry lighted tobacco or
open flame of any type when working on
or near fuel related components. Highly
flammable vapors are always present and
may ignite. Failure to follow these
instructions may result in personal injury.
A This procedure involves fuel handling. Be
prepared for fuel spillage at all times and
always observe fuel handling precautions.
Failure to follow these instructions may
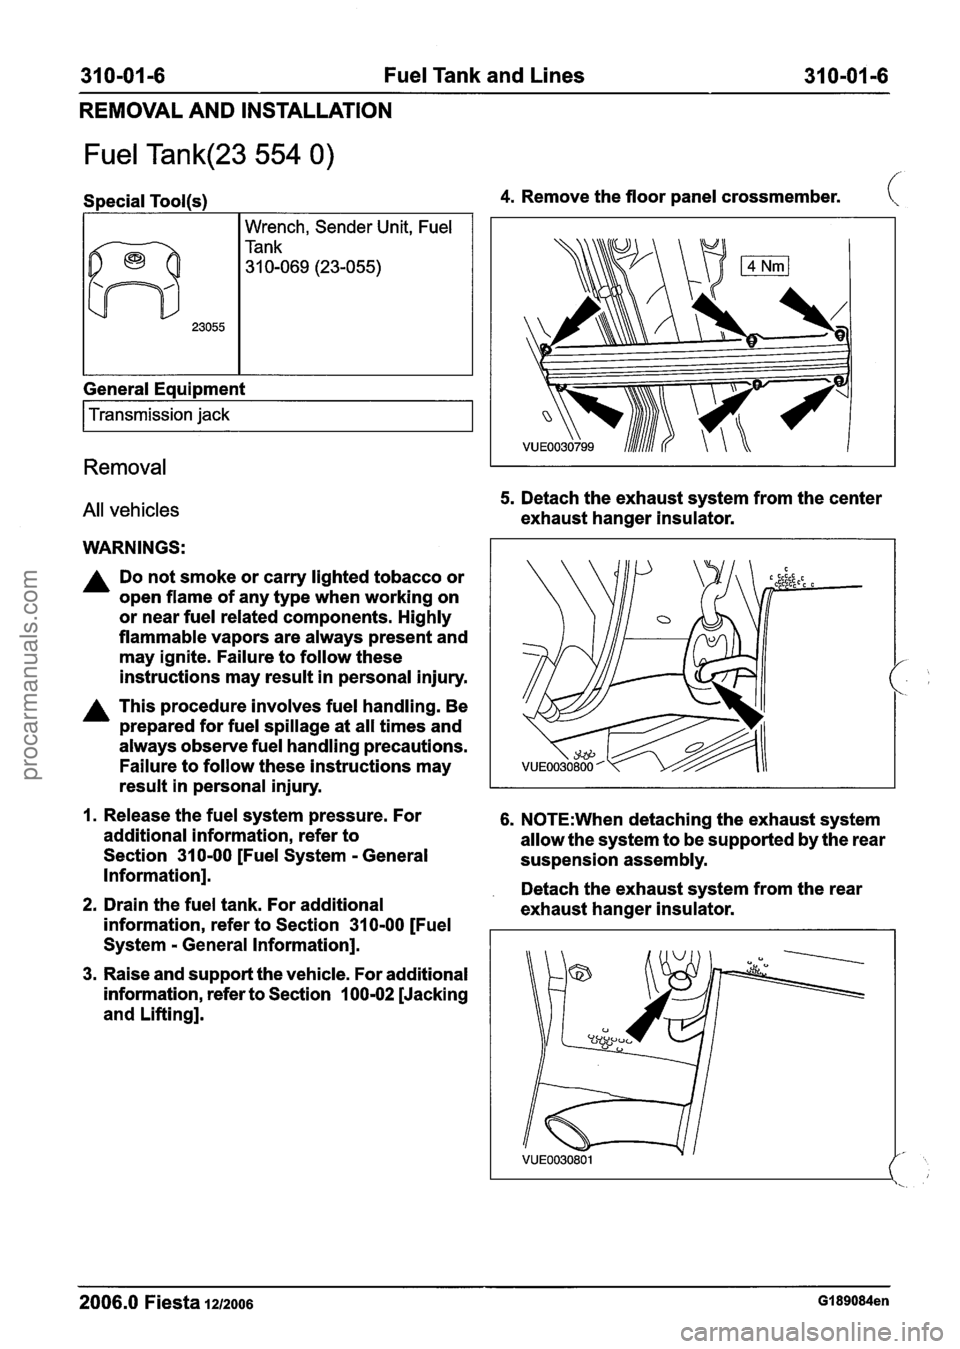
4. Remove the floor panel crossmember. (
5. Detach the exhaust system from the center
exhaust hanger insulator.
result in personal injury.
I
1. Release the fuel system pressure. For 6. N0TE:When detaching the exhaust system
additional information, refer to
allow the system to be supported by the rear
Section
31 0-00 [Fuel System - General
suspension assembly.
Information].
. Detach the exhaust system from the rear 2. Drain the fuel tank. For additional
exhaust hanger insulator.
information, refer to Section
31 0-00 [Fuel
System
- General Information].
3. Raise and support the vehicle. For additional
information, refer to Section
100-02 [Jacking
and Lifting].
2006.0 Fiesta 1212006 GI 89084en
procarmanuals.com
Page 1208 of 1226
310-01 -1 0 Fuel Tank and Lines 31 0-01-10
REMOVAL AND INSTALLATION
Vehicles with diesel engine Installation
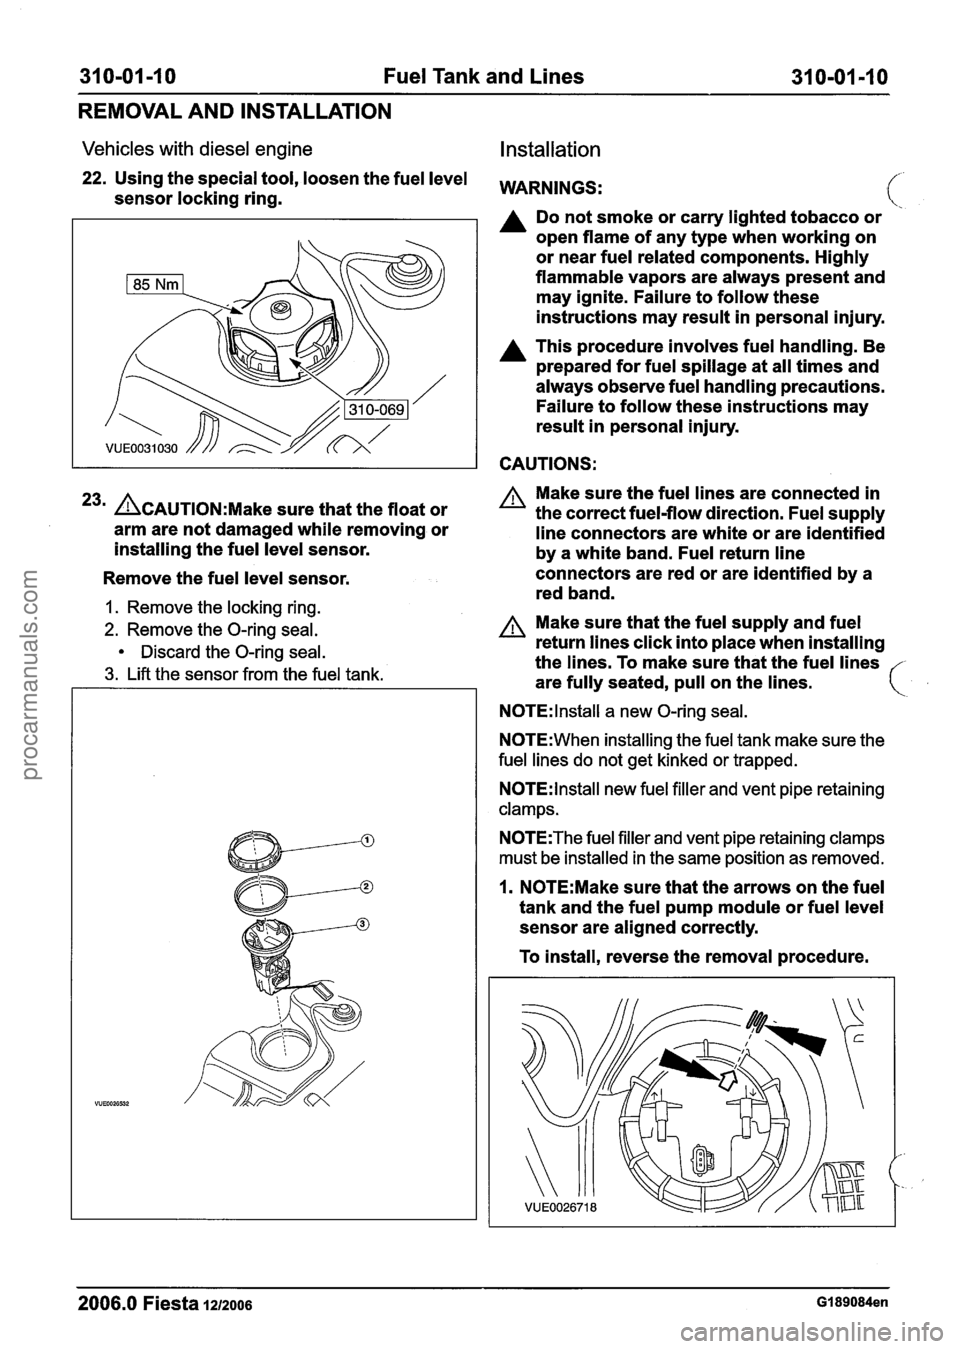
22. Using the special tool, loosen the fuel level WARNINGS: sensor locking ring.
A Do not smoke or carry lighted tobacco or
open flame of any type when working on
or near fuel related components. Highly
flammable vapors are always present and
may ignite. Failure to follow these
instructions may result in personal injury.
A This procedure involves fuel handling. Be
prepared for fuel spillage at all times and
always observe fuel handling precautions.
Failure to follow these instructions may
result in personal injury.
CAUTIONS:
23m &AUTION:M~~~ sure that the float or
arm are not damaged while removing or
installing the fuel level sensor.
Remove the fuel level sensor.
1. Remove the locking ring.
2. Remove the O-ring seal.
Discard the O-ring seal.
3. Lift the sensor from the fuel tank. Make
sure the fuel lines are connected in
the correct fuel-flow direction. Fuel supply
line connectors are white or are identified
by a white band. Fuel return line
connectors are red or are identified by a
red band.
A Make sure that the fuel supply and fuel
return lines click into place when installing
the lines. To make sure that the fuel lines
are fully seated, pull on the lines.
N0TE:lnstall a new O-ring seal.
N0TE:When installing the fuel tank make sure the
fuel lines do not get kinked or trapped.
N0TE:lnstall new fuel filler and vent pipe retaining
clamps.
N0TE:The fuel filler and vent pipe retaining clamps
must be installed in the same position as removed.
1. N0TE:Make sure that the arrows on the fuel
tank and the fuel pump module or fuel level
sensor are aligned correctly.
To install, reverse the removal procedure.
2006.0 Fiesta 1212006 GI 89084en
procarmanuals.com
Page 1210 of 1226
31 0-01 -1 2 Fuel Tank and Lines 31 0-01-12
REMOVAL AND INSTALLATION
Fuel Tank Filler Pipe(23 572 0)
Removal
WARNINGS:
A Do not smoke or carry lighted tobacco or
open flame of any type when working on
or near any fuel related components.
Highly flammable vapours are always
present and can ignite. Failure to follow
these instructions may result in personal
injury.
A This procedure involves fuel handling. Be
prepared for fuel spillage at all times and
always observe fuel handling precautions.
Failure to follow these instructions may
result in personal injury.
I. Disconnect the battery ground cable. For
additional information, refer to
Section
41 4-01 [Battery, Mounting and
Cables].
2. Drain the fuel tank. For additional
information, refer to Section
31 0-00 [Fuel
System
- General Information].
3. Raise and support the vehicle. For additional
information, refer to Section
100-02 [Jacking
and Lifting].
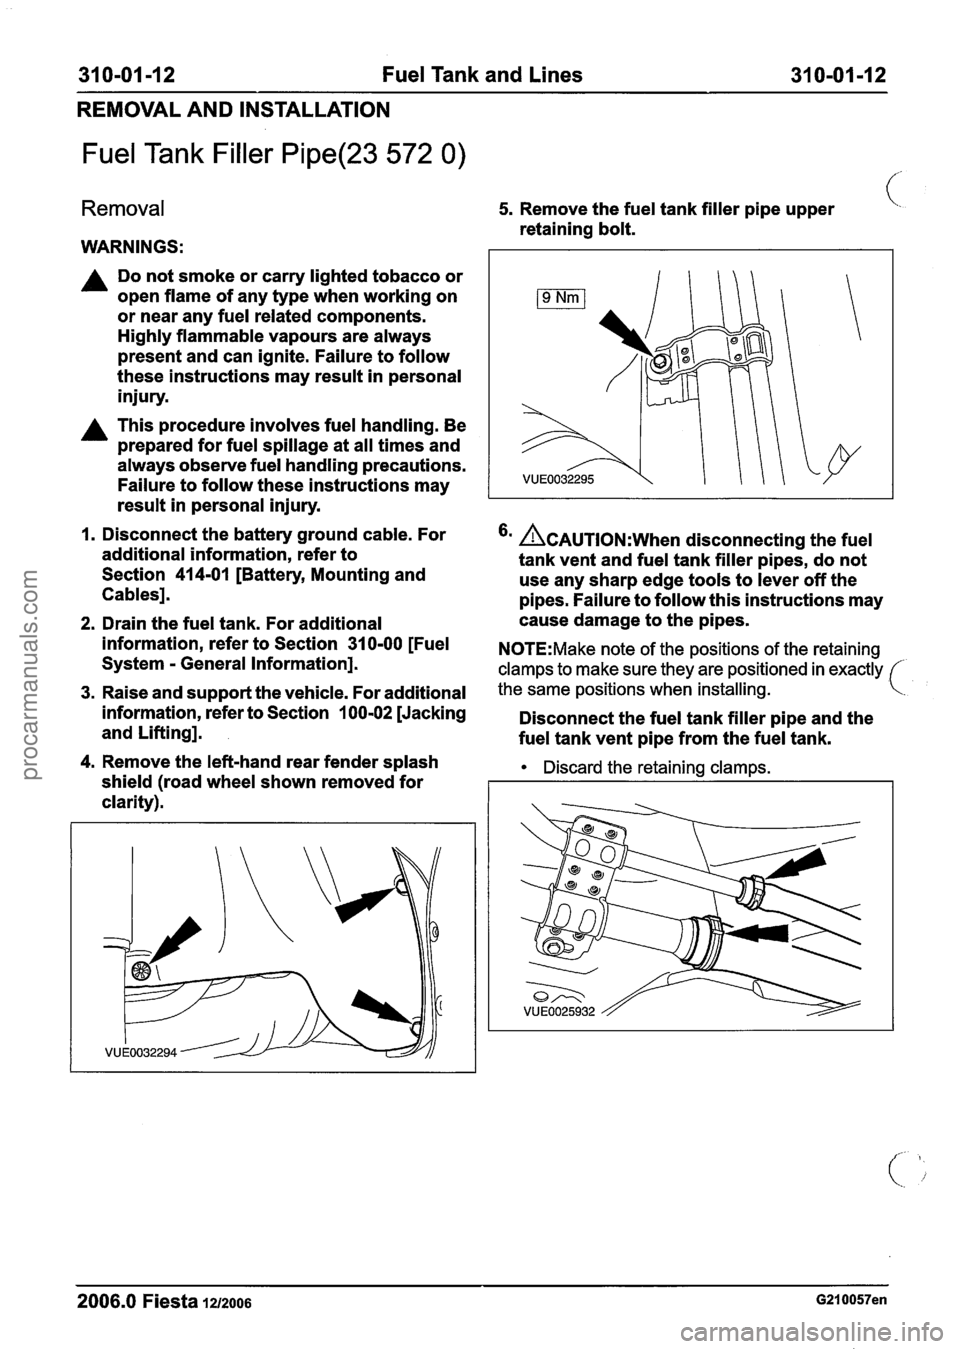
4. Remove the left-hand rear fender splash
shield (road wheel shown removed for
clarity).
5. Remove the fuel tank filler pipe upper (.
retaining bolt.
'' &AUTION:W~~~ disconnecting the fuel
tank vent and fuel tank filler pipes, do not
use any sharp edge tools to lever off the
pipes. Failure to follow this instructions may
cause damage to the pipes.
N0TE:Make note of the positions of the retaining
clamps to make sure they are positioned in exactly
the same positions when installing.
Disconnect the fuel tank filler pipe and the
fuel tank vent pipe from the fuel tank.
Discard the retaining clamps.
2006.0 Fiesta 1212006 G210057en
procarmanuals.com
Page 1211 of 1226
31 0-01 -1 3 Fuel Tank and Lines 31 0-01 -1 3
REMOVAL AND INSTALLATION
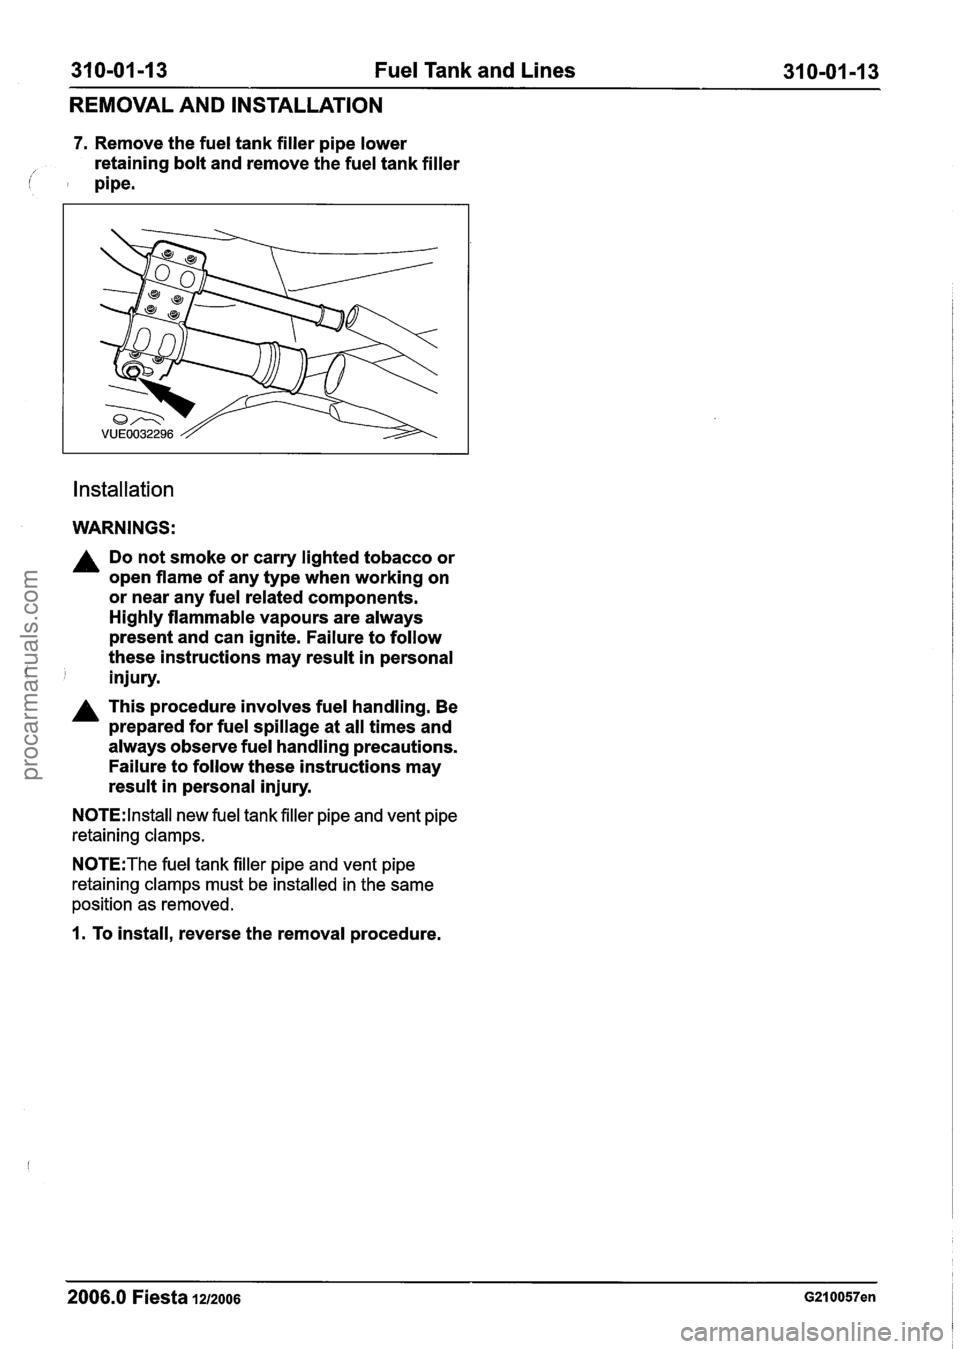
7. Remove the fuel tank filler pipe lower
retaining bolt and remove the fuel tank filler
i pipe.
Installation
WARNINGS:
A Do not smoke or carry lighted tobacco or
open flame of any type when working on
or near any fuel related components.
Highly flammable vapours are always
present and can ignite. Failure to follow
these instructions may result in personal
' injury.
A This procedure involves fuel handling. Be
prepared for fuel spillage at all times and
always observe fuel handling precautions.
Failure to follow these instructions may
result in personal injury.
N0TE:lnstall new fuel tank filler pipe and vent pipe
retaining clamps.
N0TE:The fuel tank filler pipe and vent pipe
retaining clamps must be installed in the same
position as removed.
1. To install, reverse the removal procedure.
2006.0 Fiesta 1212006 G210057en
procarmanuals.com