fuse FORD FIESTA 2007 Workshop Manual
[x] Cancel search | Manufacturer: FORD, Model Year: 2007, Model line: FIESTA, Model: FORD FIESTA 2007Pages: 1226, PDF Size: 61.26 MB
Page 26 of 1226
1 OO=OO-10 General Information 100-00-1 0
DESCRIPTION AND OPERATION
Dewaxing Engine Oils
See Solvents and Fuels (Kerosene). See Lubricants and Grease.
Dusts Exhaust Fumes
Powder, dusts or clouds may be irritant, harmful These contain asphyxiating, harmful and toxic
or toxic. Avoid breathing dusts from powdery chemicals and particles such as carbon oxides,
chemical materials or those arising from dry nitrogen oxides, aldehydes, lead and aromatic
abrasion operations. Wear respiratory protection hydrocarbons. Engines should be run only under
if ventilation is inadequate. conditions of adequate exhaust extraction or
Fine dusts of combustible material can present an general ventilation
and not in confined spaces.
explosion hazard. Avoid explosive limits and
sources of ignition.
Gasoline (petrol) engine
Electric Shock There may not be adequate warning of odor or of
irritation before toxic or harmful effects arise. These
Electric shock can result from the use of faulty may be immediate
or delayed.
electrical equipment or from the misuse of
equipment in good condition.
Diesel engine Make sure that electrical equipment is maintained
in good condition and frequently tested. Faulty
Soot, discomfort and irritation usually give
equipment should be labeled and preferably
adequate warning of hazardous fume
removed from the workstation. concentrations.
Make sure that flexes, cables, plugs and sockets
are not frayed, kinked, cut, cracked or otherwise
Fibre damaged.
Make sure that electrical equipment and flexes do
See also Dusts.
not come into contact with water.
Used in noise and sound insulation.
Make sure that electrical is protected The fibrous nature of surfaces and cut edges can by the correct rated fuse.
cause skin irritation. This is usually a physical and
Never misuse electrical equipment and never use
not a chemical effect.
equipment that is in any way faulty. The results
could be fatal. Precautions should
be taken to avoid excessive
skin contact through careful organization of work
Make sure that the cables of mobile electrical
practices and the
;se of gloves.
equipment cannot get trapped and damaged, such
as in a vehicle hoist.
-. Fire Make sure that the designated electrical workers
are trained in basic First Aid.
See also Welding, Foams, Legal Aspects.
In cases of electrocution:
Many of the materials found on or associated with
- switch off the power supply before approaching the repair of vehicles are highly flammable. Some
the victim. give
off toxic or harmful fumes if burnt.
- if this is not possible push or drag the victim
Observe strict fire safety when storing and handling
from the source of electricity using dry flammable materials
or solvents, particularly near
non-conductive material. electrical equipment or welding processes.
/
- commence resuscitation if trained to do so.
Make sure, before using electrical or welding 'L '
- SUMMON MEDICAL ASSISTANCE. equipment,
that there is no fire hazard present.
Have a suitable fire extinguisher available when
using welding or heating equipment.
procarmanuals.com
Page 96 of 1226
204-00-1 6 Suspension System - General Information 204-00-1 6
GENERAL PROCEDURES
Wheel Bearing Inspection
Special Tool(s)
General Equipment
I Dial indicator gauge I
bearing assembly. There should be no end (
play. If end play exists, install new wheel
bearings.
Check
1. N0TE:Do not to confuse lower arm ball joint
looseness with bearing looseness.
Raise and support the front of the vehicle. 6.
Install the front brake caliper anchor plate.
For additional information, refer to: (I 00-02)
For additional information, refer to: Brake
Jacking (Description and Operation),
Lifting (Description and Operation).
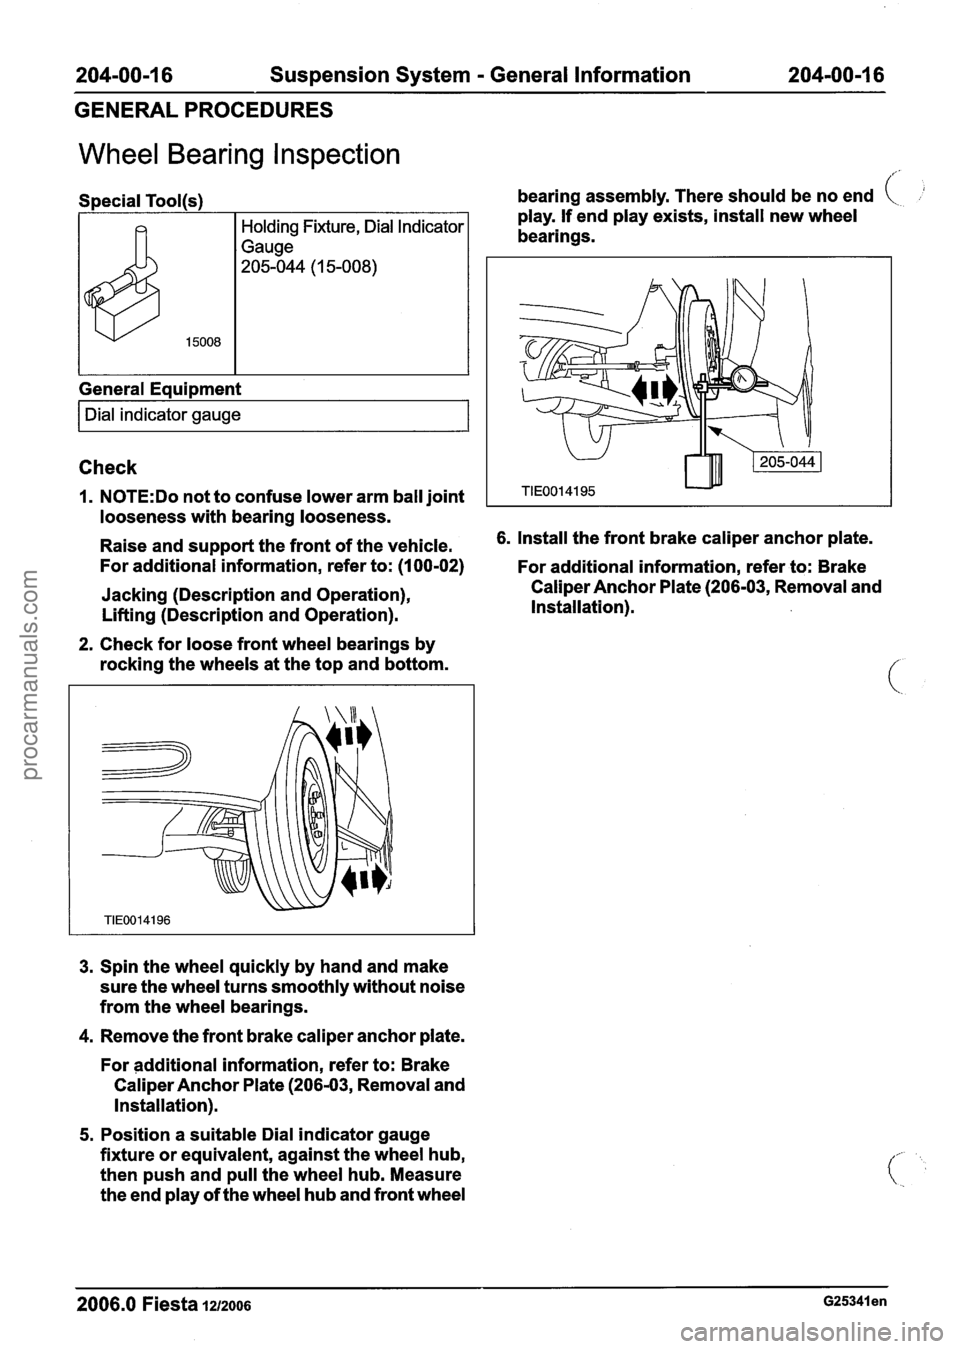
2. Check for loose front wheel bearings by
rocking the wheels at the top and bottom.
3. Spin the wheel quickly by hand and make
sure the wheel turns smoothly without noise
from the wheel bearings.
4. Remove the front brake caliper anchor plate.
For additional information, refer to: Brake
Caliper Anchor Plate (206-03, Removal and
Installation).
5. Position a suitable Dial indicator gauge
fixture or equivalent, against the wheel hub,
then push and pull the wheel hub. Measure
the end play of the wheel hub and front wheel Caliper
Anchor Plate (206-03, Removal and
Installation).
2006.0 Fiesta 1212006 ~25341 en
procarmanuals.com
Page 281 of 1226
206-09A-7 Anti-Lock Control 206-09A-7
DIAGNOSIS AND TESTING
Anti-Lock Control
, Refer to Wiring Diagrams Section 206-09A, for
schematic and connector information.
General
Equipment
I Worldwide diagnostic system (WDS) I
Inspection and Verification
I. Verify the customer concern.
2. Visually inspect for obvious signs of mechanical
or electrical damage.
Visual Inspection Chart
I Mechanical I Electrical I
3. If an obvious cause for an observed or reported
concern is found, correct the cause (if possible)
. before proceeding to the next step.
sensor(s)
Wheel speed sensor
ring (s)
I '4. If the cause is not visually evident, connect the
diagnostic tool to the data link connector and
select the vehicle to be tested from the
diagnostic tool menu.
Fuse(s)
Electrical
connector(s)
Wiring harness(s).
2006.0 Fiesta 1212006 G325340en
procarmanuals.com
Page 426 of 1226
303-004 Engine System - General Information 303-00-4
DIAGNOSIS AND TESTING
Engine
Special Tool(s)
Socket, Spark Plug
303-499
I Adhesive - Loctite 243 I WSK-M2G349A7 I
Materials
1. Verify the customer concern by operating the
system.
2. Visually inspect for obvious signs of mechanical
or electrical damage.
k.
Name S~ecification
Leaks from oil carrying
components or basic engine.
E47332
&
21211
CHECK for cracks in oil
carrying components of the
basic engine by means of a
leak test. INSTALL new
components or seals as
necessary.
2006.0 Fiesta 1212006 GI 52554en
Compression Test Adapter
303-1 052
Pliers, Valve Stem Seal
303-508
4. If the cause is not visually evident, verify the
symptom and refer to the Symptom Chart.
Symptom Chart Symptom Possible Sources Action
Visual
Inspection Chart
Loss of oil Mechanical
- Coolant
leaks
- Oil leaks
- Fuel system leaks
- Visibly damaged or
worn parts
- Loose or missing
nuts or bolts Electrical
- Fuse(s)
- Loose
or corroded
connector(s)
- Powertrain control
module
- Damaged or worn
switch(es)
Oil leaks on components that
are
eithei coated in oil them-
selves or on components local
to them.
Internal or external leak at the
oil cooler.
Leak at the crankshaft seal.
3. If an obvious cause for an observed or reported
concern is found, correct the cause (if possible)
before proceeding to the next step.
CHECK for evidence of oil
leaks on components. Use an
ultraviolet (UV) leak tester if an
oil leak is not evident, INSTALL
new gaskets or components as
required.
CHECK the coolant expansion
tank for a film of oil on the
coolant surface. INSTALL a
new oil cooler or oil cooler
gasket.
INSTALL a new crankshaft
seal.
procarmanuals.com
Page 750 of 1226
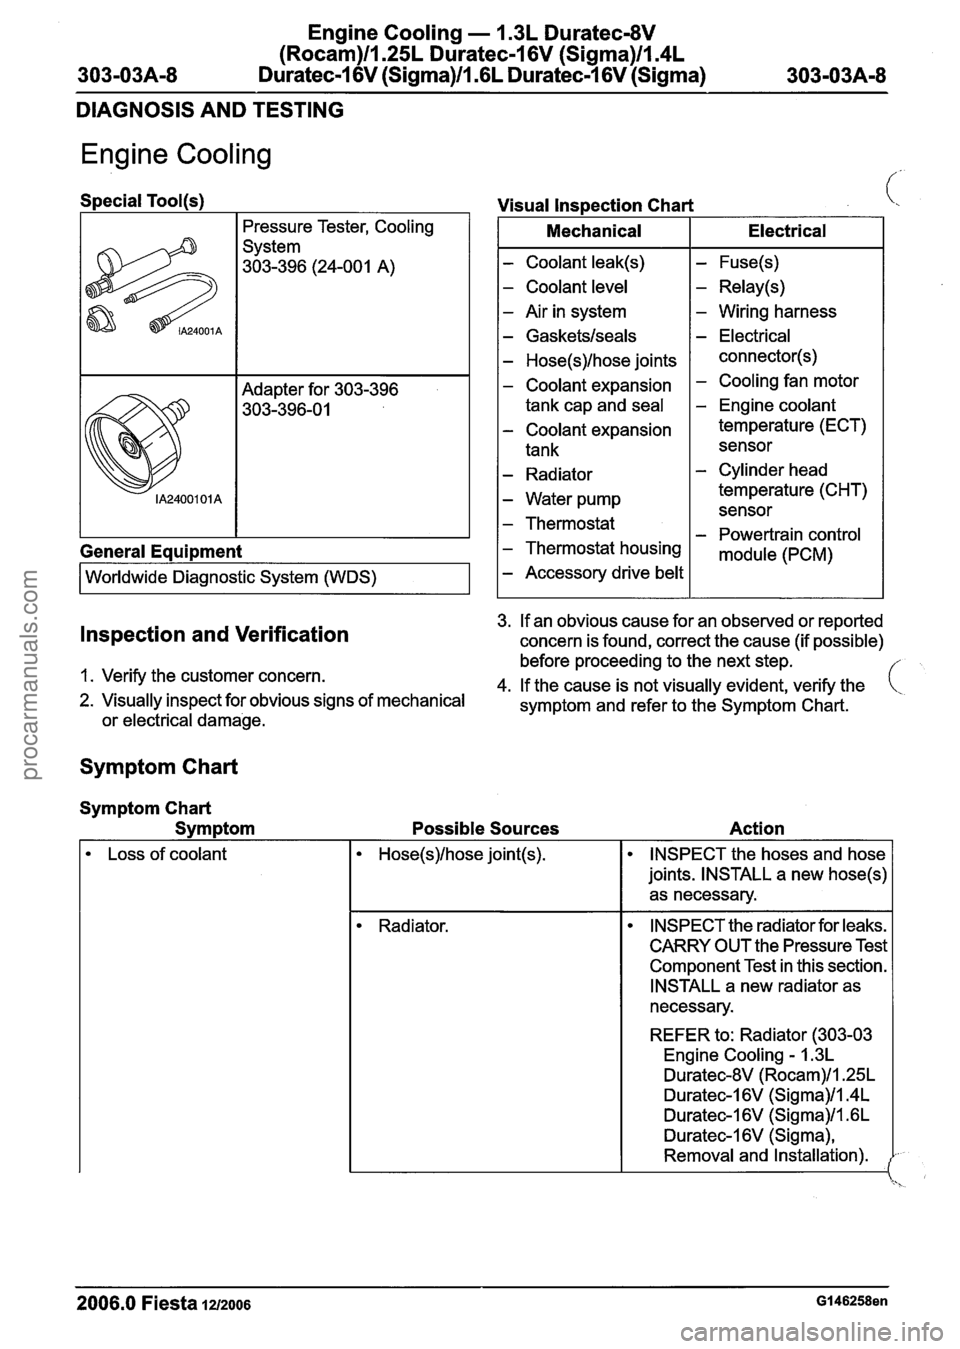
Engine Cooling - 1.3L Duratec-8V
(Rocam)ll.25L Duratec-1 6V (Sigma)ll.4L
303-03A-8 Duratec-1 6V (Sigma)/l .6L Duratec-1 6V (Sigma) 303-03A-8
DIAGNOSIS AND TESTING
Engine Cooling
Special Tool(~)
Pressure Tester,
Cooling
System
303-396 (24-001 A)
General
Equipment
I Worldwide Diagnostic System (WDS) I
Visual Inspection Chart i,
I Mechanical I Electrical I
- Coolant leak(s)
- Coolant level
- Air in system
- Gasketslseals
- Hose(s)lhose joints
- Coolant expansion
tank cap and
seal
- Coolant expansion
tank
- Radiator
- Water pump
- Thermostat
- Thermostat housing
- Accessory drive belt
- Fuse(s)
- Relay(s)
- Wiring harness
- Electrical
connector(s)
- Cooling fan motor
- Engine coolant
temperature (ECT)
sensor
- Cylinder head
temperature (CHT) sensor
- Powertrain control
module (PCM)
3.
If an obvious cause for an observed or reported Inspection and Verification concern is found, correct the cause (if possible)
before proceeding to the next step.
1. Verify the customer concern.
4.
If the cause is not visually evident, verify the ( 2. Visually inspect for obvious signs of mechanical
symptom and refer to the Symptom Chart.
or
electrical damage.
Symptom Chart
Symptom Chart
Svm
ptom Possible Sources Action
Loss of
coolant INSPECT the hoses and hose
joints. INSTALL a new
hose(s)
as necessary.
Radiator. INSPECT the radiator for leaks.
CARRY OUT the Pressure Test
Component Test in this section.
INSTALL a new radiator as
necessary.
REFER to: Radiator (303-03 Engine
Cooling - 1.3L
Duratec-8V (Rocam)/l.25L
Duratec-1 6V (Sigma)1ln4L
Duratec-1 6V (Sigma)ll .6L
Duratec-I 6V (Sigma),
Removal and Installation).
2006.0 Fiesta 1212006 GI 46258en
procarmanuals.com
Page 779 of 1226
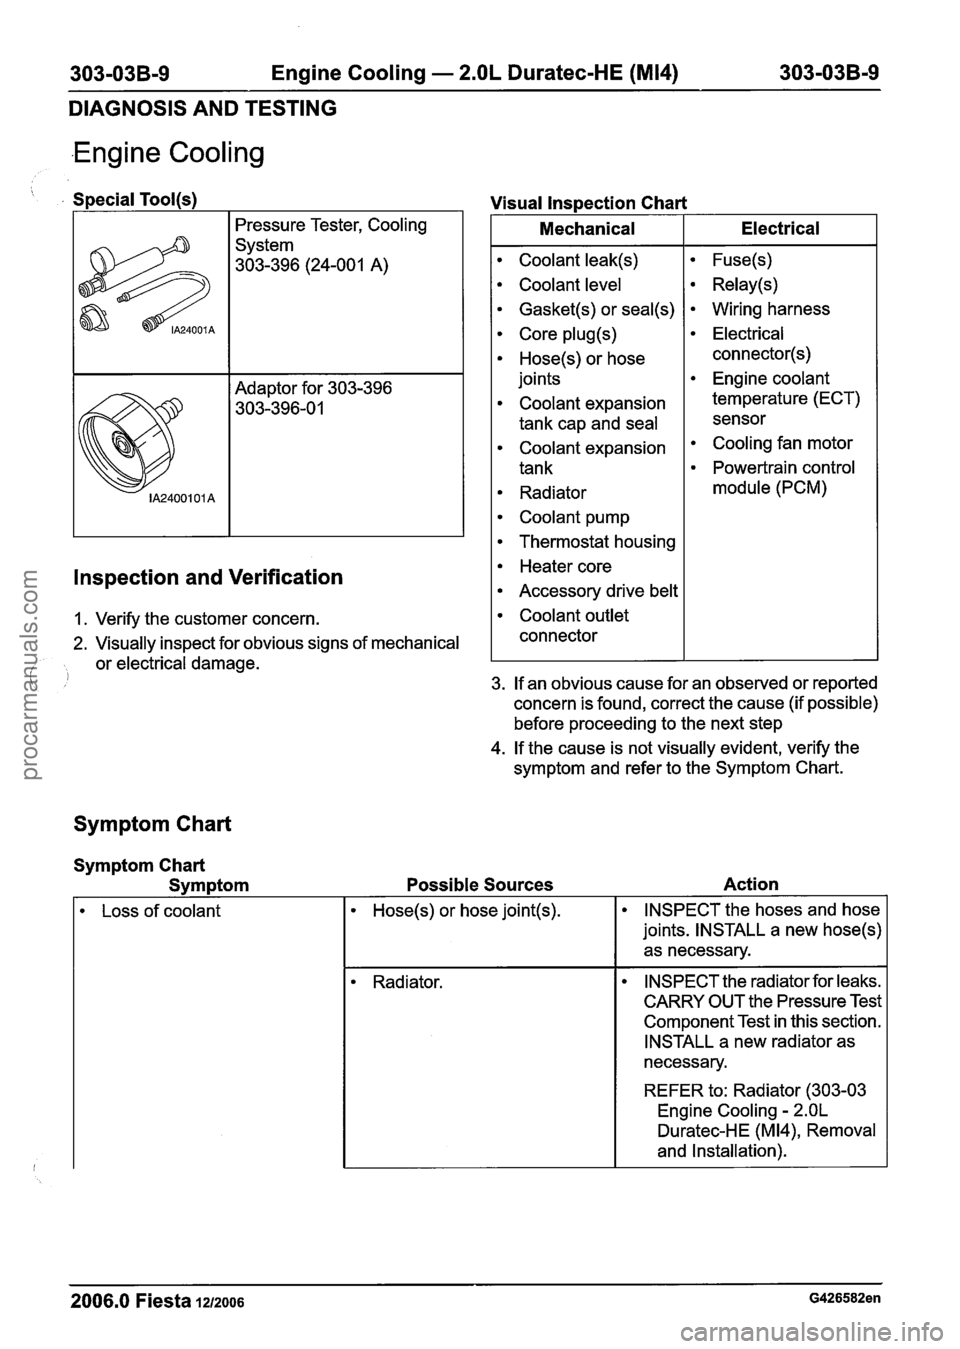
303-03B-9 Engine Cooling - 2.OL Duratec-HE (M14) 303-03B-9
DIAGNOSIS AND TESTING
.Engine Cooling
' . Special Tool(s)
Pressure Tester, Cooling
System
303-396 (24-001 A)
Inspection and Verification
1. Verify the customer concern.
2. Visually inspect for obvious signs of mechanical
( I or electrical damage. Visual
lns~ection Chart
I Mechanical I Electrical I
Coolant leak(s)
Coolant
level
Gasket(s) or seal(s)
Core plug(s)
Hose(s) or hose
joints
Coolant expansion
tank cap and seal
Coolant expansion
tank
Radiator
Coolant pump
Thermostat housing
Heater core
Accessory drive belt
Coolant outlet
connector
Fuse(s)
Relay(s)
Wiring harness
Electrical
connector(s)
Engine coolant
temperature (ECT) sensor
Cooling fan motor
Powertrain control
module (PCM)
3. If an obvious cause for an observed or reported
concern is found, correct the cause (if possible)
before proceeding to the next step
4. If the cause is not visually evident, verify the
symptom and refer to the Symptom Chart.
Symptom Chart
Symptom Chart
Symptom
Loss of coolant Possible Sources
Action
Hose(s) or hose joint(s).
Radiator. INSPECT
the hoses and hose
joints. INSTALL a new
hose(s)
as necessary.
INSPECT the radiator for leaks.
CARRY OUT the Pressure Test
Component Test in this section.
INSTALL a new radiator as
necessary.
REFER to: Radiator (303-03
Engine Cooling
- 2.OL
Duratec-H E (M 14), Removal
and Installation).
2006.0 Fiesta 1212006 G426582en
procarmanuals.com
Page 868 of 1226
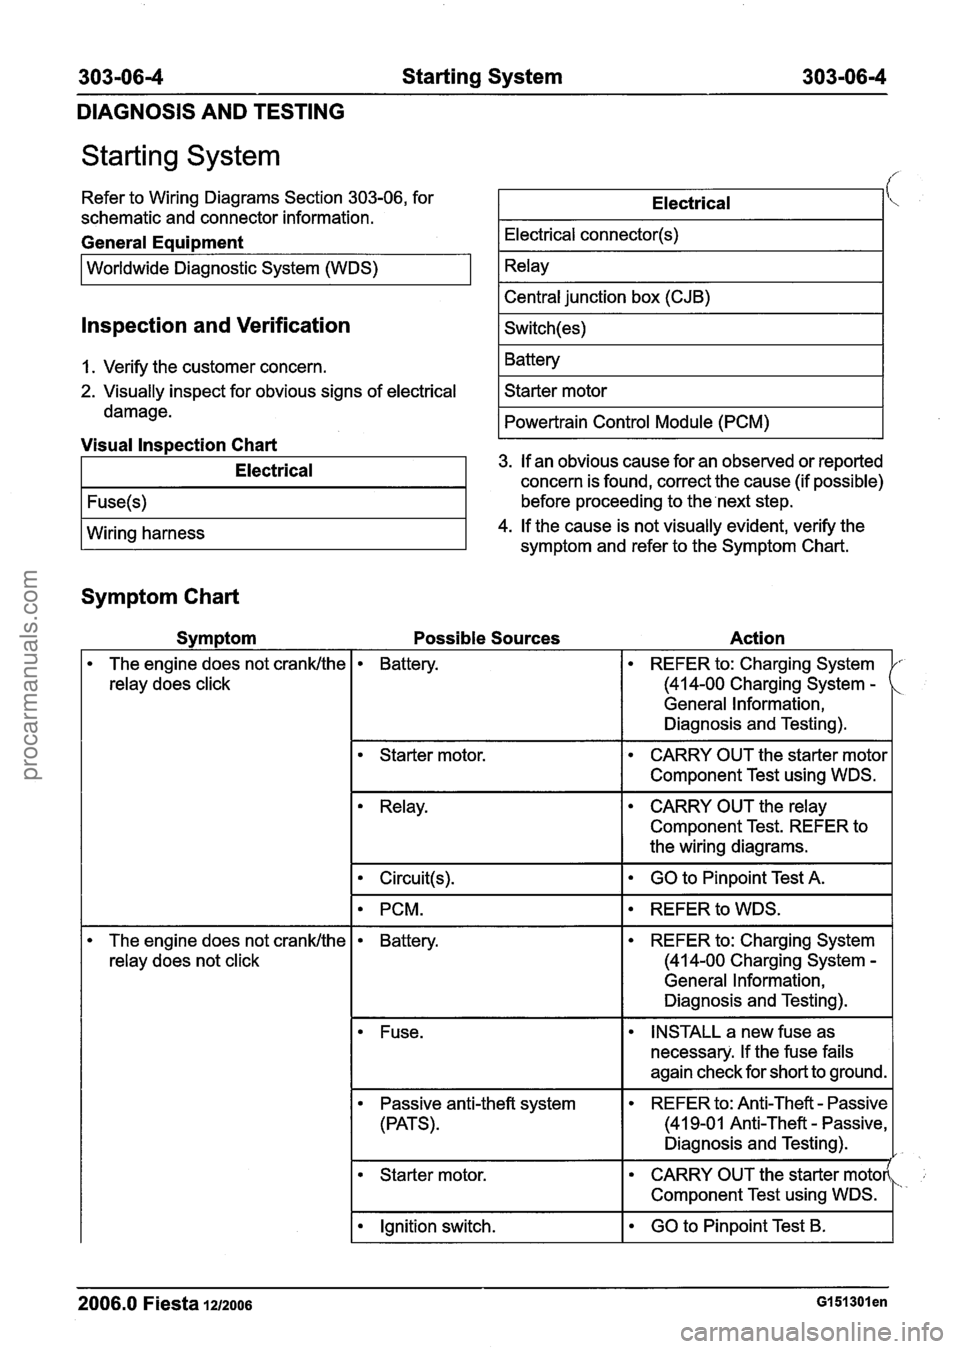
303-06-4 Starting System 303-06-4
DIAGNOSIS AND TESTING
Starting System
Refer to Wiring Diagrams Section 303-06, for
schematic and connector information.
General Eaui~ment
I Worldwide Diagnostic System (WDS) I
Electrical
Electrical connector(s)
Relay
Central junction box (CJB)
Switch(es)
Battery
Starter motor
Powertrain Control Module (PCM)
lnspection and Verification
I. Verify the customer concern.
2. Visually inspect for obvious signs of electrical
damage.
Visual lnspection Chart
Symptom Chart
Electrical
Fuse(s)
Wiring harness
Symptom
The engine does not crank/the
relay does click 3.
If an obvious cause for an observed or reported
concern is found, correct the cause (if possible)
before proceeding to the next step.
4. If the cause is not visually evident, verify the
The engine does not crank/the
relay does not click symptom
and refer to the Symptom Chart.
Possible Sources Action
Battery. REFER to: Charging System
(414-00 Charging System
-
General Information,
Diagnosis and Testing).
1
Starter motor. CARRY OUT the starter motor
I Component Test using WDS.
Relay. CARRY OUT the relay
Component Test. REFER to
the wiring diagrams.
I Circuit(s). I GO to Pinpoint Test A. I
I PCM. I REFER to WDS. I
Battery. REFER to: Charging System
(414-00 Charging System -
General Information,
Diagnosis and Testing).
Fuse. INSTALL a new fuse as
necessary. If the fuse fails
again check for short to ground.
Passive anti-theft system
(PATS). REFER to: Anti-Theft - Passive
(41 9-01 Anti-Theft
- Passive,
Diagnosis and Testing).
I
Starter motor. CARRY OUT the starter motor(
I Component Test using WDS.
I Ignition switch. I GO to Pinpoint Test B. I
2006.0 Fiesta la2006 GI 51 301 en
procarmanuals.com
Page 900 of 1226
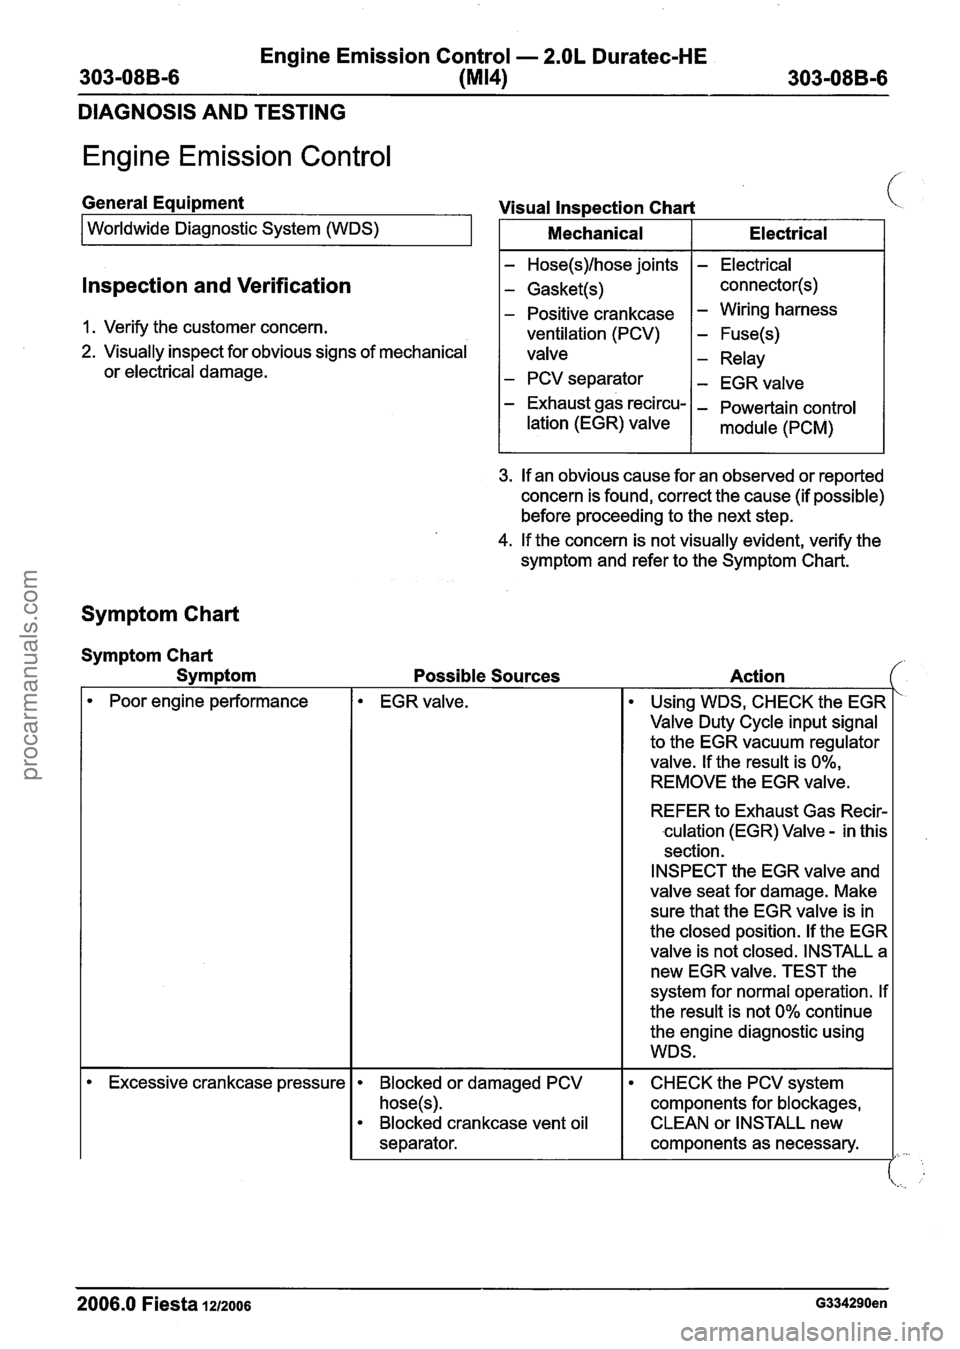
Engine Emission Control - 2.OL Duratec-HE
303-08B-6
(MI41 303-08B-6
DIAGNOSIS AND TESTING
Engine Emission Control
lnspection and Verification
General Equipment Visual Inspection Chart L..
I. Verify the customer concern.
2. Visually inspect for obvious signs of mechanical
or electrical damage.
Worldwide Diagnostic System
(WDS)
- Hose(s)/hose joints
- Gasket(s)
- Positive crankcase
ventilation (PCV)
valve
- PCV separator
Mechanical
- Exhaust gas recircu-
lation (EGR) valve
Electrical
- Electrical
con
nector(s)
- Wiring harness
- Fuse(s)
- Relay
- EGRvalve
- Powertain control
module (PCM)
3. If an obvious cause for an observed or reported
concern is found, correct the cause (if possible)
before proceeding to the next step.
4. If the concern is not visually evident, verify the
symptom and refer to the Symptom Chart.
Symptom Chart
Symptom Chart
Symptom Possible Sources Action
I
Poor engine performance EGR valve.
Using WDS, CHECK the EGR
Valve Duty Cycle input signal
I to the EGR vacuum regulator
valve. If the result is 0%,
REMOVE the EGR valve.
REFER to Exhaust Gas Recir-
culation (EGR) Valve
- in this
section.
INSPECT the EGR valve and
valve seat for damage. Make
sure that the EGR valve is in
the closed position. If the EGR
valve is not closed. INSTALL
a
new EGR valve. TEST the
system for normal operation. If
the result is not 0% continue
the engine diagnostic using
WDS.
2006.0 Fiesta 1212006 G334290en
Excessive crankcase pressure Blocked or damaged PCV
hose(s).
Blocked crankcase vent oil
separator. CHECK
the PCV system
components for blockages, CLEAN or INSTALL new
components as necessary.
procarmanuals.com
Page 921 of 1226
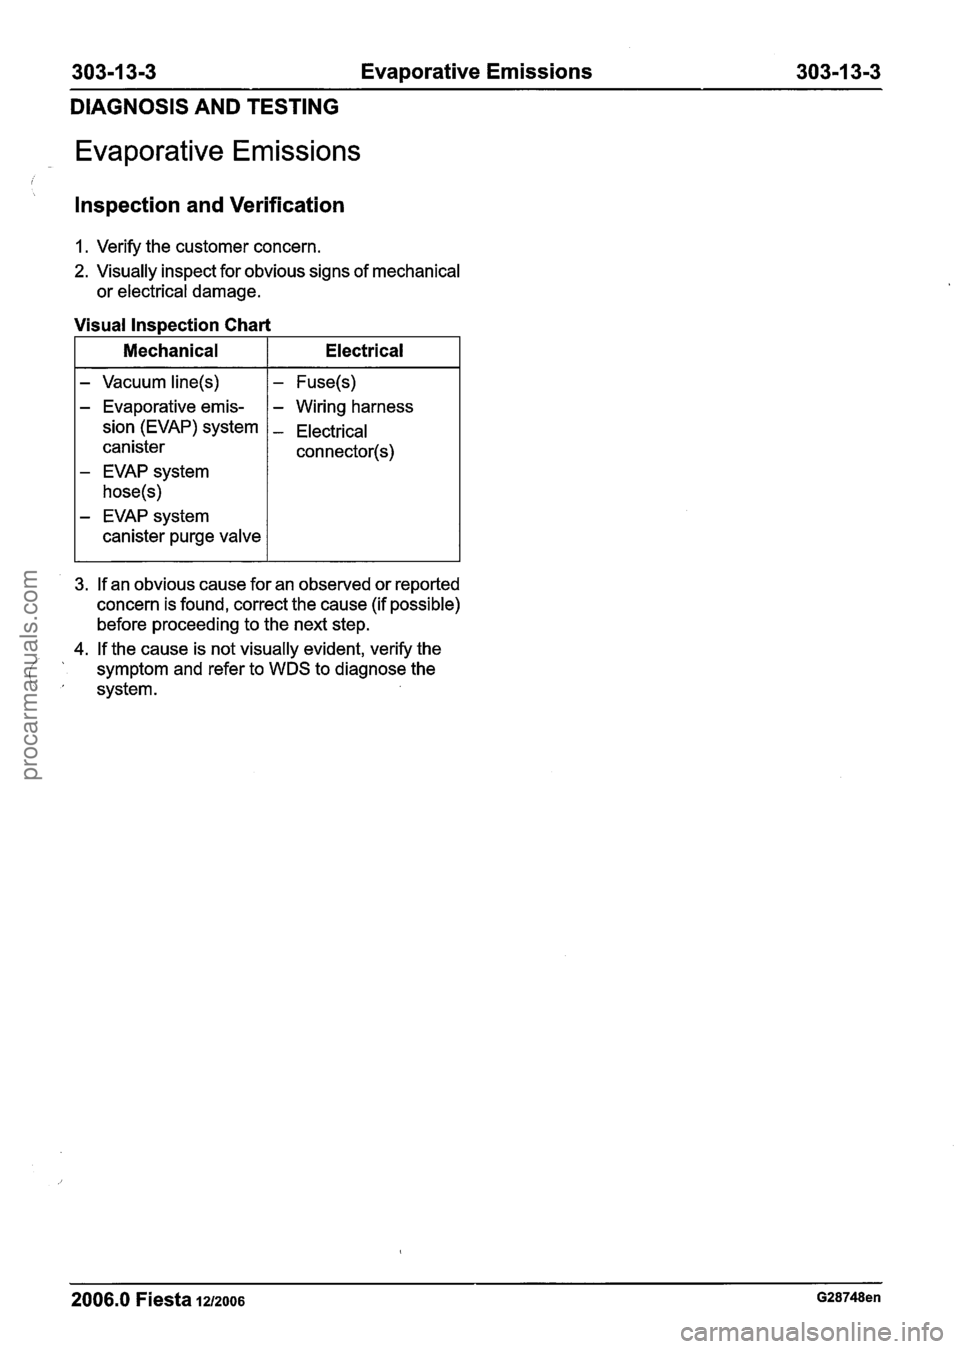
303-1 3-3 Evaporative Emissions 303-1 3-3
DIAGNOSIS AND TESTING
Evaporative Emissions
i
Inspection and Verification
1. Verify the customer concern.
2. Visually inspect for obvious signs of mechanical
or electrical damage.
Visual Inspection Chart
I Mechanical I Electrical I
- Vacuum line(s)
- Evaporative emis-
sion (EVAP) system
canister
- EVAP system
hose(s)
- EVAP system
canister purge valve
I - Fuse(s) I I - Wiring harness
- Electrical
connector(s)
3. If an obvious cause for an observed or reported
concern is found, correct the cause (if possible)
before proceeding to the next step.
4. If the cause is not visually evident, verify the
i
' symptom and refer to WDS to diagnose the
' system.
2006.0 Fiesta 12/2006 G28748en
procarmanuals.com
Page 1005 of 1226
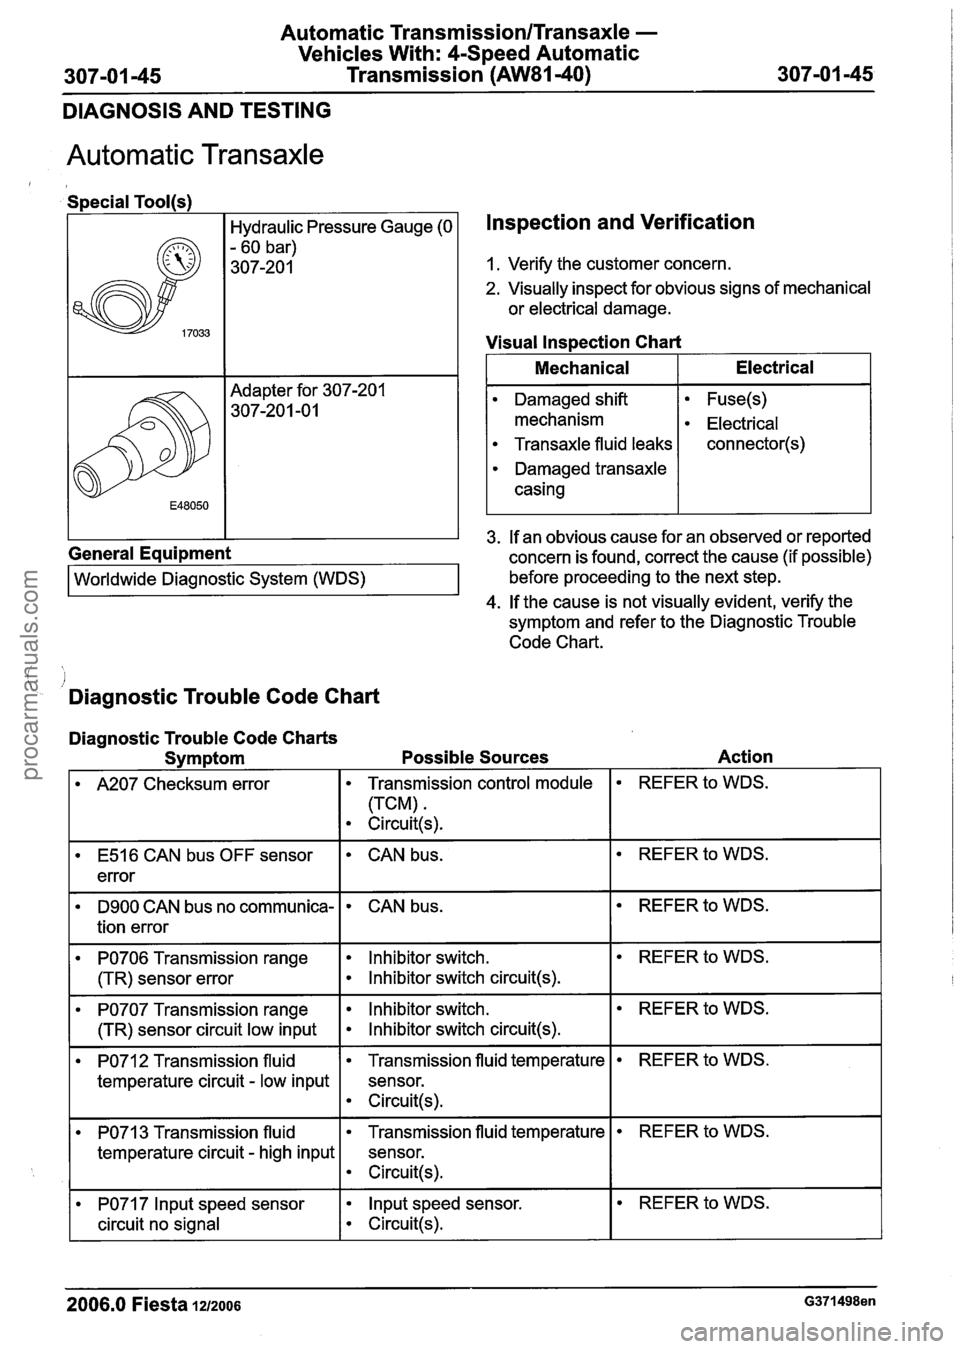
Automatic Transmission/Transaxle -
Vehicles With: 4-Speed Automatic Transmission
(AW81-40)
DIAGNOSIS AND TESTING
Automatic Transaxle
Special Tool(s)
Hydraulic Pressure Gauge (0
- 60 bar)
307-20 1
General Equipment Worldwide
~ia~noitic System (WDS)
Inspection and Verification
1. Verify the customer concern.
2. Visually inspect for obvious signs of mechanical
or electrical damage.
Visual
lns~ection Chart
I Mechanical I Electrical I
3. If an obvious cause for an observed or reported
concern is found, correct the cause (if possible)
before proceeding to the next step.
4. If the cause is not visually evident, verify the
symptom and refer to the Diagnostic Trouble
Code Chart.
Damaged shift
mechanism
Transaxle fluid leaks
Damaged transaxle
casing
.I
- Diagnostic Trouble Code Chart
Fuse(s)
Electrical
connector(s)
Diagnostic Trouble Code Charts
Symptom Possible Sources Action
I A207 Checksum error I Transmission control module I REFER to WDS.
E516 CAN bus OFF sensor
error CAN bus.
D9OO CAN bus no communica-
tion error
PO706 Transmission range
(TR) sensor error
PO707 Transmission range
(TR) sensor circuit low input
CAN bus.
Inhibitor switch.
Inhibitor switch circuit(s).
lnhibitor switch.
lnhibitor switch circuit(s).
PO712 Transmission fluid
temperature circuit
- low input
REFER to WDS.
REFER to WDS.
3 Transmission fluid
temperature circuit
- high input
2006.0 Fiesta 1212006 G371498en
Transmission fluid temperature
sensor.
Circuit(s).
PO71 7 lnput speed sensor
circuit no signal
REFER to WDS.
Transmission fluid temperature
sensor.
e Circuit(s).
lnput speed sensor.
Circuit(s).
REFER to WDS.
procarmanuals.com