change FORD FIESTA 2017 6.G Owners Manual
[x] Cancel search | Manufacturer: FORD, Model Year: 2017, Model line: FIESTA, Model: FORD FIESTA 2017 6.GPages: 450, PDF Size: 6.05 MB
Page 2 of 450
The information contained in this publication was correct at the time of going to print. In the interest of
continuous development, we reserve the right to change specifications, design or equipment at any time
without notice or obligation. No part of this publication may be reproduced, transmitted, stored in a
retrieval system or translated into any language in any form by any means without our written permission.
Errors and omissions excepted.
© Ford Motor Company 2016
All rights reserved.
Part Number: HE8J 19A321 AA 201607 20160804082629
Page 6 of 450
Opening and Closing the Hood...............182
Under Hood Overview - 1.0L
EcoBoost™................................................184
Under Hood Overview - 1.6L Duratec-16V Ti-VCT (Sigma)........................................185
Engine Oil Dipstick - 1.0L EcoBoost™................................................186
Engine Oil Dipstick - 1.6L Duratec-16V Ti-VCT (Sigma)........................................186
Engine Oil Check..........................................186
Oil Change Indicator Reset
.......................187
Engine Cooling Fan
......................................188
Engine Coolant Check................................188
Automatic Transmission Fluid Check............................................................192
Brake Fluid Check.........................................192
Clutch Fluid Check - Manual Transmission..............................................192
Washer Fluid Check.....................................193
Changing the 12V Battery..........................193
Checking the Wiper Blades......................194
Changing the Front Wiper Blades..........195
Changing the Rear Wiper Blades...........195
Adjusting the Headlamps
.........................195
Removing a Headlamp
...............................197
Changing a Bulb - 4-Door.........................197
Changing a Bulb - 5-Door........................203
Bulb Specification Chart..........................208
Changing the Engine Air Filter................209
Drive Belt Routing - 1.0L EcoBoost™.................................................210
Drive Belt Routing - 1.6L Duratec-16V Ti-VCT (Sigma)........................................210
Vehicle Care
Cleaning Products
.........................................211
Cleaning the Exterior...................................212
Waxing
..............................................................213
Cleaning the Engine.....................................213
Cleaning the Windows and Wiper Blades...........................................................214 Cleaning the Interior....................................214
Cleaning the Instrument Panel and
Instrument Cluster Lens.........................215
Cleaning Leather Seats
..............................215
Repairing Minor Paint Damage...............216
Cleaning the Wheels...................................216
Vehicle Storage.............................................216
Wheels and Tires
General Information....................................219
Tire Care
...........................................................219
Using Summer Tires
...................................234
Using Winter Tires.......................................234
Using Snow Chains.....................................234
Tire Pressure Monitoring System...........234
Changing a Road Wheel
...........................238
Technical Specifications
...........................242
Capacities and Specific- ations
Engine Specifications - 1.0L EcoBoost™................................................243
Engine Specifications - 1.6L Duratec-16V Ti-VCT (Sigma).......................................243
Transmission Specifications - 1.0L EcoBoost™, Automatic
Transmission.............................................243
Transmission Specifications - 1.6L Duratec-16V Ti-VCT (Sigma),
Automatic Transmission......................244
Transmission Specifications - 5-Speed Manual Transmission
.............................245
Motorcraft Parts - 1.0L EcoBoost™......246
Motorcraft Parts - 1.6L Duratec-16V Ti-VCT (Sigma)
........................................247
Vehicle Identification Number................248
Vehicle Certification Label.......................249
Transmission Code Designation............249
Capacities and Specifications - 1.0L EcoBoost™...............................................250
Capacities and Specifications - 1.6L Duratec-16V Ti-VCT (Sigma)
.............253
4
Fiesta (CCT) Canada/United States of America, HE8J 19A321 AA enUSA, Edition date: 201607, First Printing Table of Contents
Page 37 of 450
4. While the safety belt warning light is
on, buckle and then unbuckle the
safety belt. After Step 4, the safety belt
warning light flashes for confirmation.
• This will switch the feature off for that
seating position if it is currently on.
• This will switch the feature on for that
seating position if it is currently off.
CHILD RESTRAINT AND
SEATBELT MAINTENANCE
Inspect the vehicle safety belts and child
safety seat systems periodically to make
sure they work properly and are not
damaged. Inspect the vehicle and child
seat safety belts to make sure there are no
nicks, tears or cuts. Replace if necessary.
All vehicle safety belt assemblies, including
retractors, buckles, front safety belt buckle
assemblies, buckle support assemblies
(slide bar-if equipped), shoulder belt
height adjusters (if equipped), shoulder
belt guide on seat back (if equipped), child
safety seat LATCH and tether anchors, and
attaching hardware, should be inspected
after a crash. Read the child restraint
manufacturer's instructions for additional
inspection and maintenance information
specific to the child restraint.
Ford Motor Company recommends that
all safety belt assemblies in use in vehicles
involved in a crash be replaced. However,
if the crash was minor and an authorized
dealer finds that the belts do not show
damage and continue to operate properly,
they do not need to be replaced. Safety
belt assemblies not in use during a crash
should also be inspected and replaced if
either damage or improper operation is
noted.
Properly care for safety belts. SEATBELT EXTENSION WARNINGS
Persons who fit into the vehicle's
seatbelt should not use an extension.
Unnecessary use could result in
serious personal injury in the event of a
crash. Only use extensions provided free of
charge by Ford Motor Company
dealers. The dealer will provide an
extension designed specifically for this
vehicle, model year and seating position.
The use of an extension intended for
another vehicle, model year or seating
position may not offer you the full
protection of your vehicle ’s seatbelt
restraint system. Never use seatbelt extensions to
install child restraints.
Do not use a seatbelt extension with
an inflatable seatbelt.
Do not use extensions to change the
fit of the belt across the torso, over
the lap or to make the seatbelt
buckle easier to reach. If, because of body size or driving position,
it is not possible to properly fasten the
seatbelt over your lap and shoulder, an
extension that is compatible with the
seatbelts is available free of charge from
Ford Motor Company dealers. Only Ford
seatbelt extensions made by the original
equipment seatbelts manufacturer should
be used with Ford seatbelts. Ask your
authorized dealer if your extension is
compatible with your Ford vehicle restraint
system.
35
Fiesta (CCT) Canada/United States of America, HE8J 19A321 AA enUSA, Edition date: 201607, First Printing Seatbelts
Page 48 of 450
GENERAL INFORMATION ON
RADIO FREQUENCIES
This device complies with Part 15 of the
FCC Rules and with Industry Canada
license-exempt RSS standard(s).
Operation is subject to the following two
conditions: (1) This device may not cause
harmful interference, and (2) This device
must accept any interference received,
including interference that may cause
undesired operation.
Note:
Changes or modifications not
expressively approved by the party
responsible for compliance could void the
user's authority to operate the equipment.
The term IC before the radio certification
number only signifies that Industry Canada
technical specifications were met.
The typical operating range for your
transmitter is approximately
33 ft (10 m).
Vehicles with the remote start feature will
have a greater range.
One of the following could cause a
decrease in operating range:
• Weather conditions.
• Nearby radio towers.
• Structures around the vehicle.
• Other vehicles parked next to your
vehicle.
The radio frequency used by your remote
control can also be used by other radio
transmitters, for example amateur radios,
medical equipment, wireless headphones,
wireless remote controls, cell phones,
battery chargers and alarm systems. If the
frequencies are jammed, you will not be
able to use your remote control. You can
lock and unlock the doors with the key.
Note: Make sure to lock your vehicle before
leaving it unattended. Note:
If you are in range, the remote control
will operate if you press any button
unintentionally.
Note: The remote control contains sensitive
electrical components. Exposure to moisture
or impact may cause permanent damage.
Intelligent Access
(If Equipped)
The system uses a radio frequency signal
to communicate with your vehicle and
authorize your vehicle to unlock when one
of the following conditions are met:
• You activate the front exterior door
handle switch.
• You press the luggage compartment
button.
• You press a button on the transmitter.
If excessive radio frequency interference
is present in the area or if the transmitter
battery is low, you may need to
mechanically unlock your door. You can
use the mechanical key blade in your
intelligent access key to open the driver
door in this situation. See
Remote
Control (page 46).
REMOTE CONTROL
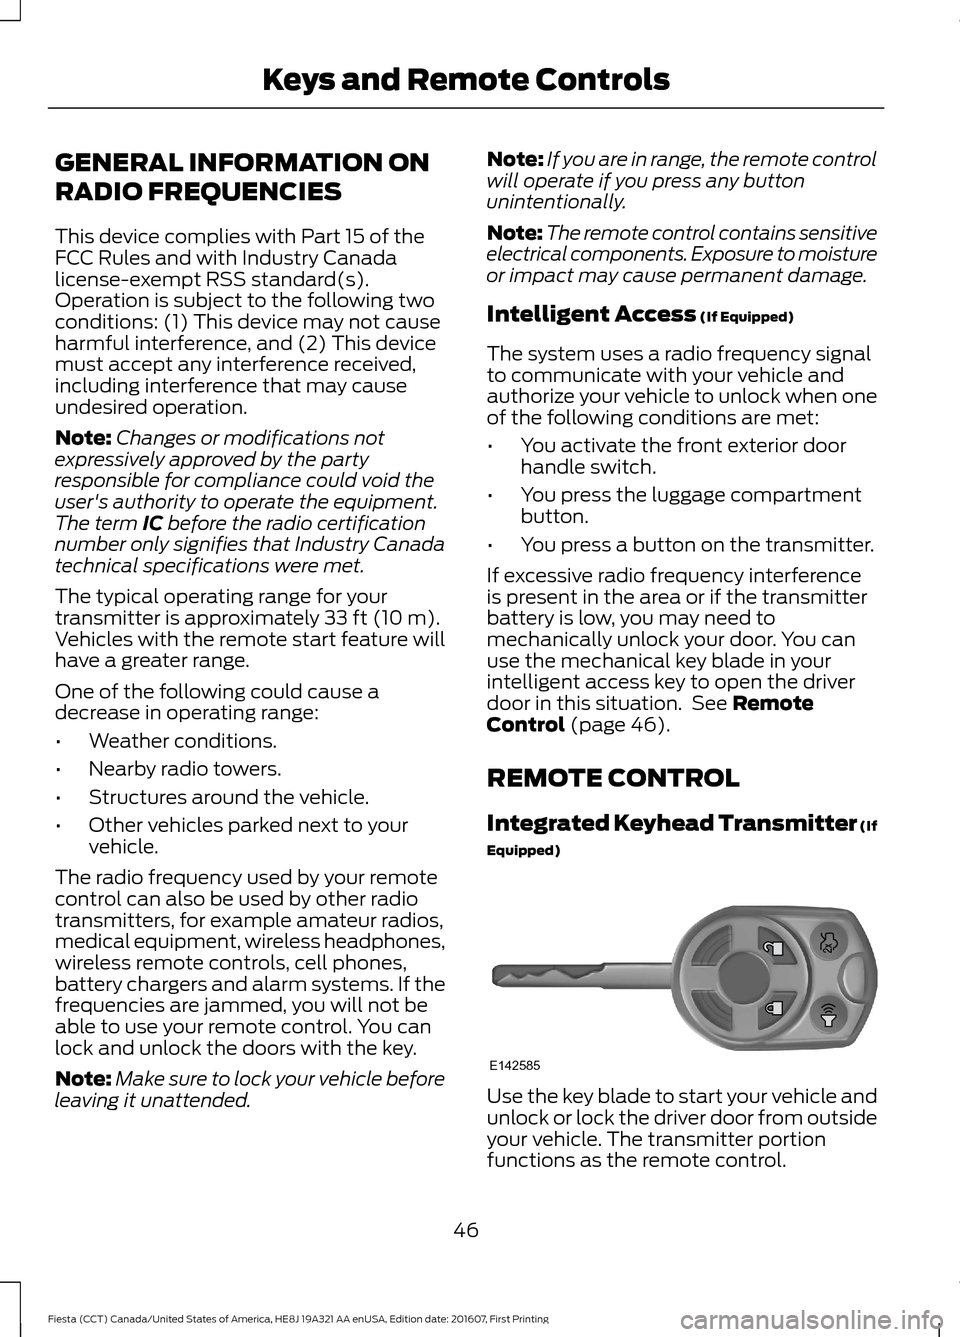
Integrated Keyhead Transmitter (If
Equipped) Use the key blade to start your vehicle and
unlock or lock the driver door from outside
your vehicle. The transmitter portion
functions as the remote control.
46
Fiesta (CCT) Canada/United States of America, HE8J 19A321 AA enUSA, Edition date: 201607, First Printing Keys and Remote ControlsE142585
Page 49 of 450
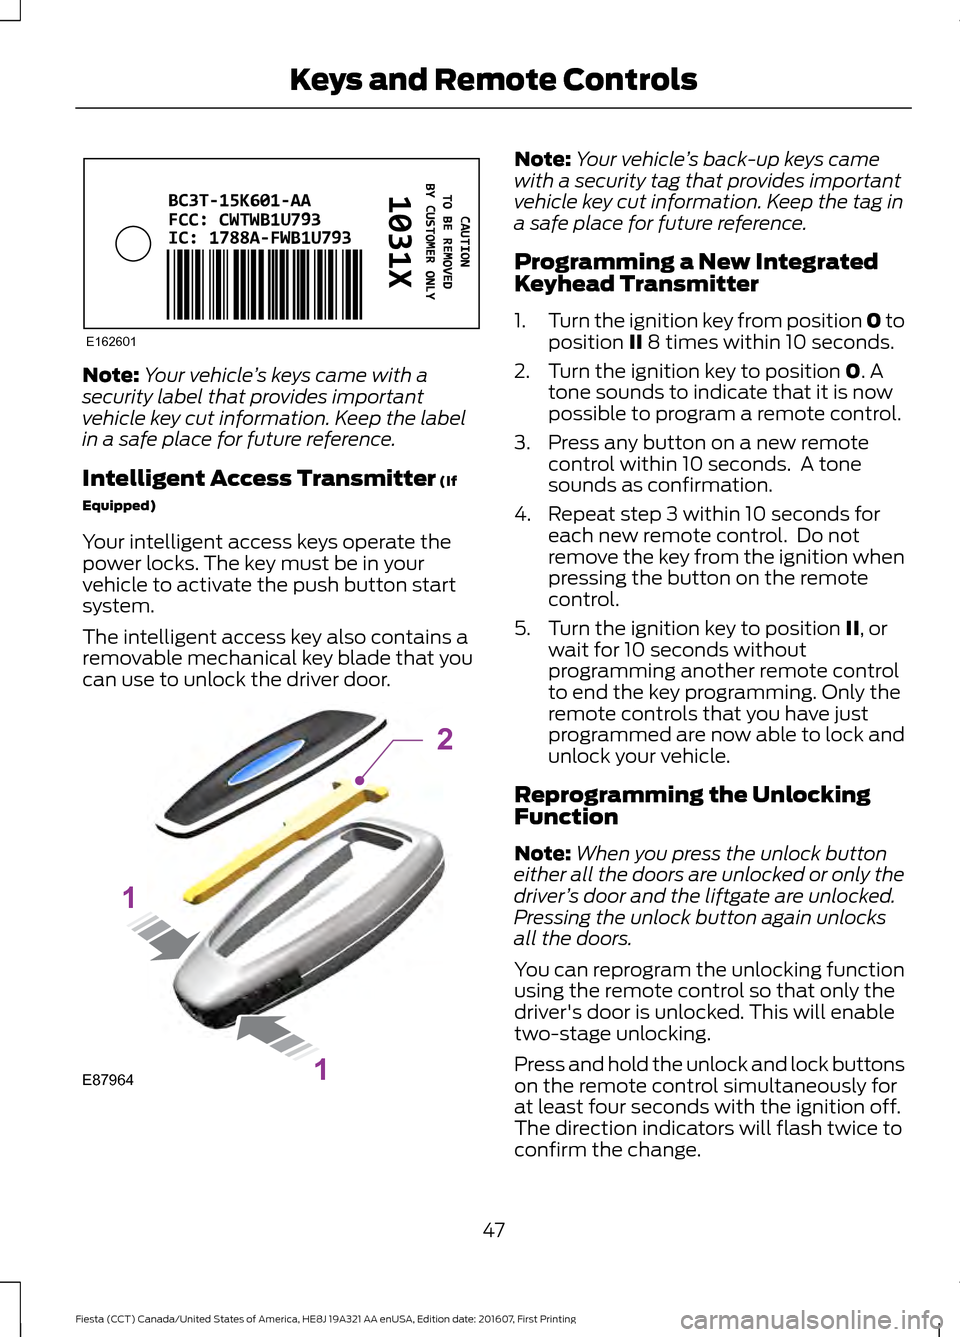
Note:
Your vehicle ’s keys came with a
security label that provides important
vehicle key cut information. Keep the label
in a safe place for future reference.
Intelligent Access Transmitter (If
Equipped)
Your intelligent access keys operate the
power locks. The key must be in your
vehicle to activate the push button start
system.
The intelligent access key also contains a
removable mechanical key blade that you
can use to unlock the driver door. Note:
Your vehicle ’s back-up keys came
with a security tag that provides important
vehicle key cut information. Keep the tag in
a safe place for future reference.
Programming a New Integrated
Keyhead Transmitter
1. Turn the ignition key from position 0 to
position
II 8 times within 10 seconds.
2. Turn the ignition key to position
0. A
tone sounds to indicate that it is now
possible to program a remote control.
3. Press any button on a new remote control within 10 seconds. A tone
sounds as confirmation.
4. Repeat step 3 within 10 seconds for each new remote control. Do not
remove the key from the ignition when
pressing the button on the remote
control.
5. Turn the ignition key to position
II, or
wait for 10 seconds without
programming another remote control
to end the key programming. Only the
remote controls that you have just
programmed are now able to lock and
unlock your vehicle.
Reprogramming the Unlocking
Function
Note: When you press the unlock button
either all the doors are unlocked or only the
driver ’s door and the liftgate are unlocked.
Pressing the unlock button again unlocks
all the doors.
You can reprogram the unlocking function
using the remote control so that only the
driver's door is unlocked. This will enable
two-stage unlocking.
Press and hold the unlock and lock buttons
on the remote control simultaneously for
at least four seconds with the ignition off.
The direction indicators will flash twice to
confirm the change.
47
Fiesta (CCT) Canada/United States of America, HE8J 19A321 AA enUSA, Edition date: 201607, First Printing Keys and Remote ControlsE162601 E87964
2
1
1
Page 53 of 450
PRINCIPLE OF OPERATION
MyKey allows you to program keys with
restricted driving modes to promote good
driving habits. All but one of the keys
programmed to the vehicle can be
activated with these restricted modes.
Any keys that have not been programmed
are referred to as administrator keys or
admin keys. These can be used to:
•
Create a MyKey.
• Program configurable MyKey settings.
• Clear all MyKey features.
When you have created a MyKey, you can
access the following information using the
information display:
• How many admin keys and MyKeys are
programmed to your vehicle.
• The total distance your vehicle has
traveled using any MyKey.
Note: All MyKeys are programmed to the
same settings. You cannot program them
individually.
Note: For vehicles with keyless start, when
both a MyKey transmitter and an admin
transmitter are present, the admin
transmitter will be recognized by the vehicle
to start the engine.
Non-configurable Settings
The following settings cannot be changed:
• Belt-Minder™. You cannot disable this
feature. The audio system will mute
when the driver and front seat
passengers’ safety belts are not
fastened.
• Early low-fuel warning. The low-fuel
warning activates earlier, giving the
MyKey user more time to refuel.
• Driver assist features, if equipped on
your vehicle, are forced on: parking aid. Configurable Settings
You can configure certain MyKey settings
when you first create a MyKey. You can
also change the settings afterward with
an admin key.
The following settings can be configured
using an admin key:
•
A vehicle speed limit can be set.
Warnings will be shown in the display
followed by an audible tone when your
vehicle reaches the set speed. You
cannot override the set speed by fully
depressing the accelerator pedal or by
setting the cruise control. WARNING
Do not set MyKey maximum speed
limit to a limit that will prevent the
driver from maintaining a safe speed
considering posted speed limits and
prevailing road conditions. The driver is
always responsible to drive in accordance
with local laws and prevailing conditions.
Failure to do so could result in accident or
injury. •
Vehicle speed minders can be set.
Once you select a speed, a visual
warning will be shown in the display
followed by an audible tone when the
set vehicle speed is exceeded.
• Audio system maximum volume of
45%. A message will be shown in the
display when you attempt to exceed
the limited volume. Also, the speed
sensitive compensated volume
(automatic volume control) feature
will be disabled.
• Always on setting. When this is
selected you will not be able to disable
AdvanceTrac, 911 Assist or the do not
disturb feature (if your vehicle is
equipped with these features).
51
Fiesta (CCT) Canada/United States of America, HE8J 19A321 AA enUSA, Edition date: 201607, First Printing MyKey
™ (If Equipped)
Page 54 of 450
CREATING A MYKEY
Use the information display to create a
MyKey:
1.
Insert the key you want to program into
the ignition. See Keyless Starting
(page 111). If your vehicle is equipped
with a push-button start, place the
remote control into the backup
position. See
Passive Anti-Theft
System (page 64). 2. Switch the ignition on.
3. Access the main menu on the
information display controls. Use the
arrow keys to get to the following menu
selections: Action and Description
Message
Press the OK button or the right arrow key.
Settings
Press the OK button or the right arrow key.
MyKey
Press the OK button or the right arrow key.
Create MyKey
When prompted, hold the OK button until
you see a message informing you to label
this key as a MyKey. The key will be
restricted at the next start.
MyKey is successfully created. Make sure
you label it so you can distinguish it from
the admin keys.
You can also program configurable
settings for the key(s). See
Programming/Changing Configurable
Settings
. Programming/Changing
Configurable Settings
Use the information display to access your
configurable MyKey settings.
1. Switch the ignition on using an admin
key or remote control.
2. Access the main menu on the information display controls. Use the
arrow keys to get to the following menu
selections: Action and Description
Message
Press the OK button or the right arrow key.
Settings
Press the OK button or the right arrow key.
MyKey
Note: You can clear or change your MyKey
settings at any time during the same key
cycle as you created the MyKey. Once you
have switched the vehicle off, however, you
will need an admin key to change or clear
your MyKey settings. CLEARING ALL MYKEYS
You can clear or change your MyKey
settings using the information display
control. See Information Displays (page
85
).
52
Fiesta (CCT) Canada/United States of America, HE8J 19A321 AA enUSA, Edition date: 201607, First Printing MyKey
™
(If Equipped)
Page 58 of 450
LOCKING AND UNLOCKING
Remote Control
Unlocking the Doors
Note:
The driver door can be unlocked with
the key if the remote control is not
functioning.
Note: When you lock your vehicle for
several weeks, the remote control will be
switched off. Your vehicle must be unlocked
and the engine started using the key.
Unlocking and starting your vehicle once will
enable the remote control.
One-Stage Unlocking Press the button to unlock all
doors.
The direction indicators will flash.
Two-Stage Unlocking Press the button to unlock the
driver door.
Press the button again within three
seconds to unlock all doors.
The direction indicators will flash.
Reprogramming the Unlocking
Function
You can reprogram the unlocking function
using the remote control to change
between one-stage and two-stage
unlocking. See Remote Control (page
46).
Locking the Doors Press the button to lock all the
doors. The direction indicators
will flash. Press the button again within three
seconds to confirm that all the doors are
closed. The doors will lock again, the
direction indicators will flash and the horn
will sound, if all the doors and the luggage
compartment are closed.
Note:
If any door, the hood or the luggage
compartment is open on vehicles that have
an anti-theft alarm or remote start, the
direction indicators will not flash but the
horn will sound.
Automatic Re-locking
The doors will relock automatically if you
do not open a door within 45 seconds of
unlocking the doors with the remote
control. The door locks and the alarm will
return to their previous state.
Locking and Unlocking the Doors
From Inside
The power door lock control is located on
the instrument panel near the radio. Press the button to lock and
unlock all the doors. The lamp
illuminates with the doors
locked.
Locking and Unlocking the Doors
With the Key
Note: Do not leave your keys in your vehicle.
Locking With the Key
Turn the top of the key toward the front of
your vehicle.
Unlocking With the Key
Turn the top of the key toward the rear of
your vehicle to unlock the driver door. Turn
the key again within a few seconds to
unlock the remaining doors.
56
Fiesta (CCT) Canada/United States of America, HE8J 19A321 AA enUSA, Edition date: 201607, First Printing Doors and Locks E138623 E102566
Page 60 of 450
Auto Unlock Feature
The auto unlock feature will unlock all the
doors when all of the following conditions
have been met:
•
The ignition is on, all doors are closed,
and your vehicle is moving at a speed
greater than 12 mph (20 km/h) for
more than two seconds.
• Your vehicle has come to a stop and
you switch the ignition off or to the
accessory position.
• The driver door is opened within 10
minutes of you switching the ignition
off or to the accessory position.
Note: The doors will not auto unlock if your
vehicle has been electronically locked after
the ignition is switched off and before the
driver door is opened.
Enabling or Disabling Auto Unlock
Note: See an authorized dealer to enable
or disable the auto unlock feature or carry
out the following procedure.
Note: You will have 30 seconds to
complete the procedure.
1. Switch the ignition on.
2. Press the power door lock button three
times.
3. Switch the ignition off.
4. Press the power door lock button three
times.
5. Switch the ignition on. The system alerts you with a tone to indicate your
vehicle is in programming mode.
6. Press the power door lock button for less than one second and release.
A tone sounds to confirm the change.
After programming the feature, switch the
ignition off to exit the programming mode. Emergency Locking With the Key
Note:
If the child safety locks are on and
you pull the interior handle, you will only
turn off the emergency locking, not the child
safety lock. You can only open the doors
using the external door handle.
Note: If the doors have been unlocked using
this method, the doors must be locked
individually until the central locking function
has been repaired.
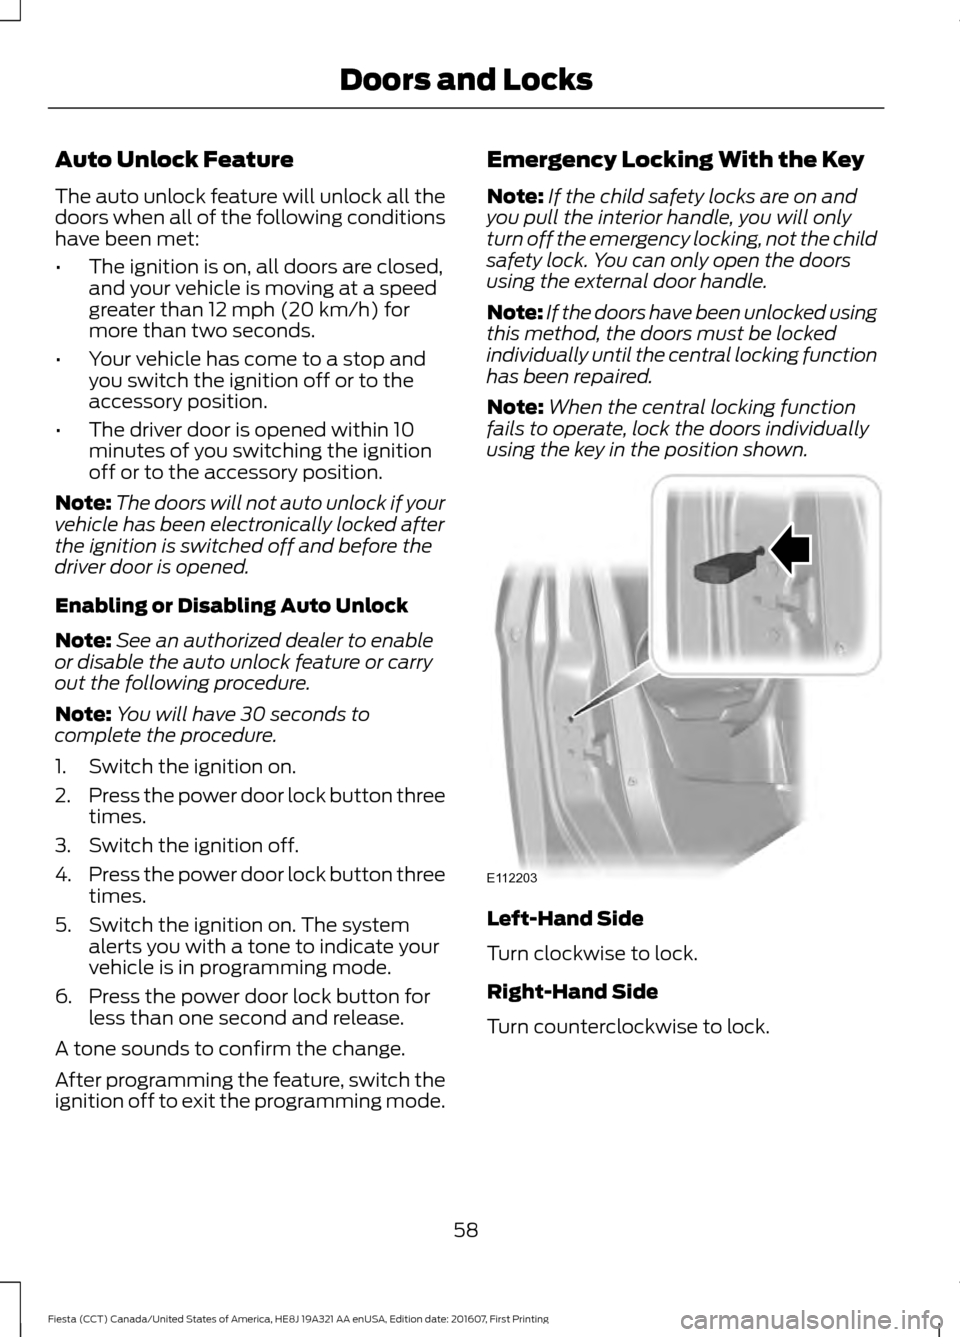
Note: When the central locking function
fails to operate, lock the doors individually
using the key in the position shown. Left-Hand Side
Turn clockwise to lock.
Right-Hand Side
Turn counterclockwise to lock.
58
Fiesta (CCT) Canada/United States of America, HE8J 19A321 AA enUSA, Edition date: 201607, First Printing Doors and LocksE112203
Page 73 of 450
GENERAL INFORMATION
Condensation in Lamp Assemblies
Exterior lamps have vents to
accommodate normal changes in air
pressure.
Condensation can be a natural by-product
of this design. When moist air enters the
lamp assembly through the vents, there is
a possibility that condensation can occur
when the temperature is cold. When
normal condensation occurs, a fine mist
can form on the interior of the lens. The
fine mist eventually clears and exits
through the vents during normal operation.
Clearing time may take as long as 48 hours
under dry weather conditions.
Examples of acceptable condensation are:
•
The presence of a fine mist (no streaks,
drip marks or large droplets).
• A fine mist covers less than 50% of the
lens.
Examples of unacceptable condensation
are:
• A water puddle inside the lamp.
• Streaks, drip marks or large droplets
present on the interior of the lens.
If you see any unacceptable condensation,
have your vehicle checked by an authorized
dealer. LIGHTING CONTROL
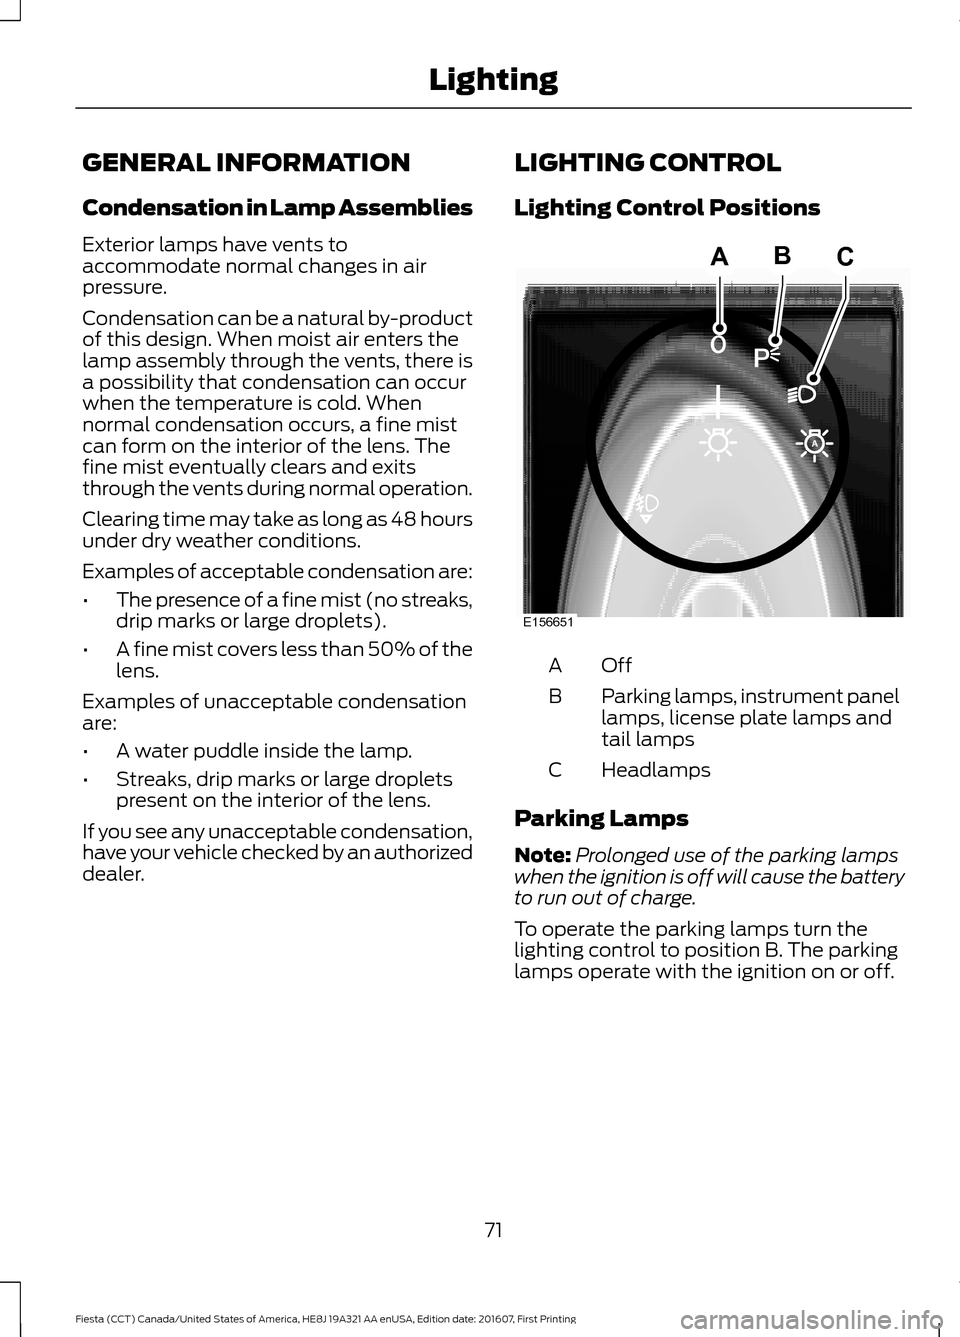
Lighting Control Positions
OffA
Parking lamps, instrument panel
lamps, license plate lamps and
tail lamps
B
Headlamps
C
Parking Lamps
Note: Prolonged use of the parking lamps
when the ignition is off will cause the battery
to run out of charge.
To operate the parking lamps turn the
lighting control to position B. The parking
lamps operate with the ignition on or off.
71
Fiesta (CCT) Canada/United States of America, HE8J 19A321 AA enUSA, Edition date: 201607, First Printing LightingE156651
ABC