FORD FIESTA 2017 6.G Owners Manual
Manufacturer: FORD, Model Year: 2017, Model line: FIESTA, Model: FORD FIESTA 2017 6.GPages: 450, PDF Size: 6.05 MB
Page 181 of 450
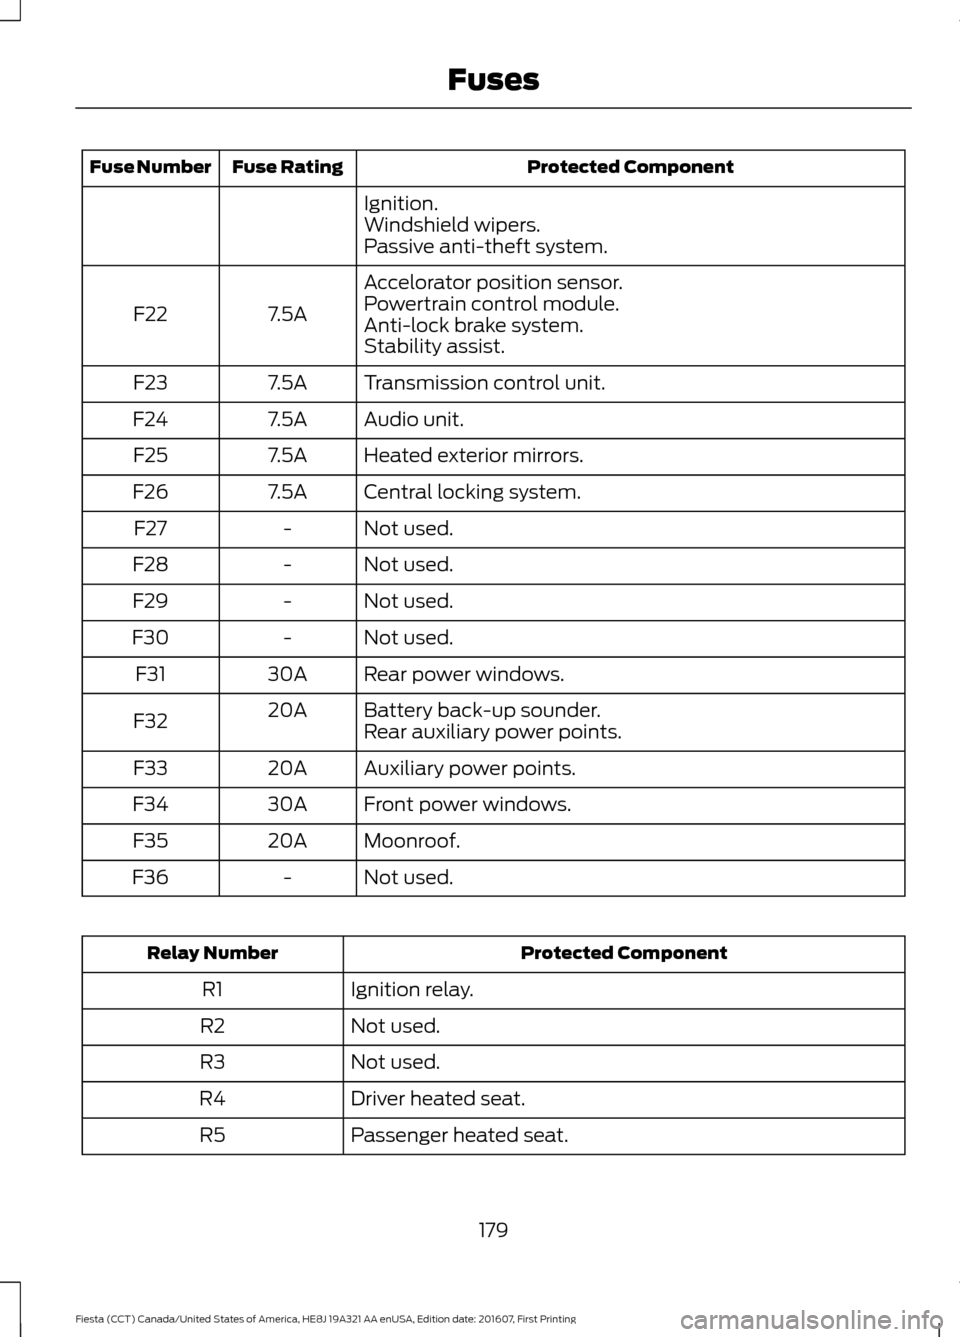
Protected Component
Fuse Rating
Fuse Number
Ignition.
Windshield wipers.
Passive anti-theft system.
Accelorator position sensor.
7.5A
F22 Powertrain control module.
Anti-lock brake system.
Stability assist.
Transmission control unit.
7.5A
F23
Audio unit.
7.5A
F24
Heated exterior mirrors.
7.5A
F25
Central locking system.
7.5A
F26
Not used.
-
F27
Not used.
-
F28
Not used.
-
F29
Not used.
-
F30
Rear power windows.
30A
F31
Battery back-up sounder.
20A
F32 Rear auxiliary power points.
Auxiliary power points.
20A
F33
Front power windows.
30A
F34
Moonroof.
20A
F35
Not used.
-
F36 Protected Component
Relay Number
Ignition relay.
R1
Not used.
R2
Not used.
R3
Driver heated seat.
R4
Passenger heated seat.
R5
179
Fiesta (CCT) Canada/United States of America, HE8J 19A321 AA enUSA, Edition date: 201607, First Printing Fuses
Page 182 of 450
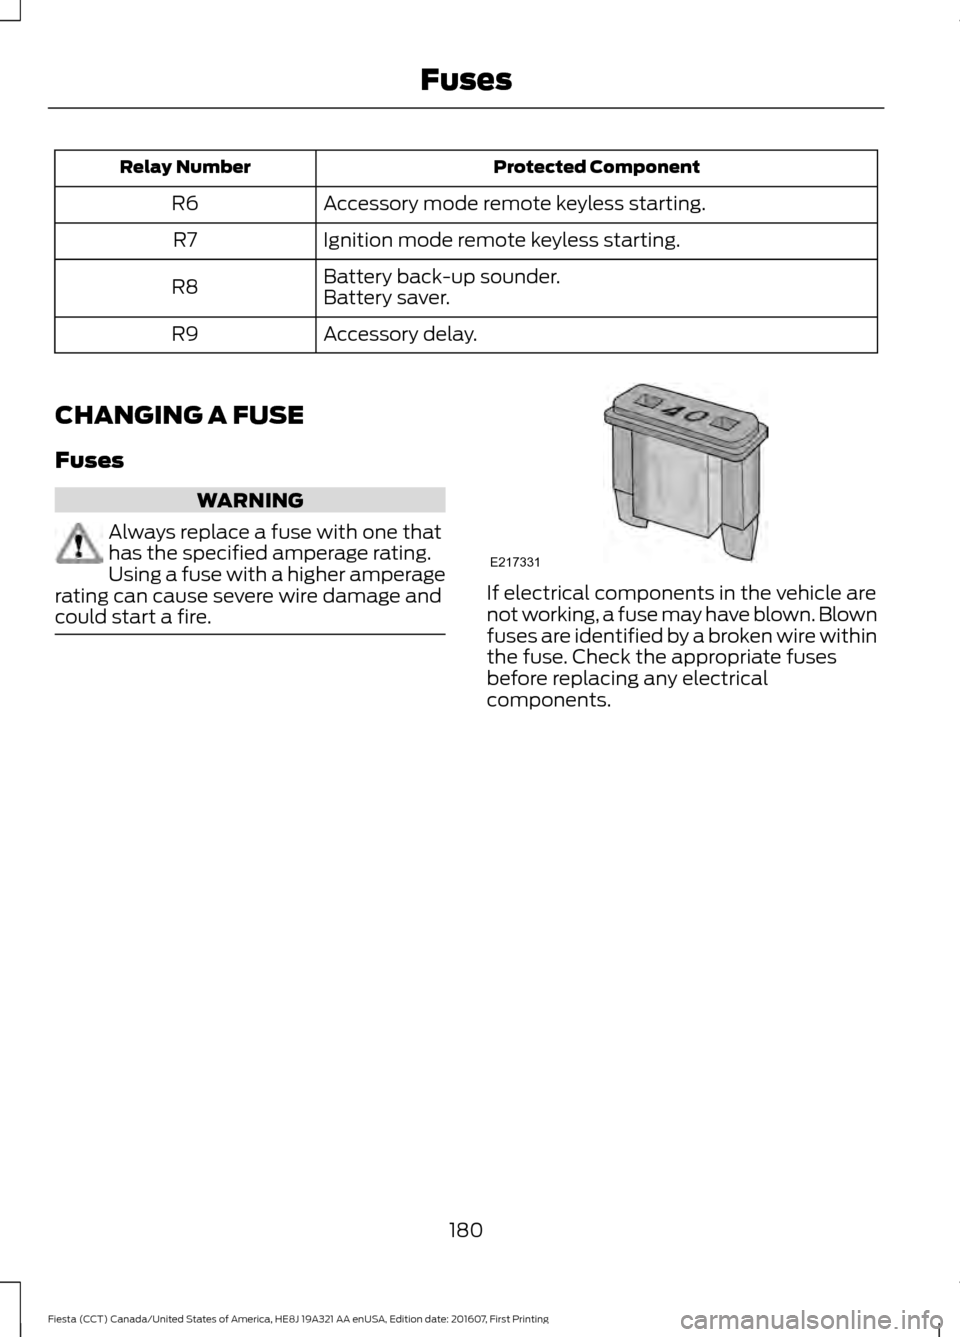
Protected Component
Relay Number
Accessory mode remote keyless starting.
R6
Ignition mode remote keyless starting.
R7
Battery back-up sounder.
R8 Battery saver.
Accessory delay.
R9
CHANGING A FUSE
Fuses WARNING
Always replace a fuse with one that
has the specified amperage rating.
Using a fuse with a higher amperage
rating can cause severe wire damage and
could start a fire. If electrical components in the vehicle are
not working, a fuse may have blown. Blown
fuses are identified by a broken wire within
the fuse. Check the appropriate fuses
before replacing any electrical
components.
180
Fiesta (CCT) Canada/United States of America, HE8J 19A321 AA enUSA, Edition date: 201607, First Printing FusesE217331
Page 183 of 450
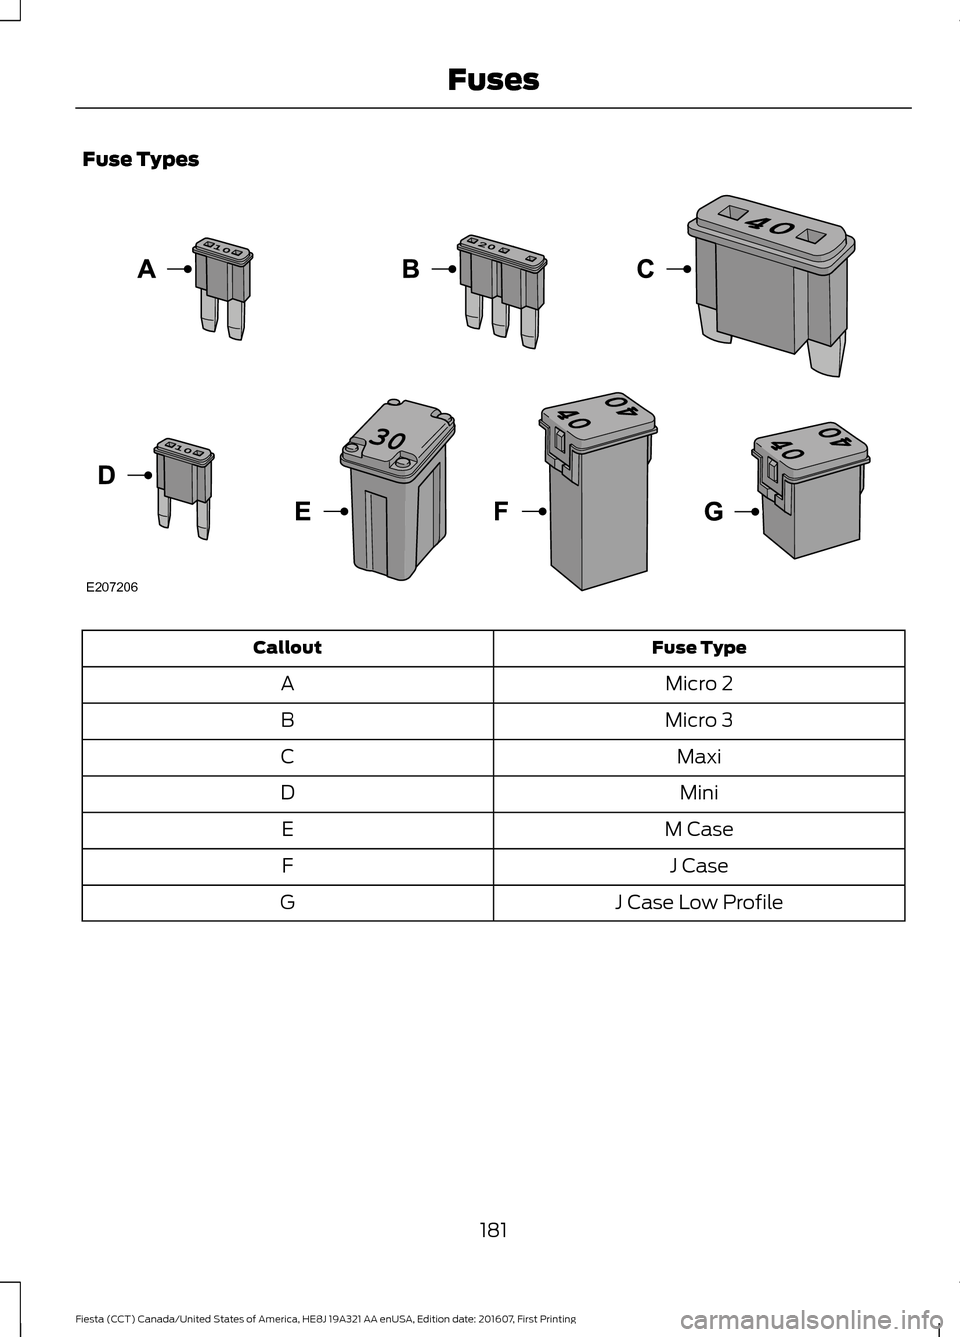
Fuse Types
Fuse Type
Callout
Micro 2
A
Micro 3
B
Maxi
C
Mini
D
M Case
E
J Case
F
J Case Low Profile
G
181
Fiesta (CCT) Canada/United States of America, HE8J 19A321 AA enUSA, Edition date: 201607, First Printing FusesE207206
Page 184 of 450
GENERAL INFORMATION
Have your vehicle serviced regularly to help
maintain its roadworthiness and resale
value. There is a large network of
authorized dealers that are there to help
you with their professional servicing
expertise. We believe that their specially
trained technicians are best qualified to
service your vehicle properly and expertly.
They are supported by a wide range of
highly specialized tools developed
specifically for servicing your vehicle.
If your vehicle requires professional service,
an authorized dealer can provide the
necessary parts and service. Check your
warranty information to find out which
parts and services are covered.
Use only recommended fuels, lubricants,
fluids and service parts conforming to
specifications. Motorcraft® parts are
designed and built to provide the best
performance in your vehicle.
Precautions
•
Do not work on a hot engine.
• Make sure that nothing gets caught in
moving parts.
• Do not work on a vehicle with the
engine running in an enclosed space,
unless you are sure you have enough
ventilation.
• Keep all open flames and other burning
material (such as cigarettes) away
from the battery and all fuel related
parts.
Working with the Engine Off
1. Set the parking brake and shift to park
(P).
2. Switch off the engine.
3. Block the wheels. Working with the Engine On WARNING
To reduce the risk of vehicle damage
and/or personal burn injuries, do not
start your engine with the air cleaner
removed and do not remove it while the
engine is running. 1.
Set the parking brake and shift to park
(P).
2. Block the wheels.
OPENING AND CLOSING THE
HOOD
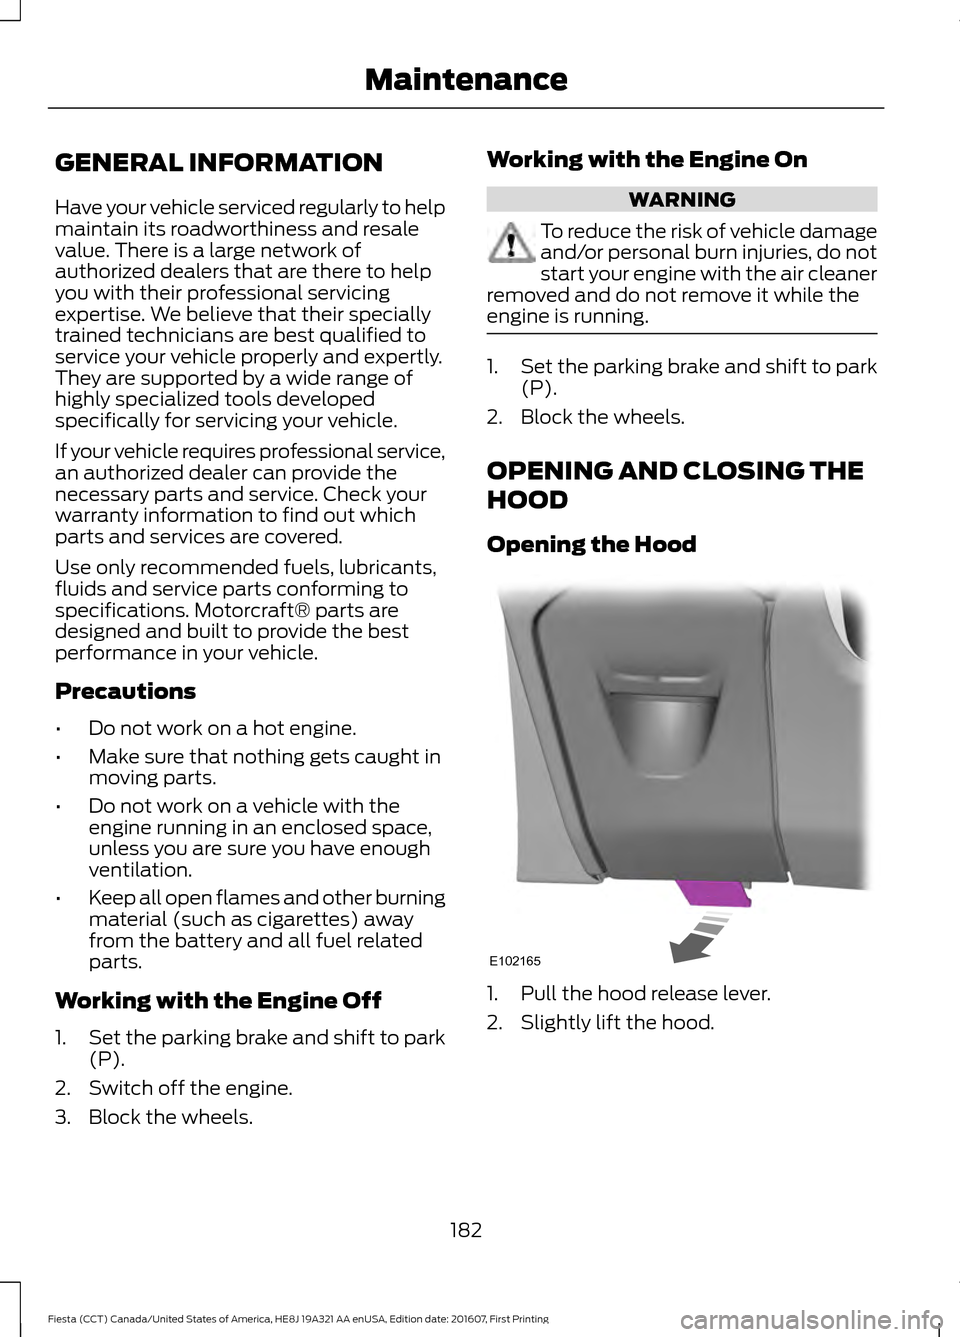
Opening the Hood 1. Pull the hood release lever.
2. Slightly lift the hood.
182
Fiesta (CCT) Canada/United States of America, HE8J 19A321 AA enUSA, Edition date: 201607, First Printing MaintenanceE102165
Page 185 of 450
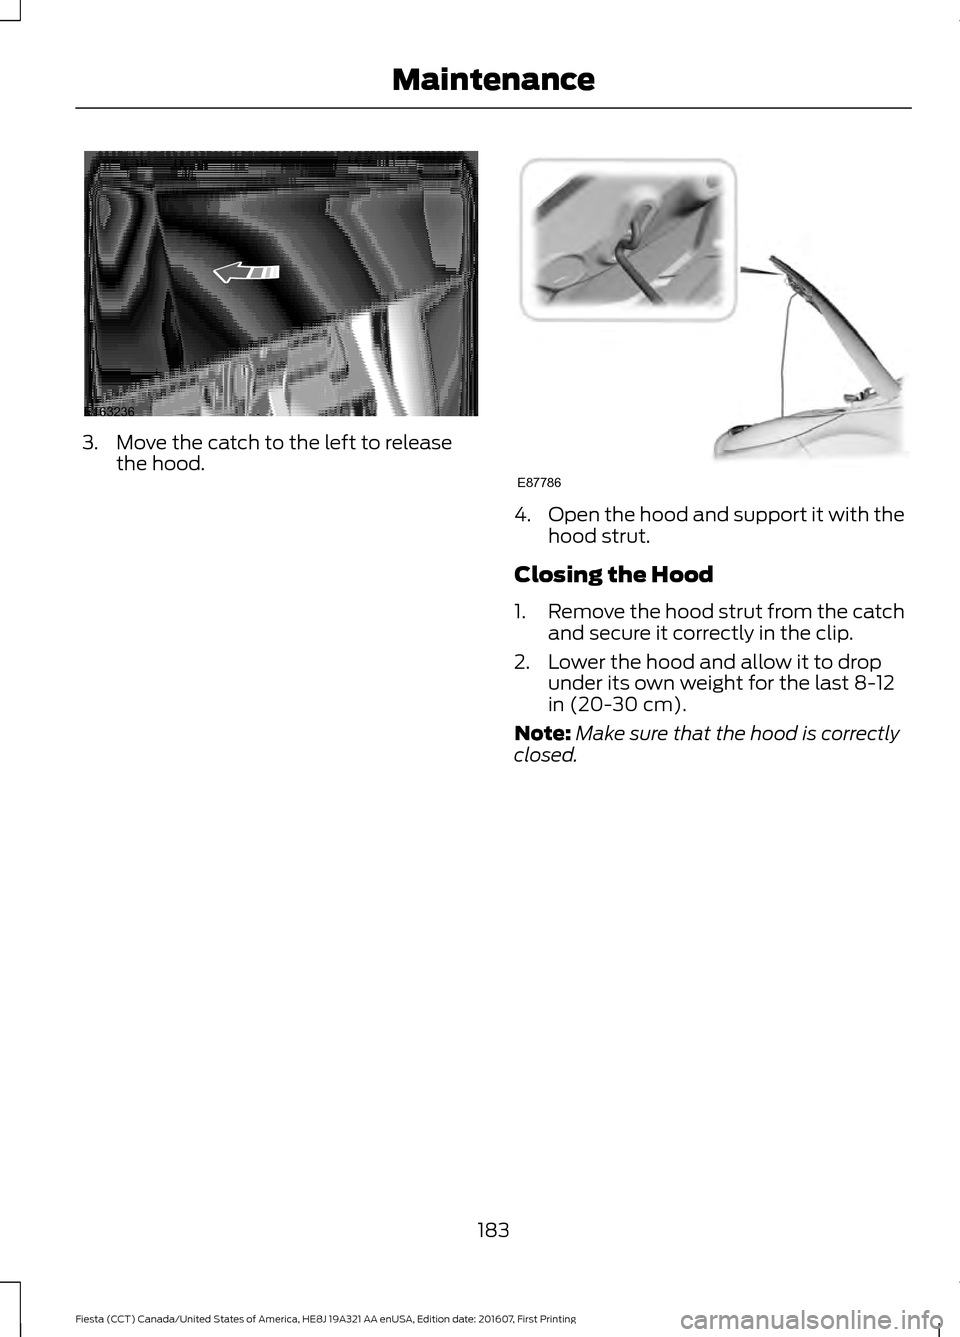
3. Move the catch to the left to release
the hood. 4.
Open the hood and support it with the
hood strut.
Closing the Hood
1. Remove the hood strut from the catch
and secure it correctly in the clip.
2. Lower the hood and allow it to drop under its own weight for the last 8-12
in (20-30 cm).
Note: Make sure that the hood is correctly
closed.
183
Fiesta (CCT) Canada/United States of America, HE8J 19A321 AA enUSA, Edition date: 201607, First Printing MaintenanceE163236 E87786
Page 186 of 450
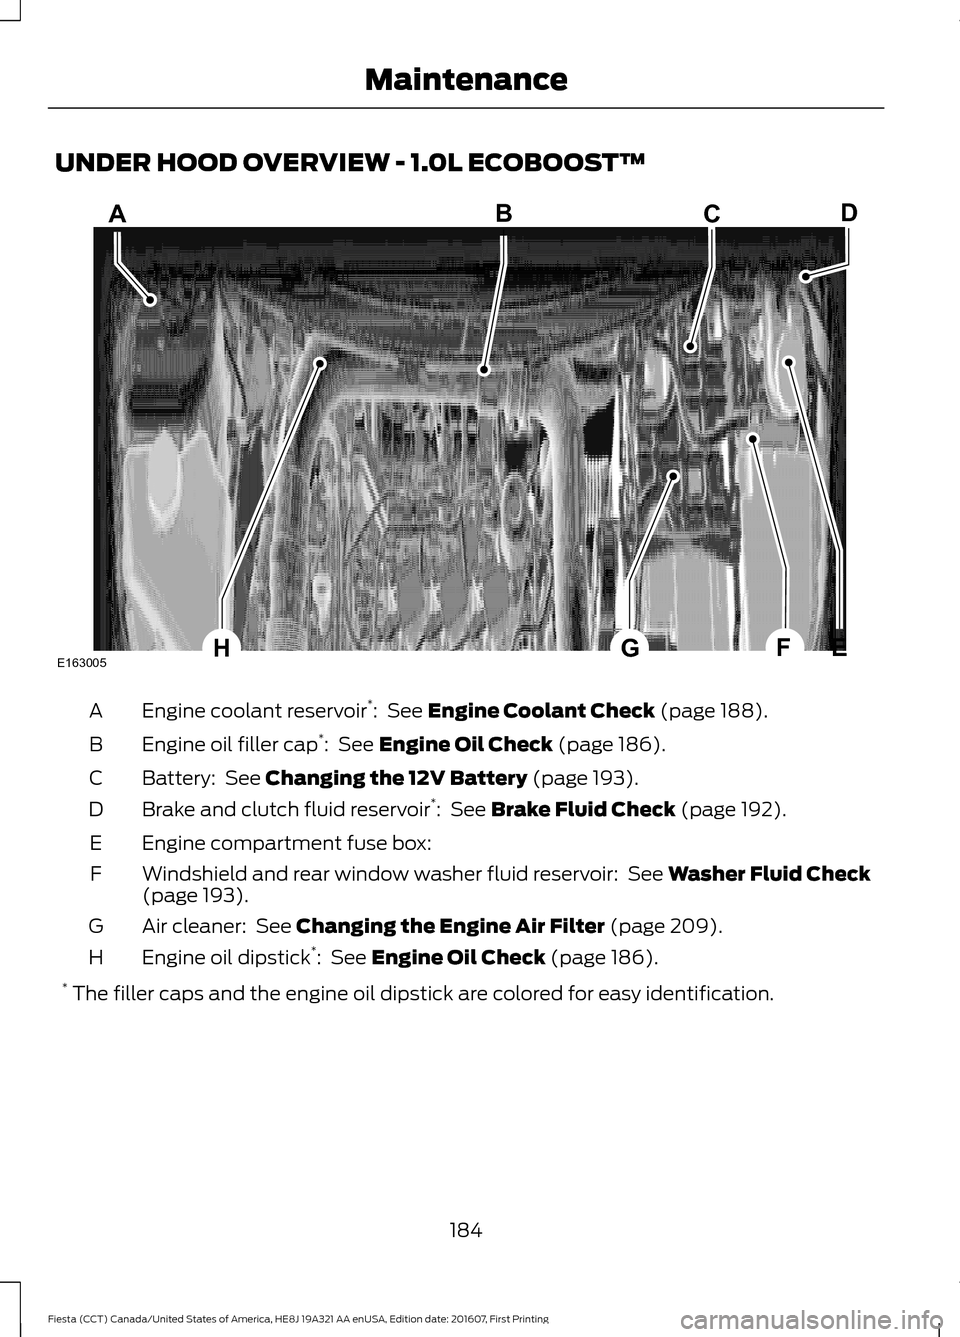
UNDER HOOD OVERVIEW - 1.0L ECOBOOST™
Engine coolant reservoir
*
: See Engine Coolant Check (page 188).
A
Engine oil filler cap *
:
See Engine Oil Check (page 186).
B
Battery:
See Changing the 12V Battery (page 193).
C
Brake and clutch fluid reservoir *
:
See Brake Fluid Check (page 192).
D
Engine compartment fuse box:
E
Windshield and rear window washer fluid reservoir:
See Washer Fluid Check
(page 193).
F
Air cleaner:
See Changing the Engine Air Filter (page 209).
G
Engine oil dipstick *
:
See Engine Oil Check (page 186).
H
* The filler caps and the engine oil dipstick are colored for easy identification.
184
Fiesta (CCT) Canada/United States of America, HE8J 19A321 AA enUSA, Edition date: 201607, First Printing MaintenanceE163005
ABCD
EGHF
Page 187 of 450
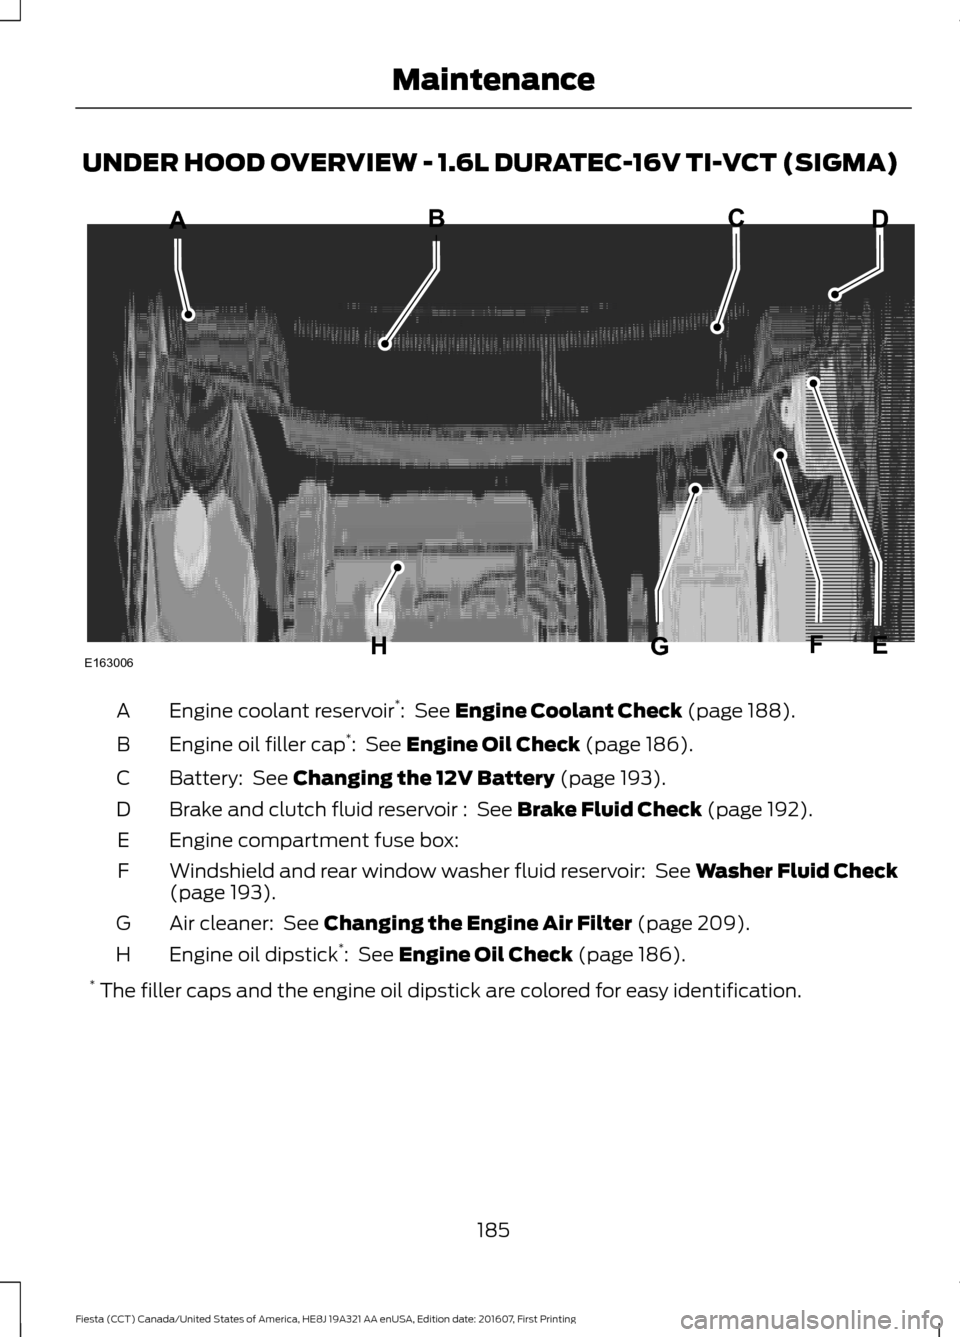
UNDER HOOD OVERVIEW - 1.6L DURATEC-16V TI-VCT (SIGMA)
Engine coolant reservoir
*
: See Engine Coolant Check (page 188).
A
Engine oil filler cap *
:
See Engine Oil Check (page 186).
B
Battery:
See Changing the 12V Battery (page 193).
C
Brake and clutch fluid reservoir :
See Brake Fluid Check (page 192).
D
Engine compartment fuse box:
E
Windshield and rear window washer fluid reservoir:
See Washer Fluid Check
(page 193).
F
Air cleaner:
See Changing the Engine Air Filter (page 209).
G
Engine oil dipstick *
:
See Engine Oil Check (page 186).
H
* The filler caps and the engine oil dipstick are colored for easy identification.
185
Fiesta (CCT) Canada/United States of America, HE8J 19A321 AA enUSA, Edition date: 201607, First Printing MaintenanceE163006
ABCD
HGFE
Page 188 of 450
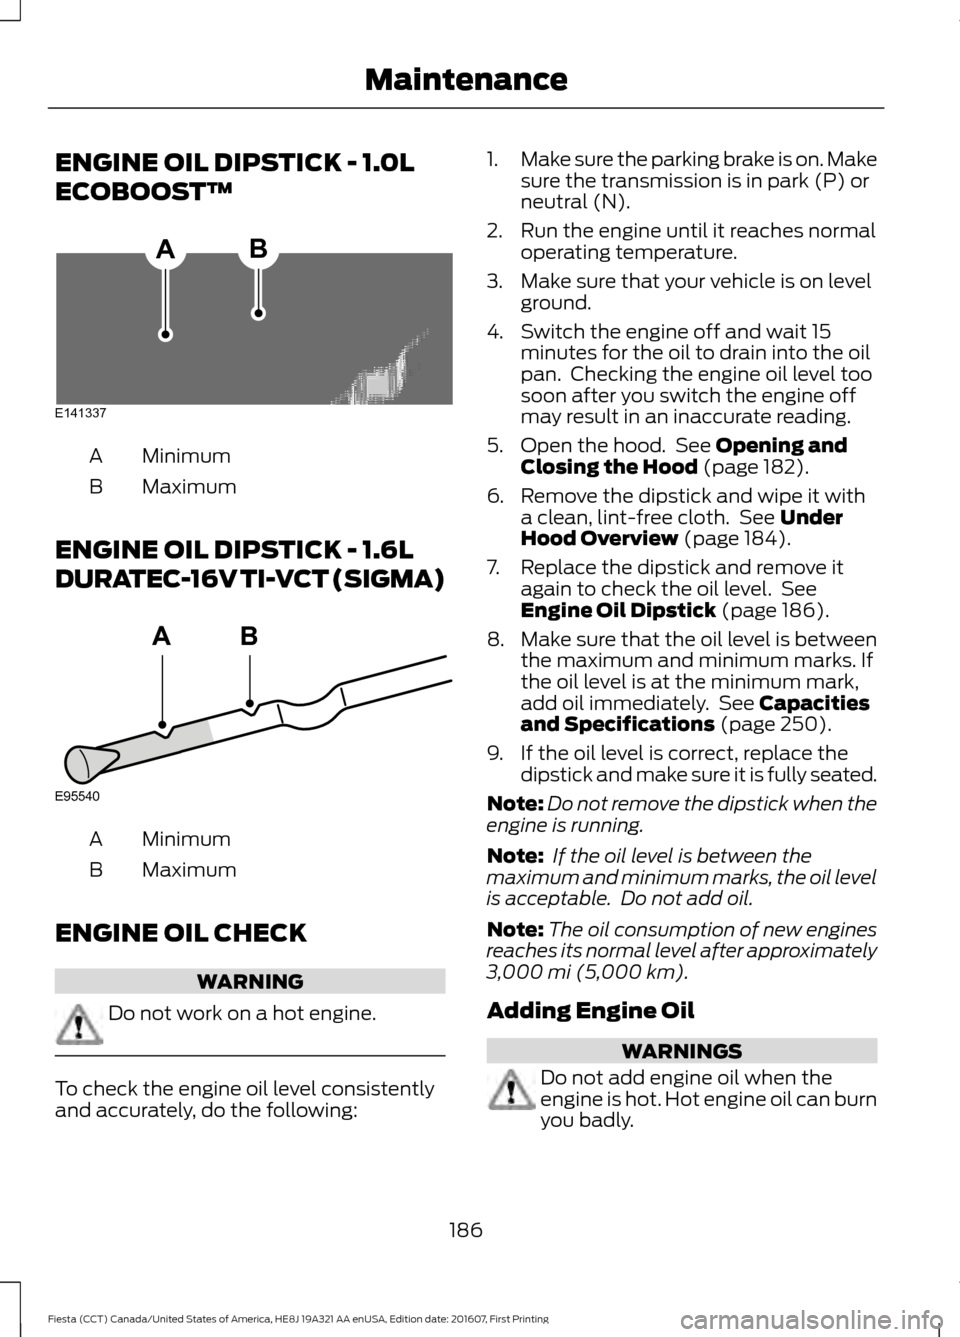
ENGINE OIL DIPSTICK - 1.0L
ECOBOOST™
Minimum
A
Maximum
B
ENGINE OIL DIPSTICK - 1.6L
DURATEC-16V TI-VCT (SIGMA) Minimum
A
Maximum
B
ENGINE OIL CHECK WARNING
Do not work on a hot engine.
To check the engine oil level consistently
and accurately, do the following: 1.
Make sure the parking brake is on. Make
sure the transmission is in park (P) or
neutral (N).
2. Run the engine until it reaches normal operating temperature.
3. Make sure that your vehicle is on level ground.
4. Switch the engine off and wait 15 minutes for the oil to drain into the oil
pan. Checking the engine oil level too
soon after you switch the engine off
may result in an inaccurate reading.
5. Open the hood. See Opening and
Closing the Hood (page 182).
6. Remove the dipstick and wipe it with a clean, lint-free cloth. See
Under
Hood Overview (page 184).
7. Replace the dipstick and remove it again to check the oil level. See
Engine Oil Dipstick
(page 186).
8. Make sure that the oil level is between
the maximum and minimum marks. If
the oil level is at the minimum mark,
add oil immediately. See
Capacities
and Specifications (page 250).
9. If the oil level is correct, replace the dipstick and make sure it is fully seated.
Note: Do not remove the dipstick when the
engine is running.
Note: If the oil level is between the
maximum and minimum marks, the oil level
is acceptable. Do not add oil.
Note: The oil consumption of new engines
reaches its normal level after approximately
3,000 mi (5,000 km)
.
Adding Engine Oil WARNINGS
Do not add engine oil when the
engine is hot. Hot engine oil can burn
you badly.
186
Fiesta (CCT) Canada/United States of America, HE8J 19A321 AA enUSA, Edition date: 201607, First Printing MaintenanceE141337
AB E95540
BA
Page 189 of 450
WARNINGS
Do not remove the filler cap when
the engine is running.
Do not use supplemental engine oil
additives because they are unnecessary
and could lead to engine damage that may
not be covered by the vehicle Warranty.
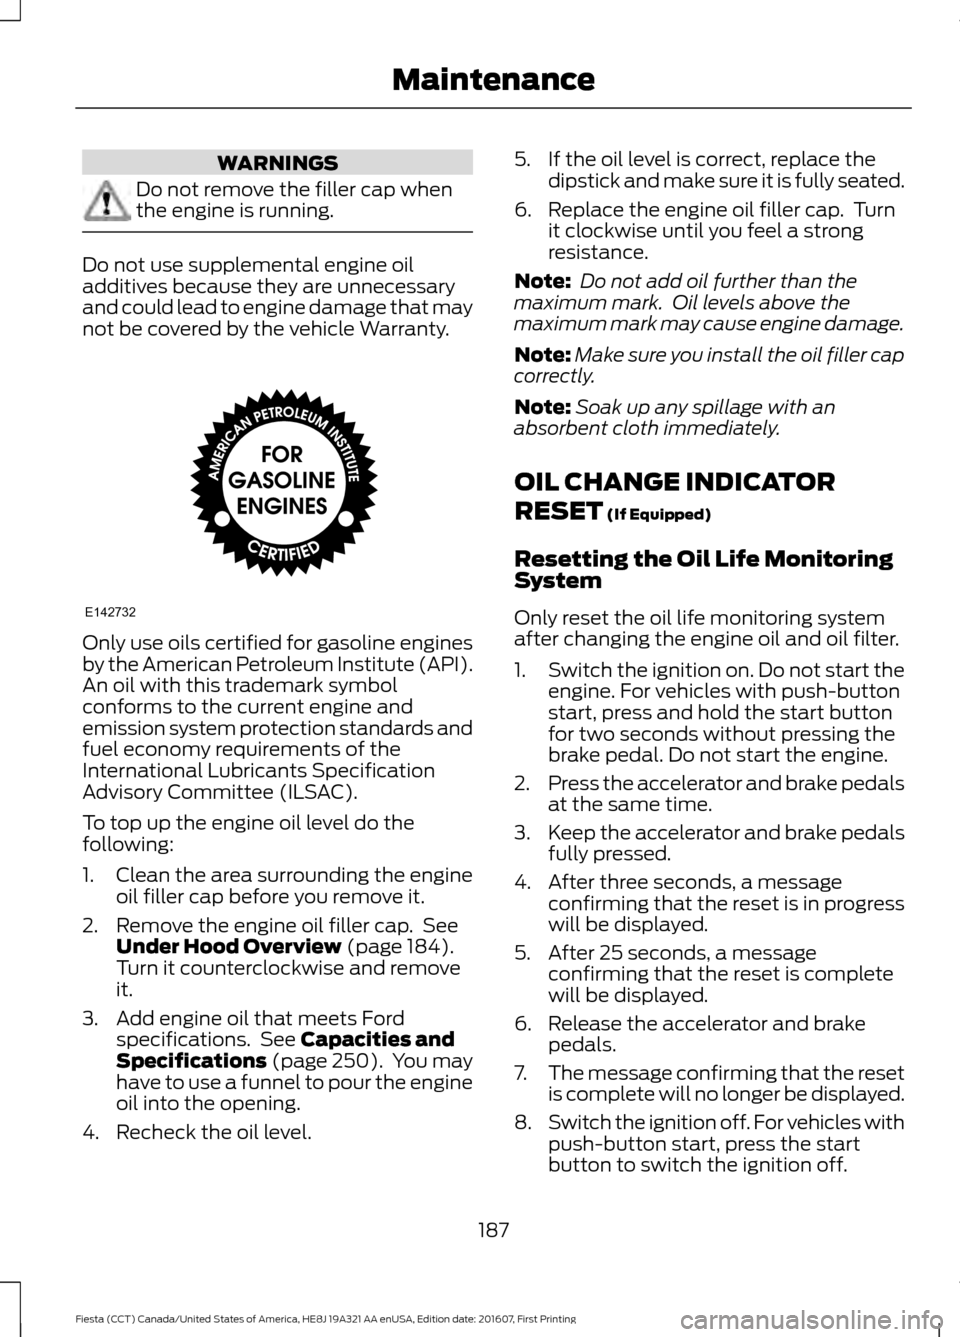
Only use oils certified for gasoline engines
by the American Petroleum Institute (API).
An oil with this trademark symbol
conforms to the current engine and
emission system protection standards and
fuel economy requirements of the
International Lubricants Specification
Advisory Committee (ILSAC).
To top up the engine oil level do the
following:
1. Clean the area surrounding the engine
oil filler cap before you remove it.
2. Remove the engine oil filler cap. See Under Hood Overview (page 184).
Turn it counterclockwise and remove
it.
3. Add engine oil that meets Ford specifications. See
Capacities and
Specifications (page 250). You may
have to use a funnel to pour the engine
oil into the opening.
4. Recheck the oil level. 5. If the oil level is correct, replace the
dipstick and make sure it is fully seated.
6. Replace the engine oil filler cap. Turn it clockwise until you feel a strong
resistance.
Note: Do not add oil further than the
maximum mark. Oil levels above the
maximum mark may cause engine damage.
Note: Make sure you install the oil filler cap
correctly.
Note: Soak up any spillage with an
absorbent cloth immediately.
OIL CHANGE INDICATOR
RESET
(If Equipped)
Resetting the Oil Life Monitoring
System
Only reset the oil life monitoring system
after changing the engine oil and oil filter.
1. Switch the ignition on. Do not start the
engine. For vehicles with push-button
start, press and hold the start button
for two seconds without pressing the
brake pedal. Do not start the engine.
2. Press the accelerator and brake pedals
at the same time.
3. Keep the accelerator and brake pedals
fully pressed.
4. After three seconds, a message confirming that the reset is in progress
will be displayed.
5. After 25 seconds, a message confirming that the reset is complete
will be displayed.
6. Release the accelerator and brake pedals.
7. The message confirming that the reset
is complete will no longer be displayed.
8. Switch the ignition off. For vehicles with
push-button start, press the start
button to switch the ignition off.
187
Fiesta (CCT) Canada/United States of America, HE8J 19A321 AA enUSA, Edition date: 201607, First Printing MaintenanceE142732
Page 190 of 450
ENGINE COOLING FAN
WARNING
Keep your hands and clothing clear
of the engine cooling fan.
Under certain conditions, the engine
cooling fan may continue to run for several
minutes after you switch your vehicle off.
ENGINE COOLANT CHECK
WARNINGS
Do not add engine coolant when the
engine is hot. Steam and scalding
liquids released from a hot cooling
system can burn you badly. Also, spilling
coolant on hot engine parts can burn you. Do not put engine coolant in the
windshield washer fluid container. If
sprayed on the windshield, engine
coolant could make it difficult to see
through the windshield. To reduce the risk of personal injury,
make sure the engine is cool before
unscrewing the coolant pressure
relief cap. The cooling system is under
pressure. Steam and hot liquid can come
out forcefully when you loosen the cap
slightly. Do not add coolant further than the
MAX mark.
When the engine is cold, check the
concentration and level of the coolant at
the intervals listed in the scheduled
maintenance information. See Scheduled
Maintenance
(page 396).
Note: Make sure that the coolant level is
between the
MIN and MAX marks on the
coolant reservoir.
Note: Coolant expands when it is hot. The
level may extend beyond the
MAX mark. Maintain coolant concentration within
48% to 50%, which equates to a freeze
point between -30°F (-34°C) and -34°F
(-37°C). Coolant concentration should be
checked using a refractometer. We do not
recommend the use of hydrometers or
coolant test strips for measuring coolant
concentration.
Adding Coolant
WARNING
Never remove the coolant reservoir
cap when the engine is running or
hot.
Note:
Automotive fluids are not
interchangeable. Do not use coolant or
windshield washer fluid outside of its
specified function and vehicle location.
Note: Do not use stop leak pellets, cooling
system sealants, or non-specified additives
as they can cause damage to the engine
cooling or heating systems. Resulting
component damage may not be covered by
the vehicle Warranty.
It is very important to use prediluted
coolant approved to the correct
specification in order to avoid plugging the
small passageways in the engine cooling
system. See
Capacities and
Specifications (page 250). Do not mix
different colors or types of coolant in your
vehicle. Mixing of engine coolants or using
an incorrect coolant may harm the engine
or cooling system components and may
not be covered by the vehicle Warranty.
Note: If prediluted coolant is not available,
use the approved concentrated coolant
diluting it to 50/50 with distilled water. See
Capacities and Specifications (page 250).
Using water that has not been deionised
may contribute to deposit formation,
corrosion and plugging of the small cooling
system passageways.
188
Fiesta (CCT) Canada/United States of America, HE8J 19A321 AA enUSA, Edition date: 201607, First Printing Maintenance