clock FORD FLEX 2010 1.G User Guide
[x] Cancel search | Manufacturer: FORD, Model Year: 2010, Model line: FLEX, Model: FORD FLEX 2010 1.GPages: 397
Page 308 of 397
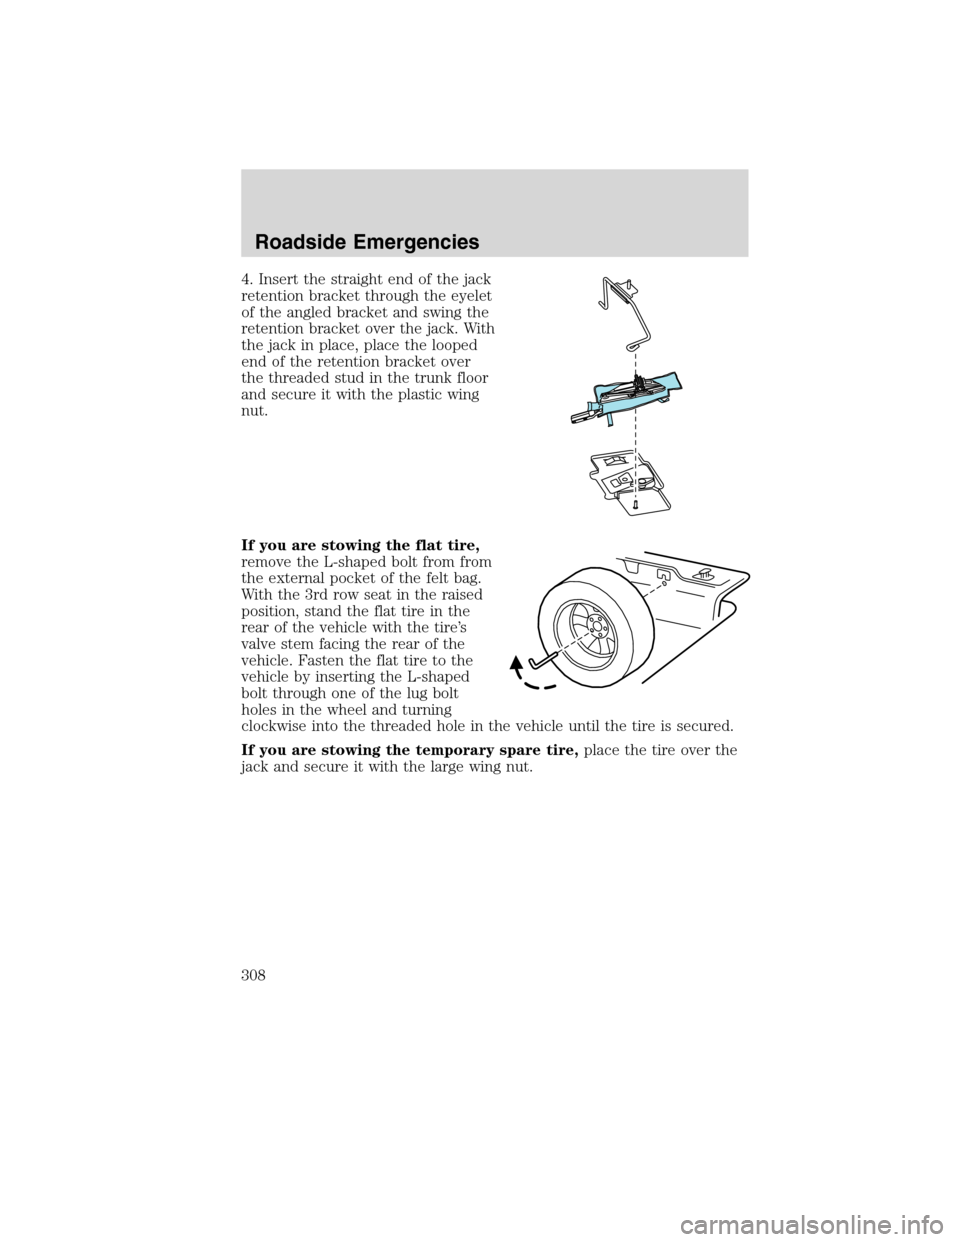
4. Insert the straight end of the jack
retention bracket through the eyelet
of the angled bracket and swing the
retention bracket over the jack. With
the jack in place, place the looped
end of the retention bracket over
the threaded stud in the trunk floor
and secure it with the plastic wing
nut.
If you are stowing the flat tire,
remove the L-shaped bolt from from
the external pocket of the felt bag.
With the 3rd row seat in the raised
position, stand the flat tire in the
rear of the vehicle with the tire’s
valve stem facing the rear of the
vehicle. Fasten the flat tire to the
vehicle by inserting the L-shaped
bolt through one of the lug bolt
holes in the wheel and turning
clockwise into the threaded hole in the vehicle until the tire is secured.
If you are stowing the temporary spare tire,place the tire over the
jack and secure it with the large wing nut.
Roadside Emergencies
308
2010 Flex(471)
Owners Guide, 1st Printing
USA(fus)
Page 312 of 397
•Operating the temporary mobility kit could cause an electrical
disturbance in radio and DVD player operation.
What to do when a tire is punctured
A tire puncture within the tire’s tread area can be repaired in two stages
with the temporary mobility kit:
•In the first stage, the tire will be reinflated with a sealing compound
and air. After the tire has been reinflated, you will need to drive the
vehicle a short distance (approximately 4 miles [6 km]) to distribute
the sealant in the tire.
•In the second stage, you will need to check the tire pressure and
adjust, if necessary, to the vehicle’s tire inflation pressure.
First stage: Reinflating the tire with sealing compound and air
Preparation
Park the vehicle in a safe, level and secure area, away from moving
traffic. Turn the hazard lights on. Apply the parking brake and turn the
engine off. Inspect the flat tire for visible damage.
Sealant compound contains latex. To avoid any allergic reactions, use the
non-latex gloves located in the accessory box on the underside of the
temporary mobility kit housing.
Do not remove any foreign object that has pierced the tire. If a puncture
is located in the tire sidewall, stop and call roadside assistance.
1. Remove the valve cap from the tire valve.
2. Unwrap the clear tube from the compressor housing.
3. Remove the tube cap and fasten the metal connector of the tube to
the tire valve, turning clockwise. Make sure the connection is tightly
fastened.
Roadside Emergencies
312
2010 Flex(471)
Owners Guide, 1st Printing
USA(fus)
Page 313 of 397
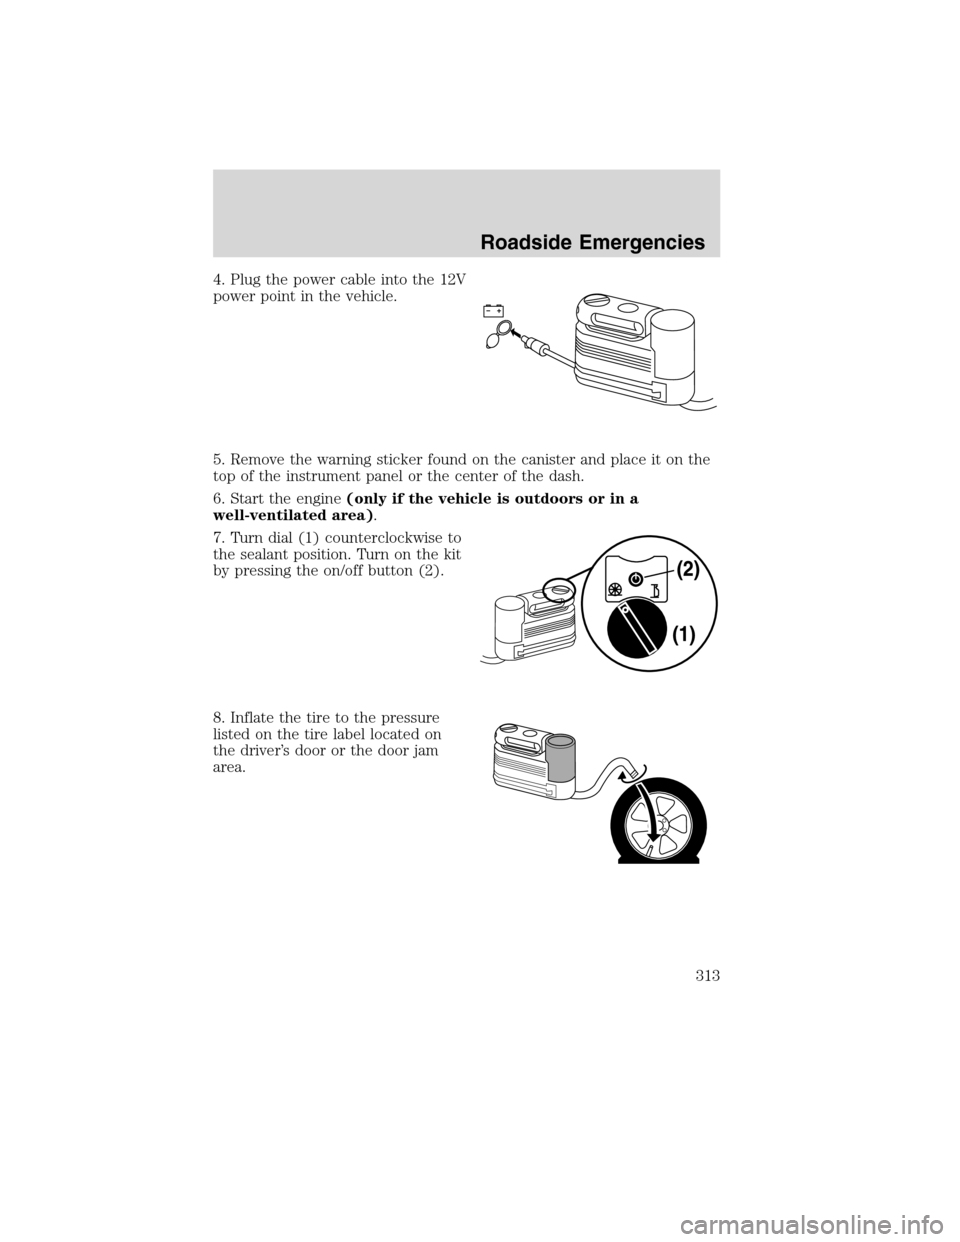
4. Plug the power cable into the 12V
power point in the vehicle.
5. Remove the warning sticker found on the canister and place it on the
top of the instrument panel or the center of the dash.
6. Start the engine(only if the vehicle is outdoors or in a
well-ventilated area).
7. Turn dial (1) counterclockwise to
the sealant position. Turn on the kit
by pressing the on/off button (2).
8. Inflate the tire to the pressure
listed on the tire label located on
the driver’s door or the door jam
area.
Roadside Emergencies
313
2010 Flex(471)
Owners Guide, 1st Printing
USA(fus)
Page 314 of 397
Note: When the sealing compound is first added into the tire, the
air pressure gauge reading on the compressor unit may indicate a
higher value; this is normal and should be no reason for concern.
The pressure will drop after about 30 seconds of operation. The
tire pressure has to be checked with the compressor in the OFF
position to get the correct tire pressure reading.
WARNING:Do not stand directly over the temporary mobility
kit while inflating the tire. If you notice any unusual bulges or
deformations in the tire’s sidewall during inflation, stop and call
roadside assistance.
WARNING:If the tire doesn’t inflate to the recommended tire
pressure within 15 minutes, stop and call roadside assistance.
9. When the recommended tire pressure is reached, turn off the kit by
pressing the on/off button; disconnect the kit from the tire valve and the
power point. Re-install the valve cap on the tire valve, place the tube cap
on the metal connector, and return the kit to the stowage area.
10.Immediately and cautiously, drive the vehicle 4 miles (6 km)
to distribute the sealant evenly inside the tire. Do not exceed
50 mph (80 km/h).
Note:If you experience any unusual vibration, ride disturbance or
noise while driving, reduce your speed until you can safely pull off to
the side of the road to call for roadside assistance.Do not proceed
to the second stage of this operation.
11. After 4 miles (6 km), stop and check the tire pressure. SeeSecond
stage: Checking tire pressure.
Second stage: Checking tire pressure
Check the air pressure of your tires as follows:
1. Remove the valve cap from the tire valve.
2. Unhook the black hose from the side of the compressor and fasten
firmly on the valve stem by turning clockwise.
WARNING:If you are proceeding from theFirst stage:
Reinflating the tire with sealing compound and airsection
and have injected sealant in the tire and the pressure is below 20 psi
(1.4 bar),stop and call roadside assistance.If tire pressure is
above 20 psi (1.4 bar), continue to the next step.
Roadside Emergencies
314
2010 Flex(471)
Owners Guide, 1st Printing
USA(fus)
Page 315 of 397
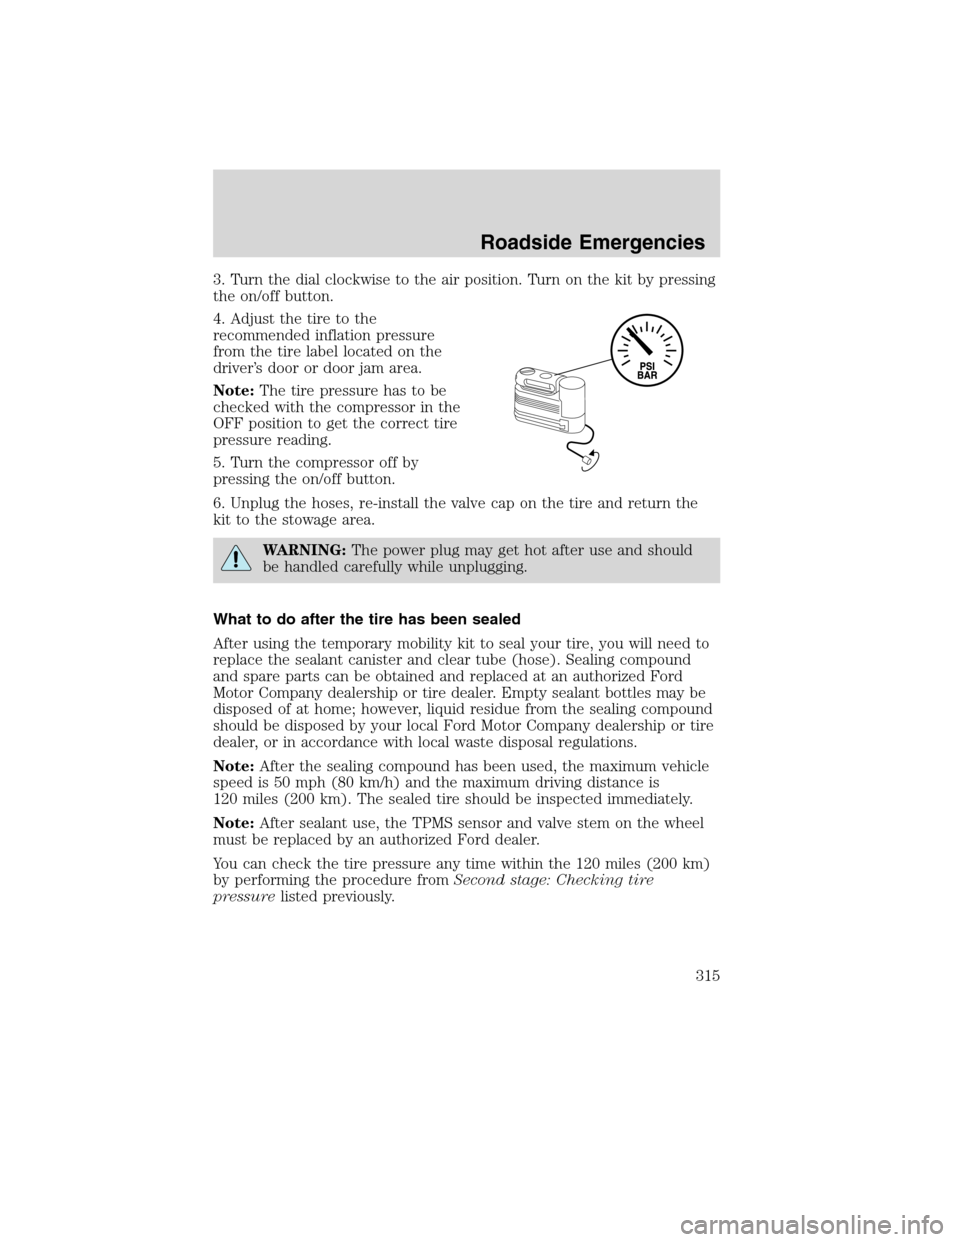
3. Turn the dial clockwise to the air position. Turn on the kit by pressing
the on/off button.
4. Adjust the tire to the
recommended inflation pressure
from the tire label located on the
driver’s door or door jam area.
Note:The tire pressure has to be
checked with the compressor in the
OFF position to get the correct tire
pressure reading.
5. Turn the compressor off by
pressing the on/off button.
6. Unplug the hoses, re-install the valve cap on the tire and return the
kit to the stowage area.
WARNING:The power plug may get hot after use and should
be handled carefully while unplugging.
What to do after the tire has been sealed
After using the temporary mobility kit to seal your tire, you will need to
replace the sealant canister and clear tube (hose). Sealing compound
and spare parts can be obtained and replaced at an authorized Ford
Motor Company dealership or tire dealer. Empty sealant bottles may be
disposed of at home; however, liquid residue from the sealing compound
should be disposed by your local Ford Motor Company dealership or tire
dealer, or in accordance with local waste disposal regulations.
Note:After the sealing compound has been used, the maximum vehicle
speed is 50 mph (80 km/h) and the maximum driving distance is
120 miles (200 km). The sealed tire should be inspected immediately.
Note:After sealant use, the TPMS sensor and valve stem on the wheel
must be replaced by an authorized Ford dealer.
You can check the tire pressure any time within the 120 miles (200 km)
by performing the procedure fromSecond stage: Checking tire
pressurelisted previously.
Roadside Emergencies
315
2010 Flex(471)
Owners Guide, 1st Printing
USA(fus)
Page 350 of 397
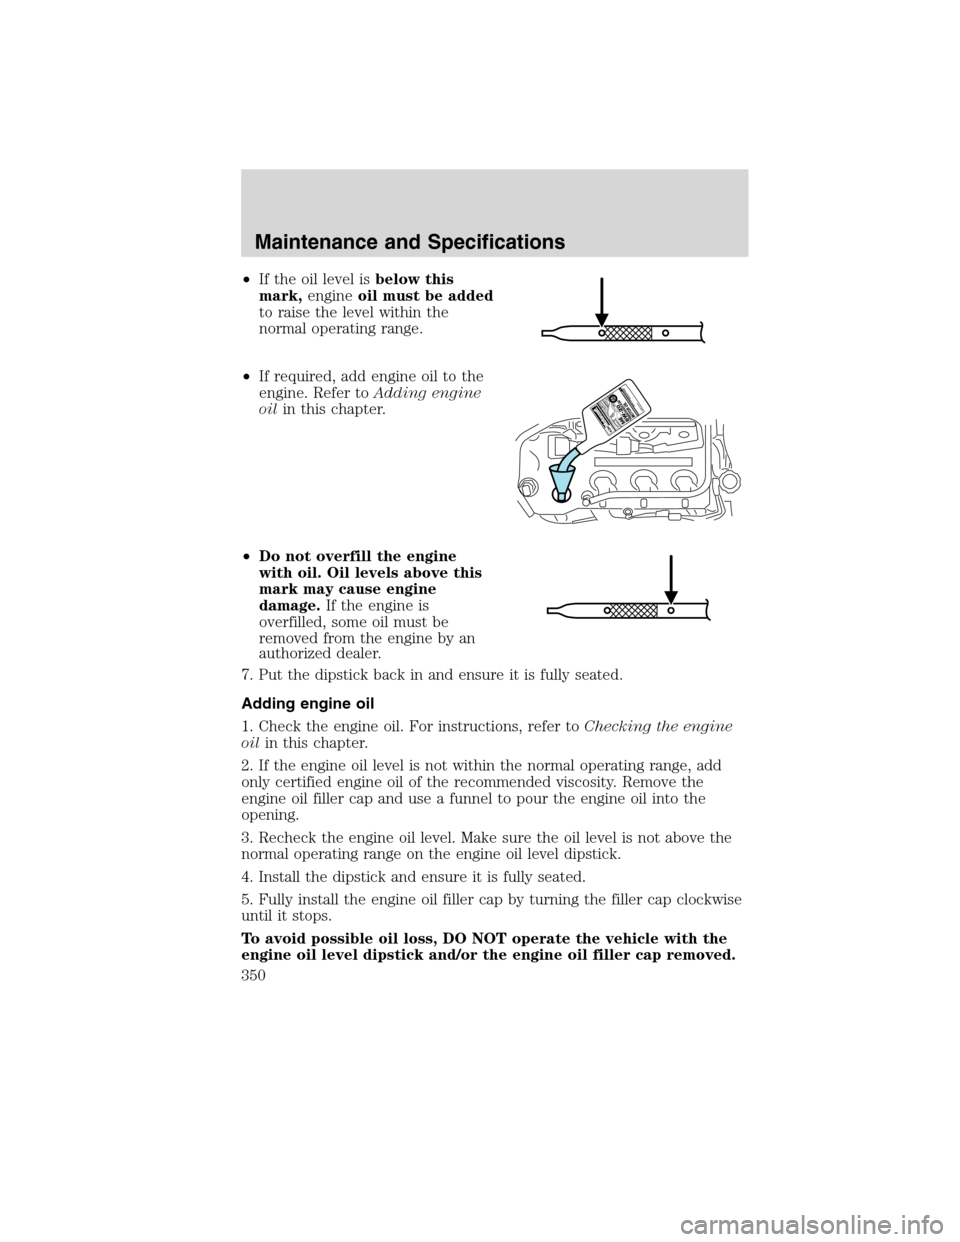
•If the oil level isbelow this
mark,engineoil must be added
to raise the level within the
normal operating range.
•If required, add engine oil to the
engine. Refer toAdding engine
oilin this chapter.
•Do not overfill the engine
with oil. Oil levels above this
mark may cause engine
damage.If the engine is
overfilled, some oil must be
removed from the engine by an
authorized dealer.
7. Put the dipstick back in and ensure it is fully seated.
Adding engine oil
1. Check the engine oil. For instructions, refer toChecking the engine
oilin this chapter.
2. If the engine oil level is not within the normal operating range, add
only certified engine oil of the recommended viscosity. Remove the
engine oil filler cap and use a funnel to pour the engine oil into the
opening.
3. Recheck the engine oil level. Make sure the oil level is not above the
normal operating range on the engine oil level dipstick.
4. Install the dipstick and ensure it is fully seated.
5. Fully install the engine oil filler cap by turning the filler cap clockwise
until it stops.
To avoid possible oil loss, DO NOT operate the vehicle with the
engine oil level dipstick and/or the engine oil filler cap removed.
Maintenance and Specifications
350
2010 Flex(471)
Owners Guide, 1st Printing
USA(fus)
Page 353 of 397
WARNING:Keep batteries out of reach of children. Batteries
contain sulfuric acid. Avoid contact with skin, eyes or clothing.
Shield your eyes when working near the battery to protect against
possible splashing of acid solution. In case of acid contact with skin or
eyes, flush immediately with water for a minimum of 15 minutes and
get prompt medical attention. If acid is swallowed, call a physician
immediately.
WARNING:Battery posts, terminals and related accessories
contain lead and lead compounds.Wash hands after handling.
Because your vehicle’s engine is electronically controlled by a computer,
some control conditions are maintained by power from the battery. When
the battery is disconnected or a new battery is installed, the engine must
relearn its idle and fuel trim strategy for optimum driveability and
performance. To begin this process:
1. With the vehicle at a complete stop, set the parking brake.
2. Put the gearshift in P (Park), turn off all accessories and start the
engine.
3. Run the engine until it reaches normal operating temperature.
4. Allow the engine to idle for at least one minute.
5. Turn the A/C on and allow the engine to idle for at least one minute.
6. Release the parking brake. With your foot on the brake pedal and with
the A/C on, put the vehicle in D (Drive) and allow the engine to idle for
at least one minute.
7. Drive the vehicle to complete the relearning process.
•The vehicle may need to be driven 10 miles (16 km) or more to
relearn the idle and fuel trim strategy.
•If you do not allow the engine to relearn its idle trim, the idle
quality of your vehicle may be adversely affected until the idle
trim is eventually relearned.
If the battery has been disconnected or a new battery has been installed,
the clock and radio settings must be reset once the battery is
reconnected.
Maintenance and Specifications
353
2010 Flex(471)
Owners Guide, 1st Printing
USA(fus)
Page 356 of 397
•Do not mix coolants. Add the coolant type originally equipped
in your vehicle.Refer toMaintenance product specifications and
capacitiesin this chapter.
Note:Do not use stop leak pellets or cooling system sealants/additives
as they can cause damage to the engine cooling and/or heating systems.
This damage would not be covered under your vehicle’s warranty.
•A large amount of water without engine coolant may be added, in case
of emergency, to reach a vehicle service location. In this instance, the
cooling system must be drained and refilled with a 50/50 mixture of
engine coolant and distilled water as soon as possible. Water alone
(without engine coolant) can cause engine damage from corrosion,
overheating or freezing.
•Do not use alcohol, methanol, brine or any engine coolants
mixed with alcohol or methanol antifreeze (coolant).Alcohol
and other liquids can cause engine damage from overheating or
freezing.
•Do not add extra inhibitors or additives to the coolant.These
can be harmful and compromise the corrosion protection of the engine
coolant.
For vehicles with overflow coolant systems with a non-pressurized cap
on the coolant recovery system, add coolant to the coolant recovery
reservoir when the engine is cool. Add the proper mixture of coolant and
water to the FULL COLD level. For all other vehicles which have a
coolant degas system with a pressurized cap, or if it is necessary to
remove the coolant pressure relief cap on the radiator of a vehicle with
an overflow system, follow these steps to add engine coolant.
WARNING:To reduce the risk of personal injury, make sure the
engine is cool before unscrewing the coolant pressure relief cap.
The cooling system is under pressure; steam and hot liquid can come
out forcefully when the cap is loosened slightly.
Add the proper mixture of coolant and water to the cooling system by
following these steps:
1. Before you begin, turn the engine off and let it cool.
2. When the engine is cool, wrap a thick cloth around the coolant
pressure relief cap on the coolant reservoir (a translucent plastic bottle).
Slowly turn cap counterclockwise (left) until pressure begins to release.
3. Step back while the pressure releases.
Maintenance and Specifications
356
2010 Flex(471)
Owners Guide, 1st Printing
USA(fus)
Page 357 of 397
4. When you are sure that all the pressure has been released, use the
cloth to turn it counterclockwise and remove the cap.
5. Fill the coolant reservoir slowly with the proper coolant mixture, to
within the COLD FILL RANGE or the FULL COLD level on the reservoir.
If you removed the radiator cap in an overflow system, fill the radiator
until the coolant is visible and radiator is almost full.
6. Replace the cap. Turn until tightly installed. Cap must be tightly
installed to prevent coolant loss.
After any coolant has been added, check the coolant concentration (refer
toChecking engine coolant). If the concentration is not 50/50
(protection to –34°F/–36°C), drain some coolant and adjust the
concentration. It may take several drains and additions to obtain a 50/50
coolant concentration.
Whenever coolant has been added, the coolant level in the coolant
reservoir should be checked the next few times you drive the vehicle. If
necessary, add enough 50/50 concentration of engine coolant and
distilled water to bring the liquid level to the proper level.
If you have to add more than 1.0 quart (1.0 liter) of engine coolant per
month, have your authorized dealer check the engine cooling system.
Your cooling system may have a leak. Operating an engine with a low
level of coolant can result in engine overheating and possible engine
damage.
Recycled engine coolant
Ford Motor Company does NOT recommend the use of recycled engine
coolant since a Ford-approved recycling process is not yet available.
Used engine coolant should be disposed of in an appropriate
manner. Follow your community’s regulations and standards for recycling
and disposing of automotive fluids.
Coolant refill capacity
To find out how much fluid your vehicle’s cooling system can hold, refer
toMaintenance product specifications and capacitiesin this chapter.
Fill your engine coolant reservoir as outlined inAdding engine coolant
in this section.
Severe climates
If you drive in extremely cold climates (less than –34°F [–36°C]):
•It may be necessary to increase the coolant concentration
above 50%.
Maintenance and Specifications
357
2010 Flex(471)
Owners Guide, 1st Printing
USA(fus)
Page 392 of 397
Child safety seats ......................203
in front seat ............................204
in rear seat ..............................204
LATCH .....................................207
recommendations ...................201
tether anchorage hardware ...210
Child safety seats - booster
seats ...........................................213
Cleaning your vehicle
engine compartment ..............336
instrument panel ....................339
interior .....................................340
plastic parts ............................338
washing ....................................334
waxing .....................................335
wheels ......................................335
wiper blades ............................338
Climate control
(see Air conditioning or
Heating) ...........................68, 71, 74
Clock ............................................93
Clock adjust
AM/FM .......................................29
Compass, electronic ....................94
calibration .................................95
set zone adjustment .................95
Console
overhead ....................................94
Controls
power seat ...............................156
steering column ......................106
Coolant
checking and adding ..............354
refill capacities ................357, 379
specifications ..........................379
Cooler ..........................................97
Cruise control
(see Speed control) ..................104Customer Assistance ................292
Ford Extended Service
Plan ..........................................388
Getting assistance outside the
U.S. and Canada .....................331
Getting roadside assistance ...292
Getting the service you
need .........................................327
Ordering additional owner’s
literature .................................332
Utilizing the
Mediation/Arbitration
Program ...................................330
D
Daytime running lamps
(see Lamps) ................................82
Defrost
rear window and rearview
mirrors .......................................74
windshield .................................74
Dipstick
automatic transmission
fluid ..........................................374
engine oil .................................349
Driving under special
conditions ..........................287, 289
sand .........................................288
snow and ice ...........................290
through water .................288, 291
DVD system .................................46
E
Electronic message center .........18
Emergencies, roadside
jump-starting ..........................319
running out of fuel .........319, 365
Emission control system ..........370
Index
392
2010 Flex(471)
Owners Guide, 1st Printing
USA(fus)