display FORD FLEX 2016 1.G Owners Manual
[x] Cancel search | Manufacturer: FORD, Model Year: 2016, Model line: FLEX, Model: FORD FLEX 2016 1.GPages: 417, PDF Size: 4.52 MB
Page 345 of 417
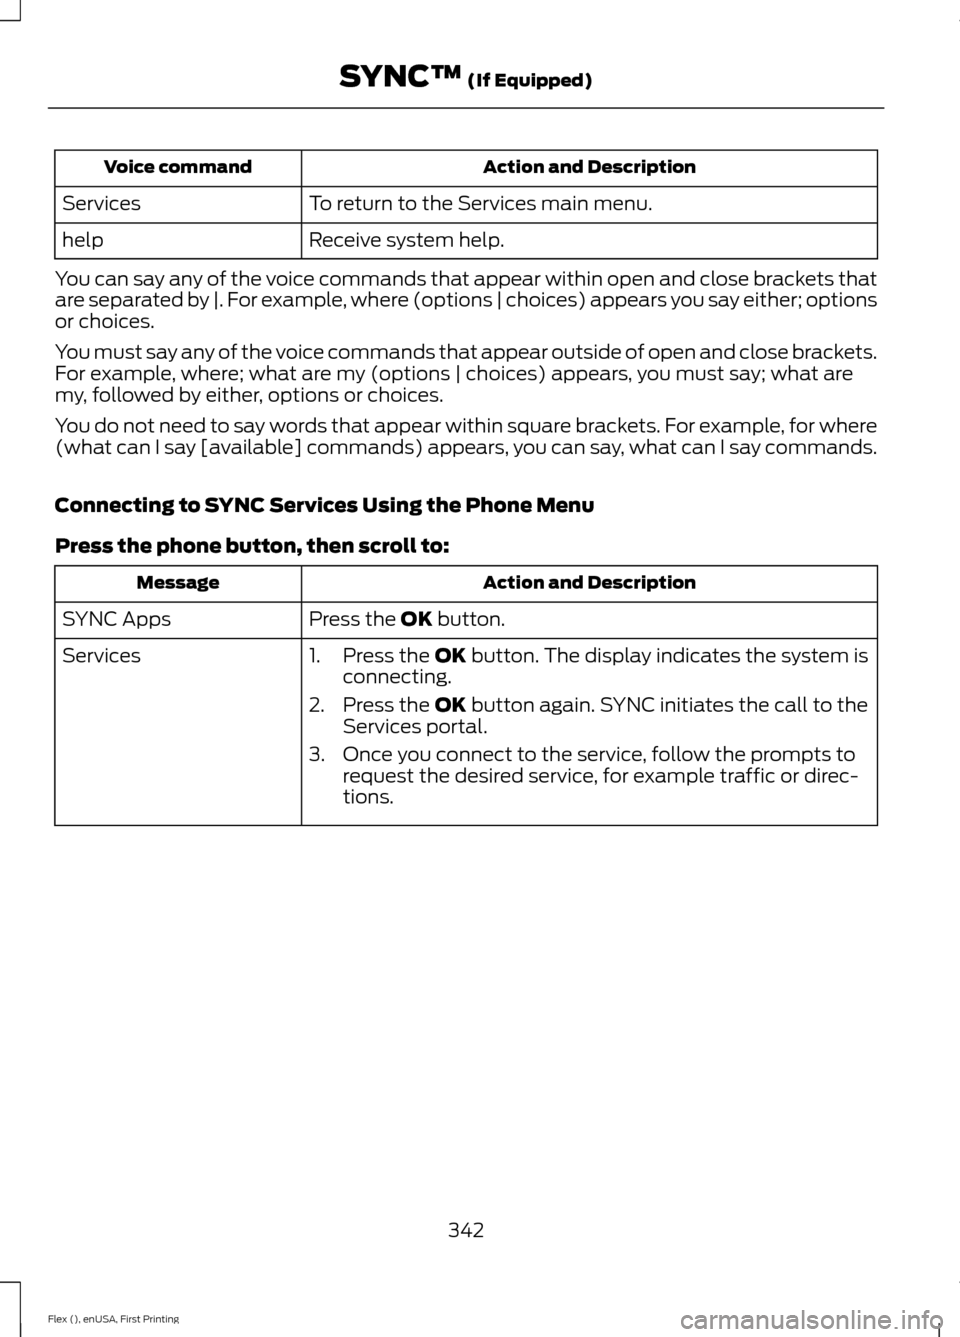
Action and Description
Voice command
To return to the Services main menu.
Services
Receive system help.
help
You can say any of the voice commands that appear within open and close brackets that
are separated by |. For example, where (options | choices) appears you say either; options
or choices.
You must say any of the voice commands that appear outside of open and close brackets.
For example, where; what are my (options | choices) appears, you must say; what are
my, followed by either, options or choices.
You do not need to say words that appear within square brackets. For example, for where
(what can I say [available] commands) appears, you can say, what can I say commands.
Connecting to SYNC Services Using the Phone Menu
Press the phone button, then scroll to: Action and Description
Message
Press the OK button.
SYNC Apps
Services 1. Press the
OK button. The display indicates the system is
connecting.
2. Press the
OK button again. SYNC initiates the call to the
Services portal.
3. Once you connect to the service, follow the prompts to request the desired service, for example traffic or direc-
tions.
342
Flex (), enUSA, First Printing SYNC™
(If Equipped)
Page 347 of 417
Disconnecting from SYNC Services
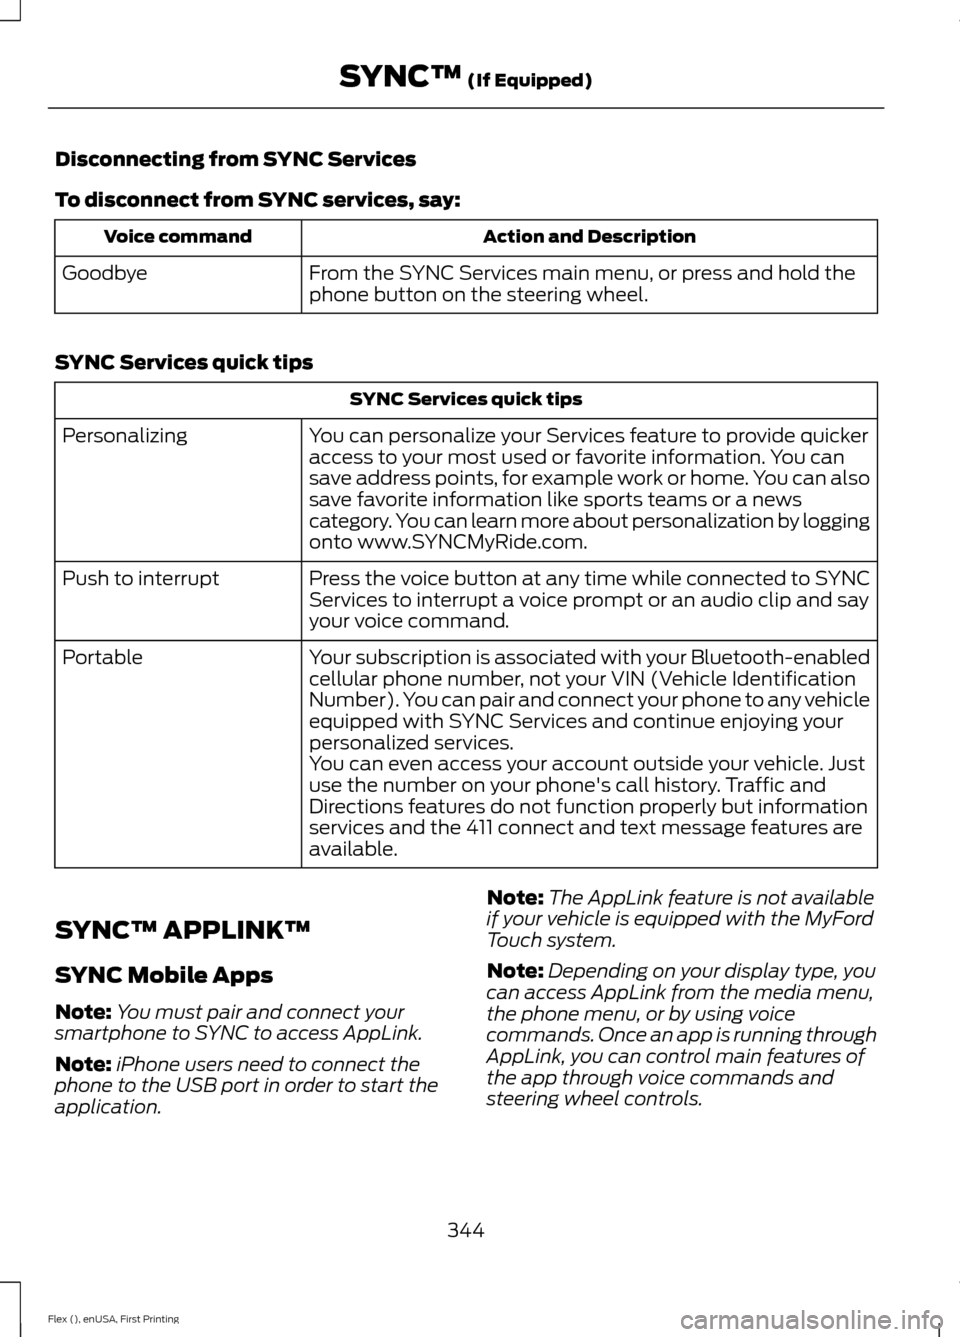
To disconnect from SYNC services, say:
Action and Description
Voice command
From the SYNC Services main menu, or press and hold the
phone button on the steering wheel.
Goodbye
SYNC Services quick tips SYNC Services quick tips
You can personalize your Services feature to provide quicker
access to your most used or favorite information. You can
save address points, for example work or home. You can also
save favorite information like sports teams or a news
category. You can learn more about personalization by logging
onto www.SYNCMyRide.com.
Personalizing
Press the voice button at any time while connected to SYNC
Services to interrupt a voice prompt or an audio clip and say
your voice command.
Push to interrupt
Your subscription is associated with your Bluetooth-enabled
cellular phone number, not your VIN (Vehicle Identification
Number). You can pair and connect your phone to any vehicle
equipped with SYNC Services and continue enjoying your
personalized services.
Portable
You can even access your account outside your vehicle. Just
use the number on your phone's call history. Traffic and
Directions features do not function properly but information
services and the 411 connect and text message features are
available.
SYNC™ APPLINK ™
SYNC Mobile Apps
Note: You must pair and connect your
smartphone to SYNC to access AppLink.
Note: iPhone users need to connect the
phone to the USB port in order to start the
application. Note:
The AppLink feature is not available
if your vehicle is equipped with the MyFord
Touch system.
Note: Depending on your display type, you
can access AppLink from the media menu,
the phone menu, or by using voice
commands. Once an app is running through
AppLink, you can control main features of
the app through voice commands and
steering wheel controls.
344
Flex (), enUSA, First Printing SYNC™ (If Equipped)
Page 348 of 417
To Access Using the Phone Menu
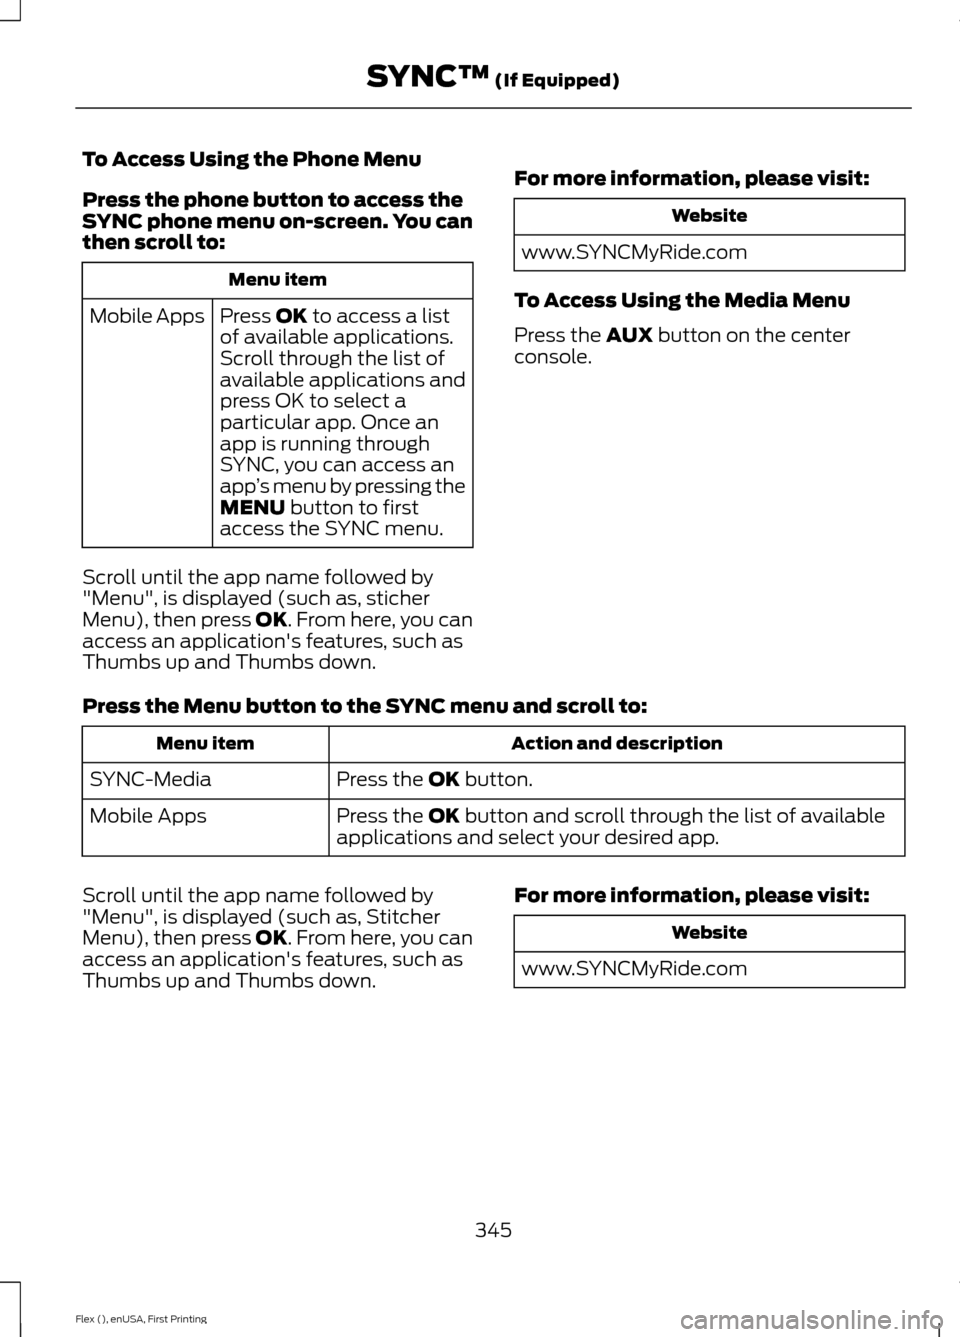
Press the phone button to access the
SYNC phone menu on-screen. You can
then scroll to:
Menu item
Press OK to access a list
of available applications.
Mobile Apps
Scroll through the list of
available applications and
press OK to select a
particular app. Once an
app is running through
SYNC, you can access an
app’s menu by pressing the
MENU
button to first
access the SYNC menu.
Scroll until the app name followed by
"Menu", is displayed (such as, sticher
Menu), then press
OK. From here, you can
access an application's features, such as
Thumbs up and Thumbs down. For more information, please visit: Website
www.SYNCMyRide.com
To Access Using the Media Menu
Press the
AUX button on the center
console.
Press the Menu button to the SYNC menu and scroll to: Action and description
Menu item
Press the
OK button.
SYNC-Media
Press the
OK button and scroll through the list of available
applications and select your desired app.
Mobile Apps
Scroll until the app name followed by
"Menu", is displayed (such as, Stitcher
Menu), then press
OK. From here, you can
access an application's features, such as
Thumbs up and Thumbs down. For more information, please visit: Website
www.SYNCMyRide.com
345
Flex (), enUSA, First Printing SYNC™
(If Equipped)
Page 350 of 417
To Connect Using the System Menu
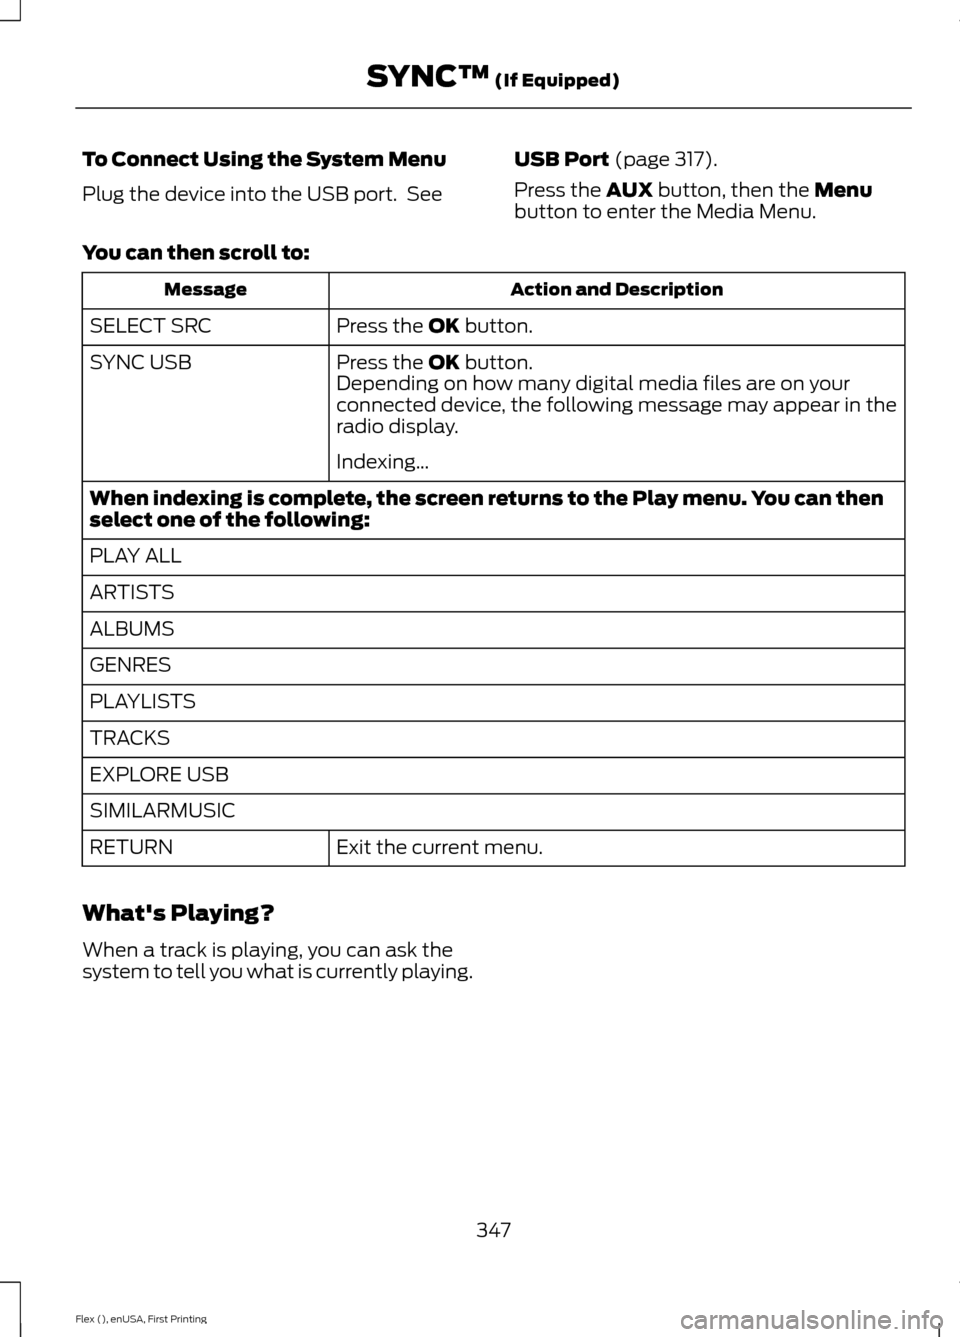
Plug the device into the USB port. See
USB Port (page 317).
Press the
AUX button, then the Menu
button to enter the Media Menu.
You can then scroll to: Action and Description
Message
Press the
OK button.
SELECT SRC
Press the
OK button.
SYNC USB
Depending on how many digital media files are on your
connected device, the following message may appear in the
radio display.
Indexing\b
When indexing is complete, the screen returns to the Play menu. You can then
select one of the following:
PLAY ALL
ARTISTS
ALBUMS
GENRES
PLAYLISTS
TRACKS
EXPLORE USB
SIMILARMUSIC Exit the current menu.
RETURN
What's Playing?
When a track is playing, you can ask the
system to tell you what is currently playing.
347
Flex (), enUSA, First Printing SYNC™
(If Equipped)
Page 354 of 417
Action and Description
Message
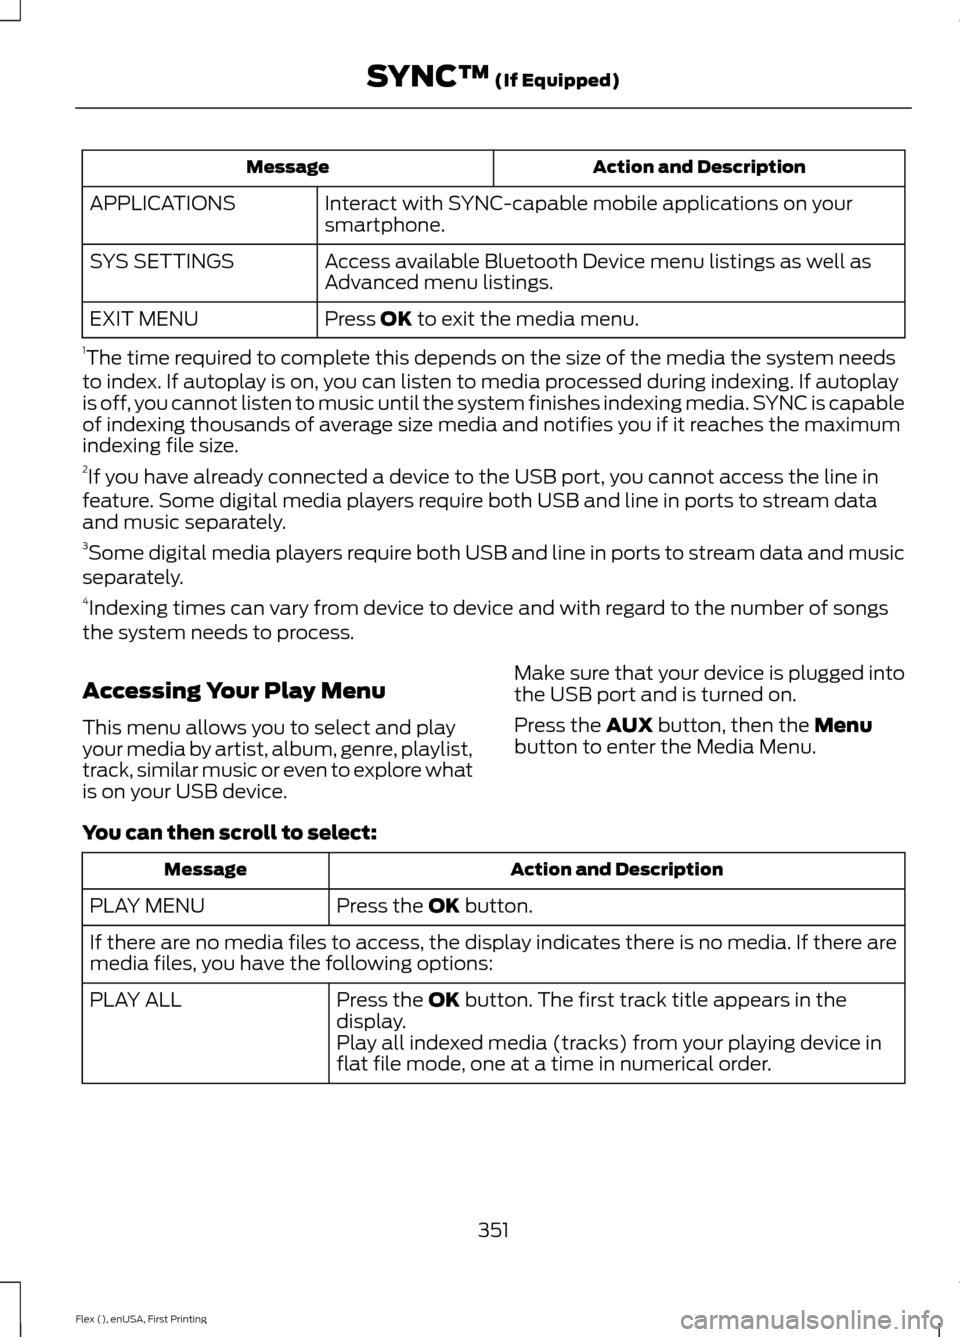
Interact with SYNC-capable mobile applications on your
smartphone.
APPLICATIONS
Access available Bluetooth Device menu listings as well as
Advanced menu listings.
SYS SETTINGS
Press OK to exit the media menu.
EXIT MENU
1 The time required to complete this depends on the size of the media the system needs
to index. If autoplay is on, you can listen to media processed during indexing. If autoplay
is off, you cannot listen to music until the system finishes indexing media. SYNC is capable
of indexing thousands of average size media and notifies you if it reaches the maximum
indexing file size.
2 If you have already connected a device to the USB port, you cannot access the line in
feature. Some digital media players require both USB and line in ports to stream data
and music separately.
3 Some digital media players require both USB and line in ports to stream data and music
separately.
4 Indexing times can vary from device to device and with regard to the number of songs
the system needs to process.
Accessing Your Play Menu
This menu allows you to select and play
your media by artist, album, genre, playlist,
track, similar music or even to explore what
is on your USB device. Make sure that your device is plugged into
the USB port and is turned on.
Press the
AUX button, then the Menu
button to enter the Media Menu.
You can then scroll to select: Action and Description
Message
Press the
OK button.
PLAY MENU
If there are no media files to access, the display indicates there is no media. If there are
media files, you have the following options:
Press the
OK button. The first track title appears in the
display.
PLAY ALL
Play all indexed media (tracks) from your playing device in
flat file mode, one at a time in numerical order.
351
Flex (), enUSA, First Printing SYNC™
(If Equipped)
Page 357 of 417
Action and Description
Message
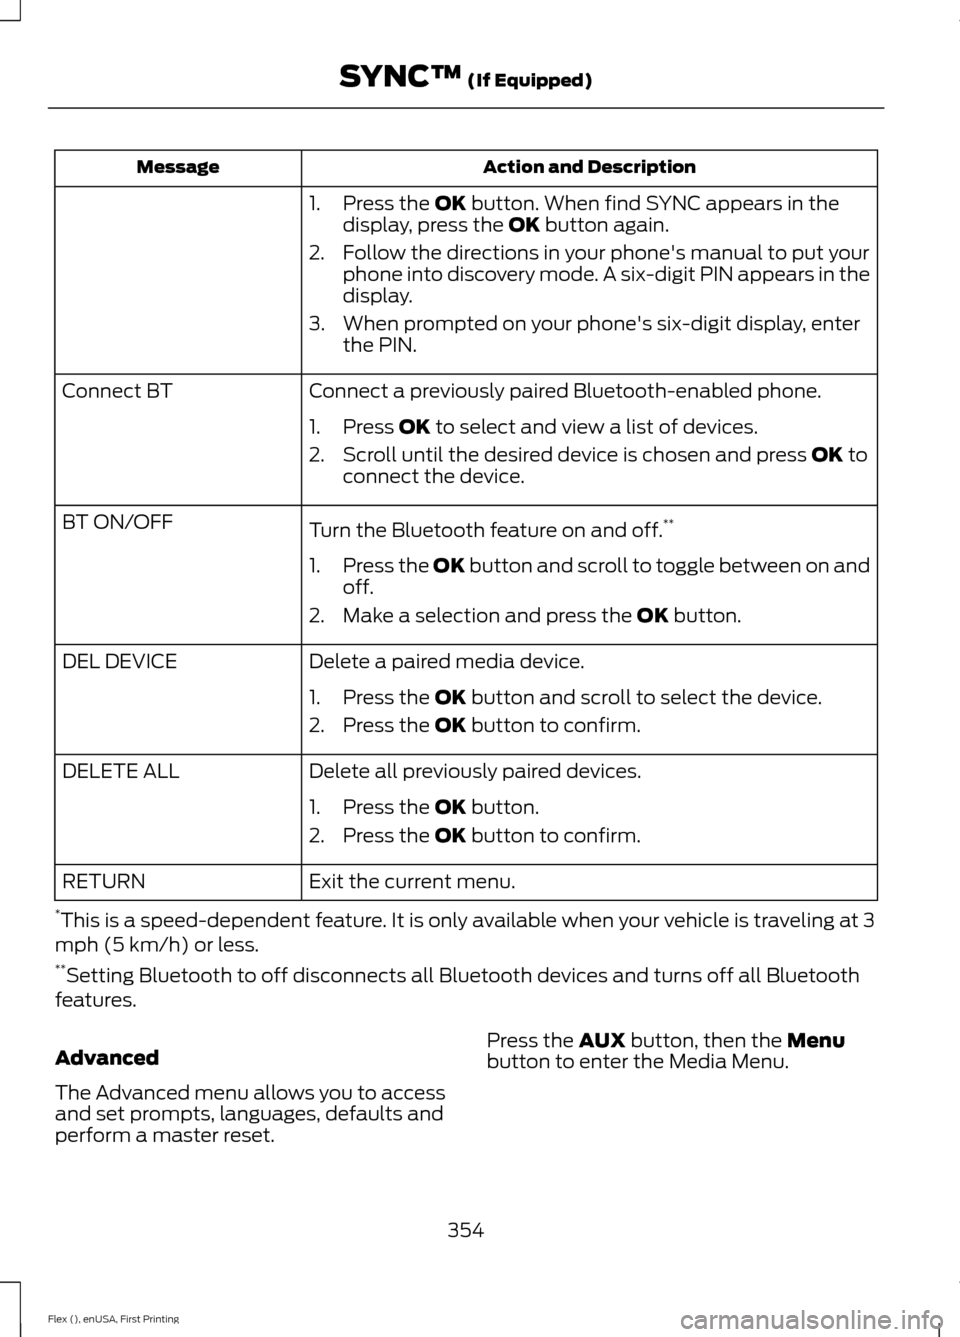
1. Press the OK button. When find SYNC appears in the
display, press the OK button again.
2. Follow the directions in your phone's manual to put your phone into discovery mode. A six-digit PIN appears in the
display.
3. When prompted on your phone's six-digit display, enter the PIN.
Connect a previously paired Bluetooth-enabled phone.
Connect BT
1. Press
OK to select and view a list of devices.
2. Scroll until the desired device is chosen and press
OK to
connect the device.
Turn the Bluetooth feature on and off. **
BT ON/OFF
1.Press the OK button and scroll to toggle between on and
off.
2. Make a selection and press the
OK button.
Delete a paired media device.
DEL DEVICE
1. Press the
OK button and scroll to select the device.
2. Press the
OK button to confirm.
Delete all previously paired devices.
DELETE ALL
1. Press the
OK button.
2. Press the
OK button to confirm.
Exit the current menu.
RETURN
* This is a speed-dependent feature. It is only available when your vehicle is traveling at 3
mph (5 km/h) or less.
** Setting Bluetooth to off disconnects all Bluetooth devices and turns off all Bluetooth
features.
Advanced
The Advanced menu allows you to access
and set prompts, languages, defaults and
perform a master reset. Press the
AUX button, then the Menu
button to enter the Media Menu.
354
Flex (), enUSA, First Printing SYNC™
(If Equipped)
Page 358 of 417
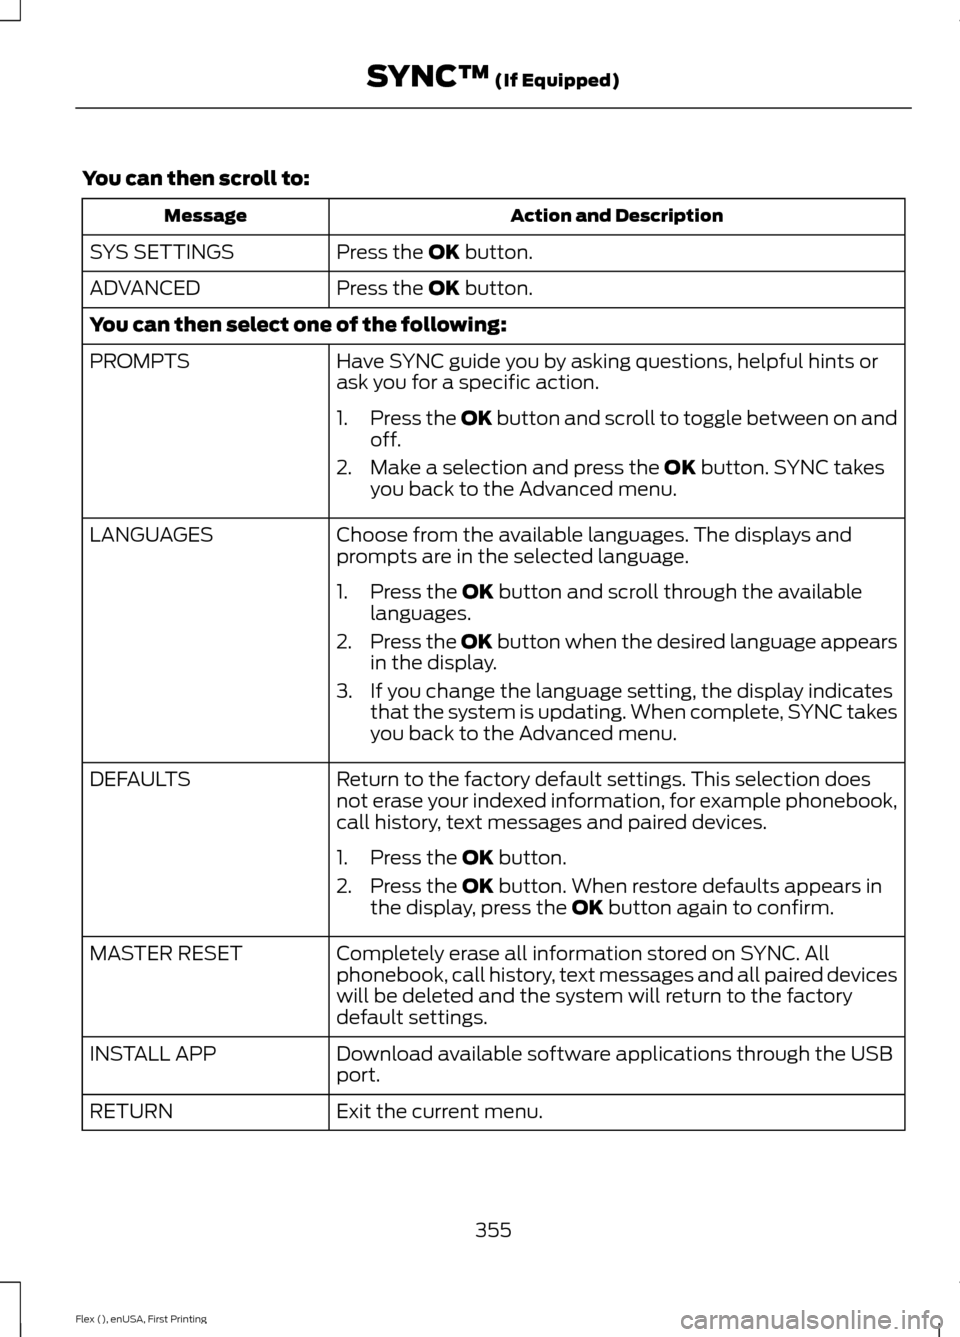
You can then scroll to:
Action and Description
Message
Press the OK button.
SYS SETTINGS
Press the
OK button.
ADVANCED
You can then select one of the following:
Have SYNC guide you by asking questions, helpful hints or
ask you for a specific action.
PROMPTS
1.Press the OK button and scroll to toggle between on and
off.
2. Make a selection and press the
OK button. SYNC takes
you back to the Advanced menu.
Choose from the available languages. The displays and
prompts are in the selected language.
LANGUAGES
1. Press the
OK button and scroll through the available
languages.
2. Press the OK button when the desired language appears
in the display.
3. If you change the language setting, the display indicates that the system is updating. When complete, SYNC takes
you back to the Advanced menu.
Return to the factory default settings. This selection does
not erase your indexed information, for example phonebook,
call history, text messages and paired devices.
DEFAULTS
1. Press the
OK button.
2. Press the
OK button. When restore defaults appears in
the display, press the OK button again to confirm.
Completely erase all information stored on SYNC. All
phonebook, call history, text messages and all paired devices
will be deleted and the system will return to the factory
default settings.
MASTER RESET
Download available software applications through the USB
port.
INSTALL APP
Exit the current menu.
RETURN
355
Flex (), enUSA, First Printing SYNC™
(If Equipped)
Page 372 of 417
GENERAL MAINTENANCE
INFORMATION
Why Maintain Your Vehicle?
Carefully following the maintenance
schedule helps protect against major repair
expenses resulting from neglect or
inadequate maintenance and may help to
increase the value of your vehicle when
you sell or trade it. Keep all receipts for
completed maintenance with your vehicle.
We have established regular maintenance
intervals for your vehicle based upon
rigorous testing. It is important that you
have your vehicle serviced at the proper
times. These intervals serve two purposes;
one is to maintain the reliability of your
vehicle and the second is to keep your cost
of owning your vehicle down.
It is your responsibility to have all
scheduled maintenance performed and to
make sure that the materials used meet
the specifications identified in this owner's
manual. See Capacities and
Specifications (page 297).
Failure to perform scheduled maintenance
invalidates warranty coverage on parts
affected by the lack of maintenance.
Why Maintain Your Vehicle at Your
Dealership?
Factory-Trained Technicians
Service technicians participate in extensive
factory-sponsored certification training to
help them become experts on the
operation of your vehicle. Ask your
dealership about the training and
certification their technicians have
received. Genuine Ford and Motorcraft®
Replacement Parts
Dealerships stock Ford, Motorcraft and
Ford-authorized branded re-manufactured
replacement parts. These parts meet or
exceed our specifications. Parts installed
at your dealership carry a nationwide
24-month or unlimited mile (kilometer)
parts and labor limited warranty.
If you do not use Ford authorized parts they
may not meet our specifications and
depending on the part, it could affect
emissions compliance.
Convenience
Many dealerships have extended evening
and Saturday hours to make your service
visit more convenient and they offer one
stop shopping. They can perform any
services that are required on your vehicle,
from general maintenance to collision
repairs.
Note:
Not all dealers have extended hours
or body shops. Please contact your dealer
for details.
Protecting Your Investment
Maintenance is an investment that pays
dividends in the form of improved
reliability, durability and resale value. To
maintain the proper performance of your
vehicle and its emission control systems,
make sure you have scheduled
maintenance performed at the designated
intervals.
Your vehicle is equipped with the
Intelligent Oil-Life Monitor system, which
displays a message in the information
display at the proper oil change interval.
This interval may be up to one year or
10000 miles (16000 kilometers).
369
Flex (), enUSA, First Printing Scheduled Maintenance
Page 373 of 417
When the oil change message appears in
the information display, it is time for an oil
change. Make sure you perform the oil
change within two weeks or 500 miles
(800 kilometers) of the message
appearing. Make sure you reset the
Intelligent Oil-Life Monitor after each oil
change. See Oil Change Indicator Reset
(page 247).
If your information display resets
prematurely or becomes inoperative, you
should perform the oil change interval at
six months or 5000 miles (8000
kilometers) from your last oil change.
Never exceed one year or 10000 miles
(16000 kilometers) between oil change
intervals.
Your vehicle is very sophisticated and built
with multiple, complex, performance
systems. Every manufacturer develops
these systems using different
specifications and performance features.
That is why it is important to rely upon your
dealership to properly diagnose and repair
your vehicle.
Ford Motor Company has recommended
maintenance intervals for various parts
and component systems based upon
engineering testing. Ford Motor Company
relies upon this testing to determine the
most appropriate mileage for replacement
of oils and fluids to protect your vehicle at
the lowest overall cost to you and
recommends against maintenance
schedules that deviate from the scheduled
maintenance information.
We strongly recommend the use of only
genuine Ford, Motorcraft or
Ford-authorized re-manufactured
replacement parts engineered for your
vehicle. Additives and Chemicals
This owner's manual and the Ford
Workshop Manual list the recommended
additives and chemicals for your vehicle.
We do not recommend using chemicals or
additives not approved by us as part of
your vehicle
’s normal maintenance. Please
consult your warranty information.
Oils, Fluids and Flushing
In many cases, fluid discoloration is a
normal operating characteristic and, by
itself, does not necessarily indicate a
concern or that the fluid needs to be
changed. However, a qualified expert, such
as the factory-trained technicians at your
dealership, should inspect discolored fluids
that also show signs of overheating or
foreign material contamination
immediately.
Make sure to change your vehicle ’s oils and
fluids at the specified intervals or in
conjunction with a repair. Flushing is a
viable way to change fluid for many vehicle
sub-systems during scheduled
maintenance. It is critical that systems are
flushed only with new fluid that is the same
as that required to fill and operate the
system or using a Ford-approved flushing
chemical.
Owner Checks and Services
Make sure you perform the following basic
maintenance checks and inspections every
month or at six-month intervals.
370
Flex (), enUSA, First Printing Scheduled Maintenance
Page 375 of 417
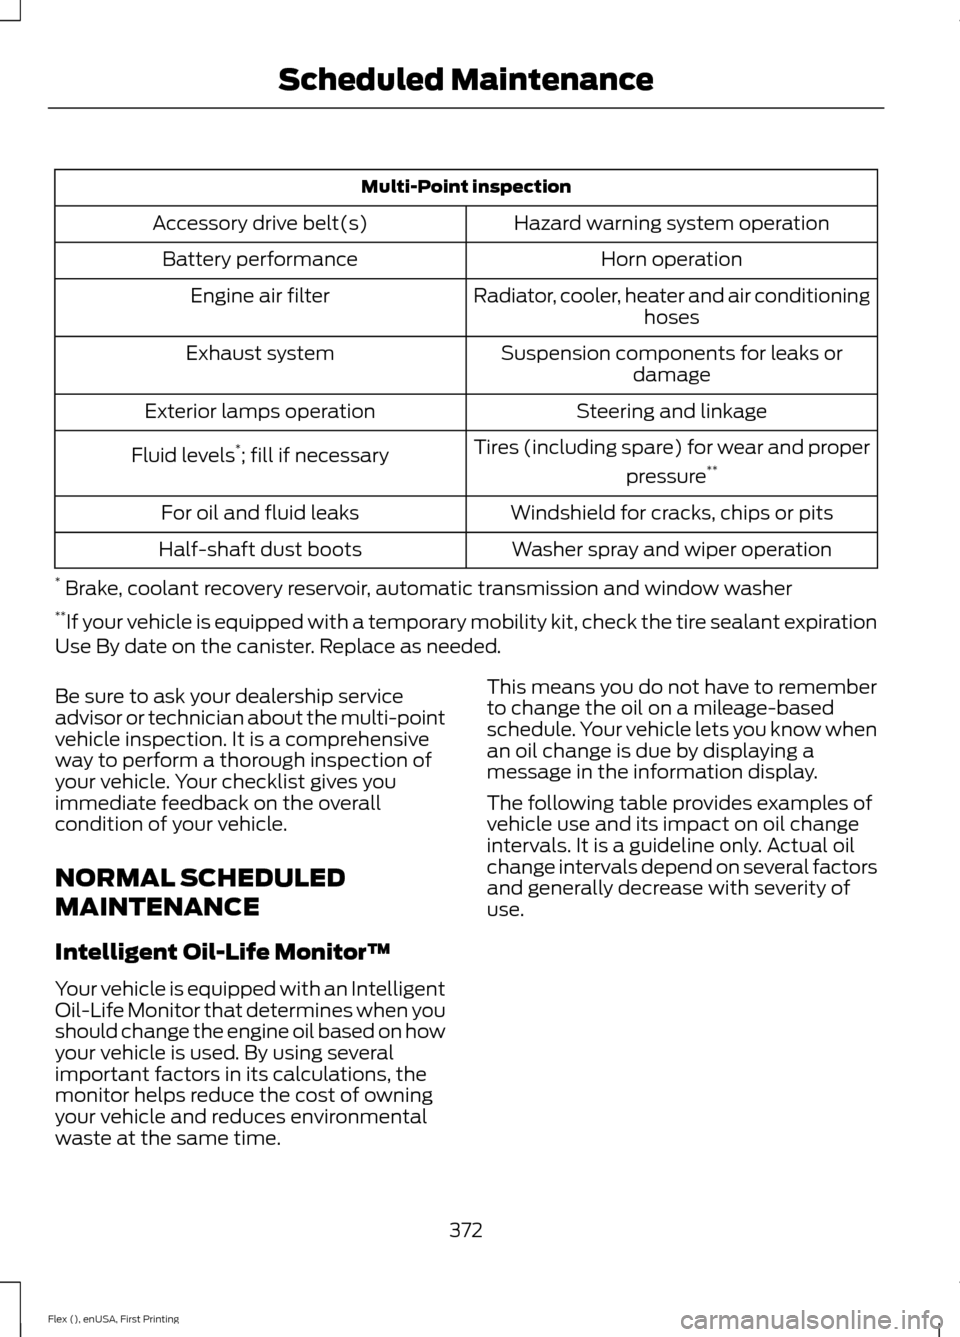
Multi-Point inspection
Hazard warning system operation
Accessory drive belt(s)
Horn operation
Battery performance
Radiator, cooler, heater and air conditioninghoses
Engine air filter
Suspension components for leaks ordamage
Exhaust system
Steering and linkage
Exterior lamps operation
Tires (including spare) for wear and properpressure**
Fluid levels *
; fill if necessary
Windshield for cracks, chips or pits
For oil and fluid leaks
Washer spray and wiper operation
Half-shaft dust boots
* Brake, coolant recovery reservoir, automatic transmission and window washer
** If your vehicle is equipped with a temporary mobility kit, check the tire sealant expiration
Use By date on the canister. Replace as needed.
Be sure to ask your dealership service
advisor or technician about the multi-point
vehicle inspection. It is a comprehensive
way to perform a thorough inspection of
your vehicle. Your checklist gives you
immediate feedback on the overall
condition of your vehicle.
NORMAL SCHEDULED
MAINTENANCE
Intelligent Oil-Life Monitor™
Your vehicle is equipped with an Intelligent
Oil-Life Monitor that determines when you
should change the engine oil based on how
your vehicle is used. By using several
important factors in its calculations, the
monitor helps reduce the cost of owning
your vehicle and reduces environmental
waste at the same time. This means you do not have to remember
to change the oil on a mileage-based
schedule. Your vehicle lets you know when
an oil change is due by displaying a
message in the information display.
The following table provides examples of
vehicle use and its impact on oil change
intervals. It is a guideline only. Actual oil
change intervals depend on several factors
and generally decrease with severity of
use.
372
Flex (), enUSA, First Printing Scheduled Maintenance