check engine FORD FLEX 2017 1.G Owner's Guide
[x] Cancel search | Manufacturer: FORD, Model Year: 2017, Model line: FLEX, Model: FORD FLEX 2017 1.GPages: 496, PDF Size: 5.92 MB
Page 256 of 496
2. If you are a member of a roadside
assistance program, we recommend
that you contact your roadside
assistance service provider.
3. If this is not possible, wait a short period for the engine to cool.
4. Check the coolant level. If the coolant level is at or below the minimum mark,
add prediluted coolant immediately.
5. When the engine temperature cools, you can re-start the engine. Have your
vehicle checked as soon as possible to
minimize engine damage.
Note: Driving your vehicle without repair
increases the chance of engine damage.
Engine Coolant Temperature
Management (If Equipped) WARNING
To reduce the risk of crash and injury,
be prepared that the vehicle speed
may reduce and the vehicle may not
be able to accelerate with full power until
the coolant temperature reduces. If you tow a trailer with your vehicle, the
engine may temporarily reach a higher
temperature during severe operating
conditions, for example ascending a long
or steep grade in high ambient
temperatures.
At this time, you may notice the coolant
temperature gauge moves toward the red
zone and a message may appear in the
information display. You may notice a reduction in vehicle
speed caused by reduced engine power in
order to manage the engine coolant
temperature. Your vehicle may enter this
mode if certain high-temperature and
high-load conditions take place. The
amount of speed reduction depends on
vehicle loading, grade and ambient
temperature. If this occurs, there is no need
to pull off the road. You can continue to
drive your vehicle.
The air conditioning may automatically
turn on and off during severe operating
conditions to protect the engine from
overheating. When the coolant
temperature decreases to the normal
operating temperature, the air conditioning
turns on.
If the coolant temperature gauge moves
fully into the red zone, or if the coolant
temperature warning or service engine
soon messages appear in your information
display, do the following:
1. Pull off the road as soon as safely
possible and shift the transmission into
park
(P).
2. Leave the engine running until the coolant temperature gauge needle
returns to the normal position. After
several minutes, if the temperature
does not drop, follow the remaining
steps.
3. Switch the engine off and wait for it to
cool. Check the coolant level.
4. If the coolant level is at or below the minimum mark, add prediluted coolant
immediately.
5. If the coolant level is normal, restart the engine and continue.
253
Flex (), enUSA, First Printing Maintenance
Page 257 of 496
AUTOMATIC TRANSMISSION
FLUID CHECK
WARNING
Do not use supplemental
transmission fluid additives,
treatments or cleaning agents. The
use of these materials may affect
transmission operation and result in
damage to internal transmission
components. The transmission does not consume fluid.
However, if the transmission slips or shifts
slowly you should check the fluid level. If
you notice a sign of leaking fluid, contact
an authorized dealer.
Checking the Transmission Fluid
Level
WARNING
The dipstick and surrounding
components are hot. Use gloves
when moving components and
checking the transmission fluid level.
Failure to follow this warning could result
in serious personal injury. Only check the transmission fluid level
when the engine is at normal operating
temperature 179°F (82°C)-199°F (93°C).
Normal operating temperature is reached
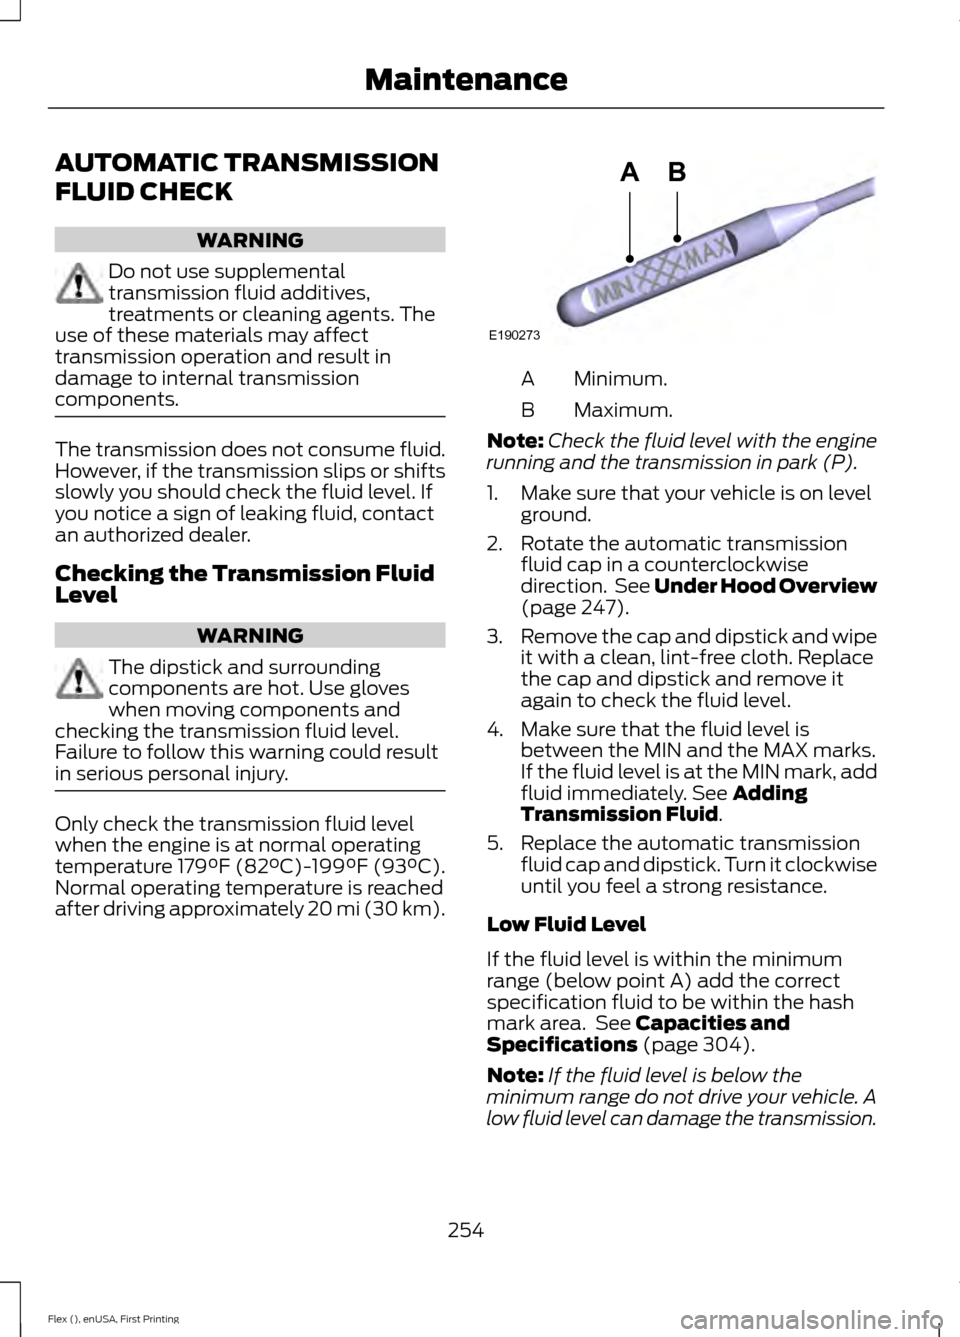
after driving approximately 20 mi (30 km). Minimum.
A
Maximum.
B
Note: Check the fluid level with the engine
running and the transmission in park (P).
1. Make sure that your vehicle is on level ground.
2. Rotate the automatic transmission fluid cap in a counterclockwise
direction. See Under Hood Overview
(page 247).
3. Remove the cap and dipstick and wipe
it with a clean, lint-free cloth. Replace
the cap and dipstick and remove it
again to check the fluid level.
4. Make sure that the fluid level is between the MIN and the MAX marks.
If the fluid level is at the MIN mark, add
fluid immediately. See
Adding
Transmission Fluid.
5. Replace the automatic transmission fluid cap and dipstick. Turn it clockwise
until you feel a strong resistance.
Low Fluid Level
If the fluid level is within the minimum
range (below point A) add the correct
specification fluid to be within the hash
mark area. See
Capacities and
Specifications (page 304).
Note: If the fluid level is below the
minimum range do not drive your vehicle. A
low fluid level can damage the transmission.
254
Flex (), enUSA, First Printing MaintenanceE190273
AB
Page 258 of 496
Correct Fluid Level
If the fluid level is within the hash mark
area (between points A and B) do not add
any fluid.
High Fluid Level
If the fluid level is above the maximum
range (above point B) fluid may need to
be removed. High fluid levels may be
caused by a overheating condition. If you
have operated your vehicle at high speeds,
towing a trailer or in city traffic during hot
weather, allow your vehicle to cool for a
minimum of 30 minutes before rechecking
the level.
Note:
An overfill condition can damage the
transmission.
Adding Transmission Fluid *
1. Rotate the automatic transmission fluid cap in a counterclockwise
direction.
2. Remove the cap and dipstick and wipe
it with a clean, lint-free cloth.
3. Add fluid that meets the Ford specifications. See Capacities and
Specifications (page 304). Pour the
fluid directly into the automatic
transmission fluid cap and dipstick
hole.
4. Replace the cap and dipstick and remove it again to check the fluid level.
5. Make sure that the fluid level is between the MIN and the MAX marks.
6. Replace the automatic transmission fluid cap and dipstick. Turn it clockwise
until you feel a strong resistance.
* Vehicles With EcoBoost Engine WARNING
Do not run the engine with the air
filter disconnected. 1. Loosen the clamp holding the air filter
assembly to the rubber hose.
2. Remove the air filter assembly securing
bolts.
3. Lift the air filter assembly to disengage
the locating pins.
4. Rotate the air filter assembly slightly in a counterclockwise direction.
5. Check the transmission fluid level.
6. Install the air filter assembly in reverse
order. Tighten the air filter assembly
securing bolts until you feel a strong
resistance.
BRAKE FLUID CHECK WARNINGS
Do not use any fluid other than the
recommended brake fluid as this will
reduce brake efficiency. Use of
incorrect fluid could result in the loss of
vehicle control, serious personal injury or
death. Only use brake fluid from a sealed
container. Contamination with dirt,
water, petroleum products or other
materials may result in brake system
damage or failure. Failure to adhere to this
warning could result in the loss of vehicle
control, serious personal injury or death. Do not allow the fluid to touch your
skin or eyes. If this happens, rinse the
affected areas immediately with
plenty of water and contact your physician. A fluid level between the
MAX and
MIN lines is within the normal
operating range and there is no need
to add fluid. A fluid level not in the normal
operating range could compromise the
performance of the system. Have your
vehicle checked immediately. 255
Flex (), enUSA, First Printing Maintenance
Page 261 of 496
7. While the engine is running, press the
brake pedal and shift into neutral (N).
8. Allow the engine to run for at least one
minute by pressing on the accelerator
pedal.
9. Drive the vehicle at least 12 mi (20 km)
to completely relearn the idle and fuel
trim strategy.
Note: If you do not allow the engine to
relearn the idle and fuel trim strategy, the
idle quality of your vehicle may be adversely
affected until the engine computer
eventually relearns the idle trim and fuel
trim strategy.
Make sure that you dispose of old batteries
in an environmentally friendly way. Seek
advice from your local authority about
recycling old batteries.
CHECKING THE WIPER
BLADES Run the tip of your fingers over the edge of
the blade to check for roughness.
Clean the wiper blades with washer fluid
or water applied with a soft sponge or
cloth.
CHANGING THE WIPER
BLADES
You can improve poor wiper quality by
cleaning the wiper blades and the
windshield. Replace the wiper blades at least annually
for optimum performance.
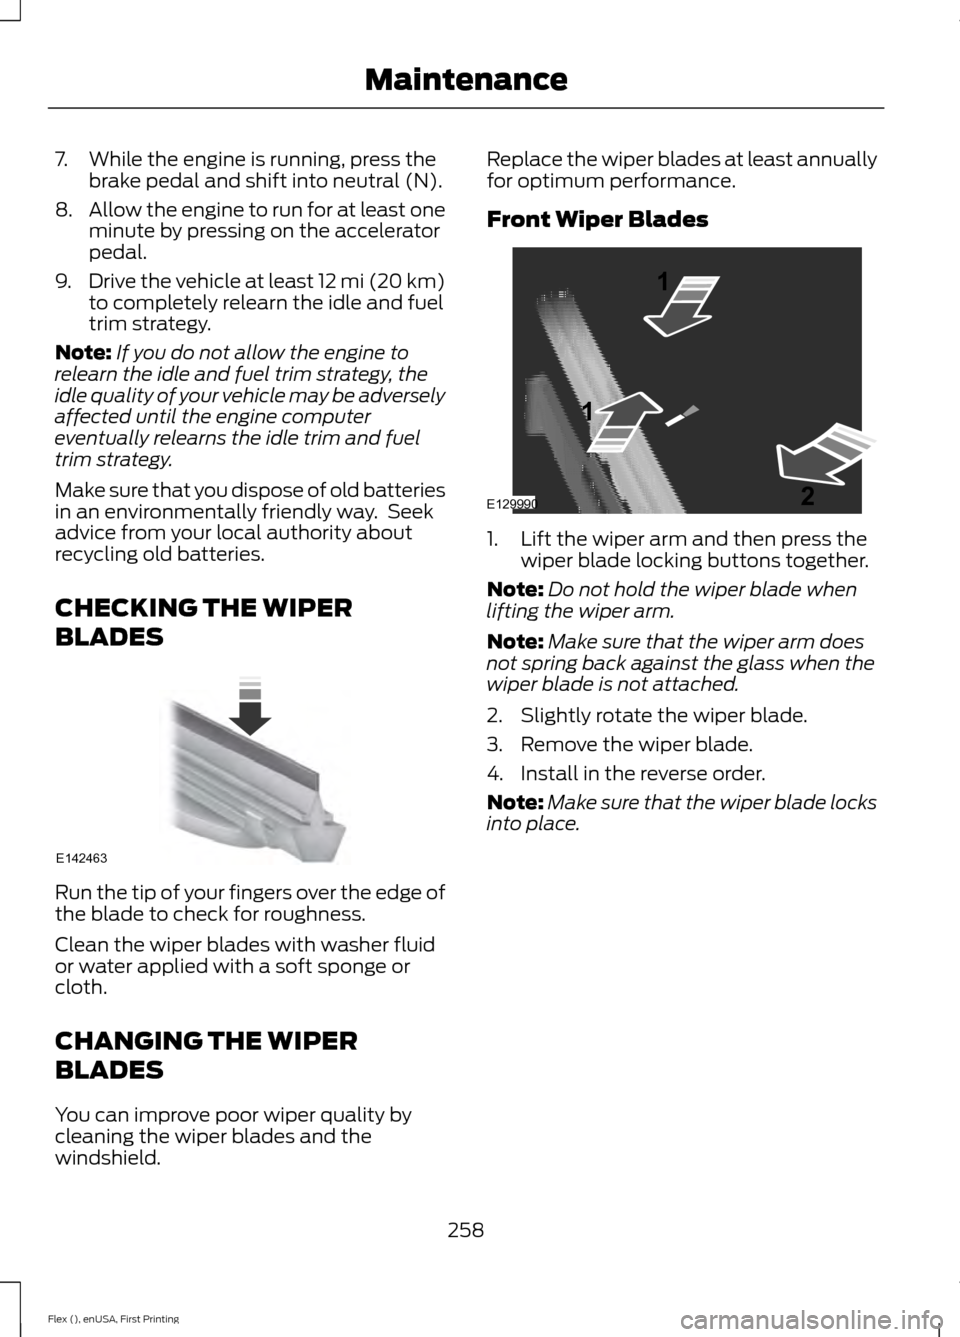
Front Wiper Blades
1. Lift the wiper arm and then press the
wiper blade locking buttons together.
Note: Do not hold the wiper blade when
lifting the wiper arm.
Note: Make sure that the wiper arm does
not spring back against the glass when the
wiper blade is not attached.
2. Slightly rotate the wiper blade.
3. Remove the wiper blade.
4. Install in the reverse order.
Note: Make sure that the wiper blade locks
into place.
258
Flex (), enUSA, First Printing MaintenanceE142463 E129990
1
1 2
Page 275 of 496
•
With your foot on the brake, shift
through all the gears while the engine
is running.
• We recommend that you change the
engine oil before you use your vehicle
again.
Fuel system
• Fill the fuel tank with high-quality fuel
until the first automatic shutoff of the
fuel pump nozzle.
Cooling system
• Protect against freezing temperatures.
• When removing your vehicle from
storage, check coolant fluid level.
Confirm that there are no cooling
system leaks and that fluid is at the
recommended level.
Battery
• Check and recharge as necessary. Keep
connections clean.
• If storing your vehicle for more than 30
days without recharging the battery,
we recommend that you disconnect
the battery cables to maintain battery
charge for quick starting.
Note: It is necessary to reset memory
features if battery cables are disconnected.
Brakes
• Make sure the brakes and parking brake
release fully.
Tires
• Maintain recommended air pressure. Miscellaneous
•
Make sure all linkages, cables, levers
and pins under your vehicle are covered
with grease to prevent rust.
• Move vehicles at least 25 ft (7.5 m)
every 15 days to lubricate working parts
and prevent corrosion.
Removing Vehicle From Storage
When your vehicle is ready to come out of
storage, do the following:
• Wash your vehicle to remove any dirt
or grease film build-up on window
surfaces.
• Check windshield wipers for any
deterioration.
• Check under the hood for any foreign
material that may have collected
during storage such as mice or squirrel
nests.
• Check the exhaust for any foreign
material that may have collected
during storage.
• Check tire pressures and set tire
inflation per the Tire Label.
• Check brake pedal operation. Drive
your vehicle
15 ft (4.5 m) back and
forth to remove rust build-up.
• Check fluid levels (including coolant,
oil and gas) to make sure there are no
leaks, and fluids are at recommended
levels.
• If you remove the battery, clean the
battery cable ends and check for
damage.
Contact an authorized dealer if you have
any concerns or issues.
272
Flex (), enUSA, First Printing Vehicle Care
Page 305 of 496
VEHICLE IDENTIFICATION
NUMBER
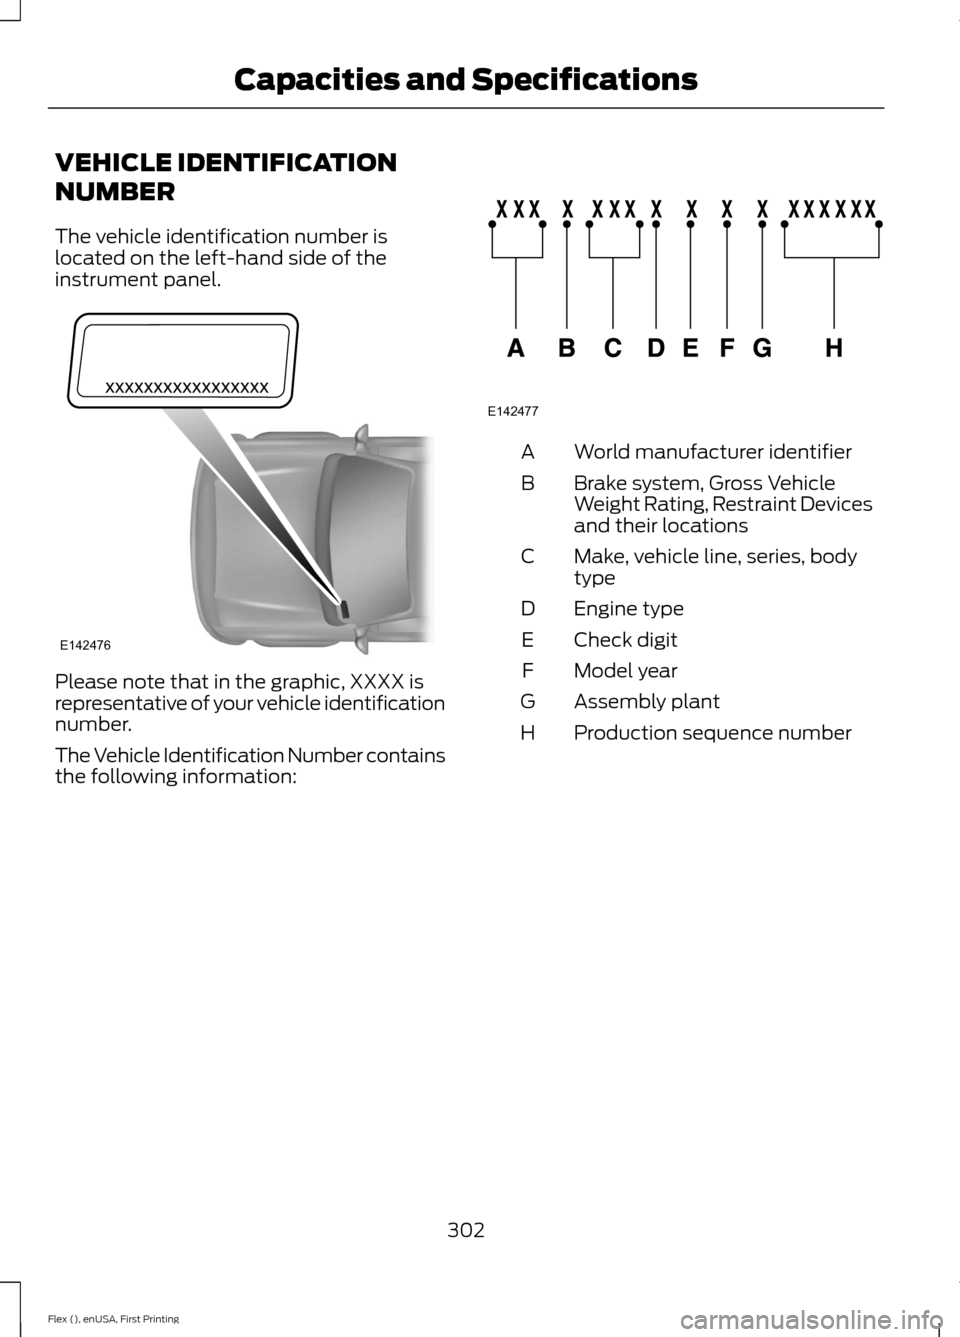
The vehicle identification number is
located on the left-hand side of the
instrument panel.
Please note that in the graphic, XXXX is
representative of your vehicle identification
number.
The Vehicle Identification Number contains
the following information: World manufacturer identifier
A
Brake system, Gross Vehicle
Weight Rating, Restraint Devices
and their locations
B
Make, vehicle line, series, body
type
C
Engine type
D
Check digit
E
Model year
F
Assembly plant
G
Production sequence number
H
302
Flex (), enUSA, First Printing Capacities and SpecificationsE142476 E142477
Page 426 of 496

Website
owner.ford.com Website
www.syncmyride.ca
www.syncmaroute.ca Cell phone issues
Possible solution
Possible cause
Issue
Refer to your device's manual about audio
adjustments.
The audio control
settings on your cell
phone may be affecting
SYNC 3 performance.
There is back-
ground noise
during a phone
call.
Try switching your cell phone off, resetting
it or removing the battery, then try again.
Possible cell phone
malfunction.
During a call, I
can hear the
other person
but they cannot
hear me.
Make sure that the microphone for SYNC
3 is not set to off. Look for the microphone
icon on the phone screen.
To restart your system, shut down the
engine, open and close the door, and then
lock the door and wait for 2-3 minutes.
Make sure that your SYNC 3 screen is black
and the lighted USB port is off.
The system may need to
be restarted.
During a call, I
cannot hear the
other person
and they cannot
hear me.
Check your cell phone's compatibility.
This is a cell phone-
dependent feature.
SYNC 3 is not
able to down-
load my phone-
book. Make sure you allow SYNC 3 to retrieve
contacts from your phone. Refer to your
cell manual.
Possible cell phone
malfunction. You must switch on your cell phone and
the automatic phonebook download
feature on SYNC 3.
Try switching your cell phone off, resetting
it or removing the battery, then try again.
Make sure you allow SYNC 3 to retrieve
contacts from your phone. Refer to your
cell manual.
Limitations on your cell
phone's capability.
The system
says "Phone-
book down-
loaded" but my
SYNC 3 phone-
book is empty or
is missing
contacts.
If the missing contacts are stored on your
SIM card, move them to your cell phone's
memory.
423
Flex (), enUSA, First Printing SYNC™ 3
Page 441 of 496
Less Cost to Properly Maintain Your
Vehicle
Ford Protect Extended Service Plan also
offers a Premium Maintenance Plan that
covers all scheduled maintenance, and
selected wear items. The coverage is
prepaid, so you never have to worry about
the cost of your vehicle
’s maintenance.
Covered maintenance includes:
• Windshield wiper blades.
• Spark plugs.
• The clutch disc.
• Brake pads and linings.
• Shock absorbers.
• Struts.
• Engine Belts.
• Engine coolant hoses, clamps and
o-rings.
• Diesel exhaust fluid replenishment.
• Cabin air filter replacement every
20,000 mi (32,000 km) (electric
vehicles only).
Interest Free Finance Options
Just a 10% down payment will provide you
with an affordable, no interest, no fee
payment program allowing you all the
security and benefits Ford Protect
Extended Service Plan has to offer while
paying over time. You are pre-approved
with no credit check or hassles. To learn
more, call our Ford Protect Extended
Service Plan specialists at 800-367-3377.
Ford Protect Extended Service Plan
P.O. Box 321067
Detroit, MI 48232 Ford Protect Extended Service
Plan (CANADA ONLY)
You can get more protection for your
vehicle by purchasing a Ford Protect
Extended Service Plan. Ford Protect
Extended Service Plan is the only service
contract backed by Ford Motor Company
of Canada, Limited. Depending on the plan
you purchase, Ford Protect Extended
Service Plan provides benefits such as:
•
Rental reimbursement.
• Coverage for certain maintenance and
wear items.
• Protection against repair costs after
your New Vehicle Limited Warranty
Coverage expires.
• Roadside Assistance benefits.
There are several Ford Protect Extended
Service Plans available in various time,
distance and deductible combinations.
Each plan is tailored to fit your own driving
needs, including reimbursement for towing
and rental. When you purchase Ford
Protect Extended Service Plan, you receive
added peace-of-mind protection
throughout Canada, the United States and
Mexico, provided by a network of
participating authorized Ford Motor
Company dealers.
Note: Repairs performed outside of
Canada, the United States and Mexico are
not eligible for Ford Protect Extended
Service Plan coverage.
This information is subject to change. For
more information; visit your local Ford of
Canada dealer or www.ford.ca to find the
Ford Protect Extended Service Plan that
is right for you.
438
Flex (), enUSA, First Printing Ford Protect
Page 443 of 496
When the oil change message appears in
the information display, it is time for an oil
change. Make sure you perform the oil
change within two weeks or 500 miles
(800 kilometers) of the message
appearing. Make sure you reset the
Intelligent Oil-Life Monitor after each oil
change. See Oil Change Indicator Reset
(page 249).
If your information display resets
prematurely or becomes inoperative, you
should perform the oil change interval at
six months or 5000 miles (8000
kilometers) from your last oil change.
Never exceed one year or 10000 miles
(16000 kilometers) between oil change
intervals.
Your vehicle is very sophisticated and built
with multiple, complex, performance
systems. Every manufacturer develops
these systems using different
specifications and performance features.
That is why it is important to rely upon your
dealership to properly diagnose and repair
your vehicle.
Ford Motor Company has recommended
maintenance intervals for various parts
and component systems based upon
engineering testing. Ford Motor Company
relies upon this testing to determine the
most appropriate mileage for replacement
of oils and fluids to protect your vehicle at
the lowest overall cost to you and
recommends against maintenance
schedules that deviate from the scheduled
maintenance information.
We strongly recommend the use of only
genuine Ford, Motorcraft or
Ford-authorized re-manufactured
replacement parts engineered for your
vehicle. Additives and Chemicals
This owner's manual and the Ford
Workshop Manual list the recommended
additives and chemicals for your vehicle.
We do not recommend using chemicals or
additives not approved by us as part of
your vehicle
’s normal maintenance. Please
consult your warranty information.
Oils, Fluids and Flushing
In many cases, fluid discoloration is a
normal operating characteristic and, by
itself, does not necessarily indicate a
concern or that the fluid needs to be
changed. However, a qualified expert, such
as the factory-trained technicians at your
dealership, should inspect discolored fluids
that also show signs of overheating or
foreign material contamination
immediately.
Make sure to change your vehicle ’s oils and
fluids at the specified intervals or in
conjunction with a repair. Flushing is a
viable way to change fluid for many vehicle
sub-systems during scheduled
maintenance. It is critical that systems are
flushed only with new fluid that is the same
as that required to fill and operate the
system or using a Ford-approved flushing
chemical.
Owner Checks and Services
Make sure you perform the following basic
maintenance checks and inspections every
month or at six-month intervals.
440
Flex (), enUSA, First Printing Scheduled Maintenance
Page 444 of 496
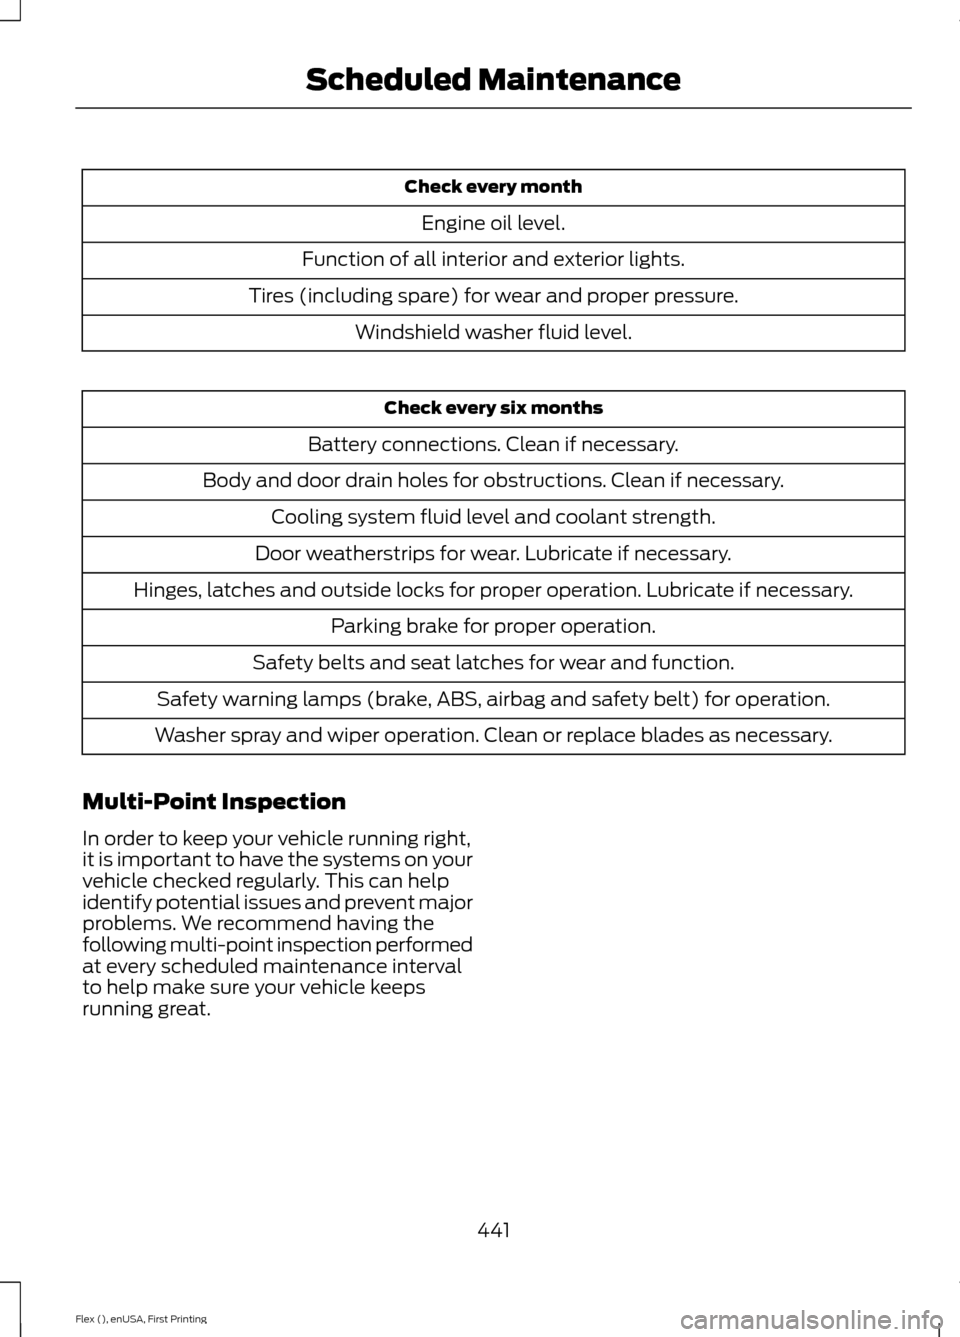
Check every month
Engine oil level.
Function of all interior and exterior lights.
Tires (including spare) for wear and proper pressure. Windshield washer fluid level. Check every six months
Battery connections. Clean if necessary.
Body and door drain holes for obstructions. Clean if necessary. Cooling system fluid level and coolant strength.
Door weatherstrips for wear. Lubricate if necessary.
Hinges, latches and outside locks for proper operation. Lubricate if necessary. Parking brake for proper operation.
Safety belts and seat latches for wear and function.
Safety warning lamps (brake, ABS, airbag and safety belt) for operation.
Washer spray and wiper operation. Clean or replace blades as necessary.
Multi-Point Inspection
In order to keep your vehicle running right,
it is important to have the systems on your
vehicle checked regularly. This can help
identify potential issues and prevent major
problems. We recommend having the
following multi-point inspection performed
at every scheduled maintenance interval
to help make sure your vehicle keeps
running great.
441
Flex (), enUSA, First Printing Scheduled Maintenance