AUX FORD FLEX 2018 Owners Manual
[x] Cancel search | Manufacturer: FORD, Model Year: 2018, Model line: FLEX, Model: FORD FLEX 2018Pages: 508, PDF Size: 6.31 MB
Page 5 of 508
Steering Wheel
Adjusting the Steering Wheel - Vehicles
With: Power Adjustable Steering
Column ..........................................................75
Adjusting the Steering Wheel - Vehicles With: Manual Adjustable Steering
Column ..........................................................
76
Audio Control ..................................................
76
Voice Control ...................................................
77
Cruise Control ..................................................
77
Information Display Control .......................
77
Heated Steering Wheel ...............................
77
Pedals
Adjusting the Pedals ....................................
79
Wipers and Washers
Windshield Wipers .......................................
80
Autowipers ......................................................
80
Windshield Washers .....................................
81
Rear Window Wiper and Washers ...........
81
Lighting
General Information .....................................
82
Lighting Control .............................................
82
Autolamps .......................................................
83
Instrument Lighting Dimmer ....................
84
Headlamp Exit Delay ...................................
84
Daytime Running Lamps ...........................
84
Front Fog Lamps ...........................................
85
Direction Indicators ......................................
85
Interior Lamps ................................................
85
Ambient Lighting ..........................................
86
Windows and Mirrors
Power Windows .............................................
87
Exterior Mirrors ...............................................
88
Interior Mirror ..................................................
90
Sun Visors ........................................................
90
Moonroof .........................................................
90Instrument Cluster
Gauges
..............................................................
92
Warning Lamps and Indicators ................
93
Audible Warnings and Indicators ............
96
Information Displays
General Information .....................................
97
Information Messages ...............................
105
Climate Control
Manual Climate Control .............................
114
Automatic Climate Control - Vehicles With: Premium AM/FM/CD ..................
115
Automatic Climate Control - Vehicles With: Sony Audio System ......................
116
Hints on Controlling the Interior Climate ........................................................................\
..
118
Rear Passenger Climate Controls .........
120
Heated Windows and Mirrors ...................
121
Cabin Air Filter ...............................................
122
Remote Start .................................................
122
Seats
Sitting in the Correct Position .................
123
Head Restraints ............................................
123
Manual Seats ................................................
126
Power Seats ...................................................
126
Memory Function ........................................
128
Rear Seats ......................................................
129
Heated Seats ................................................
136
Climate Controlled Seats ..........................
137
Universal Garage Door Opener
Universal Garage Door Opener ..............
138
Auxiliary Power Points
Auxiliary Power Points ...............................
143
2
Flex (TP3) , enUSA, Edition date: 201801, Second Printing Table of Contents
Page 146 of 508
12 Volt DC Power Point
WARNING
Do not plug optional electrical
accessories into the cigar lighter
socket. Incorrect use of the cigar
lighter can cause damage not covered by
the vehicle warranty, and can result in fire
or serious injury. Note:
When you switch the ignition on, you
can use the socket to power 12 volt
appliances with a maximum current rating
of 15 amps.
If the power supply does not work after you
switch the ignition off, switch the ignition
on.
Note: Do not hang any accessory from the
accessory plug.
Note: Do not use the power point over the
vehicle capacity of 12 volt DC 180 watts or
a fuse may blow.
Note: Always keep the power point caps
closed when not in use.
Do not insert objects other than an
accessory plug into the power point. This
damages the power point and may blow
the fuse.
Run the vehicle for full capacity use of the
power point.
To prevent the battery from running out of
charge:
• Do not use the power point longer than
necessary when the vehicle is not
running.
• Do not leave devices plugged in
overnight or when you park your vehicle
for extended periods. Locations
Power points may be in the following
locations:
•
Inside the center console.
• On the rear of the center console.
• In the cargo area.
• On the passenger side floor panel.
110 Volt AC Power Point (If Equipped) WARNING
Do not keep electrical devices
plugged in the power point whenever
the device is not in use. Do not use
any extension cord with the 110 volt AC
power point, since it will defeat the safety
protection design. Doing so may cause the
power point to overload due to powering
multiple devices that can reach beyond
the 150 watt load limit and could result in
fire or serious injury. Note:
The power point turns off when you
switch the ignition off, or when the battery
voltage drops below 11 volts.
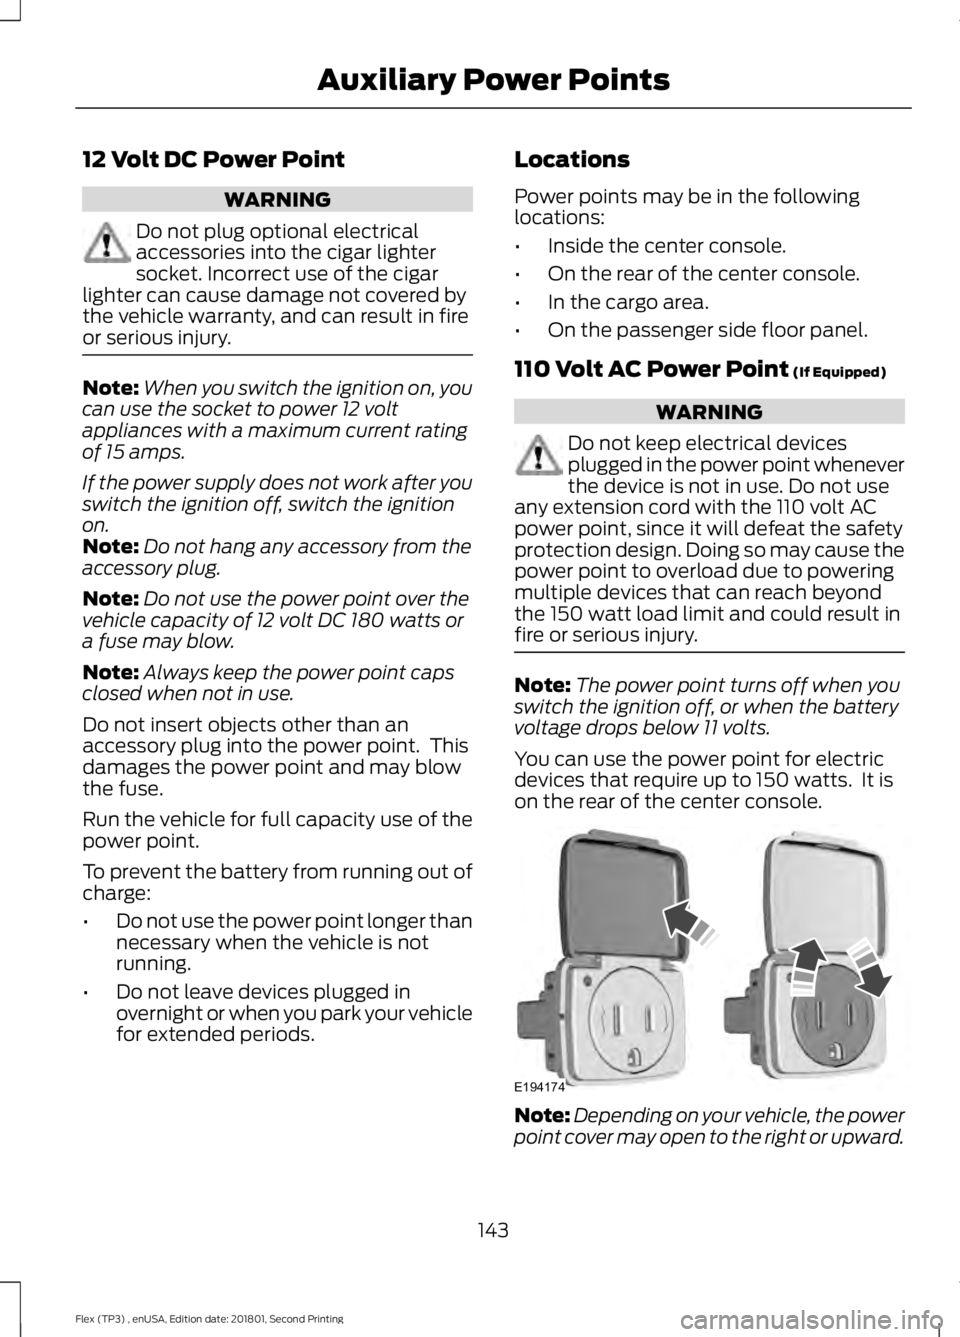
You can use the power point for electric
devices that require up to 150 watts. It is
on the rear of the center console. Note:
Depending on your vehicle, the power
point cover may open to the right or upward.
143
Flex (TP3) , enUSA, Edition date: 201801, Second Printing Auxiliary Power PointsE194174
Page 147 of 508
When the indicator light on the power point
is:
•
On: The power point is working, the
ignition is on and a device is plugged
in.
• Off: The power point is off, the ignition
is off or no device is plugged in.
• Flashing: The power point is in fault
mode.
The power outlet temporarily turns off
power when in fault mode if the device
exceeds the 150 watt limit. Unplug your
device and switch the ignition off. Switch
the ignition back on, but do not plug your
device back in. Let the system cool off and
switch the ignition off to reset the fault
mode. Switch the ignition back on and
make sure the indicator light remains on.
Do not use the power point for certain
electric devices, including:
• Cathode-ray, tube-type televisions.
• Motor loads, such as vacuum cleaners,
electric saws and other electric power
tools or compressor-driven
refrigerators.
• Measuring devices, which process
precise data, such as medical
equipment or measuring equipment.
• Other appliances requiring an
extremely stable power supply such as
microcomputer-controlled electric
blankets or touch-sensor lamps.
144
Flex (TP3) , enUSA, Edition date: 201801, Second Printing Auxiliary Power Points
Page 148 of 508
CENTER CONSOLE
Stow items in the cup holder carefully as
items may become loose during hard
braking, acceleration or crashes, including
hot drinks which may spill.
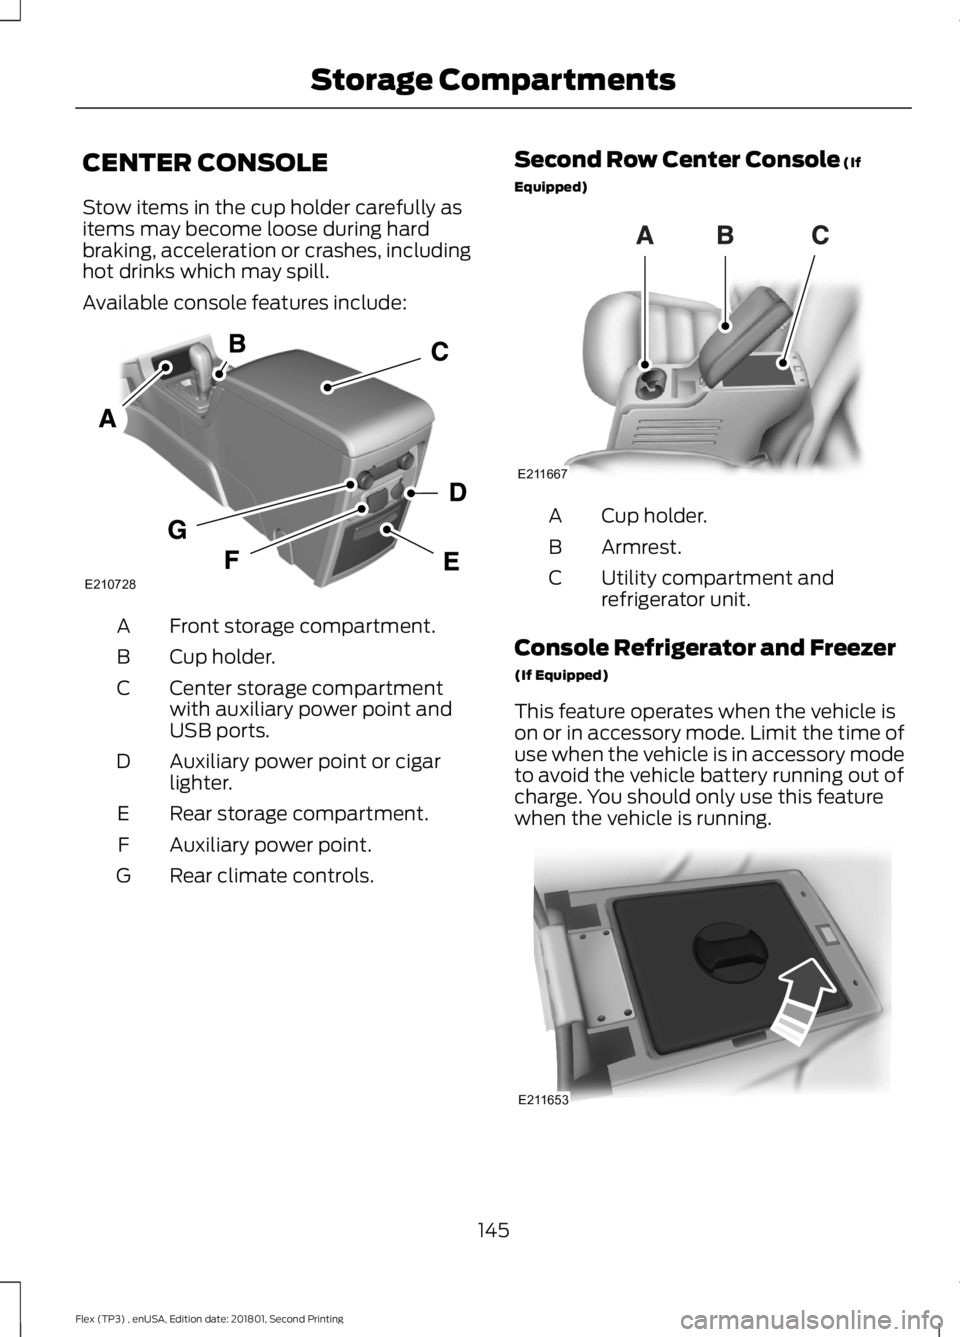
Available console features include:
Front storage compartment.
A
Cup holder.
B
Center storage compartment
with auxiliary power point and
USB ports.
C
Auxiliary power point or cigar
lighter.
D
Rear storage compartment.
E
Auxiliary power point.
F
Rear climate controls.
G Second Row Center Console (If
Equipped) Cup holder.
A
Armrest.
B
Utility compartment and
refrigerator unit.
C
Console Refrigerator and Freezer
(If Equipped)
This feature operates when the vehicle is
on or in accessory mode. Limit the time of
use when the vehicle is in accessory mode
to avoid the vehicle battery running out of
charge. You should only use this feature
when the vehicle is running. 145
Flex (TP3) , enUSA, Edition date: 201801, Second Printing Storage CompartmentsE210728 E211667 E211653
Page 239 of 508

Protected Components
Fuse Amp Rating
Fuse or Relay
Number
Rear window defroster.
40A 1
26
Heated mirrors.
Cargo power point.
20A 1
27
Front heated and cooled seats.
30A 1
28
Front heated seats (without cooled seats).
20A 1
29
Rear heated seats.
20A 1
30
Electric fan relay 3.
25A 1
31
Auxiliary blower motor relay.
Relay
32
Cooling fan #1 relay.
Relay
33
Front blower motor relay.
Relay
34
Cooling fan (series) relay.
Relay
35
Not used.
-
36
Trailer tow right-hand stop/turn lamps
relay.
Relay
37
Trailer tow reverse lamps relay.
Relay
38
Auxiliary blower motor.
30A 1
39
Not used.
-
40
Not used.
-
41
Passenger power seat.
30A 1
42
Anti-lock brake system valves.
20A 1
43
Windshield washer relay.
Relay
44
Rain sensor.
5A 2
45
Canister vent solenoid (EcoBoost engines).
5A 2
46
Washer pump.
15A 2
47
236
Flex (TP3) , enUSA, Edition date: 201801, Second Printing Fuses
Page 241 of 508
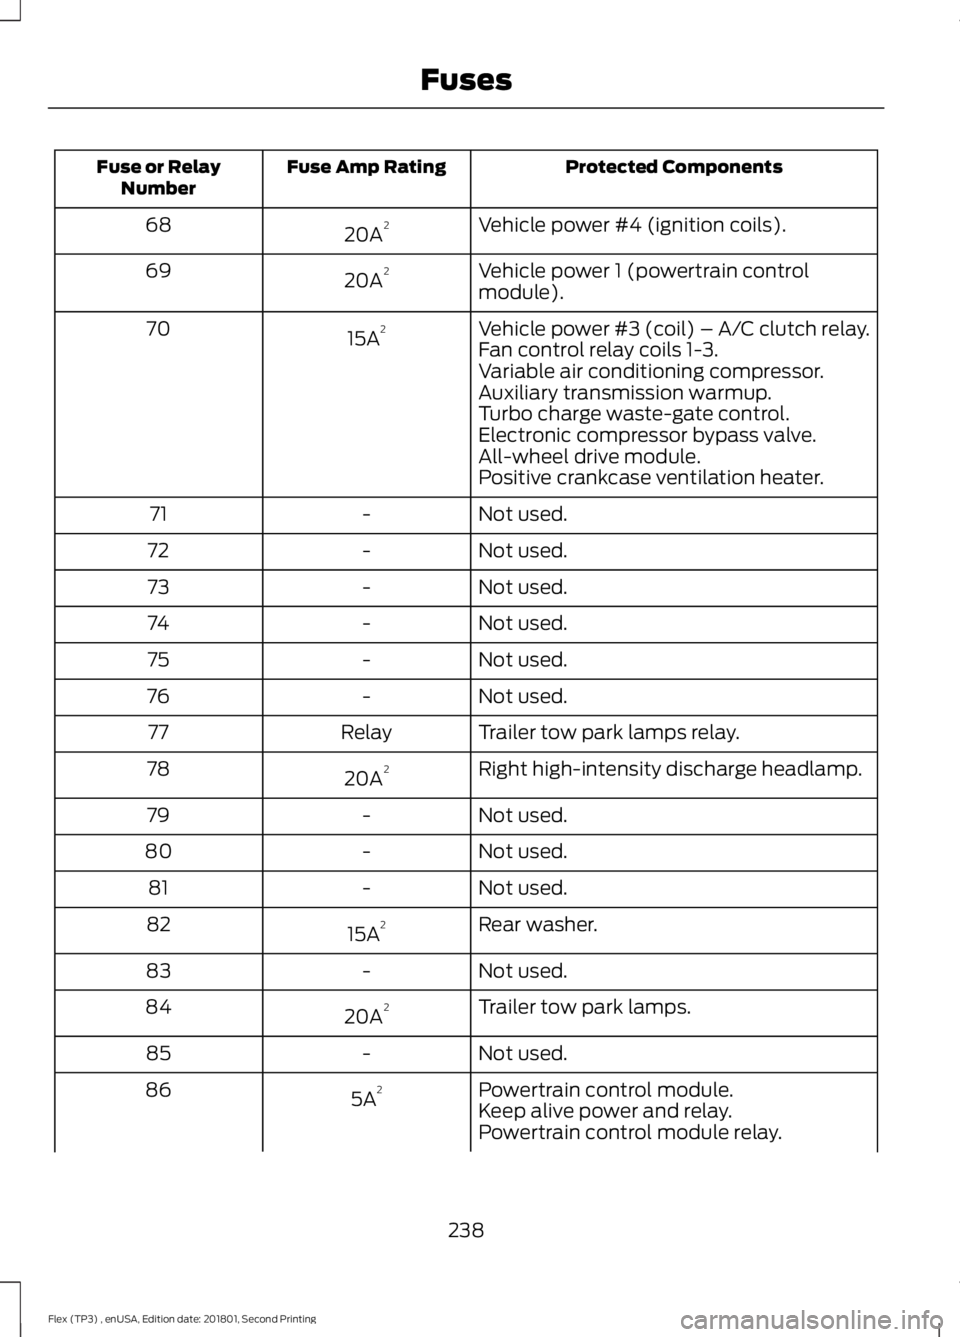
Protected Components
Fuse Amp Rating
Fuse or Relay
Number
Vehicle power #4 (ignition coils).
20A 2
68
Vehicle power 1 (powertrain control
module).
20A 2
69
Vehicle power #3 (coil) – A/C clutch relay.
15A 2
70
Fan control relay coils 1-3.
Variable air conditioning compressor.
Auxiliary transmission warmup.
Turbo charge waste-gate control.
Electronic compressor bypass valve.
All-wheel drive module.
Positive crankcase ventilation heater.
Not used.
-
71
Not used.
-
72
Not used.
-
73
Not used.
-
74
Not used.
-
75
Not used.
-
76
Trailer tow park lamps relay.
Relay
77
Right high-intensity discharge headlamp.
20A 2
78
Not used.
-
79
Not used.
-
80
Not used.
-
81
Rear washer.
15A 2
82
Not used.
-
83
Trailer tow park lamps.
20A 2
84
Not used.
-
85
Powertrain control module.
5A 2
86
Keep alive power and relay.
Powertrain control module relay.
238
Flex (TP3) , enUSA, Edition date: 201801, Second Printing Fuses
Page 242 of 508
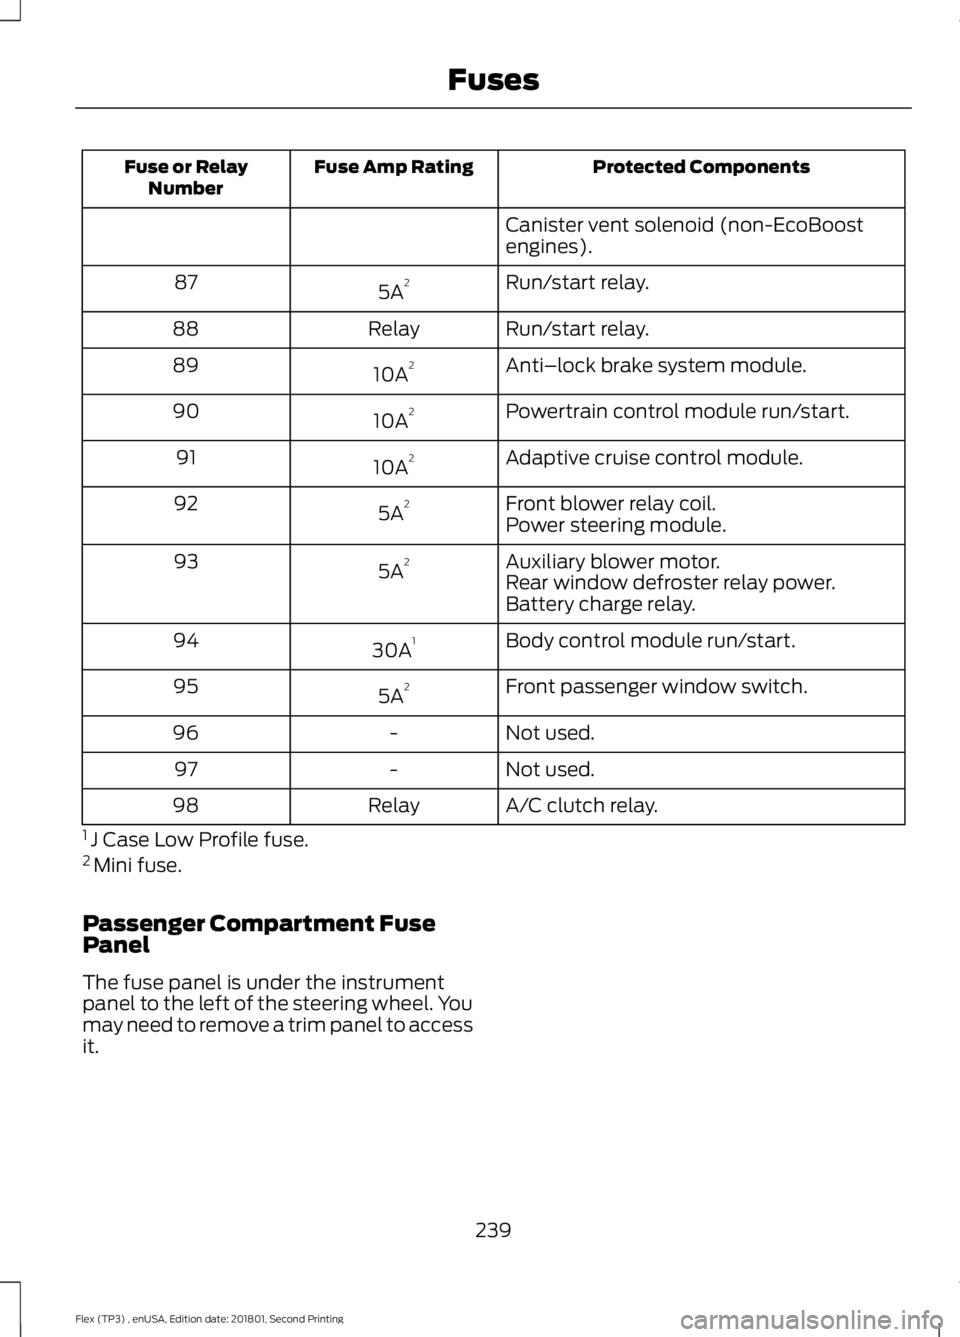
Protected Components
Fuse Amp Rating
Fuse or Relay
Number
Canister vent solenoid (non-EcoBoost
engines).
Run/start relay.
5A 2
87
Run/start relay.
Relay
88
Anti–lock brake system module.
10A 2
89
Powertrain control module run/start.
10A 2
90
Adaptive cruise control module.
10A 2
91
Front blower relay coil.
5A 2
92
Power steering module.
Auxiliary blower motor.
5A 2
93
Rear window defroster relay power.
Battery charge relay.
Body control module run/start.
30A 1
94
Front passenger window switch.
5A 2
95
Not used.
-
96
Not used.
-
97
A/C clutch relay.
Relay
98
1 J Case Low Profile fuse.
2 Mini fuse.
Passenger Compartment Fuse
Panel
The fuse panel is under the instrument
panel to the left of the steering wheel. You
may need to remove a trim panel to access
it.
239
Flex (TP3) , enUSA, Edition date: 201801, Second Printing Fuses
Page 323 of 508
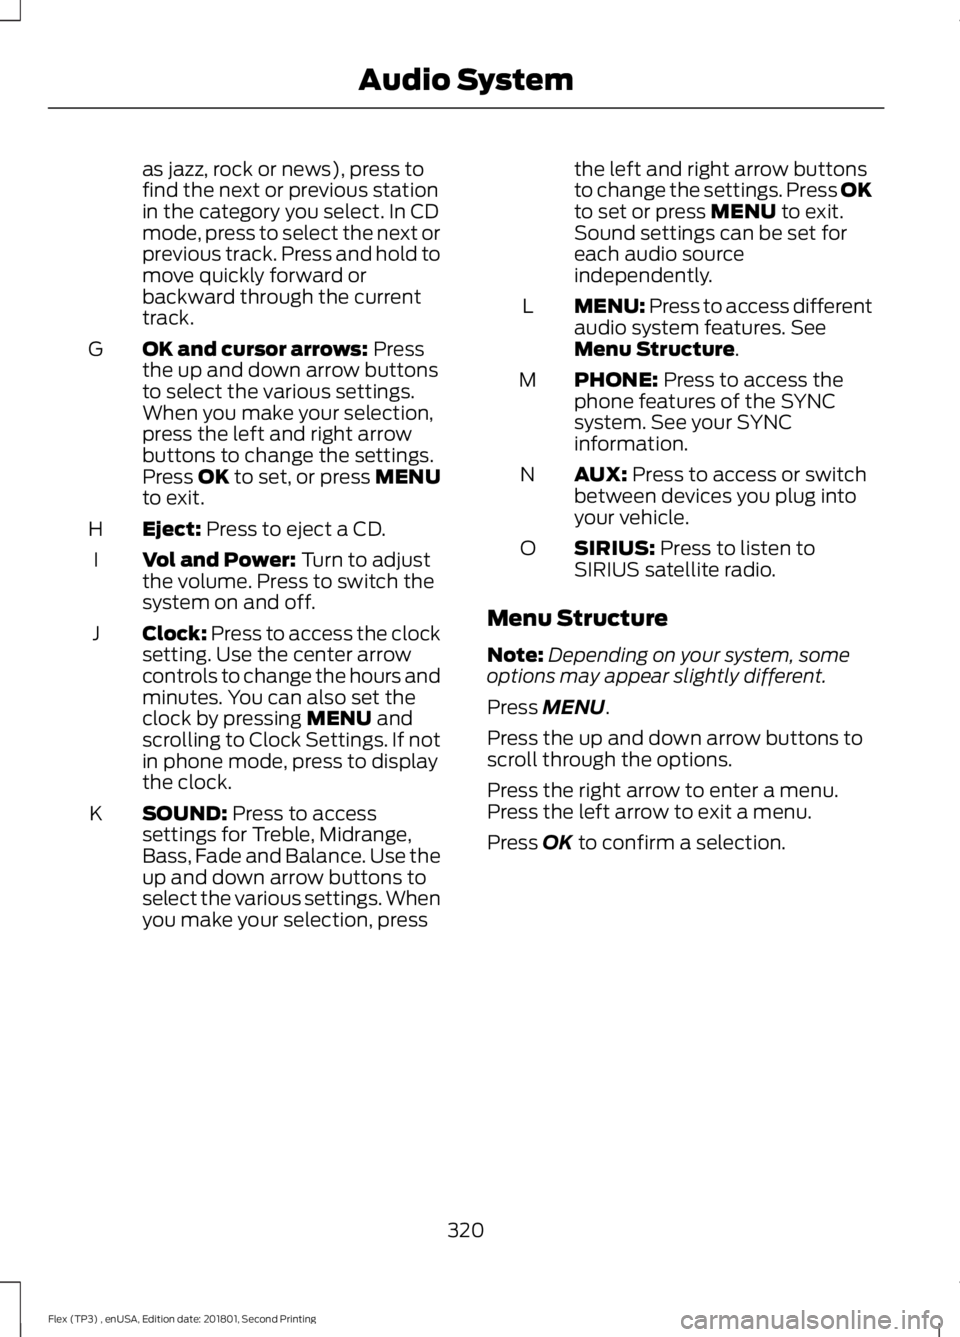
as jazz, rock or news), press to
find the next or previous station
in the category you select. In CD
mode, press to select the next or
previous track. Press and hold to
move quickly forward or
backward through the current
track.
OK and cursor arrows: Press
the up and down arrow buttons
to select the various settings.
When you make your selection,
press the left and right arrow
buttons to change the settings.
Press OK to set, or press MENU
to exit.
G
Eject:
Press to eject a CD.
H
Vol and Power:
Turn to adjust
the volume. Press to switch the
system on and off.
I
Clock:
Press to access the clock
setting. Use the center arrow
controls to change the hours and
minutes. You can also set the
clock by pressing
MENU and
scrolling to Clock Settings. If not
in phone mode, press to display
the clock.
J
SOUND:
Press to access
settings for Treble, Midrange,
Bass, Fade and Balance. Use the
up and down arrow buttons to
select the various settings. When
you make your selection, press
K the left and right arrow buttons
to change the settings. Press OK
to set or press
MENU to exit.
Sound settings can be set for
each audio source
independently.
MENU: Press to access different
audio system features. See
Menu Structure
.
L
PHONE:
Press to access the
phone features of the SYNC
system. See your SYNC
information.
M
AUX:
Press to access or switch
between devices you plug into
your vehicle.
N
SIRIUS:
Press to listen to
SIRIUS satellite radio.
O
Menu Structure
Note: Depending on your system, some
options may appear slightly different.
Press
MENU.
Press the up and down arrow buttons to
scroll through the options.
Press the right arrow to enter a menu.
Press the left arrow to exit a menu.
Press
OK to confirm a selection.
320
Flex (TP3) , enUSA, Edition date: 201801, Second Printing Audio System
Page 349 of 508
If you do not cancel the call, and SYNC
makes a successful call, a pre-recorded
message plays for the 911 operator, and
then the occupant(s) in your vehicle is able
to talk with the operator. Be prepared to
provide your name, phone number and
location immediately, because not all 911
systems are capable of receiving this
information electronically.
911 Assist May Not Work If
•
Your cellular phone or 911 Assist
hardware sustains damage in a crash.
• The vehicle's battery or the SYNC
system has no power.
• The phone(s) thrown from your vehicle
are the ones paired and connected to
the system.
911 Assist Privacy Notice
When you turn on 911 Assist, it may
disclose to emergency services that your
vehicle has been in a crash involving the
deployment of an airbag or activation of
the fuel pump shut-off. Certain versions or
updates to 911 Assist may also be capable
of electronically or verbally disclosing to
911 operators your vehicle location or other
details about your vehicle or crash to assist
911 operators to provide the most
appropriate emergency services. If you do
not want to disclose this information, do
not turn the feature on.
SYNC™ APPLINK ™
SYNC Mobile Apps
Note: You must pair and connect your
smartphone to SYNC to access AppLink.
Note: iPhone users need to connect the
phone to the USB port in order to start the
application. Note:
The AppLink feature is not available
if your vehicle is equipped with the MyFord
Touch system.
Note: Depending on your display type, you
can access AppLink from the media menu,
the phone menu, or by using voice
commands. Once an app is running through
AppLink, you can control main features of
the app through voice commands and
steering wheel controls.
To Access Using the Phone Menu
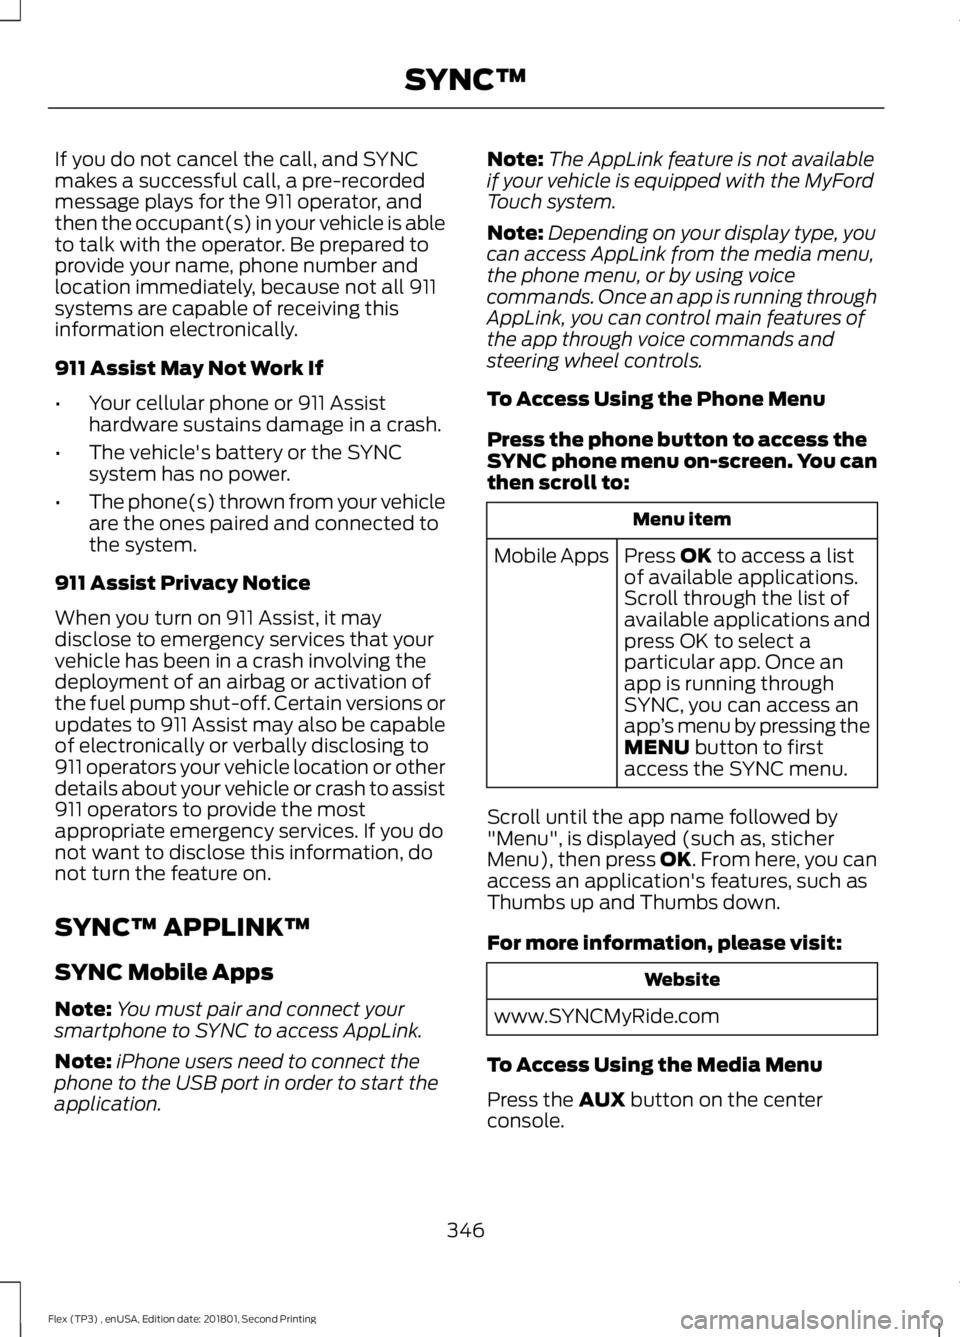
Press the phone button to access the
SYNC phone menu on-screen. You can
then scroll to: Menu item
Press OK to access a list
of available applications.
Mobile Apps
Scroll through the list of
available applications and
press OK to select a
particular app. Once an
app is running through
SYNC, you can access an
app’s menu by pressing the
MENU
button to first
access the SYNC menu.
Scroll until the app name followed by
"Menu", is displayed (such as, sticher
Menu), then press
OK. From here, you can
access an application's features, such as
Thumbs up and Thumbs down.
For more information, please visit: Website
www.SYNCMyRide.com
To Access Using the Media Menu
Press the
AUX button on the center
console.
346
Flex (TP3) , enUSA, Edition date: 201801, Second Printing SYNC™
Page 351 of 508
To Connect Using Voice Commands
Plug the device into the USB port. See
USB Port (page 325).
Press the voice button and when prompted say:
Action and Description
Voice command
You can now play music by saying any of the appropriate
voice commands. See Media voice commands.
USB [1]
You do not need to say words that appear within square brackets. For example, for where
USB[1]appears, you can say USB or USB one.
To Connect Using the System Menu
Plug the device into the USB port. See
USB Port
(page 325). Press the
AUX button, then the Menu
button to enter the Media Menu.
You can then scroll to: Action and Description
Message
Press the
OK button.
SELECT SRC
Press the
OK button.
SYNC USB
Depending on how many digital media files are on your
connected device, the following message may appear in the
radio display.
Indexing\b
When indexing is complete, the screen returns to the Play menu. You can then
select one of the following:
PLAY ALL
ARTISTS
ALBUMS
GENRES
PLAYLISTS
TRACKS
EXPLORE USB
SIMILARMUSIC Exit the current menu.
RETURN
348
Flex (TP3) , enUSA, Edition date: 201801, Second Printing SYNC™E142599