FORD FOCUS ELECTRIC 2017 3.G Owners Manual
Manufacturer: FORD, Model Year: 2017, Model line: FOCUS ELECTRIC, Model: FORD FOCUS ELECTRIC 2017 3.GPages: 367, PDF Size: 6.35 MB
Page 171 of 367
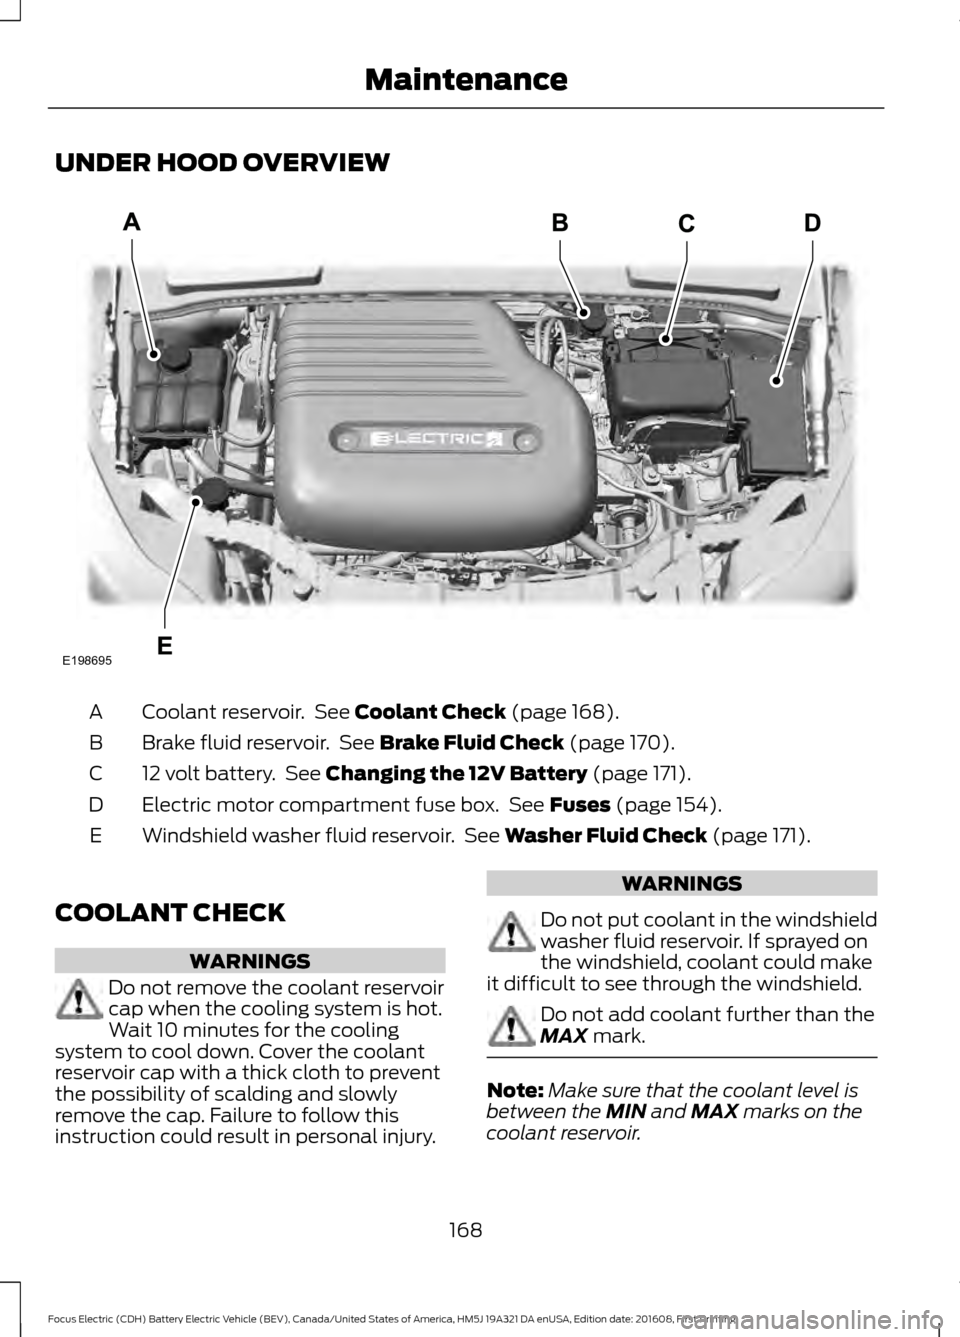
UNDER HOOD OVERVIEW
Coolant reservoir. See Coolant Check (page 168).
A
Brake fluid reservoir. See
Brake Fluid Check (page 170).
B
12 volt battery. See
Changing the 12V Battery (page 171).
C
Electric motor compartment fuse box. See
Fuses (page 154).
D
Windshield washer fluid reservoir. See
Washer Fluid Check (page 171).
E
COOLANT CHECK WARNINGS
Do not remove the coolant reservoir
cap when the cooling system is hot.
Wait 10 minutes for the cooling
system to cool down. Cover the coolant
reservoir cap with a thick cloth to prevent
the possibility of scalding and slowly
remove the cap. Failure to follow this
instruction could result in personal injury. WARNINGS
Do not put coolant in the windshield
washer fluid reservoir. If sprayed on
the windshield, coolant could make
it difficult to see through the windshield. Do not add coolant further than the
MAX
mark.
Note:
Make sure that the coolant level is
between the
MIN and MAX marks on the
coolant reservoir.
168
Focus Electric (CDH) Battery Electric Vehicle (BEV), Canada/United States of America, HM5J 19A321 DA enUSA, Edition date: 201608, First Printing MaintenanceE198695
Page 172 of 367
Note:
Coolant expands when it is hot. The
level may extend beyond the MAX mark.
When the electric motor is cold, check the
concentration and level of the coolant at
the intervals listed in the scheduled
maintenance information. See Scheduled
Maintenance
(page 316).
Maintain coolant concentration within
48% to 50%, which equates to a freeze
point between -30°F (-34°C) and -34°F
(-37°C). Coolant concentration should be
checked using a refractometer. We do not
recommend the use of hydrometers or
coolant test strips for measuring coolant
concentration.
Adding Coolant WARNINGS
Do not remove the coolant reservoir
cap when the cooling system is hot.
Wait 10 minutes for the cooling
system to cool down. Cover the coolant
reservoir cap with a thick cloth to prevent
the possibility of scalding and slowly
remove the cap. Failure to follow this
instruction could result in personal injury. Do not put coolant in the windshield
washer fluid reservoir. If sprayed on
the windshield, coolant could make
it difficult to see through the windshield. Note:
Automotive fluids are not
interchangeable.
Note: Do not use stop leak pellets, cooling
system sealants, or non-specified additives
as they can cause damage to the electric
motor cooling or heating systems. Resulting
component damage may not be covered by
the vehicle Warranty. It is very important to use prediluted
coolant approved to the correct
specification in order to avoid plugging the
small passageways in the electric motor
cooling system. See
Capacities and
Specifications (page 218). Do not mix
different colors or types of coolant in your
vehicle. Mixing of coolants or using an
incorrect coolant may harm the electric
motor or cooling system components and
may not be covered by the vehicle
Warranty.
Note: If prediluted coolant is not available,
use the approved concentrated coolant
diluting it to 50/50 with distilled water. See
Capacities and Specifications (page 218).
Using water that has not been deionised
may contribute to deposit formation,
corrosion and plugging of the small cooling
system passageways.
Note: Coolants marketed for all makes and
models may not be approved to Ford
specifications and may cause damage to
the cooling system. Resulting component
damage may not be covered by the vehicle
Warranty.
If the coolant level is at or below the
minimum mark, add prediluted coolant
immediately.
To top up the coolant level do the
following:
1. Unscrew the cap slowly. Any pressure escapes as you unscrew the cap.
2. Add prediluted coolant approved to the correct specification. See
Capacities and Specifications (page
218
).
3. Add enough prediluted coolant to reach the correct level.
4. Replace the coolant reservoir cap, turn
it clockwise until you feel a strong
resistance.
169
Focus Electric (CDH) Battery Electric Vehicle (BEV), Canada/United States of America, HM5J 19A321 DA enUSA, Edition date: 201608, First Printing Maintenance
Page 173 of 367
5. Check the coolant level in the coolant
reservoir the next few times you drive
your vehicle. If necessary, add enough
prediluted coolant to bring the coolant
level to the correct level.
If you have to add more than 1.1 qt (1 L) of
coolant per month, have your vehicle
checked as soon as possible. Operating an
electric motor with a low level of coolant
can result in electric motor overheating
and possible electric motor damage.
Note: During normal vehicle operation, the
coolant may change color from orange to
pink or light red. As long as the coolant is
clear and uncontaminated, this color change
does not indicate the coolant has degraded
nor does it require the coolant to be drained,
the system to be flushed, or the coolant to
be replaced.
Note: In case of emergency, you can add a
large amount of water without coolant in
order to reach a vehicle service location.
Water alone, without coolant, can cause
electric motor damage from corrosion,
overheating or freezing. When you reach a
service location, you must have the cooling
system drained and refilled with prediluted
coolant approved to the correct
specification. See
Capacities and
Specifications (page 218).
Do not use the following as a coolant
substitute:
• Alcohol.
• Methanol.
• Brine.
• Any coolant mixed with alcohol or
methanol antifreeze.
Alcohol and other liquids can cause electric
motor damage from overheating or
freezing.
Do not add extra inhibitors or additives to
the coolant. These can be harmful and
compromise the corrosion protection of
the coolant. Recycled Coolant
Ford Motor Company does not recommend
the use of recycled coolant since a
Ford-approved recycling process is not yet
available.
Dispose of used coolant in the appropriate
manner. Follow your community's
regulations and standards for recycling and
disposing of automotive fluids.
Severe Climates
If you drive in extremely cold climates:
•
It may be necessary to increase the
coolant concentration above 50%.
• A coolant concentration of 60%
provides improved freeze point
protection. Coolant concentrations
above 60% decrease the overheat
protection characteristics of the
coolant and may cause electric motor
damage.
If you drive in extremely hot climates:
• You can decrease the coolant
concentration to 40%.
• Coolant concentrations below 40%
decrease the freeze and corrosion
protection characteristics of the
coolant and may cause electric motor
damage.
Vehicles driven year-round in non-extreme
climates should use prediluted coolant for
optimum cooling system and electric
motor protection.
BRAKE FLUID CHECK WARNINGS
Do not use any fluid other than the
recommended brake fluid as this will
reduce brake efficiency. Use of
incorrect fluid could result in the loss of
vehicle control, serious personal injury or
death.
170
Focus Electric (CDH) Battery Electric Vehicle (BEV), Canada/United States of America, HM5J 19A321 DA enUSA, Edition date: 201608, First Printing Maintenance
Page 174 of 367
WARNINGS
Only use brake fluid from a sealed
container. Contamination with dirt,
water, petroleum products or other
materials may result in brake system
damage or failure. Failure to adhere to this
warning could result in the loss of vehicle
control, serious personal injury or death. Do not allow the fluid to touch your
skin or eyes. If this happens, rinse the
affected areas immediately with
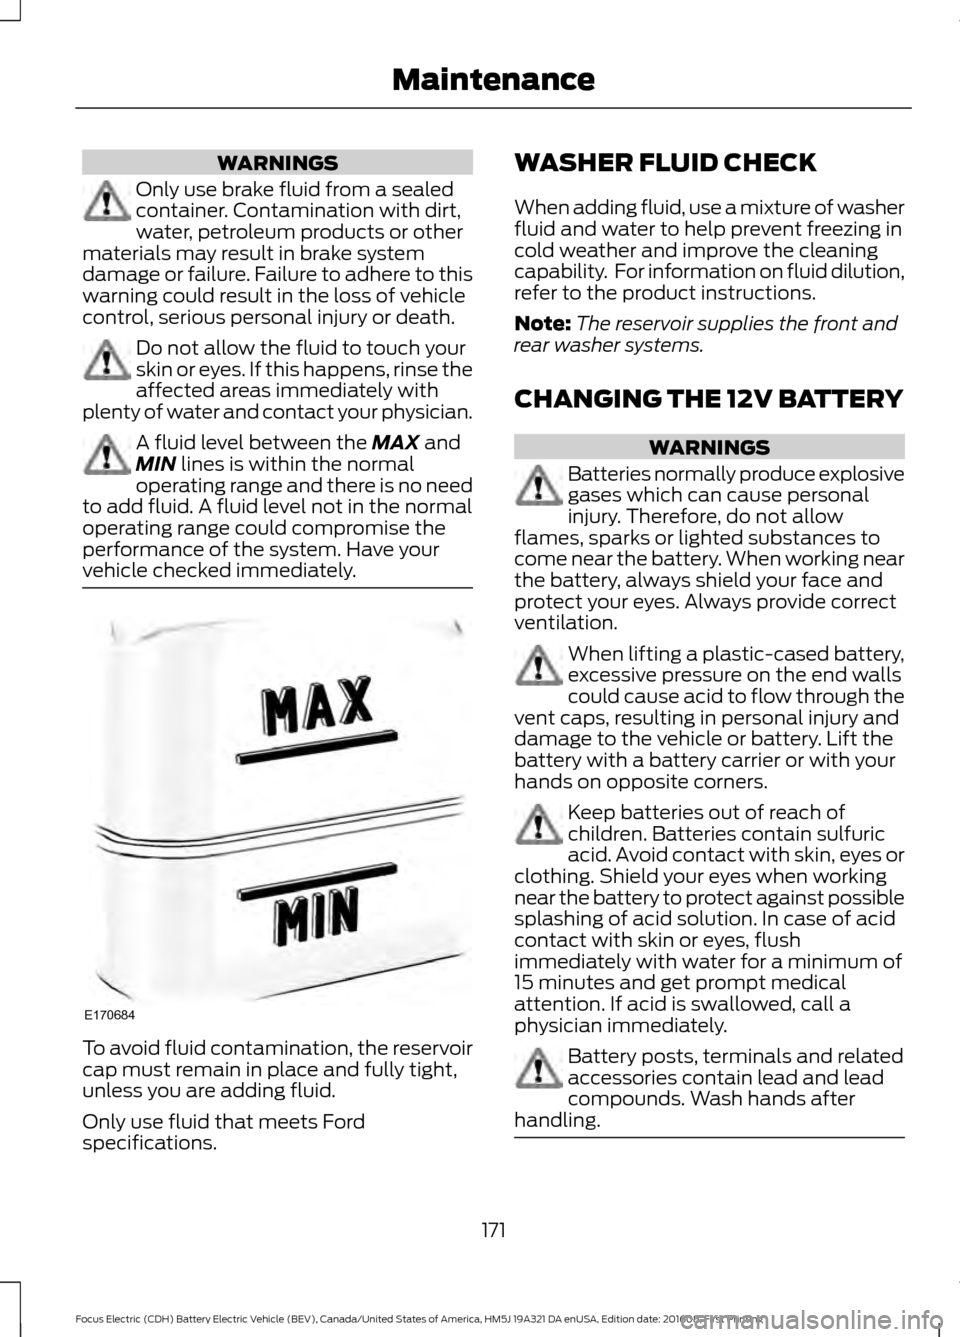
plenty of water and contact your physician. A fluid level between the MAX and
MIN lines is within the normal
operating range and there is no need
to add fluid. A fluid level not in the normal
operating range could compromise the
performance of the system. Have your
vehicle checked immediately. To avoid fluid contamination, the reservoir
cap must remain in place and fully tight,
unless you are adding fluid.
Only use fluid that meets Ford
specifications. WASHER FLUID CHECK
When adding fluid, use a mixture of washer
fluid and water to help prevent freezing in
cold weather and improve the cleaning
capability. For information on fluid dilution,
refer to the product instructions.
Note:
The reservoir supplies the front and
rear washer systems.
CHANGING THE 12V BATTERY WARNINGS
Batteries normally produce explosive
gases which can cause personal
injury. Therefore, do not allow
flames, sparks or lighted substances to
come near the battery. When working near
the battery, always shield your face and
protect your eyes. Always provide correct
ventilation. When lifting a plastic-cased battery,
excessive pressure on the end walls
could cause acid to flow through the
vent caps, resulting in personal injury and
damage to the vehicle or battery. Lift the
battery with a battery carrier or with your
hands on opposite corners. Keep batteries out of reach of
children. Batteries contain sulfuric
acid. Avoid contact with skin, eyes or
clothing. Shield your eyes when working
near the battery to protect against possible
splashing of acid solution. In case of acid
contact with skin or eyes, flush
immediately with water for a minimum of
15 minutes and get prompt medical
attention. If acid is swallowed, call a
physician immediately. Battery posts, terminals and related
accessories contain lead and lead
compounds. Wash hands after
handling. 171
Focus Electric (CDH) Battery Electric Vehicle (BEV), Canada/United States of America, HM5J 19A321 DA enUSA, Edition date: 201608, First Printing MaintenanceE170684
Page 175 of 367
Your vehicle is fitted with a Motorcraft
maintenance-free battery which normally
does not require additional water.
Note:
After cleaning or replacing the
battery, make sure you reinstall the battery
cover or shield.
When a battery replacement is required,
you must use a recommended
replacement battery that matches the
electrical requirements of the vehicle.
Note: Contact an authorized dealer for low
voltage battery access, testing or
replacement.
To make sure the battery management
system works correctly, do not connect an
electrical device ground connection
directly to the low voltage battery negative
post. This can cause inaccurate
measurements of the battery condition
and potential incorrect system operation.
Note: If you add electrical accessories or
components to the vehicle, it may adversely
affect the low voltage battery performance
and durability. This may also affect the
performance of other electrical systems in
the vehicle.
For longer, trouble-free operation, keep the
top of the battery clean and dry.
If you see any corrosion on the battery or
terminals, remove the cables from the
terminals and clean with a wire brush. You
can neutralize the acid with a solution of
baking soda and water.
A computer electronically controls your
vehicle. The power of the low voltage
battery maintains the memory of some
settings, for example, clock setting or radio
presets. When the low voltage battery is
disconnected and then connected, these
settings erase.
To restore the settings, do the following:
1. Apply the parking brake.
2. Shift into park (P) or neutral (N). 3. Switch off all accessories.
4. Press the brake pedal and start your
vehicle.
5. Reset the clock.
6. Reset the bounce-back feature. See Power Windows (page 71).
7. Reset the radio station presets. See Audio System
(page 220).
Make sure that you dispose of old batteries
in an environmentally friendly way. Seek
advice from your local authority about
recycling old batteries.
If storing your vehicle for more than 30
days without recharging the battery, we
recommend that you disconnect the
battery cables to maintain battery charge
for quick starting.
CHECKING THE WIPER
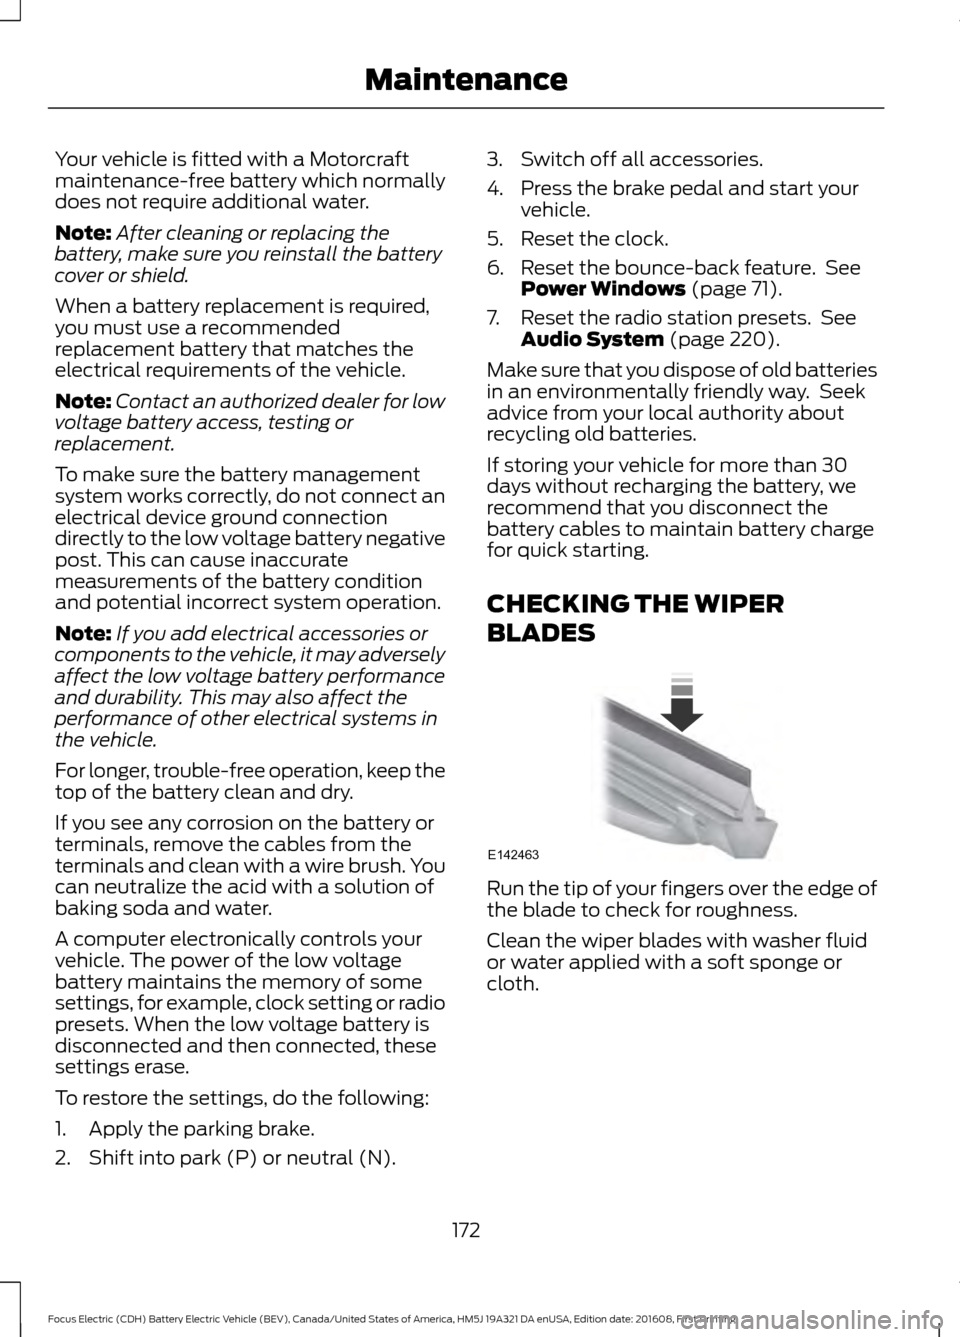
BLADES Run the tip of your fingers over the edge of
the blade to check for roughness.
Clean the wiper blades with washer fluid
or water applied with a soft sponge or
cloth.
172
Focus Electric (CDH) Battery Electric Vehicle (BEV), Canada/United States of America, HM5J 19A321 DA enUSA, Edition date: 201608, First Printing MaintenanceE142463
Page 176 of 367
CHANGING THE FRONT WIPER
BLADES
Note:
If streaks or smears appear on the
windshield, clean the windshield and the
wiper blades. If that does not resolve the
issue, install new wiper blades.
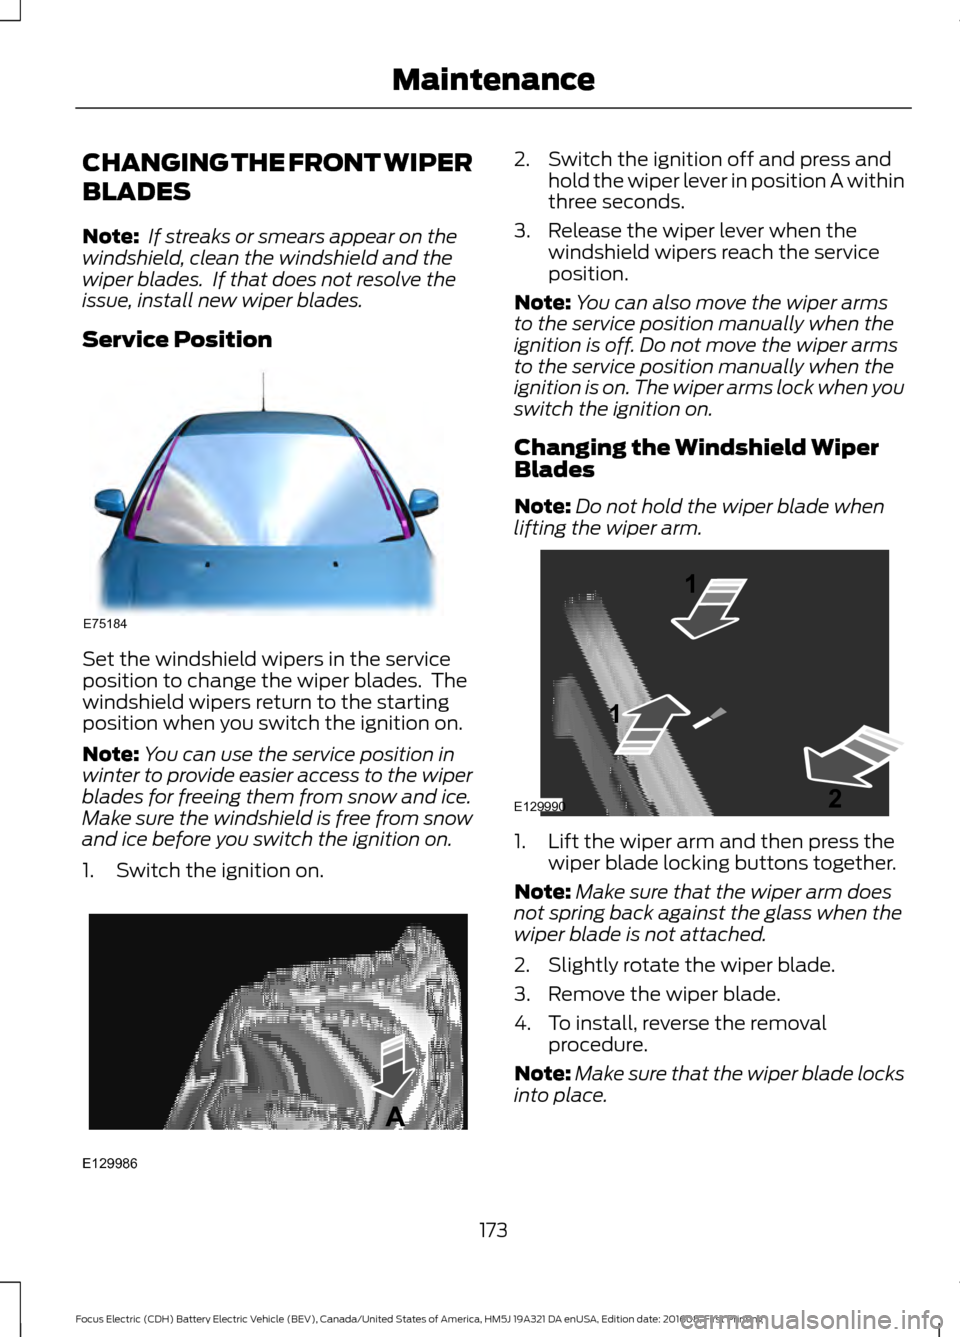
Service Position Set the windshield wipers in the service
position to change the wiper blades. The
windshield wipers return to the starting
position when you switch the ignition on.
Note:
You can use the service position in
winter to provide easier access to the wiper
blades for freeing them from snow and ice.
Make sure the windshield is free from snow
and ice before you switch the ignition on.
1. Switch the ignition on. 2. Switch the ignition off and press and
hold the wiper lever in position A within
three seconds.
3. Release the wiper lever when the windshield wipers reach the service
position.
Note: You can also move the wiper arms
to the service position manually when the
ignition is off. Do not move the wiper arms
to the service position manually when the
ignition is on. The wiper arms lock when you
switch the ignition on.
Changing the Windshield Wiper
Blades
Note: Do not hold the wiper blade when
lifting the wiper arm. 1. Lift the wiper arm and then press the
wiper blade locking buttons together.
Note: Make sure that the wiper arm does
not spring back against the glass when the
wiper blade is not attached.
2. Slightly rotate the wiper blade.
3. Remove the wiper blade.
4. To install, reverse the removal procedure.
Note: Make sure that the wiper blade locks
into place.
173
Focus Electric (CDH) Battery Electric Vehicle (BEV), Canada/United States of America, HM5J 19A321 DA enUSA, Edition date: 201608, First Printing MaintenanceE75184 E129986
A E129990
1
1 2
Page 177 of 367
CHANGING THE REAR WIPER
BLADES
Note:
Do not hold the wiper blade when
lifting the wiper arm.
Note: Make sure that the wiper arm does
not spring back against the glass when the
wiper blade is not attached.
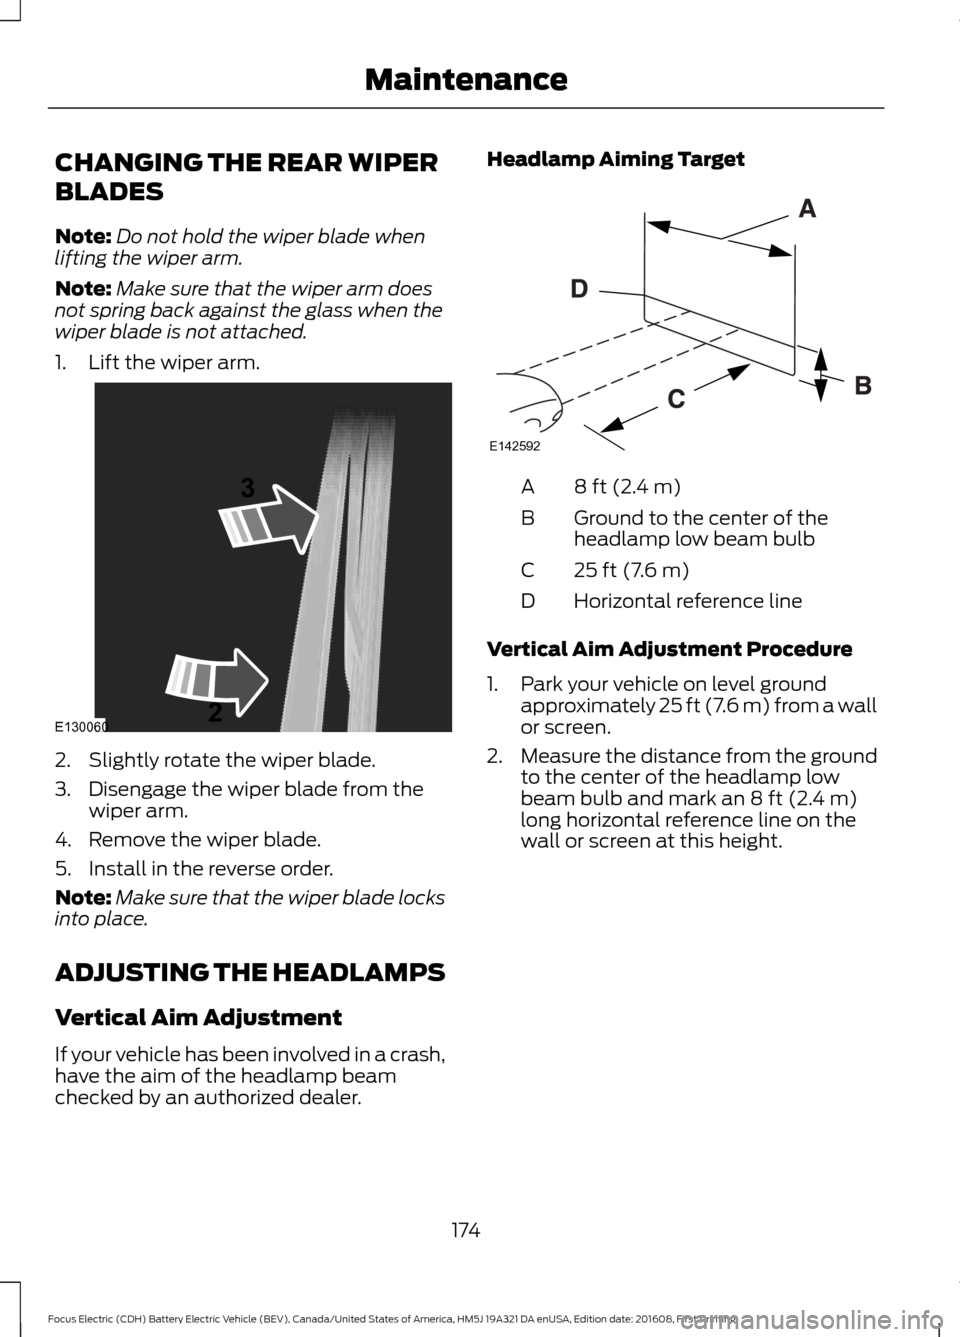
1. Lift the wiper arm. 2. Slightly rotate the wiper blade.
3. Disengage the wiper blade from the
wiper arm.
4. Remove the wiper blade.
5. Install in the reverse order.
Note: Make sure that the wiper blade locks
into place.
ADJUSTING THE HEADLAMPS
Vertical Aim Adjustment
If your vehicle has been involved in a crash,
have the aim of the headlamp beam
checked by an authorized dealer. Headlamp Aiming Target
8 ft (2.4 m)
A
Ground to the center of the
headlamp low beam bulb
B
25 ft (7.6 m)
C
Horizontal reference line
D
Vertical Aim Adjustment Procedure
1. Park your vehicle on level ground approximately 25 ft (7.6 m) from a wall
or screen.
2. Measure the distance from the ground
to the center of the headlamp low
beam bulb and mark an
8 ft (2.4 m)
long horizontal reference line on the
wall or screen at this height.
174
Focus Electric (CDH) Battery Electric Vehicle (BEV), Canada/United States of America, HM5J 19A321 DA enUSA, Edition date: 201608, First Printing MaintenanceE130060
3
2 E142592
Page 178 of 367
Note:
There may be an identifying mark on
the lens to help you locate the center of the
bulb.
Note: To see a clearer light pattern while
adjusting one headlamp, you may want to
block the light from the other headlamp.
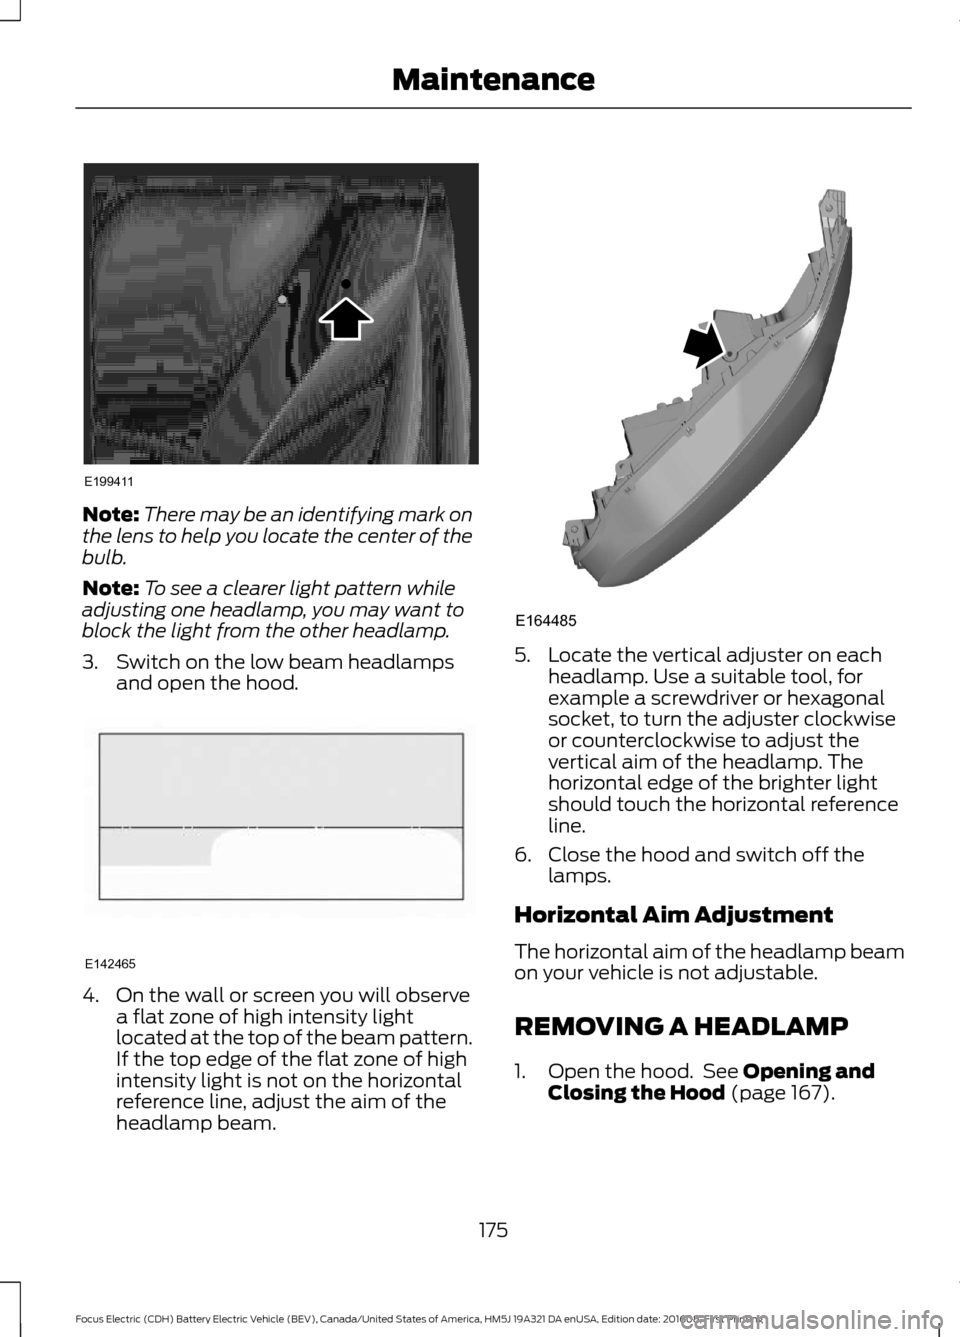
3. Switch on the low beam headlamps and open the hood. 4. On the wall or screen you will observe
a flat zone of high intensity light
located at the top of the beam pattern.
If the top edge of the flat zone of high
intensity light is not on the horizontal
reference line, adjust the aim of the
headlamp beam. 5. Locate the vertical adjuster on each
headlamp. Use a suitable tool, for
example a screwdriver or hexagonal
socket, to turn the adjuster clockwise
or counterclockwise to adjust the
vertical aim of the headlamp. The
horizontal edge of the brighter light
should touch the horizontal reference
line.
6. Close the hood and switch off the lamps.
Horizontal Aim Adjustment
The horizontal aim of the headlamp beam
on your vehicle is not adjustable.
REMOVING A HEADLAMP
1. Open the hood. See Opening and
Closing the Hood (page 167).
175
Focus Electric (CDH) Battery Electric Vehicle (BEV), Canada/United States of America, HM5J 19A321 DA enUSA, Edition date: 201608, First Printing MaintenanceE199411 E142465 E164485
Page 179 of 367
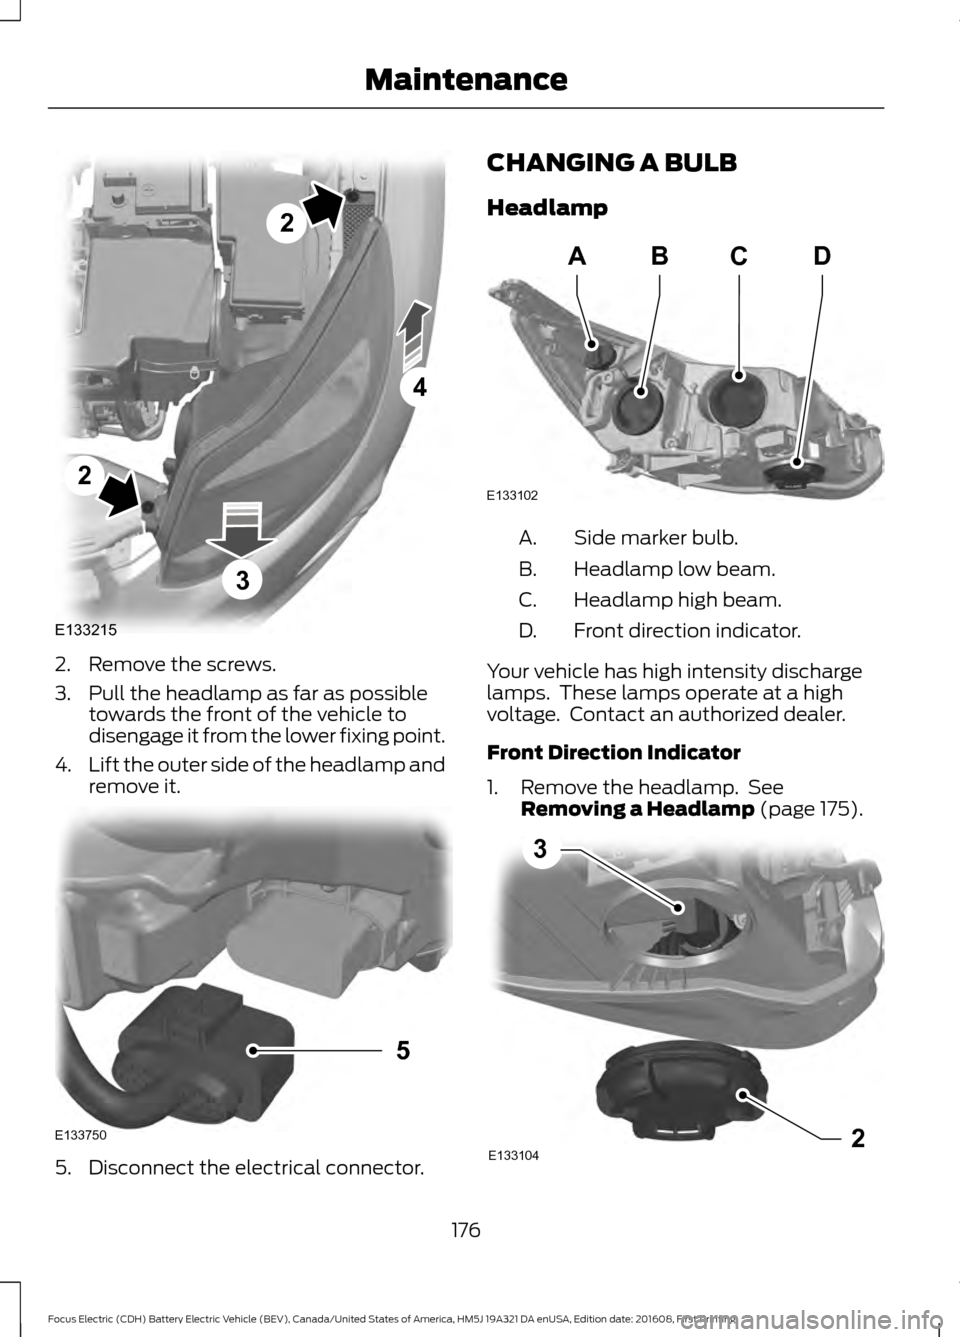
2. Remove the screws.
3. Pull the headlamp as far as possible
towards the front of the vehicle to
disengage it from the lower fixing point.
4. Lift the outer side of the headlamp and
remove it. 5. Disconnect the electrical connector. CHANGING A BULB
Headlamp
Side marker bulb.
A.
Headlamp low beam.
B.
Headlamp high beam.
C.
Front direction indicator.
D.
Your vehicle has high intensity discharge
lamps. These lamps operate at a high
voltage. Contact an authorized dealer.
Front Direction Indicator
1. Remove the headlamp. See Removing a Headlamp (page 175). 176
Focus Electric (CDH) Battery Electric Vehicle (BEV), Canada/United States of America, HM5J 19A321 DA enUSA, Edition date: 201608, First Printing MaintenanceE133215
2
2
4
3 E133750
5 E133102
ABCD E1331042
3
Page 180 of 367
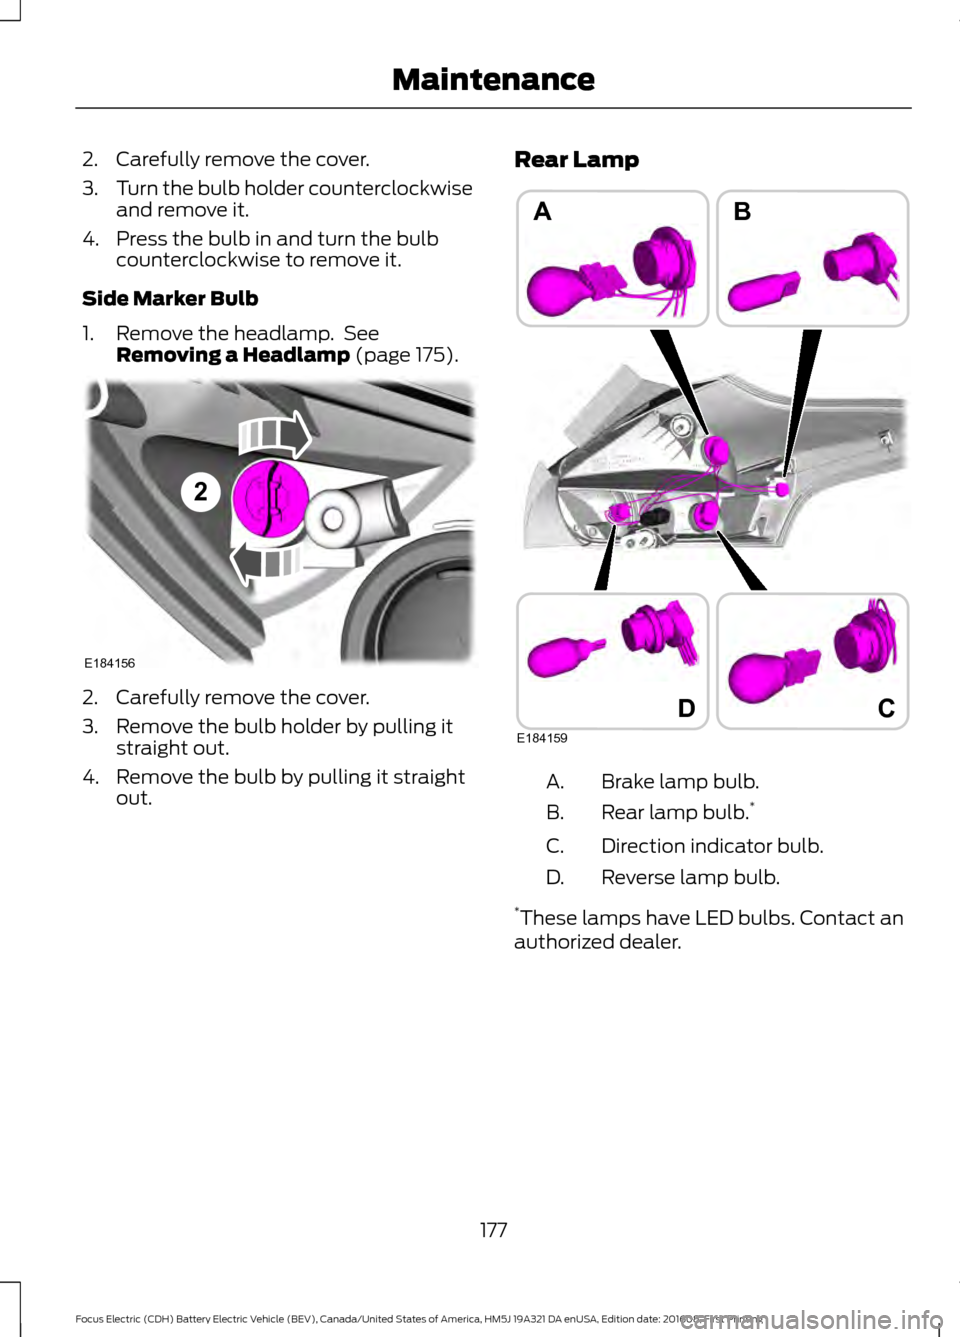
2. Carefully remove the cover.
3.
Turn the bulb holder counterclockwise
and remove it.
4. Press the bulb in and turn the bulb counterclockwise to remove it.
Side Marker Bulb
1. Remove the headlamp. See Removing a Headlamp (page 175). 2. Carefully remove the cover.
3. Remove the bulb holder by pulling it
straight out.
4. Remove the bulb by pulling it straight out. Rear Lamp
Brake lamp bulb.
A.
Rear lamp bulb. *
B.
Direction indicator bulb.
C.
Reverse lamp bulb.
D.
* These lamps have LED bulbs. Contact an
authorized dealer.
177
Focus Electric (CDH) Battery Electric Vehicle (BEV), Canada/United States of America, HM5J 19A321 DA enUSA, Edition date: 201608, First Printing Maintenance2
E184156 D
AB
E184159
C