engine FORD FREESTAR 2004 1.G Owner's Guide
[x] Cancel search | Manufacturer: FORD, Model Year: 2004, Model line: FREESTAR, Model: FORD FREESTAR 2004 1.GPages: 280, PDF Size: 5.08 MB
Page 176 of 280
OFF indicator remains illuminated when the system is disabled. If the
indicator light illuminates when the RSS is not turned off, it may indicate
a failure in the RSS.
The system defaults toenabledevery time the ignition is turned on.
Press the control to disable or enable the system.
Keep the RSS sensors (located on the rear bumper/fascia) free
from snow, ice and large accumulations of dirt (do not clean the
sensors with sharp objects). If the sensors are covered, it will
affect the accuracy of the RSS.
If your vehicle sustains damage to the rear bumper/fascia, leaving
it misaligned or bent, the sensing zone may be altered causing
inaccurate measurement of obstacles or false alarms.
DRIVING THROUGH WATER
If driving through deep or standing water is unavoidable, proceed very
slowly especially if the depth is not known. Never drive through water
that is higher than the bottom of the hubs (for trucks) or the bottom of
the wheel rims (for cars). Traction or brake capability may be limited
and your vehicle may stall. Water may also enter your engine’s air intake
and severely damage your engine.
Once through the water, always dry the brakes by moving your vehicle
slowly while applying light pressure on the brake pedal. Wet brakes do
not stop the vehicle as quickly as dry brakes.Driving through deep
water where the transmission vent tube is submerged may allow
water into the transmission and cause internal transmission
damage.
VEHICLE LOADING – WITH AND WITHOUT A TRAILER
This section will guide you in the proper loading of your vehicle and/or
trailer, to keep your loaded vehicle weight within its design rating
capability, with or without a trailer. Properly loading your vehicle will
provide maximum return of vehicle design performance. Before loading
your vehicle, familiarize yourself with the following terms for determining
your vehicle’s weight ratings, with or without a trailer, from the vehicle’s
Safety Certification Label and Tire and Load Information Label:
Base Curb Weight– is the weight of the vehicle including a full tank of
fuel and all standard equipment. It does not include passengers, cargo, or
optional equipment.
Vehicle Curb Weight– is the weight of your new vehicle when you
picked it up from your dealer plus any aftermarket equipment.
2004 Windstar(win)
Owners Guide (post-2002-fmt)
USA English(fus)
Driving
176
Page 177 of 280
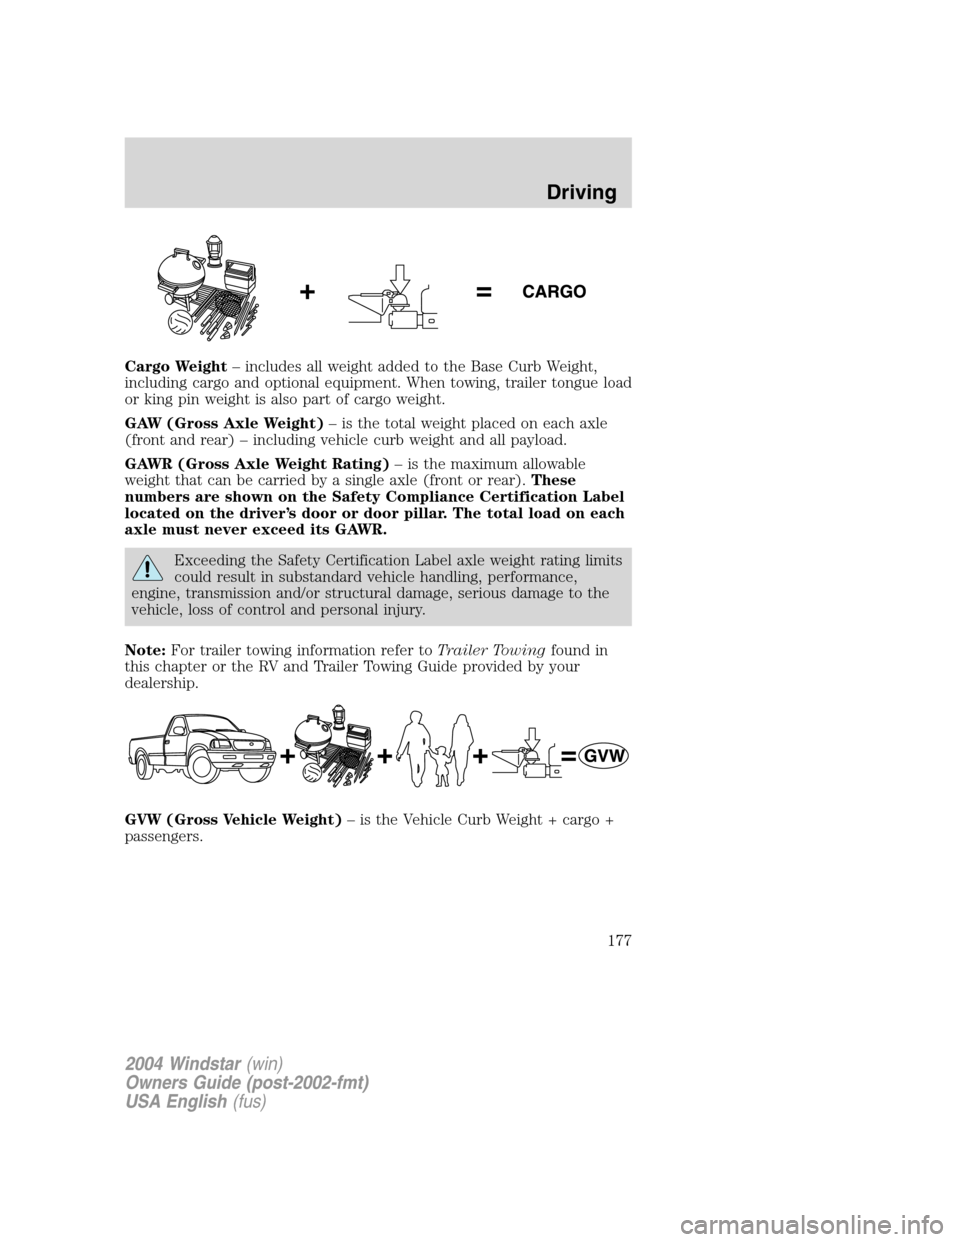
Cargo Weight– includes all weight added to the Base Curb Weight,
including cargo and optional equipment. When towing, trailer tongue load
or king pin weight is also part of cargo weight.
GAW (Gross Axle Weight)– is the total weight placed on each axle
(front and rear) – including vehicle curb weight and all payload.
GAWR (Gross Axle Weight Rating)– is the maximum allowable
weight that can be carried by a single axle (front or rear).These
numbers are shown on the Safety Compliance Certification Label
located on the driver’s door or door pillar. The total load on each
axle must never exceed its GAWR.
Exceeding the Safety Certification Label axle weight rating limits
could result in substandard vehicle handling, performance,
engine, transmission and/or structural damage, serious damage to the
vehicle, loss of control and personal injury.
Note:For trailer towing information refer toTrailer Towingfound in
this chapter or the RV and Trailer Towing Guide provided by your
dealership.
GVW (Gross Vehicle Weight)– is the Vehicle Curb Weight + cargo +
passengers.
2004 Windstar(win)
Owners Guide (post-2002-fmt)
USA English(fus)
Driving
177
Page 178 of 280
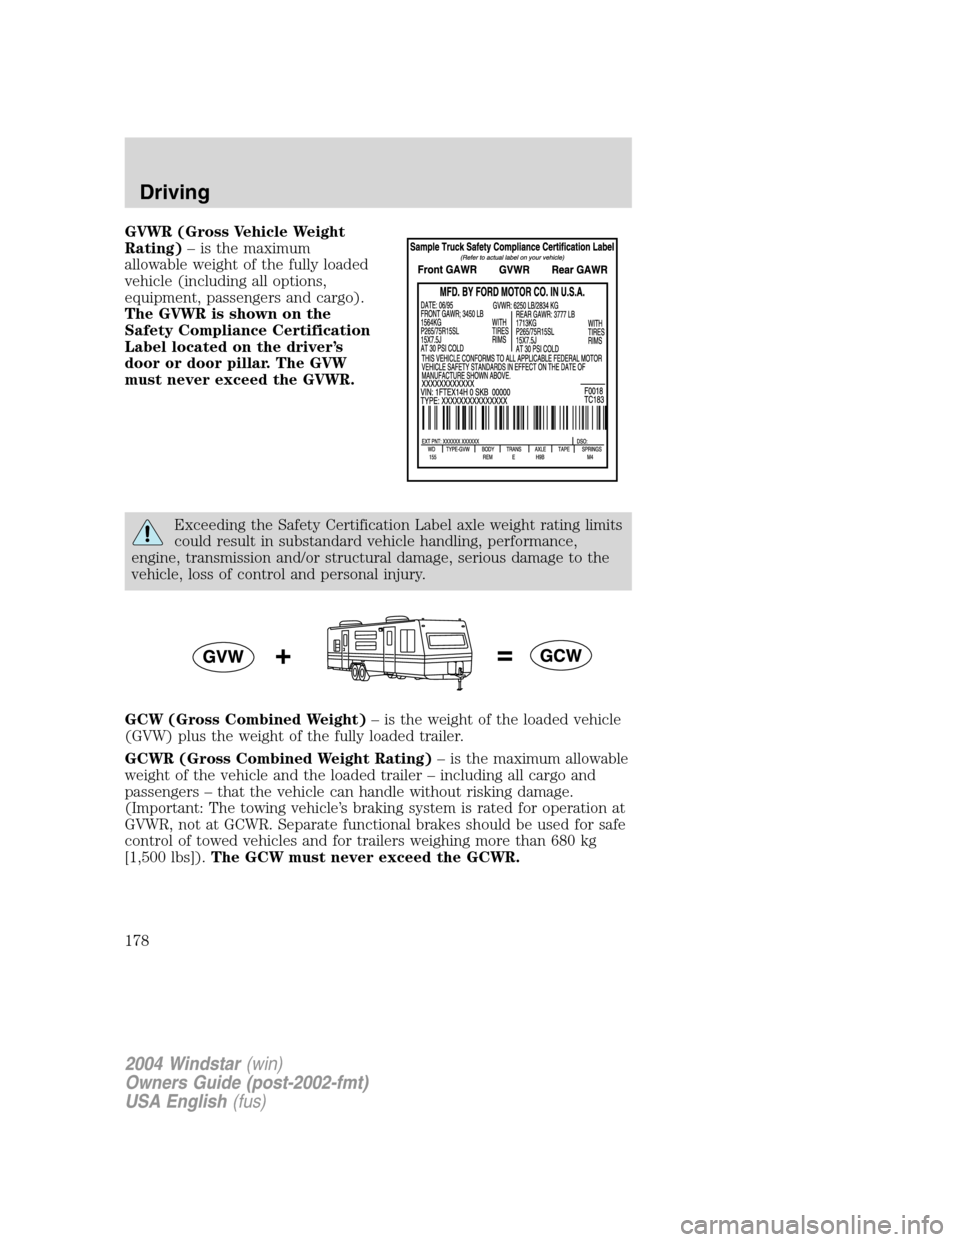
GVWR (Gross Vehicle Weight
Rating)– is the maximum
allowable weight of the fully loaded
vehicle (including all options,
equipment, passengers and cargo).
The GVWR is shown on the
Safety Compliance Certification
Label located on the driver’s
door or door pillar. The GVW
must never exceed the GVWR.
Exceeding the Safety Certification Label axle weight rating limits
could result in substandard vehicle handling, performance,
engine, transmission and/or structural damage, serious damage to the
vehicle, loss of control and personal injury.
GCW (Gross Combined Weight)– is the weight of the loaded vehicle
(GVW) plus the weight of the fully loaded trailer.
GCWR (Gross Combined Weight Rating)– is the maximum allowable
weight of the vehicle and the loaded trailer – including all cargo and
passengers – that the vehicle can handle without risking damage.
(Important: The towing vehicle’s braking system is rated for operation at
GVWR, not at GCWR. Separate functional brakes should be used for safe
control of towed vehicles and for trailers weighing more than 680 kg
[1,500 lbs]).The GCW must never exceed the GCWR.
2004 Windstar(win)
Owners Guide (post-2002-fmt)
USA English(fus)
Driving
178
Page 180 of 280
If your vehicle has the optional trailer tow package it comes with heavy
duty cooling fans, auxiliary transmission fluid cooler, an auxiliary engine
oil cooler (4.2L engine only), heavy duty battery, trailer tow wiring
(including fuses and relays to isolate the vehicle lighting circuitry from
the trailer lighting) and a kit (in a cardboard box) that includes an
adapter wiring harness that contains the standard 4-pin trailer plug.
Trailer towing puts additional loads on your vehicle’s engine,
transmission, axle, brakes, tires, and suspension. For your safety and to
maximize vehicle performance, be sure to use the proper equipment
while towing.
Follow these guidelines to ensure safe towing procedure:
•Stay within your vehicle’s load limits. If exceeded, cargo should be
removed from the trailer and/or the vehicle until all weights are within
specified limits.
•Thoroughly prepare your vehicle for towing. Refer toPreparing to
towin this chapter.
•Use extra caution when driving while trailer towing. Refer toDriving
while you towin this chapter.
•Service your vehicle more frequently if you tow a trailer. Refer to
Special Operating Conditionsin the scheduled maintenance guide.
•Do not tow a trailer until your vehicle has been driven at least 800 km
(500 miles).
•Refer to the instructions included with towing accessories for the
proper installation and adjustment specifications.
Vehicle towing capability/Trailer
hitch requirementTrailer
Model/
EngineGCWR -
kg (lbs)Hitch type
requiredTrailer Weight
range - kg
(lbs)Tongue load
Van, 3.9L
3175
(7000)
Class I
Non-Equalizing
Weight
Carrying
0 - 907
(0 - 2000)10–15% of TW
(91 kg [200
lbs.] maximum) Wagon,
3.9L
Wagon,
4.2L3266
(7200)
2004 Windstar(win)
Owners Guide (post-2002-fmt)
USA English(fus)
Driving
180
Page 181 of 280
![FORD FREESTAR 2004 1.G Owners Guide Vehicle towing capability/Trailer
hitch requirementTrailer
Wagon,
3.9L with
trailer
tow
option3856
(8500)
Class II
Non-Equalizing
Weight
Carrying0 - 1588
(0 - 3500)10–15% of TW
(159 kg [350
lbs.] ma FORD FREESTAR 2004 1.G Owners Guide Vehicle towing capability/Trailer
hitch requirementTrailer
Wagon,
3.9L with
trailer
tow
option3856
(8500)
Class II
Non-Equalizing
Weight
Carrying0 - 1588
(0 - 3500)10–15% of TW
(159 kg [350
lbs.] ma](/img/11/5167/w960_5167-180.png)
Vehicle towing capability/Trailer
hitch requirementTrailer
Wagon,
3.9L with
trailer
tow
option3856
(8500)
Class II
Non-Equalizing
Weight
Carrying0 - 1588
(0 - 3500)10–15% of TW
(159 kg [350
lbs.] maximum) Wagon,
4.2L with
trailer
tow
option3946
(8700)
Do not exceed the maximum loads listed on the Safety Compliance
Certification label. For load specification terms found on the label, refer
toVehicle loadingin this chapter. Remember to figure in the tongue
load of your loaded trailer when figuring the total weight.
Towing trailers beyond the maximum recommended gross trailer
weight exceeds the limit of the vehicle and could result in
engine damage, transmission damage, structural damage, loss of control
and personal injury.
Preparing to tow
Use the proper equipment for towing a trailer and make sure it is
properly attached to your vehicle. See your dealer or a reliable trailer
dealer if you require assistance.
Hitches
Do not use hitches that clamp onto the vehicle bumper. Use a load
carrying hitch that does not exceed your vehicle’s capability. See the
Tongue Loadsection in the trailer towing chart earlier in this section for
range details on a specific trailer load.
Safety chains
Always connect the trailer’s safety chains to the hook retainers on the
hitch. To connect the trailer’s safety chains, cross the chains under the
trailer tongue and allow slack for turning corners.
If you use a rental trailer, follow the instructions that the rental agency
gives to you.
Do not attach safety chains to the bumper.
2004 Windstar(win)
Owners Guide (post-2002-fmt)
USA English(fus)
Driving
181
Page 183 of 280
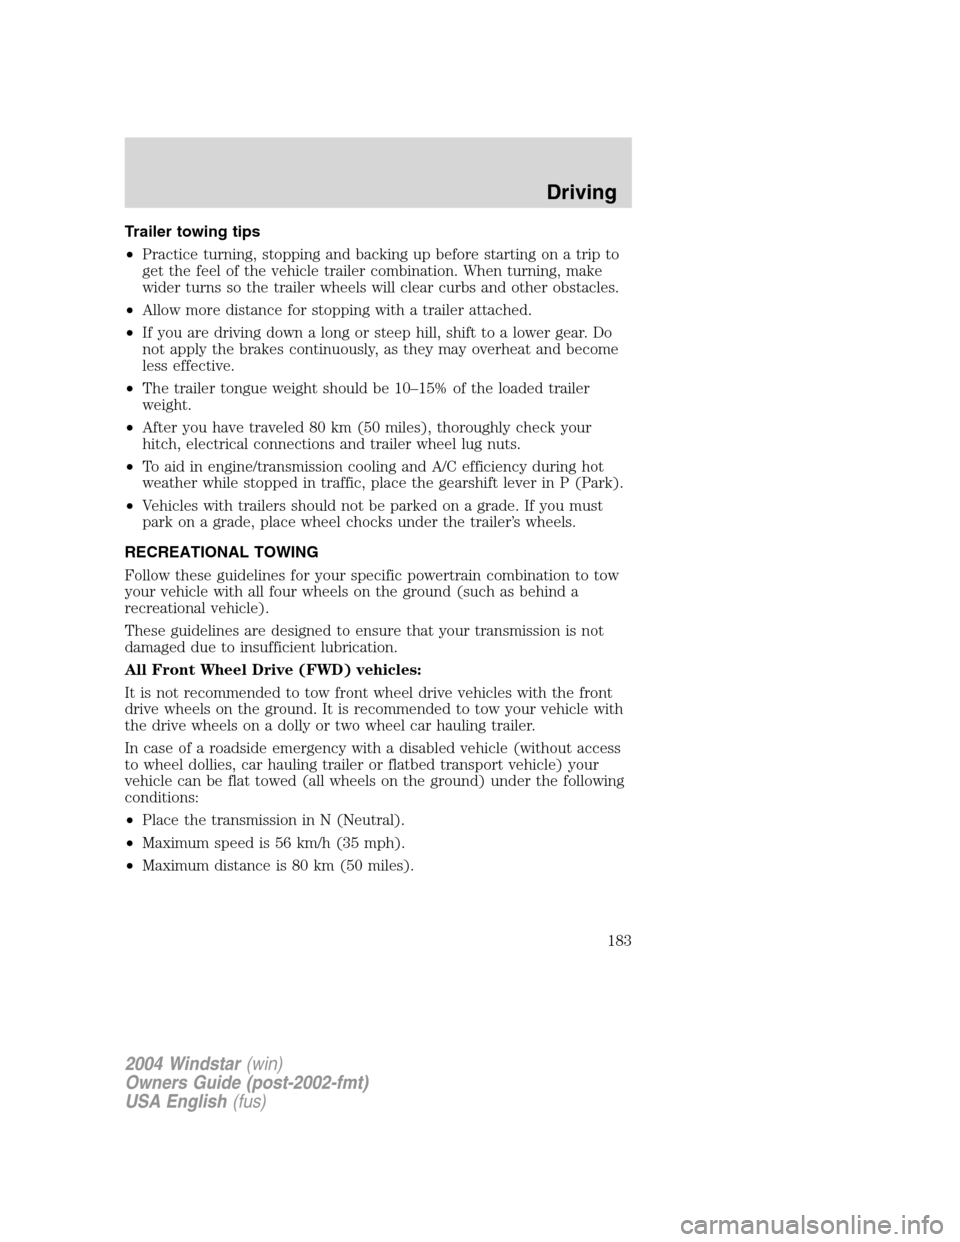
Trailer towing tips
•Practice turning, stopping and backing up before starting on a trip to
get the feel of the vehicle trailer combination. When turning, make
wider turns so the trailer wheels will clear curbs and other obstacles.
•Allow more distance for stopping with a trailer attached.
•If you are driving down a long or steep hill, shift to a lower gear. Do
not apply the brakes continuously, as they may overheat and become
less effective.
•The trailer tongue weight should be 10–15% of the loaded trailer
weight.
•After you have traveled 80 km (50 miles), thoroughly check your
hitch, electrical connections and trailer wheel lug nuts.
•To aid in engine/transmission cooling and A/C efficiency during hot
weather while stopped in traffic, place the gearshift lever in P (Park).
•Vehicles with trailers should not be parked on a grade. If you must
park on a grade, place wheel chocks under the trailer’s wheels.
RECREATIONAL TOWING
Follow these guidelines for your specific powertrain combination to tow
your vehicle with all four wheels on the ground (such as behind a
recreational vehicle).
These guidelines are designed to ensure that your transmission is not
damaged due to insufficient lubrication.
All Front Wheel Drive (FWD) vehicles:
It is not recommended to tow front wheel drive vehicles with the front
drive wheels on the ground. It is recommended to tow your vehicle with
the drive wheels on a dolly or two wheel car hauling trailer.
In case of a roadside emergency with a disabled vehicle (without access
to wheel dollies, car hauling trailer or flatbed transport vehicle) your
vehicle can be flat towed (all wheels on the ground) under the following
conditions:
•Place the transmission in N (Neutral).
•Maximum speed is 56 km/h (35 mph).
•Maximum distance is 80 km (50 miles).
2004 Windstar(win)
Owners Guide (post-2002-fmt)
USA English(fus)
Driving
183
Page 185 of 280
Canadian customers who require roadside assistance, call
1–800–665–2006.
If you need to arrange roadside assistance for yourself, Ford Motor
Company will reimburse a reasonable amount. To obtain reimbursement
information, U.S. Ford or Mercury vehicles customers call
1-800-241-3673; Lincoln vehicle customers call 1–800–521–4140.
Canadian customers who need to obtain reimbursement information, call
1–800–665–2006.
ROADSIDE COVERAGE BEYOND BASIC WARRANTY
In the United States, you may purchase additional roadside assistance
coverage beyond this period through the Ford Auto Club by contacting
your Ford or Lincoln Mercury dealer.
Similarly in Canada, for uninterrupted Roadside Assistance coverage, you
may purchase extended coverage prior to your Basic Warranty’s Roadside
Assistance expiring. For more information and enrollment, contact
1–877–294–2582 or visit our website at www.ford.ca.
HAZARD FLASHER CONTROL
The hazard flasher is located on the
instrument panel by the radio. The
hazard flashers will operate when
the ignition is off.
Push in the flasher control and all
front and rear direction signals will
flash. Press the flasher control again
to turn them off. Use it when your vehicle is disabled and is creating a
safety hazard for other motorists.
Note:With extended use, the flasher may run down your battery.
FUEL PUMP SHUT-OFF SWITCH
This device stops the electric fuel pump from sending fuel to the engine
when your vehicle has had a substantial jolt.
After an accident, if the engine cranks but does not start, this switch
may have been activated.
2004 Windstar(win)
Owners Guide (post-2002-fmt)
USA English(fus)
Roadside Emergencies
185
Page 189 of 280
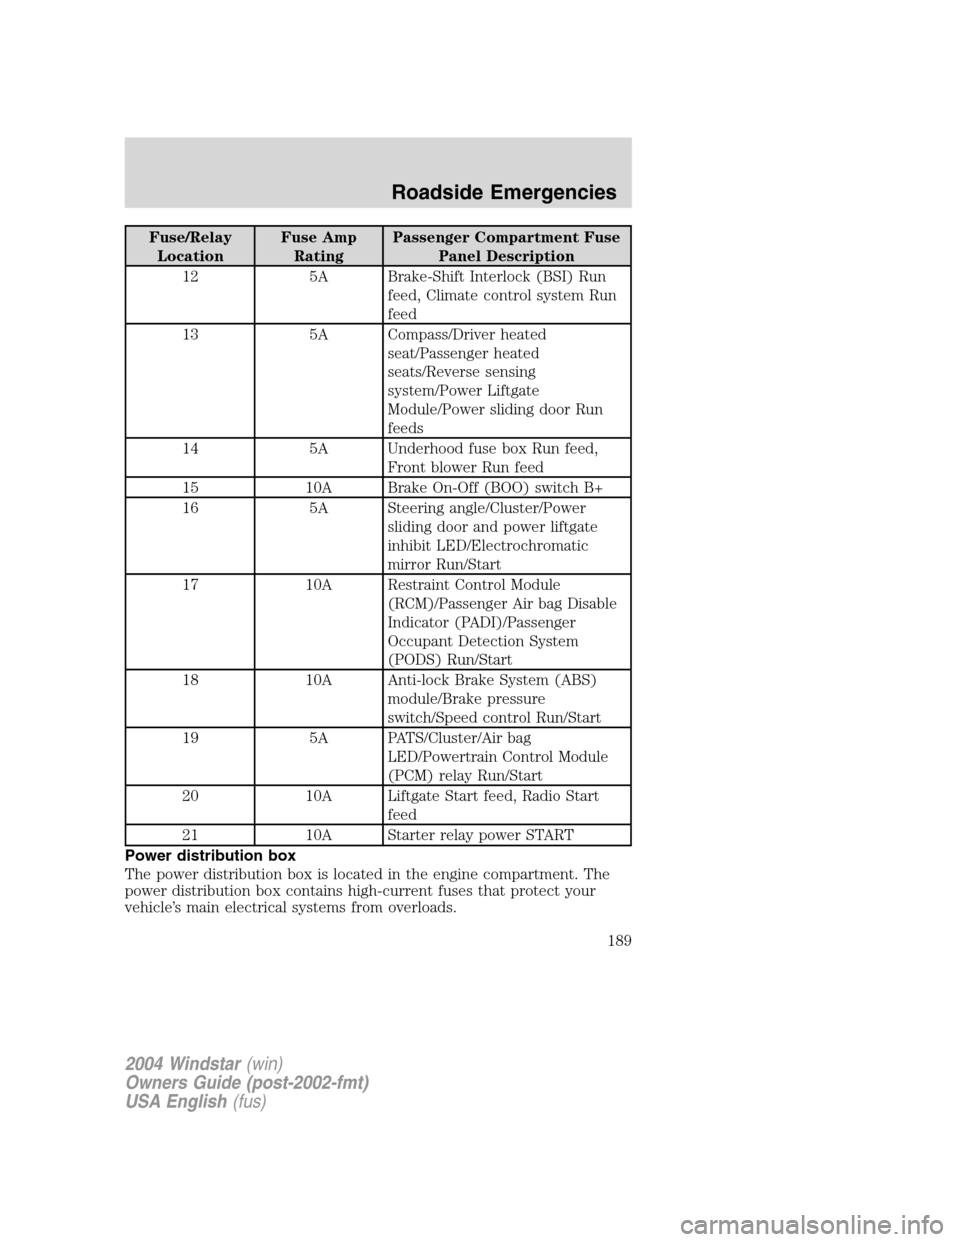
Fuse/Relay
LocationFuse Amp
RatingPassenger Compartment Fuse
Panel Description
12 5A Brake-Shift Interlock (BSI) Run
feed, Climate control system Run
feed
13 5A Compass/Driver heated
seat/Passenger heated
seats/Reverse sensing
system/Power Liftgate
Module/Power sliding door Run
feeds
14 5A Underhood fuse box Run feed,
Front blower Run feed
15 10A Brake On-Off (BOO) switch B+
16 5A Steering angle/Cluster/Power
sliding door and power liftgate
inhibit LED/Electrochromatic
mirror Run/Start
17 10A Restraint Control Module
(RCM)/Passenger Air bag Disable
Indicator (PADI)/Passenger
Occupant Detection System
(PODS) Run/Start
18 10A Anti-lock Brake System (ABS)
module/Brake pressure
switch/Speed control Run/Start
19 5A PATS/Cluster/Air bag
LED/Powertrain Control Module
(PCM) relay Run/Start
20 10A Liftgate Start feed, Radio Start
feed
21 10A Starter relay power START
Power distribution box
The power distribution box is located in the engine compartment. The
power distribution box contains high-current fuses that protect your
vehicle’s main electrical systems from overloads.
2004 Windstar(win)
Owners Guide (post-2002-fmt)
USA English(fus)
Roadside Emergencies
189
Page 191 of 280
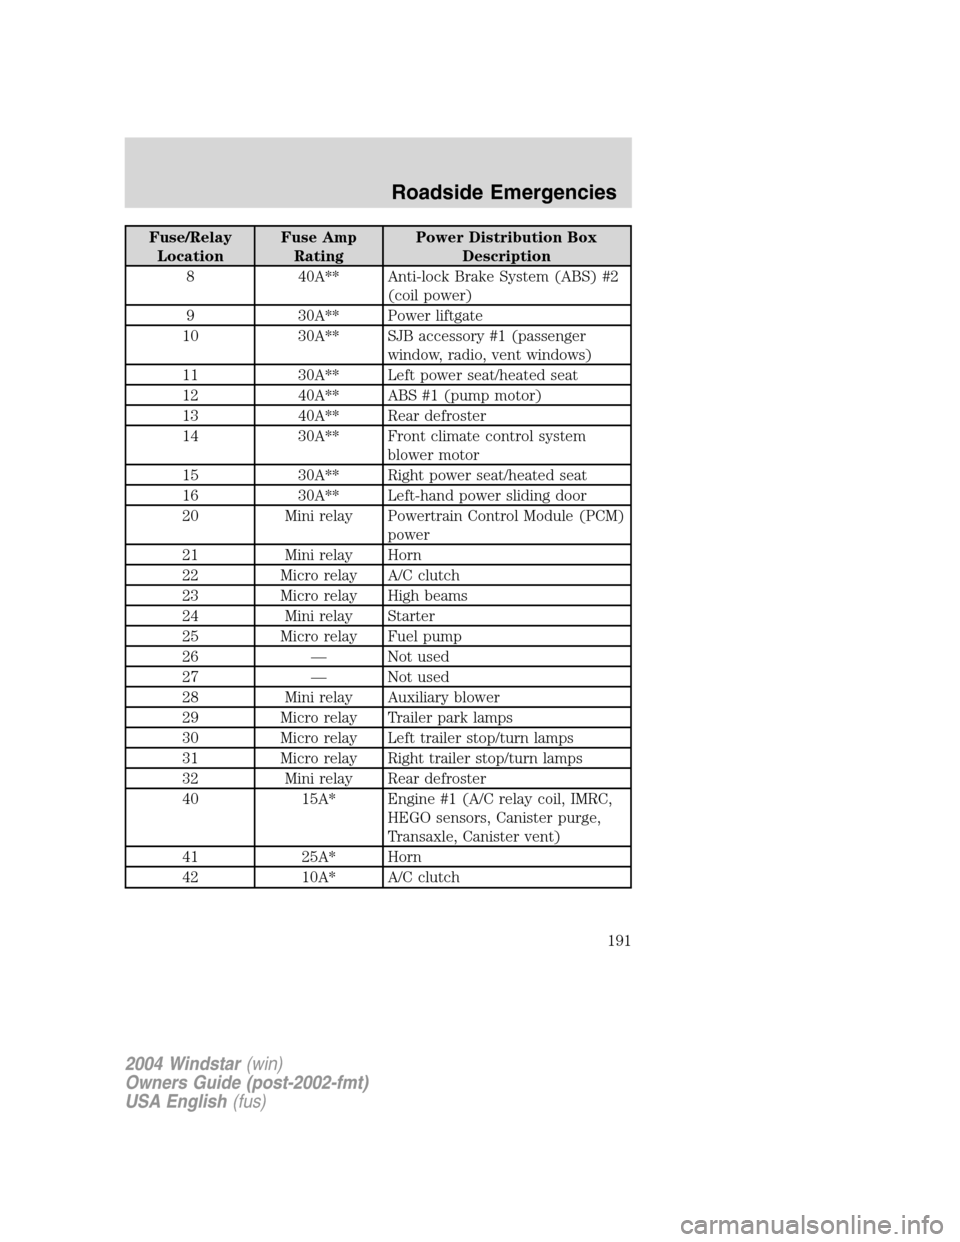
Fuse/Relay
LocationFuse Amp
RatingPower Distribution Box
Description
8 40A** Anti-lock Brake System (ABS) #2
(coil power)
9 30A** Power liftgate
10 30A** SJB accessory #1 (passenger
window, radio, vent windows)
11 30A** Left power seat/heated seat
12 40A** ABS #1 (pump motor)
13 40A** Rear defroster
14 30A** Front climate control system
blower motor
15 30A** Right power seat/heated seat
16 30A** Left-hand power sliding door
20 Mini relay Powertrain Control Module (PCM)
power
21 Mini relay Horn
22 Micro relay A/C clutch
23 Micro relay High beams
24 Mini relay Starter
25 Micro relay Fuel pump
26 — Not used
27 — Not used
28 Mini relay Auxiliary blower
29 Micro relay Trailer park lamps
30 Micro relay Left trailer stop/turn lamps
31 Micro relay Right trailer stop/turn lamps
32 Mini relay Rear defroster
40 15A* Engine #1 (A/C relay coil, IMRC,
HEGO sensors, Canister purge,
Transaxle, Canister vent)
41 25A* Horn
42 10A* A/C clutch
2004 Windstar(win)
Owners Guide (post-2002-fmt)
USA English(fus)
Roadside Emergencies
191
Page 192 of 280
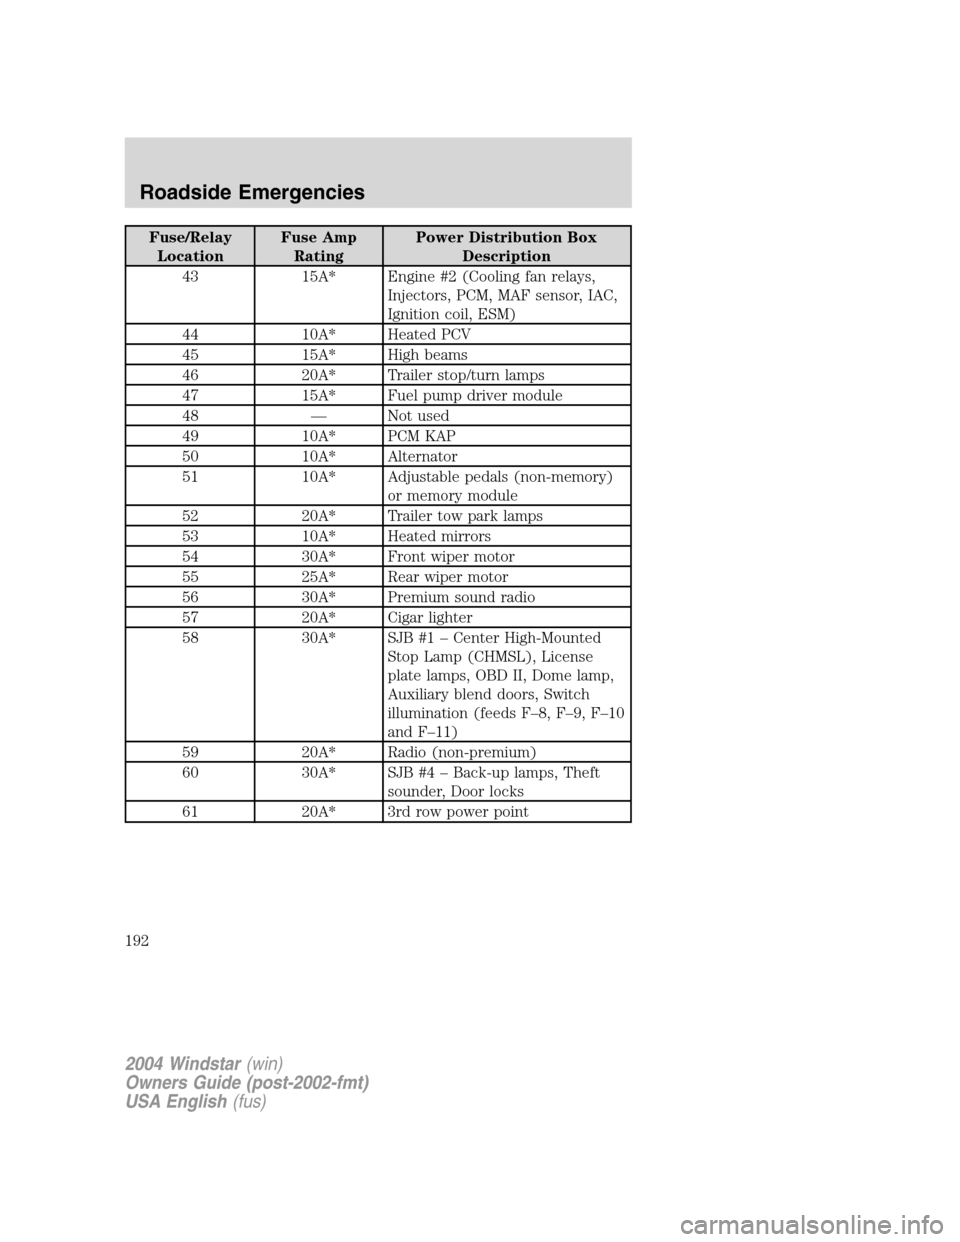
Fuse/Relay
LocationFuse Amp
RatingPower Distribution Box
Description
43 15A* Engine #2 (Cooling fan relays,
Injectors, PCM, MAF sensor, IAC,
Ignition coil, ESM)
44 10A* Heated PCV
45 15A* High beams
46 20A* Trailer stop/turn lamps
47 15A* Fuel pump driver module
48 — Not used
49 10A* PCM KAP
50 10A* Alternator
51 10A* Adjustable pedals (non-memory)
or memory module
52 20A* Trailer tow park lamps
53 10A* Heated mirrors
54 30A* Front wiper motor
55 25A* Rear wiper motor
56 30A* Premium sound radio
57 20A* Cigar lighter
58 30A* SJB #1 – Center High-Mounted
Stop Lamp (CHMSL), License
plate lamps, OBD II, Dome lamp,
Auxiliary blend doors, Switch
illumination (feeds F–8, F–9, F–10
and F–11)
59 20A* Radio (non-premium)
60 30A* SJB #4 – Back-up lamps, Theft
sounder, Door locks
61 20A* 3rd row power point
2004 Windstar(win)
Owners Guide (post-2002-fmt)
USA English(fus)
Roadside Emergencies
192