height FORD FUSION 2019 User Guide
[x] Cancel search | Manufacturer: FORD, Model Year: 2019, Model line: FUSION, Model: FORD FUSION 2019Pages: 550, PDF Size: 8.5 MB
Page 136 of 550
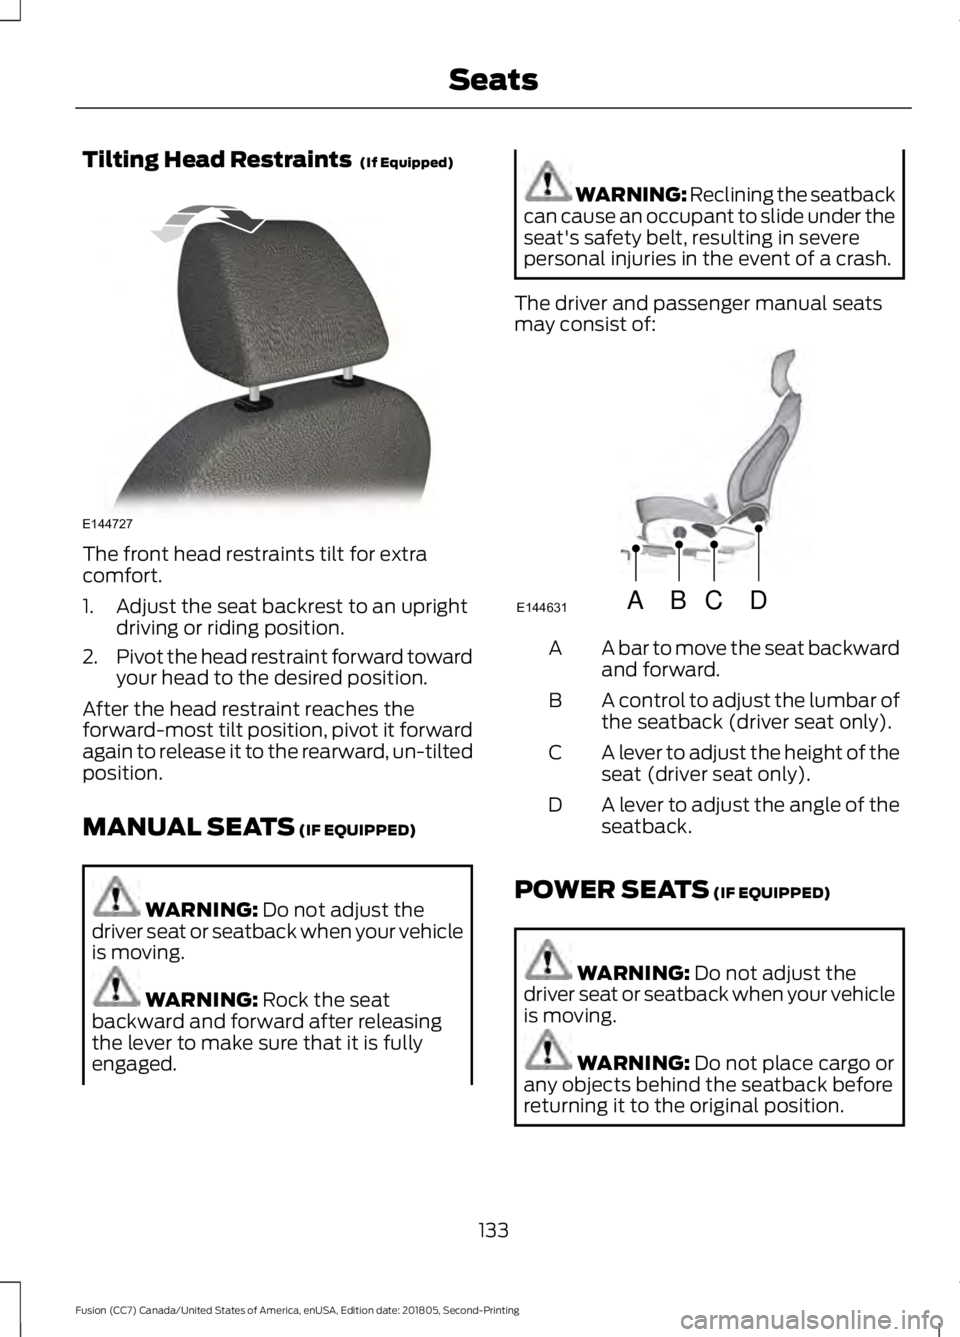
Tilting Head Restraints (If Equipped)
The front head restraints tilt for extra
comfort.
1. Adjust the seat backrest to an upright
driving or riding position.
2. Pivot the head restraint forward toward
your head to the desired position.
After the head restraint reaches the
forward-most tilt position, pivot it forward
again to release it to the rearward, un-tilted
position.
MANUAL SEATS
(IF EQUIPPED) WARNING:
Do not adjust the
driver seat or seatback when your vehicle
is moving. WARNING:
Rock the seat
backward and forward after releasing
the lever to make sure that it is fully
engaged. WARNING: Reclining the seatback
can cause an occupant to slide under the
seat's safety belt, resulting in severe
personal injuries in the event of a crash.
The driver and passenger manual seats
may consist of: A bar to move the seat backward
and forward.
A
A control to adjust the lumbar of
the seatback (driver seat only).
B
A lever to adjust the height of the
seat (driver seat only).
C
A lever to adjust the angle of the
seatback.
D
POWER SEATS
(IF EQUIPPED) WARNING:
Do not adjust the
driver seat or seatback when your vehicle
is moving. WARNING:
Do not place cargo or
any objects behind the seatback before
returning it to the original position.
133
Fusion (CC7) Canada/United States of America, enUSA, Edition date: 201805, Second-Printing SeatsE144727 ABCD
E144631
Page 208 of 550
DRIVER ALERT
PRINCIPLE OF OPERATION
WARNING: You are responsible
for controlling your vehicle at all times.
The system is designed to be an aid and
does not relieve you of your responsibility
to drive with due care and attention.
Failure to follow this instruction could
result in the loss of control of your
vehicle, personal injury or death. WARNING:
The system may not
function if the sensor is blocked. WARNING:
Take regular rest
breaks if you feel tired. Do not wait for
the system to warn you. WARNING:
Certain driving styles
may result in the system warning you
even if you are not feeling tired. WARNING:
In cold and severe
weather conditions the system may not
function. Rain, snow and spray can all
limit sensor performance. WARNING:
The system will not
operate if the sensor cannot track the
road lane markings. WARNING:
If damage occurs in
the immediate area surrounding the
sensor, have your vehicle checked as
soon as possible. WARNING:
The system may not
correctly operate if your vehicle is fitted
with a suspension kit not approved by
us.
Note: The system may not operate correctly
if you modify the ride height. Note:
Keep the windshield free from
obstructions. For example, bird droppings,
insects, snow or ice.
Note: If the camera is blocked or if the
windshield is damaged, the system may not
function.
Note: If enabled in the menu, the system
activates at speeds above
40 mph
(64 km/h). When below the activation
speed, the information display informs the
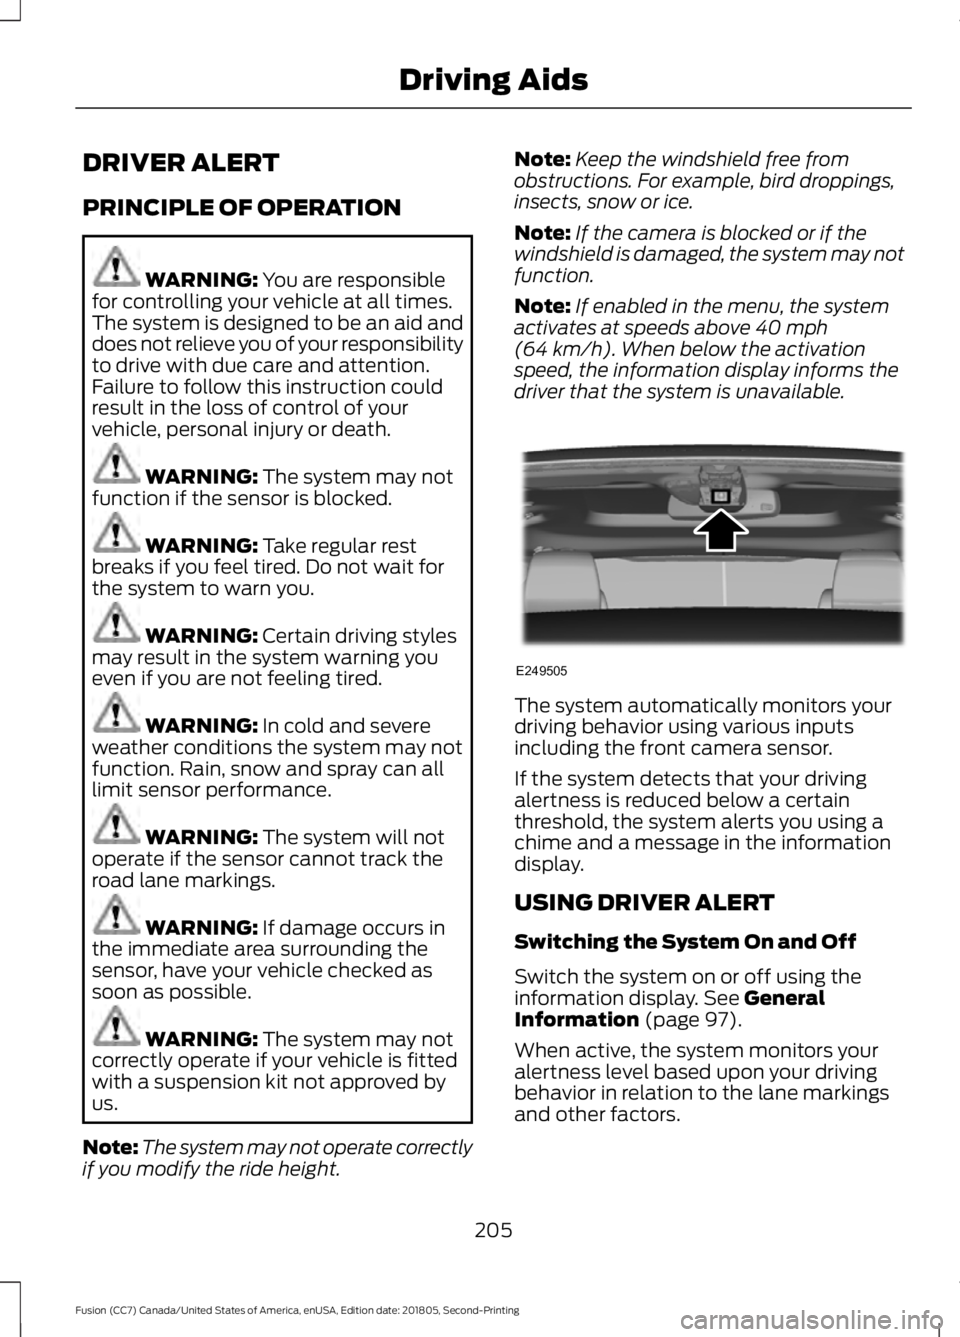
driver that the system is unavailable. The system automatically monitors your
driving behavior using various inputs
including the front camera sensor.
If the system detects that your driving
alertness is reduced below a certain
threshold, the system alerts you using a
chime and a message in the information
display.
USING DRIVER ALERT
Switching the System On and Off
Switch the system on or off using the
information display.
See General
Information (page 97).
When active, the system monitors your
alertness level based upon your driving
behavior in relation to the lane markings
and other factors.
205
Fusion (CC7) Canada/United States of America, enUSA, Edition date: 201805, Second-Printing Driving AidsE249505
Page 276 of 550
Note:
Make sure that the wiper blade locks
into place. Lower the wiper arm and blade
back to the windshield. The wiper arms will
automatically return to their normal position
when the ignition is turned on.
Replace wiper blades at least once per
year for optimum performance.
Poor wiper quality can be improved by
cleaning the wiper blades and the
windshield.
ADJUSTING THE HEADLAMPS
Vertical Aim Adjustment
The headlamps on your vehicle are
properly aimed at the assembly plant. If
your vehicle has been in an accident, the
alignment of your headlamps should be
checked by your authorized dealer.
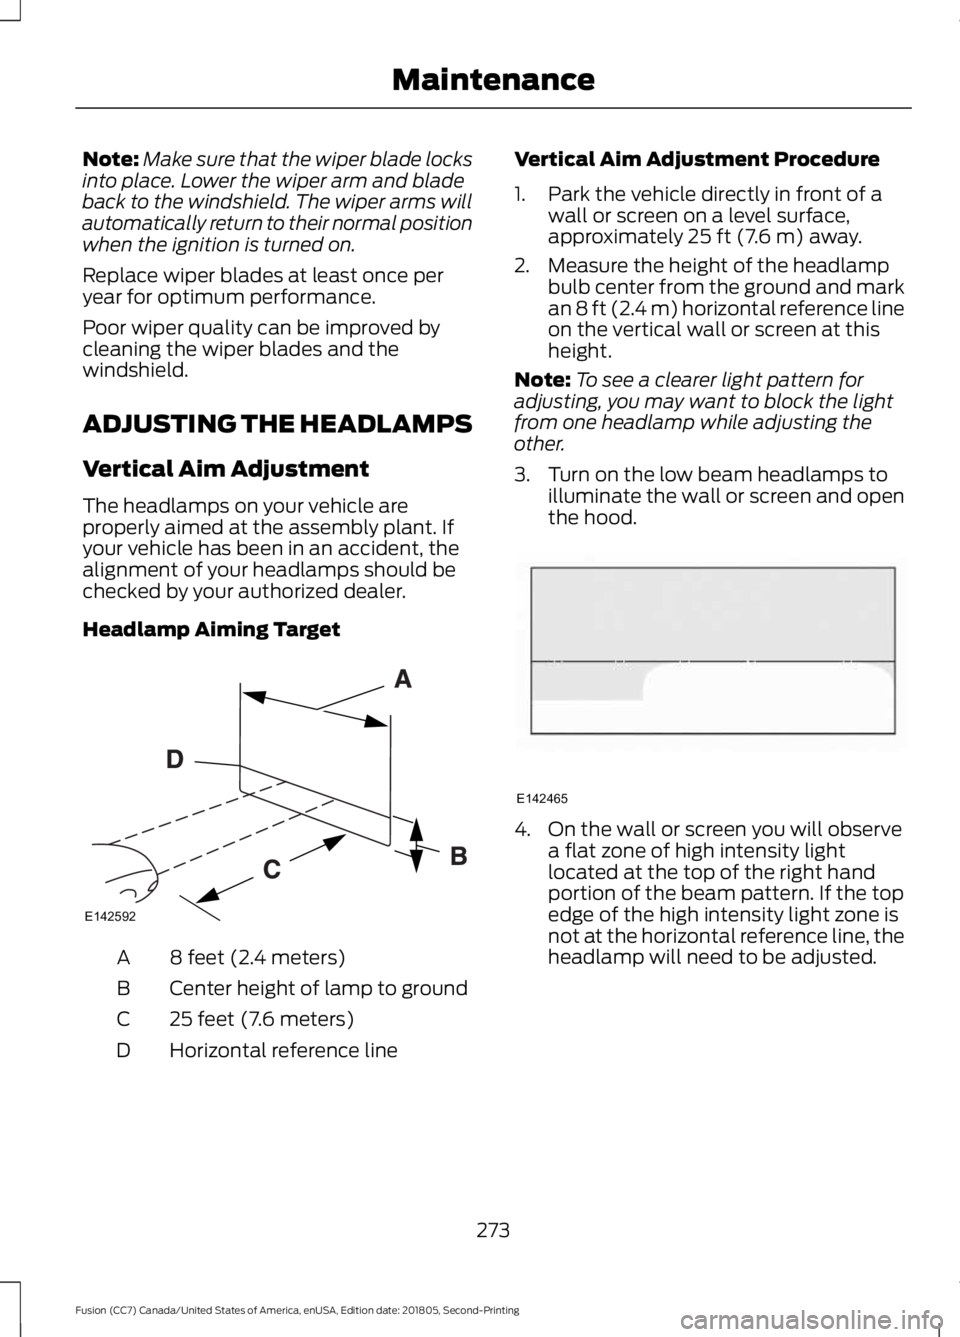
Headlamp Aiming Target 8 feet (2.4 meters)
A
Center height of lamp to ground
B
25 feet (7.6 meters)
C
Horizontal reference line
D Vertical Aim Adjustment Procedure
1. Park the vehicle directly in front of a
wall or screen on a level surface,
approximately 25 ft (7.6 m) away.
2. Measure the height of the headlamp bulb center from the ground and mark
an
8 ft (2.4 m) horizontal reference line
on the vertical wall or screen at this
height.
Note: To see a clearer light pattern for
adjusting, you may want to block the light
from one headlamp while adjusting the
other.
3. Turn on the low beam headlamps to illuminate the wall or screen and open
the hood. 4. On the wall or screen you will observe
a flat zone of high intensity light
located at the top of the right hand
portion of the beam pattern. If the top
edge of the high intensity light zone is
not at the horizontal reference line, the
headlamp will need to be adjusted.
273
Fusion (CC7) Canada/United States of America, enUSA, Edition date: 201805, Second-Printing MaintenanceE142592 E142465
Page 295 of 550
B.
215: Indicates the nominal
width of the tire in millimeters
from sidewall edge to sidewall
edge. In general, the larger the
number, the wider the tire.
C. 65:
Indicates the aspect ratio
which gives the tire's ratio of
height to width.
D. R:
Indicates a radial type tire.
E. 15:
Indicates the wheel or rim
diameter in inches. If you change
your wheel size, you will have to
purchase new tires to match the
new wheel diameter.
F. 95:
Indicates the tire's load
index. It is an index that relates to
how much weight a tire can carry.
You may find this information in
your owner ’s manual. If not,
contact a local tire dealer.
Note: You may not find this
information on all tires because it
is not required by federal law.
G. H:
Indicates the tire's speed
rating. The speed rating denotes
the speed at which a tire is
designed to be driven for extended
periods of time under a standard
condition of load and inflation
pressure. The tires on your vehicle
may operate at different
conditions for load and inflation
pressure. These speed ratings may
need to be adjusted for the
difference in conditions. The
ratings range from
81– 186 mph
(130– 299 km/h). These ratings
are listed in the following chart. Note:
You may not find this
information on all tires because it
is not required by federal law. mph ( km/h)
Letter
rating
81 mph (130 km/h)
M
87 mph (140 km/h)
N
99 mph (159 km/h)
Q
106 mph (171 km/h)
R
112 mph (180 km/h)
S
118 mph (190 km/h)
T
124 mph (200 km/h)
U
130 mph (210 km/h)
H
149 mph (240 km/h)
V
168 mph (270 km/h)
W
186 mph (299 km/h)
Y
Note: For tires with a maximum
speed capability over 149 mph
(240 km/h), tire manufacturers
sometimes use the letters ZR. For
those with a maximum speed
capability over 186 mph (299
km/h), tire manufacturers always
use the letters ZR.
H. U.S. DOT Tire Identification
Number (TIN):
This begins with
the letters DOT and indicates that
the tire meets all federal
standards. The next two numbers
or letters are the plant code
designating where it was
manufactured, the next two are
292
Fusion (CC7) Canada/United States of America, enUSA, Edition date: 201805, Second-Printing Wheels and Tires
Page 298 of 550
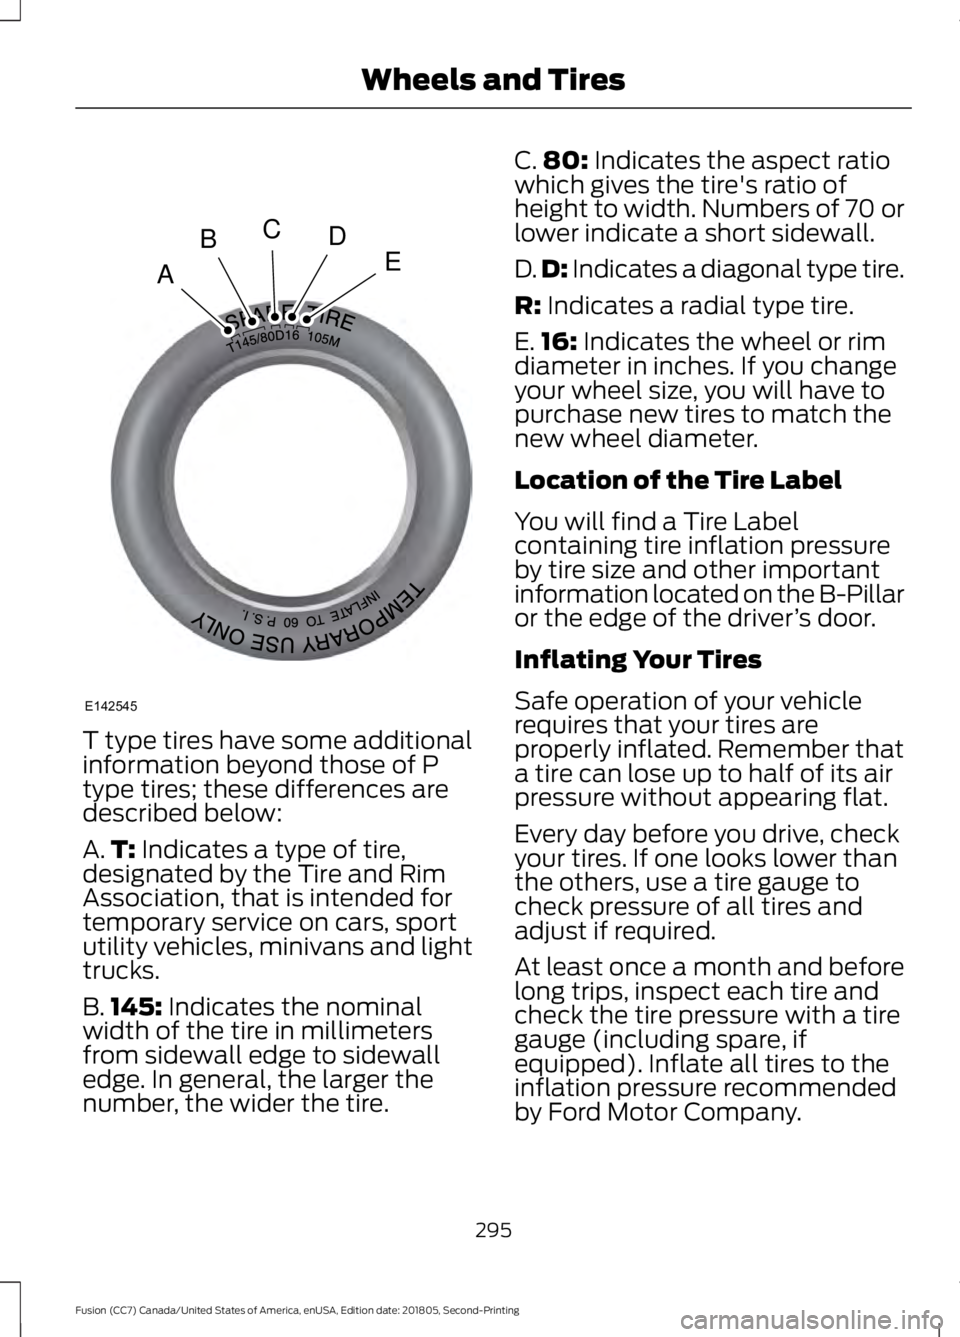
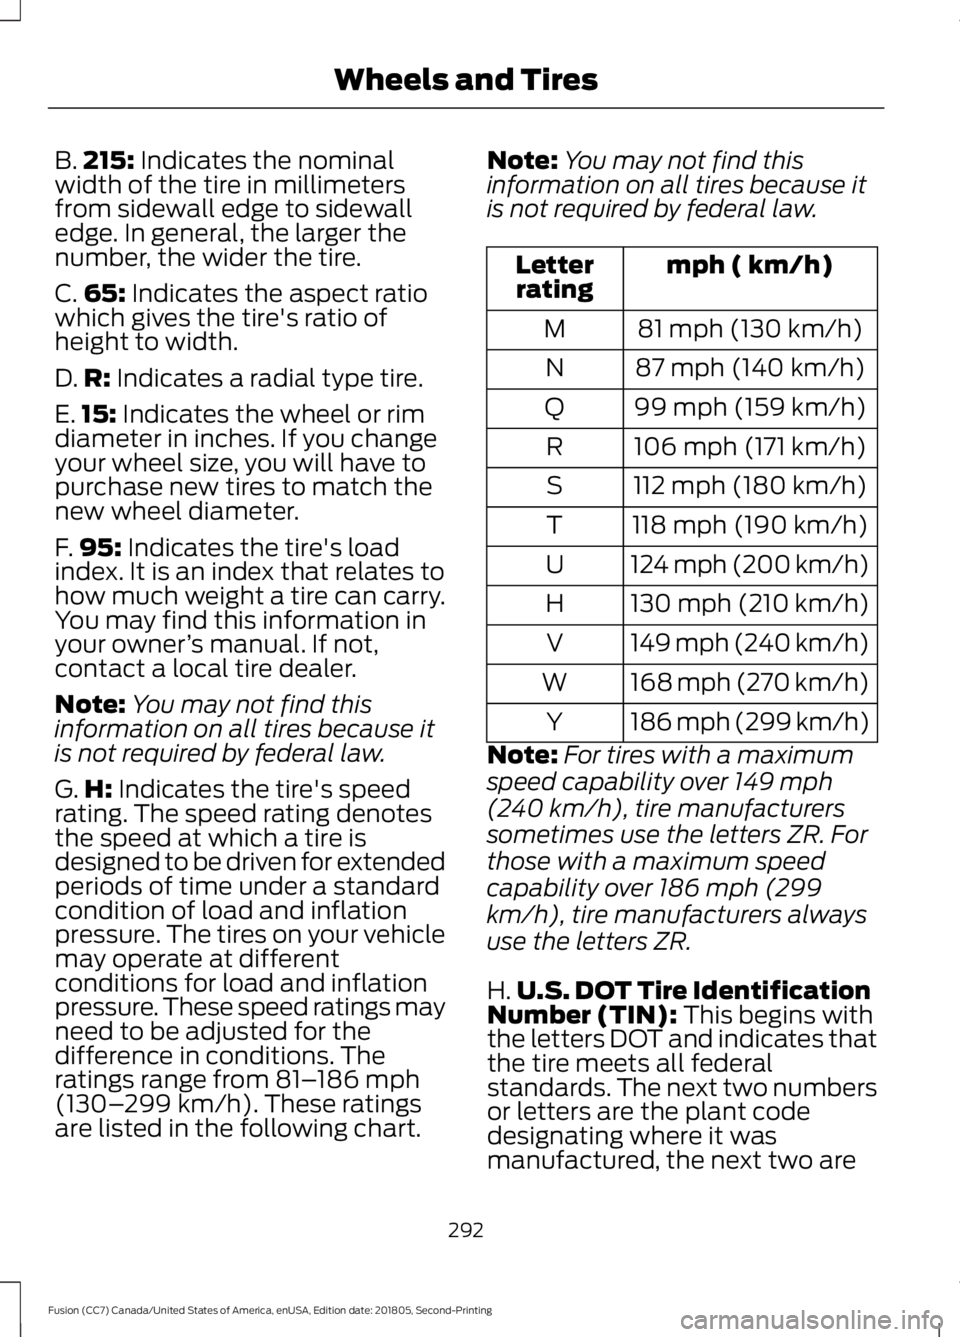
T type tires have some additional
information beyond those of P
type tires; these differences are
described below:
A.
T: Indicates a type of tire,
designated by the Tire and Rim
Association, that is intended for
temporary service on cars, sport
utility vehicles, minivans and light
trucks.
B. 145:
Indicates the nominal
width of the tire in millimeters
from sidewall edge to sidewall
edge. In general, the larger the
number, the wider the tire. C.
80:
Indicates the aspect ratio
which gives the tire's ratio of
height to width. Numbers of 70 or
lower indicate a short sidewall.
D. D:
Indicates a diagonal type tire.
R:
Indicates a radial type tire.
E. 16:
Indicates the wheel or rim
diameter in inches. If you change
your wheel size, you will have to
purchase new tires to match the
new wheel diameter.
Location of the Tire Label
You will find a Tire Label
containing tire inflation pressure
by tire size and other important
information located on the B-Pillar
or the edge of the driver ’s door.
Inflating Your Tires
Safe operation of your vehicle
requires that your tires are
properly inflated. Remember that
a tire can lose up to half of its air
pressure without appearing flat.
Every day before you drive, check
your tires. If one looks lower than
the others, use a tire gauge to
check pressure of all tires and
adjust if required.
At least once a month and before
long trips, inspect each tire and
check the tire pressure with a tire
gauge (including spare, if
equipped). Inflate all tires to the
inflation pressure recommended
by Ford Motor Company.
295
Fusion (CC7) Canada/United States of America, enUSA, Edition date: 201805, Second-Printing Wheels and TiresA
BCDE
E142545
Page 301 of 550
Inspecting Your Tires and
Wheel Valve Stems
Periodically inspect the tire treads
for uneven or excessive wear and
remove objects such as stones,
nails or glass that may be wedged
in the tread grooves. Check the tire
and valve stems for holes, cracks,
or cuts that may permit air
leakage and repair or replace the
tire and replace the valve stem.
Inspect the tire sidewalls for
cracking, cuts, bruises and other
signs of damage or excessive
wear. If internal damage to the tire
is suspected, have the tire
demounted and inspected in case
it needs to be repaired or replaced.
For your safety, tires that are
damaged or show signs of
excessive wear should not be used
because they are more likely to
blow out or fail.
Improper or inadequate vehicle
maintenance can cause tires to
wear abnormally. Inspect all your
tires, including the spare,
frequently, and replace them if
one or more of the following
conditions exist:
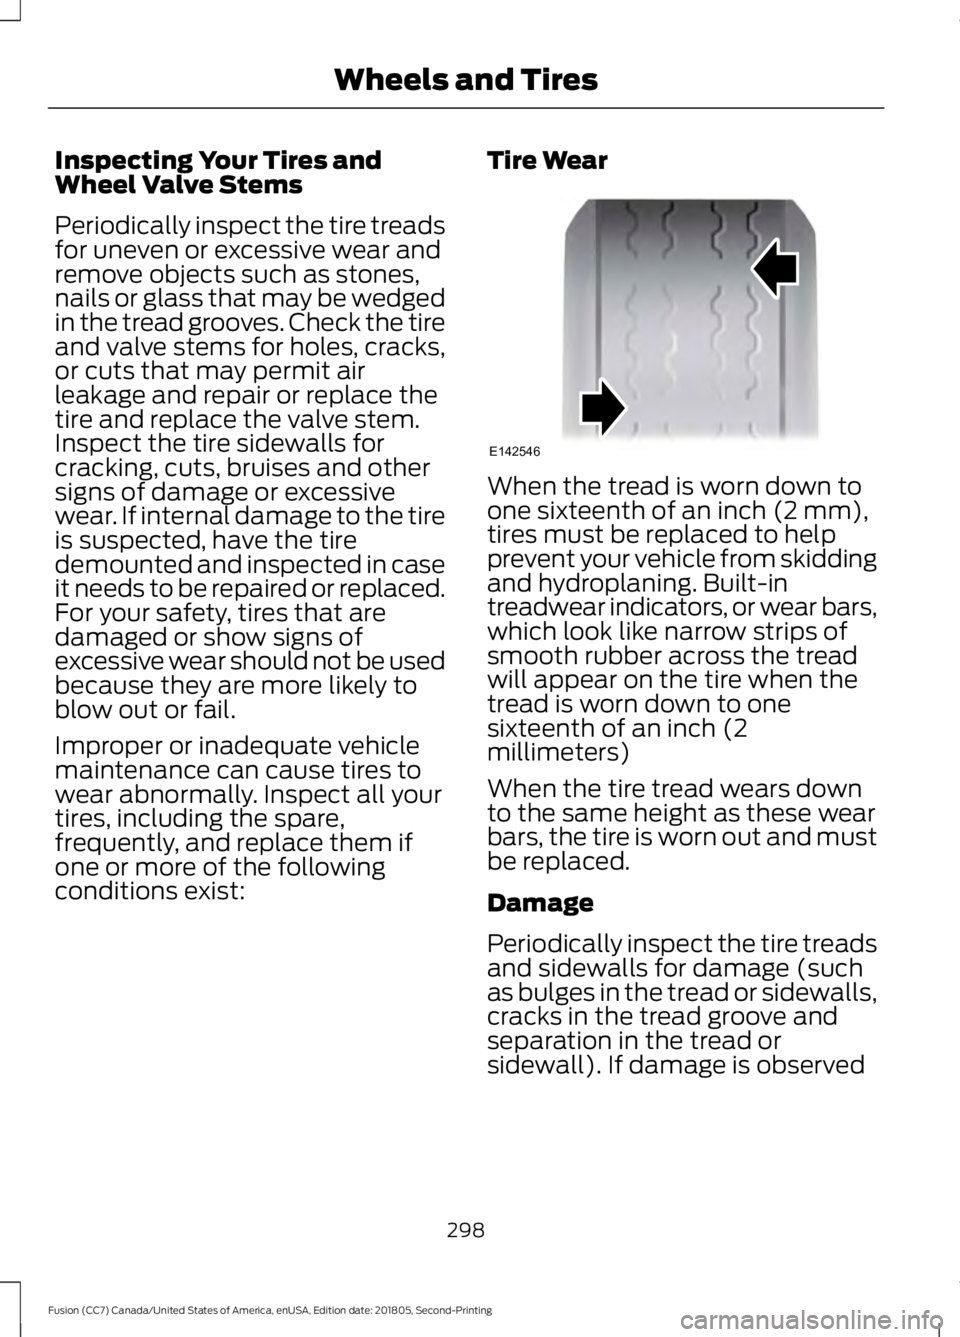
Tire Wear When the tread is worn down to
one sixteenth of an inch (2 mm),
tires must be replaced to help
prevent your vehicle from skidding
and hydroplaning. Built-in
treadwear indicators, or wear bars,
which look like narrow strips of
smooth rubber across the tread
will appear on the tire when the
tread is worn down to one
sixteenth of an inch (2
millimeters)
When the tire tread wears down
to the same height as these wear
bars, the tire is worn out and must
be replaced.
Damage
Periodically inspect the tire treads
and sidewalls for damage (such
as bulges in the tread or sidewalls,
cracks in the tread groove and
separation in the tread or
sidewall). If damage is observed
298
Fusion (CC7) Canada/United States of America, enUSA, Edition date: 201805, Second-Printing Wheels and TiresE142546
Page 318 of 550
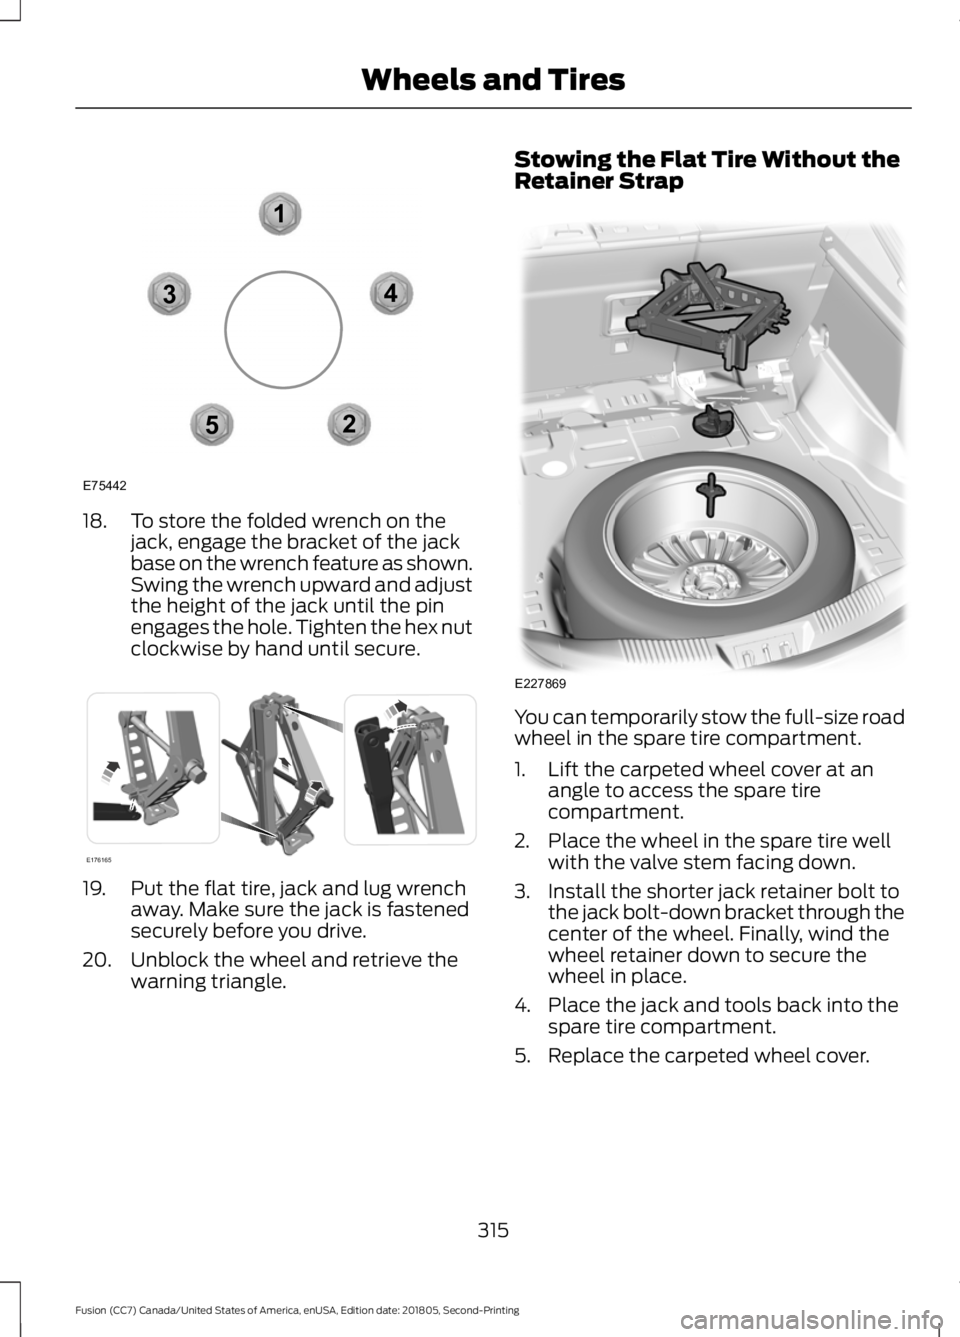
18. To store the folded wrench on the
jack, engage the bracket of the jack
base on the wrench feature as shown.
Swing the wrench upward and adjust
the height of the jack until the pin
engages the hole. Tighten the hex nut
clockwise by hand until secure. 19. Put the flat tire, jack and lug wrench
away. Make sure the jack is fastened
securely before you drive.
20. Unblock the wheel and retrieve the warning triangle. Stowing the Flat Tire Without the
Retainer Strap
You can temporarily stow the full-size road
wheel in the spare tire compartment.
1. Lift the carpeted wheel cover at an
angle to access the spare tire
compartment.
2. Place the wheel in the spare tire well with the valve stem facing down.
3. Install the shorter jack retainer bolt to the jack bolt-down bracket through the
center of the wheel. Finally, wind the
wheel retainer down to secure the
wheel in place.
4. Place the jack and tools back into the spare tire compartment.
5. Replace the carpeted wheel cover.
315
Fusion (CC7) Canada/United States of America, enUSA, Edition date: 201805, Second-Printing Wheels and Tires12
3
4
5
E75442 E176165 E227869
Page 547 of 550
Removing a Headlamp..............................274
Repairing Minor Paint Damage..............285
Replacement Parts
Recommendation........................................14
Collision Repairs.................................................... 14
Scheduled Maintenance and Mechanical Repairs.................................................................. 14
Warranty on Replacement Parts..................... 14
Replacing a Lost Key or Remote Control............................................................58
Reporting Safety Defects (Canada Only)..............................................................243
Reporting Safety Defects (U.S. Only)..............................................................243
Roadside Assistance..................................232 Vehicles Sold in Canada: Getting Roadside
Assistance....................................................... 233
Vehicles Sold in the United States: Getting Roadside Assistance................................... 232
Vehicles Sold in the United States: Using Roadside Assistance................................... 232
Roadside Emergencies..............................232
Running-In See: Breaking-In................................................. 230
Running Out of Fuel
.....................................157
Adding Fuel From a Portable Fuel
Container........................................................... 157
Filling a Portable Fuel Container................... 157
S
Safety Canopy ™
............................................50
Safety Precautions.......................................155
Satellite Radio..............................................355
Satellite Radio Electronic Serial Number
(ESN)................................................................ 356
Satellite Radio Reception Factors..............356
SiriusXM Satellite Radio Service.................356
Troubleshooting................................................. 357
Scheduled Maintenance Record
...........484
Scheduled Maintenance...........................476
Seatbelt Extension........................................42
Seatbelt Height Adjustment......................39
Seatbelt Reminder
........................................40
Belt-Minder™....................................................... 40
Seatbelts...........................................................35 Principle of Operation......................................... 35Seatbelt Warning Lamp and Indicator
Chime..............................................................40
Conditions of operation.................................... 40
Seats...................................................................131
Security
................................................................71
Settings...........................................................446 911 Assist................................................................ 451
Ambient Lighting............................................... 458
Bluetooth............................................................. 448
Clock...................................................................... 448
Display
................................................................... 459
General.................................................................. 456
Media Player........................................................ 447
Mobile Apps......................................................... 454
Navigation............................................................ 452
Phone.................................................................... 448
Radio....................................................................... 451
SiriusXM................................................................ 452
Sound.................................................................... 446
Valet Mode.......................................................... 460
Vehicle................................................................... 458
Voice Control....................................................... 459
Wi-Fi & Hotspot................................................. 456
Side Airbags
.....................................................48
Side Sensing System..................................185 Obstacle Distance Indicator.......................... 186
Sitting in the Correct Position...................131
Snow Chains See: Using Snow Chains................................. 303
Spare Wheel See: Changing a Road Wheel........................ 310
Special Notices
................................................14
New Vehicle Limited Warranty......................... 14
On Board Diagnostics Data Link Connector............................................................ 15
Special Instructions.............................................. 14
Special Operating Conditions Scheduled Maintenance..............................................482
Exceptions........................................................... 483
Speed Control See: Cruise Control............................................. 197
Stability Control
.............................................181
Principle of Operation........................................ 181
Starting a Gasoline Engine.......................149 Automatic Engine Shutdown........................ 150
Failure to Start..................................................... 149
Guarding Against Exhaust Fumes.................151
Important Ventilating Information................151
544
Fusion (CC7) Canada/United States of America, enUSA, Edition date: 201805, Second-Printing Index