mirror FORD FUSION 2019 User Guide
[x] Cancel search | Manufacturer: FORD, Model Year: 2019, Model line: FUSION, Model: FORD FUSION 2019Pages: 550, PDF Size: 8.5 MB
Page 139 of 550
•
Driver seat.
• Power mirrors.
• Power steering column.
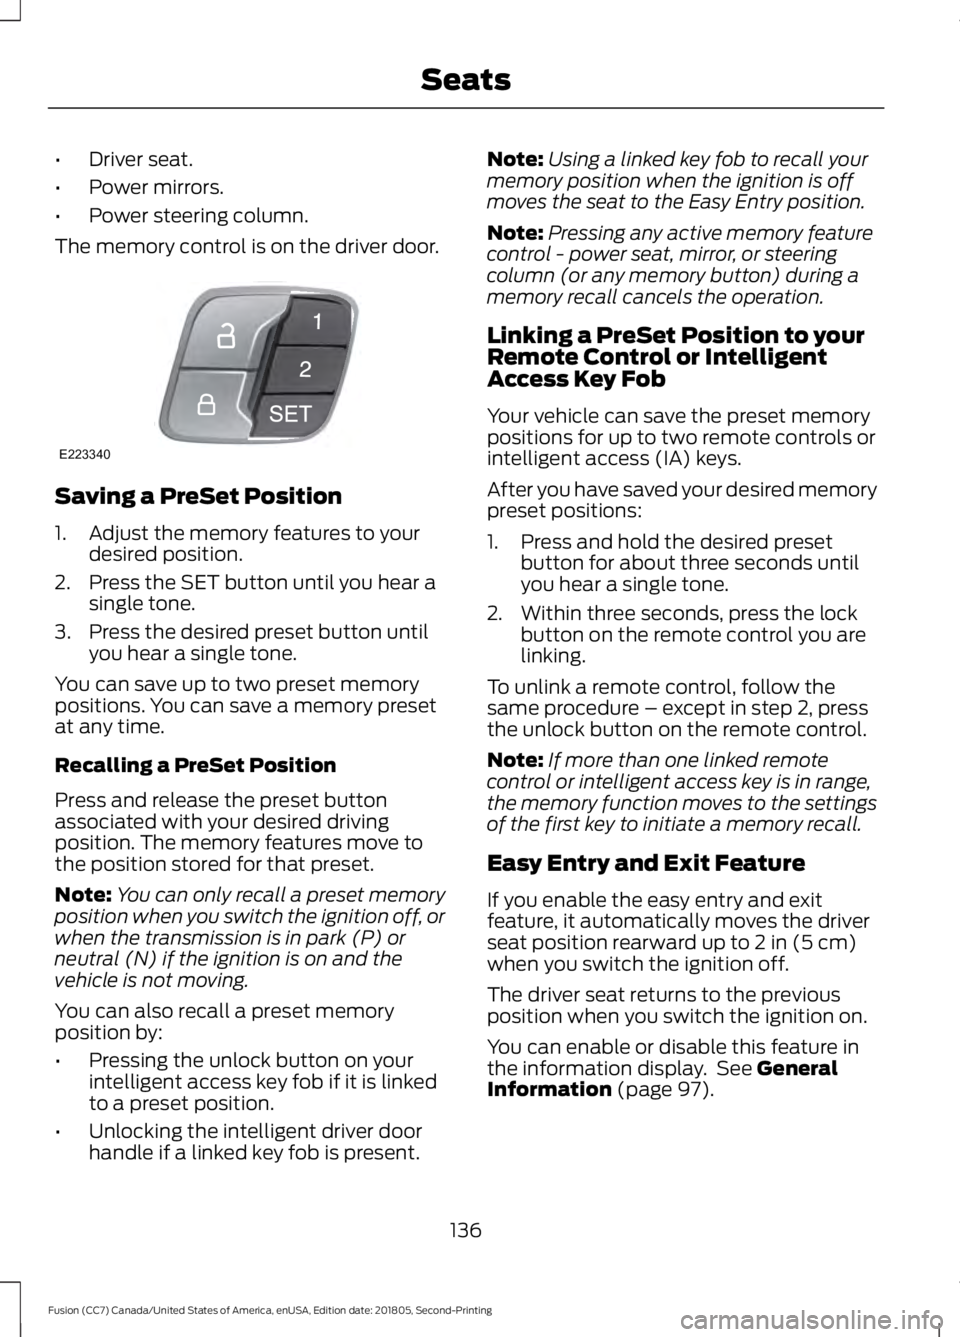
The memory control is on the driver door. Saving a PreSet Position
1. Adjust the memory features to your
desired position.
2. Press the SET button until you hear a single tone.
3. Press the desired preset button until you hear a single tone.
You can save up to two preset memory
positions. You can save a memory preset
at any time.
Recalling a PreSet Position
Press and release the preset button
associated with your desired driving
position. The memory features move to
the position stored for that preset.
Note: You can only recall a preset memory
position when you switch the ignition off, or
when the transmission is in park (P) or
neutral (N) if the ignition is on and the
vehicle is not moving.
You can also recall a preset memory
position by:
• Pressing the unlock button on your
intelligent access key fob if it is linked
to a preset position.
• Unlocking the intelligent driver door
handle if a linked key fob is present. Note:
Using a linked key fob to recall your
memory position when the ignition is off
moves the seat to the Easy Entry position.
Note: Pressing any active memory feature
control - power seat, mirror, or steering
column (or any memory button) during a
memory recall cancels the operation.
Linking a PreSet Position to your
Remote Control or Intelligent
Access Key Fob
Your vehicle can save the preset memory
positions for up to two remote controls or
intelligent access (IA) keys.
After you have saved your desired memory
preset positions:
1. Press and hold the desired preset button for about three seconds until
you hear a single tone.
2. Within three seconds, press the lock button on the remote control you are
linking.
To unlink a remote control, follow the
same procedure – except in step 2, press
the unlock button on the remote control.
Note: If more than one linked remote
control or intelligent access key is in range,
the memory function moves to the settings
of the first key to initiate a memory recall.
Easy Entry and Exit Feature
If you enable the easy entry and exit
feature, it automatically moves the driver
seat position rearward up to 2 in (5 cm)
when you switch the ignition off.
The driver seat returns to the previous
position when you switch the ignition on.
You can enable or disable this feature in
the information display. See
General
Information (page 97).
136
Fusion (CC7) Canada/United States of America, enUSA, Edition date: 201805, Second-Printing SeatsE223340
Page 196 of 550
Possible Cause
Symptom
Vehicles or objects bordering the space may not be
correctly parked.
Your vehicle stopped too far past the parking space.
The tires may not be correctly installed or maintained.
For example, not inflated correctly, improper size, or of
different sizes.
A repair or alteration changes the detection capabilities.
A parked vehicle has a high attachment. For example,
a salt sprayer, snowplow or moving truck bed.
The parking space length or position of parked objects
changes after your vehicle passes the space.
The temperature around your vehicle quickly changes.
For example, driving from a heated garage into the cold,
or after leaving a car wash.
REAR VIEW CAMERA WARNING: The rear view camera
system is a reverse aid supplement
device that still requires the driver to use
it in conjunction with the interior and
exterior mirrors for maximum coverage. WARNING: Objects that are close
to either corner of the bumper or under
the bumper, might not be seen on the
screen due to the limited coverage of the
camera system. WARNING: Reverse your vehicle
slowly. Failure to follow this instruction
could result in the loss of control of your
vehicle, personal injury or death. WARNING:
Use caution when the
rear cargo door is ajar. If the rear cargo
door is ajar, the camera will be out of
position and the video image may be
incorrect. All guidelines disappear when
the rear cargo door is ajar. Failure to
follow this instruction could result in
personal injury. WARNING:
Use caution when
turning camera features on or off when
the transmission is not in park (P). Make
sure your vehicle is not moving.
The rear view camera system provides a
video image of the area behind your
vehicle.
During operation, lines appear in the
display which represent your vehicle ’s path
and proximity to objects behind your
vehicle.
193
Fusion (CC7) Canada/United States of America, enUSA, Edition date: 201805, Second-Printing Parking Aids
Page 198 of 550
Fixed guideline: Yellow zone
D
Fixed guideline: Red zone
E
Rear bumper
F
Active guidelines only show with fixed
guidelines. To use active guidelines, turn
the steering wheel to point the guidelines
toward an intended path. If the steering
wheel position changes while reversing,
your vehicle might deviate from the original
intended path.
The fixed and active guidelines fade in and
out depending on the steering wheel
position. The active guidelines do not
display when the steering wheel position
is straight.
Always use caution while reversing.
Objects in the red zone are closest to your
vehicle and objects in the green zone are
farther away. Objects are getting closer to
your vehicle as they move from the green
zone to the yellow or red zones. Use the
side view mirrors and rear view mirror to
get better coverage on both sides and rear
of your vehicle.
Camera System Settings
You can access the rear view camera
system settings through the display screen.
See General Information (page 97). Enhanced Park Aids or Park Pilot
(If Equipped)
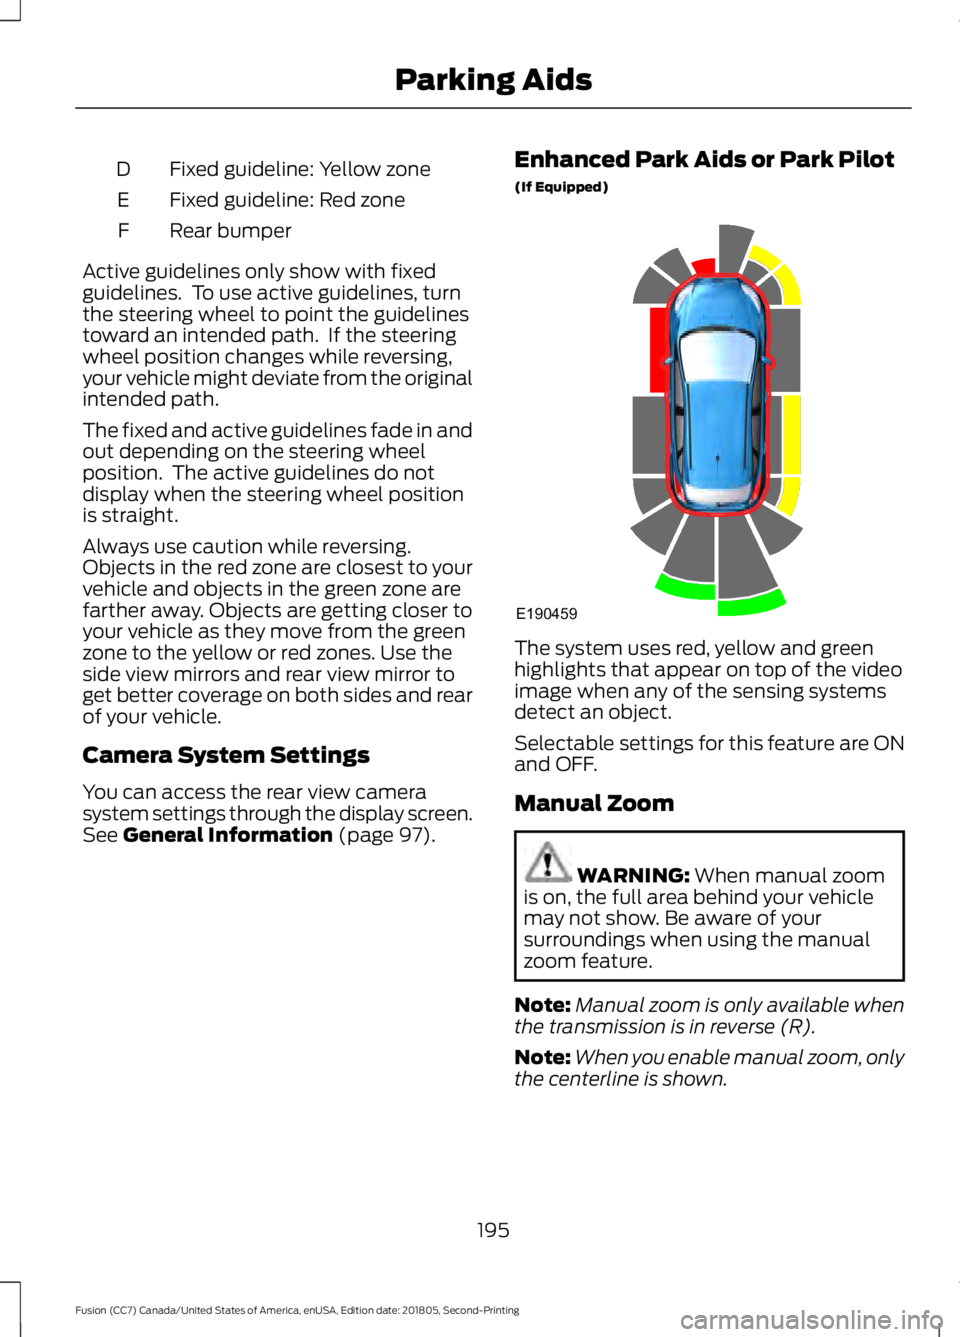
The system uses red, yellow and green
highlights that appear on top of the video
image when any of the sensing systems
detect an object.
Selectable settings for this feature are ON
and OFF.
Manual Zoom
WARNING:
When manual zoom
is on, the full area behind your vehicle
may not show. Be aware of your
surroundings when using the manual
zoom feature.
Note: Manual zoom is only available when
the transmission is in reverse (R).
Note: When you enable manual zoom, only
the centerline is shown.
195
Fusion (CC7) Canada/United States of America, enUSA, Edition date: 201805, Second-Printing Parking AidsE190459
Page 214 of 550
BLIND SPOT INFORMATION
SYSTEM (IF EQUIPPED)
WARNING:
Do not use the blind
spot information system as a
replacement for using the interior and
exterior mirrors or looking over your
shoulder before changing lanes. The
blind spot information system is not a
replacement for careful driving. WARNING:
The system may not
operate properly during severe weather
conditions, for example snow, ice, heavy
rain and spray. Always drive with due
care and attention. Failure to take care
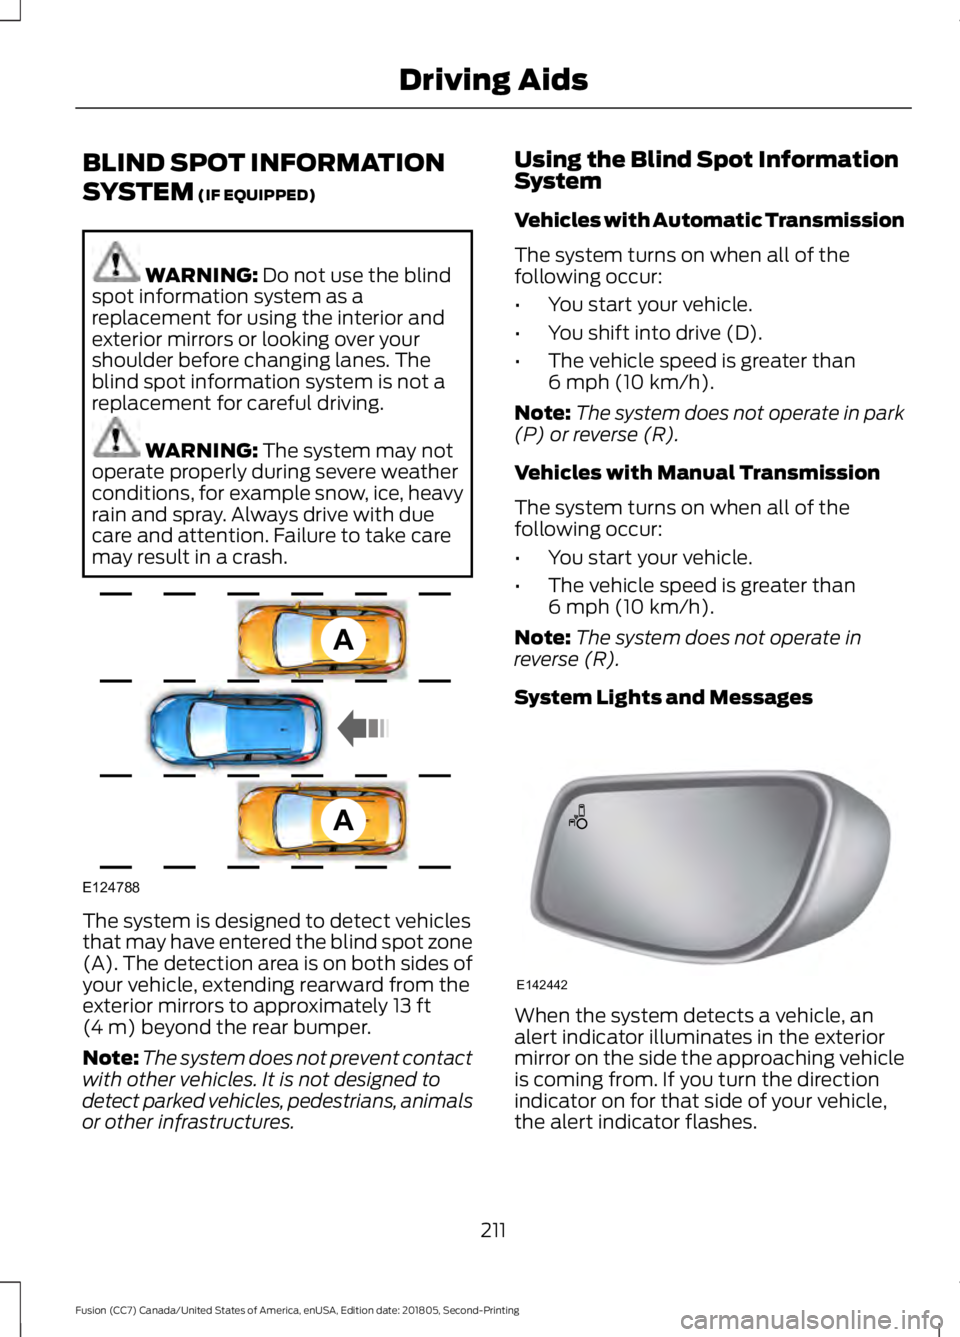
may result in a crash. The system is designed to detect vehicles
that may have entered the blind spot zone
(A). The detection area is on both sides of
your vehicle, extending rearward from the
exterior mirrors to approximately
13 ft
(4 m) beyond the rear bumper.
Note: The system does not prevent contact
with other vehicles. It is not designed to
detect parked vehicles, pedestrians, animals
or other infrastructures. Using the Blind Spot Information
System
Vehicles with Automatic Transmission
The system turns on when all of the
following occur:
•
You start your vehicle.
• You shift into drive (D).
• The vehicle speed is greater than
6 mph (10 km/h)
.
Note: The system does not operate in park
(P) or reverse (R).
Vehicles with Manual Transmission
The system turns on when all of the
following occur:
• You start your vehicle.
• The vehicle speed is greater than
6 mph (10 km/h)
.
Note: The system does not operate in
reverse (R).
System Lights and Messages When the system detects a vehicle, an
alert indicator illuminates in the exterior
mirror on the side the approaching vehicle
is coming from. If you turn the direction
indicator on for that side of your vehicle,
the alert indicator flashes.
211
Fusion (CC7) Canada/United States of America, enUSA, Edition date: 201805, Second-Printing Driving AidsA
A
E124788 E142442
Page 215 of 550
Note:
The system may not alert you if a
vehicle quickly passes through the detection
zone.
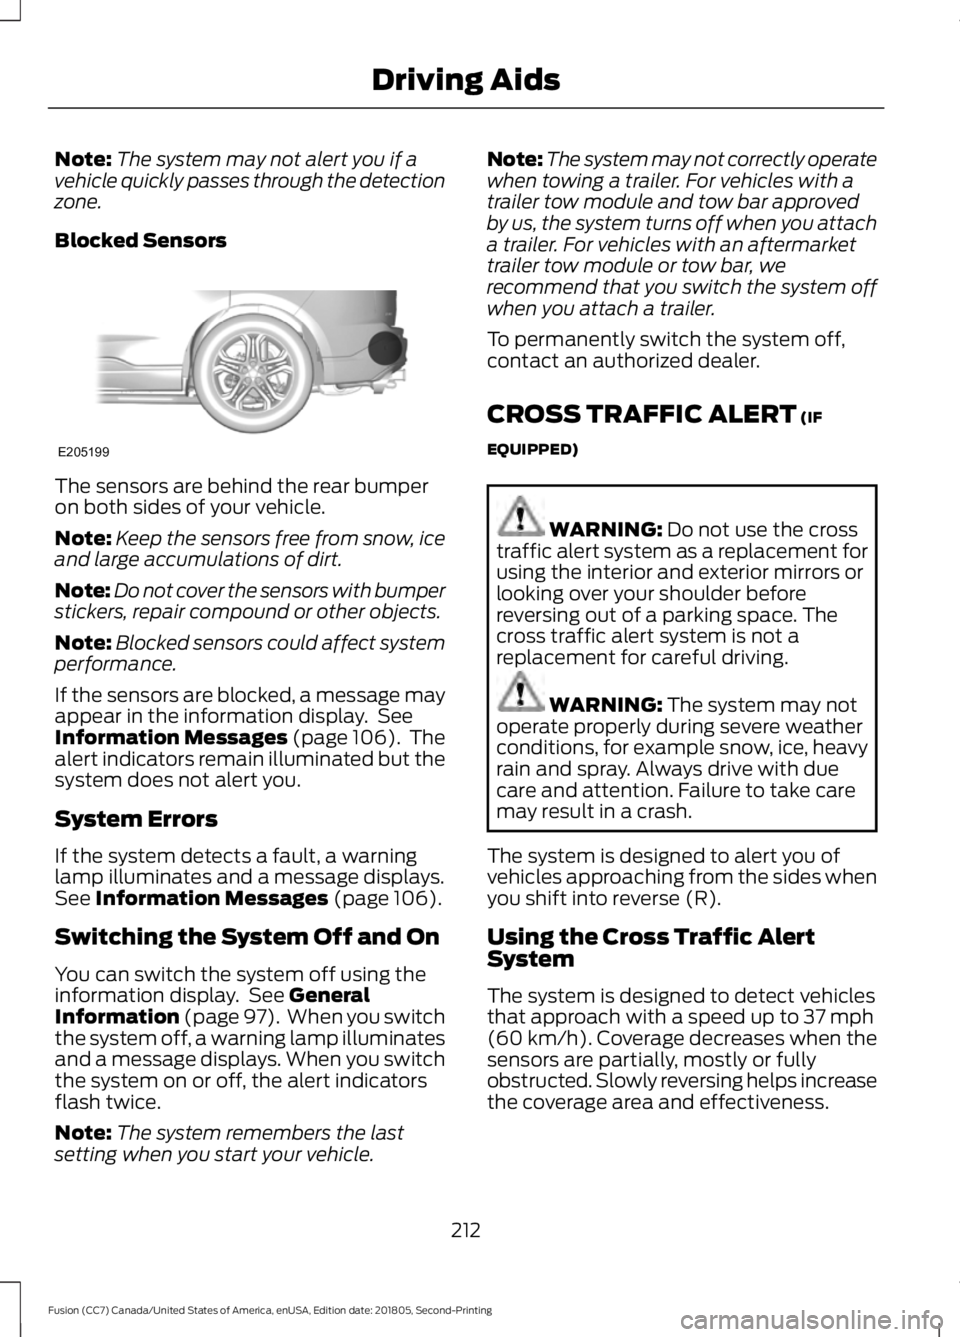
Blocked Sensors The sensors are behind the rear bumper
on both sides of your vehicle.
Note:
Keep the sensors free from snow, ice
and large accumulations of dirt.
Note: Do not cover the sensors with bumper
stickers, repair compound or other objects.
Note: Blocked sensors could affect system
performance.
If the sensors are blocked, a message may
appear in the information display. See
Information Messages (page 106). The
alert indicators remain illuminated but the
system does not alert you.
System Errors
If the system detects a fault, a warning
lamp illuminates and a message displays.
See
Information Messages (page 106).
Switching the System Off and On
You can switch the system off using the
information display. See
General
Information (page 97). When you switch
the system off, a warning lamp illuminates
and a message displays. When you switch
the system on or off, the alert indicators
flash twice.
Note: The system remembers the last
setting when you start your vehicle. Note:
The system may not correctly operate
when towing a trailer. For vehicles with a
trailer tow module and tow bar approved
by us, the system turns off when you attach
a trailer. For vehicles with an aftermarket
trailer tow module or tow bar, we
recommend that you switch the system off
when you attach a trailer.
To permanently switch the system off,
contact an authorized dealer.
CROSS TRAFFIC ALERT
(IF
EQUIPPED) WARNING:
Do not use the cross
traffic alert system as a replacement for
using the interior and exterior mirrors or
looking over your shoulder before
reversing out of a parking space. The
cross traffic alert system is not a
replacement for careful driving. WARNING:
The system may not
operate properly during severe weather
conditions, for example snow, ice, heavy
rain and spray. Always drive with due
care and attention. Failure to take care
may result in a crash.
The system is designed to alert you of
vehicles approaching from the sides when
you shift into reverse (R).
Using the Cross Traffic Alert
System
The system is designed to detect vehicles
that approach with a speed up to
37 mph
(60 km/h). Coverage decreases when the
sensors are partially, mostly or fully
obstructed. Slowly reversing helps increase
the coverage area and effectiveness.
212
Fusion (CC7) Canada/United States of America, enUSA, Edition date: 201805, Second-Printing Driving AidsE205199
Page 217 of 550
Zone coverage also decreases when
parking at narrow angles. The sensor on
the left-hand side is mostly obstructed and
zone coverage on that side is severely
reduced.
System Lights, Messages and
Audible Alerts
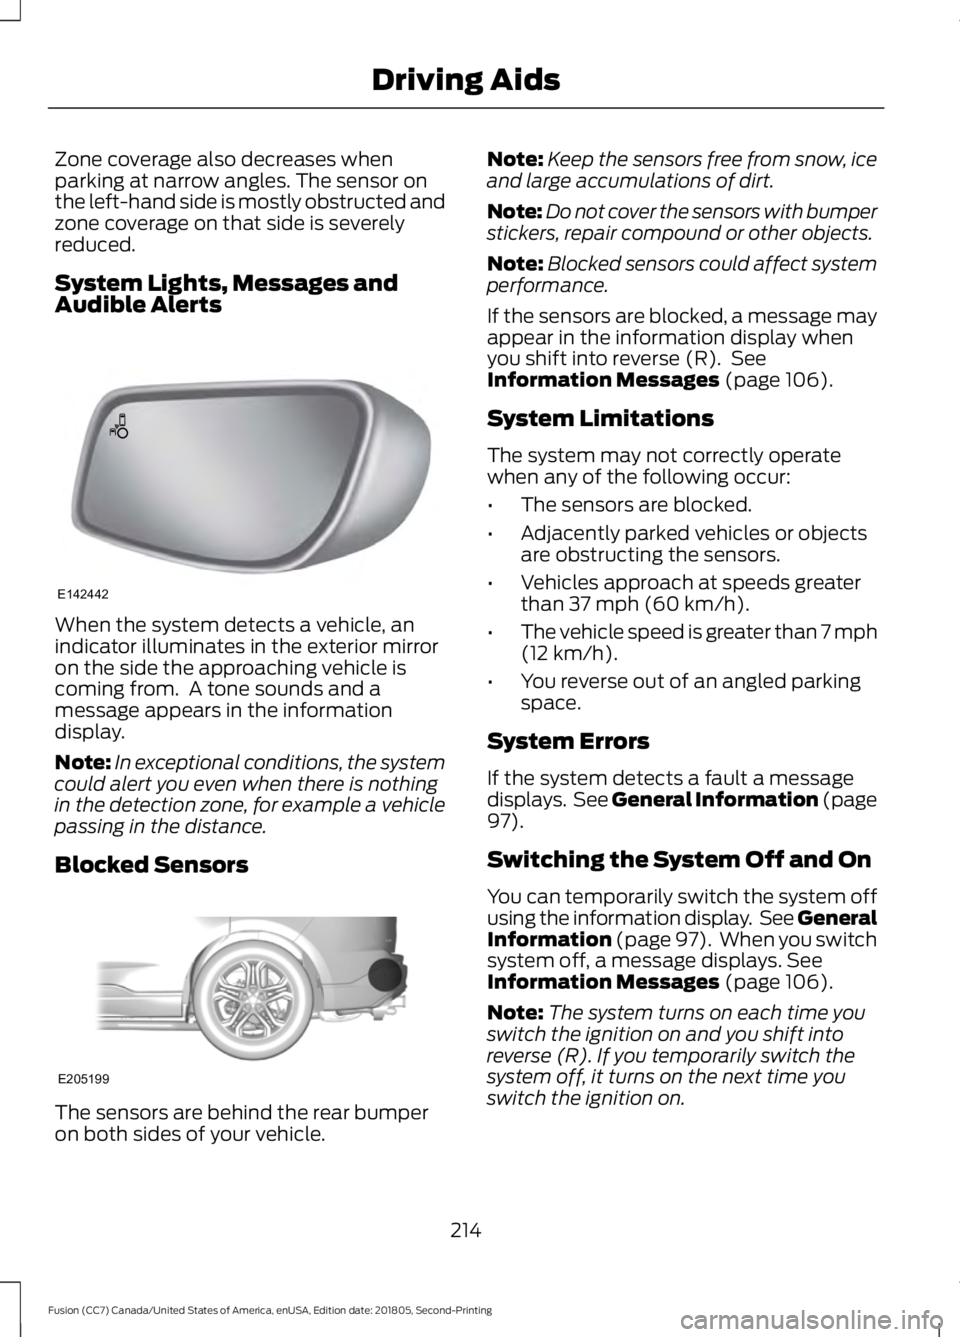
When the system detects a vehicle, an
indicator illuminates in the exterior mirror
on the side the approaching vehicle is
coming from. A tone sounds and a
message appears in the information
display.
Note:
In exceptional conditions, the system
could alert you even when there is nothing
in the detection zone, for example a vehicle
passing in the distance.
Blocked Sensors The sensors are behind the rear bumper
on both sides of your vehicle. Note:
Keep the sensors free from snow, ice
and large accumulations of dirt.
Note: Do not cover the sensors with bumper
stickers, repair compound or other objects.
Note: Blocked sensors could affect system
performance.
If the sensors are blocked, a message may
appear in the information display when
you shift into reverse (R). See
Information Messages (page 106).
System Limitations
The system may not correctly operate
when any of the following occur:
• The sensors are blocked.
• Adjacently parked vehicles or objects
are obstructing the sensors.
• Vehicles approach at speeds greater
than
37 mph (60 km/h).
• The vehicle speed is greater than 7 mph
(12 km/h)
.
• You reverse out of an angled parking
space.
System Errors
If the system detects a fault a message
displays. See General Information (page
97
).
Switching the System Off and On
You can temporarily switch the system off
using the information display. See
General
Information (page 97). When you switch
system off, a message displays. See
Information Messages (page 106).
Note: The system turns on each time you
switch the ignition on and you shift into
reverse (R). If you temporarily switch the
system off, it turns on the next time you
switch the ignition on.
214
Fusion (CC7) Canada/United States of America, enUSA, Edition date: 201805, Second-Printing Driving AidsE142442 E205199
Page 256 of 550
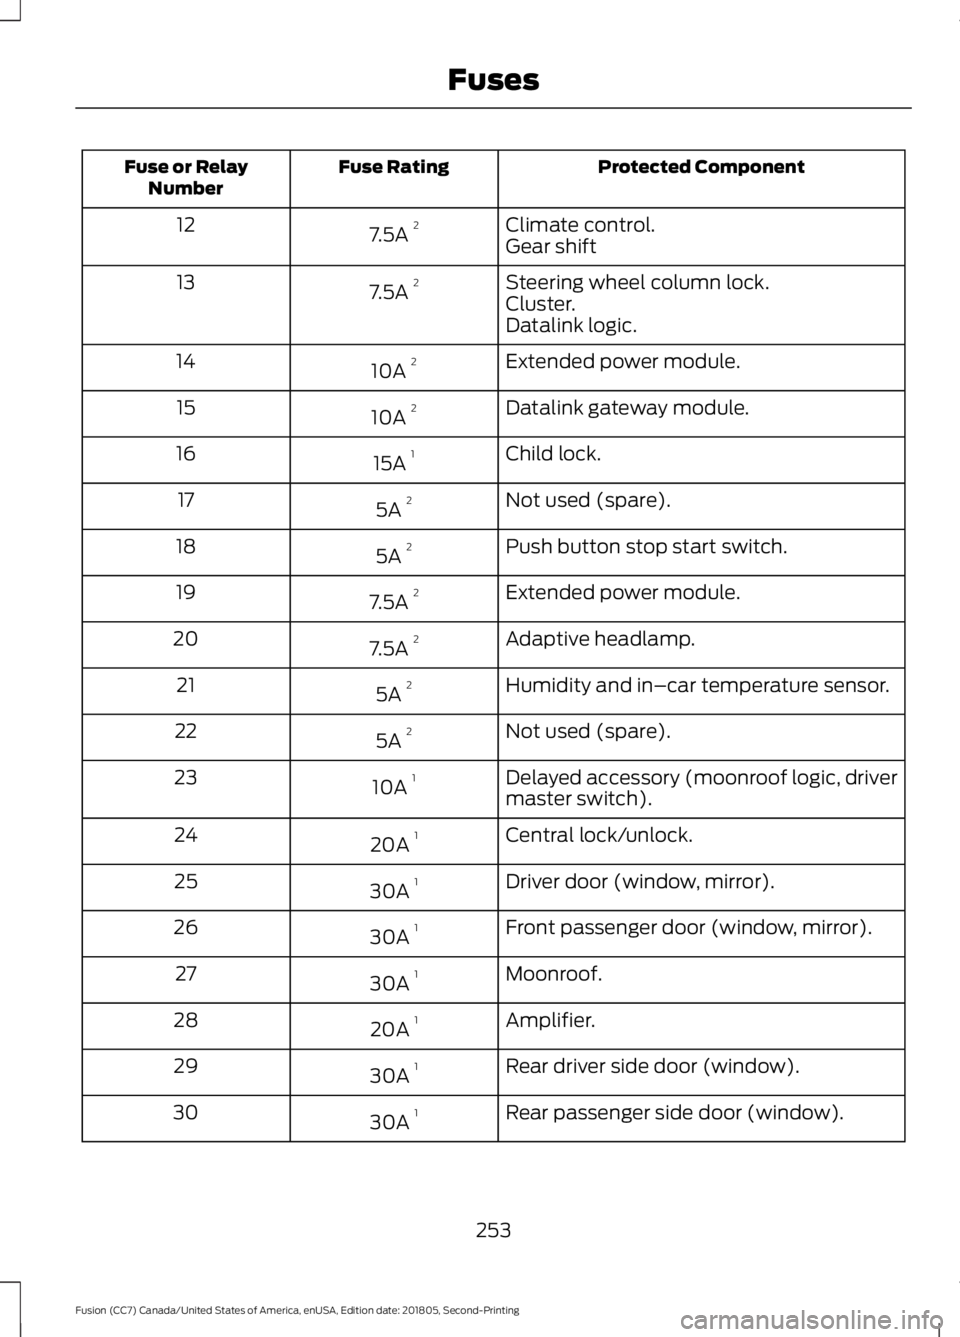
Protected Component
Fuse Rating
Fuse or Relay
Number
Climate control.
7.5A 2
12
Gear shift
Steering wheel column lock.
7.5A 2
13
Cluster.
Datalink logic.
Extended power module.
10A 2
14
Datalink gateway module.
10A 2
15
Child lock.
15A 1
16
Not used (spare).
5A 2
17
Push button stop start switch.
5A 2
18
Extended power module.
7.5A 2
19
Adaptive headlamp.
7.5A 2
20
Humidity and in–car temperature sensor.
5A 2
21
Not used (spare).
5A 2
22
Delayed accessory (moonroof logic, driver
master switch).
10A 1
23
Central lock/unlock.
20A 1
24
Driver door (window, mirror).
30A 1
25
Front passenger door (window, mirror).
30A 1
26
Moonroof.
30A 1
27
Amplifier.
20A 1
28
Rear driver side door (window).
30A 1
29
Rear passenger side door (window).
30A 1
30
253
Fusion (CC7) Canada/United States of America, enUSA, Edition date: 201805, Second-Printing Fuses
Page 257 of 550
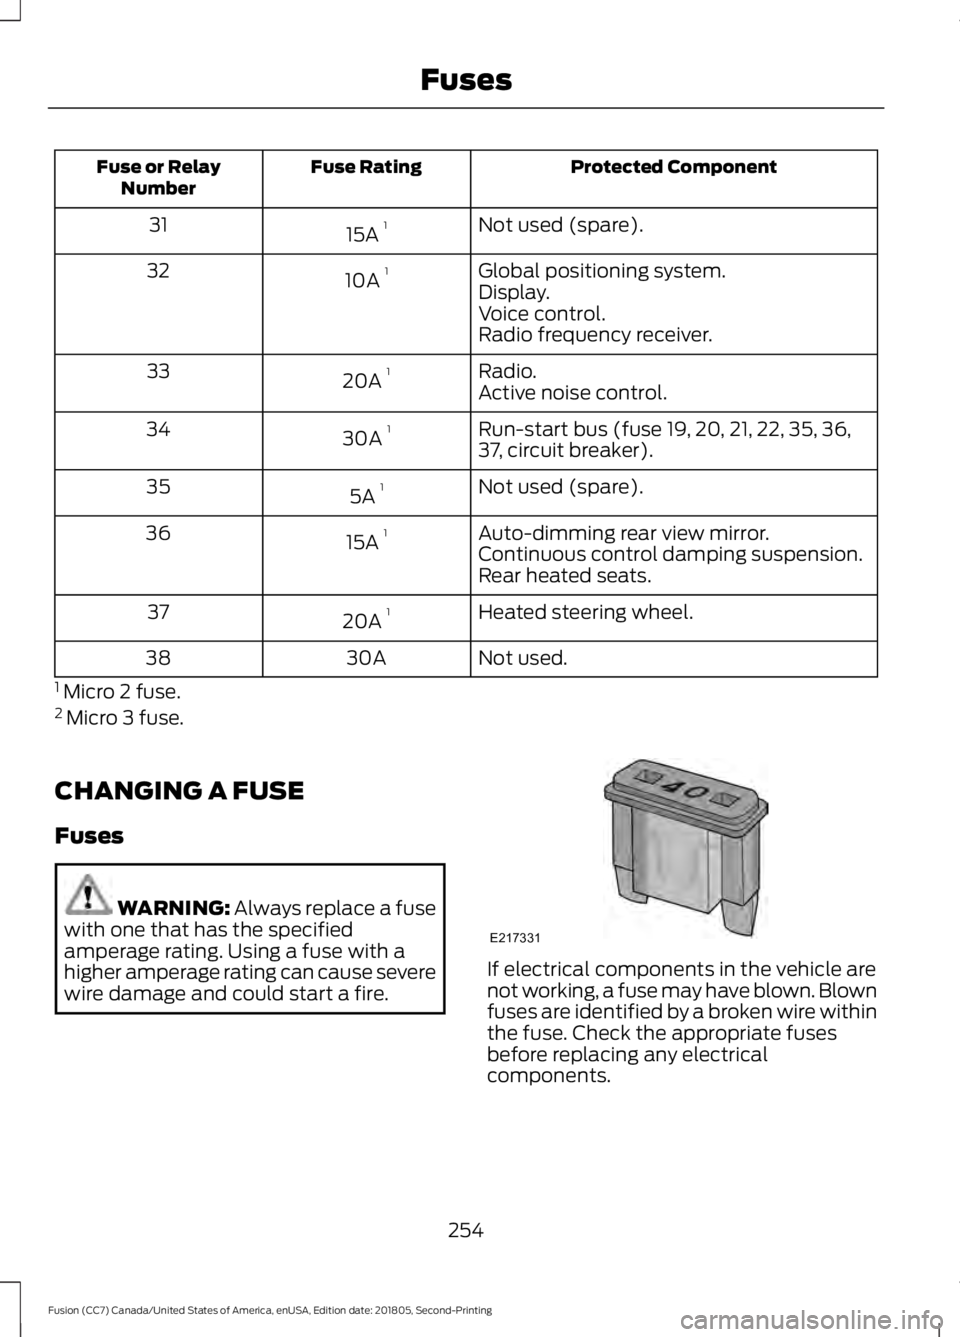
Protected Component
Fuse Rating
Fuse or Relay
Number
Not used (spare).
15A 1
31
Global positioning system.
10A 1
32
Display.
Voice control.
Radio frequency receiver.
Radio.
20A 1
33
Active noise control.
Run-start bus (fuse 19, 20, 21, 22, 35, 36,
37, circuit breaker).
30A 1
34
Not used (spare).
5A 1
35
Auto-dimming rear view mirror.
15A 1
36
Continuous control damping suspension.
Rear heated seats.
Heated steering wheel.
20A 1
37
Not used.
30A
38
1 Micro 2 fuse.
2 Micro 3 fuse.
CHANGING A FUSE
Fuses WARNING: Always replace a fuse
with one that has the specified
amperage rating. Using a fuse with a
higher amperage rating can cause severe
wire damage and could start a fire. If electrical components in the vehicle are
not working, a fuse may have blown. Blown
fuses are identified by a broken wire within
the fuse. Check the appropriate fuses
before replacing any electrical
components.
254
Fusion (CC7) Canada/United States of America, enUSA, Edition date: 201805, Second-Printing FusesE217331
Page 275 of 550
1. With the vehicle at a complete stop,
set the parking brake.
2. Shift the transmission into park (P).
3. Switch off all accessories.
4. Fully press the brake pedal and start the vehicle.
5. Run the engine until it reaches normal operating temperature. While the
engine is warming up, complete the
following: Reset the clock. See Audio
System (page 345). Reset the power
windows bounce-back feature. See
Windows and Mirrors
(page 85).
Reset the radio station presets. See
Audio System
(page 345).
6. Allow the engine to idle for at least one
minute. If the engine turns off, press
the accelerator pedal to start the
engine.
7. While the engine is running, press the brake pedal and shift into neutral (N).
8. Allow the engine to run for at least one
minute by pressing on the accelerator
pedal.
9. Drive the vehicle at least 12 mi (20 km)
to completely relearn the idle and fuel
trim strategy.
Note: If you do not allow the engine to
relearn the idle and fuel trim strategy, the
idle quality of your vehicle may be adversely
affected until the engine computer
eventually relearns the idle trim and fuel
trim strategy.
Make sure that you dispose of old batteries
in an environmentally friendly way. Seek
advice from your local authority about
recycling old batteries. CHECKING THE WIPER
BLADES
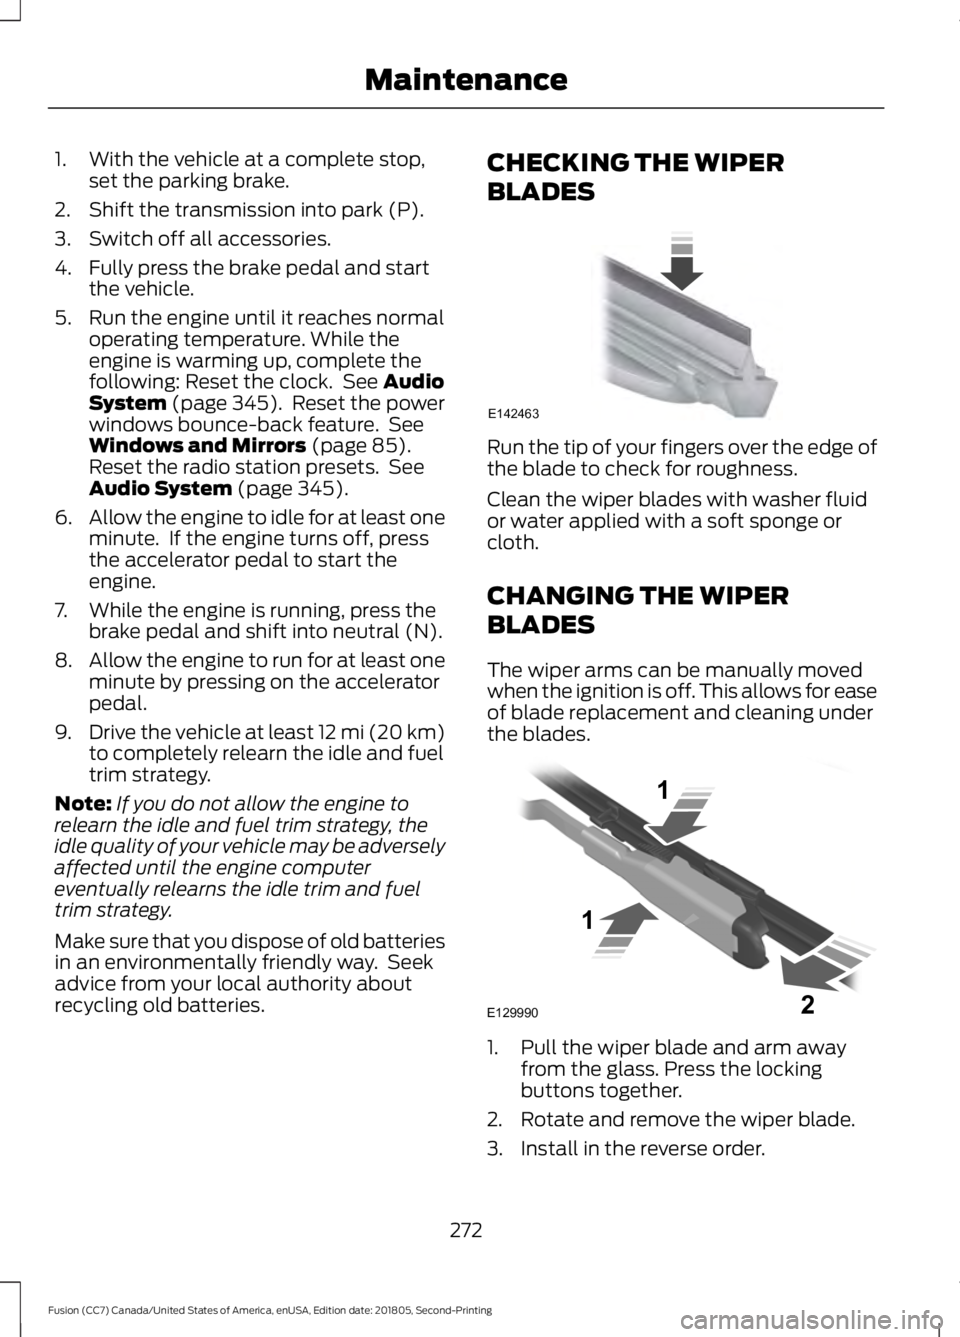
Run the tip of your fingers over the edge of
the blade to check for roughness.
Clean the wiper blades with washer fluid
or water applied with a soft sponge or
cloth.
CHANGING THE WIPER
BLADES
The wiper arms can be manually moved
when the ignition is off. This allows for ease
of blade replacement and cleaning under
the blades.
1. Pull the wiper blade and arm away
from the glass. Press the locking
buttons together.
2. Rotate and remove the wiper blade.
3. Install in the reverse order.
272
Fusion (CC7) Canada/United States of America, enUSA, Edition date: 201805, Second-Printing MaintenanceE142463 E129990
1
1 2
Page 285 of 550
WAXING
Regular waxing is necessary to protect your
car's paint from the elements. We
recommend that you wash and wax the
painted surface once or twice a year.
When washing and waxing, park your
vehicle in a shaded area out of direct
sunlight. Always wash your vehicle before
applying wax.
•
Use a quality wax that does not contain
abrasives.
• Follow the manufacturer ’s instructions
to apply and remove the wax.
• Apply a small amount of wax in a
back-and-forth motion, not in circles.
• Do not allow wax to come in contact
with any non-body (low-gloss black)
colored trim. The wax will discolor or
stain the parts over time.
•Roof racks.
• Bumpers.
• Grained door handles.
• Side moldings.
• Mirror housings.
• Windshield cowl area.
• Do not apply wax to glass areas.
• After waxing, your car's paint should
feel smooth, and be free of streaks and
smudges.
CLEANING THE ENGINE
Engines are more efficient when they are
clean because grease and dirt buildup keep
the engine warmer than normal. When washing:
•
Take care when using a power washer
to clean the engine. The high-pressure
fluid could penetrate the sealed parts
and cause damage.
• Do not spray a hot engine with cold
water to avoid cracking the engine
block or other engine components.
• Spray Motorcraft Engine Shampoo and
Degreaser on all parts that require
cleaning and pressure rinse clean. In
Canada, use Motorcraft Engine
Shampoo.
Note: If your vehicle has an engine cover
remove the cover before application of
Motorcraft Engine Shampoo and Degreaser.
Immediately rinse away any over spray.
• Never wash or rinse the engine while it
is hot or running; water in the running
engine may cause internal damage.
• Never wash or rinse any ignition coil,
spark plug wire or spark plug well, or
the area in and around these locations.
• Cover the battery, power distribution
box, and air filter assembly to prevent
water damage when cleaning the
engine.
CLEANING THE WINDOWS AND
WIPER BLADES
Car wash chemicals and environmental
fallout can result in windshield and wiper
blade contamination. Dirty windshield and
wipers will result in poor windshield wiper
operation. Keep the windshield and wiper
blades clean to maintain windshield wiper
performance.
282
Fusion (CC7) Canada/United States of America, enUSA, Edition date: 201805, Second-Printing Vehicle Care