warning light FORD FUSION 2020 Workshop Manual
[x] Cancel search | Manufacturer: FORD, Model Year: 2020, Model line: FUSION, Model: FORD FUSION 2020Pages: 497, PDF Size: 6.64 MB
Page 265 of 497
Action and description
Message
If the instrument cluster
displays one of the following
messages, repeat the
process.
Not Reset
Reset Cancelled
ENGINE COOLANT CHECK WARNING: Do not remove the
coolant reservoir cap when the engine is
on or the cooling system is hot. Wait 10
minutes for the cooling system to cool
down. Cover the coolant reservoir cap
with a thick cloth to prevent the
possibility of scalding and slowly remove
the cap. Failure to follow this instruction
could result in personal injury. WARNING:
Do not put coolant in
the windshield washer reservoir. If
sprayed on the windshield, coolant could
make it difficult to see through the
windshield. WARNING:
To reduce the risk of
personal injury, make sure the engine is
cool before unscrewing the coolant
pressure relief cap. The cooling system
is under pressure. Steam and hot liquid
can come out forcefully when you loosen
the cap slightly. WARNING:
Do not add coolant
further than the MAX mark.
When the engine is cold, check the
concentration and level of the coolant at
the intervals listed in the scheduled
maintenance information. See Scheduled
Maintenance
(page 433). Note:
Make sure that the coolant level is
between the
MIN and the MAX marks on
the coolant reservoir.
Note: Coolant expands when it is hot. The
level may extend beyond the
MAX mark.
Note: Automotive fluids are not
interchangeable. Do not use coolant or
windshield washer fluid outside of its
specified function and vehicle location.
Note: Do not use stop leak pellets, cooling
system sealants, or non-specified additives
as they can cause damage to the engine
cooling or heating systems. Resulting
component damage may not be covered by
the vehicle Warranty.
Maintain coolant concentration within
48% to 50%, which equates to a freeze
point between -30°F (-34°C) and -34°F
(-37°C). Coolant concentration should be
checked using a refractometer. We do not
recommend the use of hydrometers or
coolant test strips for measuring coolant
concentration.
Adding Coolant WARNING:
Do not add engine
coolant when the engine is on or the
cooling system is hot. Failure to follow
this instruction could result in personal
injury. WARNING:
Do not remove the
coolant reservoir cap when the engine is
on or the cooling system is hot. Wait 10
minutes for the cooling system to cool
down. Cover the coolant reservoir cap
with a thick cloth to prevent the
possibility of scalding and slowly remove
the cap. Failure to follow this instruction
could result in personal injury.
262
Fusion (CC7) Canada/United States of America, enUSA, Edition date: 201905, Second-Printing Maintenance
Page 271 of 497
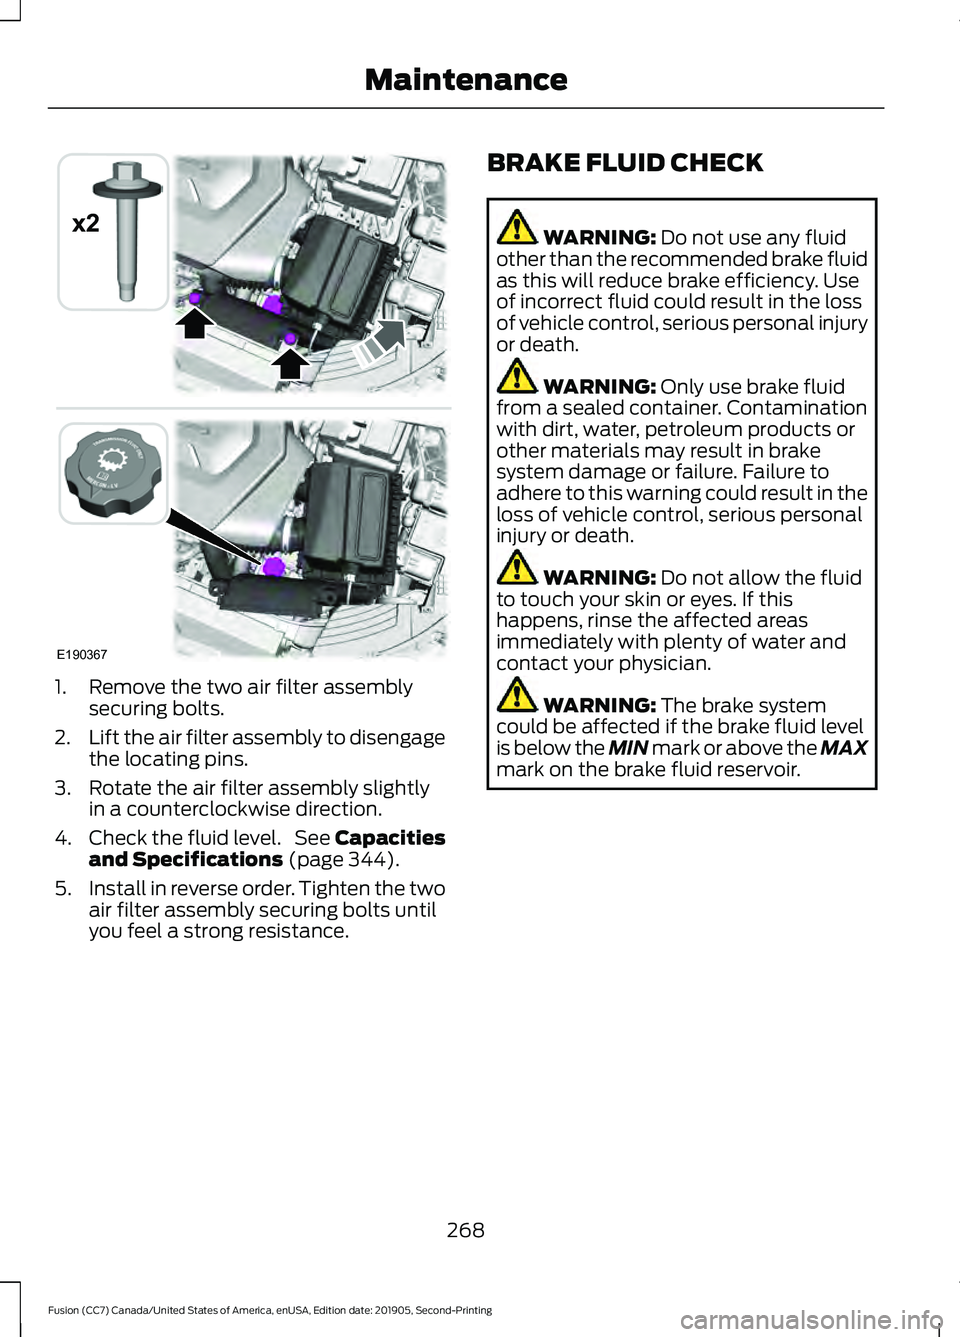
1. Remove the two air filter assembly
securing bolts.
2. Lift the air filter assembly to disengage
the locating pins.
3. Rotate the air filter assembly slightly in a counterclockwise direction.
4. Check the fluid level. See Capacities
and Specifications (page 344).
5. Install in reverse order. Tighten the two
air filter assembly securing bolts until
you feel a strong resistance. BRAKE FLUID CHECK WARNING:
Do not use any fluid
other than the recommended brake fluid
as this will reduce brake efficiency. Use
of incorrect fluid could result in the loss
of vehicle control, serious personal injury
or death. WARNING:
Only use brake fluid
from a sealed container. Contamination
with dirt, water, petroleum products or
other materials may result in brake
system damage or failure. Failure to
adhere to this warning could result in the
loss of vehicle control, serious personal
injury or death. WARNING:
Do not allow the fluid
to touch your skin or eyes. If this
happens, rinse the affected areas
immediately with plenty of water and
contact your physician. WARNING:
The brake system
could be affected if the brake fluid level
is below the MIN mark or above the MAX
mark on the brake fluid reservoir.
268
Fusion (CC7) Canada/United States of America, enUSA, Edition date: 201905, Second-Printing MaintenanceE190367
x2
Page 273 of 497
CHANGING THE 12V BATTERY
WARNING: Batteries normally
produce explosive gases which can
cause personal injury. Therefore, do not
allow flames, sparks or lighted
substances to come near the battery.
When working near the battery, always
shield your face and protect your eyes.
Always provide correct ventilation. WARNING:
When lifting a
plastic-cased battery, excessive pressure
on the end walls could cause acid to flow
through the vent caps, resulting in
personal injury and damage to the
vehicle or battery. Lift the battery with a
battery carrier or with your hands on
opposite corners. WARNING:
Keep batteries out of
reach of children. Batteries contain
sulfuric acid. Avoid contact with skin,
eyes or clothing. Shield your eyes when
working near the battery to protect
against possible splashing of acid
solution. In case of acid contact with skin
or eyes, flush immediately with water for
a minimum of 15 minutes and get prompt
medical attention. If acid is swallowed,
call a physician immediately. WARNING:
Battery posts,
terminals and related accessories
contain lead and lead compounds,
chemicals known to the State of
California to cause cancer and
reproductive harm. Wash your hands
after handling
.
Your vehicle has a Motorcraft®
maintenance-free battery which normally
does not require additional water during
its life of service. Note:
If your vehicle's battery has a cover
or shield, make sure it is reinstalled after the
battery has been cleaned or replaced.
Note: See an authorized dealer for low
voltage battery access, testing, or
replacement.
When a low voltage battery replacement
is necessary, see an authorized dealer to
replace the low voltage battery with a Ford
recommended replacement low voltage
battery that matches the electrical
requirements of the vehicle.
To ensure proper operation of the battery
management system (BMS), do not allow
a technician to connect any electrical
device ground connection directly to the
low voltage battery negative post. A
connection at the low voltage battery
negative post can cause inaccurate
measurements of the battery condition
and potential incorrect system operation.
Note: If a person adds electrical or
electronic accessories or components to the
vehicle, the accessories or components may
adversely affect the low voltage battery
performance and durability and may also
affect the performance of other electrical
systems in the vehicle.
For longer, trouble-free operation, keep the
top of the battery clean and dry. Also,
make certain the battery cables are always
tightly fastened to the battery terminals.
If you see any corrosion on the battery or
terminals, remove the cables from the
terminals and clean with a wire brush. You
can neutralize the acid with a solution of
baking soda and water.
When a battery replacement is required,
the battery should only be replaced with
a Ford recommended replacement battery
that matches the electrical requirements
of the vehicle.
270
Fusion (CC7) Canada/United States of America, enUSA, Edition date: 201905, Second-Printing Maintenance
Page 286 of 497
To clean the windshield and wiper blades:
•
Clean the windshield with a
non-abrasive glass cleaner. When
cleaning the interior of the windshield,
avoid getting any glass cleaner on the
instrument panel or door panels. Wipe
any glass cleaner off these surfaces
immediately.
• For windshields contaminated with
tree sap, chemicals, wax or bugs, clean
the entire windshield using steel wool
(no greater than 0000 grade) in a
circular motion and rinse with water.
• Clean the wiper blades with isopropyl
rubbing alcohol or windshield washer
concentrate.
Note: Do not use razor blades or other
sharp objects to clean or remove decals
from the inside of the heated rear window.
The vehicle warranty does not cover
damage caused to the heated rear window
grid lines.
CLEANING THE INTERIOR WARNING: Do not use cleaning
solvents, bleach or dye on the vehicle's
seatbelts, as these actions may weaken
the belt webbing. WARNING:
On vehicles equipped
with seat-mounted airbags, do not use
chemical solvents or strong detergents.
Such products could contaminate the
side airbag system and affect
performance of the side airbag in a crash.
For fabric, carpets, cloth seats and seats
equipped with side airbags:
• Remove dust and loose dirt with a
vacuum cleaner.
• Remove light stains and soil with
Motorcraft Professional Strength
Carpet & Upholstery Cleaner. •
If grease or tar is present on the
material, spot-clean the area first with
Motorcraft Spot and Stain Remover. In
Canada, use Motorcraft Multi-Purpose
Cleaner.
• If a ring forms on the fabric after spot
cleaning, clean the entire area
immediately (but do not oversaturate)
or the ring will set.
• Do not use household cleaning
products or glass cleaners, which can
stain and discolor the fabric and affect
the flame retardant abilities of the seat
materials.
Mirrors
Do not clean the housing or glass of any
mirror with harsh abrasives, fuel or other
petroleum or ammonia-based cleaning
products.
CLEANING THE INSTRUMENT
PANEL AND INSTRUMENT
CLUSTER LENS WARNING:
Do not use chemical
solvents or strong detergents when
cleaning the steering wheel or
instrument panel to avoid contamination
of the airbag system.
Note: Follow the same procedure as
cleaning leather seats for cleaning leather
instrument panels and leather interior trim
surfaces. See
Cleaning Leather Seats
(page 284).
Clean the instrument panel and cluster
lens with a clean, damp and soft cloth,
then use a clean, dry and soft cloth to dry
these areas.
283
Fusion (CC7) Canada/United States of America, enUSA, Edition date: 201905, Second-Printing Vehicle Care
Page 292 of 497
Tire Quality Grades apply to new
pneumatic passenger car tires.
They do not apply to deep tread,
winter-type snow tires,
space-saver or temporary use
spare tires, light truck or LT type
tires, tires with nominal rim
diameters of 10 to 12 inches or
limited production tires as defined
in Title 49 Code of Federal
Regulations Part 575.104 ©)(2).
U.S. Department of
Transportation Tire quality
grades: The U.S. Department of
Transportation requires Ford
Motor Company to give you the
following information about tire
grades exactly as the government
has written it.
Treadwear
The treadwear grade is a
comparative rating based on the
wear rate of the tire when tested
under controlled conditions on a
specified government test course.
For example, a tire graded 150
would wear 1 ½ times as well on
the government course as a tire
graded 100. The relative
performance of tires depends
upon the actual conditions of their
use, however, and may depart
significantly from the norm due to
variations in driving habits, service
practices, and differences in road
characteristics and climate. Traction AA A B C WARNING:
The traction
grade assigned to this tire is
based on straight-ahead braking
traction tests, and does not
include acceleration, cornering,
hydroplaning or peak traction
characteristics.
The traction grades, from highest
to lowest are AA, A, B, and C. The
grades represent the tire ’s ability
to stop on wet pavement as
measured under controlled
conditions on specified
government test surfaces of
asphalt and concrete. A tire
marked C may have poor traction
performance.
Temperature A B C WARNING:
The
temperature grade for this tire is
established for a tire that is
properly inflated and not
overloaded. Excessive speed,
underinflation, or excessive
loading, either separately or in
combination, can cause heat
buildup and possible tire failure.
The temperature grades are A
(the highest), B and C,
representing the tire ’s resistance
to the generation of heat and its
ability to dissipate heat when
tested under controlled conditions
on a specified indoor laboratory
289
Fusion (CC7) Canada/United States of America, enUSA, Edition date: 201905, Second-Printing Wheels and Tires
Page 297 of 497
door-latch post, or the door edge
that meets the door-latch post,
next to the driver's seating
position), or Tire Label which is
located on the B-Pillar or the edge
of the driver
’s door. The cold
inflation pressure should never be
set lower than the recommended
pressure on the vehicle label.
The tire suppliers may have
additional markings, notes or
warnings such as standard load,
radial tubeless, etc.
Additional Information
Contained on the Tire Sidewall
for LT Type Tires
Note: Tire Quality Grades do not
apply to this type of tire. LT type tires have some additional
information beyond those of P
type tires; these differences are
described below.
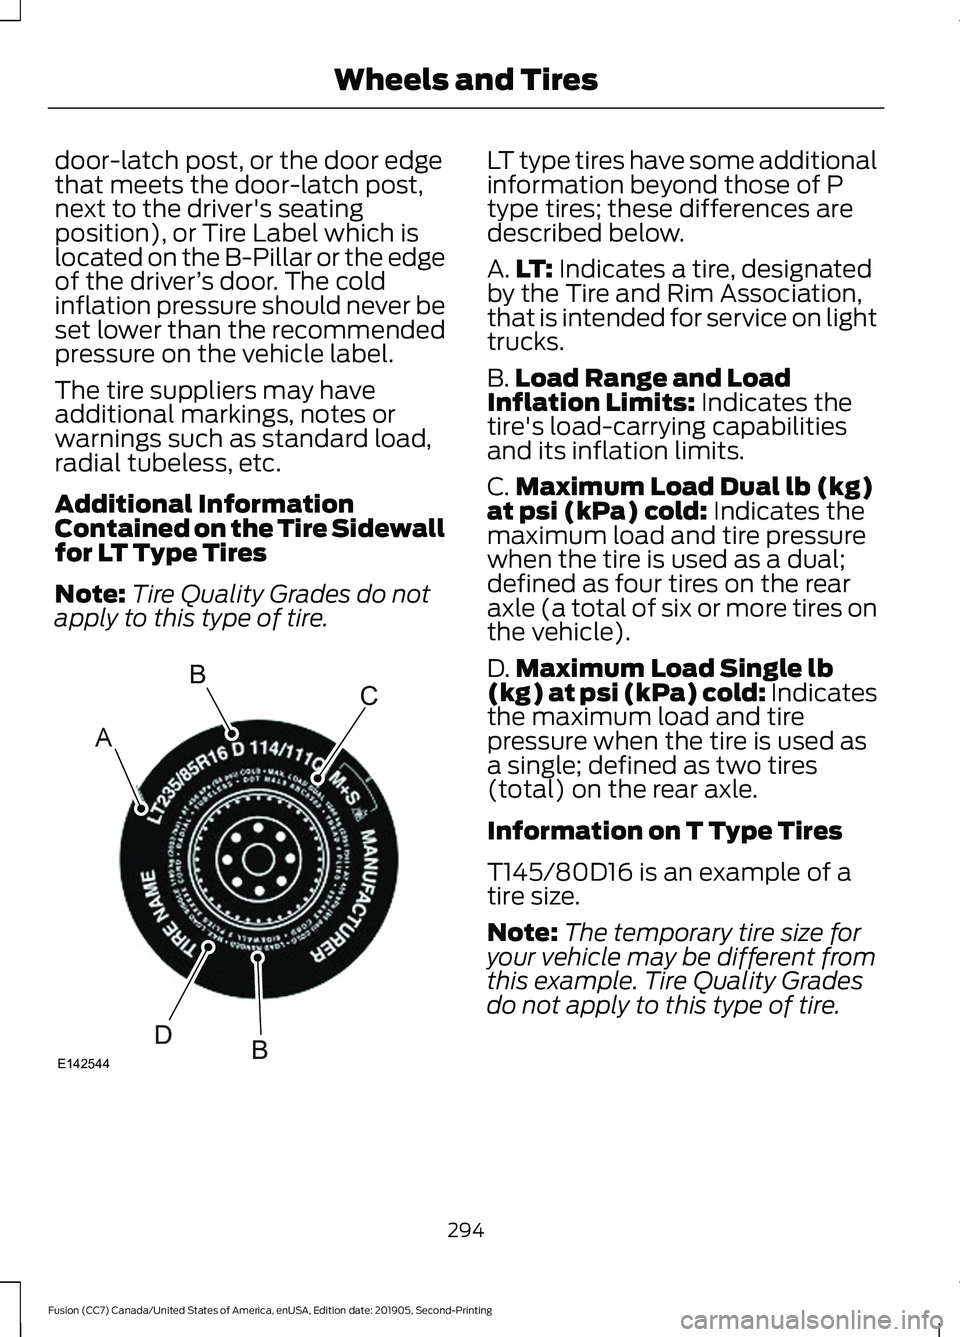
A.
LT: Indicates a tire, designated
by the Tire and Rim Association,
that is intended for service on light
trucks.
B. Load Range and Load
Inflation Limits:
Indicates the
tire's load-carrying capabilities
and its inflation limits.
C. Maximum Load Dual lb (kg)
at psi (kPa) cold:
Indicates the
maximum load and tire pressure
when the tire is used as a dual;
defined as four tires on the rear
axle (a total of six or more tires on
the vehicle).
D. Maximum Load Single lb
(kg) at psi (kPa) cold:
Indicates
the maximum load and tire
pressure when the tire is used as
a single; defined as two tires
(total) on the rear axle.
Information on T Type Tires
T145/80D16 is an example of a
tire size.
Note: The temporary tire size for
your vehicle may be different from
this example. Tire Quality Grades
do not apply to this type of tire.
294
Fusion (CC7) Canada/United States of America, enUSA, Edition date: 201905, Second-Printing Wheels and TiresA
BC
BDE142544
Page 309 of 497
Understanding Your Tire Pressure
Monitoring System
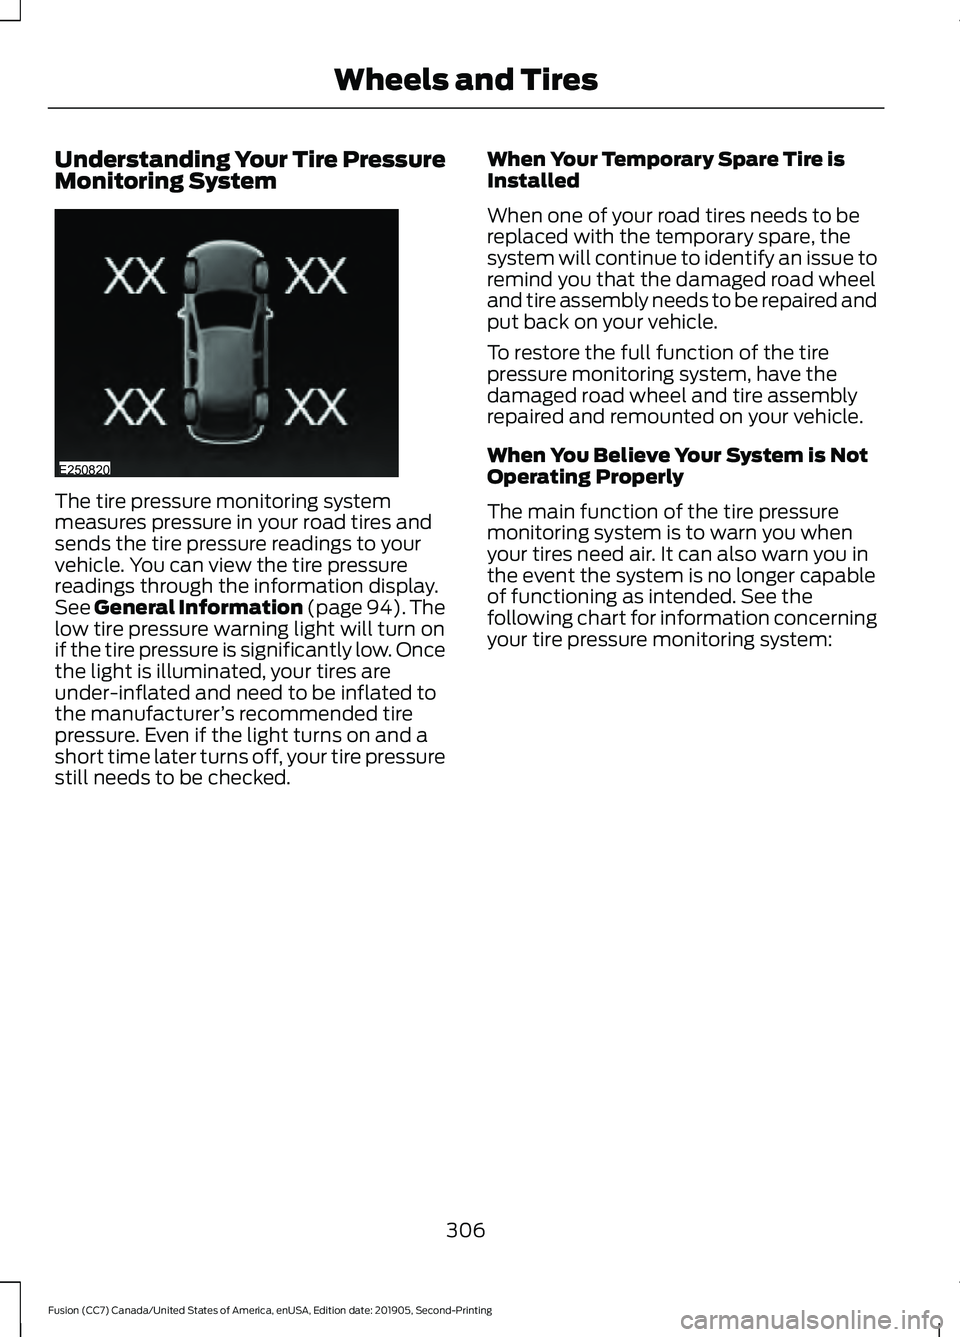
The tire pressure monitoring system
measures pressure in your road tires and
sends the tire pressure readings to your
vehicle. You can view the tire pressure
readings through the information display.
See General Information (page 94). The
low tire pressure warning light will turn on
if the tire pressure is significantly low. Once
the light is illuminated, your tires are
under-inflated and need to be inflated to
the manufacturer
’s recommended tire
pressure. Even if the light turns on and a
short time later turns off, your tire pressure
still needs to be checked. When Your Temporary Spare Tire is
Installed
When one of your road tires needs to be
replaced with the temporary spare, the
system will continue to identify an issue to
remind you that the damaged road wheel
and tire assembly needs to be repaired and
put back on your vehicle.
To restore the full function of the tire
pressure monitoring system, have the
damaged road wheel and tire assembly
repaired and remounted on your vehicle.
When You Believe Your System is Not
Operating Properly
The main function of the tire pressure
monitoring system is to warn you when
your tires need air. It can also warn you in
the event the system is no longer capable
of functioning as intended. See the
following chart for information concerning
your tire pressure monitoring system:
306
Fusion (CC7) Canada/United States of America, enUSA, Edition date: 201905, Second-Printing Wheels and TiresE250820
Page 310 of 497
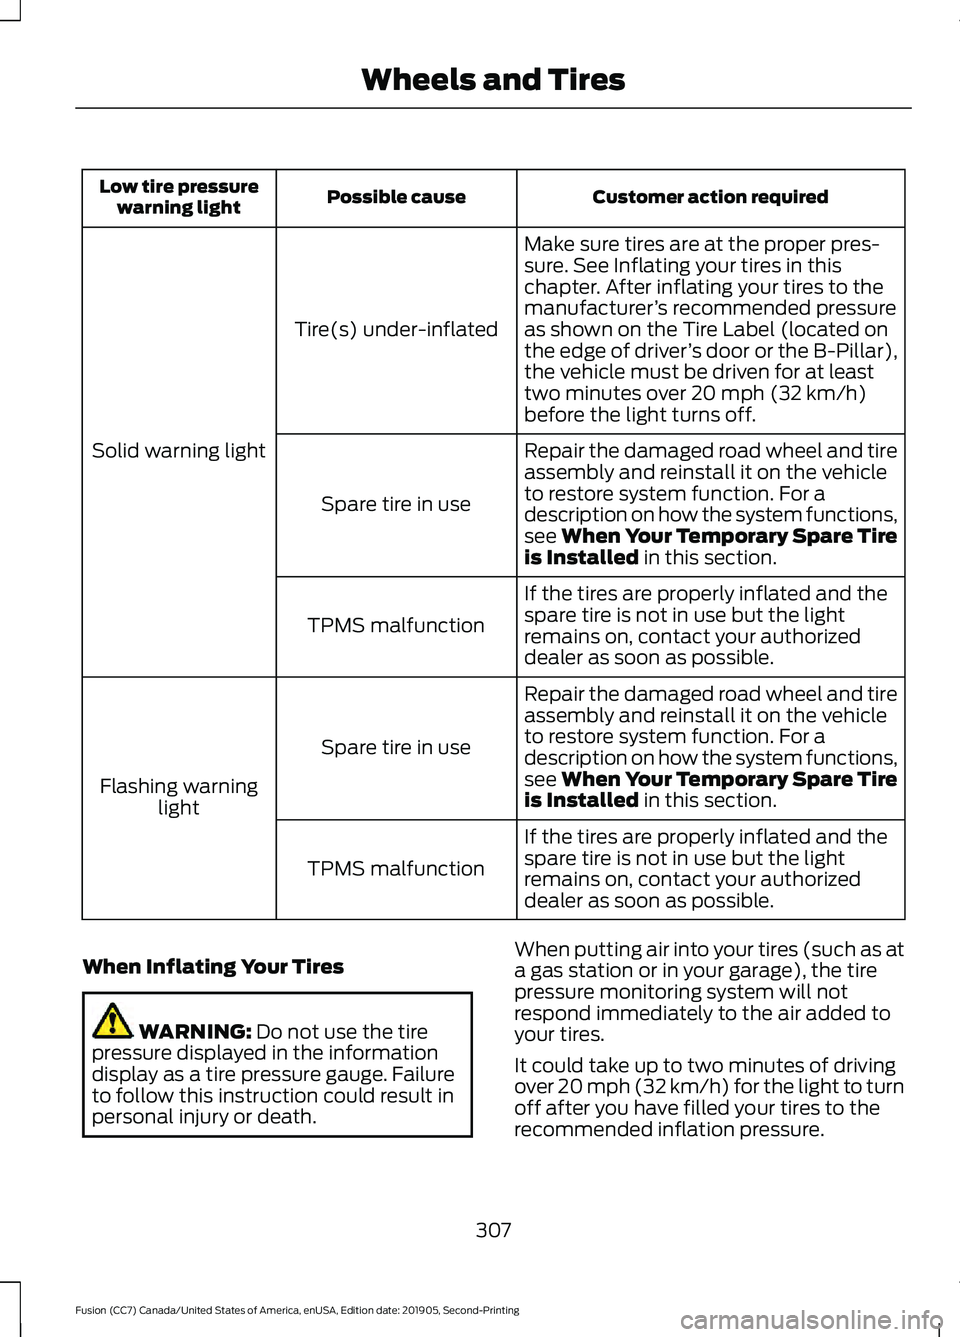
Customer action required
Possible cause
Low tire pressure
warning light
Make sure tires are at the proper pres-
sure. See Inflating your tires in this
chapter. After inflating your tires to the
manufacturer’s recommended pressure
as shown on the Tire Label (located on
the edge of driver ’s door or the B-Pillar),
the vehicle must be driven for at least
two minutes over 20 mph (32 km/h)
before the light turns off.
Tire(s) under-inflated
Solid warning light Repair the damaged road wheel and tire
assembly and reinstall it on the vehicle
to restore system function. For a
description on how the system functions,
see When Your Temporary Spare Tire
is Installed
in this section.
Spare tire in use
If the tires are properly inflated and the
spare tire is not in use but the light
remains on, contact your authorized
dealer as soon as possible.
TPMS malfunction
Repair the damaged road wheel and tire
assembly and reinstall it on the vehicle
to restore system function. For a
description on how the system functions,
see When Your Temporary Spare Tire
is Installed
in this section.
Spare tire in use
Flashing warning light
If the tires are properly inflated and the
spare tire is not in use but the light
remains on, contact your authorized
dealer as soon as possible.
TPMS malfunction
When Inflating Your Tires WARNING:
Do not use the tire
pressure displayed in the information
display as a tire pressure gauge. Failure
to follow this instruction could result in
personal injury or death. When putting air into your tires (such as at
a gas station or in your garage), the tire
pressure monitoring system will not
respond immediately to the air added to
your tires.
It could take up to two minutes of driving
over 20 mph (32 km/h) for the light to turn
off after you have filled your tires to the
recommended inflation pressure.
307
Fusion (CC7) Canada/United States of America, enUSA, Edition date: 201905, Second-Printing Wheels and Tires
Page 311 of 497
How Temperature Affects Your Tire
Pressure
The tire pressure monitoring system
monitors tire pressure in each pneumatic
tire. While driving in a normal manner, a
typical passenger tire inflation pressure
could increase about 2
–4 psi (14– 28 kPa)
from a cold start situation. If the vehicle is
stationary overnight with the outside
temperature significantly lower than the
daytime temperature, the tire pressure
could decrease about
3 psi (21 kPa) for a
drop of 30°F (17°C) in ambient
temperature. This lower pressure value
could be detected by the tire pressure
monitoring system as being significantly
lower than the recommended inflation
pressure and activate the system warning
light for low tire pressure. If the low tire
pressure warning light is on, visually check
each tire to verify that no tire is flat. If one
or more tires are flat, repair as necessary.
Check the air pressure in the road tires. If
any tire is under-inflated, carefully drive
the vehicle to the nearest location where
air can be added to the tires. Inflate all the
tires to the recommended inflation
pressure.
CHANGING A ROAD WHEEL WARNING:
If the tire pressure
monitor sensor becomes damaged it
may not function.
Note: The tire pressure monitoring system
indicator light illuminates when the spare
tire is in use. To restore the full function of
the monitoring system, mount all road
wheels equipped with tire pressure
monitoring sensors on the vehicle. Note:
You should only use tire sealants in
roadside emergencies as they may cause
damage to the tire pressure monitoring
system sensor.
If you get a flat tire when driving, do not
apply the brake heavily. Instead, gradually
decrease your speed. Hold the steering
wheel firmly and slowly move to a safe
place on the side of the road.
Have a flat serviced by an authorized
dealer to prevent damage to the tire
pressure monitoring system sensors.
See
Tire Pressure Monitoring System (page
304). Replace the spare tire with a road tire
as soon as possible. During repairing or
replacing of the flat tire, have an authorized
dealer inspect the tire pressure monitoring
system sensor for damage.
Dissimilar Spare Wheel and Tire
Assembly Information WARNING:
Failure to follow these
guidelines could result in an increased
risk of loss of vehicle control, injury or
death.
If you have a dissimilar spare wheel and
tire, use it for temporary use only. This
means that if you need to use it, you should
replace it as soon as possible with a road
wheel and tire assembly that is the same
size and type as the road tires and wheels
that originally came with your vehicle. If
the dissimilar spare tire or wheel is
damaged, replace it instead of repairing it.
308
Fusion (CC7) Canada/United States of America, enUSA, Edition date: 201905, Second-Printing Wheels and Tires
Page 484 of 497
A
A/C
See: Climate Control.......................................... 118
About This Manual...........................................7
ABS See: Brakes............................................................ 173
ABS driving hints See: Hints on Driving With Anti-Lock
Brakes................................................................. 173
Accessories....................................................430
Accessories See: Replacement Parts
Recommendation............................................ 14
ACC See: Using Adaptive Cruise Control............196
Active Park Assist
.........................................185
Using Active Park Assist.................................. 186
Adjusting the Headlamps
.........................272
Horizontal Aim Adjustment............................ 273
Vertical Aim Adjustment................................. 272
Adjusting the Steering Wheel....................70
Airbag Disposal
...............................................49
Air Conditioning See: Climate Control.......................................... 118
Air Filter See: Changing the Engine Air Filter.............278
Alarm See: Anti-Theft Alarm........................................ 69
All-Wheel Drive.............................................168
Ambient Lighting............................................79 Adjusting the Brightness................................... 79
Changing the Color.............................................. 79
Switching Ambient Lighting Off..................... 79
Switching Ambient Lighting On...................... 79
Anti-Theft Alarm............................................69 Arming the Alarm................................................ 69
Disarming the Alarm........................................... 69
Appendices.....................................................451
Apps...................................................................412 SiriusXM Traffic and Travel Link.................... 414
Using Apps on an Android Device................413
Using Apps on an iOS Device......................... 413
Using Mobile Navigation on an Android Device................................................................. 413
At a Glance........................................................18
Audible Warnings and Indicators.............93 Headlamps On Warning Chime...................... 93Keyless Warning Alert.........................................
93
Parking Brake On Warning Chime.................. 93
Audio Control...................................................70 You can operate the following functions
with the control:............................................... 70
Audio System................................................357 General Information.......................................... 357
Audio Unit - Vehicles With: Sony Audio System/Touchscreen Display
...............361
Accessing the Sound Settings....................... 361
Adjusting the Volume....................................... 361
Changing Radio Stations................................ 362
Ejecting the CD................................................... 362
Inserting a CD...................................................... 362
Switching the Audio Unit On and Off........362
Using Seek, Fast Forward and Reverse............................................................. 362
Audio Unit - Vehicles With: SYNC.........358 Accessing the Apps Menu.............................. 359
Accessing the Clock Settings........................ 359
Accessing the Media Source Menu.............359
Accessing the Phone Features..................... 359
Accessing the Settings Menu........................ 359
Accessing the Sound Settings...................... 359
Adjusting the Volume...................................... 359
Changing Radio Stations............................... 360
Listening to the Radio..................................... 360
Playing or Pausing Media............................... 360
Switching Radio Text On and Off...............360
Switching Repeat Mode On and Off..........360
Switching Shuffle Mode On and Off.........360
Switching the Audio Unit On and Off........360
Switching the Display On and Off..............360
Using Seek, Fast Forward and Reverse.............................................................. 361
Using the Display Control.............................. 360
Using the Number Block................................ 360
Audio Unit - Vehicles With: Touchscreen Display, Vehicles Without: Sony Audio
System..........................................................357
Adjusting the Volume...................................... 358
Changing Radio Stations................................ 358
Playing or Pausing Media............................... 358
Switching the Audio Unit On and Off........358
Using Seek, Fast Forward and Reverse............................................................. 358
481
Fusion (CC7) Canada/United States of America, enUSA, Edition date: 201905, Second-Printing Index