remove seats FORD FUSION (AMERICAS) 2013 2.G Owners Manual
[x] Cancel search | Manufacturer: FORD, Model Year: 2013, Model line: FUSION (AMERICAS), Model: FORD FUSION (AMERICAS) 2013 2.GPages: 458
Page 19 of 458
Use any attachment method as indicated below by X
Child
Weight
Restraint
Type Safety belt
only
Safety belt
and LATCH
(lower
anchors and top tether
anchor)
Safety belt
and toptether
anchor
LATCH
(lower
anchors only)
LATCH
(lower
anchors and top tether
anchor)
X
X
Up to 48 lb
(21 kg)
Rear facing
child seat
X
X
X
Up to 48 lb
(21 kg)
Forward
facing
child seat
X
X
Over 48 lb
(21 kg)
Forward
facing
child seat
Note: The child seat must rest tightly
against the vehicle seat upon which it is
installed. It may be necessary to lift or
remove the head restraint. See Seats (page
129).
BOOSTER SEATS WARNING
Never place, or allow a child to place,
the shoulder belt under a child's arm
or behind the back because it
reduces the protection for the upper part
of the body and may increase the risk of
injury or death in a collision. Use a belt-positioning booster seat for
children who have outgrown or no longer
properly fit in a child safety seat (generally
children who are less than 4 feet 9 inches
(1.45 meters) tall, are greater than age four
(4) and less than age twelve (12), and
between 40 pounds (18 kilograms) and
80 pounds (36 kilograms) and upward to
100 pounds (45 kilograms) if recommended by your child restraint
manufacturer). Many state and provincial
laws require that children use approved
booster seats until they reach age eight, a
height of 4 feet 9 inches (1.45 meters) tall,
or 80 pounds (36 kilograms).
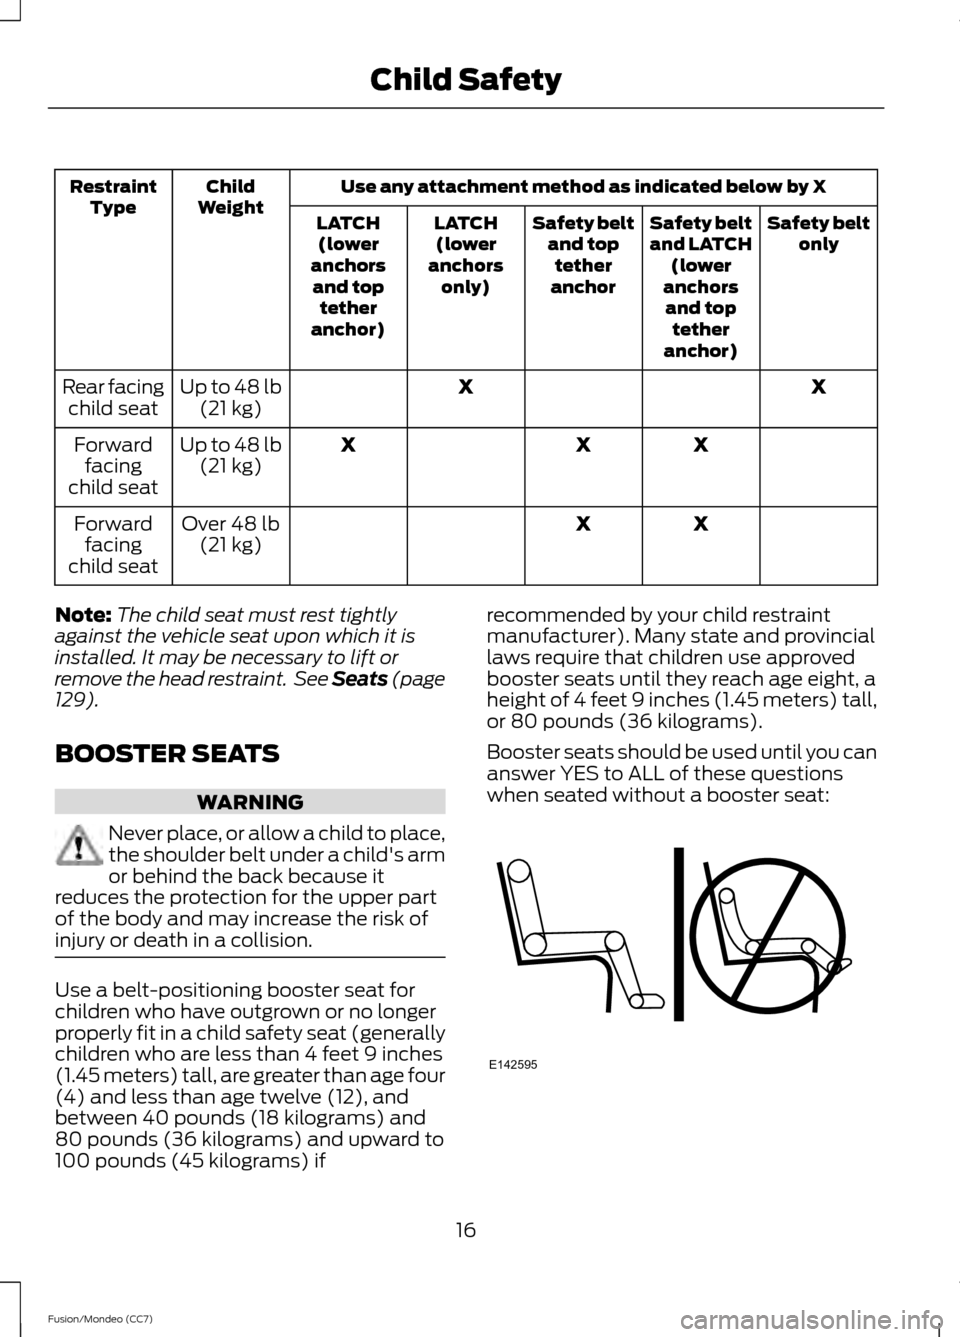
Booster seats should be used until you can
answer YES to ALL of these questions
when seated without a booster seat:
16
Fusion/Mondeo (CC7) Child SafetyE142595
Page 20 of 458
•
Can the child sit all the way back
against their vehicle seat back with
knees bent comfortably at the edge of
the seat cushion?
• Can the child sit without slouching?
• Does the lap belt rest low across the
hips?
• Is the shoulder belt centered on the
shoulder and chest?
• Can the child stay seated like this for
the whole trip?
Always use booster seats in conjunction
with your vehicle lap and shoulder belt.
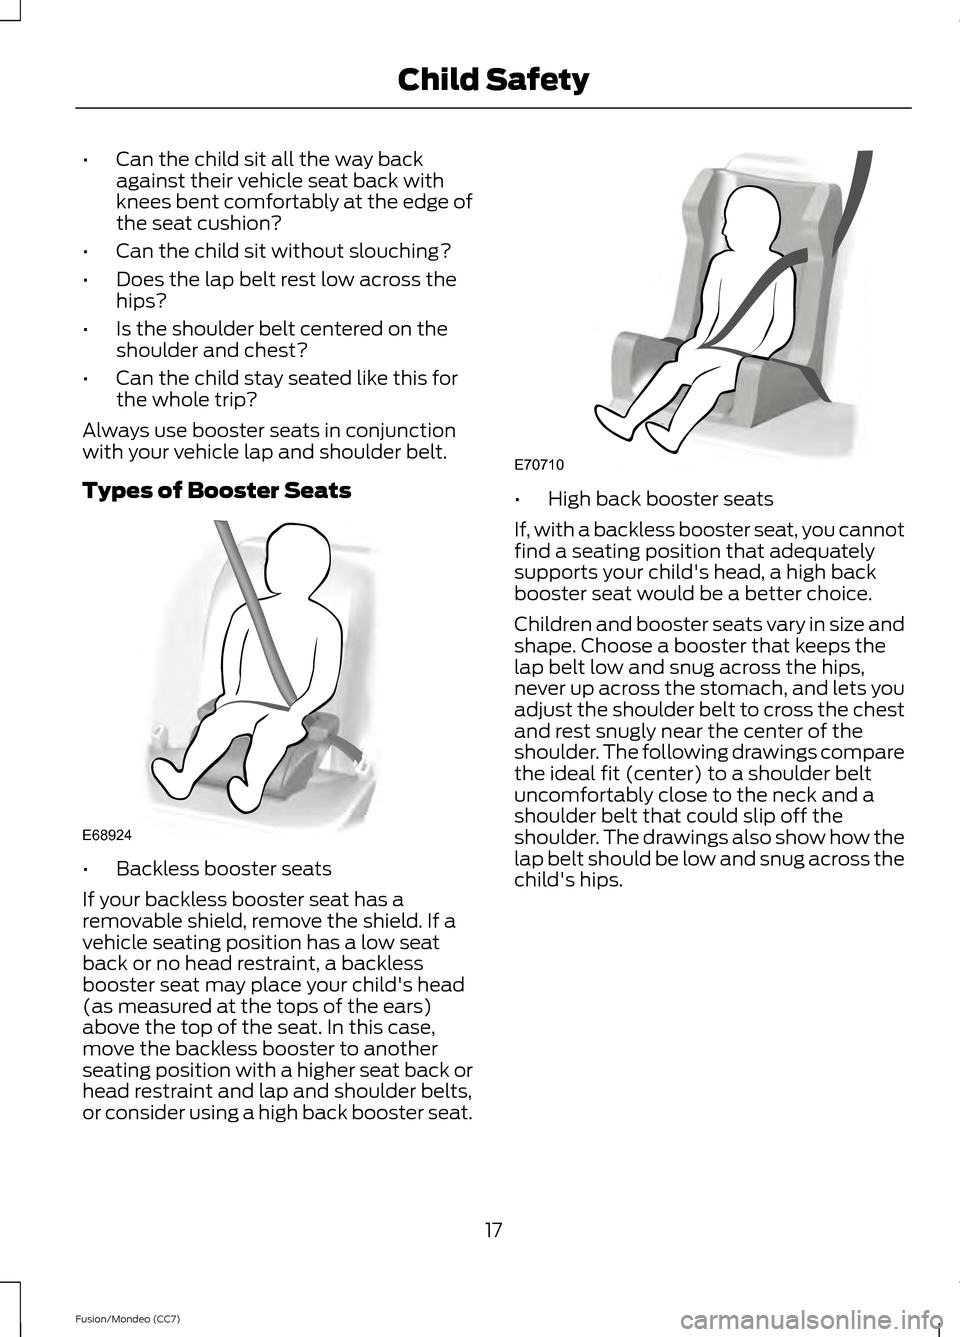
Types of Booster Seats •
Backless booster seats
If your backless booster seat has a
removable shield, remove the shield. If a
vehicle seating position has a low seat
back or no head restraint, a backless
booster seat may place your child's head
(as measured at the tops of the ears)
above the top of the seat. In this case,
move the backless booster to another
seating position with a higher seat back or
head restraint and lap and shoulder belts,
or consider using a high back booster seat. •
High back booster seats
If, with a backless booster seat, you cannot
find a seating position that adequately
supports your child's head, a high back
booster seat would be a better choice.
Children and booster seats vary in size and
shape. Choose a booster that keeps the
lap belt low and snug across the hips,
never up across the stomach, and lets you
adjust the shoulder belt to cross the chest
and rest snugly near the center of the
shoulder. The following drawings compare
the ideal fit (center) to a shoulder belt
uncomfortably close to the neck and a
shoulder belt that could slip off the
shoulder. The drawings also show how the
lap belt should be low and snug across the
child's hips.
17
Fusion/Mondeo (CC7) Child SafetyE68924 E70710
Page 23 of 458
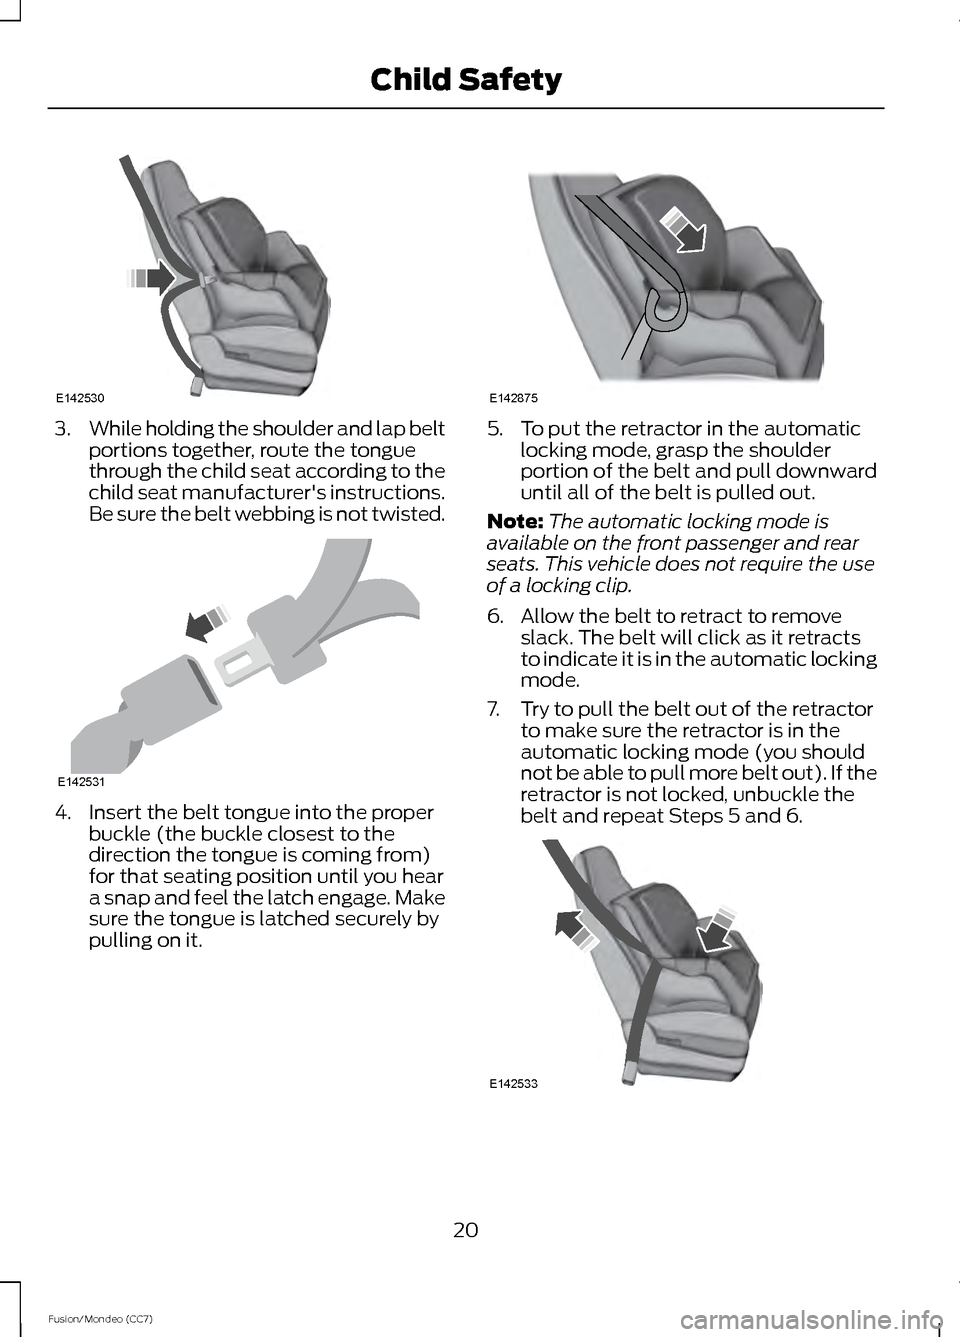
3.
While holding the shoulder and lap belt
portions together, route the tongue
through the child seat according to the
child seat manufacturer's instructions.
Be sure the belt webbing is not twisted. 4. Insert the belt tongue into the proper
buckle (the buckle closest to the
direction the tongue is coming from)
for that seating position until you hear
a snap and feel the latch engage. Make
sure the tongue is latched securely by
pulling on it. 5. To put the retractor in the automatic
locking mode, grasp the shoulder
portion of the belt and pull downward
until all of the belt is pulled out.
Note: The automatic locking mode is
available on the front passenger and rear
seats. This vehicle does not require the use
of a locking clip.
6. Allow the belt to retract to remove slack. The belt will click as it retracts
to indicate it is in the automatic locking
mode.
7. Try to pull the belt out of the retractor to make sure the retractor is in the
automatic locking mode (you should
not be able to pull more belt out). If the
retractor is not locked, unbuckle the
belt and repeat Steps 5 and 6. 20
Fusion/Mondeo (CC7) Child SafetyE142530 E142531 E142875 E142533
Page 24 of 458
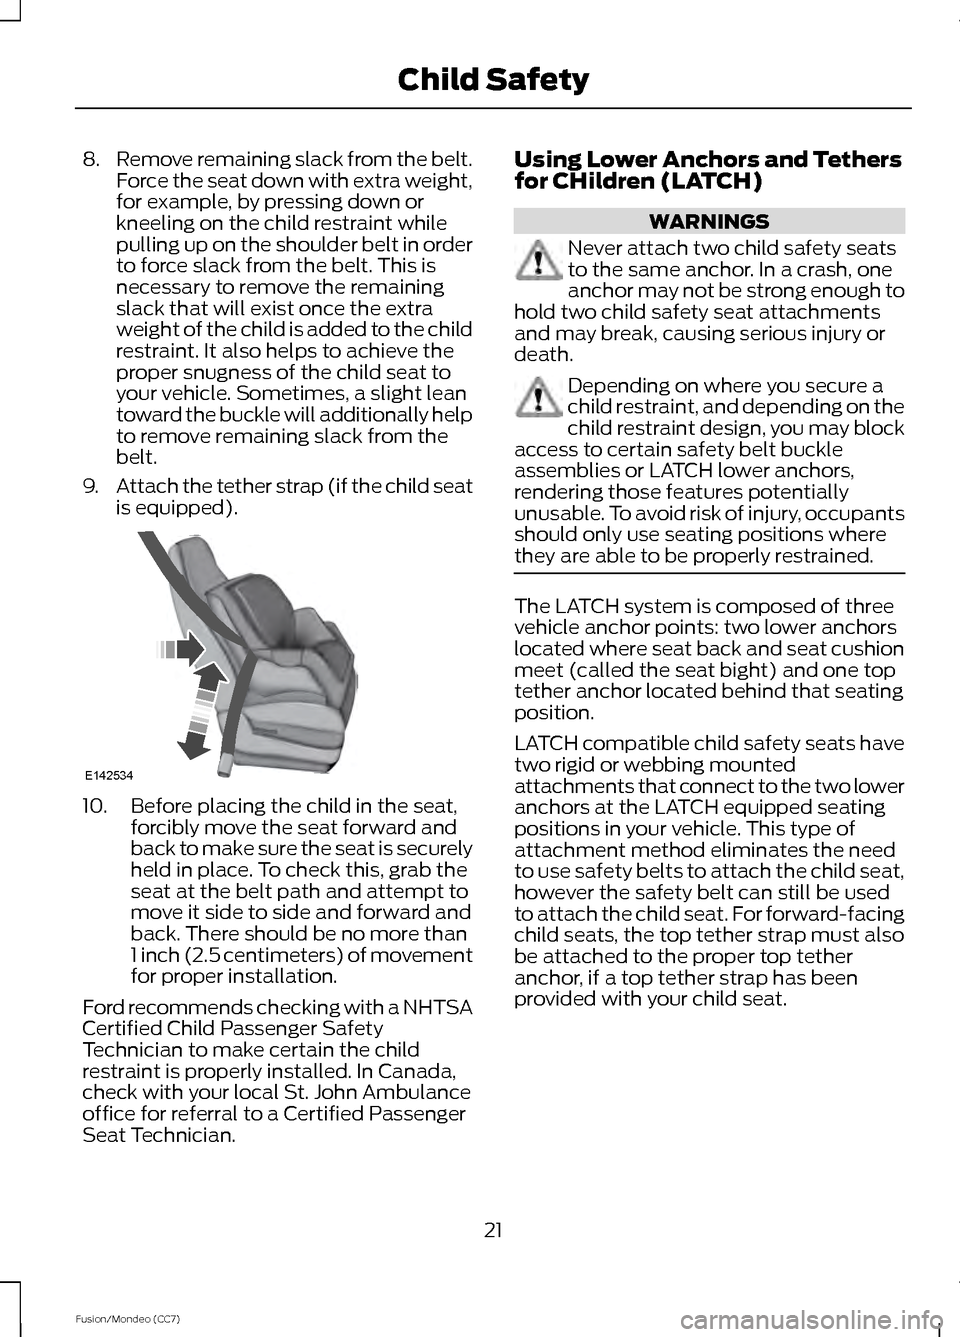
8.
Remove remaining slack from the belt.
Force the seat down with extra weight,
for example, by pressing down or
kneeling on the child restraint while
pulling up on the shoulder belt in order
to force slack from the belt. This is
necessary to remove the remaining
slack that will exist once the extra
weight of the child is added to the child
restraint. It also helps to achieve the
proper snugness of the child seat to
your vehicle. Sometimes, a slight lean
toward the buckle will additionally help
to remove remaining slack from the
belt.
9. Attach the tether strap (if the child seat
is equipped). 10. Before placing the child in the seat,
forcibly move the seat forward and
back to make sure the seat is securely
held in place. To check this, grab the
seat at the belt path and attempt to
move it side to side and forward and
back. There should be no more than
1 inch (2.5 centimeters) of movement
for proper installation.
Ford recommends checking with a NHTSA
Certified Child Passenger Safety
Technician to make certain the child
restraint is properly installed. In Canada,
check with your local St. John Ambulance
office for referral to a Certified Passenger
Seat Technician. Using Lower Anchors and Tethers
for CHildren (LATCH) WARNINGS
Never attach two child safety seats
to the same anchor. In a crash, one
anchor may not be strong enough to
hold two child safety seat attachments
and may break, causing serious injury or
death. Depending on where you secure a
child restraint, and depending on the
child restraint design, you may block
access to certain safety belt buckle
assemblies or LATCH lower anchors,
rendering those features potentially
unusable. To avoid risk of injury, occupants
should only use seating positions where
they are able to be properly restrained. The LATCH system is composed of three
vehicle anchor points: two lower anchors
located where seat back and seat cushion
meet (called the seat bight) and one top
tether anchor located behind that seating
position.
LATCH compatible child safety seats have
two rigid or webbing mounted
attachments that connect to the two lower
anchors at the LATCH equipped seating
positions in your vehicle. This type of
attachment method eliminates the need
to use safety belts to attach the child seat,
however the safety belt can still be used
to attach the child seat. For forward-facing
child seats, the top tether strap must also
be attached to the proper top tether
anchor, if a top tether strap has been
provided with your child seat.
21
Fusion/Mondeo (CC7) Child SafetyE142534
Page 26 of 458
Using Tether Straps
Many forward-facing child safety
seats include a tether strap
which extends from the back of
the child safety seat and hooks to an
anchoring point called the top tether
anchor. Tether straps are available as an
accessory for many older safety seats.
Contact the manufacturer of your child
seat for information about ordering a
tether strap, or to obtain a longer tether
strap if the tether strap on your safety seat
does not reach the appropriate top tether
anchor in your vehicle.
Once the child safety seat has been
installed using either the safety belt, the
lower anchors of the LATCH system, or
both, you can attach the top tether strap.
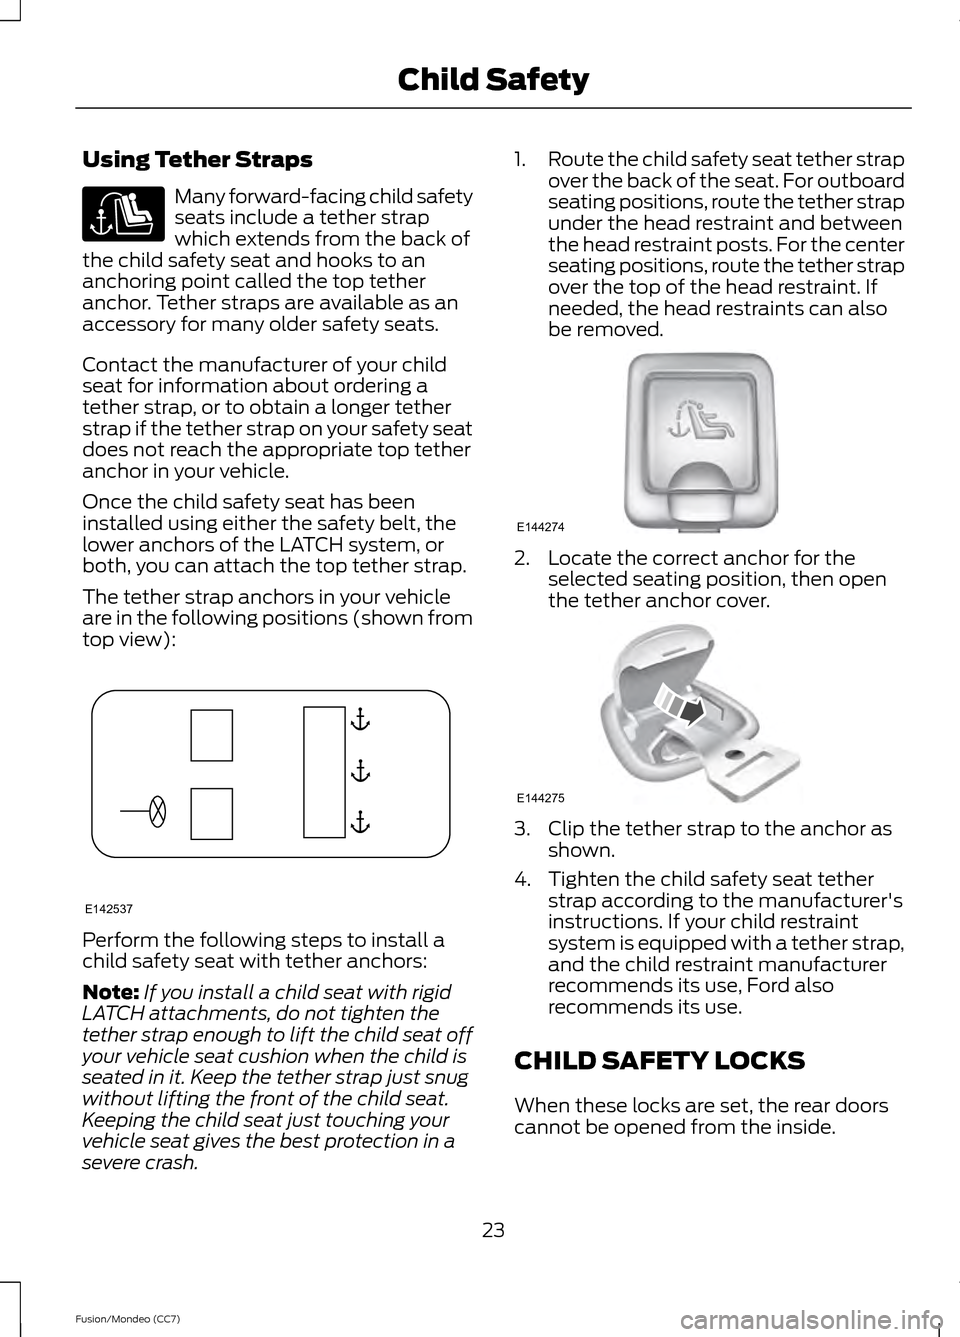
The tether strap anchors in your vehicle
are in the following positions (shown from
top view): Perform the following steps to install a
child safety seat with tether anchors:
Note:
If you install a child seat with rigid
LATCH attachments, do not tighten the
tether strap enough to lift the child seat off
your vehicle seat cushion when the child is
seated in it. Keep the tether strap just snug
without lifting the front of the child seat.
Keeping the child seat just touching your
vehicle seat gives the best protection in a
severe crash. 1.
Route the child safety seat tether strap
over the back of the seat. For outboard
seating positions, route the tether strap
under the head restraint and between
the head restraint posts. For the center
seating positions, route the tether strap
over the top of the head restraint. If
needed, the head restraints can also
be removed. 2. Locate the correct anchor for the
selected seating position, then open
the tether anchor cover. 3. Clip the tether strap to the anchor as
shown.
4. Tighten the child safety seat tether strap according to the manufacturer's
instructions. If your child restraint
system is equipped with a tether strap,
and the child restraint manufacturer
recommends its use, Ford also
recommends its use.
CHILD SAFETY LOCKS
When these locks are set, the rear doors
cannot be opened from the inside.
23
Fusion/Mondeo (CC7) Child Safety E142537 E144274 E144275
Page 30 of 458
Pregnant women should always wear their
safety belt. The lap belt portion of a
combination lap and shoulder belt should
be positioned low across the hips below
the belly and worn as tight as comfort will
allow. The shoulder belt should be
positioned to cross the middle of the
shoulder and the center of the chest.
Safety Belt Locking Modes
WARNINGS
After any vehicle collision, the safety
belt system at all passenger seating
positions must be checked by an
authorized dealer to verify that the
automatic locking retractor feature for
child seats is still functioning properly. In
addition, all safety belts should be checked
for proper function. BELT AND RETRACTOR ASSEMBLY
MUST BE REPLACED if the safety
belt assembly automatic locking
retractor feature or any other safety belt
function is not operating properly when
checked by an authorized dealer. Failure
to replace the belt and retractor assembly
could increase the risk of injury in collisions. All safety restraints in the vehicle are
combination lap and shoulder belts. The
driver safety belt has the first type of
locking mode, and the front outboard
passenger and rear seat safety belts have
both types of locking modes described as
follows: Vehicle Sensitive Mode
This is the normal retractor mode, which
allows free shoulder belt length
adjustment to your movements and
locking in response to vehicle movement.
For example, if the driver brakes suddenly
or turns a corner sharply, or the vehicle
receives an impact of approximately 5 mph
(8 km/h) or more, the combination safety
belts will lock to help reduce forward
movement of the driver and passengers.
In addition, the retractor is designed to lock
if the webbing is pulled out too quickly. If
this occurs, let the belt retract slightly and
pull webbing out again in a slow and
controlled manner.
Automatic Locking Mode
In this mode, the shoulder belt is
automatically pre-locked. The belt will still
retract to remove any slack in the shoulder
belt. The automatic locking mode is not
available on the driver safety belt.
When to Use the Automatic Locking
Mode
This mode should be used any time a child
safety seat, except a booster, is installed
in passenger front or rear seating positions.
Children 12 years old and under should be
properly restrained in a rear seating
position whenever possible. See Child
Safety (page 13).
27
Fusion/Mondeo (CC7) Safety Belts
Page 41 of 458
•
Cargo interference with the seat
• Other passengers pushing or pulling on
the seat
• Rear passenger feet and knees resting
or pushing on the seat
The conditions listed above may cause the
weight of a properly seated occupant to
be incorrectly interpreted by the front
passenger sensing system. The person in
the front passenger seat may appear
heavier or lighter due to the conditions
described in the list above. To know if the front passenger
sensing system is operating
properly, See Crash Sensors
and Airbag Indicator (page 40).
If the airbag readiness light is lit, do the
following:
The driver and adult passengers should
check for any objects that may be lodged
underneath the front passenger seat or
cargo interfering with the seat.
If objects are lodged or cargo is interfering
with the seat; please take the following
steps to remove the obstruction:
• Pull the vehicle over.
• Turn the vehicle off.
• Driver and adult passengers should
check for any objects lodged
underneath the front passenger seat
or cargo interfering with the seat.
• Remove the obstruction(s) (if found).
• Restart the vehicle.
• Wait at least two minutes and verify
that the airbag readiness light is no
longer illuminated.
• If the airbag readiness light remains
illuminated, this may or may not be a
problem due to the front passenger
sensing system. Do not attempt to repair or service the
system. Take your vehicle immediately to
an authorized dealer.
If it is necessary to modify an advanced
front airbag system to accommodate a
person with disabilities, contact the Ford
Customer Relationship Center. See
Getting the Services You Need
(page
221).
SIDE AIRBAGS WARNINGS
Do not place objects or mount
equipment on or near the airbag
cover, on the side of the seat backs
(of the front seats), or in front seat areas
that may come into contact with a
deploying airbag. Failure to follow these
instructions may increase the risk of
personal injury in the event of a crash. Do not use accessory seat covers.
The use of accessory seat covers
may prevent the deployment of the
side airbags and increase the risk of injury
in an accident. Do not lean your head on the door.
The side airbag could injure you as it
deploys from the side of the seat
back. Do not attempt to service, repair, or
modify the airbag, its fuses or the
seat cover on a seat containing an
airbag as you could be seriously injured or
killed. Contact your authorized dealer as
soon as possible. If the side airbag has deployed, the
airbag will not function again. The
side airbag system (including the
seat) must be inspected and serviced by
an authorized dealer. If the airbag is not
replaced, the unrepaired area will increase
the risk of injury in a crash. 38
Fusion/Mondeo (CC7) Supplementary Restraints System
Page 127 of 458
Passenger temperature control: Allows the passenger to set their
temperature independent of the driver temperature. Press + or - to increase or
decrease the air temperature on the passenger side of the vehicle when in dual
zone mode.
F
Fan speed control:
Press the small fan icon or large fan icon to decrease or
increase the volume of air circulated in your vehicle.
G
Driver temperature control:
Press + or - to increase or decrease the air
temperature inside the vehicle. This control also adjusts the passenger side
temperature when dual zone operation is disengaged.
H
MAX Defrost:
Press to switch on. The system distributes outside air through
the windshield air vents, the air conditioning automatically turns on, and the
fan automatically adjusts to the highest speed. When MAX defrost is on,
recirculated air cannot be selected (to prevent fogging). The heated rear window
is automatically switched on when MAX defrost is selected.
I
Heated rear window:
Turns the heated rear window on and off. See Heated
Windows and Mirrors (page 126).
J
Defrost:
Distributes air through the windshield defroster vents and de-mister
vents. You can also use this setting to defog and clear the windshield of a thin
covering of ice.
K
HINTS ON CONTROLLING THE
INTERIOR CLIMATE
General Hints
Note: Prolonged use of recirculated air may
cause the windows to fog up.
Note: You may feel a small amount of air
from the footwell air vents regardless of the
air distribution setting.
Note: To reduce humidity build-up inside
your vehicle, do not drive with the system
switched off or with recirculated air always
switched on.
Note: Do not place objects under the front
seats as this may interfere with the airflow
to the rear seats.
Note: Remove any snow, ice or leaves from
the air intake area at the base of the
windshield. Manual Climate Control
Note:
To reduce fogging of the windshield
during humid weather, adjust the air
distribution control to the windshield air
vents position.
Automatic Climate Control
Note: Adjusting the settings when your
vehicle interior is extremely hot or cold is
not necessary. The system automatically
adjusts to heat or cool the cabin to your
selected temperature as quickly as possible.
For the system to function efficiently, the
instrument panel and side air vents should
be fully open.
Note: At low ambient temperatures with
AUTO selected, the system directs airflow
to the windshield and side window vents
and fan may run at a slow speed until the
engine warms up.
124
Fusion/Mondeo (CC7) Climate Control
Page 130 of 458
Heated Exterior Mirror (If Equipped)
Note: Do not remove ice from the mirrors
with a scraper or attempt to readjust the
mirror glass that has frozen in place. These
actions could cause damage to the glass
and mirrors.
Note: Do not clean the housing or glass of
any mirror with harsh abrasives, fuel or other
petroleum-based cleaning products.
The heated mirrors remove ice, mist and
fog when you switch on the heated rear
window.
CABIN AIR FILTER
Your vehicle is equipped with a cabin air
filter. It is located behind the glove box.
The particulate filtration system reduces
the concentration of airborne particles
such as dust, spores and pollen in the air
supplied to the interior of your vehicle.
Note: Make sure you have a cabin air filter
installed at all times. This prevents foreign
objects from entering the system. Running
the system without a filter in place could
result in degradation or damage to the
system.
The particulate filtration system gives you
and your passengers the following
benefits:
• It improves your driving comfort by
reducing particle concentration.
• It improves the interior compartment
cleanliness.
• It protects the climate control
components from particle deposits.
Replace the filter at regular intervals. See
Scheduled Maintenance
(page 428).
For additional cabin air filter information,
or to replace the filter, see an authorized
dealer. REMOTE START
(IF EQUIPPED)
The climate control system adjusts the
cabin temperature during remote start.
You cannot adjust the system during
remote start operation. Turn the ignition
on to return the system to its previous
settings. You can now make adjustments.
You need to turn certain
vehicle-dependent features back on, such
as:
• heated seats
• heated mirrors
• heated rear window.
You can adjust the settings using the
information display controls. See
Information Displays
(page 83).
Automatic Settings
You can set the climate control to operate
in AUTO mode through the information
display setting: Remote Start > Climate
Control > Heater-A/C > Auto. The climate
control system automatically sets the
interior temperature to 72°F (22°C).
In hot weather, the system is set to 72°F
(22°C).
In moderate weather, the system either
heats or cools (based on previous
settings). The rear defroster, heated
mirrors and heated seats do not
automatically turn on.
In cold weather, the system is set to 72°F
(22°C). The heated seats are set to high
(if available, and selected to AUTO in the
information display). The rear defroster
and heated mirrors automatically turn on.
127
Fusion/Mondeo (CC7) Climate Control
Page 133 of 458
WARNINGS
Install the head restraint properly to
help minimize the risk of neck injury
in the event of a collision.
Note:
Adjust the seat back to an upright
driving position before adjusting the head
restraint. Adjust the head restraint so that
the top of it is level with the top of your head
and as far forward as possible. Make sure
that you remain comfortable. If you are
extremely tall, adjust the head restraint to
its highest position.
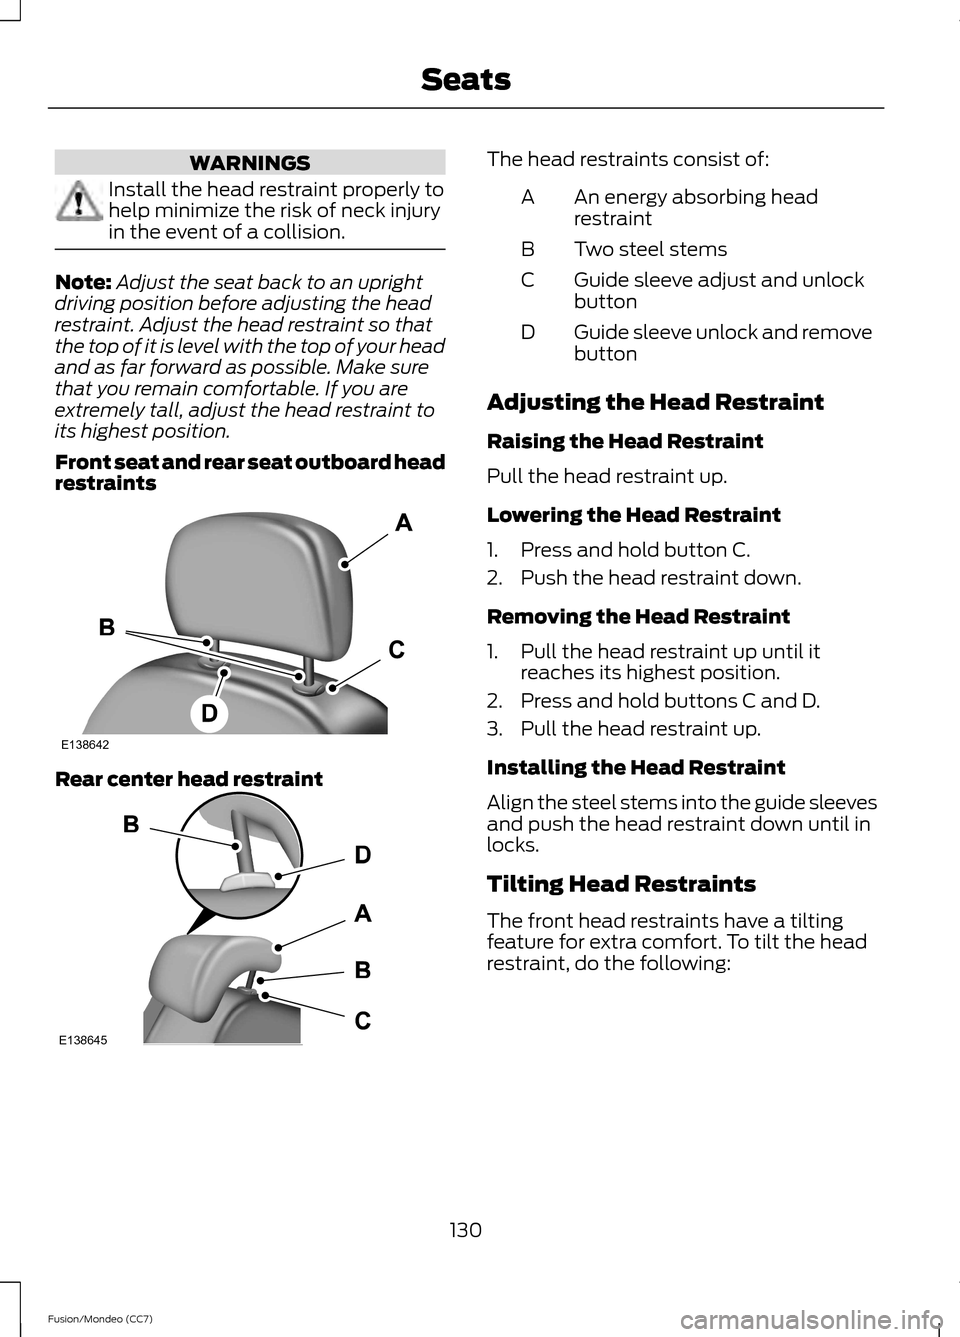
Front seat and rear seat outboard head
restraints Rear center head restraint The head restraints consist of:
An energy absorbing head
restraint
A
Two steel stems
B
Guide sleeve adjust and unlock
button
C
Guide sleeve unlock and remove
button
D
Adjusting the Head Restraint
Raising the Head Restraint
Pull the head restraint up.
Lowering the Head Restraint
1. Press and hold button C.
2. Push the head restraint down.
Removing the Head Restraint
1. Pull the head restraint up until it reaches its highest position.
2. Press and hold buttons C and D.
3. Pull the head restraint up.
Installing the Head Restraint
Align the steel stems into the guide sleeves
and push the head restraint down until in
locks.
Tilting Head Restraints
The front head restraints have a tilting
feature for extra comfort. To tilt the head
restraint, do the following:
130
Fusion/Mondeo (CC7) SeatsE138642 E138645