clock FORD FUSION ENERGI 2018 User Guide
[x] Cancel search | Manufacturer: FORD, Model Year: 2018, Model line: FUSION ENERGI, Model: FORD FUSION ENERGI 2018Pages: 538, PDF Size: 7.52 MB
Page 240 of 538
TRANSPORTING THE VEHICLE
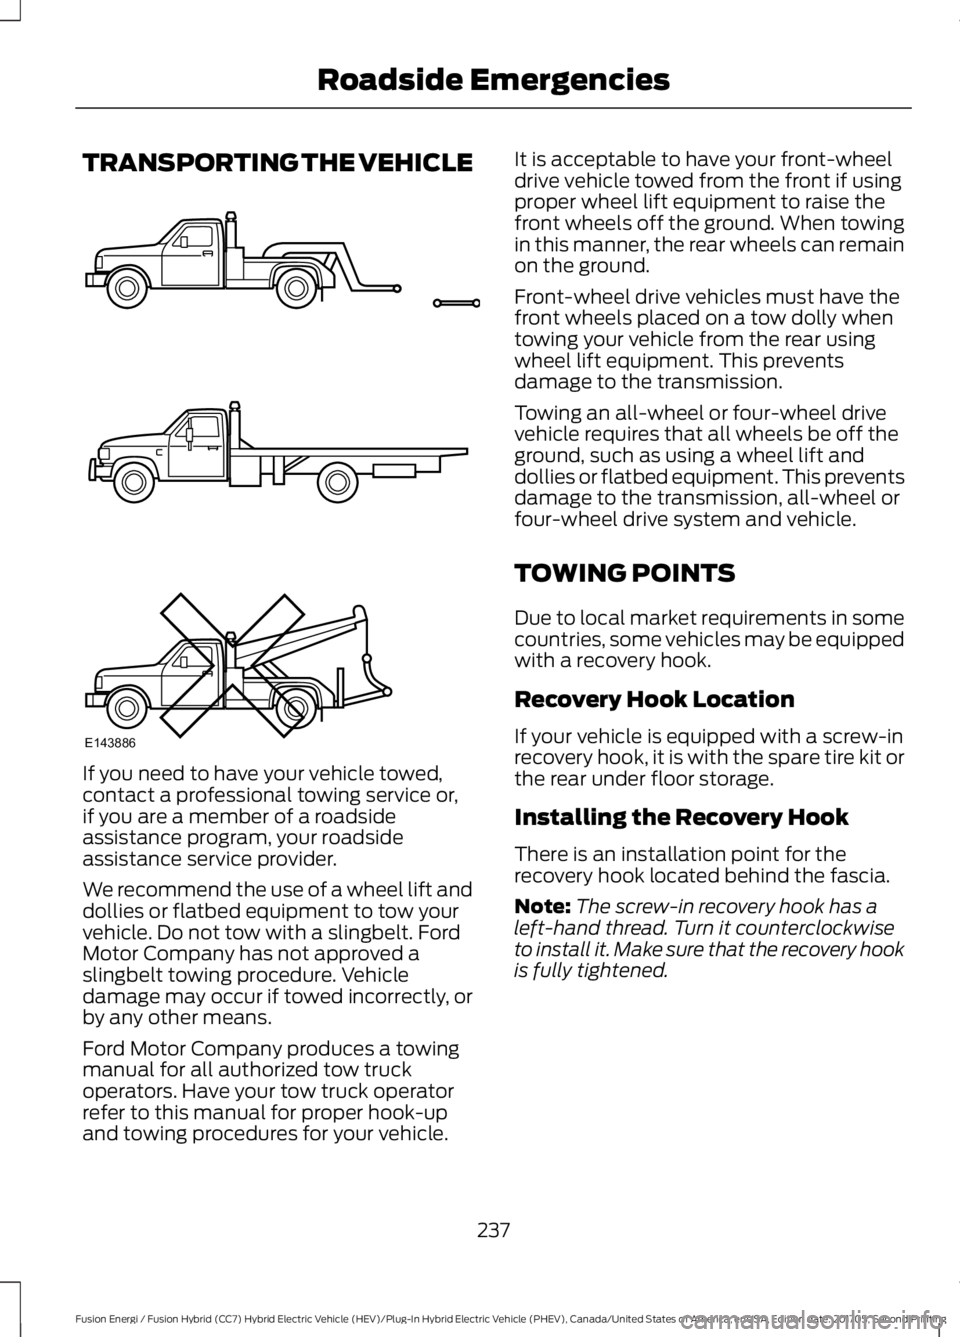
If you need to have your vehicle towed,contact a professional towing service or,if you are a member of a roadsideassistance program, your roadsideassistance service provider.
We recommend the use of a wheel lift anddollies or flatbed equipment to tow yourvehicle. Do not tow with a slingbelt. FordMotor Company has not approved aslingbelt towing procedure. Vehicledamage may occur if towed incorrectly, orby any other means.
Ford Motor Company produces a towingmanual for all authorized tow truckoperators. Have your tow truck operatorrefer to this manual for proper hook-upand towing procedures for your vehicle.
It is acceptable to have your front-wheeldrive vehicle towed from the front if usingproper wheel lift equipment to raise thefront wheels off the ground. When towingin this manner, the rear wheels can remainon the ground.
Front-wheel drive vehicles must have thefront wheels placed on a tow dolly whentowing your vehicle from the rear usingwheel lift equipment. This preventsdamage to the transmission.
Towing an all-wheel or four-wheel drivevehicle requires that all wheels be off theground, such as using a wheel lift anddollies or flatbed equipment. This preventsdamage to the transmission, all-wheel orfour-wheel drive system and vehicle.
TOWING POINTS
Due to local market requirements in somecountries, some vehicles may be equippedwith a recovery hook.
Recovery Hook Location
If your vehicle is equipped with a screw-inrecovery hook, it is with the spare tire kit orthe rear under floor storage.
Installing the Recovery Hook
There is an installation point for therecovery hook located behind the fascia.
Note:The screw-in recovery hook has aleft-hand thread. Turn it counterclockwiseto install it. Make sure that the recovery hookis fully tightened.
237
Fusion Energi / Fusion Hybrid (CC7) Hybrid Electric Vehicle (HEV)/Plug-In Hybrid Electric Vehicle (PHEV), Canada/United States of America, enUSA, Edition date: 201705, Second Printing
Roadside EmergenciesE143886
Page 265 of 538
Note:Make sure that the coolant level isbetween the MIN and the MAX marks onthe coolant reservoir.
Note: Coolant expands when it is hot. Thelevel may extend beyond the MAX mark.
Maintain coolant concentration within48% to 50%, which equates to a freezepoint between -30°F (-34°C) and -34°F(-37°C). Coolant concentration should bechecked using a refractometer. We do notrecommend the use of hydrometers orcoolant test strips for measuring coolantconcentration.
Adding Coolant
WARNINGS
Do not add engine coolant when theengine is hot. Failure to follow thisinstruction could result in personalinjury.
Never remove the coolant reservoircap when the engine is running orhot.
Note: Automotive fluids are notinterchangeable. Do not use coolant orwindshield washer fluid outside of itsspecified function and vehicle location.
Note: Do not use stop leak pellets, coolingsystem sealants, or non-specified additivesas they can cause damage to the enginecooling or heating systems. Resultingcomponent damage may not be covered bythe vehicle Warranty.
It is very important to use predilutedcoolant approved to the correctspecification in order to avoid plugging thesmall passageways in the engine coolingsystem. See Capacities andSpecifications (page 312). Do not mixdifferent colors or types of coolant in yourvehicle. Mixing of engine coolants or usingan incorrect coolant may harm the engineor cooling system components and maynot be covered by the vehicle Warranty.
Note:If prediluted coolant is not available,use the approved concentrated coolantdiluting it to 50/50 with distilled water. SeeCapacities and Specifications (page 308).Using water that has not been deionizedmay contribute to deposit formation,corrosion and plugging of the small coolingsystem passageways.
Note: Coolants marketed for all makes andmodels may not be approved to Fordspecifications and may cause damage tothe cooling system. Resulting componentdamage may not be covered by the vehicleWarranty.
If the coolant level is at or below theminimum mark, add prediluted coolantimmediately.
To top up the coolant level do thefollowing:
1. Unscrew the cap slowly. Any pressureescapes as you unscrew the cap.
2. Add prediluted coolant approved tothe correct specification. SeeCapacities and Specifications (page308).
3. Add enough prediluted coolant toreach the correct level.
4.Replace the coolant reservoir cap, turnit clockwise until you feel a strongresistance.
262
Fusion Energi / Fusion Hybrid (CC7) Hybrid Electric Vehicle (HEV)/Plug-In Hybrid Electric Vehicle (PHEV), Canada/United States of America, enUSA, Edition date: 201705, Second Printing
Maintenance
Page 271 of 538
Note:Contact an authorized dealer for lowvoltage battery access, testing orreplacement.
To make sure the battery managementsystem works correctly, do not connect anelectrical device ground connectiondirectly to the low voltage battery negativepost. This can cause inaccuratemeasurements of the battery conditionand potential incorrect system operation.
Note:If you add electrical accessories orcomponents to the vehicle, it may adverselyaffect the low voltage battery performanceand durability. This may also affect theperformance of other electrical systems inthe vehicle.
For longer, trouble-free operation, keep thetop of the battery clean and dry.
If you see any corrosion on the battery orterminals, remove the cables from theterminals and clean with a wire brush. Youcan neutralize the acid with a solution ofbaking soda and water.
Because your vehicle’s engine iselectronically-controlled by a computer,some engine control settings aremaintained by power from the low-voltagebattery. Some engine computer settings,like the idle trim and fuel trim strategy,optimize the driveability and performanceof the engine. The clock and radio stationpresets are also maintained in memory bypower from the low-voltage battery. Thesesettings are erased when a techniciandisconnects and connects the low-voltagebattery.
To restore the settings, do the following:
1. Apply the parking brake.
2. Shift into park (P) or neutral (N).
3. Switch off all accessories.
4. Press the brake pedal and start yourvehicle.
5. Run the engine until it reaches normaloperating temperature. While theengine is warming up, complete thefollowing: Reset the clock. See AudioSystem (page 317). Reset the powerwindows bounce-back feature. SeeWindows and Mirrors (page 83).Reset the radio station presets. SeeAudio System (page 317).
6.Allow the engine to idle for at least oneminute.
7.Drive the vehicle at least 10 mi (16 km)to completely relearn the idle trim andfuel trim strategy.
Note:If you do not allow the engine torelearn the idle and fuel trim strategy, theidle quality of your vehicle may be adverselyaffected until the engine computereventually relearns the idle trim and fueltrim strategy.
Make sure that you dispose of old batteriesin an environmentally friendly way. Seekadvice from your local authority aboutrecycling old batteries.
If storing your vehicle for more than 30days without recharging the battery, werecommend that you disconnect thebattery cables to maintain battery chargefor quick starting.
CHECKING THE WIPER
BLADES
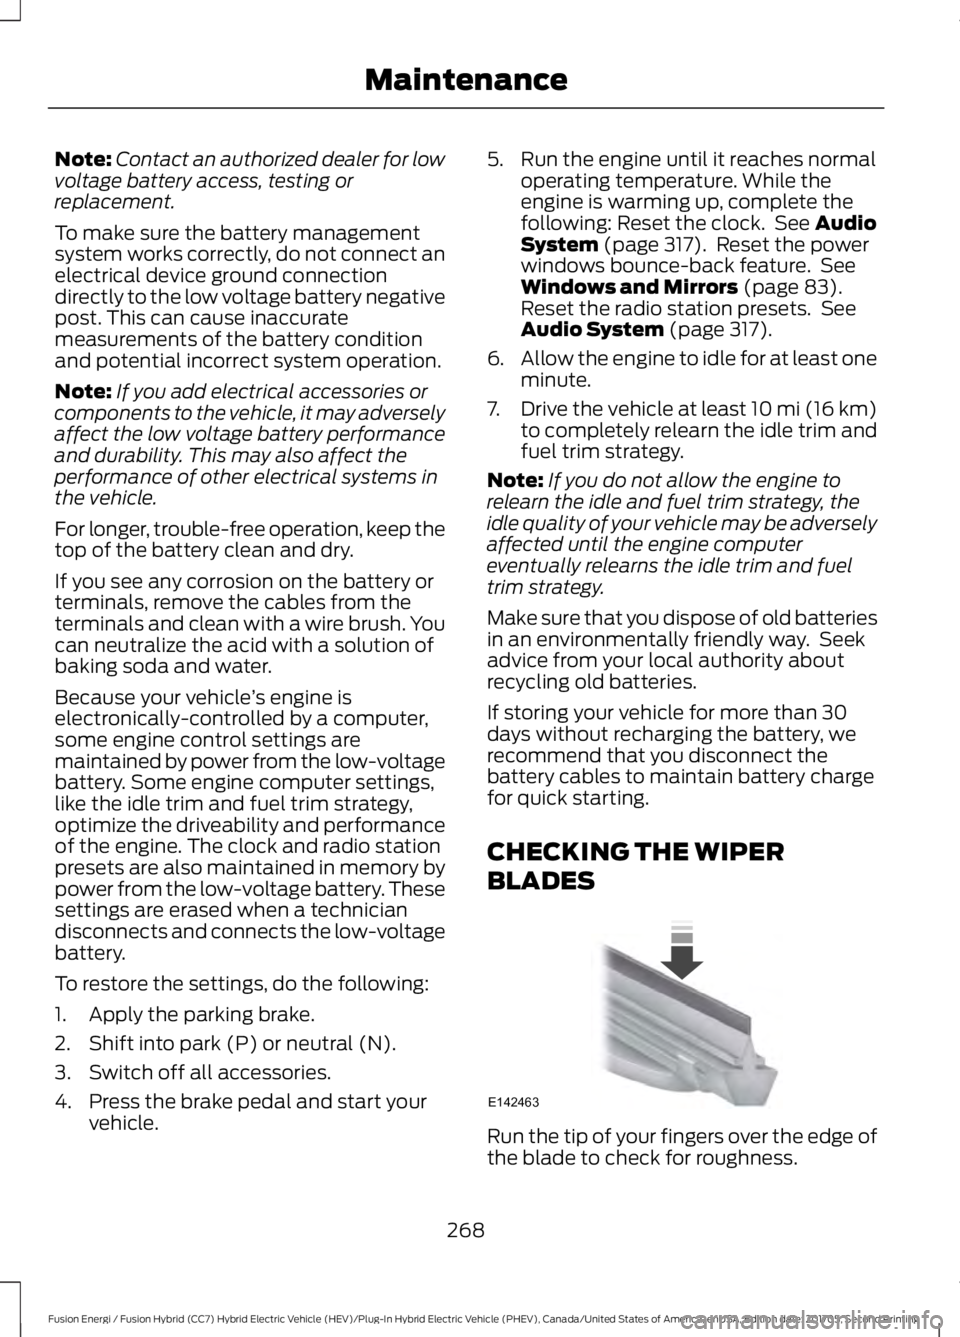
Run the tip of your fingers over the edge ofthe blade to check for roughness.
268
Fusion Energi / Fusion Hybrid (CC7) Hybrid Electric Vehicle (HEV)/Plug-In Hybrid Electric Vehicle (PHEV), Canada/United States of America, enUSA, Edition date: 201705, Second Printing
MaintenanceE142463
Page 273 of 538
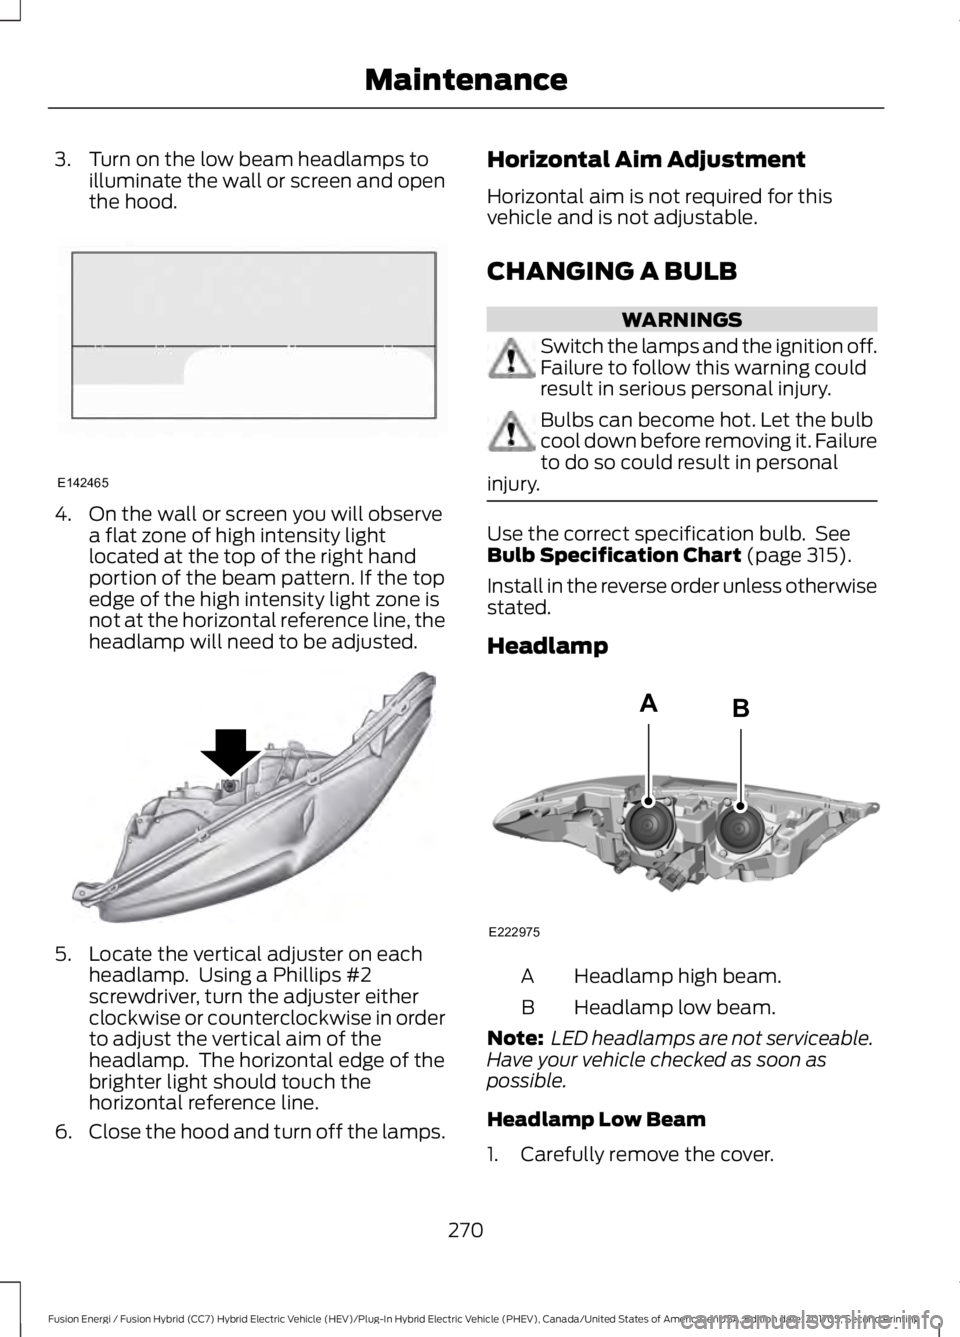
3. Turn on the low beam headlamps toilluminate the wall or screen and openthe hood.
4. On the wall or screen you will observea flat zone of high intensity lightlocated at the top of the right handportion of the beam pattern. If the topedge of the high intensity light zone isnot at the horizontal reference line, theheadlamp will need to be adjusted.
5. Locate the vertical adjuster on eachheadlamp. Using a Phillips #2screwdriver, turn the adjuster eitherclockwise or counterclockwise in orderto adjust the vertical aim of theheadlamp. The horizontal edge of thebrighter light should touch thehorizontal reference line.
6.Close the hood and turn off the lamps.
Horizontal Aim Adjustment
Horizontal aim is not required for thisvehicle and is not adjustable.
CHANGING A BULB
WARNINGS
Switch the lamps and the ignition off.Failure to follow this warning couldresult in serious personal injury.
Bulbs can become hot. Let the bulbcool down before removing it. Failureto do so could result in personalinjury.
Use the correct specification bulb. SeeBulb Specification Chart (page 315).
Install in the reverse order unless otherwisestated.
Headlamp
Headlamp high beam.A
Headlamp low beam.B
Note: LED headlamps are not serviceable.Have your vehicle checked as soon aspossible.
Headlamp Low Beam
1. Carefully remove the cover.
270
Fusion Energi / Fusion Hybrid (CC7) Hybrid Electric Vehicle (HEV)/Plug-In Hybrid Electric Vehicle (PHEV), Canada/United States of America, enUSA, Edition date: 201705, Second Printing
MaintenanceE142465 E145594 E222975
AB
Page 274 of 538
2. Disconnect the electrical connector.
3.Turn the bulb holder counterclockwiseand remove it.
Note:Do not touch the bulb glass.
Note:You cannot separate the bulb fromthe bulb holder.
Headlamp High Beam
1. Carefully remove the cover.
2. Disconnect the electrical connector.
3.Turn the bulb holder counterclockwiseand remove it.
Note:Do not touch the bulb glass.
Note:You cannot separate the bulb fromthe bulb holder.
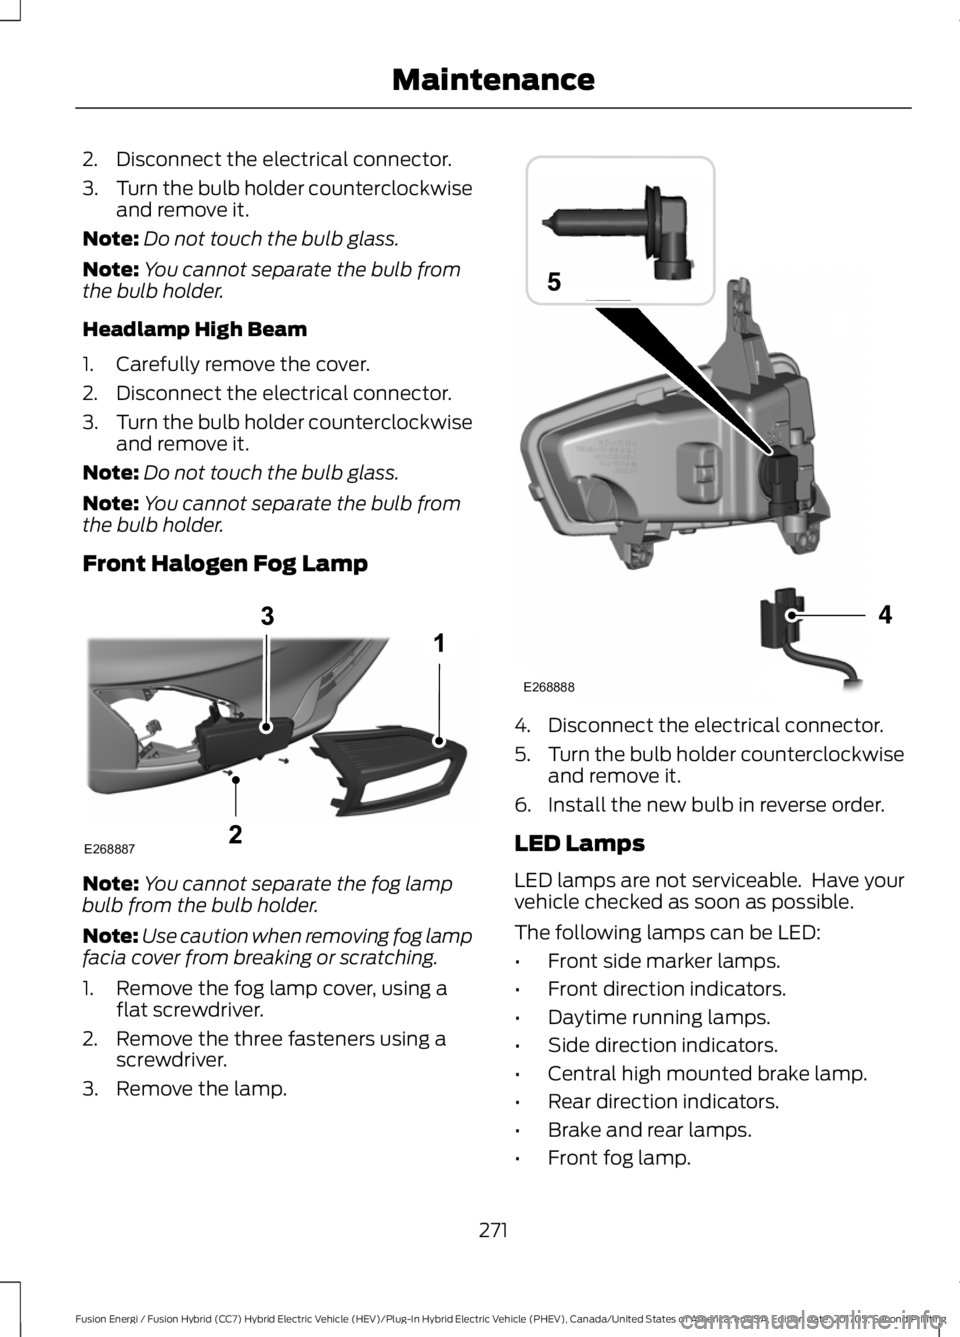
Front Halogen Fog Lamp
Note:You cannot separate the fog lampbulb from the bulb holder.
Note:Use caution when removing fog lampfacia cover from breaking or scratching.
1. Remove the fog lamp cover, using aflat screwdriver.
2. Remove the three fasteners using ascrewdriver.
3. Remove the lamp.
4. Disconnect the electrical connector.
5.Turn the bulb holder counterclockwiseand remove it.
6. Install the new bulb in reverse order.
LED Lamps
LED lamps are not serviceable. Have yourvehicle checked as soon as possible.
The following lamps can be LED:
•Front side marker lamps.
•Front direction indicators.
•Daytime running lamps.
•Side direction indicators.
•Central high mounted brake lamp.
•Rear direction indicators.
•Brake and rear lamps.
•Front fog lamp.
271
Fusion Energi / Fusion Hybrid (CC7) Hybrid Electric Vehicle (HEV)/Plug-In Hybrid Electric Vehicle (PHEV), Canada/United States of America, enUSA, Edition date: 201705, Second Printing
MaintenanceE268887 E268888
Page 275 of 538
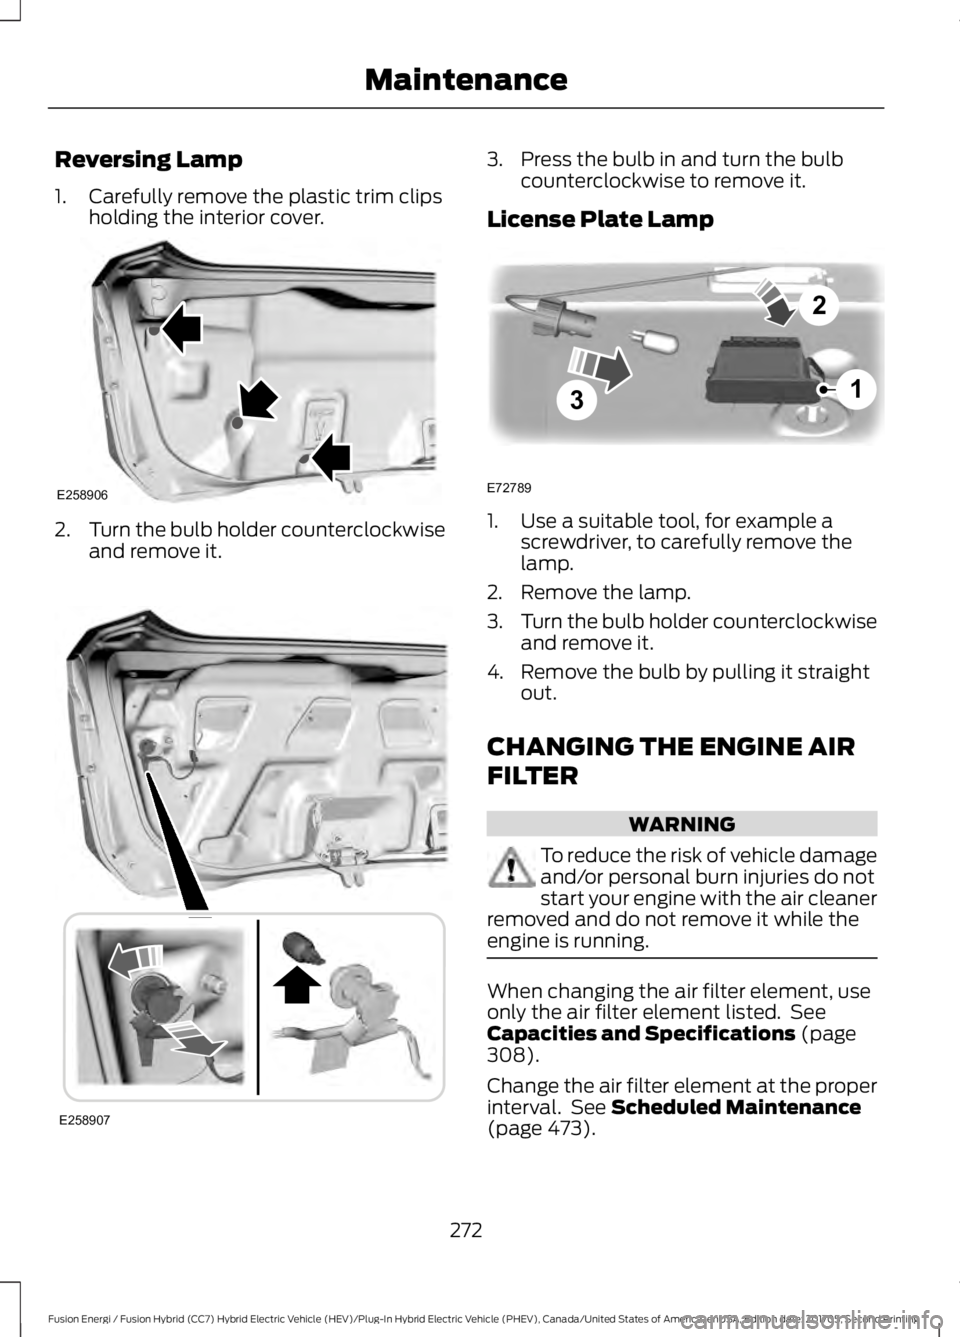
Reversing Lamp
1. Carefully remove the plastic trim clipsholding the interior cover.
2.Turn the bulb holder counterclockwiseand remove it.
3. Press the bulb in and turn the bulbcounterclockwise to remove it.
License Plate Lamp
1. Use a suitable tool, for example ascrewdriver, to carefully remove thelamp.
2. Remove the lamp.
3.Turn the bulb holder counterclockwiseand remove it.
4. Remove the bulb by pulling it straightout.
CHANGING THE ENGINE AIR
FILTER
WARNING
To reduce the risk of vehicle damageand/or personal burn injuries do notstart your engine with the air cleanerremoved and do not remove it while theengine is running.
When changing the air filter element, useonly the air filter element listed. SeeCapacities and Specifications (page308).
Change the air filter element at the properinterval. See Scheduled Maintenance(page 473).
272
Fusion Energi / Fusion Hybrid (CC7) Hybrid Electric Vehicle (HEV)/Plug-In Hybrid Electric Vehicle (PHEV), Canada/United States of America, enUSA, Edition date: 201705, Second Printing
MaintenanceE258906 E258907 3
2
1
E72789
Page 286 of 538
* When inflation only is requiredfor a tire or other objects, theselector must be in the Airposition.
What to do when a Tire IsPunctured
A tire puncture within the tire's tread areacan be repaired in two stages with the kit.
•In the first stage, the tire will bereinflated with a sealing compoundand air. After the tire has been inflated,you will need to drive the vehicle ashort distance 4 mi (6 km) to distributethe sealant in the tire.
•In the second stage, you will need tocheck the tire pressure and adjust, ifnecessary, to the vehicle's specifiedtire inflation pressure.
First Stage: Reinflating the Tirewith Sealing Compound and Air
WARNINGS
Do not stand directly over the kitwhile inflating the tire. If you noticeany unusual bulges or deformationsin the tire's sidewall during inflation, stopand call roadside assistance.
If the tire does not inflate to therecommended tire pressure within15 minutes, stop and call roadsideassistance.
Do not run the engine whenoperating the air compressor unlessthe vehicle is outdoors or in awell-ventilated area.
Preparation: Park the vehicle in a safe, leveland secure area, away from moving traffic.
Turn the hazard lights on. Apply the parkingbrake and turn the engine off. Inspect theflat tire for visible damage.
Sealant compound contains latex. Useappropriate precautions to avoid anyallergic reactions.
Do not remove any foreign object that haspierced the tire. If a puncture is located inthe tire sidewall, stop and call roadsideassistance.
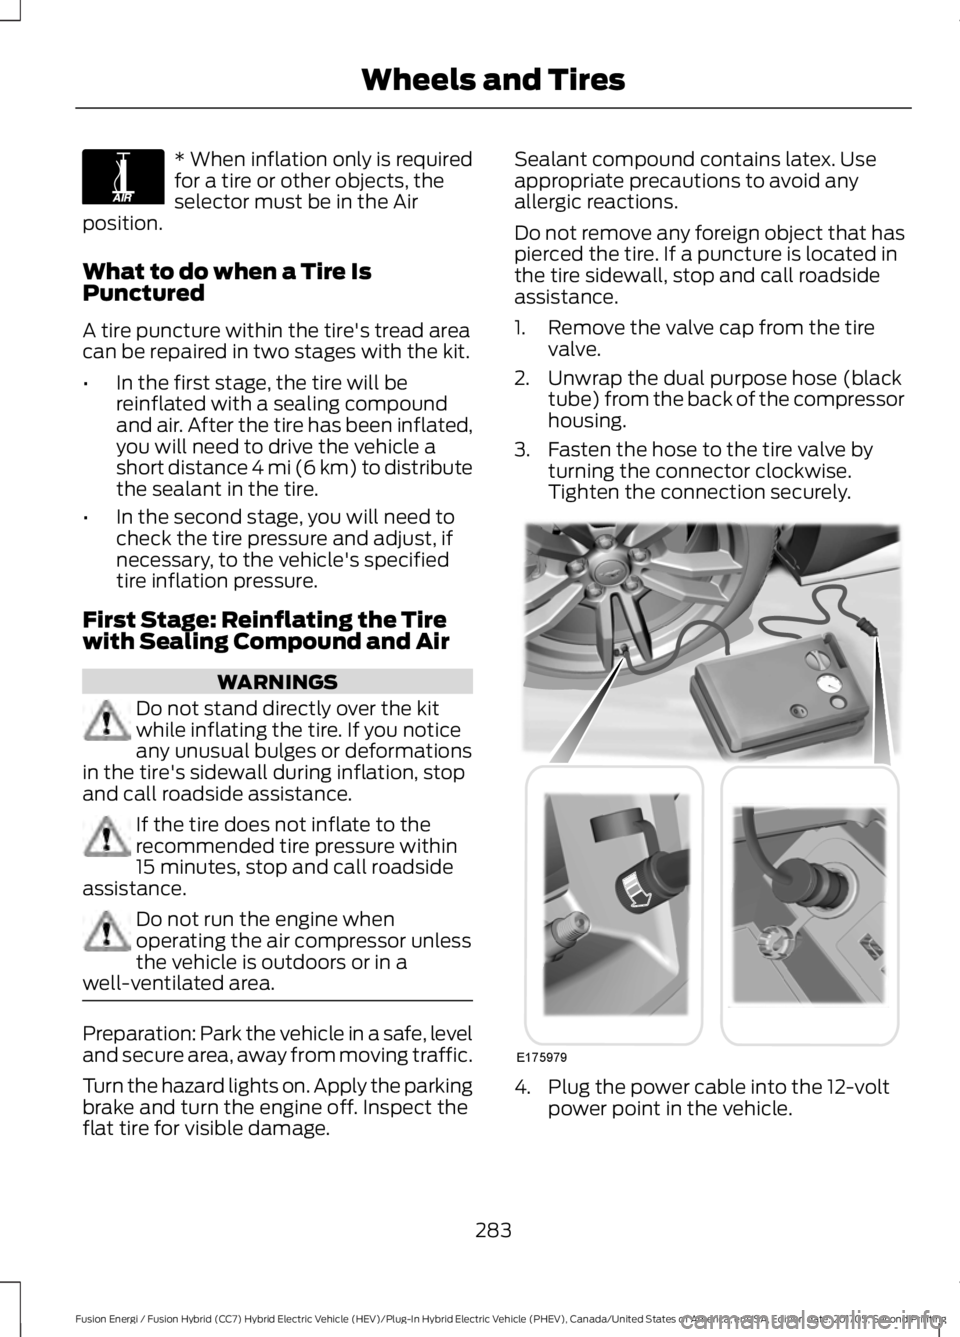
1. Remove the valve cap from the tirevalve.
2. Unwrap the dual purpose hose (blacktube) from the back of the compressorhousing.
3. Fasten the hose to the tire valve byturning the connector clockwise.Tighten the connection securely.
4. Plug the power cable into the 12-voltpower point in the vehicle.
283
Fusion Energi / Fusion Hybrid (CC7) Hybrid Electric Vehicle (HEV)/Plug-In Hybrid Electric Vehicle (PHEV), Canada/United States of America, enUSA, Edition date: 201705, Second Printing
Wheels and TiresE175978 E175979
Page 287 of 538
5. Remove the warning sticker found onthe casing/housing and place it on thetop of the instrument panel or thecenter of the dash.
6. Start the vehicle leave the enginerunning so the compressor does notdrain the vehicle’s battery.
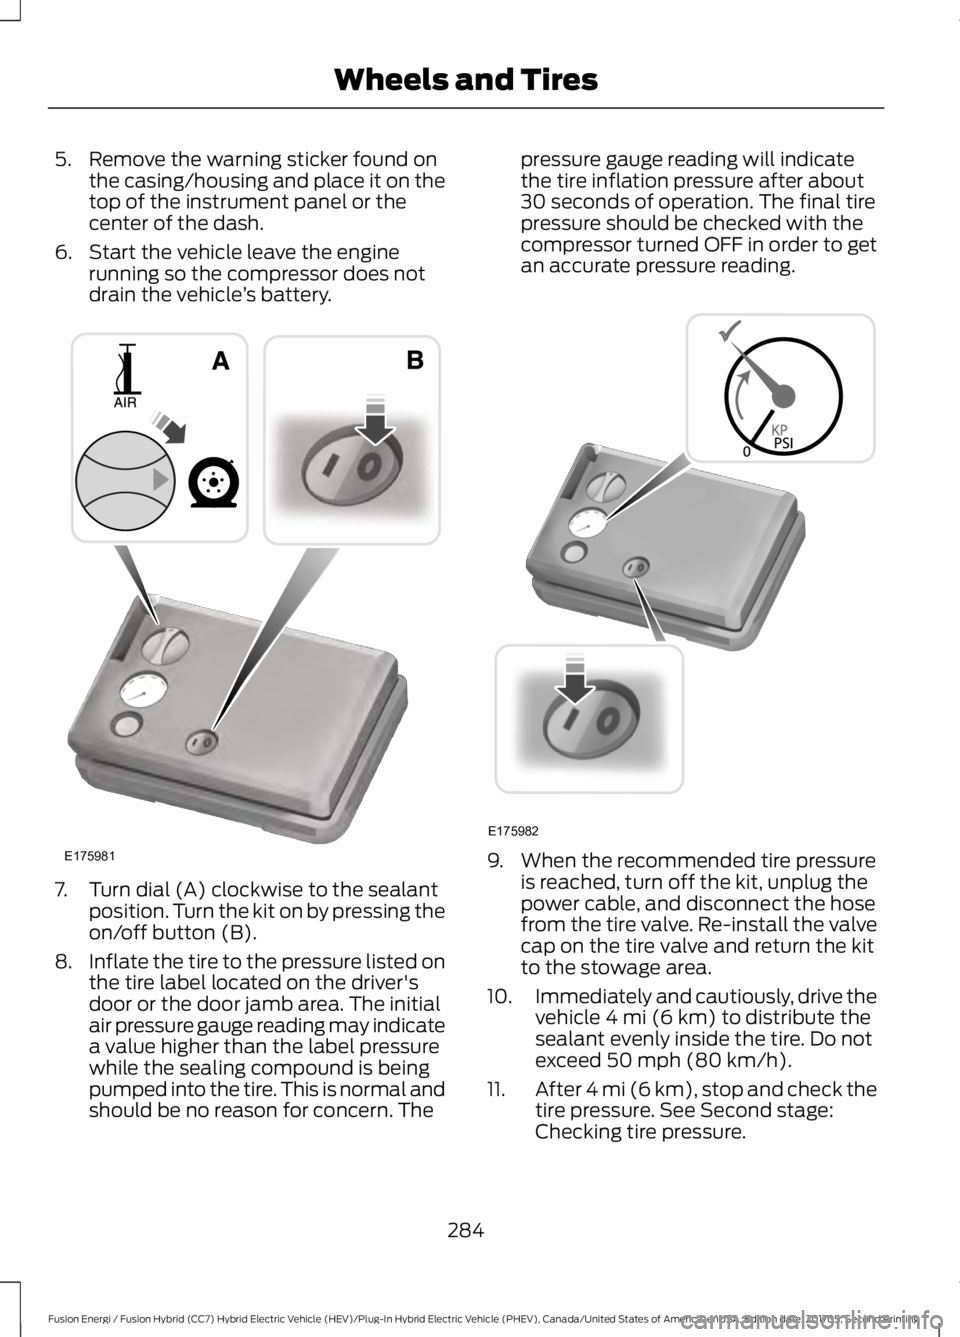
7. Turn dial (A) clockwise to the sealantposition. Turn the kit on by pressing theon/off button (B).
8.Inflate the tire to the pressure listed onthe tire label located on the driver'sdoor or the door jamb area. The initialair pressure gauge reading may indicatea value higher than the label pressurewhile the sealing compound is beingpumped into the tire. This is normal andshould be no reason for concern. The
pressure gauge reading will indicatethe tire inflation pressure after about30 seconds of operation. The final tirepressure should be checked with thecompressor turned OFF in order to getan accurate pressure reading.
9. When the recommended tire pressureis reached, turn off the kit, unplug thepower cable, and disconnect the hosefrom the tire valve. Re-install the valvecap on the tire valve and return the kitto the stowage area.
10.Immediately and cautiously, drive thevehicle 4 mi (6 km) to distribute thesealant evenly inside the tire. Do notexceed 50 mph (80 km/h).
11.After 4 mi (6 km), stop and check thetire pressure. See Second stage:Checking tire pressure.
284
Fusion Energi / Fusion Hybrid (CC7) Hybrid Electric Vehicle (HEV)/Plug-In Hybrid Electric Vehicle (PHEV), Canada/United States of America, enUSA, Edition date: 201705, Second Printing
Wheels and TiresE175981 E175982
Page 288 of 538
Note:If you experience any unusualvibration, ride disturbance or noise whiledriving, reduce your speed until you cansafely pull off to the side of the road to callfor roadside assistance. Note: Do notproceed to the second stage of thisoperation.
Second Stage: Checking TirePressure
WARNINGS
If the tire does not inflate to therecommended tire pressure within15 minutes, stop and call roadsideassistance.
The power plug may get hot after useand should be handled carefullywhen unplugging.
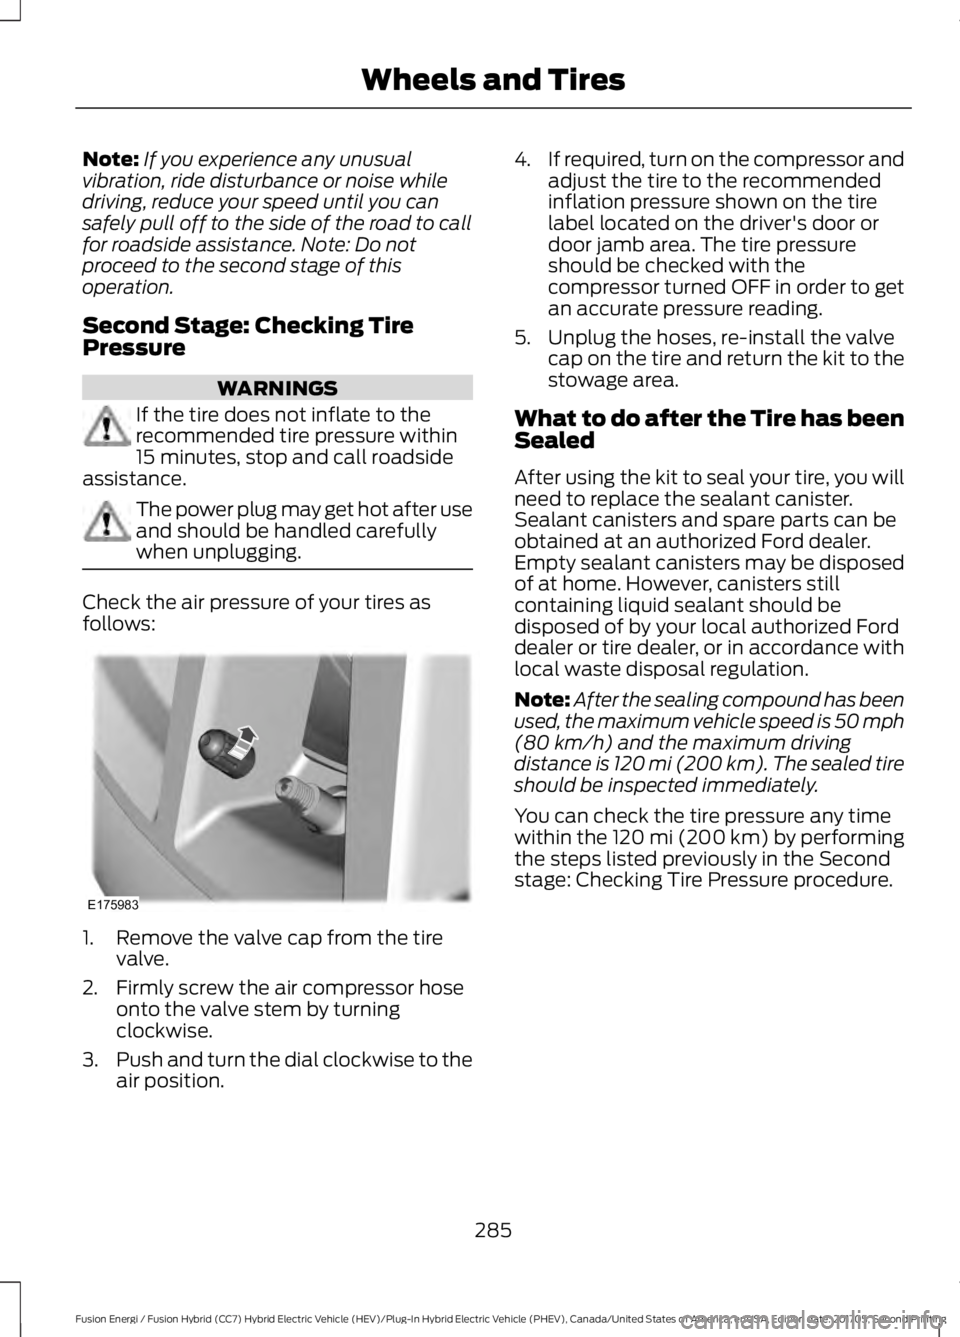
Check the air pressure of your tires asfollows:
1. Remove the valve cap from the tirevalve.
2. Firmly screw the air compressor hoseonto the valve stem by turningclockwise.
3.Push and turn the dial clockwise to theair position.
4.If required, turn on the compressor andadjust the tire to the recommendedinflation pressure shown on the tirelabel located on the driver's door ordoor jamb area. The tire pressureshould be checked with thecompressor turned OFF in order to getan accurate pressure reading.
5. Unplug the hoses, re-install the valvecap on the tire and return the kit to thestowage area.
What to do after the Tire has beenSealed
After using the kit to seal your tire, you willneed to replace the sealant canister.Sealant canisters and spare parts can beobtained at an authorized Ford dealer.Empty sealant canisters may be disposedof at home. However, canisters stillcontaining liquid sealant should bedisposed of by your local authorized Forddealer or tire dealer, or in accordance withlocal waste disposal regulation.
Note:After the sealing compound has beenused, the maximum vehicle speed is 50 mph(80 km/h) and the maximum drivingdistance is 120 mi (200 km). The sealed tireshould be inspected immediately.
You can check the tire pressure any timewithin the 120 mi (200 km) by performingthe steps listed previously in the Secondstage: Checking Tire Pressure procedure.
285
Fusion Energi / Fusion Hybrid (CC7) Hybrid Electric Vehicle (HEV)/Plug-In Hybrid Electric Vehicle (PHEV), Canada/United States of America, enUSA, Edition date: 201705, Second Printing
Wheels and TiresE175983
Page 325 of 538
MEDIA: Press to open the mediasource menu. You can press thismultiple times to change to CDor to a SYNC-Media device orscroll through the media sourcesusing the arrow buttons. PressOK to select a source.
Q
Clock: Press to access the clocksetting. Use the center arrowcontrols to change the hours andminutes. You can also set theclock by pressing the MENUbutton and scrolling to ClockSettings.
R
RADIO: Press to listen to theradio or change radio stations.Press the function buttonsbelow the radio screen to selectdifferent radio functions.
S
SIRIUS or MUTE: Press to listento SIRIUS satellite radio, or ifequipped, press to mute theplaying audio.
T
Menu Structure
Note:Depending on your system, someoptions may appear slightly different.
Press MENU.
Press the up and down arrow buttons toscroll through the options.
Press the right arrow to enter a menu.Press the left arrow to exit a menu.
Press OK to confirm a selection.
Radio
Use the left and right arrows to go up or down thefrequency band.Manual Tune
Select for a brief sampling of all available channels.Scan
Select to store the six strongest local stations on the AM-AST and FM-AST frequency bands.AST
Select to have the system search by certain musiccategories (such as Rock, Pop or Country).Set Category for Seek/Scan
Select to view additional broadcast data, if available. Thisfeature defaults to off. RBDS must be on for you to set acategory.
RDS Text Display
322
Fusion Energi / Fusion Hybrid (CC7) Hybrid Electric Vehicle (HEV)/Plug-In Hybrid Electric Vehicle (PHEV), Canada/United States of America, enUSA, Edition date: 201705, Second Printing
Audio System