manual transmission FORD FUSION HYBRID 2014 Owners Manual
[x] Cancel search | Manufacturer: FORD, Model Year: 2014, Model line: FUSION HYBRID, Model: FORD FUSION HYBRID 2014Pages: 473, PDF Size: 5.93 MB
Page 35 of 473
Deactivating and Activating the
Belt-Minder Feature
WARNING
While the system allows you to
deactivate it, this system is designed
to improve your chances of being
safely belted and surviving an accident.
We recommend you leave the system
activated for yourself and others who may
use the vehicle. To reduce the risk of injury,
do not deactivate or activate the system
while driving the vehicle.
Note: The driver and front passenger
warning are deactivated and activated
independently. When deactivating or
activating one seating position, do not
buckle the other position as this will
terminate the process.
Read Steps 1 - 4 thoroughly before
proceeding with the programming
procedure.
The system can be deactivated or
activated by performing the following
procedure:
Before following the procedure, make sure
that:
• the parking brake is set
• the transmission selector lever is in
position P (automatic transmission)
or N (manual transmission)
• the ignition is off
• the driver and front passenger safety
belts are unbuckled.
1. Turn the ignition on. Do not start the
vehicle.
2. Wait until the safety belt warning light
turns off (about one minute). After
Step 2, wait an additional five seconds
before proceeding with Step 3. Once
Step 3 is started, the procedure must
be completed within 30 seconds. 3. For the seating position being disabled,
buckle then unbuckle the safety belt
three times at a moderate speed,
ending in the unbuckled state. After
Step 3, the safety belt warning light will
turn on.
4. While the safety belt warning light is
on, buckle and then unbuckle the
safety belt. After Step 4, the safety belt
warning light will flash for confirmation.
• This will disable the feature for that
seating position if it is currently
enabled.
• This will enable the feature for that
seating position if it is currently
disabled.
CHILD RESTRAINT AND
SAFETY BELT MAINTENANCE Inspect the vehicle safety belts and child
safety seat systems periodically to make
sure they work properly and are not
damaged. Inspect the vehicle and child
seat safety belts to make sure there are no
nicks, tears or cuts. Replace if necessary.
All vehicle safety belt assemblies, including
retractors, buckles, front safety belt buckle
assemblies, buckle support assemblies
(slide bar-if equipped), shoulder belt
height adjusters (if equipped), shoulder
belt guide on seat back (if equipped), child
safety seat LATCH and tether anchors, and
attaching hardware, should be inspected
after a crash. Read the child restraint
manufacturer's instructions for additional
inspection and maintenance information
specific to the child restraint.
32Safety Belts
Page 51 of 473
5. Reinstall the housing and cover.
Car Finder E138623
Press the button twice within
three seconds. The horn will
sound and the turn signals will
flash. We recommend you use this method
to locate your vehicle, rather than using
the panic alarm.
Sounding a Panic Alarm Note: The panic alarm will only operate
when the ignition is off. E138624
Press the button to activate the
alarm. Press the button again or
switch the ignition on to
deactivate.
Remote Start (If Equipped)
WARNING
To avoid exhaust fumes, do not use
remote start if your vehicle is parked
indoors or areas that are not well
ventilated.
Note: Do not use remote start if your vehicle
is low on fuel. E138625
The remote start button is on the
transmitter.
This feature allows you to start your
vehicle from outside the vehicle. The
transmitter has an extended operating
range.
Vehicles with automatic climate control
can be configured to operate when the
vehicle is remote started. See Climate
Control (page 113). A manual climate
control system will run at the setting it was
set to when you switched the vehicle off. Many states and provinces have
restrictions for the use of remote start.
Check your local and state or provincial
laws for specific requirements regarding
remote start systems.
The remote start system will not work if:
• the ignition is on
• the alarm system triggered
• you disable the feature
• the hood is open
• the transmission is not in P
• the vehicle battery voltage is too low
• the service engine soon light is on.
Remote Control Feedback
An LED on the remote control provides
status feedback of remote start or stop
commands. StatusLED
Remote start or
extension
successfulSolid green
Remote stop
successful; engine
offSolid red
Remote start or
stop failedBlinking red
Waiting for status
updateBlinking green
Remote Starting the Vehicle
Note: You must press each button within
three seconds of each other. Your vehicle
will not remote start if you do not follow this
sequence.
48Keys and Remote Controls
Page 114 of 473
Traction Control ActionMessage
Displays when the traction control system has been switched
off or on. See Using Traction Control (page 174).Traction Control Off/On
Displays when a spinout has occurred and the hazard are
activated.Spinout Detected
Hazards Activated
Transmission ActionMessage
See your authorized dealer.Transmission Malfunc-
tion Service Now
The transmission is overheating and needs to cool. Stop in a
safe place as soon as it’s possible.Transmission Overtem-
perature Stop Safely
The transmission is hot and needs to cool. Stop in a safe place
as soon as it’s possible.Transmission Over-
heating Stop Safely
See your authorized dealer.Transmission Service
Required
Transmission is getting hot. Stop to let it cool.Transmission Too Hot
Press Brake
Displays when the transmission has overheated and has
limited functionality. See Automatic Transmission (page
166).Transmission Limited
Function See Manual
Transmission is too cold. Wait for it to warm up before you
drive.Transmission Warming
Up Please Wait
Displays as a reminder to shift into park.Transmission Not in Park
Displays to request the operator to apply the brake as needed
by the transmission.Press Brake Pedal
Displays when the transmission has adjusted the shift
strategy.Transmission Adjusted
111Information Displays
Page 183 of 473
Deactivating the Park Assist
Feature The system can be deactivated manually
by:
• pressing the active park assist button
• grabbing the steering wheel
• driving above approximately 50 mph
(80 km/h) for 30 seconds during an
active park search
• driving above 6 mph (10 km/h) during
automatic steering
• turning off the traction control system. Certain vehicle conditions can also
deactivate the system, such as:
• Traction control has activated on a
slippery or loose surface.
• There is an anti-lock brake system
activation or failure.
• Something touches the steering wheel.
If a problem occurs with the system, a
warning message is displayed, followed
by a chime. Occasional system messages
may occur in normal operation. For
recurring or frequent system faults, contact
an authorized dealer to have your vehicle
serviced.
Troubleshooting the System The system does not look for a space
The traction control system may be off
The transmission is in R (Reverse); the vehicle must be moving forward to detect a
parking space
The system does not offer a particular space
Something may be contacting the front bumper or side sensors
There is not enough room on both sides of the vehicle in order to park
There is not enough space for the parking maneuver on the opposite side of the parking
space
The vehicle is farther than 5 ft (1.5 m) from the parking space
The vehicle is closer than 16 in. (40 cm) from neighboring parked vehicles
The transmission is in R (Reverse); the vehicle must be moving forward to detect a
parking space
180Parking Aids
Page 186 of 473
A B C D
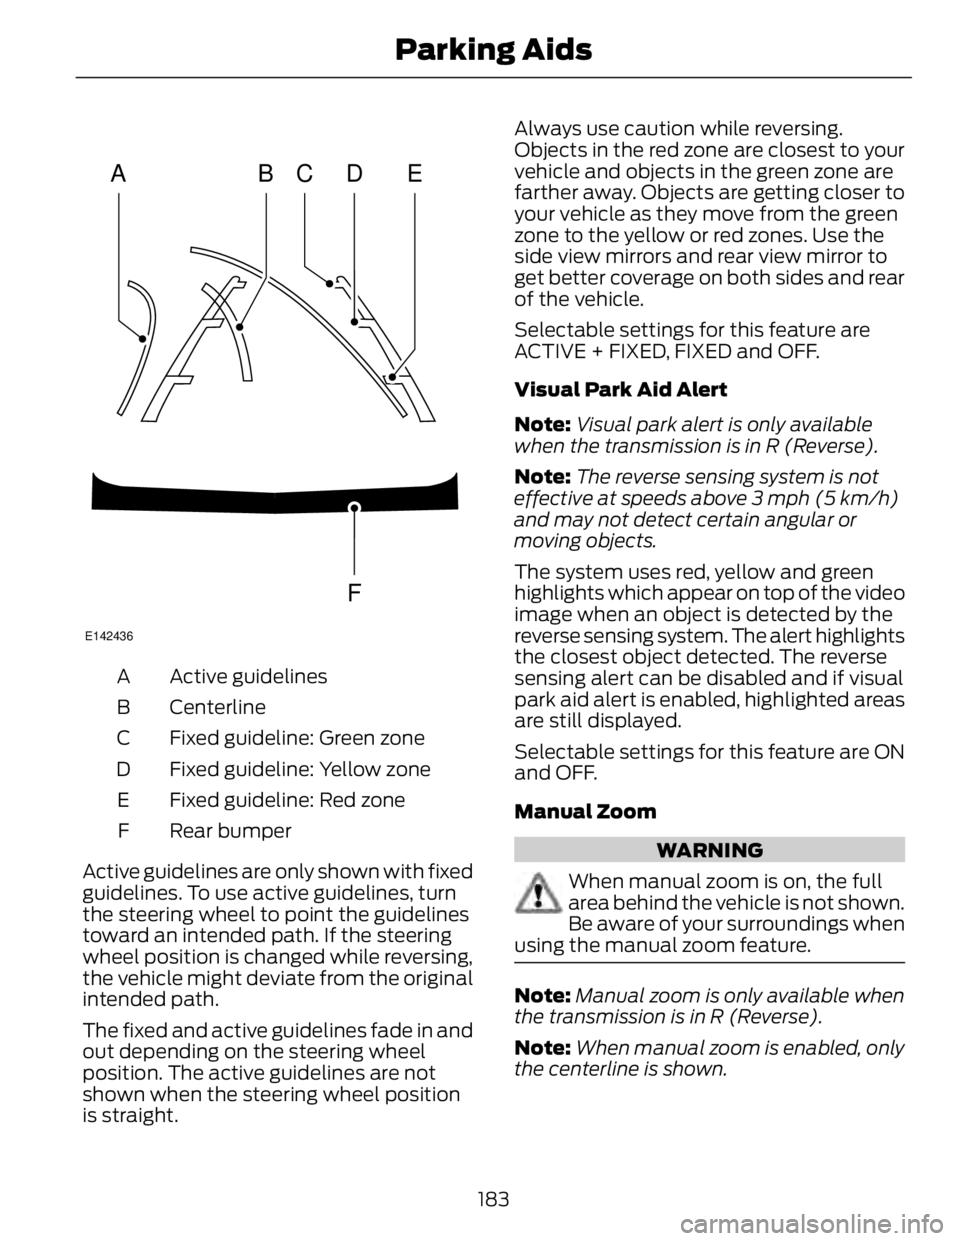
F EE142436
Active guidelinesA
CenterlineB
Fixed guideline: Green zoneC
Fixed guideline: Yellow zoneD
Fixed guideline: Red zoneE
Rear bumperF
Active guidelines are only shown with fixed
guidelines. To use active guidelines, turn
the steering wheel to point the guidelines
toward an intended path. If the steering
wheel position is changed while reversing,
the vehicle might deviate from the original
intended path.
The fixed and active guidelines fade in and
out depending on the steering wheel
position. The active guidelines are not
shown when the steering wheel position
is straight. Always use caution while reversing.
Objects in the red zone are closest to your
vehicle and objects in the green zone are
farther away. Objects are getting closer to
your vehicle as they move from the green
zone to the yellow or red zones. Use the
side view mirrors and rear view mirror to
get better coverage on both sides and rear
of the vehicle.
Selectable settings for this feature are
ACTIVE + FIXED, FIXED and OFF.
Visual Park Aid Alert
Note: Visual park alert is only available
when the transmission is in R (Reverse).
Note: The reverse sensing system is not
effective at speeds above 3 mph (5 km/h)
and may not detect certain angular or
moving objects.
The system uses red, yellow and green
highlights which appear on top of the video
image when an object is detected by the
reverse sensing system. The alert highlights
the closest object detected. The reverse
sensing alert can be disabled and if visual
park aid alert is enabled, highlighted areas
are still displayed.
Selectable settings for this feature are ON
and OFF.
Manual Zoom
WARNING
When manual zoom is on, the full
area behind the vehicle is not shown.
Be aware of your surroundings when
using the manual zoom feature.
Note: Manual zoom is only available when
the transmission is in R (Reverse).
Note: When manual zoom is enabled, only
the centerline is shown.
183Parking Aids
Page 201 of 473
Note: BLIS does not function in R (Reverse)
or P (Park) or provide any additional
warning when a turn signal is on.
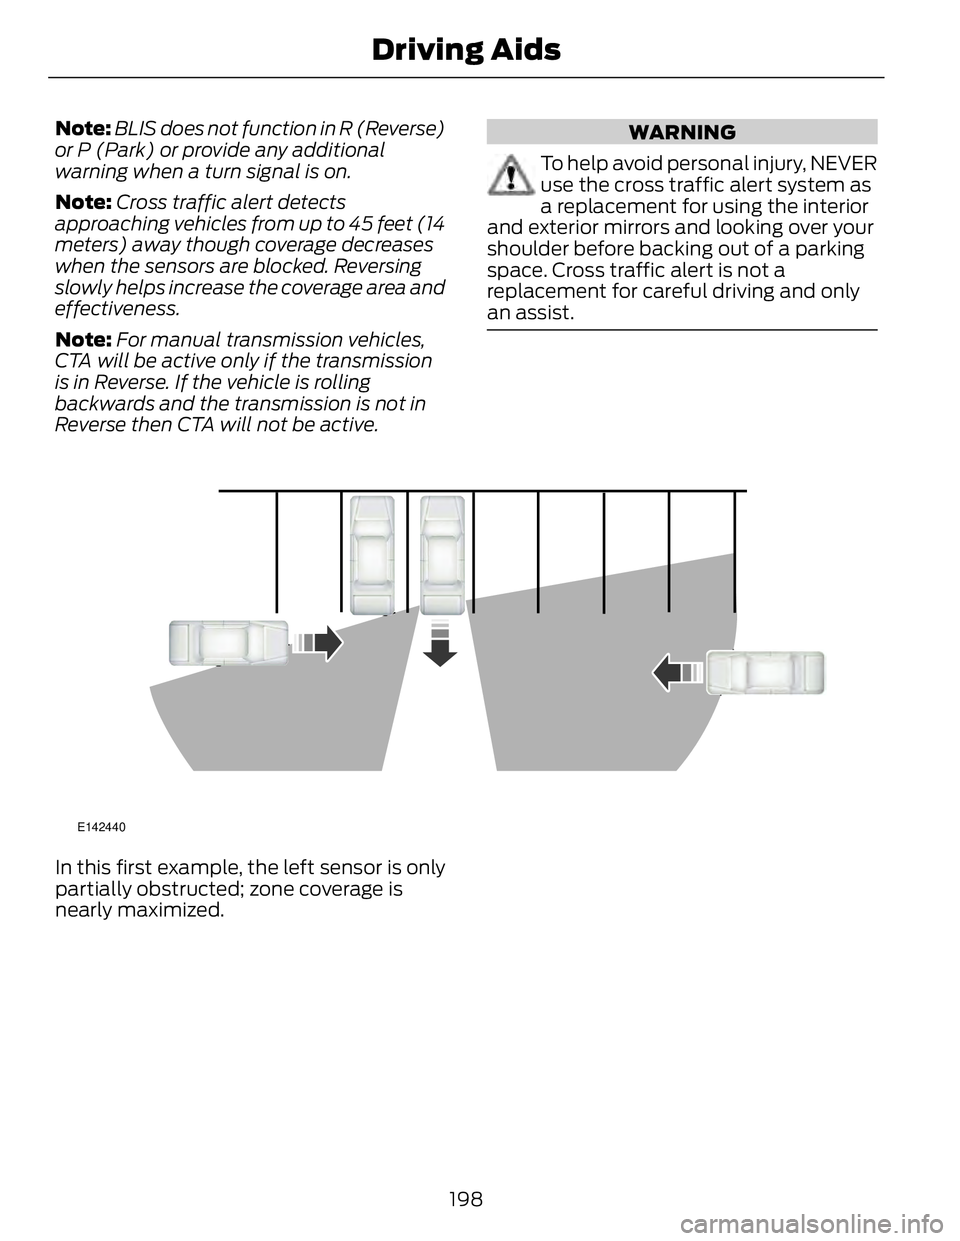
Note: Cross traffic alert detects
approaching vehicles from up to 45 feet (14
meters) away though coverage decreases
when the sensors are blocked. Reversing
slowly helps increase the coverage area and
effectiveness.
Note: For manual transmission vehicles,
CTA will be active only if the transmission
is in Reverse. If the vehicle is rolling
backwards and the transmission is not in
Reverse then CTA will not be active. WARNING
To help avoid personal injury, NEVER
use the cross traffic alert system as
a replacement for using the interior
and exterior mirrors and looking over your
shoulder before backing out of a parking
space. Cross traffic alert is not a
replacement for careful driving and only
an assist.
E142440
In this first example, the left sensor is only
partially obstructed; zone coverage is
nearly maximized.
198Driving Aids
Page 216 of 473
TOWING A TRAILER
WARNING
Never tow a trailer with a
Fusion Hybrid. This
powertrain is not designed to tow.
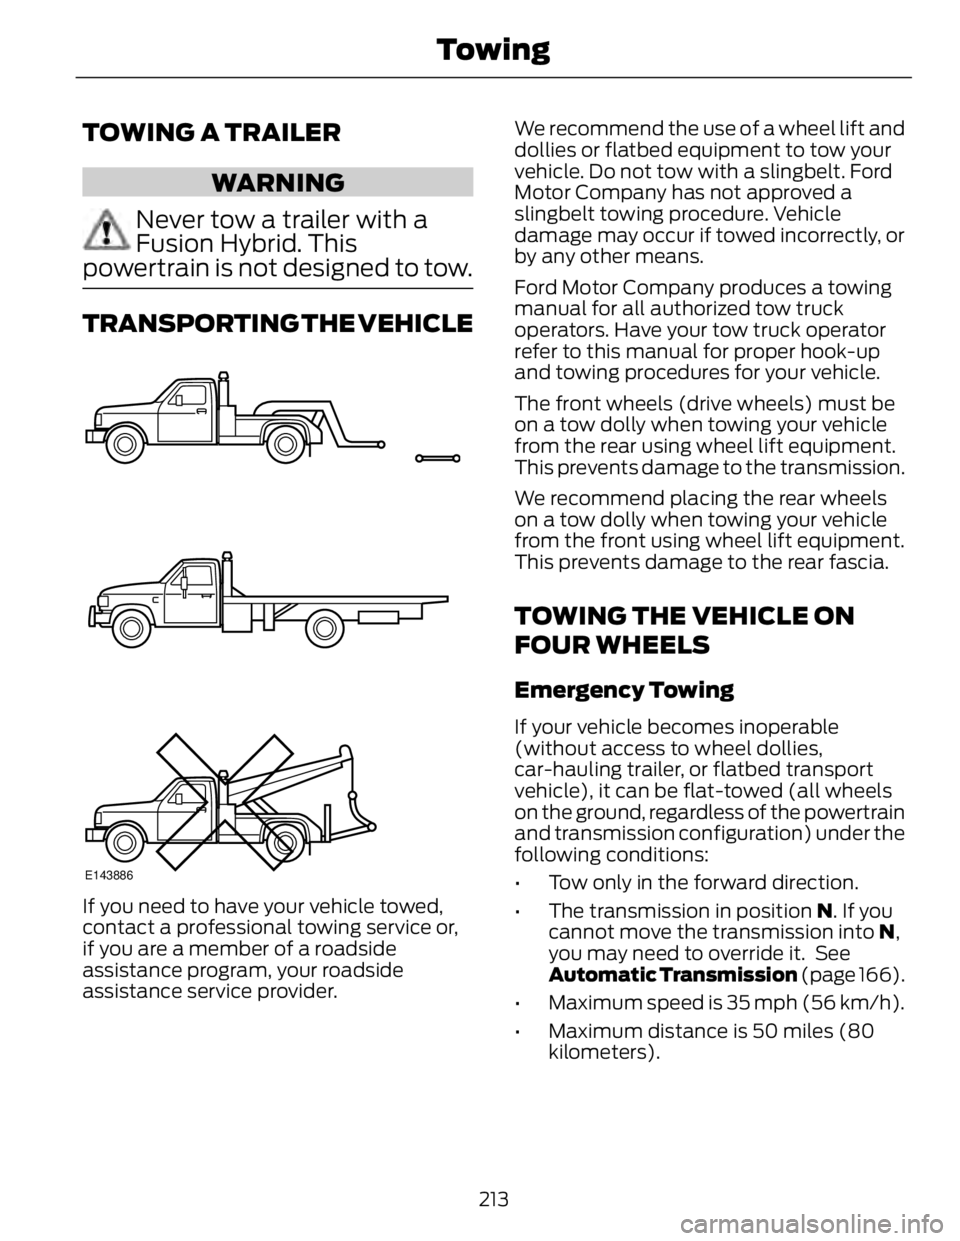
TRANSPORTING THE VEHICLE
E143886
If you need to have your vehicle towed,
contact a professional towing service or,
if you are a member of a roadside
assistance program, your roadside
assistance service provider. We recommend the use of a wheel lift and
dollies or flatbed equipment to tow your
vehicle. Do not tow with a slingbelt. Ford
Motor Company has not approved a
slingbelt towing procedure. Vehicle
damage may occur if towed incorrectly, or
by any other means.
Ford Motor Company produces a towing
manual for all authorized tow truck
operators. Have your tow truck operator
refer to this manual for proper hook-up
and towing procedures for your vehicle.
The front wheels (drive wheels) must be
on a tow dolly when towing your vehicle
from the rear using wheel lift equipment.
This prevents damage to the transmission.
We recommend placing the rear wheels
on a tow dolly when towing your vehicle
from the front using wheel lift equipment.
This prevents damage to the rear fascia.
TOWING THE VEHICLE ON
FOUR WHEELS Emergency Towing If your vehicle becomes inoperable
(without access to wheel dollies,
car-hauling trailer, or flatbed transport
vehicle), it can be flat-towed (all wheels
on the ground, regardless of the powertrain
and transmission configuration) under the
following conditions:
• Tow only in the forward direction.
• The transmission in position N . If you
cannot move the transmission into N ,
you may need to override it. See
Automatic Transmission (page 166).
• Maximum speed is 35 mph (56 km/h).
• Maximum distance is 50 miles (80
kilometers).
213Towing
Page 254 of 473
Because your vehicle’s engine is
electronically-controlled by a computer,
some engine control settings are
maintained by power from the low-voltage
battery. Some engine computer settings,
like the idle trim and fuel trim strategy,
optimize the driveability and performance
of the engine. The clock and radio station
presets are also maintained in memory by
power from the low-voltage battery. These
settings are erased when a technician
disconnects and connects the low-voltage
battery.
Complete the following procedure in order
to restore the settings:
1. With the vehicle at a complete stop,
set the parking brake.
2. Shift the transmission into P (Park)
3. Turn off all accessories.
4. Step on the brake pedal and start the
vehicle.
5. Run the engine until it reaches normal
operating temperature. While the
engine is warming up, complete the
following: Reset the clock. See Audio
System (page 299). Reset the power
windows bounce-back feature. See
Windows and Mirrors (page 74).
Reset the radio station presets. See
Audio System (page 299).
6. Allow the engine to idle for at least one
minute. If the engine turns off, step on
the accelerator to start the engine.
7. While the engine is running, step on the
brake pedal and shift the transmission
to N.
8. Allow the engine to run for at least one
minute by pressing on the accelerator
pedal.
9. Drive the vehicle at least 10 miles (16
kilometers) to completely relearn the
idle and fuel trim strategy. Note: If you do not allow the engine to
relearn the idle and fuel trim strategy, the
idle quality of your vehicle may be adversely
affected until the engine computer
eventually relearns the idle trim and fuel
trim strategy.
Note: Always dispose of automotive
batteries in a responsible manner. Follow
your local authorized standards for disposal.
Call your local authorized recycling center
to find out more about recycling automotive
batteries.
Note: It is recommended that the negative
battery cable terminal be disconnected from
the battery if you plan to store your vehicle
for an extended period of time.
CHECKING THE WIPER
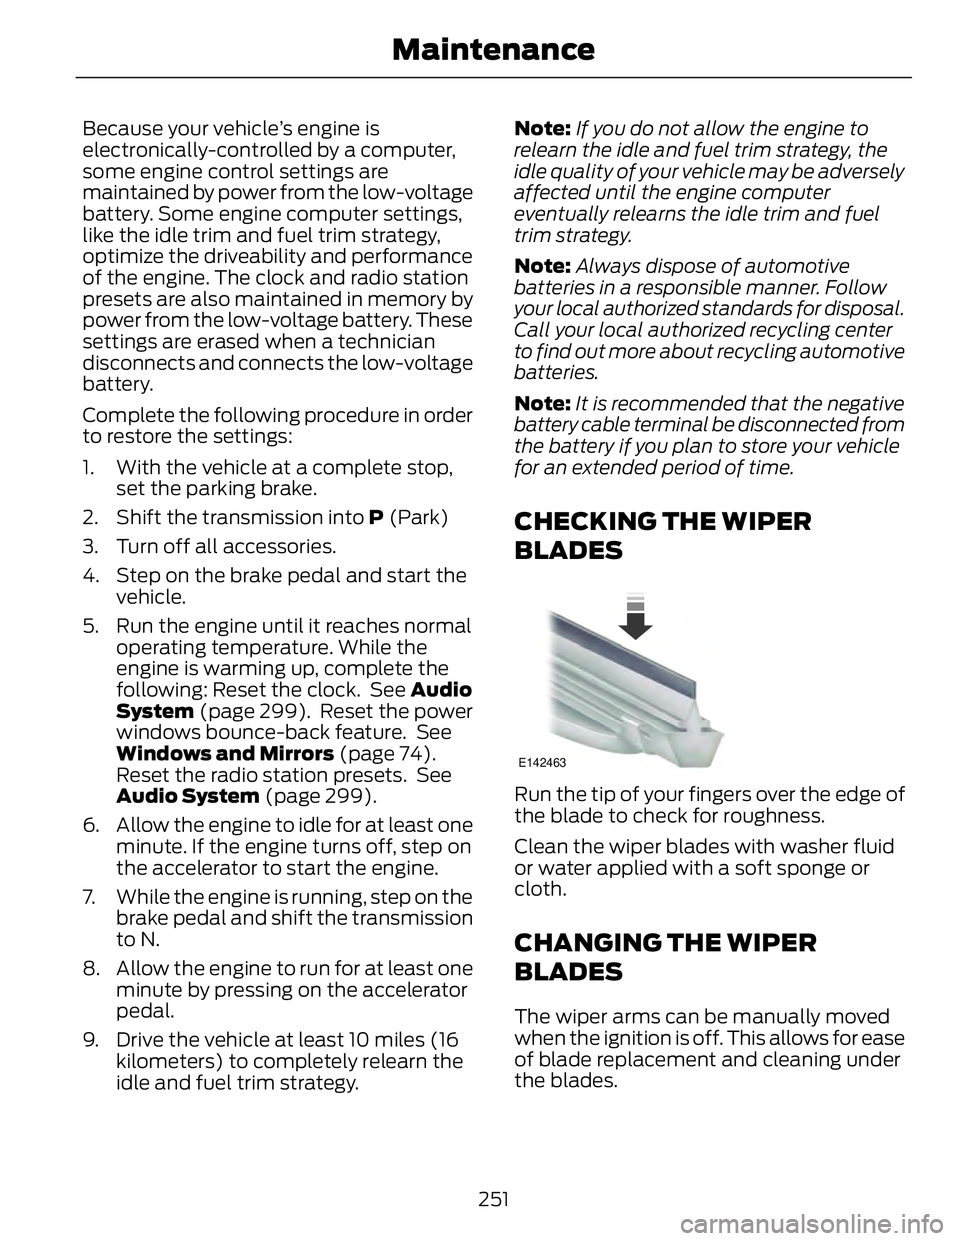
BLADES E142463
Run the tip of your fingers over the edge of
the blade to check for roughness.
Clean the wiper blades with washer fluid
or water applied with a soft sponge or
cloth.
CHANGING THE WIPER
BLADES The wiper arms can be manually moved
when the ignition is off. This allows for ease
of blade replacement and cleaning under
the blades.
251Maintenance
Page 315 of 473
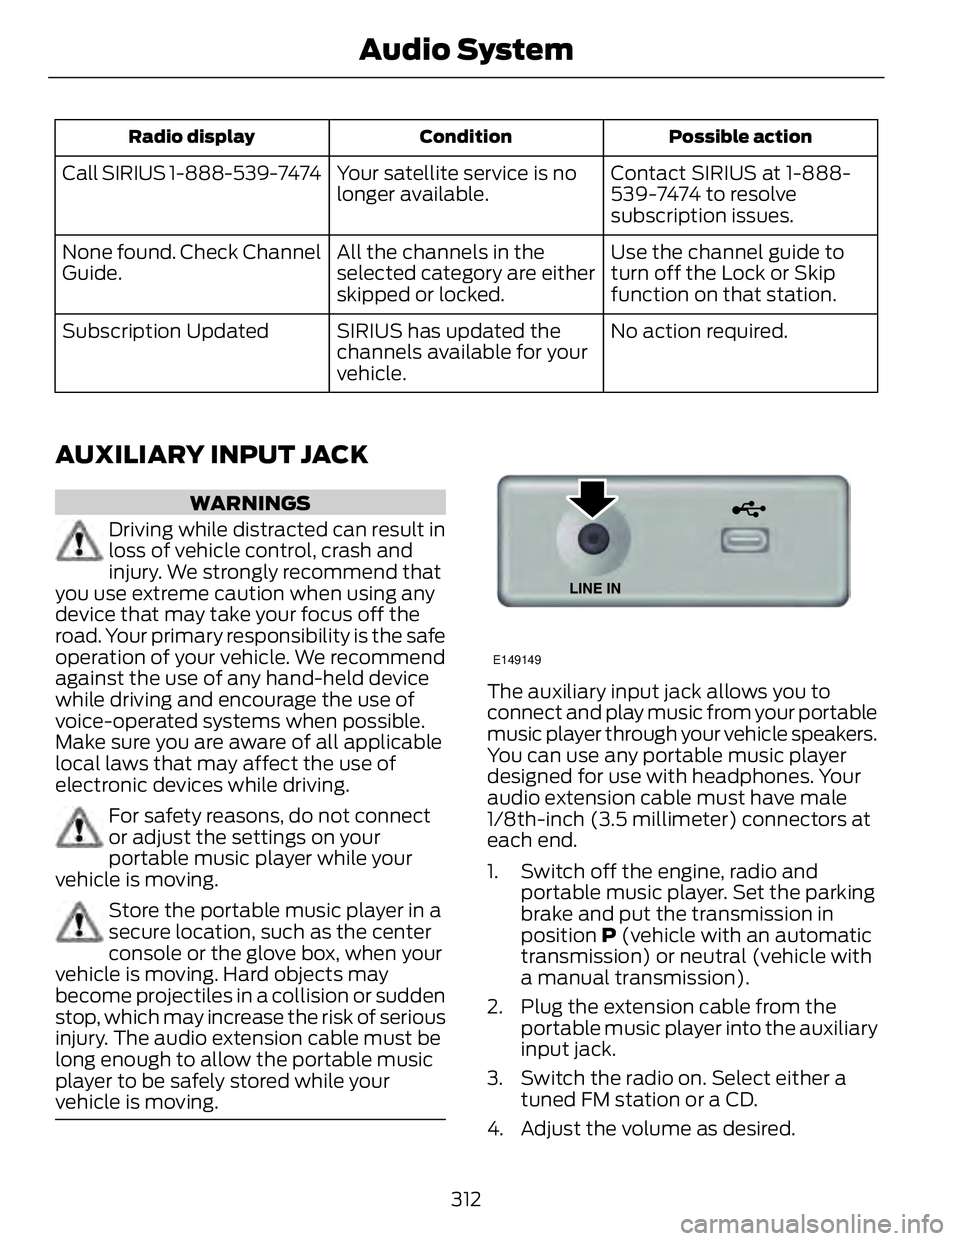
Possible actionConditionRadio display
Contact SIRIUS at 1-888-
539-7474 to resolve
subscription issues.Your satellite service is no
longer available.Call SIRIUS 1-888-539-7474
Use the channel guide to
turn off the Lock or Skip
function on that station.All the channels in the
selected category are either
skipped or locked.None found. Check Channel
Guide.
No action required.SIRIUS has updated the
channels available for your
vehicle.Subscription Updated
AUXILIARY INPUT JACK WARNINGS
Driving while distracted can result in
loss of vehicle control, crash and
injury. We strongly recommend that
you use extreme caution when using any
device that may take your focus off the
road. Your primary responsibility is the safe
operation of your vehicle. We recommend
against the use of any hand-held device
while driving and encourage the use of
voice-operated systems when possible.
Make sure you are aware of all applicable
local laws that may affect the use of
electronic devices while driving.
For safety reasons, do not connect
or adjust the settings on your
portable music player while your
vehicle is moving.
Store the portable music player in a
secure location, such as the center
console or the glove box, when your
vehicle is moving. Hard objects may
become projectiles in a collision or sudden
stop, which may increase the risk of serious
injury. The audio extension cable must be
long enough to allow the portable music
player to be safely stored while your
vehicle is moving. E149149
The auxiliary input jack allows you to
connect and play music from your portable
music player through your vehicle speakers.
You can use any portable music player
designed for use with headphones. Your
audio extension cable must have male
1/8th-inch (3.5 millimeter) connectors at
each end.
1. Switch off the engine, radio and
portable music player. Set the parking
brake and put the transmission in
position P (vehicle with an automatic
transmission) or neutral (vehicle with
a manual transmission).
2. Plug the extension cable from the
portable music player into the auxiliary
input jack.
3. Switch the radio on. Select either a
tuned FM station or a CD.
4. Adjust the volume as desired.
312Audio System
Page 327 of 473
Pairing a Phone for the First Time Note: SYNC can support downloading up
to approximately 1000 entries per
Bluetooth-enabled cellular phone.
Note: Make sure to switch on the ignition
and the radio. Put the transmission in
position P (automatic transmission) or
neutral with the parking brake applied
(manual transmission).
Note: To scroll through the menus, press
the up and down arrows on your audio
system.
Wirelessly pairing your phone with SYNC
allows you to make and receive hands-free
calls.
1. Press the phone button. When the
display indicates there is no phone
paired, press OK .
2. When Find SYNC appears in the
display, press OK .
3. Put your phone into Bluetooth
discovery mode. See your device's
manual if necessary.
4. When prompted on your phone's
display, enter the six-digit PIN provided
by SYNC in the radio display. The
display indicates when the pairing is
successful.
Depending on your phone's capability and
your market, the system may prompt you
with questions, such as setting the current
phone as the primary phone (the phone
SYNC automatically tries to connect with
first upon vehicle start-up) and
downloading your phonebook.
Pairing Subsequent Phones
Note: Make sure to switch on the ignition
and the radio. Put the transmission in
position P (automatic transmission) or
neutral with the parking brake applied
(manual transmission). Note: To scroll through the menus, press
the up and down arrows on your audio
system.
1. Press the phone button, and then scroll
to System Settings. Press OK .
2. Scroll to Bluetooth Devices. Press OK .
3. Scroll to Add Bluetooth Device. Press
OK .
4. When Find SYNC appears in the
display, press OK .
5. Put your phone into Bluetooth
discovery mode. See your phone's
manual if necessary.
6. When prompted on your phone's
display, enter the six-digit PIN provided
by SYNC in the radio display. The
display indicates when the pairing is
successful.
The system then prompts with questions,
such as if you would like to set the current
phone as the primary phone (the phone
SYNC automatically tries to connect with
first upon vehicle start-up) or download
your phone book.
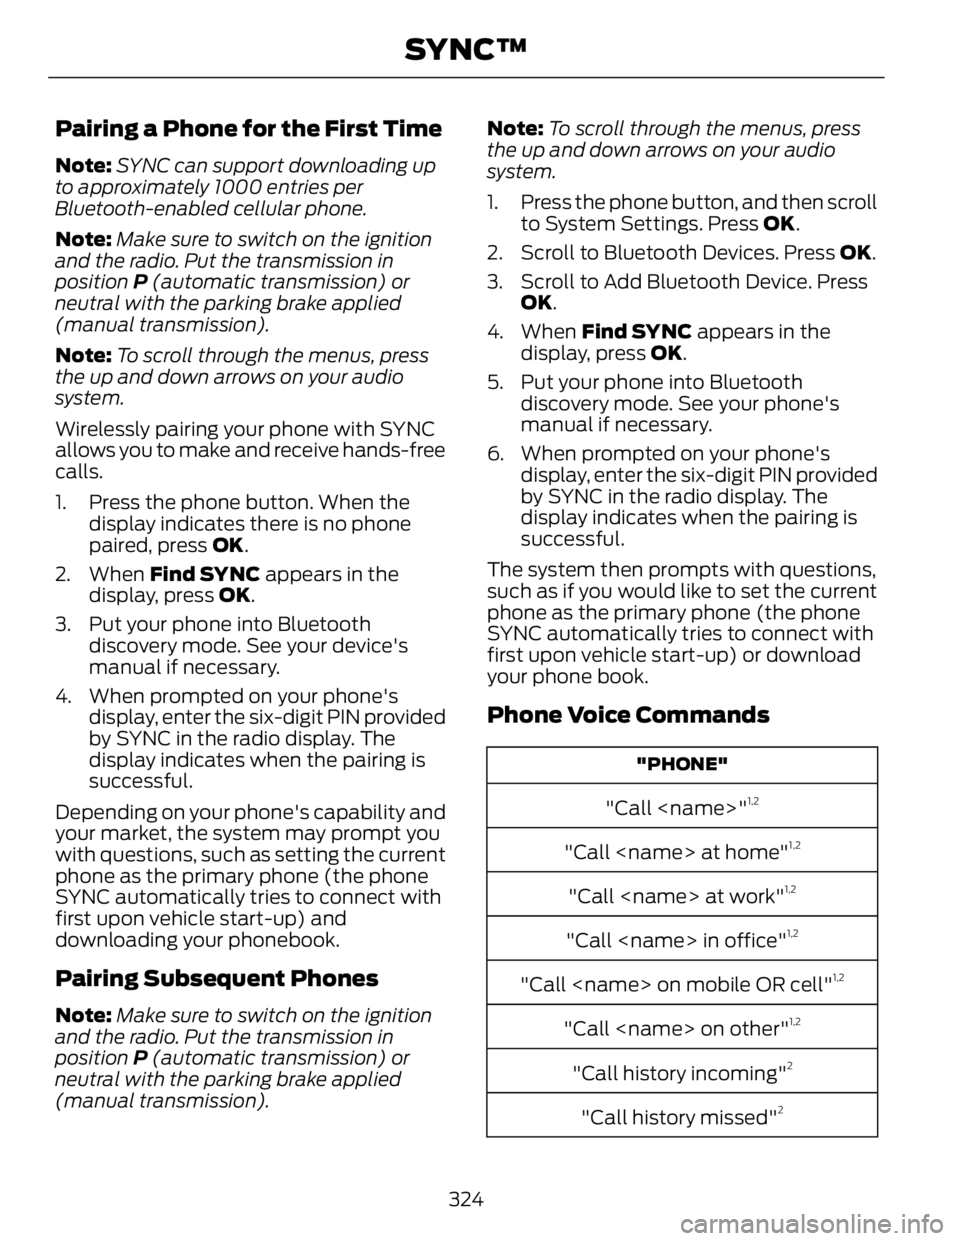
Phone Voice Commands "PHONE"
"Call
"Call
"Call
"Call
"Call
"Call
"Call history incoming" 2
"Call history missed" 2
324SYNC™