spare tire FORD FUSION HYBRID 2014 Owners Manual
[x] Cancel search | Manufacturer: FORD, Model Year: 2014, Model line: FUSION HYBRID, Model: FORD FUSION HYBRID 2014Pages: 473, PDF Size: 5.93 MB
Page 65 of 473
You must have two previously
programmed coded keys and the new
unprogrammed key readily accessible. See
an authorized dealer to have the spare key
programmed if two previously
programmed coded keys are not available.
Read and understand the entire procedure
before you begin.
1. Insert the first previously programmed
coded key into the ignition.
2. Switch the ignition from off to on. Keep
the ignition on for at least three
seconds, but no more than 10 seconds.
3. Switch the ignition off and remove the
first coded key from the ignition.
4. After three seconds but within 10
seconds of switching the ignition off,
insert the second previously coded key
into the ignition.
5. Switch the ignition from off to on. Keep
the ignition on for at least three
seconds, but no more than 10 seconds.
6. Switch the ignition off and remove the
second previously programmed coded
key from the ignition.
7. After three seconds but within 10
seconds of switching the ignition off
and removing the previously
programmed coded key, insert the new
unprogrammed key into the ignition.
8. Switch the ignition from off to on. Keep
the ignition on for at least six seconds.
9. Remove the newly programmed coded
key from the ignition.
If the key has been successfully
programmed it will start your vehicle and
operate the remote entry system (if the
new key is an integrated keyhead
transmitter).
If programming was not successful, wait
10 seconds and repeat Steps 1 through 8.
If you are still unsuccessful, take your
vehicle to an authorized dealer. Programming a Spare Intelligent
Access Key
Note: You can program a maximum for four
intelligent access keys to your vehicle.
You must have two previously
programmed intelligent access keys inside
your vehicle and the new unprogrammed
intelligent access keys readily accessible.
See an authorized dealer to have the spare
key programmed if two previously
programmed keys are not available.
Make sure that your vehicle is off before
beginning this procedure. Make sure that
you close all the doors before beginning
and that they remain closed throughout
the procedure. Perform all steps within 30
seconds of starting the sequence. Stop
and wait for at least one minute before
starting again if you perform any steps out
of sequence.
Read and understand the entire procedure
before you begin.
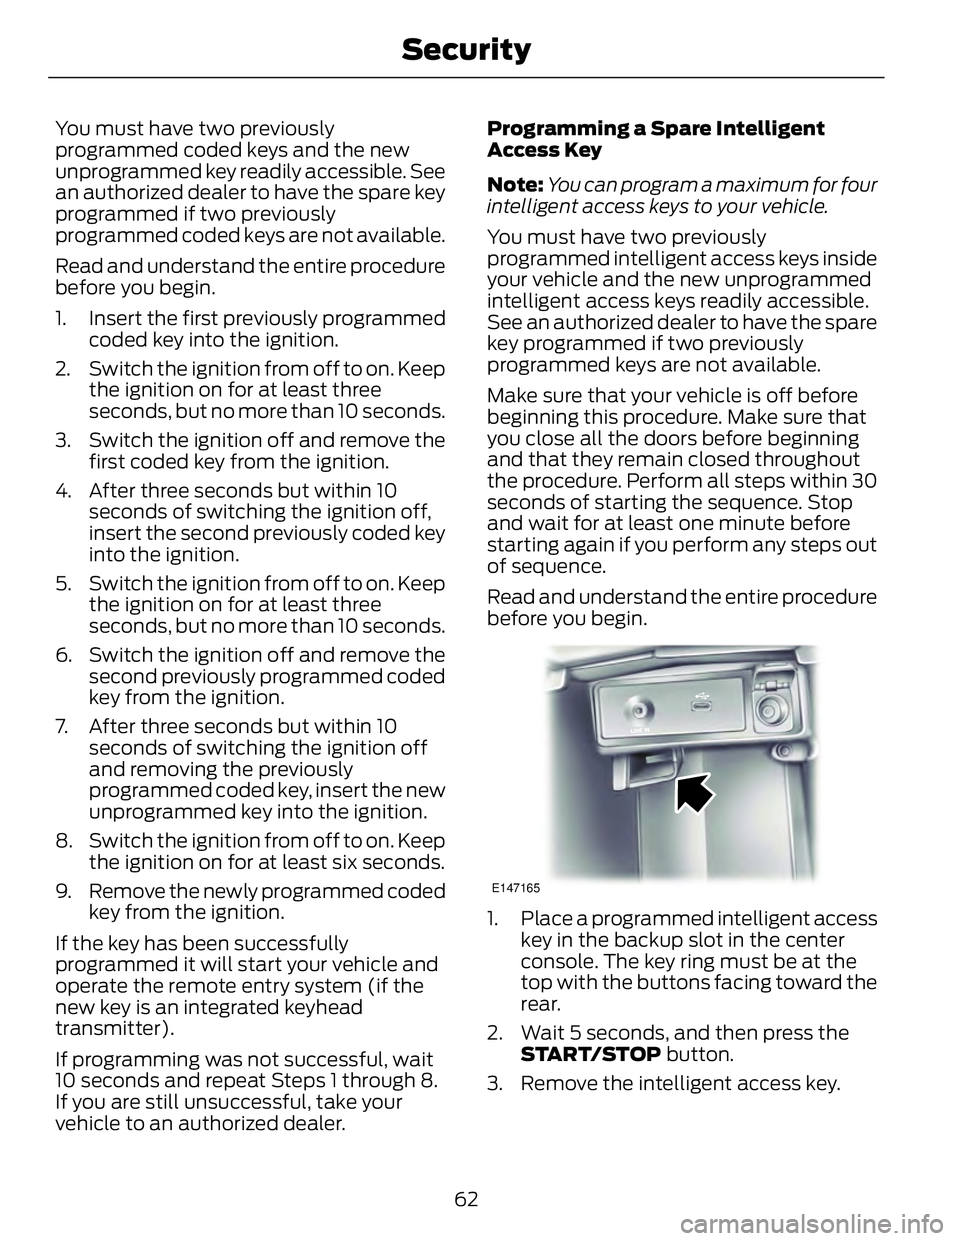
E147165
1. Place a programmed intelligent access
key in the backup slot in the center
console. The key ring must be at the
top with the buttons facing toward the
rear.
2. Wait 5 seconds, and then press the
START/STOP button.
3. Remove the intelligent access key.
62Security
Page 113 of 473
Seats ActionMessage
Displays as a reminder that memory seats are not available
while driving.Memory Recall Not
Permitted While Driving
Displays to show where your memory setting has been saved.Memory X Saved
Starting System ActionMessage
Displays when starting the vehicle as a reminder to apply the
brake.Press Brake to Start
Displays when the starter has exceeded its cranking time in
attempting to start the vehicle.Cranking Time Exceeded
Displays when the starter is attempting to start the vehicle.Engine Start Pending
Please Wait
Displays when the pending start has been cancelled.Pending Start Cancelled
Tire Pressure Monitoring System ActionMessage
Displays when one or more tires on your vehicle have low tire
pressure. See Tire Pressure Monitoring System (page 288).LOW Tire Pressure
Displays when the tire pressure monitoring system is
malfunctioning. If the warning stays on or continues to come
on, contact your authorized dealer. See Tire Pressure
Monitoring System (page 288).Tire Pressure Monitor
Fault
Displayed when a tire pressure sensor is malfunctioning, or
your spare tire is in use. For more information on how the
system operates under these conditions, See Tire Pressure
Monitoring System (page 288). If the warning stays on or
continues to come on, contact your authorized dealer as soon
as possible.Tire Pressure Sensor
Fault
110Information Displays
Page 181 of 473
For specific information on the reverse
sensing portion of the system, refer to that
section.
ACTIVE PARK ASSIST (IF
EQUIPPED)
WARNING
This system is designed to be a
supplementary park aid. It may not
work in all conditions and is not
intended to replace the driver’s attention
and judgment. The driver is responsible for
avoiding hazards and maintaining a safe
distance and speed, even when the system
is in use.
Note: The driver is always responsible for
controlling the vehicle, supervising the
system and intervening if required.
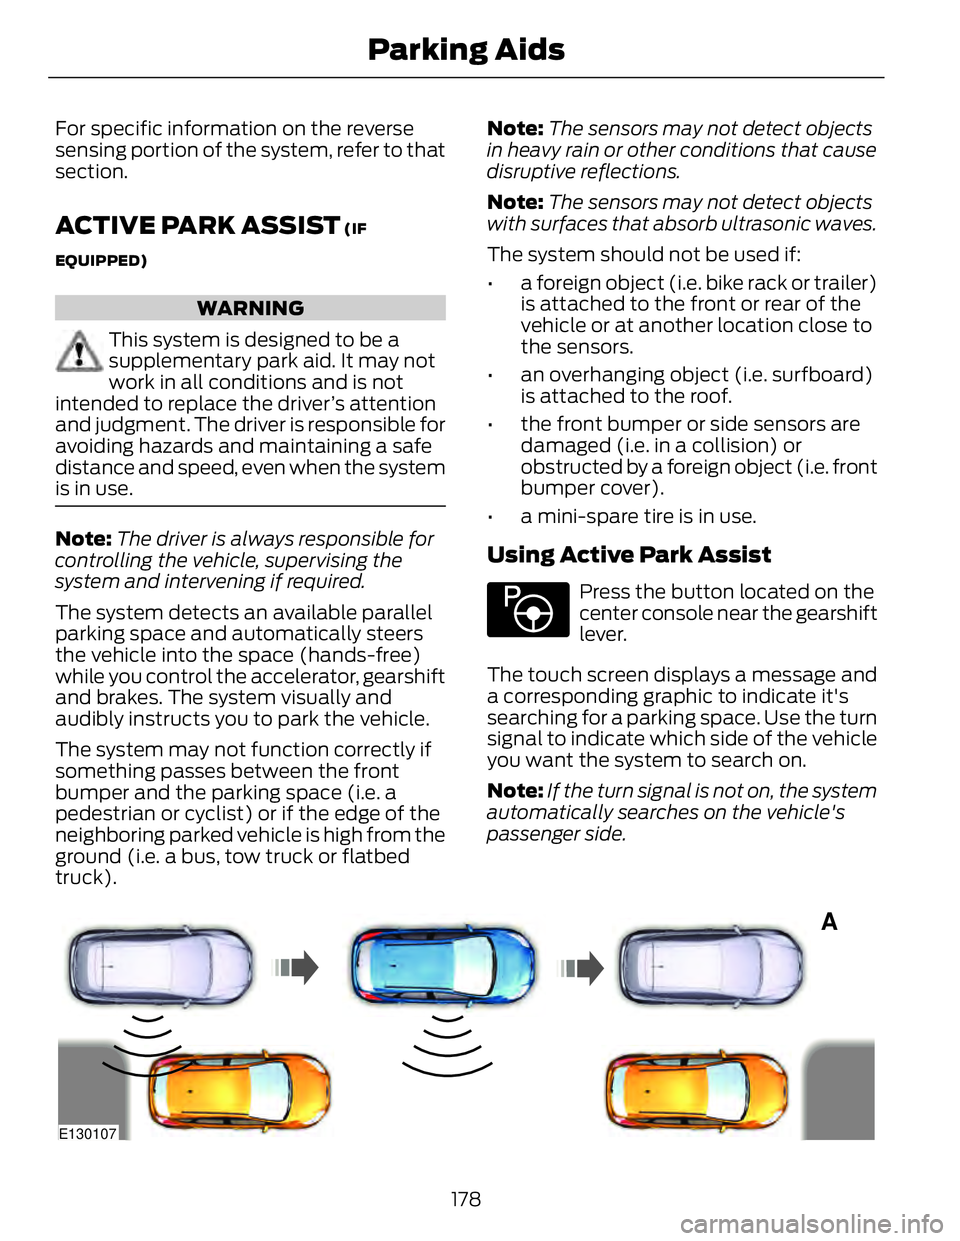
The system detects an available parallel
parking space and automatically steers
the vehicle into the space (hands-free)
while you control the accelerator, gearshift
and brakes. The system visually and
audibly instructs you to park the vehicle.
The system may not function correctly if
something passes between the front
bumper and the parking space (i.e. a
pedestrian or cyclist) or if the edge of the
neighboring parked vehicle is high from the
ground (i.e. a bus, tow truck or flatbed
truck). Note: The sensors may not detect objects
in heavy rain or other conditions that cause
disruptive reflections.
Note: The sensors may not detect objects
with surfaces that absorb ultrasonic waves.
The system should not be used if:
• a foreign object (i.e. bike rack or trailer)
is attached to the front or rear of the
vehicle or at another location close to
the sensors.
• an overhanging object (i.e. surfboard)
is attached to the roof.
• the front bumper or side sensors are
damaged (i.e. in a collision) or
obstructed by a foreign object (i.e. front
bumper cover).
• a mini-spare tire is in use.
Using Active Park Assist E146186
Press the button located on the
center console near the gearshift
lever.
The touch screen displays a message and
a corresponding graphic to indicate it's
searching for a parking space. Use the turn
signal to indicate which side of the vehicle
you want the system to search on.
Note: If the turn signal is not on, the system
automatically searches on the vehicle's
passenger side.
A
E130107
178Parking Aids
Page 227 of 473
ROADSIDE ASSISTANCE Vehicles Sold In The U.S.: Getting
Roadside Assistance To fully assist you should you have a
vehicle concern, Ford Motor Company
offers a complimentary roadside
assistance program. This program is
separate from the New Vehicle Limited
Warranty. The service is available:
• 24 hours, seven days a week.
• for the coverage period listed on the
Roadside Assistance Card included in
your Owner's Manual portfolio.
Roadside assistance will cover:
• a flat tire change with a good spare, if
provided with the vehicle (except
vehicles that have been supplied with
a tire inflation kit).
• battery jump start.
• lock-out assistance (key replacement
cost is the customer's responsibility).
• fuel delivery — Independent Service
Contractors, if not prohibited by state,
local or municipal law, shall deliver up
to 2.0 gallons (7.5 liters) of gasoline or
5.0 gallons (18.9 liters) of diesel fuel
to a disabled vehicle. Fuel delivery
service is limited to two no-charge
occurrences within a 12-month period.
• winch out — available within 100 feet
(30.5 meters) of a paved or county
maintained road, no recoveries.
• towing — Ford and Lincoln eligible
vehicles towed to an authorized dealer
within 35 miles (56.3 kilometers) of the
disablement location or to the nearest
authorized dealer. If a member
requests to be towed to an authorized
dealer more than 35 miles (56.3
kilometers) from the disablement
location, the member shall be
responsible for any mileage costs in
excess of 35 miles (56.3 kilometers). Trailers shall be covered up to $200 if the
disabled eligible vehicle requires service at
the nearest authorized dealer. If the trailer
is disabled, but the towing vehicle is
operational, the trailer does not qualify for
any roadside services.
Vehicles Sold In The U.S. : Using
Roadside Assistance Complete the roadside assistance
identification card and place it in your
wallet for quick reference. This card is
found in the owner's information portfolio
in the glove compartment.
U.S. Ford vehicle customers who require
Roadside Assistance, call 1-800-241-3673.
If you need to arrange roadside assistance
for yourself, Ford Motor Company will
reimburse a reasonable amount for towing
to the nearest dealership within 35 miles
(56.3 kilometers). To obtain
reimbursement information, U.S. Ford
vehicle customers call 1-800-241-3673.
Customers will be asked to submit their
original receipts.
Vehicles Sold In Canada : Getting
Roadside Assistance Canadian customers who require roadside
assistance, call 1-800-665-2006.
Vehicles Sold In Canada : Using
Roadside Assistance For your convenience, you may complete
the roadside assistance identification card
found in the centerfold of your warranty
guide and retain for future reference.
Canadian roadside coverage and benefits
may differ from the U.S. coverage. If you
require more information, please refer to
the coverage section of your warranty
guide, call us in Canada at
1-800-665-2006, or visit our website at
www.ford.ca.
224Roadside Emergencies
Page 270 of 473
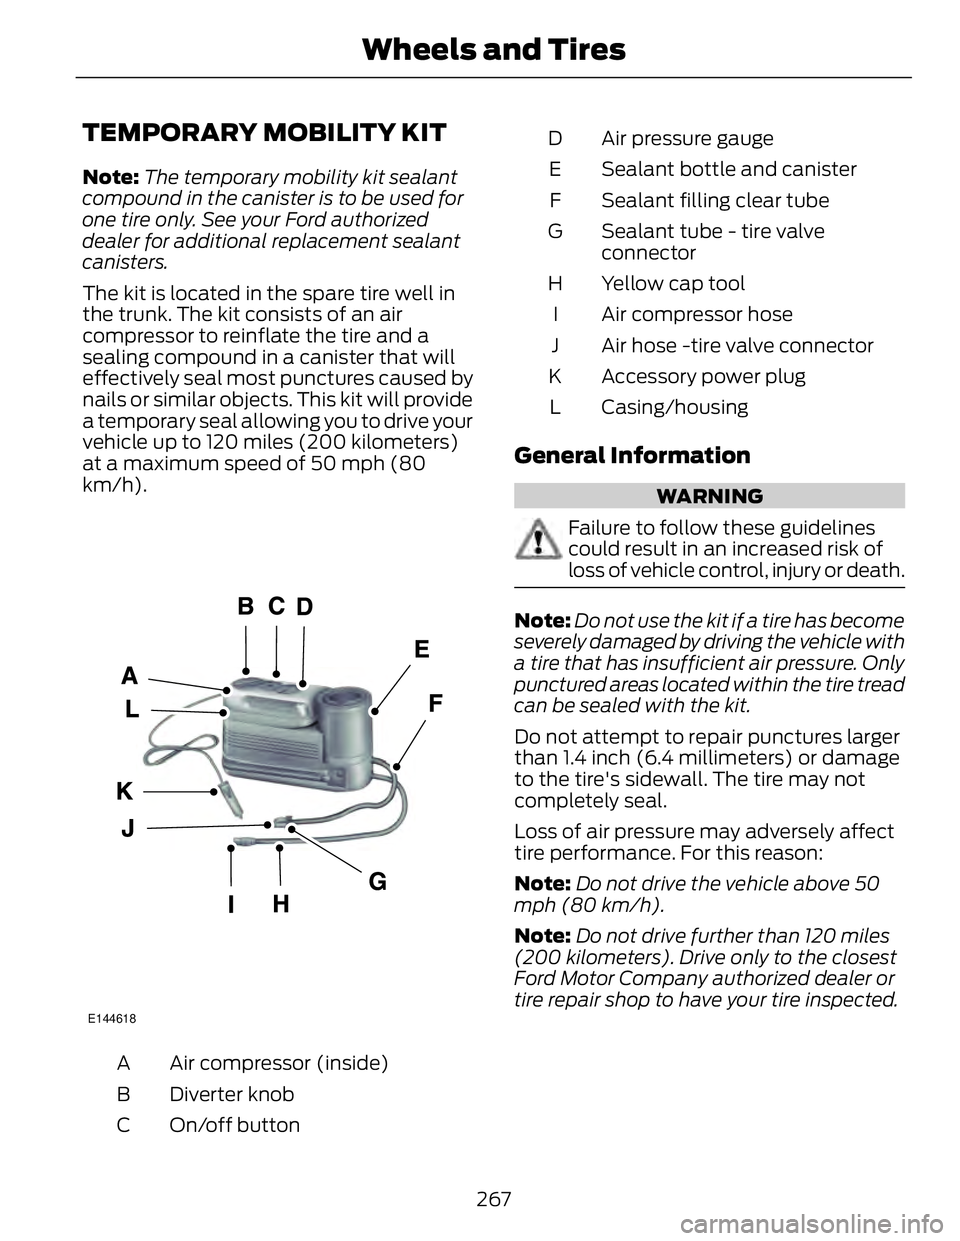
TEMPORARY MOBILITY KIT Note: The temporary mobility kit sealant
compound in the canister is to be used for
one tire only. See your Ford authorized
dealer for additional replacement sealant
canisters.
The kit is located in the spare tire well in
the trunk. The kit consists of an air
compressor to reinflate the tire and a
sealing compound in a canister that will
effectively seal most punctures caused by
nails or similar objects. This kit will provide
a temporary seal allowing you to drive your
vehicle up to 120 miles (200 kilometers)
at a maximum speed of 50 mph (80
km/h).
E144618
Air compressor (inside)A
Diverter knobB
On/off buttonC Air pressure gaugeD
Sealant bottle and canisterE
Sealant filling clear tubeF
Sealant tube - tire valve
connectorG
Yellow cap toolH
Air compressor hoseI
Air hose -tire valve connectorJ
Accessory power plugK
Casing/housingL
General Information WARNING
Failure to follow these guidelines
could result in an increased risk of
loss of vehicle control, injury or death.
Note: Do not use the kit if a tire has become
severely damaged by driving the vehicle with
a tire that has insufficient air pressure. Only
punctured areas located within the tire tread
can be sealed with the kit.
Do not attempt to repair punctures larger
than 1.4 inch (6.4 millimeters) or damage
to the tire's sidewall. The tire may not
completely seal.
Loss of air pressure may adversely affect
tire performance. For this reason:
Note: Do not drive the vehicle above 50
mph (80 km/h).
Note: Do not drive further than 120 miles
(200 kilometers). Drive only to the closest
Ford Motor Company authorized dealer or
tire repair shop to have your tire inspected.
267Wheels and Tires
Page 271 of 473
• Drive carefully and avoid abrupt
steering maneuvers.
• Periodically monitor tire inflation
pressure in the affected tire; if the tire
is losing pressure, have the vehicle
towed.
• Read the information in the Tips for
Use of the Kit section to make sure safe
operation of the kit and your vehicle.
Tips for Use of the Kit Read the following list of tips to ensure
safe operation of the kit:
• Before operating the kit, make sure
your vehicle is safely off the road and
away from moving traffic. Turn on the
hazard lights.
• Always set the parking brake to ensure
the vehicle doesn't move unexpectedly.
• Do not remove any foreign objects,
such as nails or screws, from the tire.
• When using the kit, leave the engine
running (only if the vehicle is outdoors
or in a well-ventilated area) so the
compressor doesn't drain the vehicle's
battery.
• Do not allow the compressor to
operate continuously for more than 15
minutes; this will help prevent the
compressor from overheating.
• Never leave the kit unattended when
it is operating.
• Sealant compound contains latex.
Make sure that you use the non-latex
gloves provided to avoid an allergic
reaction.
• Keep the kit away from children.
• Only use the kit when the ambient
temperature is between -22°F (–30°C)
and 158°F (70°C). • Only use the sealing compound before
the use by date. The use by date is on
the lower right hand corner of the label
located on the sealant canister
(bottle). Check the use by date
regularly and replace the canister after
four years.
• Do not store the kit unsecured inside
the passenger compartment of the
vehicle as it may cause injury during a
sudden stop or crash. Always store the
kit in its original location.
• After sealant use, the tire pressure
monitoring system sensor and valve
stem on the wheel must be replaced
by an authorized Ford dealer.
• When inflating a tire or other objects,
use the black air hose only. Do not use
the transparent hose which is designed
for sealant application only.
• Operating the kit could cause an
electrical disturbance in radio, CD, and
DVD player operation.
What to do when a Tire Is
Punctured A tire puncture within the tire's tread area
can be repaired in two stages with the kit.
• In the first stage, the tire will be
reinflated with a sealing compound
and air. After the tire has been
reinflated, you will need to drive the
vehicle a short distance (about 4 miles
[6 kilometers]) to distribute the
sealant in the tire.
• In the second stage, you will need to
check the tire pressure and adjust, if
necessary, to the vehicle's tire inflation
pressure.
268Wheels and Tires
Page 274 of 473

E144622
4. Adjust the tire to the recommended
inflation pressure from the tire label
located on the driver's door or door
jamb area. The tire pressure has to be
checked with the compressor in the
OFF position to get the correct tire
pressure reading.
5. Turn the compressor off by pressing
the on/off button.
6. Unplug the hoses, re-install the valve
cap on the tire and return the kit to the
stowage area.
What to do after the Tire has been
Sealed After using the kit to seal your tire, you will
need to replace the sealant canister and
clear tube (hose). Sealing compound and
spare parts can be obtained and replaced
at an authorized Ford Motor Company
dealership or tire dealer. Empty sealant
bottles may be disposed of at home;
however, liquid residue from the sealing
compound should be disposed by your
local Ford Motor Company dealership or
tire dealer, or in accordance with local
waste disposal regulations.
Note: After the sealing compound has been
used, the maximum vehicle speed is 50 mph
(80 km/h) and the maximum driving
distance is 120 miles (200 kilometers). The
sealed tire should be inspected immediately. Note: After sealant use, the tire pressure
monitoring system sensor and valve stem
on the wheel must be replaced by an
authorized Ford dealer.
You can check the tire pressure any time
within the 120 miles (200 kilometers) by
performing the procedure from Second
stage: Checking tire pressure listed
previously.
Removal of the sealant canister from
the kit E144623
1. Unwrap the clear tube from the
compressor housing. E144624
2. Locate the yellow cap at the end of the
clear tube.
271Wheels and Tires
Page 276 of 473

TIRE CARE
Information About Uniform
Tire Quality Grading E142542
Tire Quality Grades apply to new
pneumatic passenger car tires.
The Quality grades can be found
where applicable on the tire
sidewall between tread shoulder
and maximum section width. For
example: Treadwear 200
Traction AA Temperature A .
These Tire Quality Grades are
determined by standards that the
United States Department of
Transportation has set.
Tire Quality Grades apply to new
pneumatic passenger car tires.
They do not apply to deep tread,
winter-type snow tires,
space-saver or temporary use
spare tires, light truck or LT type
tires, tires with nominal rim
diameters of 10 to 12 inches or
limited production tires as defined
in Title 49 Code of Federal
Regulations Part 575.104 (c)(2). U.S. Department of
Transportation Tire quality
grades: The U.S. Department of
Transportation requires Ford
Motor Company to give you the
following information about tire
grades exactly as the government
has written it.
Treadwear
The treadwear grade is a
comparative rating based on the
wear rate of the tire when tested
under controlled conditions on a
specified government test course.
For example, a tire graded 150
would wear 1½ times as well on
the government course as a tire
graded 100. The relative
performance of tires depends
upon the actual conditions of their
use, however, and may depart
significantly from the norm due to
variations in driving habits, service
practices, and differences in road
characteristics and climate.
Traction AA A B C
WARNING
The traction grade assigned
to this tire is based on
straight-ahead braking traction
tests, and does not include
acceleration, cornering,
hydroplaning or peak traction
characteristics.
273Wheels and Tires
Page 283 of 473
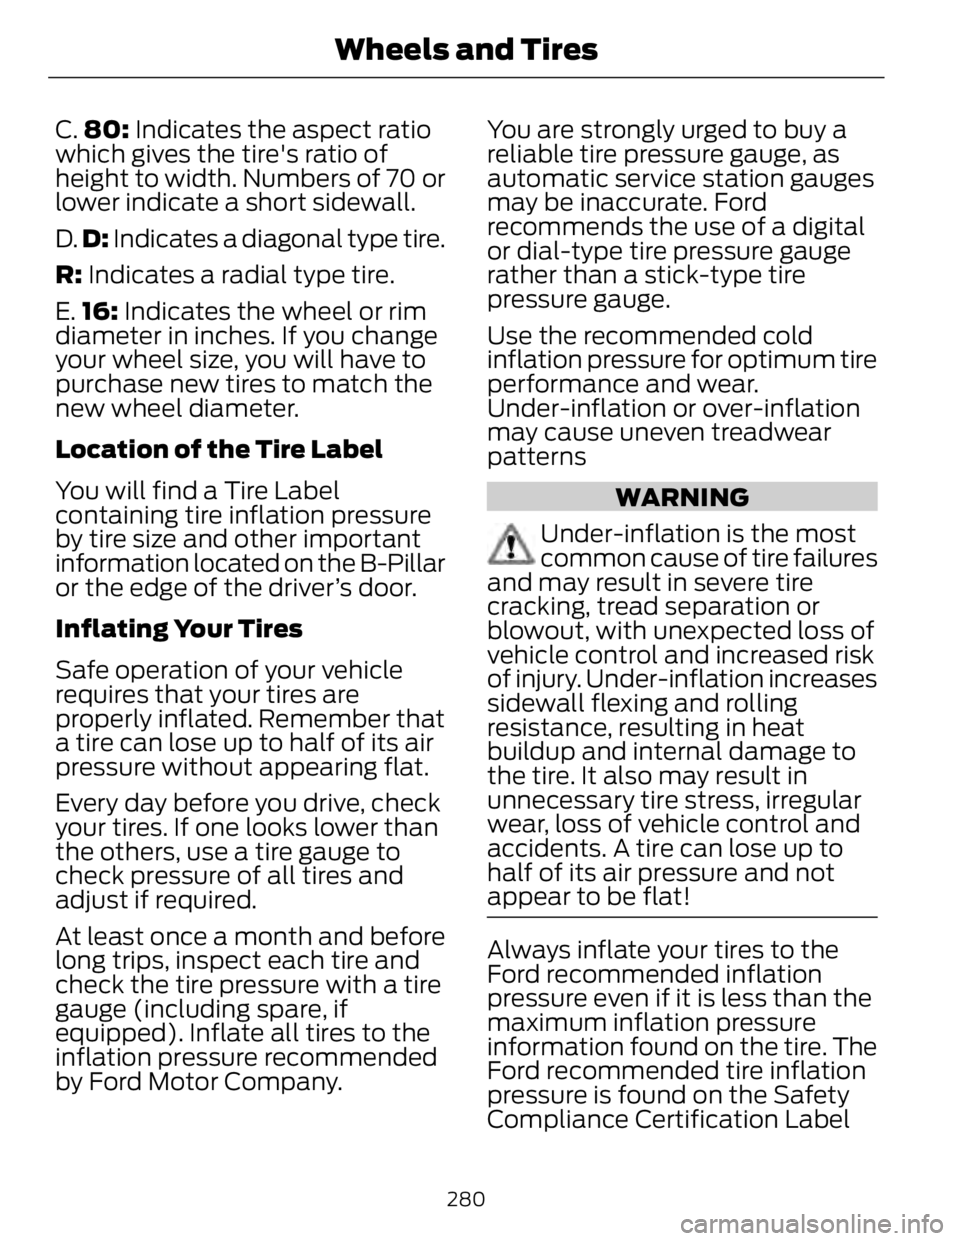
C. 80: Indicates the aspect ratio
which gives the tire's ratio of
height to width. Numbers of 70 or
lower indicate a short sidewall.
D. D: Indicates a diagonal type tire.
R: Indicates a radial type tire.
E. 16: Indicates the wheel or rim
diameter in inches. If you change
your wheel size, you will have to
purchase new tires to match the
new wheel diameter.
Location of the Tire Label
You will find a Tire Label
containing tire inflation pressure
by tire size and other important
information located on the B-Pillar
or the edge of the driver’s door.
Inflating Your Tires
Safe operation of your vehicle
requires that your tires are
properly inflated. Remember that
a tire can lose up to half of its air
pressure without appearing flat.
Every day before you drive, check
your tires. If one looks lower than
the others, use a tire gauge to
check pressure of all tires and
adjust if required.
At least once a month and before
long trips, inspect each tire and
check the tire pressure with a tire
gauge (including spare, if
equipped). Inflate all tires to the
inflation pressure recommended
by Ford Motor Company. You are strongly urged to buy a
reliable tire pressure gauge, as
automatic service station gauges
may be inaccurate. Ford
recommends the use of a digital
or dial-type tire pressure gauge
rather than a stick-type tire
pressure gauge.
Use the recommended cold
inflation pressure for optimum tire
performance and wear.
Under-inflation or over-inflation
may cause uneven treadwear
patterns
WARNING
Under-inflation is the most
common cause of tire failures
and may result in severe tire
cracking, tread separation or
blowout, with unexpected loss of
vehicle control and increased risk
of injury. Under-inflation increases
sidewall flexing and rolling
resistance, resulting in heat
buildup and internal damage to
the tire. It also may result in
unnecessary tire stress, irregular
wear, loss of vehicle control and
accidents. A tire can lose up to
half of its air pressure and not
appear to be flat!
Always inflate your tires to the
Ford recommended inflation
pressure even if it is less than the
maximum inflation pressure
information found on the tire. The
Ford recommended tire inflation
pressure is found on the Safety
Compliance Certification Label
280Wheels and Tires
Page 285 of 473

3. Add enough air to reach the
recommended air pressure.
Note: If you overfill the tire, release
air by pressing on the metal stem
in the center of the valve. Then
recheck the pressure with your tire
gauge.
4. Replace the valve cap.
5. Repeat this procedure for each
tire, including the spare.
Note: Some spare tires operate at
a higher inflation pressure than the
other tires. For T type mini-spare
tires, see the Dissimilar spare wheel
and tire assembly information for
a description. Store and maintain
at 60 psi (4.15 bar). For full-size
and dissimilar spare tires, see the
Dissimilar spare wheel and tire
assembly information for a
description. Store and maintain at
the higher of the front and rear
inflation pressure as shown on the
Tire Label.
6. Visually inspect the tires to
make sure there are no nails or
other objects embedded that
could poke a hole in the tire
and cause an air leak.
7. Check the sidewalls to make
sure there are no gouges, cuts
or bulges. Inspecting Your Tires and
Wheel Valve Stems
Periodically inspect the tire treads
for uneven or excessive wear and
remove objects such as stones,
nails or glass that may be wedged
in the tread grooves. Check the tire
and valve stems for holes, cracks,
or cuts that may permit air
leakage and repair or replace the
tire and replace the valve stem.
Inspect the tire sidewalls for
cracking, cuts, bruises and other
signs of damage or excessive
wear. If internal damage to the tire
is suspected, have the tire
demounted and inspected in case
it needs to be repaired or replaced.
For your safety, tires that are
damaged or show signs of
excessive wear should not be used
because they are more likely to
blow out or fail.
Improper or inadequate vehicle
maintenance can cause tires to
wear abnormally. Inspect all your
tires, including the spare,
frequently, and replace them if
one or more of the following
conditions exist:
282Wheels and Tires