change wheel FORD FUSION HYBRID 2017 User Guide
[x] Cancel search | Manufacturer: FORD, Model Year: 2017, Model line: FUSION HYBRID, Model: FORD FUSION HYBRID 2017Pages: 516, PDF Size: 7.53 MB
Page 198 of 516
PRINCIPLE OF OPERATION
Cruise control lets you maintain a setspeed without keeping your foot on theaccelerator pedal. You can use cruisecontrol when your vehicle speed is greaterthan 20 mph (30 km/h).
USING CRUISE CONTROL
WARNINGS
Do not use cruise control on windingroads, in heavy traffic or when theroad surface is slippery. This couldresult in loss of vehicle control, seriousinjury or death.
When you are going downhill, yourvehicle speed may increase abovethe set speed. The system will notapply the brakes but a warning displays.
Note:When you are going downhill whileusing cruise control, the battery chargingsystem and engine work together to helpmaintain the set speed. Engine noise mayincrease or decrease under these conditions.
Note:Cruise control disengages if thevehicle speed decreases more than 10 mph(16 km/h) below the set speed while drivinguphill.
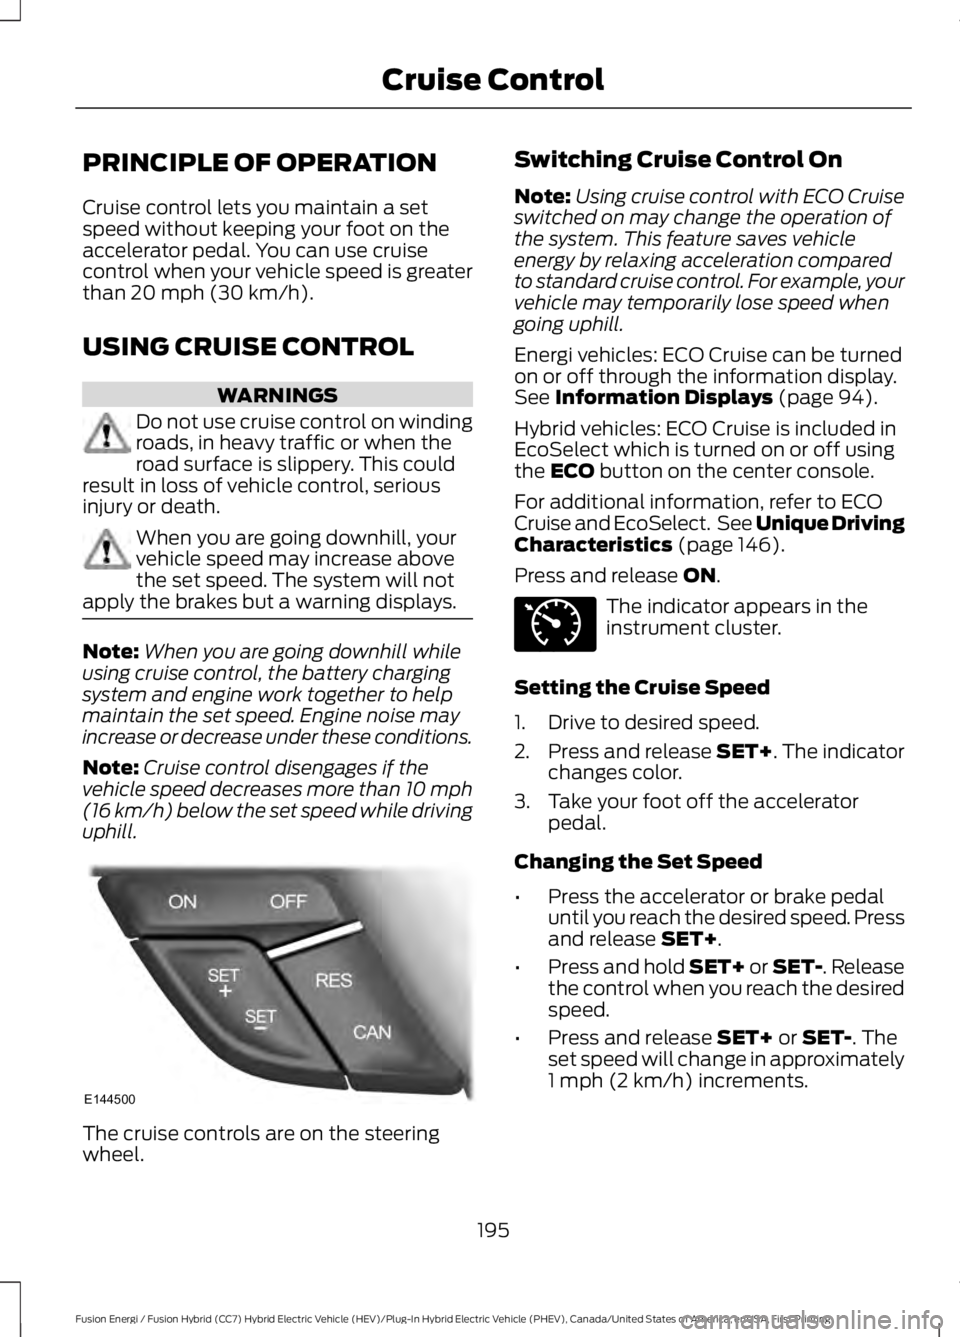
The cruise controls are on the steeringwheel.
Switching Cruise Control On
Note:Using cruise control with ECO Cruiseswitched on may change the operation ofthe system. This feature saves vehicleenergy by relaxing acceleration comparedto standard cruise control. For example, yourvehicle may temporarily lose speed whengoing uphill.
Energi vehicles: ECO Cruise can be turnedon or off through the information display.See Information Displays (page 94).
Hybrid vehicles: ECO Cruise is included inEcoSelect which is turned on or off usingthe ECO button on the center console.
For additional information, refer to ECOCruise and EcoSelect. See Unique DrivingCharacteristics (page 146).
Press and release ON.
The indicator appears in theinstrument cluster.
Setting the Cruise Speed
1. Drive to desired speed.
2.Press and release SET+. The indicatorchanges color.
3. Take your foot off the acceleratorpedal.
Changing the Set Speed
•Press the accelerator or brake pedaluntil you reach the desired speed. Pressand release SET+.
•Press and hold SET+ or SET-. Releasethe control when you reach the desiredspeed.
•Press and release SET+ or SET-. Theset speed will change in approximately1 mph (2 km/h) increments.
195
Fusion Energi / Fusion Hybrid (CC7) Hybrid Electric Vehicle (HEV)/Plug-In Hybrid Electric Vehicle (PHEV), Canada/United States of America, enUSA, First Printing
Cruise ControlE144500 E71340
Page 200 of 516
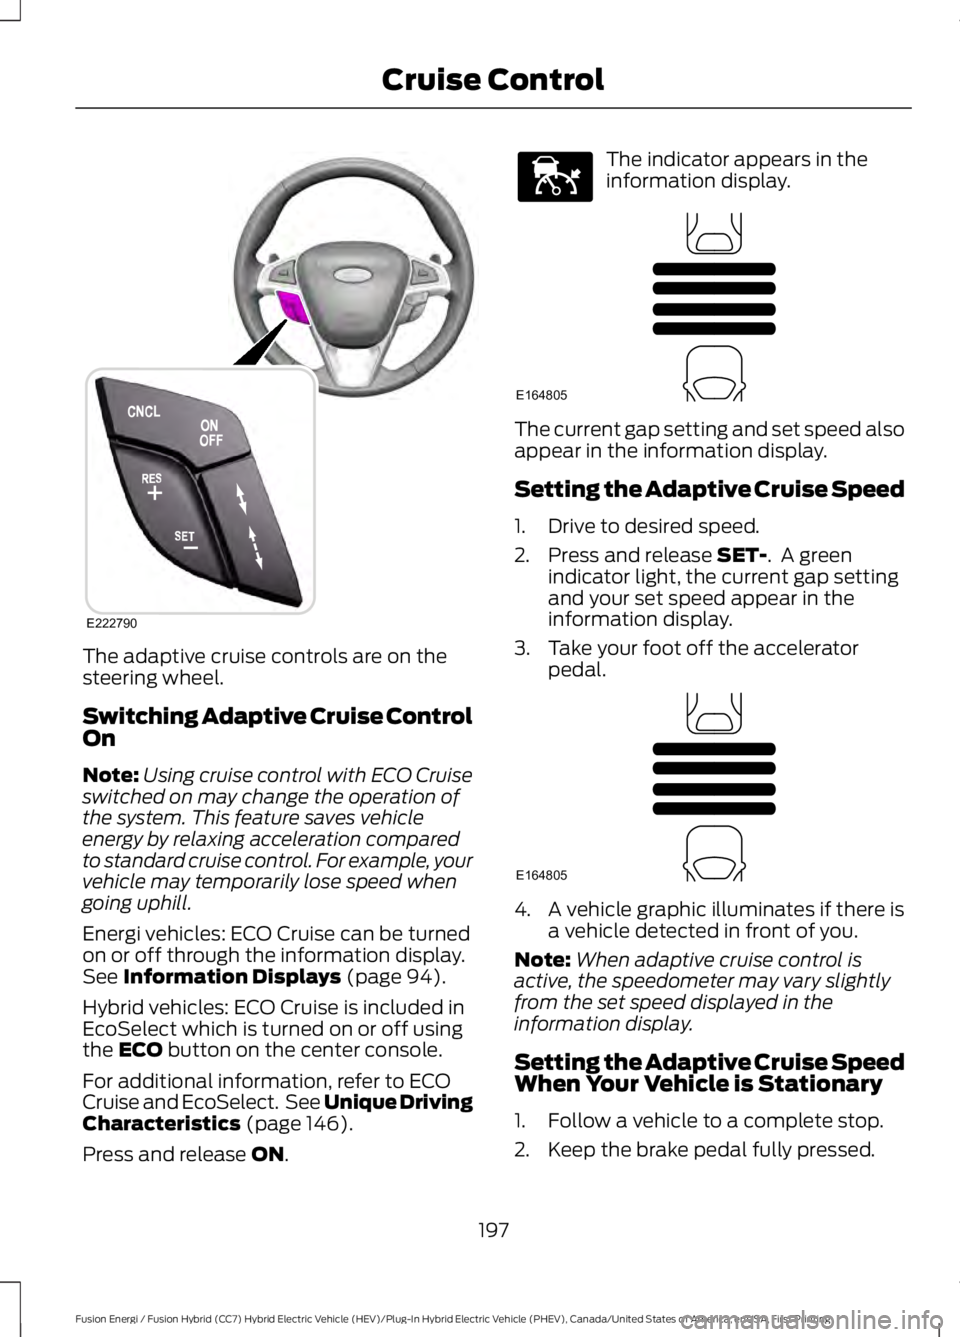
The adaptive cruise controls are on thesteering wheel.
Switching Adaptive Cruise ControlOn
Note:Using cruise control with ECO Cruiseswitched on may change the operation ofthe system. This feature saves vehicleenergy by relaxing acceleration comparedto standard cruise control. For example, yourvehicle may temporarily lose speed whengoing uphill.
Energi vehicles: ECO Cruise can be turnedon or off through the information display.See Information Displays (page 94).
Hybrid vehicles: ECO Cruise is included inEcoSelect which is turned on or off usingthe ECO button on the center console.
For additional information, refer to ECOCruise and EcoSelect. See Unique DrivingCharacteristics (page 146).
Press and release ON.
The indicator appears in theinformation display.
The current gap setting and set speed alsoappear in the information display.
Setting the Adaptive Cruise Speed
1. Drive to desired speed.
2. Press and release SET-. A greenindicator light, the current gap settingand your set speed appear in theinformation display.
3. Take your foot off the acceleratorpedal.
4. A vehicle graphic illuminates if there isa vehicle detected in front of you.
Note:When adaptive cruise control isactive, the speedometer may vary slightlyfrom the set speed displayed in theinformation display.
Setting the Adaptive Cruise SpeedWhen Your Vehicle is Stationary
1. Follow a vehicle to a complete stop.
2. Keep the brake pedal fully pressed.
197
Fusion Energi / Fusion Hybrid (CC7) Hybrid Electric Vehicle (HEV)/Plug-In Hybrid Electric Vehicle (PHEV), Canada/United States of America, enUSA, First Printing
Cruise ControlE222790 E144529 E164805 E164805
Page 207 of 516
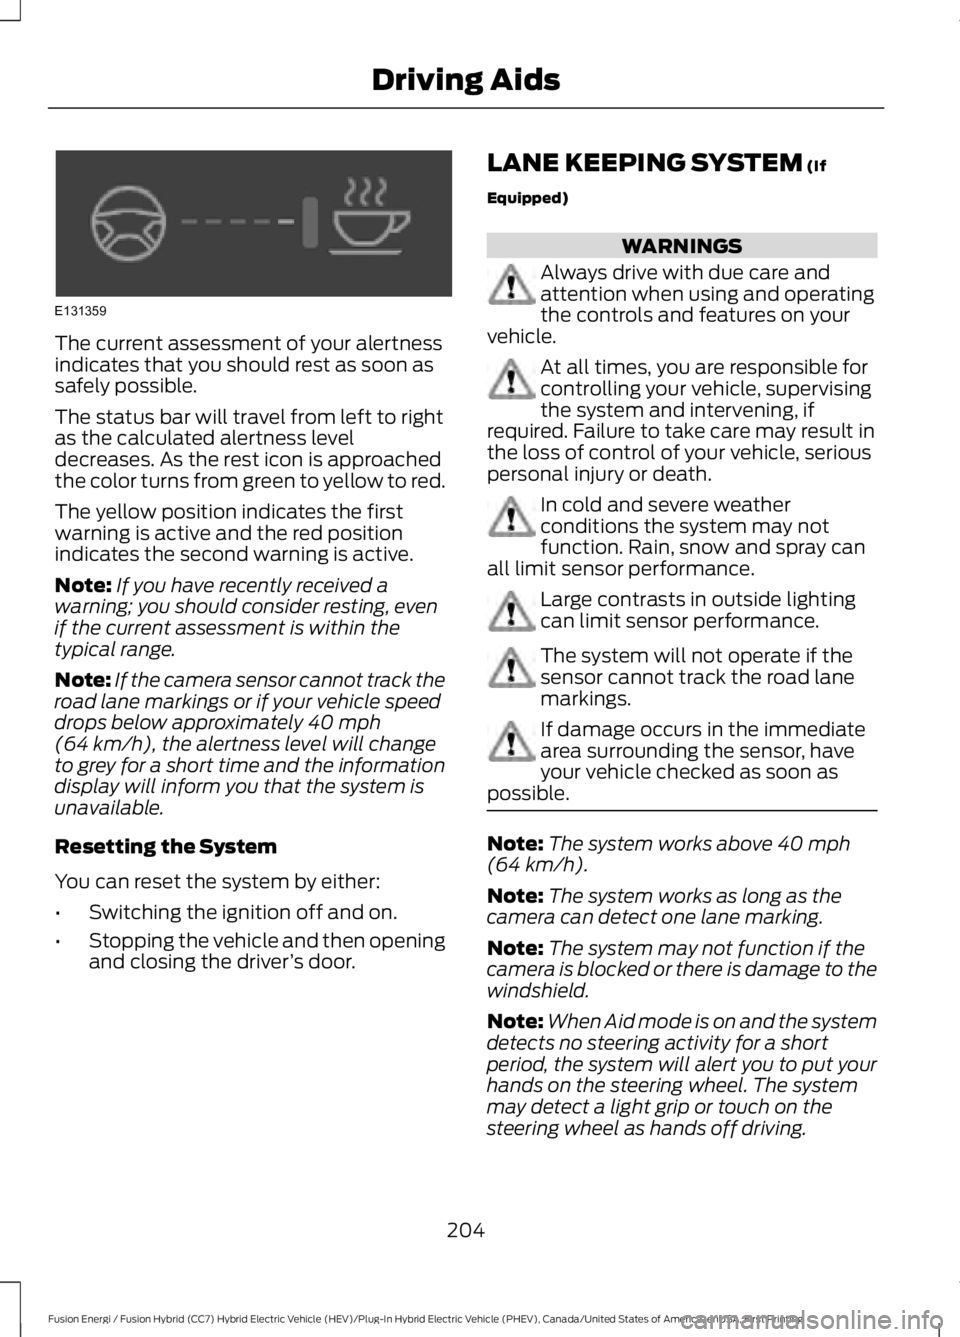
The current assessment of your alertnessindicates that you should rest as soon assafely possible.
The status bar will travel from left to rightas the calculated alertness leveldecreases. As the rest icon is approachedthe color turns from green to yellow to red.
The yellow position indicates the firstwarning is active and the red positionindicates the second warning is active.
Note:If you have recently received awarning; you should consider resting, evenif the current assessment is within thetypical range.
Note:If the camera sensor cannot track theroad lane markings or if your vehicle speeddrops below approximately 40 mph(64 km/h), the alertness level will changeto grey for a short time and the informationdisplay will inform you that the system isunavailable.
Resetting the System
You can reset the system by either:
•Switching the ignition off and on.
•Stopping the vehicle and then openingand closing the driver’s door.
LANE KEEPING SYSTEM (If
Equipped)
WARNINGS
Always drive with due care andattention when using and operatingthe controls and features on yourvehicle.
At all times, you are responsible forcontrolling your vehicle, supervisingthe system and intervening, ifrequired. Failure to take care may result inthe loss of control of your vehicle, seriouspersonal injury or death.
In cold and severe weatherconditions the system may notfunction. Rain, snow and spray canall limit sensor performance.
Large contrasts in outside lightingcan limit sensor performance.
The system will not operate if thesensor cannot track the road lanemarkings.
If damage occurs in the immediatearea surrounding the sensor, haveyour vehicle checked as soon aspossible.
Note:The system works above 40 mph(64 km/h).
Note:The system works as long as thecamera can detect one lane marking.
Note:The system may not function if thecamera is blocked or there is damage to thewindshield.
Note:When Aid mode is on and the systemdetects no steering activity for a shortperiod, the system will alert you to put yourhands on the steering wheel. The systemmay detect a light grip or touch on thesteering wheel as hands off driving.
204
Fusion Energi / Fusion Hybrid (CC7) Hybrid Electric Vehicle (HEV)/Plug-In Hybrid Electric Vehicle (PHEV), Canada/United States of America, enUSA, First Printing
Driving AidsE131359
Page 208 of 516
The system notifies you to stay in your lanethrough the steering system and theinstrument cluster display when the frontcamera detects an unintentional drift outof your lane is likely to occur. The systemautomatically detects and tracks the roadlane markings using a camera mountedbehind the interior rear view mirror.
Switching the System On and Off
Note:The system on or off setting is storeduntil it is manually changed, unless a MyKeyis detected. If the system detects a MyKeyit defaults to on and the mode is set to Alert.
Note:If a MyKey is detected, pressing thebutton will not affect the on or off status ofthe system.
Press the button on the steeringwheel stalk to switch the systemon or off.
System Settings
The system has optional setting menusavailable. The system stores thelast-known selection for each of thesesettings. You do not need to readjust yoursettings each time you turn on the system.
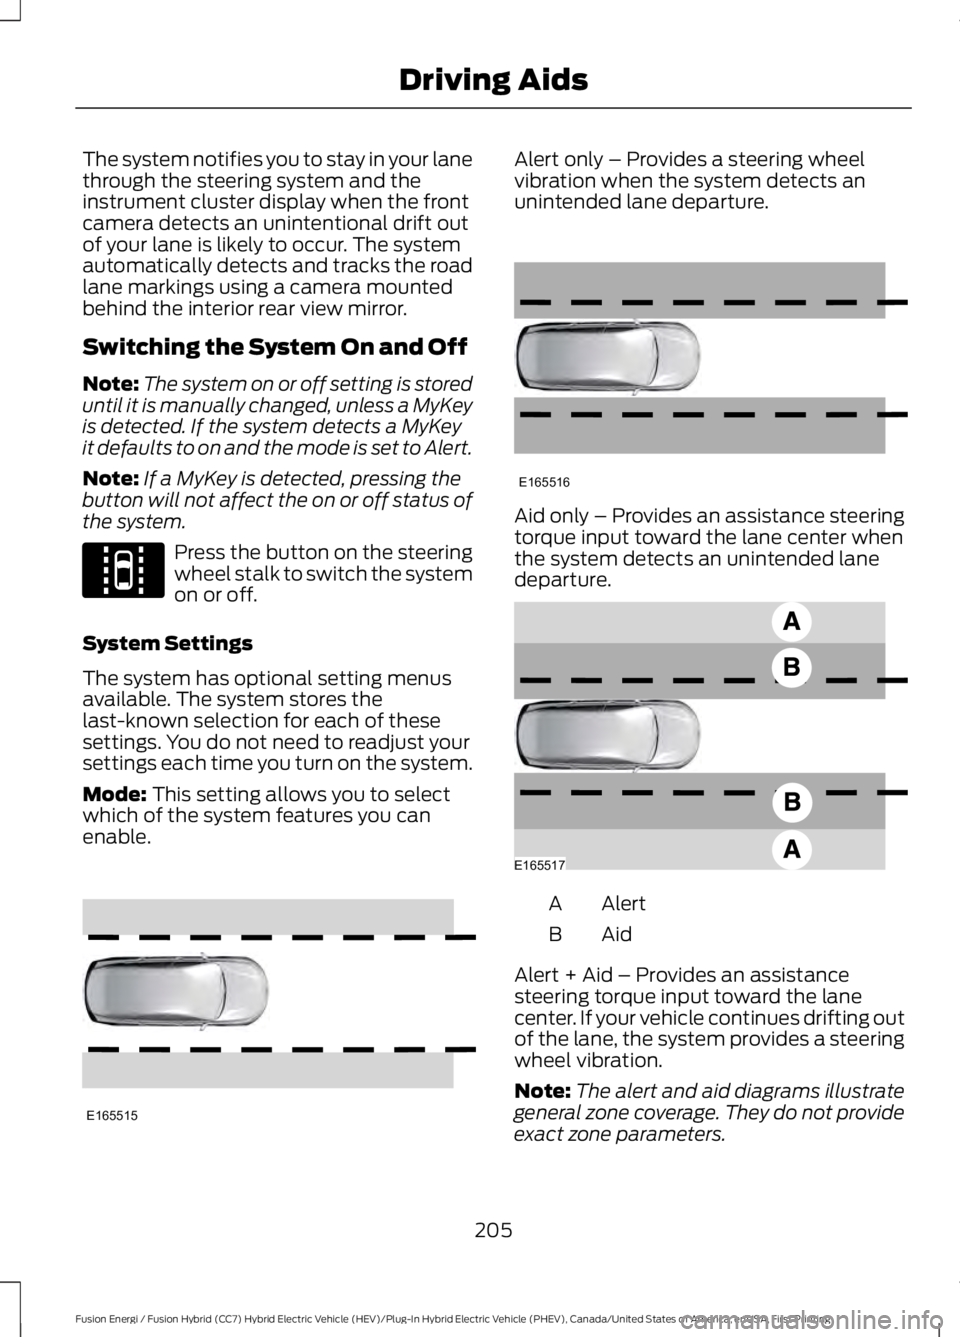
Mode: This setting allows you to selectwhich of the system features you canenable.
Alert only – Provides a steering wheelvibration when the system detects anunintended lane departure.
Aid only – Provides an assistance steeringtorque input toward the lane center whenthe system detects an unintended lanedeparture.
AlertA
AidB
Alert + Aid – Provides an assistancesteering torque input toward the lanecenter. If your vehicle continues drifting outof the lane, the system provides a steeringwheel vibration.
Note:The alert and aid diagrams illustrategeneral zone coverage. They do not provideexact zone parameters.
205
Fusion Energi / Fusion Hybrid (CC7) Hybrid Electric Vehicle (HEV)/Plug-In Hybrid Electric Vehicle (PHEV), Canada/United States of America, enUSA, First Printing
Driving AidsE144813 E165515 E165516 E165517
Page 209 of 516
Intensity: This setting affects the intensityof the steering wheel vibration used for thealert and alert + aid modes. This settingdoes not affect the aid mode.
•Low
•Normal
•High
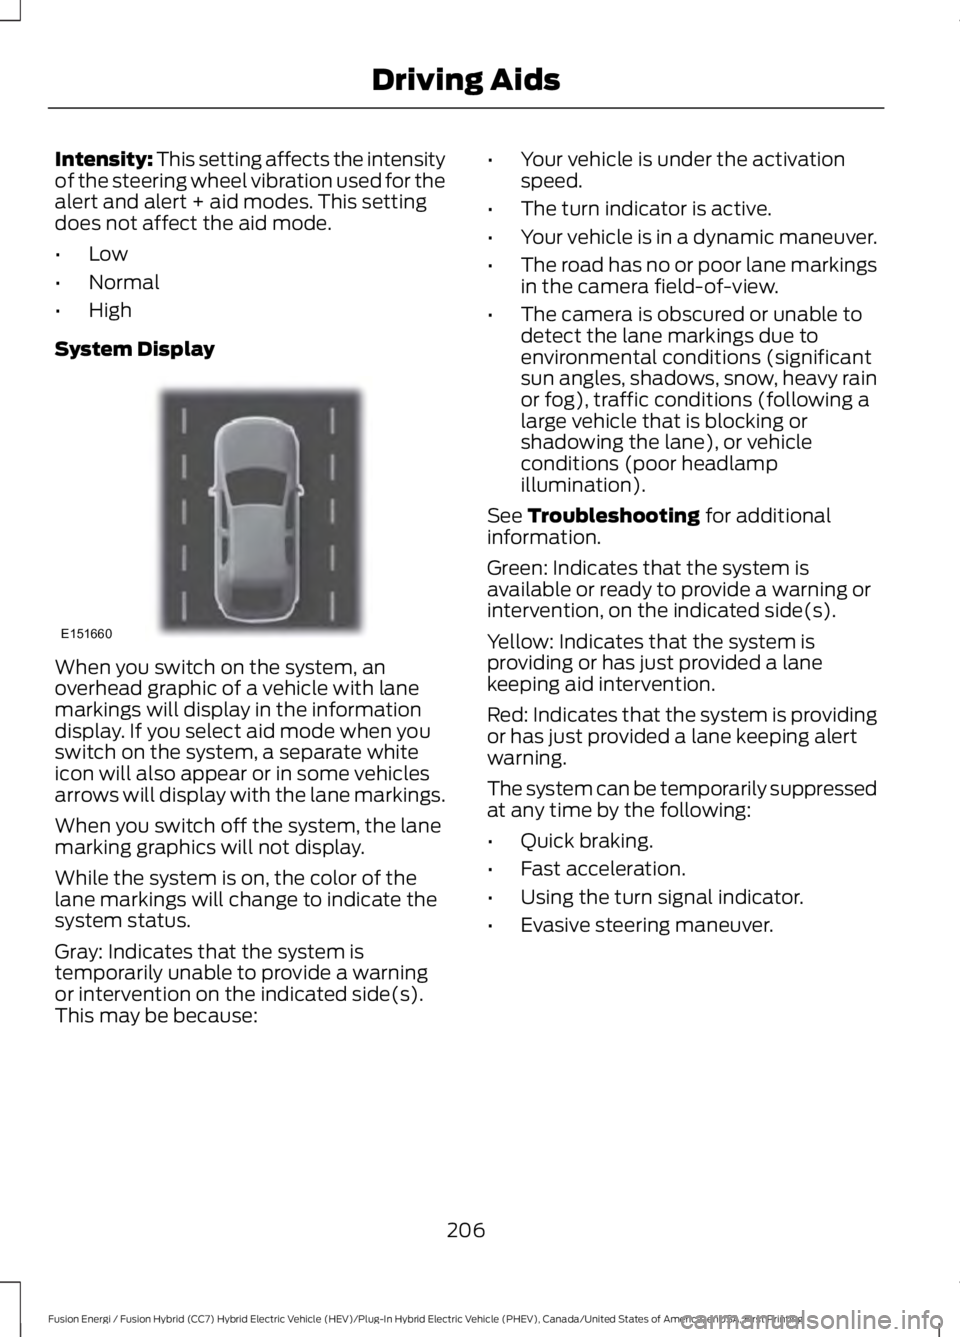
System Display
When you switch on the system, anoverhead graphic of a vehicle with lanemarkings will display in the informationdisplay. If you select aid mode when youswitch on the system, a separate whiteicon will also appear or in some vehiclesarrows will display with the lane markings.
When you switch off the system, the lanemarking graphics will not display.
While the system is on, the color of thelane markings will change to indicate thesystem status.
Gray: Indicates that the system istemporarily unable to provide a warningor intervention on the indicated side(s).This may be because:
•Your vehicle is under the activationspeed.
•The turn indicator is active.
•Your vehicle is in a dynamic maneuver.
•The road has no or poor lane markingsin the camera field-of-view.
•The camera is obscured or unable todetect the lane markings due toenvironmental conditions (significantsun angles, shadows, snow, heavy rainor fog), traffic conditions (following alarge vehicle that is blocking orshadowing the lane), or vehicleconditions (poor headlampillumination).
See Troubleshooting for additionalinformation.
Green: Indicates that the system isavailable or ready to provide a warning orintervention, on the indicated side(s).
Yellow: Indicates that the system isproviding or has just provided a lanekeeping aid intervention.
Red: Indicates that the system is providingor has just provided a lane keeping alertwarning.
The system can be temporarily suppressedat any time by the following:
•Quick braking.
•Fast acceleration.
•Using the turn signal indicator.
•Evasive steering maneuver.
206
Fusion Energi / Fusion Hybrid (CC7) Hybrid Electric Vehicle (HEV)/Plug-In Hybrid Electric Vehicle (PHEV), Canada/United States of America, enUSA, First Printing
Driving AidsE151660
Page 259 of 516
Only use oils certified for gasoline enginesby the American Petroleum Institute (API).An oil with this trademark symbolconforms to the current engine andemission system protection standards andfuel economy requirements of theInternational Lubricants SpecificationAdvisory Committee (ILSAC).
1. Remove the filler cap.
2. Add engine oil that meets the Fordspecifications. See Capacities andSpecifications (page 306).
3. Replace the filler cap. Turn it until youfeel a strong resistance.
OIL CHANGE INDICATOR
RESET
Use the information display controls onthe steering wheel to reset the oil changeindicator.
From the main menu scroll to:
Action and descriptionMessage
Press the right arrow button,then from this menu scrollto the following message.
Settings
Press the right arrow button,then from this menu scrollto the following message.
Vehicle
Press the right arrow button,then from this menu scrollto the following message.
Oil Life
Press and hold the OKbutton until the instrumentcluster displays thefollowing message.
Hold OK toReset
Reset Successful
When the oil change indic-ator resets the instrumentcluster displays 100%.
Remaining Life
{00}%
If the instrument clusterdisplays one of the followingmessages, repeat theprocess.
Not Reset
Reset Cancelled
ENGINE COOLANT CHECK
WARNINGS
Do not add engine coolant when theengine is hot. Steam and scaldingliquids released from a hot coolingsystem can burn you badly. Also, spillingcoolant on hot engine parts can burn you.
256
Fusion Energi / Fusion Hybrid (CC7) Hybrid Electric Vehicle (HEV)/Plug-In Hybrid Electric Vehicle (PHEV), Canada/United States of America, enUSA, First Printing
MaintenanceE142732
Page 279 of 516
Note:Industrial-strength or heavy-dutycleaners in combination with brush agitationto remove brake dust and dirt, could wearaway the clear coat finish over a period time.
Note:Do not use hydrofluoric acid-basedor high caustic-based wheel cleaners, steelwool, fuels or strong household detergents.
Note:If you intend parking your vehicle foran extended period after cleaning thewheels with a wheel cleaner, drive yourvehicle for a few minutes before doing so.This will reduce the risk of increasedcorrosion of the brake discs.
Alloy wheels and wheel covers are coatedwith a clear coat paint finish. To maintaintheir condition we recommend that you:
•Clean the wheels weekly usingMotorcraft Wheel and Tire Cleaner.Apply using manufacturer'sinstructions.
•Use a sponge to remove heavydeposits of dirt and brake dustaccumulation.
•Rinse thoroughly with a strong streamof water when you have completed thecleaning process.
•To remove tar and grease, useMotorcraft Bug and Tar Remover.
VEHICLE STORAGE
If you plan on storing your vehicle for 30days or more, read the followingmaintenance recommendations to makesure your vehicle stays in good operatingcondition.
We engineer and test all motor vehiclesand their components for reliable, regulardriving. Under various conditions,long-term storage may lead to degradedengine performance or failure unless youuse specific precautions to preserve enginecomponents.
General
•Store all vehicles in a dry, ventilatedplace.
•Protect from sunlight, if possible.
•If you store vehicles outside, theyrequire regular maintenance to protectagainst rust and damage.
Body
•Wash your vehicle thoroughly toremove dirt, grease, oil, tar or mud fromexterior surfaces, rear-wheel housingand the underside of front fenders.
•Periodically wash your vehicle if youstore it in exposed locations.
•Touch-up exposed or primed metal toprevent rust.
•Cover chrome and stainless steel partswith a thick coat of auto wax to preventdiscoloration. Re-wax as necessarywhen you wash your vehicle.
•Lubricate all hood, door and luggagecompartment hinges and latches witha light grade oil.
•Cover interior trim to prevent fading.
•Keep all rubber parts free from oil andsolvents.
Engine
•Change the engine oil and filter prior tostorage because used engine oilcontains contaminates which maycause engine damage.
•Start the engine every 15 days for aminimum of 15 minutes. Run at fast idlewith the climate controls set to defrostuntil the engine reaches normaloperating temperature.
276
Fusion Energi / Fusion Hybrid (CC7) Hybrid Electric Vehicle (HEV)/Plug-In Hybrid Electric Vehicle (PHEV), Canada/United States of America, enUSA, First Printing
Vehicle Care
Page 291 of 516
Information Contained on theTire Sidewall
Both U.S. and Canada Federalregulations require tiremanufacturers to placestandardized information on thesidewall of all tires. Thisinformation identifies anddescribes the fundamentalcharacteristics of the tire and alsoprovides a U.S. DOT TireIdentification Number for safetystandard certification and in caseof a recall.
Information on P Type Tires
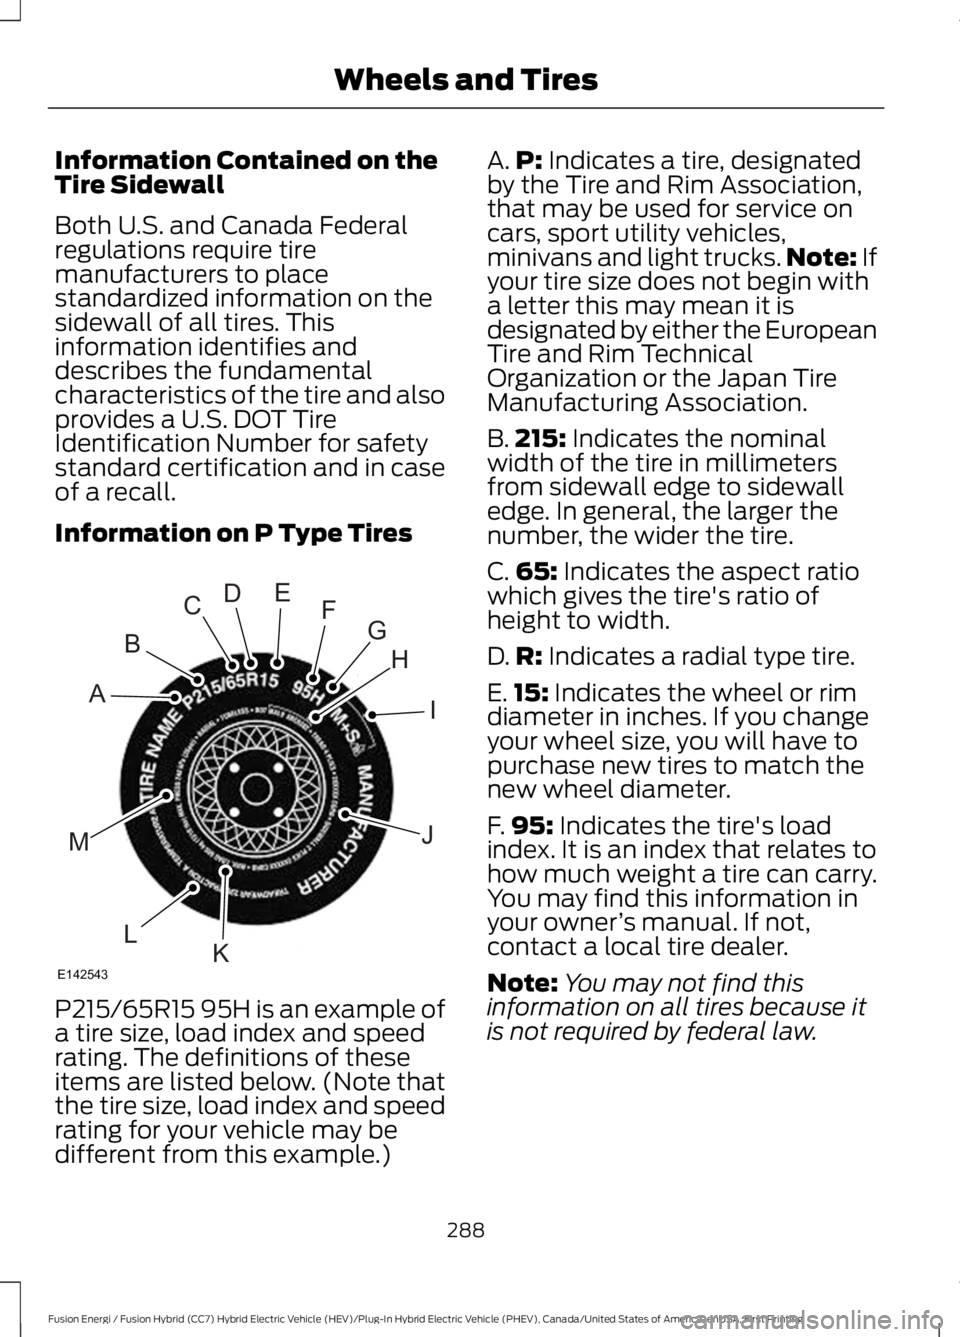
P215/65R15 95H is an example ofa tire size, load index and speedrating. The definitions of theseitems are listed below. (Note thatthe tire size, load index and speedrating for your vehicle may bedifferent from this example.)
A.P: Indicates a tire, designatedby the Tire and Rim Association,that may be used for service oncars, sport utility vehicles,minivans and light trucks.Note: Ifyour tire size does not begin witha letter this may mean it isdesignated by either the EuropeanTire and Rim TechnicalOrganization or the Japan TireManufacturing Association.
B.215: Indicates the nominalwidth of the tire in millimetersfrom sidewall edge to sidewalledge. In general, the larger thenumber, the wider the tire.
C.65: Indicates the aspect ratiowhich gives the tire's ratio ofheight to width.
D.R: Indicates a radial type tire.
E.15: Indicates the wheel or rimdiameter in inches. If you changeyour wheel size, you will have topurchase new tires to match thenew wheel diameter.
F.95: Indicates the tire's loadindex. It is an index that relates tohow much weight a tire can carry.You may find this information inyour owner’s manual. If not,contact a local tire dealer.
Note:You may not find thisinformation on all tires because itis not required by federal law.
288
Fusion Energi / Fusion Hybrid (CC7) Hybrid Electric Vehicle (HEV)/Plug-In Hybrid Electric Vehicle (PHEV), Canada/United States of America, enUSA, First Printing
Wheels and TiresH
I
J
KL
M
A
B
CDEFG
E142543
Page 295 of 516
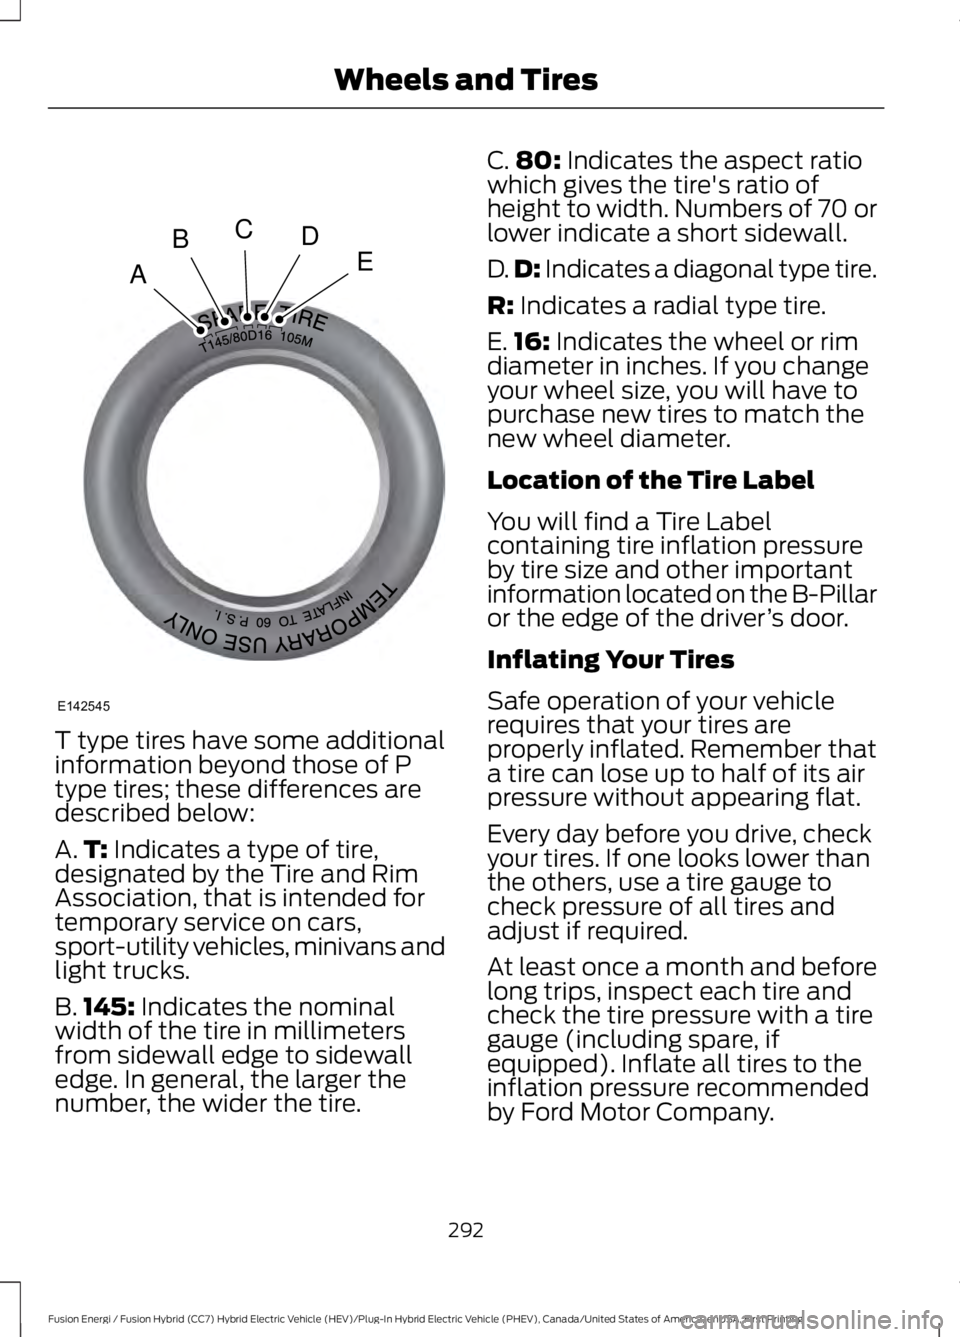
T type tires have some additionalinformation beyond those of Ptype tires; these differences aredescribed below:
A.T: Indicates a type of tire,designated by the Tire and RimAssociation, that is intended fortemporary service on cars,sport-utility vehicles, minivans andlight trucks.
B.145: Indicates the nominalwidth of the tire in millimetersfrom sidewall edge to sidewalledge. In general, the larger thenumber, the wider the tire.
C.80: Indicates the aspect ratiowhich gives the tire's ratio ofheight to width. Numbers of 70 orlower indicate a short sidewall.
D.D: Indicates a diagonal type tire.
R: Indicates a radial type tire.
E.16: Indicates the wheel or rimdiameter in inches. If you changeyour wheel size, you will have topurchase new tires to match thenew wheel diameter.
Location of the Tire Label
You will find a Tire Labelcontaining tire inflation pressureby tire size and other importantinformation located on the B-Pillaror the edge of the driver’s door.
Inflating Your Tires
Safe operation of your vehiclerequires that your tires areproperly inflated. Remember thata tire can lose up to half of its airpressure without appearing flat.
Every day before you drive, checkyour tires. If one looks lower thanthe others, use a tire gauge tocheck pressure of all tires andadjust if required.
At least once a month and beforelong trips, inspect each tire andcheck the tire pressure with a tiregauge (including spare, ifequipped). Inflate all tires to theinflation pressure recommendedby Ford Motor Company.
292
Fusion Energi / Fusion Hybrid (CC7) Hybrid Electric Vehicle (HEV)/Plug-In Hybrid Electric Vehicle (PHEV), Canada/United States of America, enUSA, First Printing
Wheels and TiresA
BCDE
E142545
Page 297 of 516
When weather temperaturechanges occur, tire inflationpressures also change. A 10°F(6°C) temperature drop cancause a corresponding drop of 1psi (7 kPa) in inflation pressure.Check your tire pressuresfrequently and adjust them to theproper pressure which can befound on the Safety ComplianceCertification Label or Tire Label.
To check the pressure in yourtire(s):
1. Make sure the tires are cool,meaning they are not hot fromdriving even a mile.
Note:If you are checking tirepressure when the tire is hot, (forexample, driven more than 1 mile[1.6 kilometers]), never bleed orreduce air pressure. The tires arehot from driving and it is normal forpressures to increase aboverecommended cold pressures. Ahot tire at or below recommendedcold inflation pressure could besignificantly under-inflated.
Note:If you have to drive adistance to get air for your tire(s),check and record the tire pressurefirst and add the appropriate airpressure when you get to thepump. It is normal for tires to heatup and the air pressure inside to goup as you drive.
2.Remove the cap from the valveon one tire, then firmly pressthe tire gauge onto the valve
and measure the pressure.
3.Add enough air to reach therecommended air pressure.
Note:If you overfill the tire, releaseair by pressing on the metal stemin the center of the valve. Thenrecheck the pressure with your tiregauge.
4.Replace the valve cap.
5.Repeat this procedure for eachtire, including the spare.
Note:Some spare tires operate ata higher inflation pressure than theother tires. For T type mini-sparetires, see the Dissimilar spare wheeland tire assembly information fora description. Store and maintainat 60 psi (4.15 bar). For full-sizeand dissimilar spare tires, see theDissimilar spare wheel and tireassembly information for adescription. Store and maintain atthe higher of the front and rearinflation pressure as shown on theTire Label.
6.Visually inspect the tires tomake sure there are no nails orother objects embedded thatcould poke a hole in the tireand cause an air leak.
7. Check the sidewalls to makesure there are no gouges, cutsor bulges.
294
Fusion Energi / Fusion Hybrid (CC7) Hybrid Electric Vehicle (HEV)/Plug-In Hybrid Electric Vehicle (PHEV), Canada/United States of America, enUSA, First Printing
Wheels and Tires