headlamp FORD FUSION HYBRID 2017 User Guide
[x] Cancel search | Manufacturer: FORD, Model Year: 2017, Model line: FUSION HYBRID, Model: FORD FUSION HYBRID 2017Pages: 516, PDF Size: 7.53 MB
Page 96 of 516
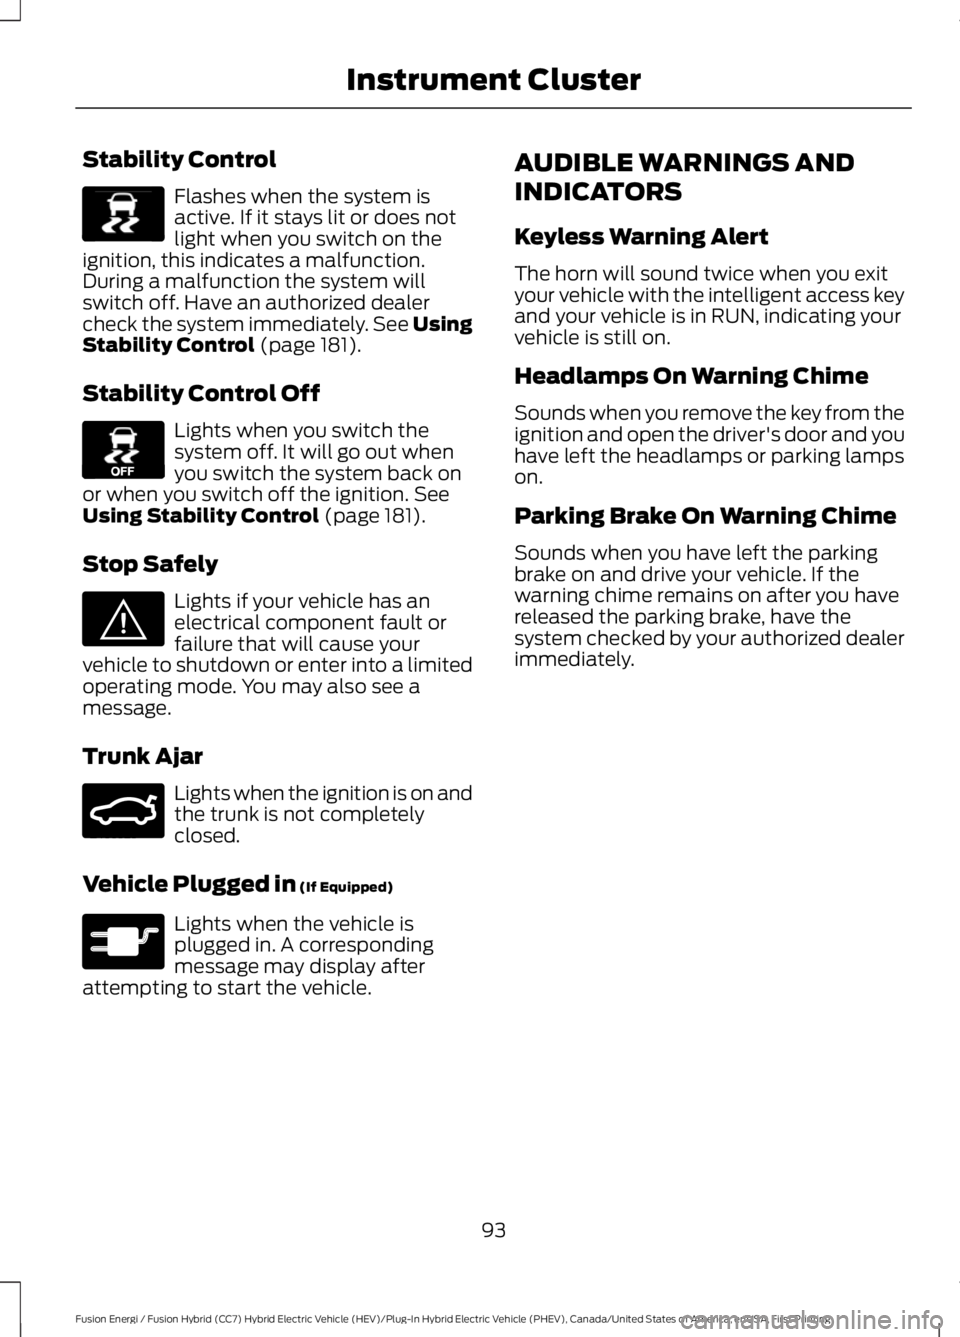
Stability Control
Flashes when the system isactive. If it stays lit or does notlight when you switch on theignition, this indicates a malfunction.During a malfunction the system willswitch off. Have an authorized dealercheck the system immediately. See UsingStability Control (page 181).
Stability Control Off
Lights when you switch thesystem off. It will go out whenyou switch the system back onor when you switch off the ignition. SeeUsing Stability Control (page 181).
Stop Safely
Lights if your vehicle has anelectrical component fault orfailure that will cause yourvehicle to shutdown or enter into a limitedoperating mode. You may also see amessage.
Trunk Ajar
Lights when the ignition is on andthe trunk is not completelyclosed.
Vehicle Plugged in (If Equipped)
Lights when the vehicle isplugged in. A correspondingmessage may display afterattempting to start the vehicle.
AUDIBLE WARNINGS AND
INDICATORS
Keyless Warning Alert
The horn will sound twice when you exityour vehicle with the intelligent access keyand your vehicle is in RUN, indicating yourvehicle is still on.
Headlamps On Warning Chime
Sounds when you remove the key from theignition and open the driver's door and youhave left the headlamps or parking lampson.
Parking Brake On Warning Chime
Sounds when you have left the parkingbrake on and drive your vehicle. If thewarning chime remains on after you havereleased the parking brake, have thesystem checked by your authorized dealerimmediately.
93
Fusion Energi / Fusion Hybrid (CC7) Hybrid Electric Vehicle (HEV)/Plug-In Hybrid Electric Vehicle (PHEV), Canada/United States of America, enUSA, First Printing
Instrument ClusterE138639 E130458 E144693 E159323 E144694
Page 145 of 516
STARTING A GASOLINE
ENGINE
When you start the engine, the idle speedincreases. This helps to warm up theengine. If the engine idle speed does notslow down automatically, have yourvehicle checked by an authorized dealer.
Note: You can crank the engine for a totalof 60 seconds without the engine startingbefore the starting system temporarilydisables. The 60 seconds does not have tobe all at once. For example, if you crank theengine three times for 20 seconds eachtime, without the engine starting, youreached the 60-second time limit. Amessage appears in the information displayalerting you that you exceeded the crankingtime. You cannot attempt to start theengine for at least 15 minutes. After 15minutes, you are limited to a 15-secondengine cranking time. You need to wait 60minutes before you can crank the engine for60 seconds again.
Before starting your vehicle, check thefollowing:
•Make sure all occupants have fastenedtheir seatbelts.
•Make sure the headlamps andelectrical accessories are off.
•Make sure the parking brake is on.
•Make sure the transmission is in park(P).
Starting Your Vehicle
Note: Do not touch the accelerator pedal.
Note:You must have your intelligent accesskey in your vehicle to shift the transmissionout of park (P).
Note:The green ready indicator illuminatesletting you know that the vehicle is readyfor driving. Since your vehicle is equippedwith a silent key start, the engine may notstart at the time of the vehicle start. SeeHybrid Vehicle Operation (page 146).
1. Fully depress the brake pedal.
2. Briefly press the push button ignitionswitch.
Failure to Start
The system does not function if:
•The key frequencies are jammed.
•The key battery has no charge.
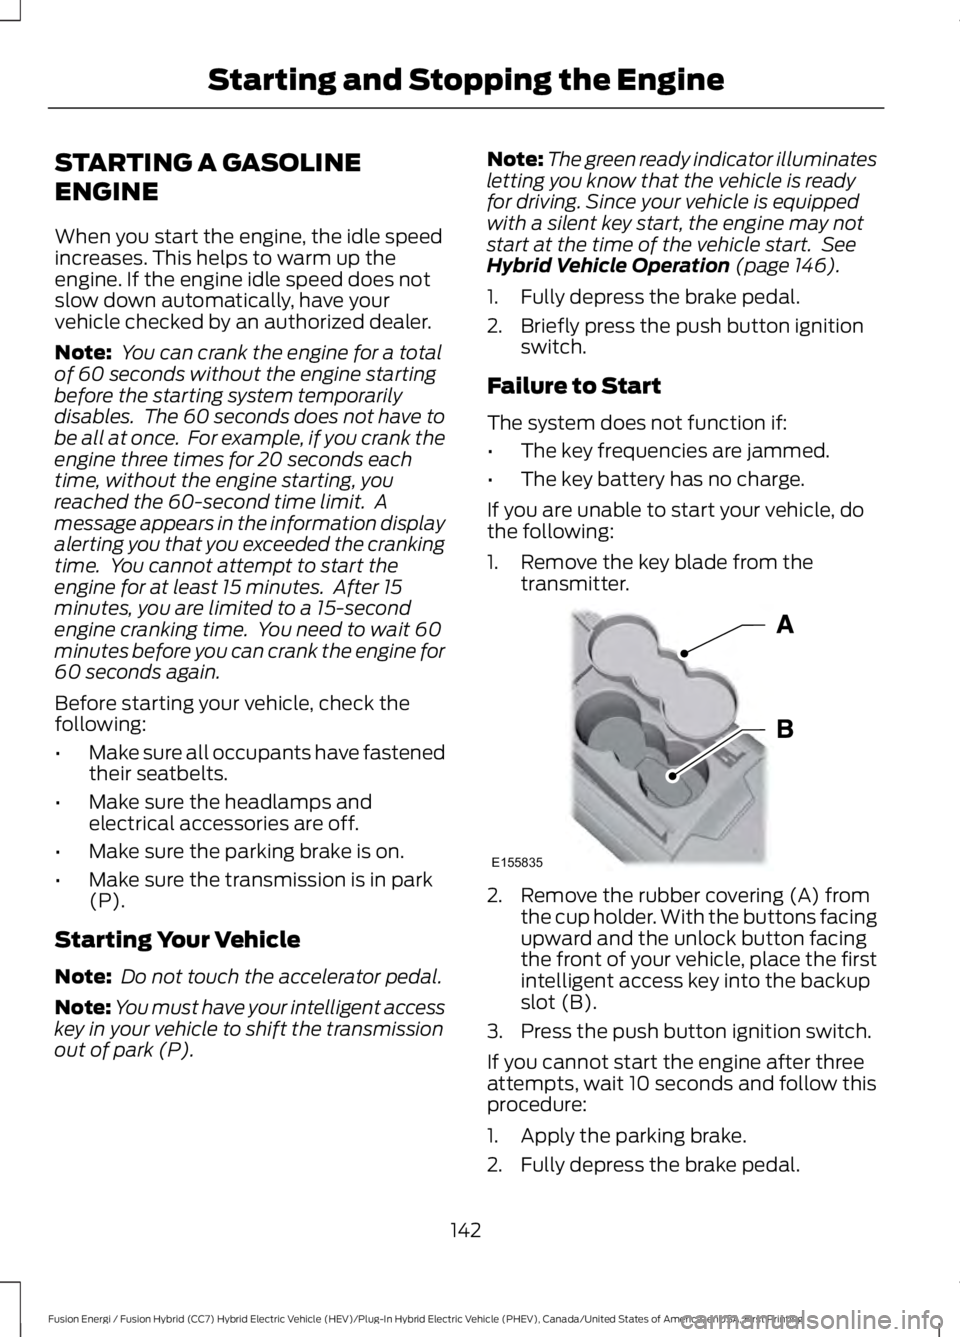
If you are unable to start your vehicle, dothe following:
1. Remove the key blade from thetransmitter.
2. Remove the rubber covering (A) fromthe cup holder. With the buttons facingupward and the unlock button facingthe front of your vehicle, place the firstintelligent access key into the backupslot (B).
3. Press the push button ignition switch.
If you cannot start the engine after threeattempts, wait 10 seconds and follow thisprocedure:
1. Apply the parking brake.
2. Fully depress the brake pedal.
142
Fusion Energi / Fusion Hybrid (CC7) Hybrid Electric Vehicle (HEV)/Plug-In Hybrid Electric Vehicle (PHEV), Canada/United States of America, enUSA, First Printing
Starting and Stopping the EngineE155835
Page 209 of 516
Intensity: This setting affects the intensityof the steering wheel vibration used for thealert and alert + aid modes. This settingdoes not affect the aid mode.
•Low
•Normal
•High
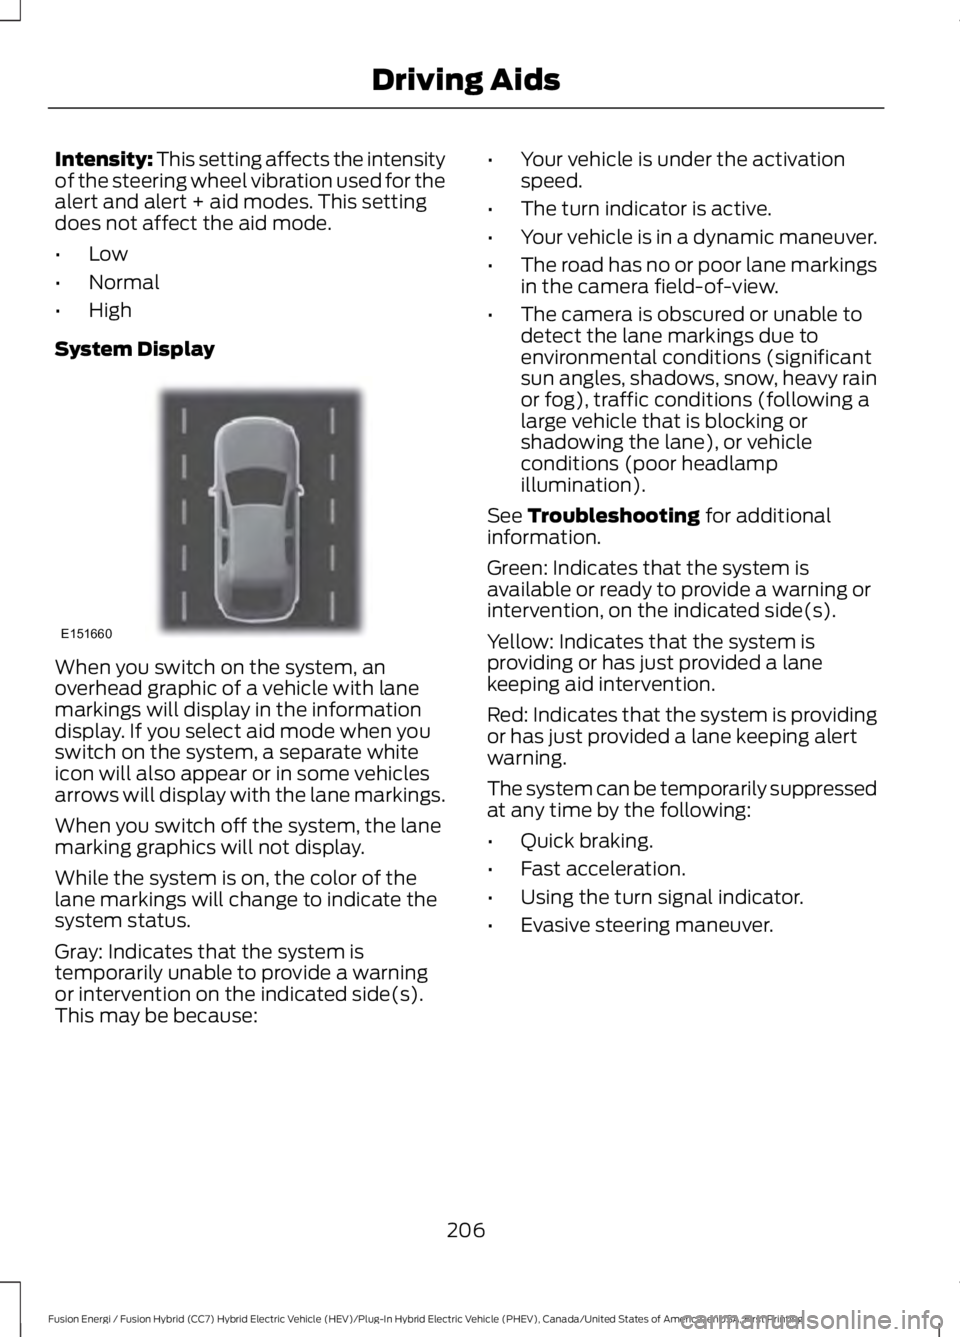
System Display
When you switch on the system, anoverhead graphic of a vehicle with lanemarkings will display in the informationdisplay. If you select aid mode when youswitch on the system, a separate whiteicon will also appear or in some vehiclesarrows will display with the lane markings.
When you switch off the system, the lanemarking graphics will not display.
While the system is on, the color of thelane markings will change to indicate thesystem status.
Gray: Indicates that the system istemporarily unable to provide a warningor intervention on the indicated side(s).This may be because:
•Your vehicle is under the activationspeed.
•The turn indicator is active.
•Your vehicle is in a dynamic maneuver.
•The road has no or poor lane markingsin the camera field-of-view.
•The camera is obscured or unable todetect the lane markings due toenvironmental conditions (significantsun angles, shadows, snow, heavy rainor fog), traffic conditions (following alarge vehicle that is blocking orshadowing the lane), or vehicleconditions (poor headlampillumination).
See Troubleshooting for additionalinformation.
Green: Indicates that the system isavailable or ready to provide a warning orintervention, on the indicated side(s).
Yellow: Indicates that the system isproviding or has just provided a lanekeeping aid intervention.
Red: Indicates that the system is providingor has just provided a lane keeping alertwarning.
The system can be temporarily suppressedat any time by the following:
•Quick braking.
•Fast acceleration.
•Using the turn signal indicator.
•Evasive steering maneuver.
206
Fusion Energi / Fusion Hybrid (CC7) Hybrid Electric Vehicle (HEV)/Plug-In Hybrid Electric Vehicle (PHEV), Canada/United States of America, enUSA, First Printing
Driving AidsE151660
Page 253 of 516
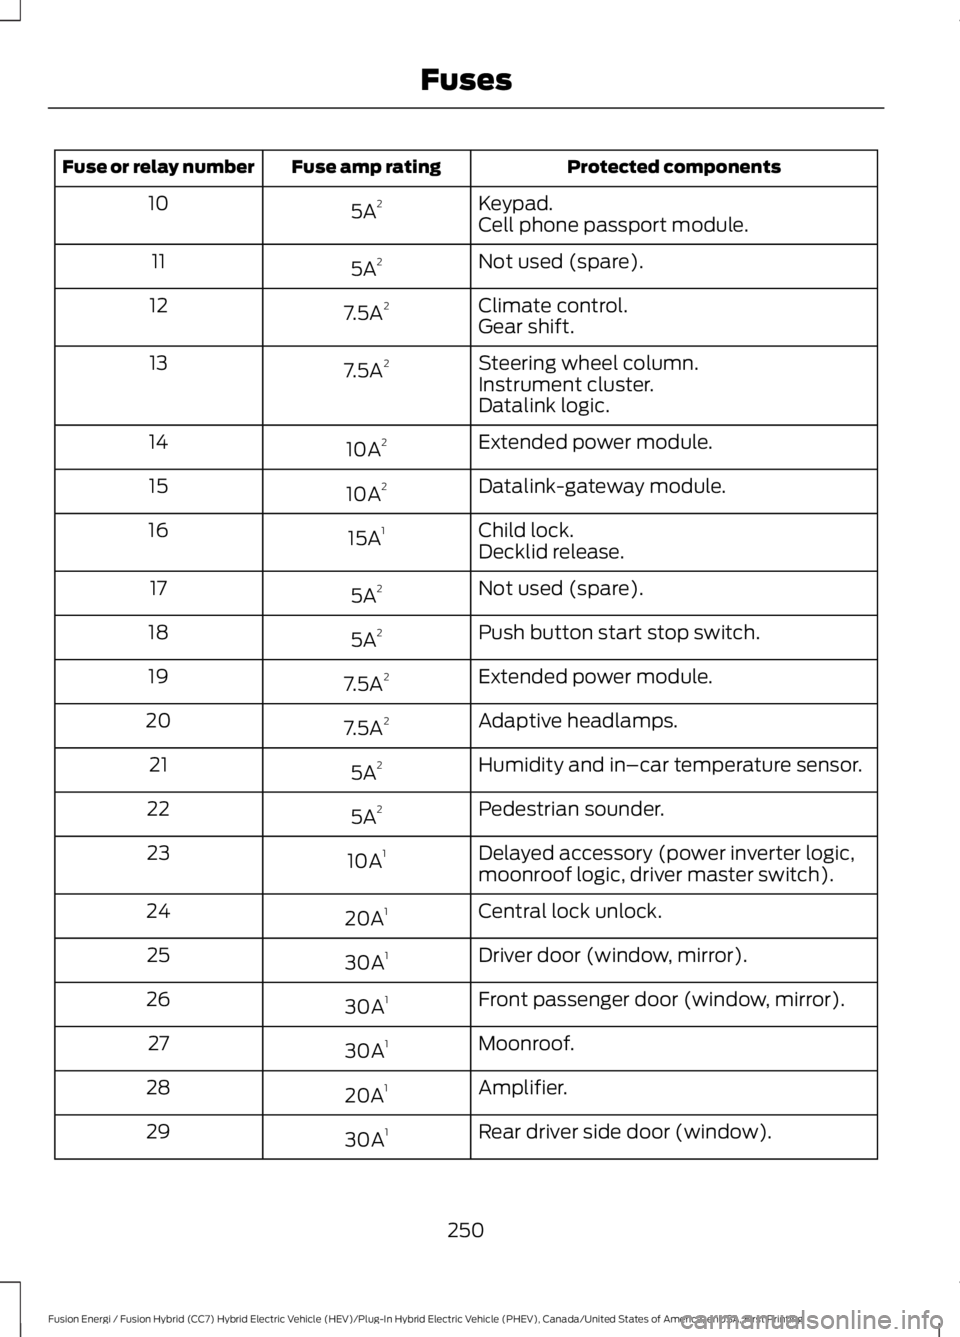
Protected componentsFuse amp ratingFuse or relay number
Keypad.5A210Cell phone passport module.
Not used (spare).5A211
Climate control.7.5A212Gear shift.
Steering wheel column.7.5A213Instrument cluster.Datalink logic.
Extended power module.10A214
Datalink-gateway module.10A215
Child lock.15A116Decklid release.
Not used (spare).5A217
Push button start stop switch.5A218
Extended power module.7.5A219
Adaptive headlamps.7.5A220
Humidity and in–car temperature sensor.5A221
Pedestrian sounder.5A222
Delayed accessory (power inverter logic,moonroof logic, driver master switch).10A123
Central lock unlock.20A124
Driver door (window, mirror).30A125
Front passenger door (window, mirror).30A126
Moonroof.30A127
Amplifier.20A128
Rear driver side door (window).30A129
250
Fusion Energi / Fusion Hybrid (CC7) Hybrid Electric Vehicle (HEV)/Plug-In Hybrid Electric Vehicle (PHEV), Canada/United States of America, enUSA, First Printing
Fuses
Page 267 of 516
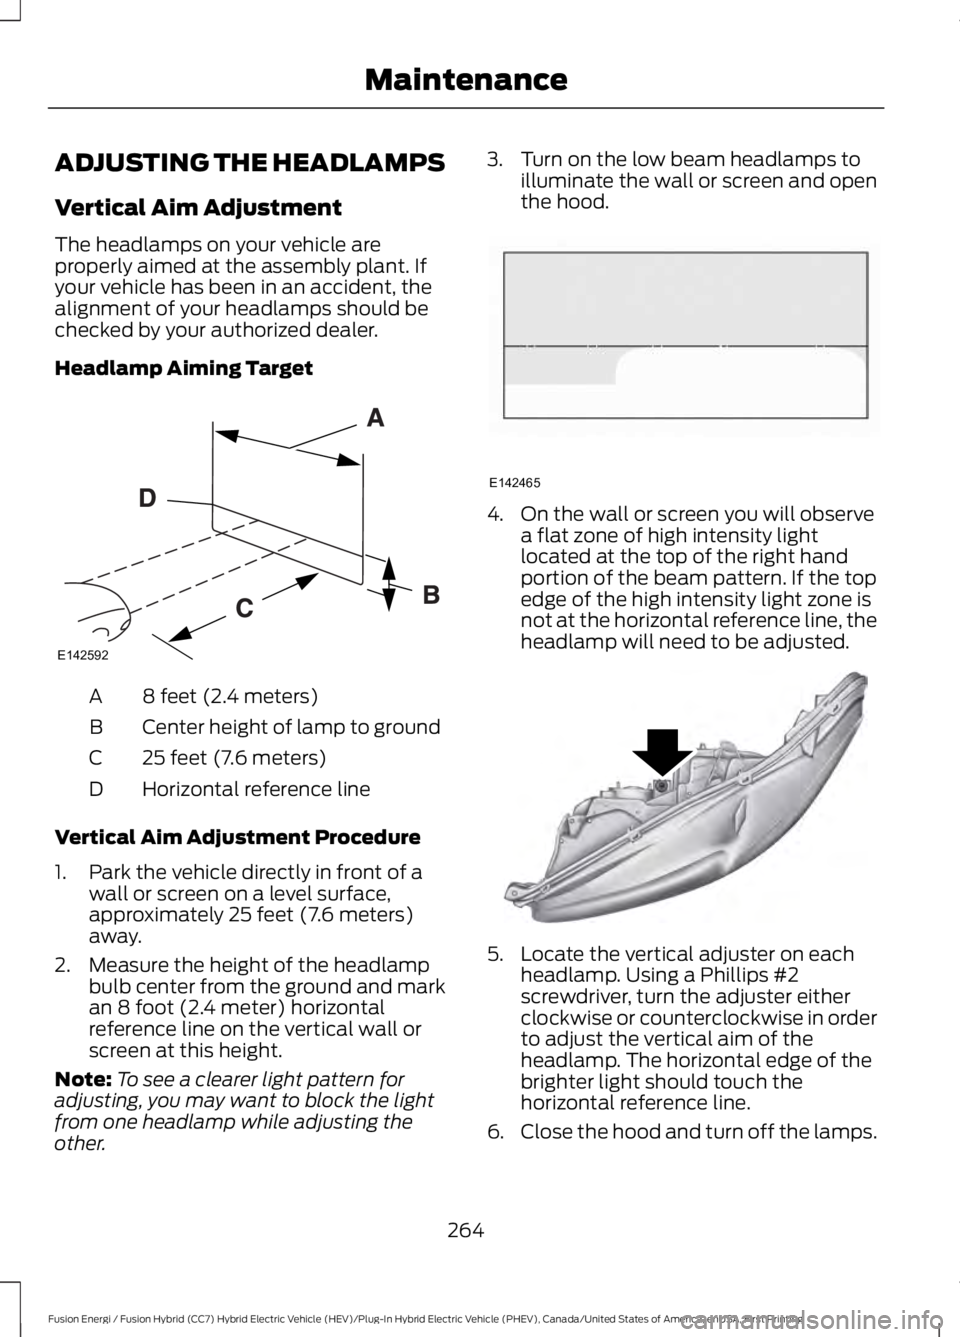
ADJUSTING THE HEADLAMPS
Vertical Aim Adjustment
The headlamps on your vehicle areproperly aimed at the assembly plant. Ifyour vehicle has been in an accident, thealignment of your headlamps should bechecked by your authorized dealer.
Headlamp Aiming Target
8 feet (2.4 meters)A
Center height of lamp to groundB
25 feet (7.6 meters)C
Horizontal reference lineD
Vertical Aim Adjustment Procedure
1. Park the vehicle directly in front of awall or screen on a level surface,approximately 25 feet (7.6 meters)away.
2. Measure the height of the headlampbulb center from the ground and markan 8 foot (2.4 meter) horizontalreference line on the vertical wall orscreen at this height.
Note:To see a clearer light pattern foradjusting, you may want to block the lightfrom one headlamp while adjusting theother.
3. Turn on the low beam headlamps toilluminate the wall or screen and openthe hood.
4. On the wall or screen you will observea flat zone of high intensity lightlocated at the top of the right handportion of the beam pattern. If the topedge of the high intensity light zone isnot at the horizontal reference line, theheadlamp will need to be adjusted.
5. Locate the vertical adjuster on eachheadlamp. Using a Phillips #2screwdriver, turn the adjuster eitherclockwise or counterclockwise in orderto adjust the vertical aim of theheadlamp. The horizontal edge of thebrighter light should touch thehorizontal reference line.
6.Close the hood and turn off the lamps.
264
Fusion Energi / Fusion Hybrid (CC7) Hybrid Electric Vehicle (HEV)/Plug-In Hybrid Electric Vehicle (PHEV), Canada/United States of America, enUSA, First Printing
MaintenanceE142592 E142465 E145594
Page 268 of 516
Horizontal Aim AdjustmentHorizontal aim is not required for thisvehicle and is not adjustable.
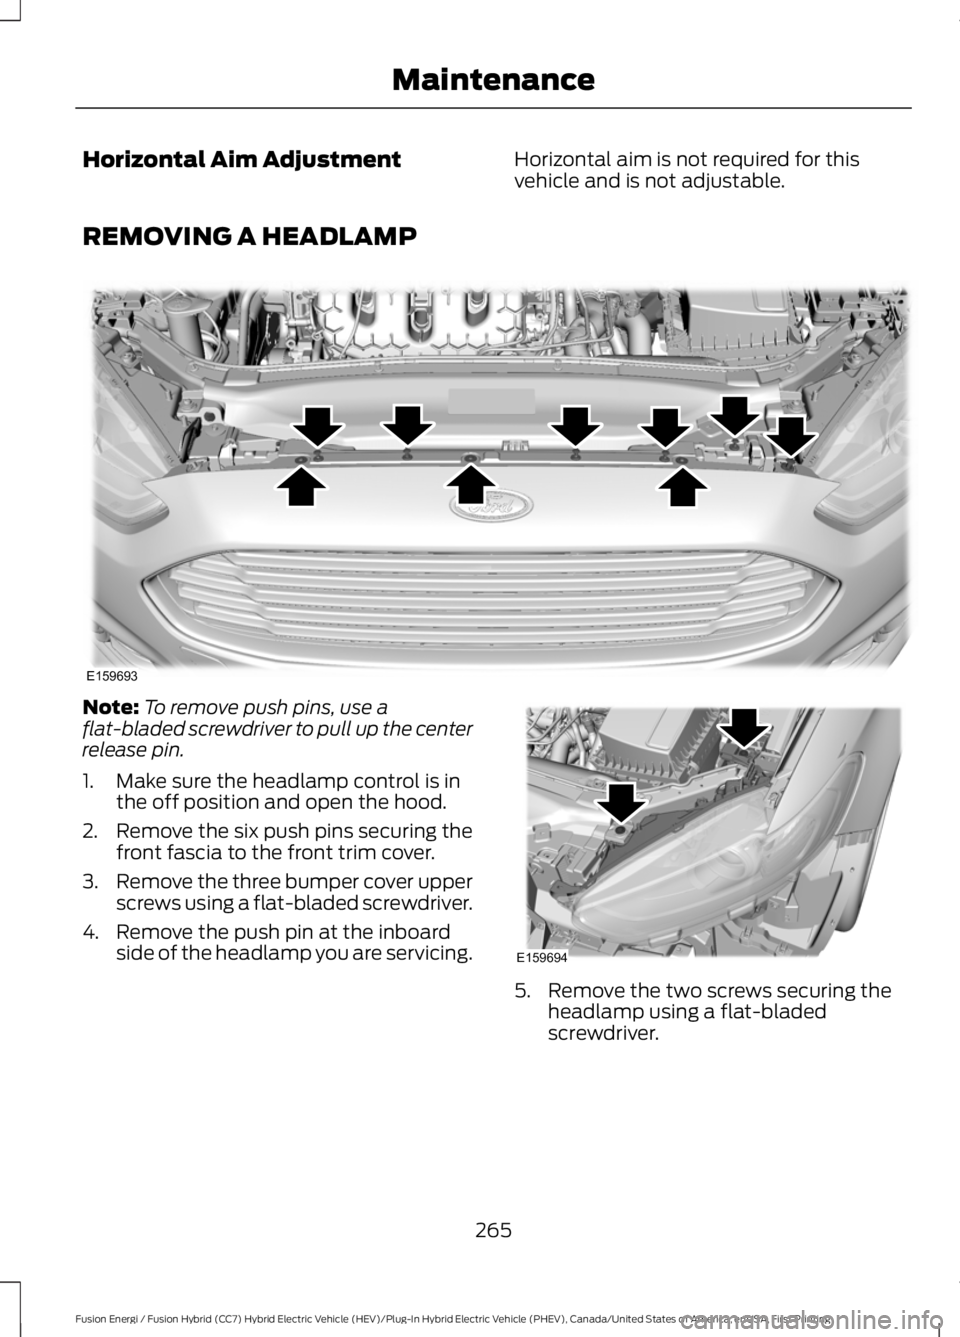
REMOVING A HEADLAMP
Note:To remove push pins, use aflat-bladed screwdriver to pull up the centerrelease pin.
1. Make sure the headlamp control is inthe off position and open the hood.
2.Remove the six push pins securing thefront fascia to the front trim cover.
3.Remove the three bumper cover upperscrews using a flat-bladed screwdriver.
4. Remove the push pin at the inboardside of the headlamp you are servicing.
5. Remove the two screws securing theheadlamp using a flat-bladedscrewdriver.
265
Fusion Energi / Fusion Hybrid (CC7) Hybrid Electric Vehicle (HEV)/Plug-In Hybrid Electric Vehicle (PHEV), Canada/United States of America, enUSA, First Printing
MaintenanceE159693 E159694
Page 269 of 516
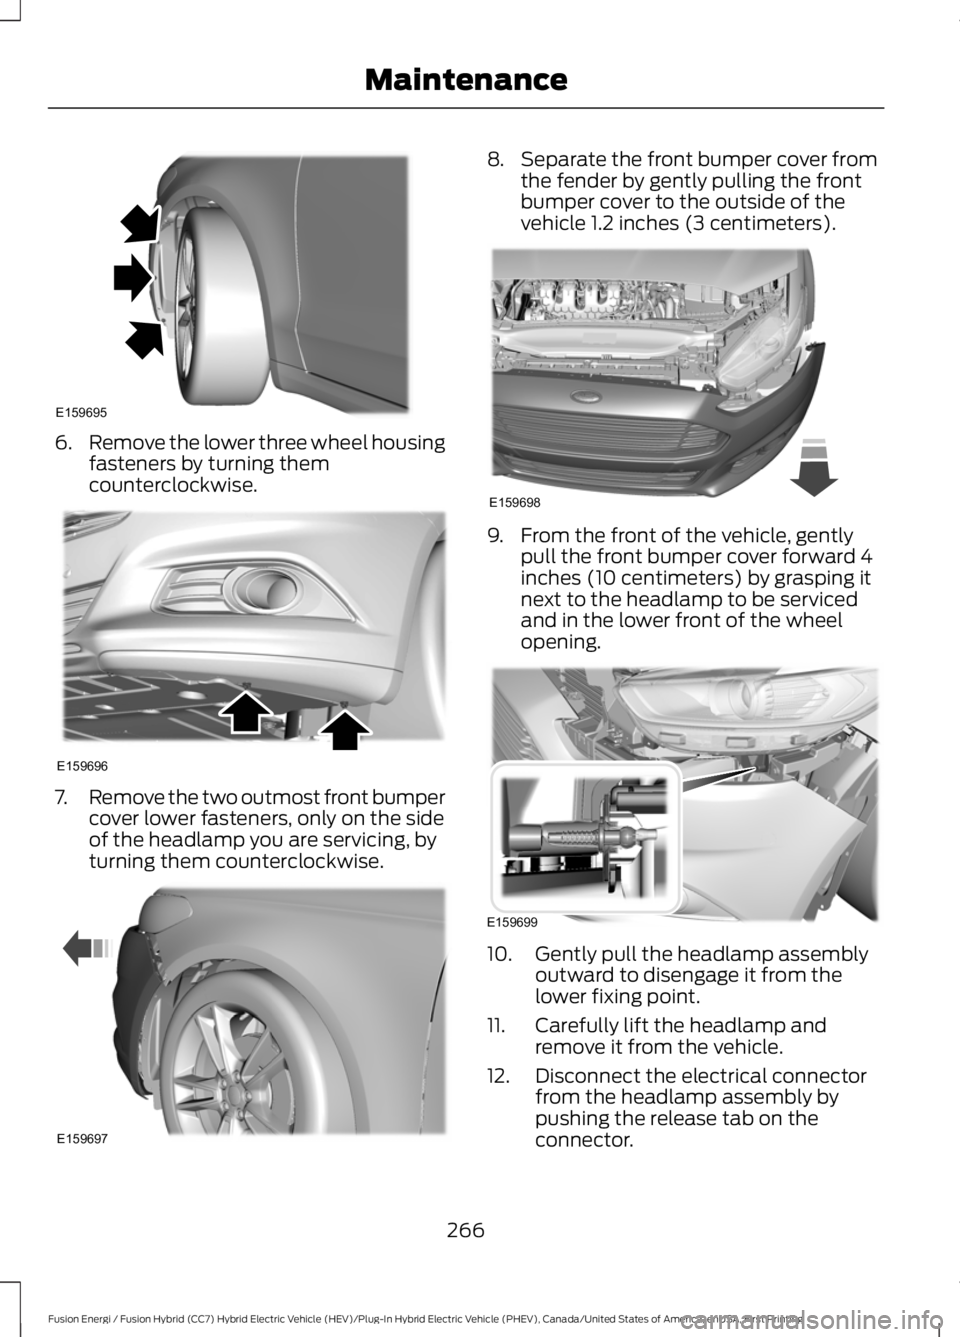
6.Remove the lower three wheel housingfasteners by turning themcounterclockwise.
7.Remove the two outmost front bumpercover lower fasteners, only on the sideof the headlamp you are servicing, byturning them counterclockwise.
8.Separate the front bumper cover fromthe fender by gently pulling the frontbumper cover to the outside of thevehicle 1.2 inches (3 centimeters).
9. From the front of the vehicle, gentlypull the front bumper cover forward 4inches (10 centimeters) by grasping itnext to the headlamp to be servicedand in the lower front of the wheelopening.
10. Gently pull the headlamp assemblyoutward to disengage it from thelower fixing point.
11. Carefully lift the headlamp andremove it from the vehicle.
12. Disconnect the electrical connectorfrom the headlamp assembly bypushing the release tab on theconnector.
266
Fusion Energi / Fusion Hybrid (CC7) Hybrid Electric Vehicle (HEV)/Plug-In Hybrid Electric Vehicle (PHEV), Canada/United States of America, enUSA, First Printing
MaintenanceE159695 E159696 E159697 E159698 E159699
Page 270 of 516
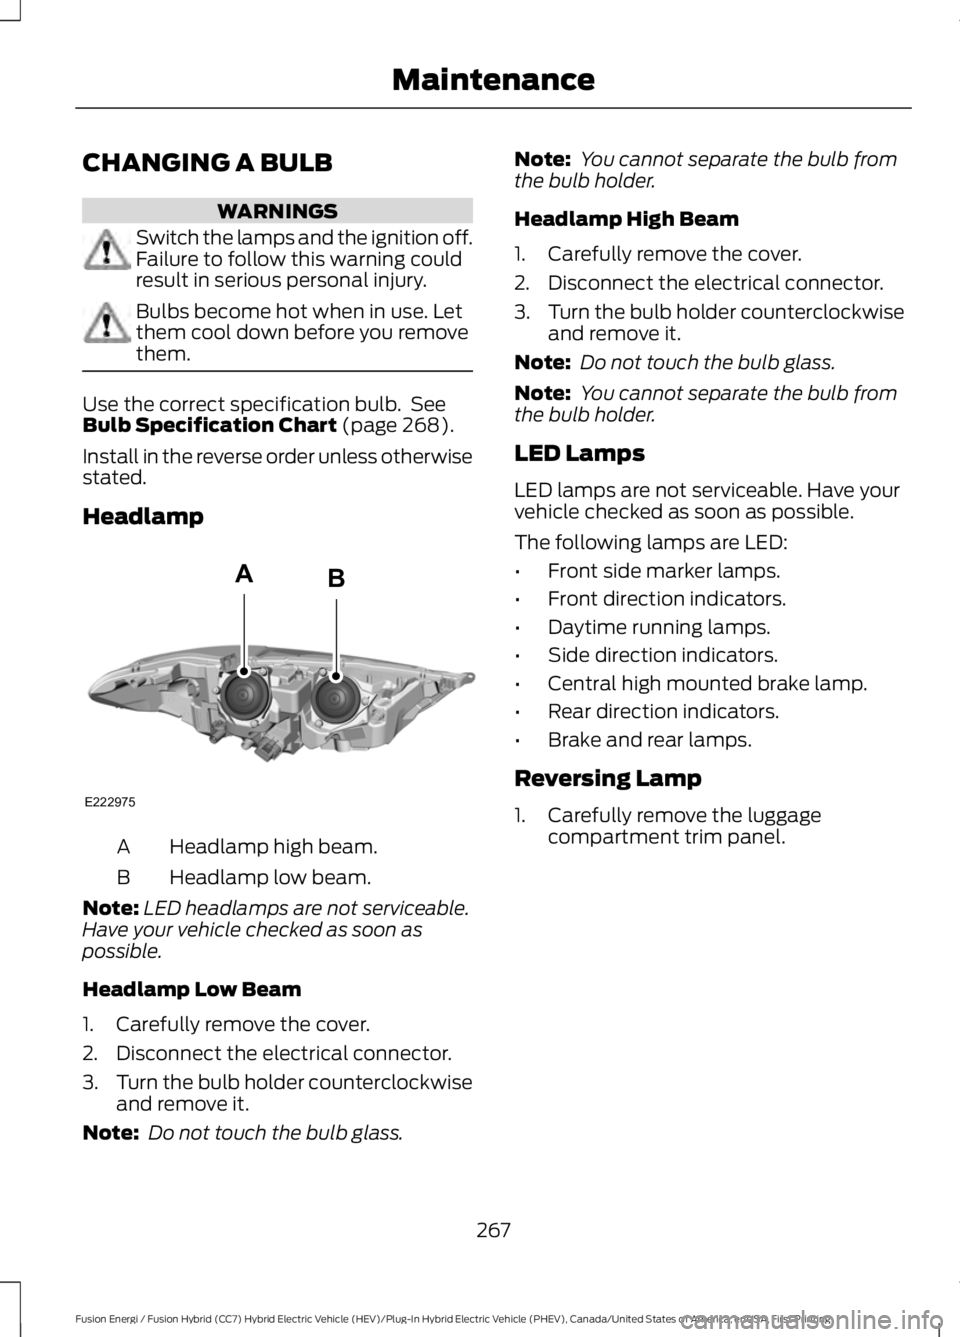
CHANGING A BULB
WARNINGS
Switch the lamps and the ignition off.Failure to follow this warning couldresult in serious personal injury.
Bulbs become hot when in use. Letthem cool down before you removethem.
Use the correct specification bulb. SeeBulb Specification Chart (page 268).
Install in the reverse order unless otherwisestated.
Headlamp
Headlamp high beam.A
Headlamp low beam.B
Note:LED headlamps are not serviceable.Have your vehicle checked as soon aspossible.
Headlamp Low Beam
1. Carefully remove the cover.
2. Disconnect the electrical connector.
3.Turn the bulb holder counterclockwiseand remove it.
Note: Do not touch the bulb glass.
Note: You cannot separate the bulb fromthe bulb holder.
Headlamp High Beam
1. Carefully remove the cover.
2. Disconnect the electrical connector.
3.Turn the bulb holder counterclockwiseand remove it.
Note: Do not touch the bulb glass.
Note: You cannot separate the bulb fromthe bulb holder.
LED Lamps
LED lamps are not serviceable. Have yourvehicle checked as soon as possible.
The following lamps are LED:
•Front side marker lamps.
•Front direction indicators.
•Daytime running lamps.
•Side direction indicators.
•Central high mounted brake lamp.
•Rear direction indicators.
•Brake and rear lamps.
Reversing Lamp
1. Carefully remove the luggagecompartment trim panel.
267
Fusion Energi / Fusion Hybrid (CC7) Hybrid Electric Vehicle (HEV)/Plug-In Hybrid Electric Vehicle (PHEV), Canada/United States of America, enUSA, First Printing
MaintenanceE222975
AB
Page 271 of 516
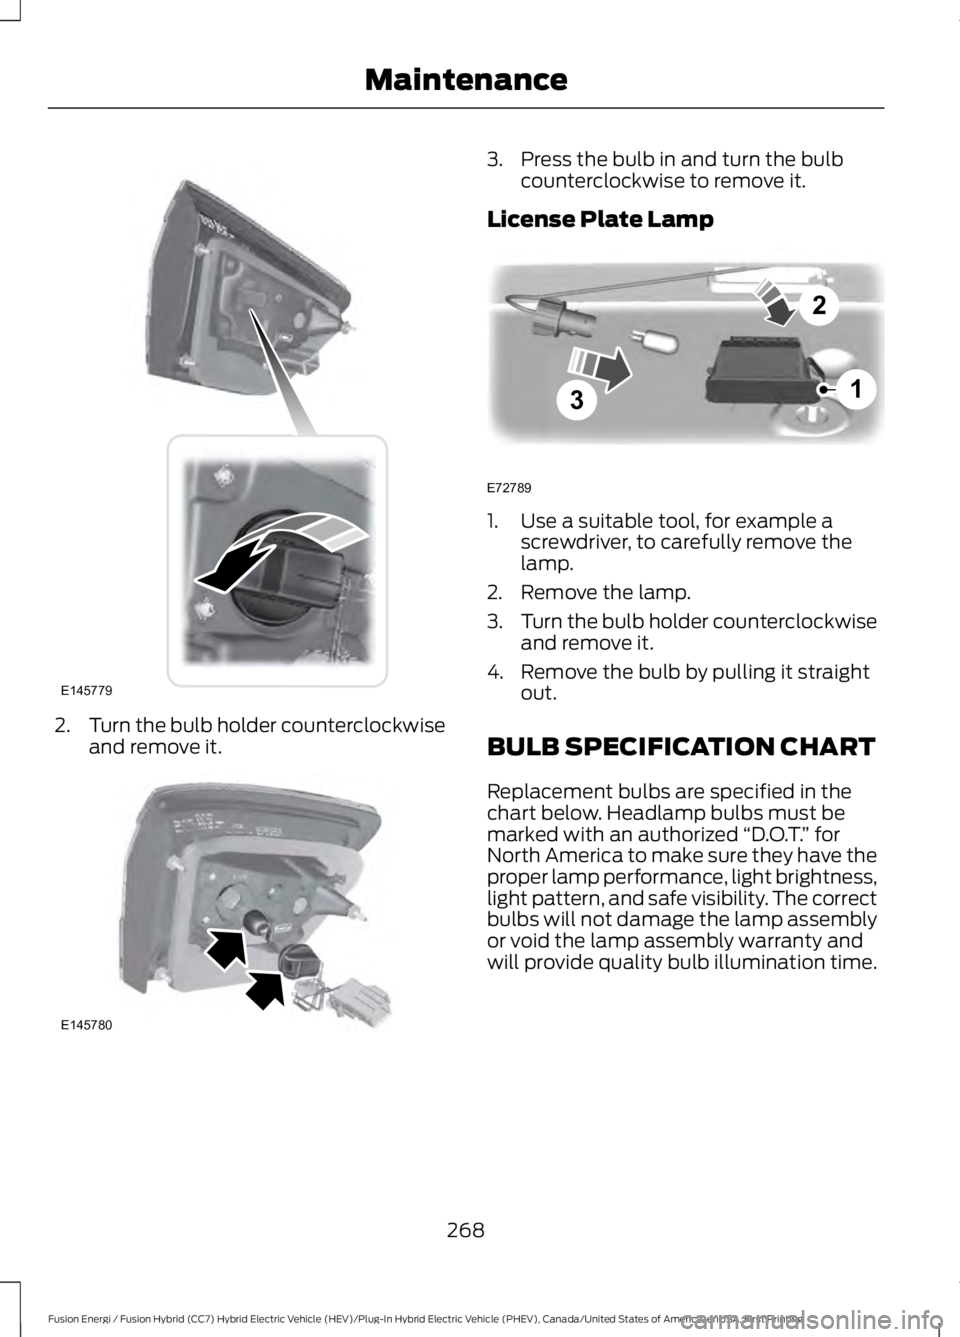
2.Turn the bulb holder counterclockwiseand remove it.
3. Press the bulb in and turn the bulbcounterclockwise to remove it.
License Plate Lamp
1. Use a suitable tool, for example ascrewdriver, to carefully remove thelamp.
2. Remove the lamp.
3.Turn the bulb holder counterclockwiseand remove it.
4. Remove the bulb by pulling it straightout.
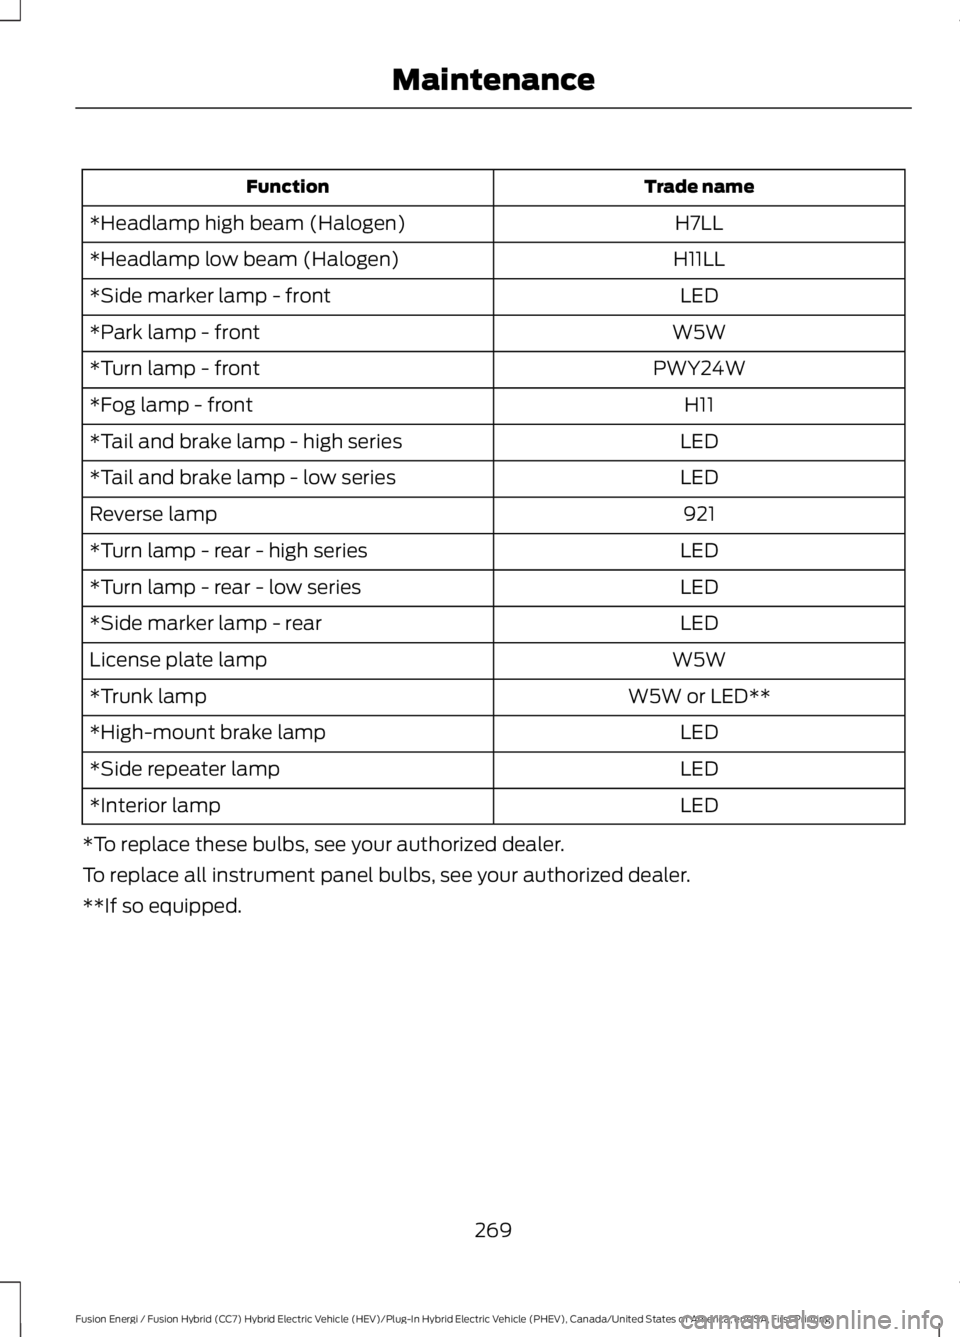
BULB SPECIFICATION CHART
Replacement bulbs are specified in thechart below. Headlamp bulbs must bemarked with an authorized “D.O.T.” forNorth America to make sure they have theproper lamp performance, light brightness,light pattern, and safe visibility. The correctbulbs will not damage the lamp assemblyor void the lamp assembly warranty andwill provide quality bulb illumination time.
268
Fusion Energi / Fusion Hybrid (CC7) Hybrid Electric Vehicle (HEV)/Plug-In Hybrid Electric Vehicle (PHEV), Canada/United States of America, enUSA, First Printing
MaintenanceE145779 E145780 3
2
1
E72789
Page 272 of 516
Trade nameFunction
H7LL*Headlamp high beam (Halogen)
H11LL*Headlamp low beam (Halogen)
LED*Side marker lamp - front
W5W*Park lamp - front
PWY24W*Turn lamp - front
H11*Fog lamp - front
LED*Tail and brake lamp - high series
LED*Tail and brake lamp - low series
921Reverse lamp
LED*Turn lamp - rear - high series
LED*Turn lamp - rear - low series
LED*Side marker lamp - rear
W5WLicense plate lamp
W5W or LED***Trunk lamp
LED*High-mount brake lamp
LED*Side repeater lamp
LED*Interior lamp
*To replace these bulbs, see your authorized dealer.
To replace all instrument panel bulbs, see your authorized dealer.
**If so equipped.
269
Fusion Energi / Fusion Hybrid (CC7) Hybrid Electric Vehicle (HEV)/Plug-In Hybrid Electric Vehicle (PHEV), Canada/United States of America, enUSA, First Printing
Maintenance