buttons FORD FUSION/HYBRID 2018 Owners Manual
[x] Cancel search | Manufacturer: FORD, Model Year: 2018, Model line: FUSION/HYBRID, Model: FORD FUSION/HYBRID 2018Pages: 538, PDF Size: 6.06 MB
Page 64 of 538
LOCKING AND UNLOCKING
You can use the power door lock control
or the remote control to lock and unlock
your vehicle.
Power Door Locks
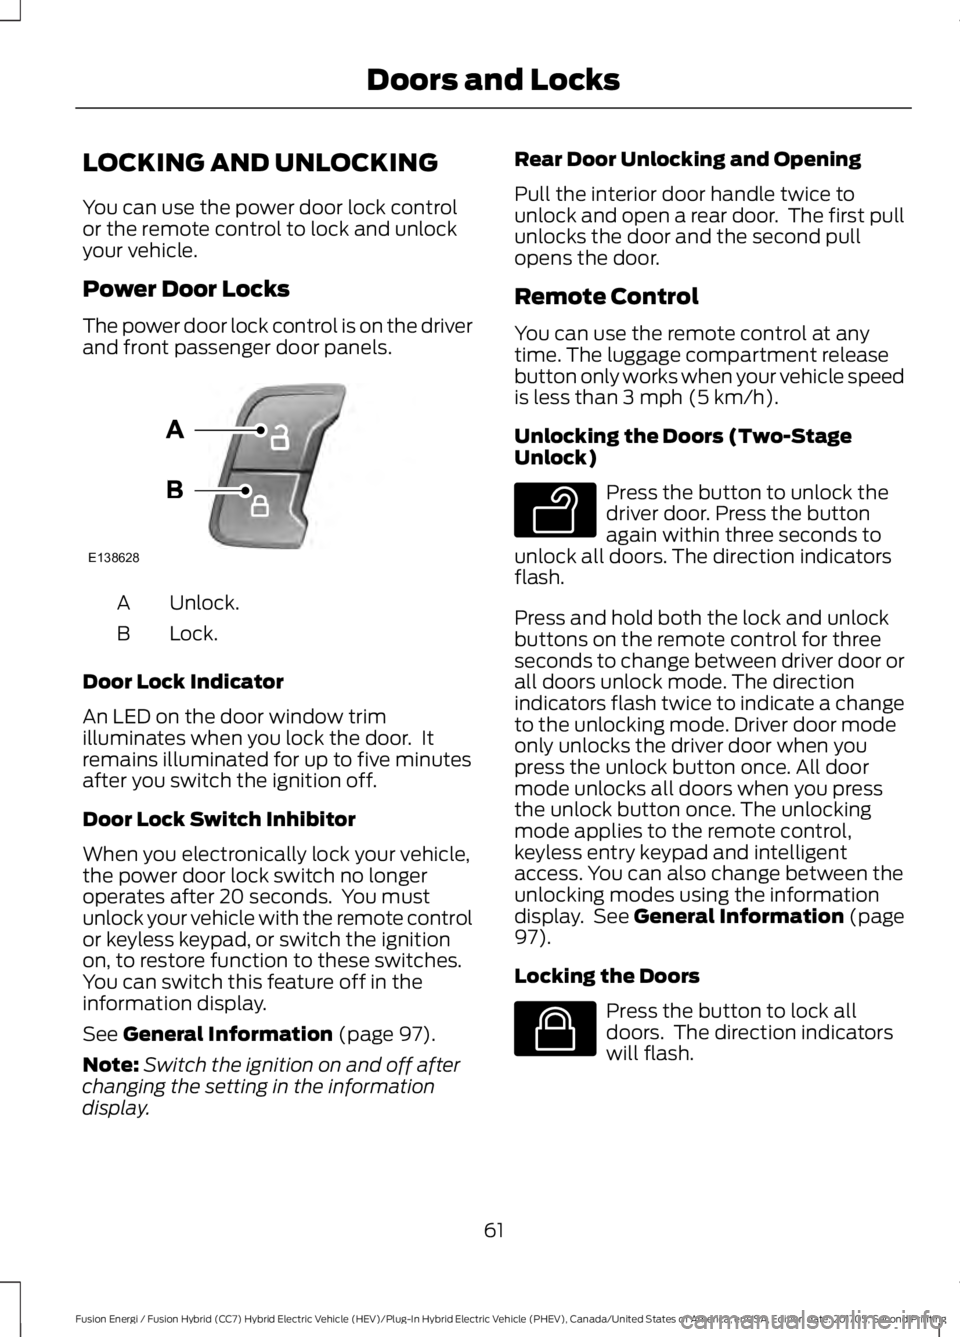
The power door lock control is on the driver
and front passenger door panels.
Unlock.
A
Lock.
B
Door Lock Indicator
An LED on the door window trim
illuminates when you lock the door. It
remains illuminated for up to five minutes
after you switch the ignition off.
Door Lock Switch Inhibitor
When you electronically lock your vehicle,
the power door lock switch no longer
operates after 20 seconds. You must
unlock your vehicle with the remote control
or keyless keypad, or switch the ignition
on, to restore function to these switches.
You can switch this feature off in the
information display.
See General Information (page 97).
Note: Switch the ignition on and off after
changing the setting in the information
display. Rear Door Unlocking and Opening
Pull the interior door handle twice to
unlock and open a rear door. The first pull
unlocks the door and the second pull
opens the door.
Remote Control
You can use the remote control at any
time. The luggage compartment release
button only works when your vehicle speed
is less than
3 mph (5 km/h).
Unlocking the Doors (Two-Stage
Unlock) Press the button to unlock the
driver door. Press the button
again within three seconds to
unlock all doors. The direction indicators
flash.
Press and hold both the lock and unlock
buttons on the remote control for three
seconds to change between driver door or
all doors unlock mode. The direction
indicators flash twice to indicate a change
to the unlocking mode. Driver door mode
only unlocks the driver door when you
press the unlock button once. All door
mode unlocks all doors when you press
the unlock button once. The unlocking
mode applies to the remote control,
keyless entry keypad and intelligent
access. You can also change between the
unlocking modes using the information
display. See
General Information (page
97).
Locking the Doors Press the button to lock all
doors. The direction indicators
will flash.
61
Fusion Energi / Fusion Hybrid (CC7) Hybrid Electric Vehicle (HEV)/Plug-In Hybrid Electric Vehicle (PHEV), Canada/United States of America, enUSA, Edition date: 201705, Second Printing Doors and LocksE138628 E138629 E138623
Page 69 of 538
•
You switch the ignition on.
• You unlock the vehicle using intelligent
access.
Locking and Unlocking the Doors
Locking All Doors
Press and hold 7·8 and 9·0 on the keypad
simultaneously with the driver door closed.
You do not need to enter a code first.
Unlocking Only the Driver Door
Enter the factory-set or your personal
five-digit code. You must press each
number within five seconds of each other.
The interior lamps illuminate.
Note: All doors unlock if you switch on the
all door unlocking mode. See Locking and
Unlocking (page 61).
Unlocking All Doors
Enter the factory-set code or your personal
code, then press
3·4 on the keypad within
five seconds.
Opening the Luggage Compartment
Enter the factory-set code or your personal
code, then press
5·6 on the keypad within
five seconds.
Displaying the Factory-Set Code
Note: You need to have two programmed
keys for this procedure.
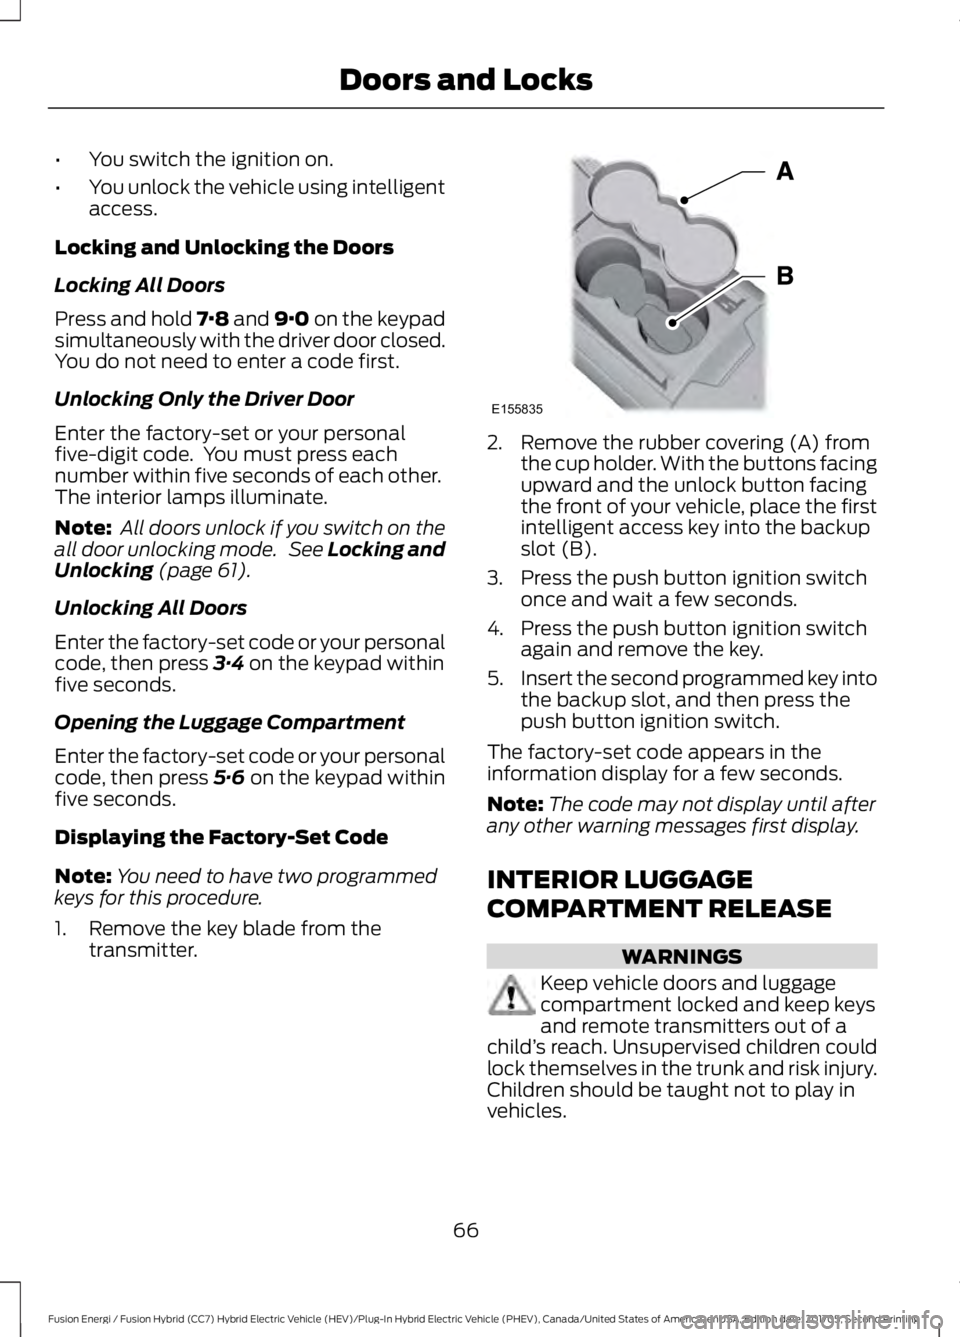
1. Remove the key blade from the transmitter. 2. Remove the rubber covering (A) from
the cup holder. With the buttons facing
upward and the unlock button facing
the front of your vehicle, place the first
intelligent access key into the backup
slot (B).
3. Press the push button ignition switch once and wait a few seconds.
4. Press the push button ignition switch again and remove the key.
5. Insert the second programmed key into
the backup slot, and then press the
push button ignition switch.
The factory-set code appears in the
information display for a few seconds.
Note: The code may not display until after
any other warning messages first display.
INTERIOR LUGGAGE
COMPARTMENT RELEASE WARNINGS
Keep vehicle doors and luggage
compartment locked and keep keys
and remote transmitters out of a
child ’s reach. Unsupervised children could
lock themselves in the trunk and risk injury.
Children should be taught not to play in
vehicles.
66
Fusion Energi / Fusion Hybrid (CC7) Hybrid Electric Vehicle (HEV)/Plug-In Hybrid Electric Vehicle (PHEV), Canada/United States of America, enUSA, Edition date: 201705, Second Printing Doors and LocksE155835
Page 72 of 538
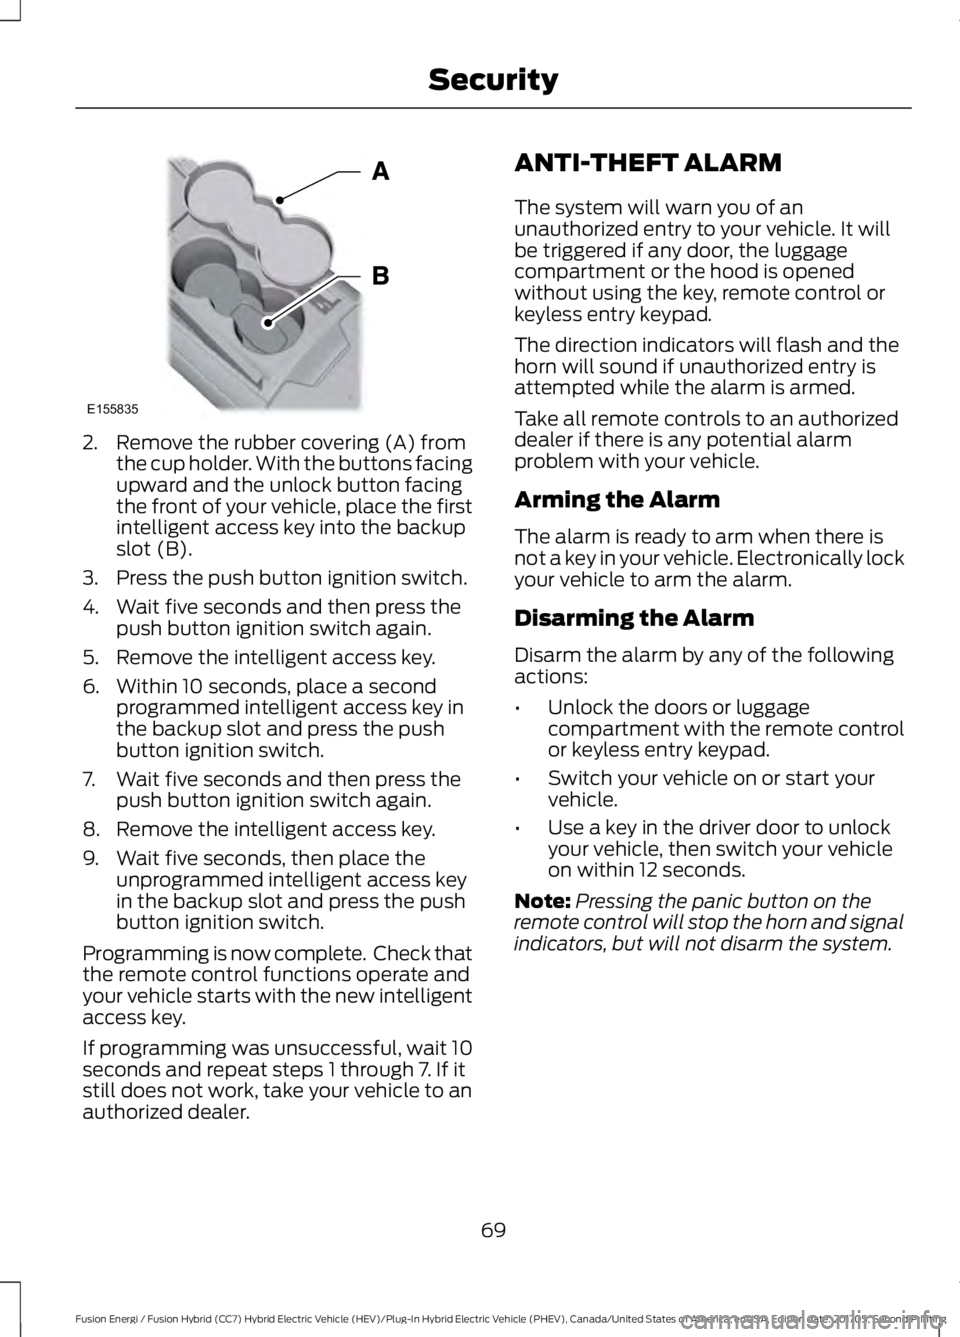
2. Remove the rubber covering (A) from
the cup holder. With the buttons facing
upward and the unlock button facing
the front of your vehicle, place the first
intelligent access key into the backup
slot (B).
3. Press the push button ignition switch.
4. Wait five seconds and then press the push button ignition switch again.
5. Remove the intelligent access key.
6. Within 10 seconds, place a second programmed intelligent access key in
the backup slot and press the push
button ignition switch.
7. Wait five seconds and then press the push button ignition switch again.
8. Remove the intelligent access key.
9. Wait five seconds, then place the unprogrammed intelligent access key
in the backup slot and press the push
button ignition switch.
Programming is now complete. Check that
the remote control functions operate and
your vehicle starts with the new intelligent
access key.
If programming was unsuccessful, wait 10
seconds and repeat steps 1 through 7. If it
still does not work, take your vehicle to an
authorized dealer. ANTI-THEFT ALARM
The system will warn you of an
unauthorized entry to your vehicle. It will
be triggered if any door, the luggage
compartment or the hood is opened
without using the key, remote control or
keyless entry keypad.
The direction indicators will flash and the
horn will sound if unauthorized entry is
attempted while the alarm is armed.
Take all remote controls to an authorized
dealer if there is any potential alarm
problem with your vehicle.
Arming the Alarm
The alarm is ready to arm when there is
not a key in your vehicle. Electronically lock
your vehicle to arm the alarm.
Disarming the Alarm
Disarm the alarm by any of the following
actions:
•
Unlock the doors or luggage
compartment with the remote control
or keyless entry keypad.
• Switch your vehicle on or start your
vehicle.
• Use a key in the driver door to unlock
your vehicle, then switch your vehicle
on within 12 seconds.
Note: Pressing the panic button on the
remote control will stop the horn and signal
indicators, but will not disarm the system.
69
Fusion Energi / Fusion Hybrid (CC7) Hybrid Electric Vehicle (HEV)/Plug-In Hybrid Electric Vehicle (PHEV), Canada/United States of America, enUSA, Edition date: 201705, Second Printing SecurityE155835
Page 100 of 538
GENERAL INFORMATION
WARNING
Driving while distracted can result in
loss of vehicle control, crash and
injury. We strongly recommend that
you use extreme caution when using any
device that may take your focus off the
road. Your primary responsibility is the safe
operation of your vehicle. We recommend
against the use of any hand-held device
while driving and encourage the use of
voice-operated systems when possible.
Make sure you are aware of all applicable
local laws that may affect the use of
electronic devices while driving. Various systems on your vehicle can be
controlled using the information display
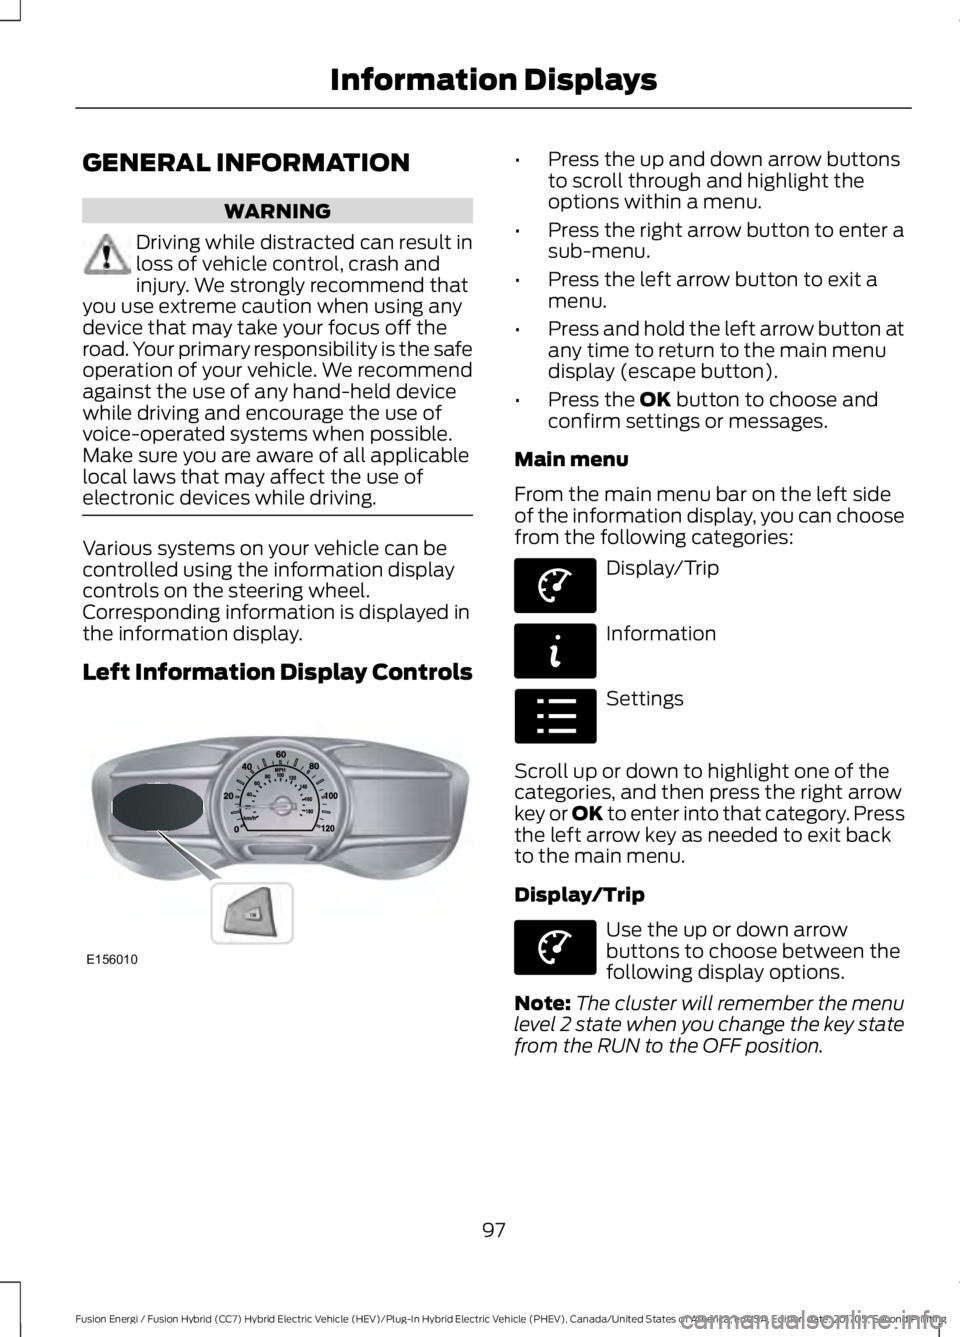
controls on the steering wheel.
Corresponding information is displayed in
the information display.
Left Information Display Controls •
Press the up and down arrow buttons
to scroll through and highlight the
options within a menu.
• Press the right arrow button to enter a
sub-menu.
• Press the left arrow button to exit a
menu.
• Press and hold the left arrow button at
any time to return to the main menu
display (escape button).
• Press the OK button to choose and
confirm settings or messages.
Main menu
From the main menu bar on the left side
of the information display, you can choose
from the following categories: Display/Trip
Information
Settings
Scroll up or down to highlight one of the
categories, and then press the right arrow
key or OK to enter into that category. Press
the left arrow key as needed to exit back
to the main menu.
Display/Trip Use the up or down arrow
buttons to choose between the
following display options.
Note: The cluster will remember the menu
level 2 state when you change the key state
from the RUN to the OFF position.
97
Fusion Energi / Fusion Hybrid (CC7) Hybrid Electric Vehicle (HEV)/Plug-In Hybrid Electric Vehicle (PHEV), Canada/United States of America, enUSA, Edition date: 201705, Second Printing Information DisplaysE156010 E144639 E144642 E100023 E144639
Page 104 of 538
Fuel Economy (Energi only)
This display is only available in Hybrid
Mode. In Plug-in Power Mode the display
changes to Miles (or km)/Full Charge.
An Instant Fuel Economy gauge is provided
along with Avg Fuel Economy. While
viewing this screen you can reset your
average fuel economy by pressing and
holding the OK button on the left hand
steering wheel controls. For more
information see Common Displays in this
chapter.
Trip 1 & 2
Provides trip odometer, trip average fuel
economy and trip timer.
Distance traveled on battery power only
with the engine off is shown in blue next
to total trip distance.
For Energi vehicles total plug-in electricity
used in kilowatt hours (kWh) is shown in
blue next to trip average fuel economy.
Information In this mode, you can view
different vehicle system
information and perform a
system check. Information
Displays a number of different system tutorials. Use the
up or down arrows to scroll through the tutorials. Then
press OK to view.
Tutorial
Warnings
Displays the associated driver alert graphic.
Driver Alert
MyKeys (Number of MyKeys programmed)
MyKey
MyKey Miles (km) (Distance traveled using a
programmed MyKey)
Admin Keys (Number of admin keys)
All active warnings will display first if applicable. The
system check menu may appear different based upon
equipment options and current vehicle status. Use the
up or down arrow buttons to scroll through the list.
System Check
Settings In this mode, you can configure
different driver setting choices.
Note:
Some items are optional and may
not appear.
Note: Some MyKey items will only appear
if a MyKey is set.
101
Fusion Energi / Fusion Hybrid (CC7) Hybrid Electric Vehicle (HEV)/Plug-In Hybrid Electric Vehicle (PHEV), Canada/United States of America, enUSA, Edition date: 201705, Second Printing Information DisplaysE144642 E100023
Page 107 of 538
Settings
Miles & GAL, l/100km or km/L
Distance
Units
Fahrenheit (°F) or Celsius (°C)
Temperature
psi, kPa or bar
Tire Pressure
On or Off
Brake Coach
On or Off
Battery
Display
On or Off
Regen Display
Hold OK to Reset
Driving History
* Energi only.
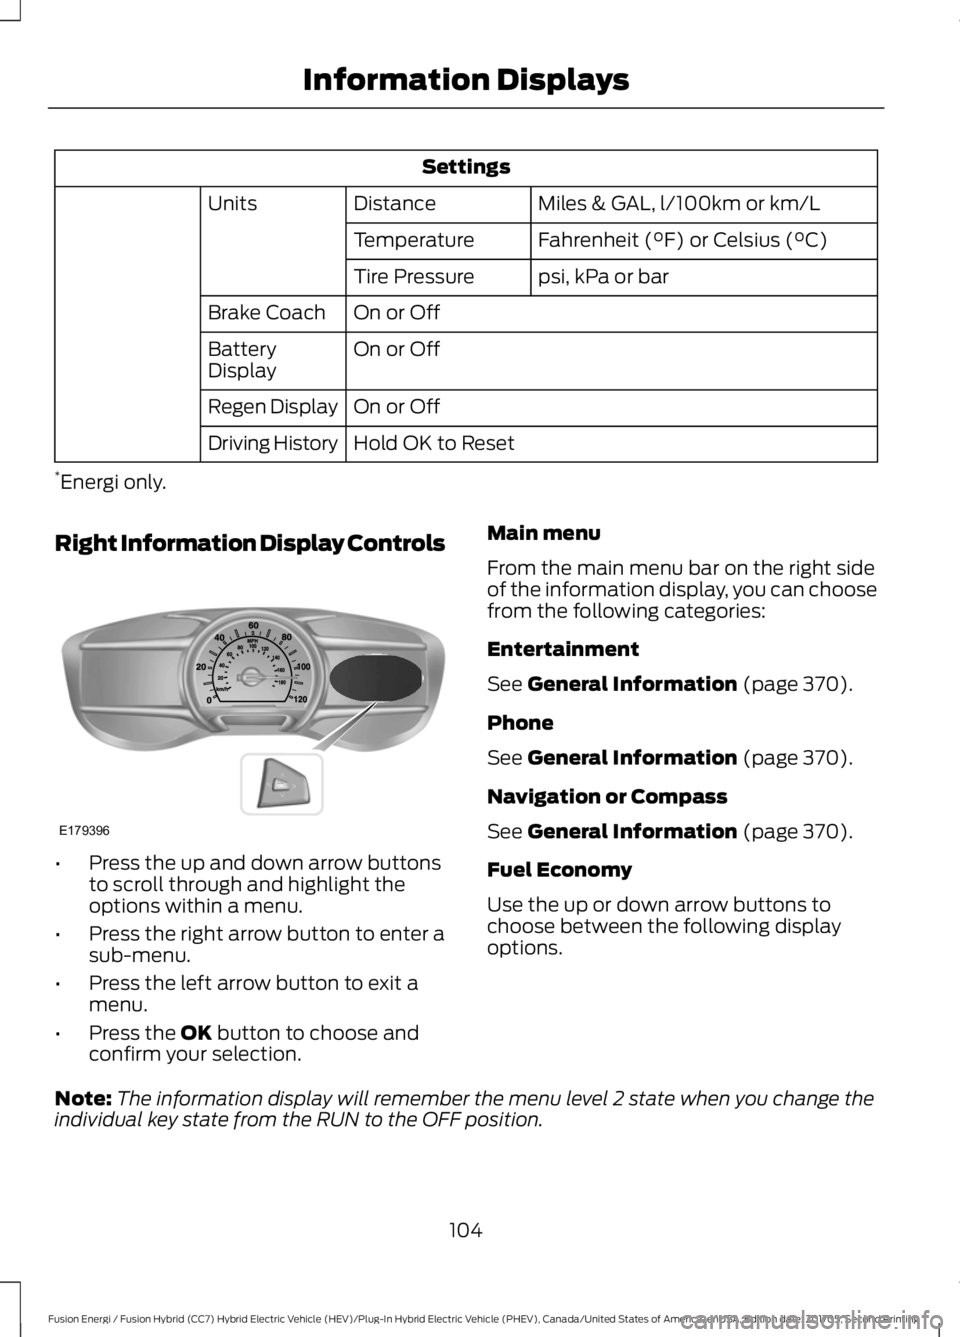
Right Information Display Controls •
Press the up and down arrow buttons
to scroll through and highlight the
options within a menu.
• Press the right arrow button to enter a
sub-menu.
• Press the left arrow button to exit a
menu.
• Press the OK button to choose and
confirm your selection. Main menu
From the main menu bar on the right side
of the information display, you can choose
from the following categories:
Entertainment
See
General Information (page 370).
Phone
See
General Information (page 370).
Navigation or Compass
See
General Information (page 370).
Fuel Economy
Use the up or down arrow buttons to
choose between the following display
options.
Note: The information display will remember the menu level 2 state when you change the
individual key state from the RUN to the OFF position.
104
Fusion Energi / Fusion Hybrid (CC7) Hybrid Electric Vehicle (HEV)/Plug-In Hybrid Electric Vehicle (PHEV), Canada/United States of America, enUSA, Edition date: 201705, Second Printing Information DisplaysE179396
Page 127 of 538
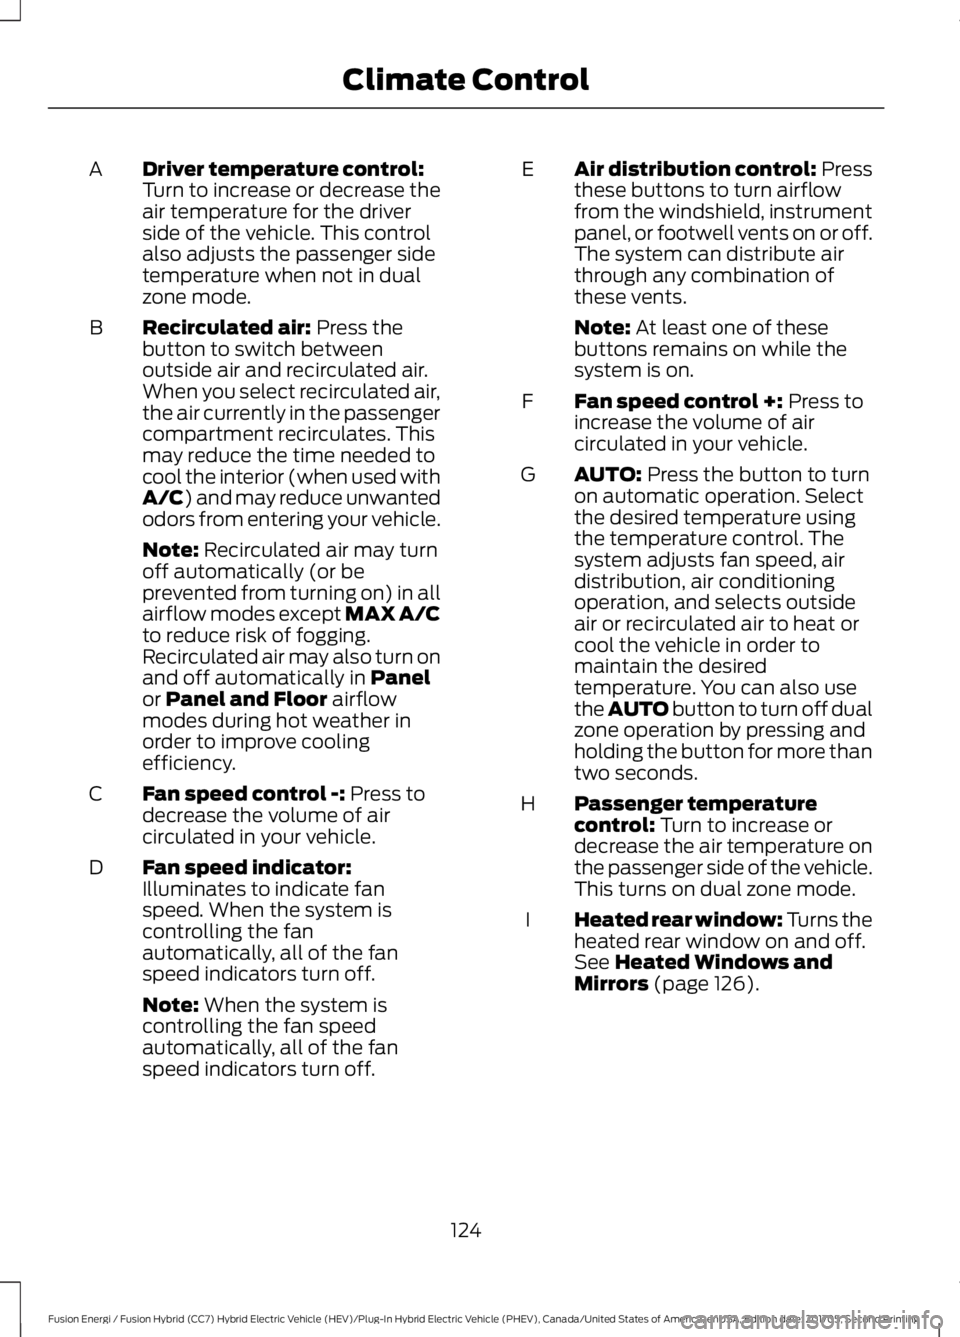
Driver temperature control:
Turn to increase or decrease the
air temperature for the driver
side of the vehicle. This control
also adjusts the passenger side
temperature when not in dual
zone mode.
A
Recirculated air: Press the
button to switch between
outside air and recirculated air.
When you select recirculated air,
the air currently in the passenger
compartment recirculates. This
may reduce the time needed to
cool the interior (when used with
A/C
) and may reduce unwanted
odors from entering your vehicle.
B
Note:
Recirculated air may turn
off automatically (or be
prevented from turning on) in all
airflow modes except MAX A/C
to reduce risk of fogging.
Recirculated air may also turn on
and off automatically in
Panel
or Panel and Floor airflow
modes during hot weather in
order to improve cooling
efficiency.
Fan speed control -:
Press to
decrease the volume of air
circulated in your vehicle.
C
Fan speed indicator:
Illuminates to indicate fan
speed. When the system is
controlling the fan
automatically, all of the fan
speed indicators turn off.
D
Note:
When the system is
controlling the fan speed
automatically, all of the fan
speed indicators turn off. Air distribution control: Press
these buttons to turn airflow
from the windshield, instrument
panel, or footwell vents on or off.
The system can distribute air
through any combination of
these vents.
E
Note:
At least one of these
buttons remains on while the
system is on.
Fan speed control +:
Press to
increase the volume of air
circulated in your vehicle.
F
AUTO:
Press the button to turn
on automatic operation. Select
the desired temperature using
the temperature control. The
system adjusts fan speed, air
distribution, air conditioning
G
operation, and selects outside
air or recirculated air to heat or
cool the vehicle in order to
maintain the desired
temperature. You can also use
the AUTO button to turn off dual
zone operation by pressing and
holding the button for more than
two seconds.
Passenger temperature
control:
Turn to increase or
decrease the air temperature on
the passenger side of the vehicle.
This turns on dual zone mode.
H
Heated rear window: Turns the
heated rear window on and off.
See
Heated Windows and
Mirrors (page 126).
I
124
Fusion Energi / Fusion Hybrid (CC7) Hybrid Electric Vehicle (HEV)/Plug-In Hybrid Electric Vehicle (PHEV), Canada/United States of America, enUSA, Edition date: 201705, Second Printing Climate Control
Page 132 of 538
Note:
Adjust the seat backrest to an upright
driving position before adjusting the head
restraint. Adjust the head restraint so that
the top of it is level with the top of your head
and as far forward as possible. Make sure
that you remain comfortable. If you are
extremely tall, adjust the head restraint to
its highest position.
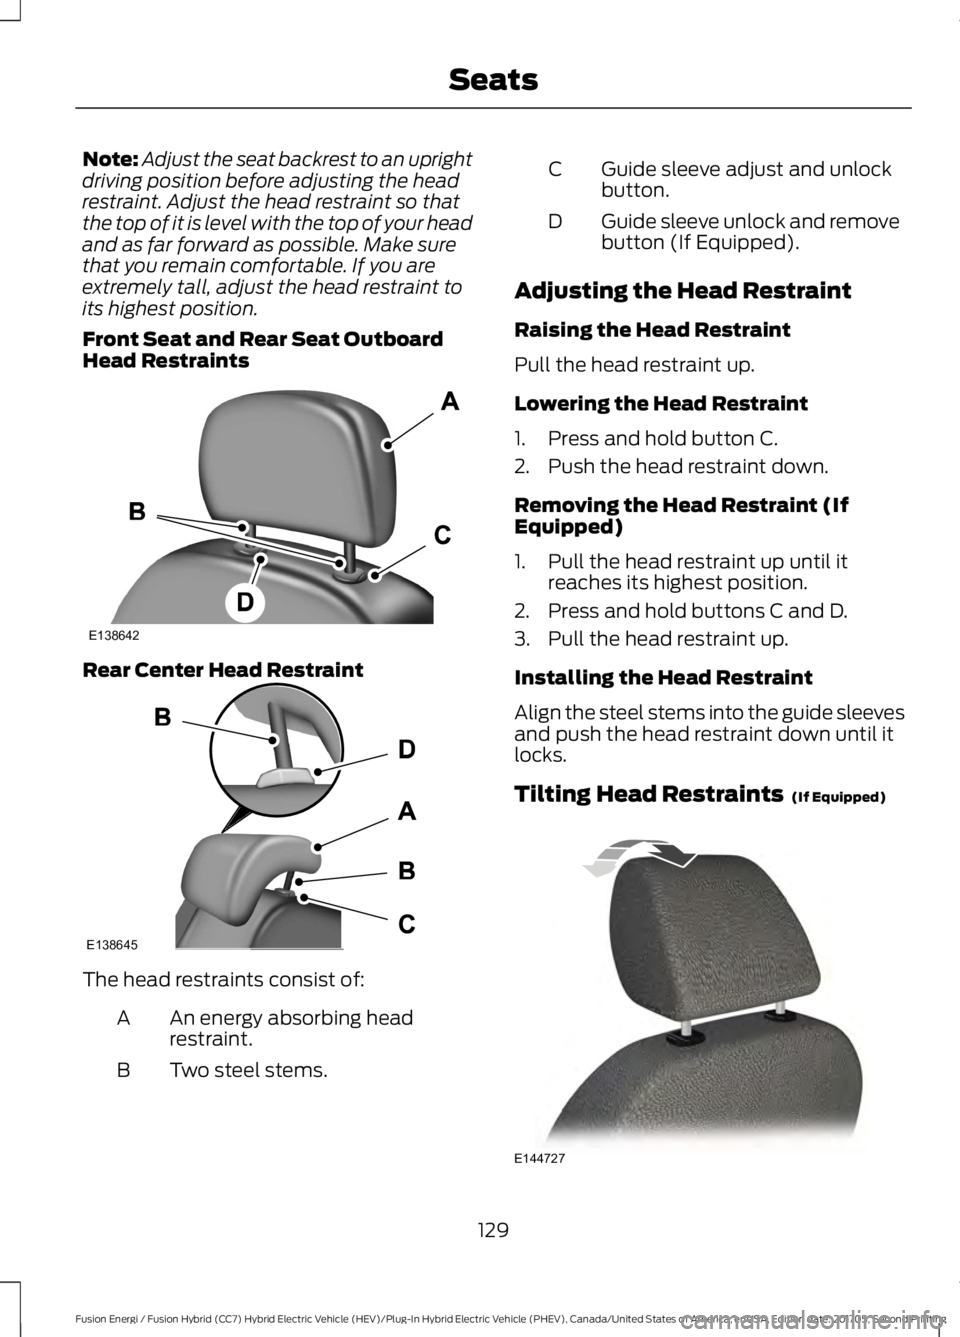
Front Seat and Rear Seat Outboard
Head Restraints Rear Center Head Restraint
The head restraints consist of:
An energy absorbing head
restraint.
A
Two steel stems.
B Guide sleeve adjust and unlock
button.
C
Guide sleeve unlock and remove
button (If Equipped).
D
Adjusting the Head Restraint
Raising the Head Restraint
Pull the head restraint up.
Lowering the Head Restraint
1. Press and hold button C.
2. Push the head restraint down.
Removing the Head Restraint (If
Equipped)
1. Pull the head restraint up until it reaches its highest position.
2. Press and hold buttons C and D.
3. Pull the head restraint up.
Installing the Head Restraint
Align the steel stems into the guide sleeves
and push the head restraint down until it
locks.
Tilting Head Restraints (If Equipped) 129
Fusion Energi / Fusion Hybrid (CC7) Hybrid Electric Vehicle (HEV)/Plug-In Hybrid Electric Vehicle (PHEV), Canada/United States of America, enUSA, Edition date: 201705, Second Printing SeatsE138642 E138645 E144727
Page 140 of 538
HomeLink Wireless Control
System
WARNINGS
Make sure that the garage door and
security device are free from
obstruction when you are
programming. Do not program the system
with the vehicle in the garage. Do not use the system with any
garage door opener that does not
have the safety stop and reverse
feature as required by U.S. Federal Safety
Standards (this includes any garage door
opener manufactured before April 1, 1982).
A garage door opener which cannot detect
an object, signaling the door to stop and
reverse, does not meet current federal
safety standards. Using a garage door
opener without these features increases
the risk of serious injury or death. Note:
Make sure you keep the original
remote control transmitter for use in other
vehicles as well as for future system
programming.
Note: We recommend that upon the sale
or lease termination of your vehicle, you
erase the programmed function buttons for
security reasons. See Erasing the Function
Button Codes.
Note: You can program a maximum of
three devices. To change or replace any of
the three devices after it has been initially
programmed, you must first erase the
current settings. See Erasing the Function
Button Codes
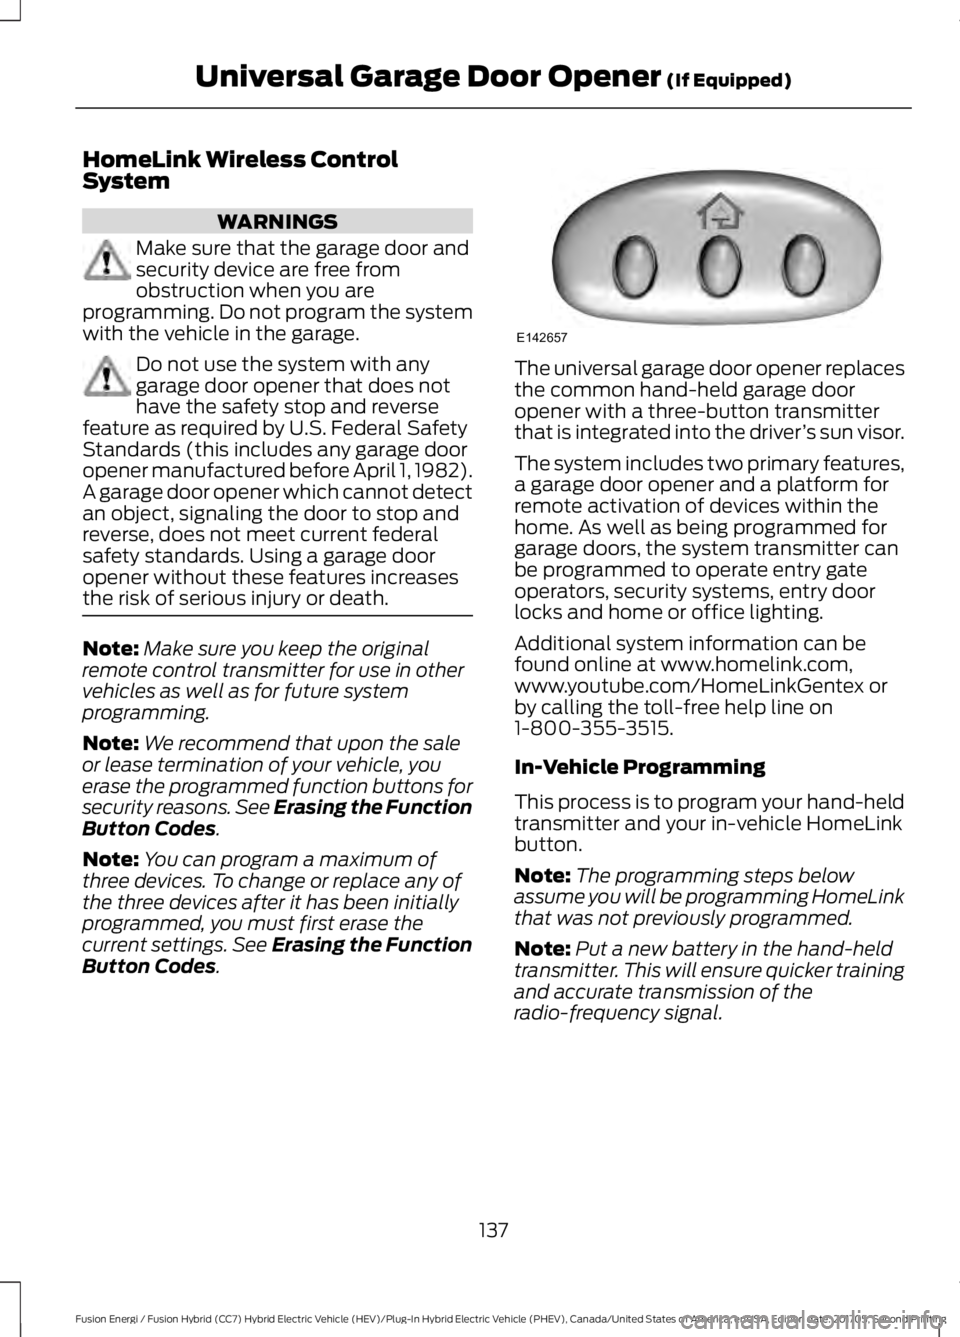
. The universal garage door opener replaces
the common hand-held garage door
opener with a three-button transmitter
that is integrated into the driver
’s sun visor.
The system includes two primary features,
a garage door opener and a platform for
remote activation of devices within the
home. As well as being programmed for
garage doors, the system transmitter can
be programmed to operate entry gate
operators, security systems, entry door
locks and home or office lighting.
Additional system information can be
found online at www.homelink.com,
www.youtube.com/HomeLinkGentex or
by calling the toll-free help line on
1-800-355-3515.
In-Vehicle Programming
This process is to program your hand-held
transmitter and your in-vehicle HomeLink
button.
Note: The programming steps below
assume you will be programming HomeLink
that was not previously programmed.
Note: Put a new battery in the hand-held
transmitter. This will ensure quicker training
and accurate transmission of the
radio-frequency signal.
137
Fusion Energi / Fusion Hybrid (CC7) Hybrid Electric Vehicle (HEV)/Plug-In Hybrid Electric Vehicle (PHEV), Canada/United States of America, enUSA, Edition date: 201705, Second Printing Universal Garage Door Opener
(If Equipped)E142657
Page 141 of 538
1.
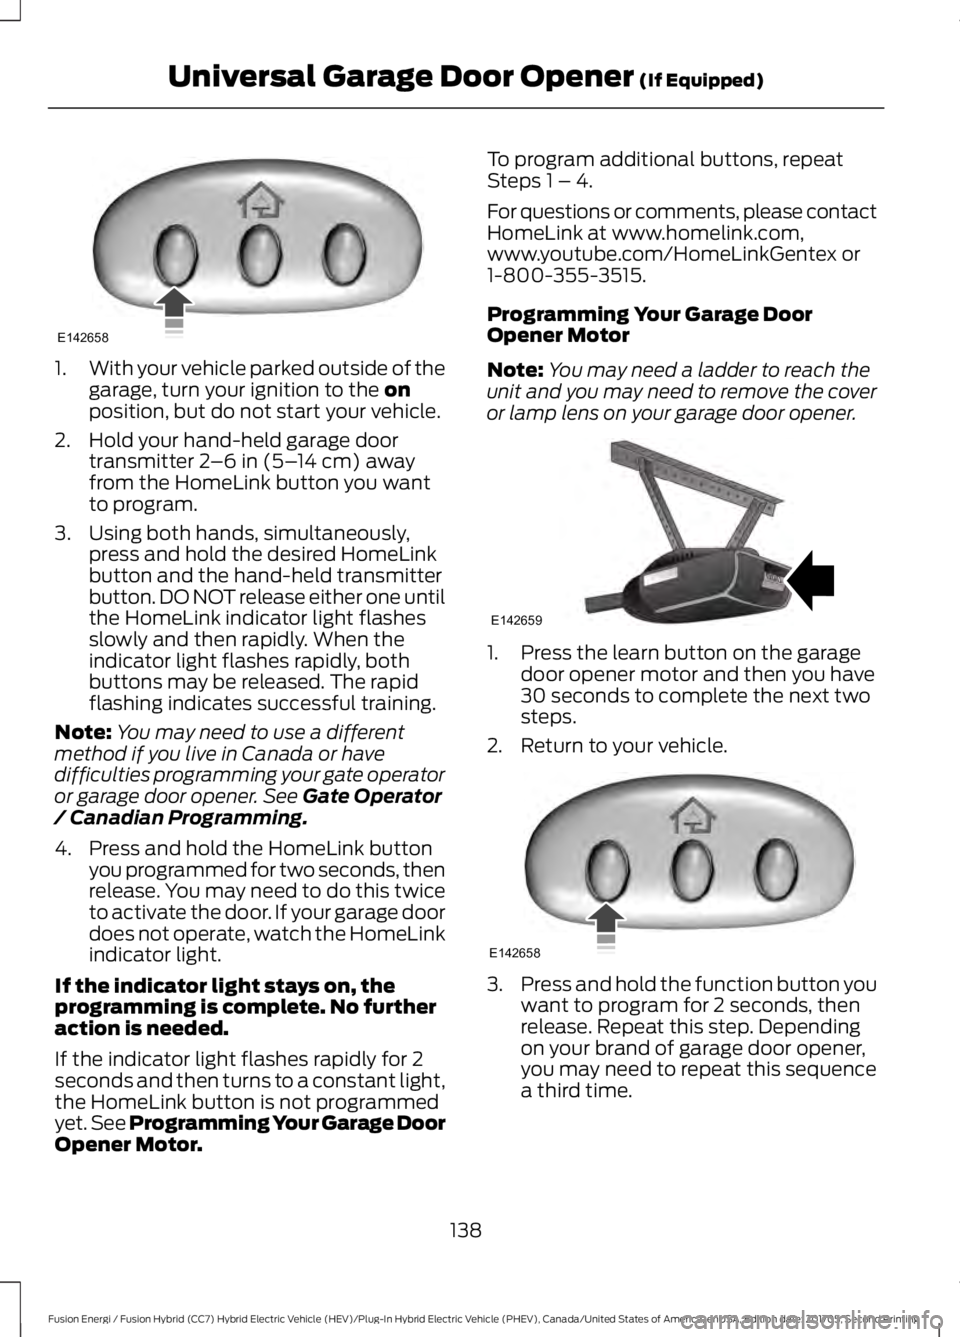
With your vehicle parked outside of the
garage, turn your ignition to the on
position, but do not start your vehicle.
2. Hold your hand-held garage door transmitter
2–6 in (5– 14 cm) away
from the HomeLink button you want
to program.
3. Using both hands, simultaneously, press and hold the desired HomeLink
button and the hand-held transmitter
button. DO NOT release either one until
the HomeLink indicator light flashes
slowly and then rapidly. When the
indicator light flashes rapidly, both
buttons may be released. The rapid
flashing indicates successful training.
Note: You may need to use a different
method if you live in Canada or have
difficulties programming your gate operator
or garage door opener. See
Gate Operator
/ Canadian Programming.
4. Press and hold the HomeLink button you programmed for two seconds, then
release. You may need to do this twice
to activate the door. If your garage door
does not operate, watch the HomeLink
indicator light.
If the indicator light stays on, the
programming is complete. No further
action is needed.
If the indicator light flashes rapidly for 2
seconds and then turns to a constant light,
the HomeLink button is not programmed
yet. See Programming Your Garage Door
Opener Motor. To program additional buttons, repeat
Steps 1 – 4.
For questions or comments, please contact
HomeLink at www.homelink.com,
www.youtube.com/HomeLinkGentex or
1-800-355-3515.
Programming Your Garage Door
Opener Motor
Note:
You may need a ladder to reach the
unit and you may need to remove the cover
or lamp lens on your garage door opener. 1. Press the learn button on the garage
door opener motor and then you have
30 seconds to complete the next two
steps.
2. Return to your vehicle. 3.
Press and hold the function button you
want to program for 2 seconds, then
release. Repeat this step. Depending
on your brand of garage door opener,
you may need to repeat this sequence
a third time.
138
Fusion Energi / Fusion Hybrid (CC7) Hybrid Electric Vehicle (HEV)/Plug-In Hybrid Electric Vehicle (PHEV), Canada/United States of America, enUSA, Edition date: 201705, Second Printing Universal Garage Door Opener
(If Equipped)E142658 E142659 E142658