AUX FORD GRANADA 1985 Service User Guide
[x] Cancel search | Manufacturer: FORD, Model Year: 1985, Model line: GRANADA, Model: FORD GRANADA 1985Pages: 255, PDF Size: 14.98 MB
Page 32 of 255
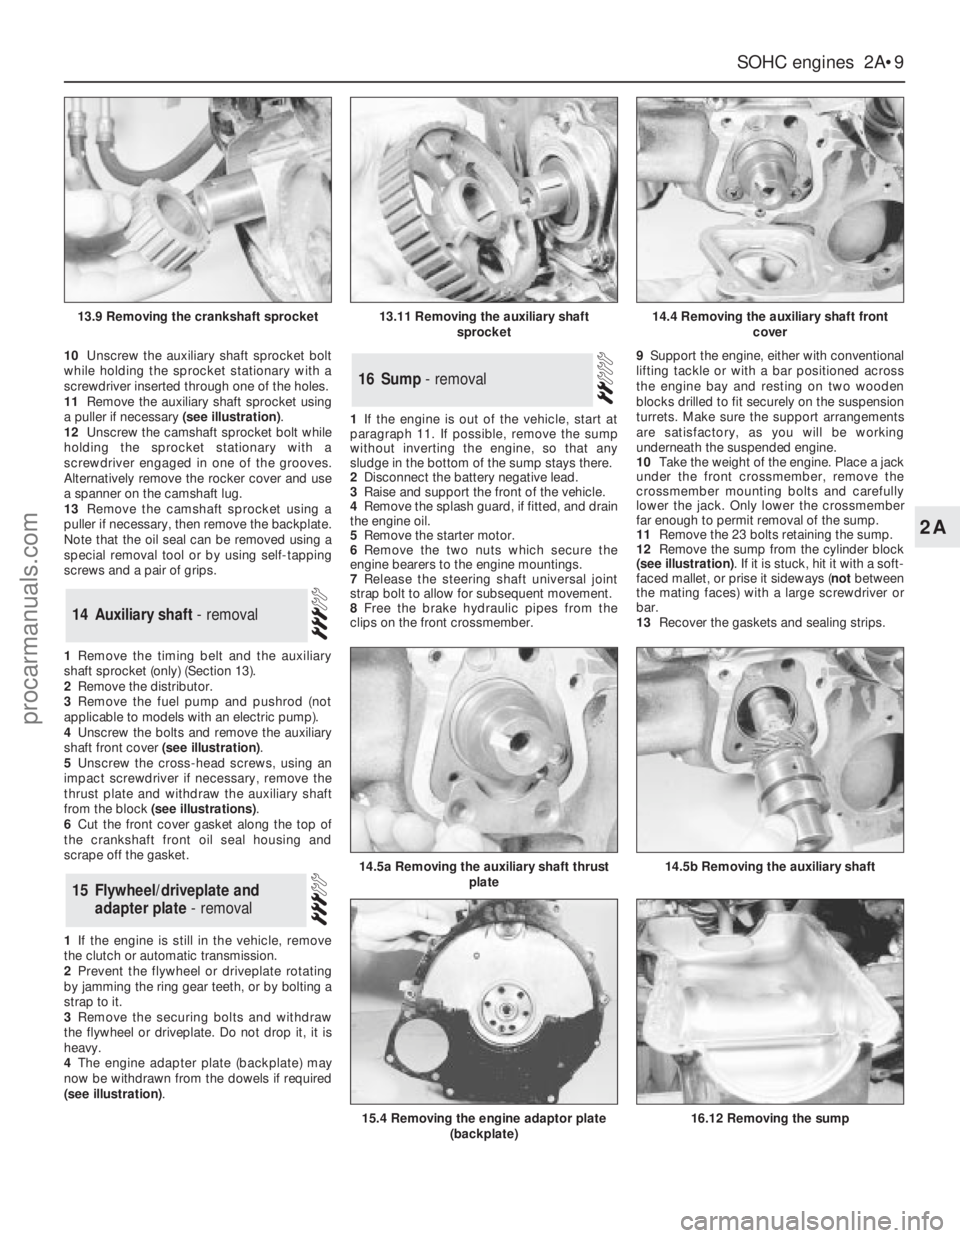
10Unscrew the auxiliary shaft sprocket bolt
while holding the sprocket stationary with a
screwdriver inserted through one of the holes.
11Remove the auxiliary shaft sprocket using
a puller if necessary (see illustration).
12Unscrew the camshaft sprocket bolt while
holding the sprocket stationary with a
screwdriver engaged in one of the grooves.
Alternatively remove the rocker cover and use
a spanner on the camshaft lug.
13Remove the camshaft sprocket using a
puller if necessary, then remove the backplate.
Note that the oil seal can be removed using a
special removal tool or by using self-tapping
screws and a pair of grips.
1Remove the timing belt and the auxiliary
shaft sprocket (only) (Section 13).
2Remove the distributor.
3Remove the fuel pump and pushrod (not
applicable to models with an electric pump).
4Unscrew the bolts and remove the auxiliary
shaft front cover (see illustration).
5Unscrew the cross-head screws, using an
impact screwdriver if necessary, remove the
thrust plate and withdraw the auxiliary shaft
from the block (see illustrations).
6Cut the front cover gasket along the top of
the crankshaft front oil seal housing and
scrape off the gasket.
1If the engine is still in the vehicle, remove
the clutch or automatic transmission.
2Prevent the flywheel or driveplate rotating
by jamming the ring gear teeth, or by bolting a
strap to it.
3Remove the securing bolts and withdraw
the flywheel or driveplate. Do not drop it, it is
heavy.
4The engine adapter plate (backplate) may
now be withdrawn from the dowels if required
(see illustration).1If the engine is out of the vehicle, start at
paragraph 11. If possible, remove the sump
without inverting the engine, so that any
sludge in the bottom of the sump stays there.
2Disconnect the battery negative lead.
3Raise and support the front of the vehicle.
4Remove the splash guard, if fitted, and drain
the engine oil.
5Remove the starter motor.
6Remove the two nuts which secure the
engine bearers to the engine mountings.
7Release the steering shaft universal joint
strap bolt to allow for subsequent movement.
8Free the brake hydraulic pipes from the
clips on the front crossmember.9Support the engine, either with conventional
lifting tackle or with a bar positioned across
the engine bay and resting on two wooden
blocks drilled to fit securely on the suspension
turrets. Make sure the support arrangements
are satisfactory, as you will be working
underneath the suspended engine.
10Take the weight of the engine. Place a jack
under the front crossmember, remove the
crossmember mounting bolts and carefully
lower the jack. Only lower the crossmember
far enough to permit removal of the sump.
11Remove the 23 bolts retaining the sump.
12Remove the sump from the cylinder block
(see illustration). If it is stuck, hit it with a soft-
faced mallet, or prise it sideways (notbetween
the mating faces) with a large screwdriver or
bar.
13Recover the gaskets and sealing strips.
16Sump - removal
15Flywheel/driveplate and
adapter plate - removal
14Auxiliary shaft - removal
SOHCengines 2A•9
2A
13.9 Removing the crankshaft sprocket13.11 Removing the auxiliary shaft
sprocket14.4 Removing the auxiliary shaft front
cover
14.5b Removing the auxiliary shaft14.5a Removing the auxiliary shaft thrust
plate
15.4 Removing the engine adaptor plate
(backplate)16.12 Removing the sump
procarmanuals.com
Page 33 of 255
1Remove the timing belt and the crankshaft
sprocket (only).
2If an oil seal removal tool is available. the oil
seal can be removed at this stage. It may also
be possible to remove the oil seal by drilling
the outer face and using self-tapping screws
and a pair of grips.
3If the oil seal cannot be removed as
described in paragraph 2, remove the sump.
Also remove the auxiliary shaft sprocket.
Unbolt the oil seal housing and auxiliary shaft
front cover and remove the gasket. The oil seal
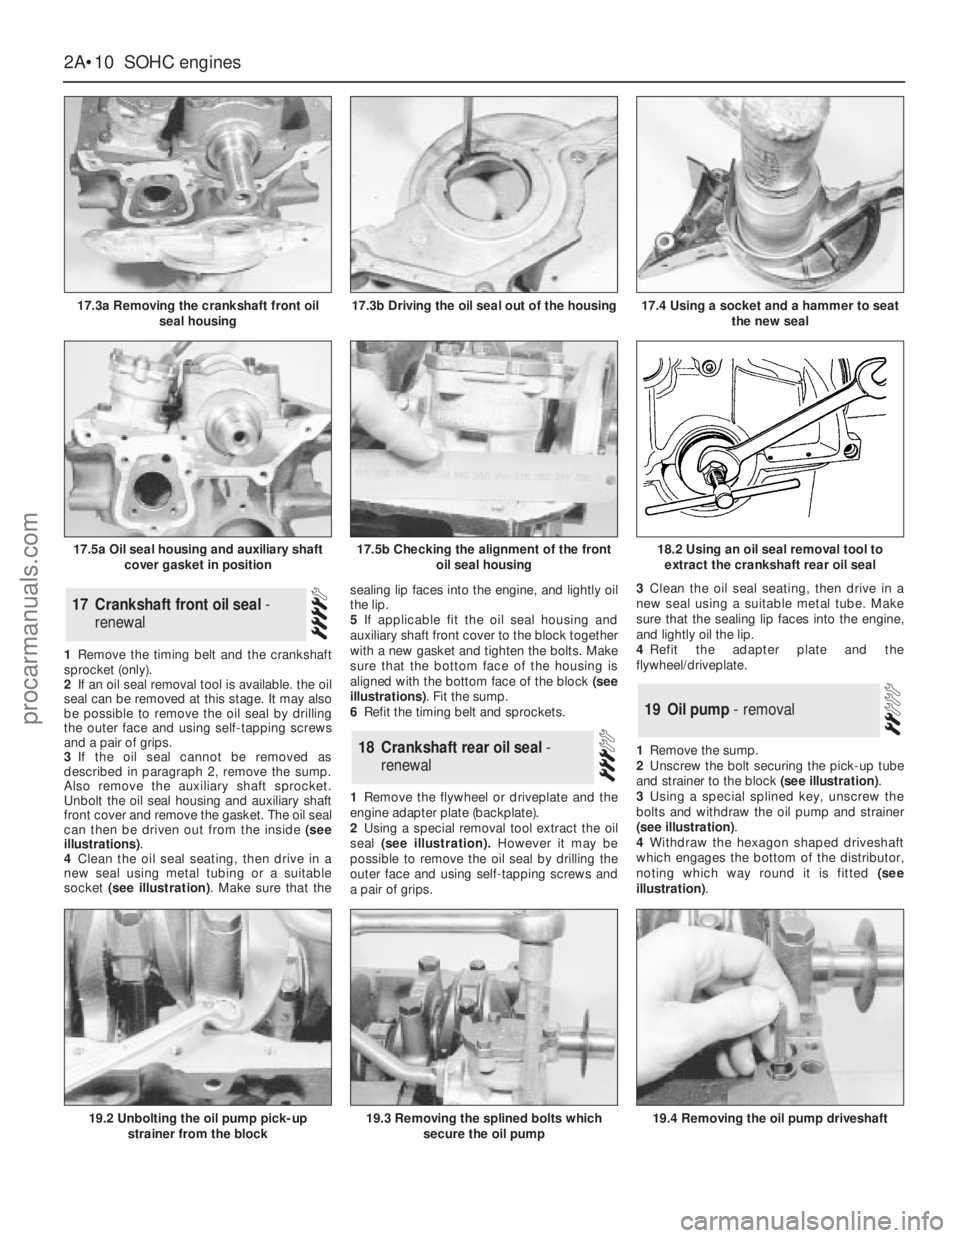
can then be driven out from the inside (see
illustrations).
4Clean the oil seal seating, then drive in a
new seal using metal tubing or a suitable
socket (see illustration). Make sure that thesealing lip faces into the engine, and lightly oil
the lip.
5If applicable fit the oil seal housing and
auxiliary shaft front cover to the block together
with a new gasket and tighten the bolts. Make
sure that the bottom face of the housing is
aligned with the bottom face of the block (see
illustrations). Fit the sump.
6Refit the timing belt and sprockets.
1Remove the flywheel or driveplate and the
engine adapter plate (backplate).
2Using a special removal tool extract the oil
seal (see illustration).However it may be
possible to remove the oil seal by drilling the
outer face and using self-tapping screws and
a pair of grips.3Clean the oil seal seating, then drive in a
new seal using a suitable metal tube. Make
sure that the sealing lip faces into the engine,
and lightly oil the lip.
4Refit the adapter plate and the
flywheel/driveplate.
1Remove the sump.
2Unscrew the bolt securing the pick-up tube
and strainer to the block (see illustration).
3Using a special splined key, unscrew the
bolts and withdraw the oil pump and strainer
(see illustration).
4Withdraw the hexagon shaped driveshaft
which engages the bottom of the distributor,
noting which way round it is fitted (see
illustration).
19Oil pump - removal
18Crankshaft rear oil seal -
renewal
17Crankshaft front oil seal -
renewal
2A•10SOHCengines
17.3a Removing the crankshaft front oil
seal housing
19.2 Unbolting the oil pump pick-up
strainer from the block19.3 Removing the splined bolts which
secure the oil pump19.4 Removing the oil pump driveshaft
18.2 Using an oil seal removal tool to
extract the crankshaft rear oil seal
17.3b Driving the oil seal out of the housing
17.5a Oil seal housing and auxiliary shaft
cover gasket in position17.5b Checking the alignment of the front
oil seal housing
17.4 Using a socket and a hammer to seat
the new seal
procarmanuals.com
Page 34 of 255
See Chapter 1, Section 8.
1Remove the sump and cylinder head.
2Check the big-end caps for identification
marks and if necessary use a centre-punch to
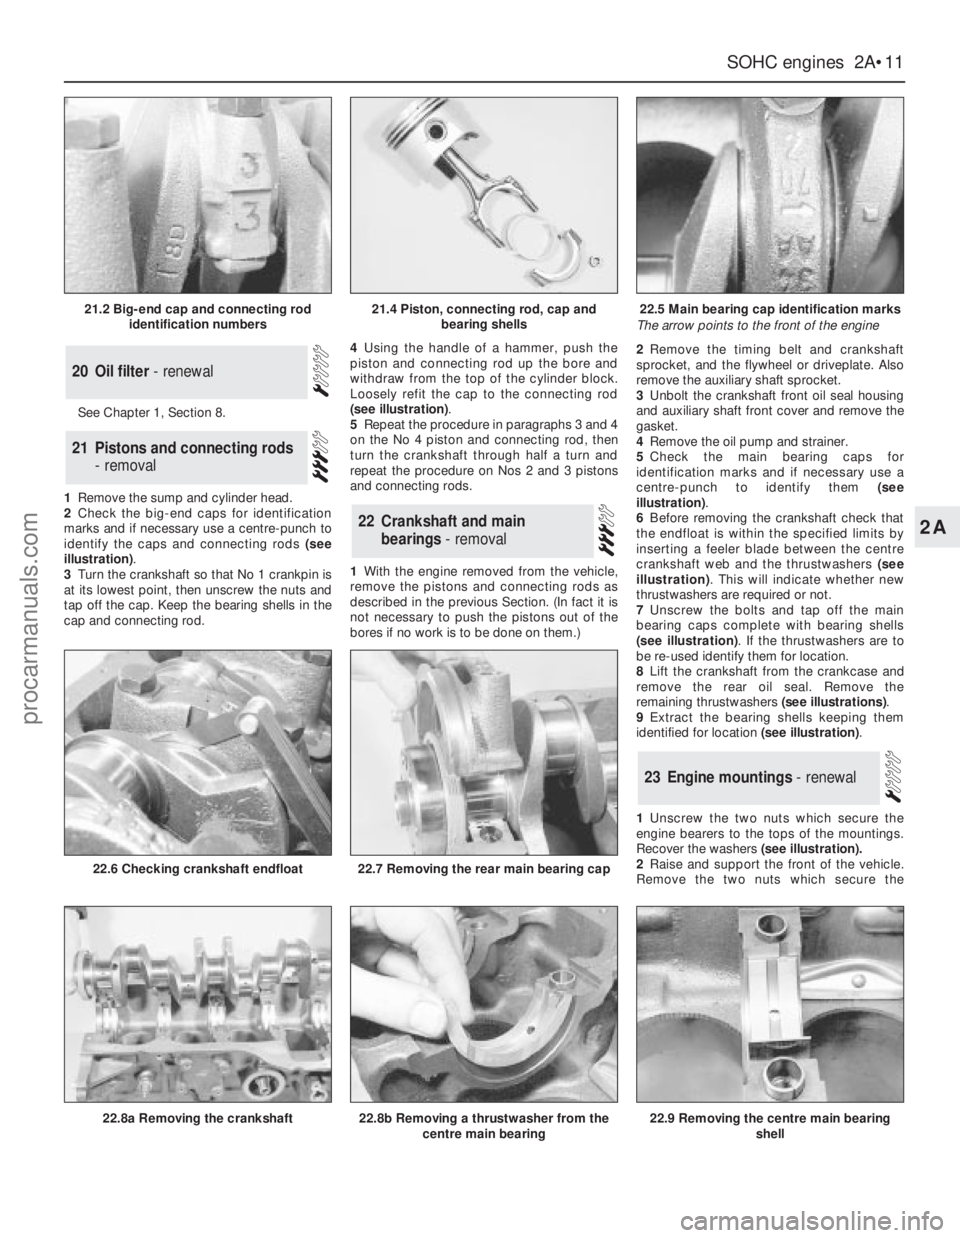
identify the caps and connecting rods (see
illustration).
3Turn the crankshaft so that No 1 crankpin is
at its lowest point, then unscrew the nuts and
tap off the cap. Keep the bearing shells in the
cap and connecting rod.4Using the handle of a hammer, push the
piston and connecting rod up the bore and
withdraw from the top of the cylinder block.
Loosely refit the cap to the connecting rod
(see illustration).
5Repeat the procedure in paragraphs 3 and 4
on the No 4 piston and connecting rod, then
turn the crankshaft through half a turn and
repeat the procedure on Nos 2 and 3 pistons
and connecting rods.
1With the engine removed from the vehicle,
remove the pistons and connecting rods as
described in the previous Section. (In fact it is
not necessary to push the pistons out of the
bores if no work is to be done on them.)2Remove the timing belt and crankshaft
sprocket, and the flywheel or driveplate. Also
remove the auxiliary shaft sprocket.
3Unbolt the crankshaft front oil seal housing
and auxiliary shaft front cover and remove the
gasket.
4Remove the oil pump and strainer.
5Check the main bearing caps for
identification marks and if necessary use a
centre-punch to identify them (see
illustration).
6Before removing the crankshaft check that
the endfloat is within the specified limits by
inserting a feeler blade between the centre
crankshaft web and the thrustwashers (see
illustration). This will indicate whether new
thrustwashers are required or not.
7Unscrew the bolts and tap off the main
bearing caps complete with bearing shells
(see illustration). If the thrustwashers are to
be re-used identify them for location.
8Lift the crankshaft from the crankcase and
remove the rear oil seal. Remove the
remaining thrustwashers (see illustrations).
9Extract the bearing shells keeping them
identified for location (see illustration).
1Unscrew the two nuts which secure the
engine bearers to the tops of the mountings.
Recover the washers(see illustration).
2Raise and support the front of the vehicle.
Remove the two nuts which secure the
23Engine mountings - renewal
22Crankshaft and main
bearings - removal
21Pistons and connecting rods
- removal
20Oil filter - renewal
SOHCengines 2A•11
2A
21.2 Big-end cap and connecting rod
identification numbers21.4 Piston, connecting rod, cap and
bearing shells22.5 Main bearing cap identification marks
The arrow points to the front of the engine
22.8a Removing the crankshaft
22.6 Checking crankshaft endfloat
22.8b Removing a thrustwasher from the
centre main bearing
22.7 Removing the rear main bearing cap
22.9 Removing the centre main bearing
shell
procarmanuals.com
Page 37 of 255
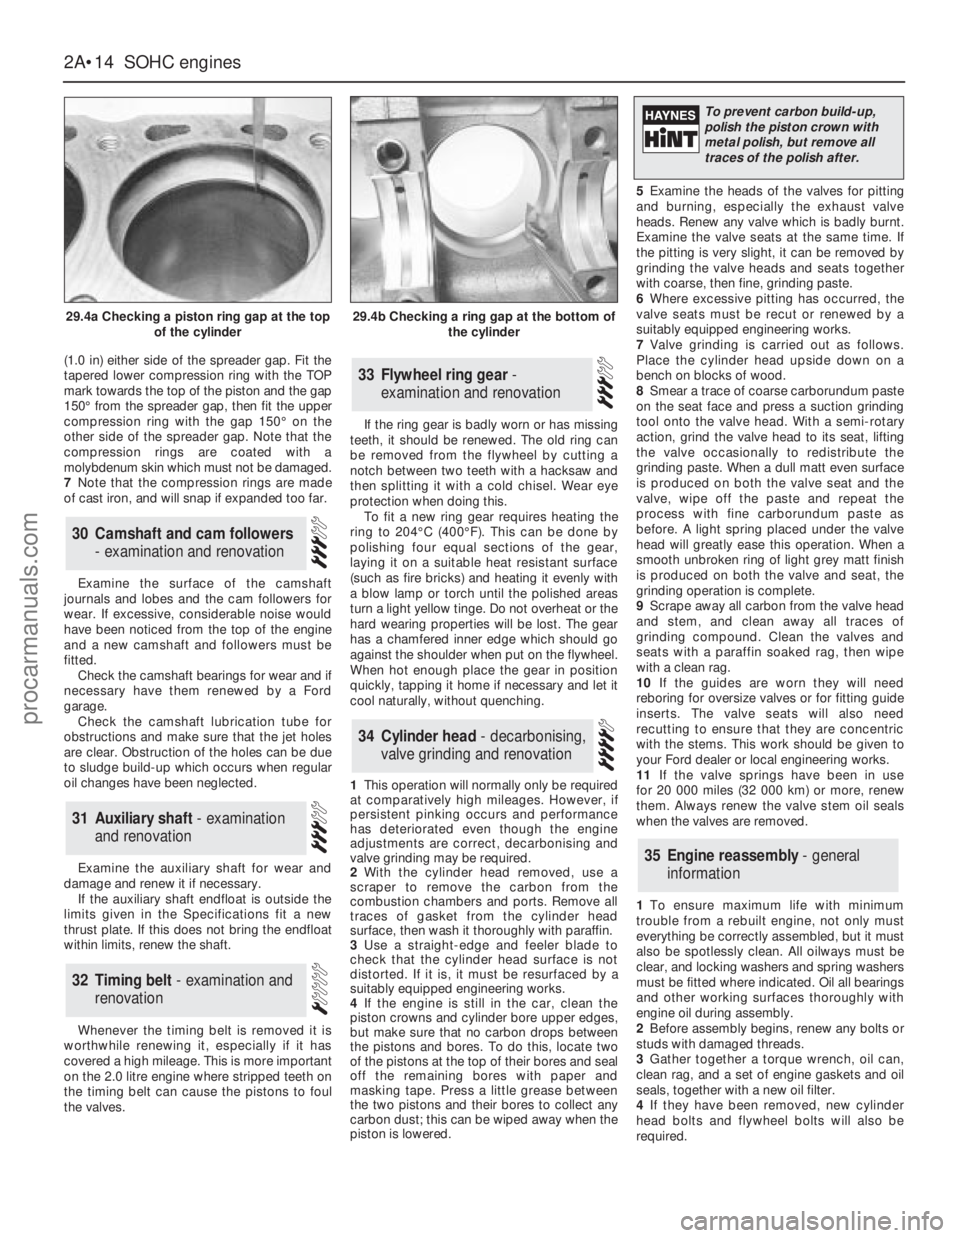
(1.0 in) either side of the spreader gap. Fit the
tapered lower compression ring with the TOP
mark towards the top of the piston and the gap
150°from the spreader gap, then fit the upper
compression ring with the gap 150°on the
other side of the spreader gap. Note that the
compression rings are coated with a
molybdenum skin which must not be damaged.
7Note that the compression rings are made
of cast iron, and will snap if expanded too far.
Examine the surface of the camshaft
journals and lobes and the cam followers for
wear. If excessive, considerable noise would
have been noticed from the top of the engine
and a new camshaft and followers must be
fitted.
Check the camshaft bearings for wear and if
necessary have them renewed by a Ford
garage.
Check the camshaft lubrication tube for
obstructions and make sure that the jet holes
are clear. Obstruction of the holes can be due
to sludge build-up which occurs when regular
oil changes have been neglected.
Examine the auxiliary shaft for wear and
damage and renew it if necessary.
If the auxiliary shaft endfloat is outside the
limits given in the Specifications fit a new
thrust plate. If this does not bring the endfloat
within limits, renew the shaft.
Whenever the timing belt is removed it is
worthwhile renewing it, especially if it has
covered a high mileage. This is more important
on the 2.0 litre engine where stripped teeth on
the timing belt can cause the pistons to foul
the valves.If the ring gear is badly worn or has missing
teeth, it should be renewed. The old ring can
be removed from the flywheel by cutting a
notch between two teeth with a hacksaw and
then splitting it with a cold chisel. Wear eye
protection when doing this.
To fit a new ring gear requires heating the
ring to 204°C (400°F). This can be done by
polishing four equal sections of the gear,
laying it on a suitable heat resistant surface
(such as fire bricks) and heating it evenly with
a blow lamp or torch until the polished areas
turn a light yellow tinge. Do not overheat or the
hard wearing properties will be lost. The gear
has a chamfered inner edge which should go
against the shoulder when put on the flywheel.
When hot enough place the gear in position
quickly, tapping it home if necessary and let it
cool naturally, without quenching.
1This operation will normally only be required
at comparatively high mileages. However, if
persistent pinking occurs and performance
has deteriorated even though the engine
adjustments are correct, decarbonising and
valve grinding may be required.
2With the cylinder head removed, use a
scraper to remove the carbon from the
combustion chambers and ports. Remove all
traces of gasket from the cylinder head
surface, then wash it thoroughly with paraffin.
3Use a straight-edge and feeler blade to
check that the cylinder head surface is not
distorted. If it is, it must be resurfaced by a
suitably equipped engineering works.
4If the engine is still in the car, clean the
piston crowns and cylinder bore upper edges,
but make sure that no carbon drops between
the pistons and bores. To do this, locate two
of the pistons at the top of their bores and seal
off the remaining bores with paper and
masking tape. Press a little grease between
the two pistons and their bores to collect any
carbon dust; this can be wiped away when the
piston is lowered.5Examine the heads of the valves for pitting
and burning, especially the exhaust valve
heads. Renew any valve which is badly burnt.
Examine the valve seats at the same time. If
the pitting is very slight, it can be removed by
grinding the valve heads and seats together
with coarse, then fine, grinding paste.
6Where excessive pitting has occurred, the
valve seats must be recut or renewed by a
suitably equipped engineering works.
7Valve grinding is carried out as follows.
Place the cylinder head upside down on a
bench on blocks of wood.
8Smear a trace of coarse carborundum paste
on the seat face and press a suction grinding
tool onto the valve head. With a semi-rotary
action, grind the valve head to its seat, lifting
the valve occasionally to redistribute the
grinding paste. When a dull matt even surface
is produced on both the valve seat and the
valve, wipe off the paste and repeat the
process with fine carborundum paste as
before. A light spring placed under the valve
head will greatly ease this operation. When a
smooth unbroken ring of light grey matt finish
is produced on both the valve and seat, the
grinding operation is complete.
9Scrape away all carbon from the valve head
and stem, and clean away all traces of
grinding compound. Clean the valves and
seats with a paraffin soaked rag, then wipe
with a clean rag.
10If the guides are worn they will need
reboring for oversize valves or for fitting guide
inserts. The valve seats will also need
recutting to ensure that they are concentric
with the stems. This work should be given to
your Ford dealer or local engineering works.
11If the valve springs have been in use
for 20 000 miles (32 000 km) or more, renew
them. Always renew the valve stem oil seals
when the valves are removed.
1To ensure maximum life with minimum
trouble from a rebuilt engine, not only must
everything be correctly assembled, but it must
also be spotlessly clean. All oilways must be
clear, and locking washers and spring washers
must be fitted where indicated. Oil all bearings
and other working surfaces thoroughly with
engine oil during assembly.
2Before assembly begins, renew any bolts or
studs with damaged threads.
3Gather together a torque wrench, oil can,
clean rag, and a set of engine gaskets and oil
seals, together with a new oil filter.
4If they have been removed, new cylinder
head bolts and flywheel bolts will also be
required.
35Engine reassembly - general
information
34Cylinder head - decarbonising,
valve grinding and renovation
33Flywheel ring gear -
examination and renovation
32Timing belt - examination and
renovation
31Auxiliary shaft - examination
and renovation
30Camshaft and cam followers
- examination and renovation
2A•14SOHCengines
29.4a Checking a piston ring gap at the top
of the cylinder29.4b Checking a ring gap at the bottom of
the cylinder
To prevent carbon build-up,
polish the piston crown with
metal polish, but remove all
traces of the polish after.
procarmanuals.com
Page 38 of 255
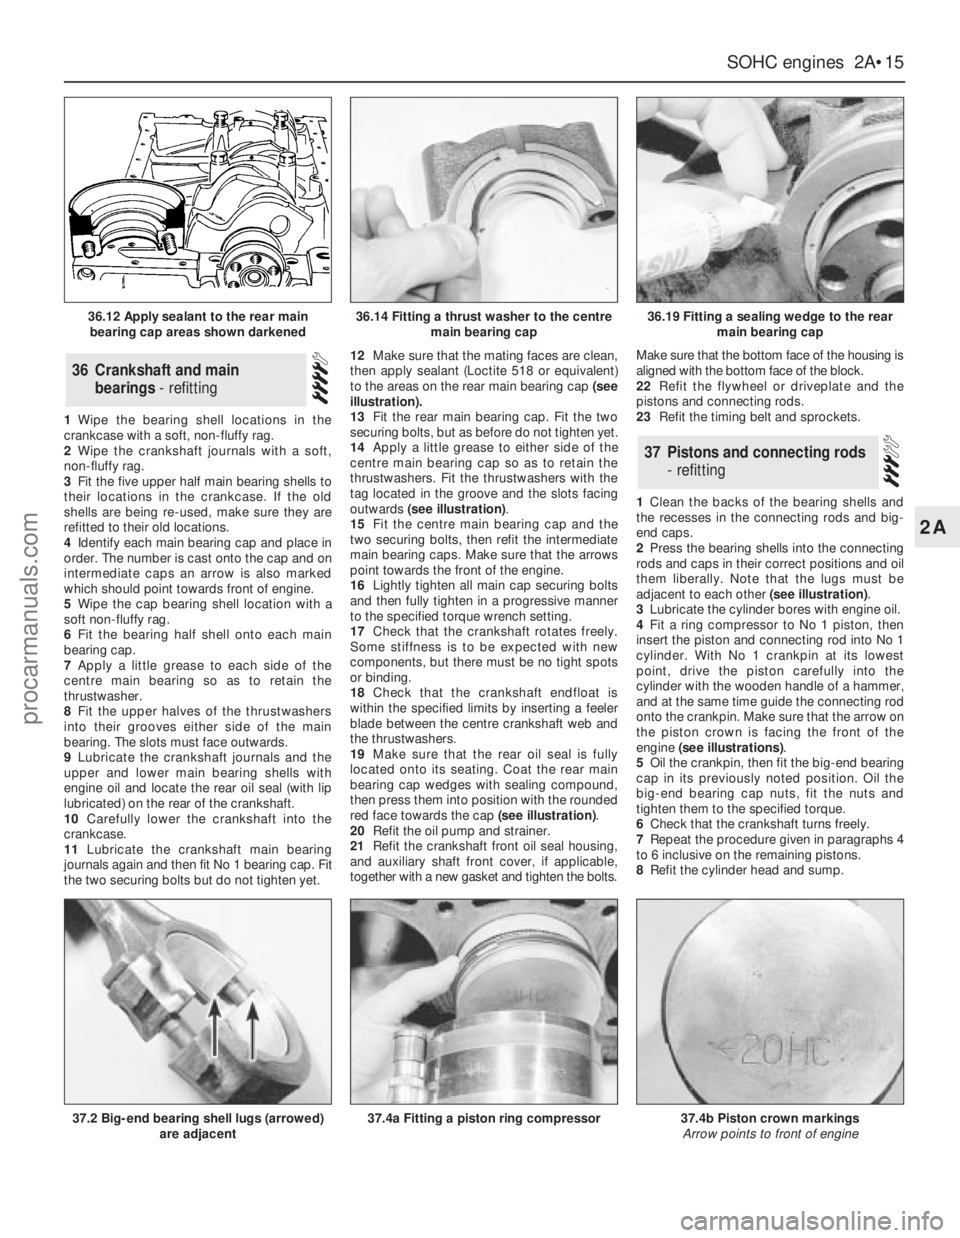
1Wipe the bearing shell locations in the
crankcase with a soft, non-fluffy rag.
2Wipe the crankshaft journals with a soft,
non-fluffy rag.
3Fit the five upper half main bearing shells to
their locations in the crankcase. If the old
shells are being re-used, make sure they are
refitted to their old locations.
4Identify each main bearing cap and place in
order. The number is cast onto the cap and on
intermediate caps an arrow is also marked
which should point towards front of engine.
5Wipe the cap bearing shell location with a
soft non-fluffy rag.
6Fit the bearing half shell onto each main
bearing cap.
7Apply a little grease to each side of the
centre main bearing so as to retain the
thrustwasher.
8Fit the upper halves of the thrustwashers
into their grooves either side of the main
bearing. The slots must face outwards.
9Lubricate the crankshaft journals and the
upper and lower main bearing shells with
engine oil and locate the rear oil seal (with lip
lubricated) on the rear of the crankshaft.
10Carefully lower the crankshaft into the
crankcase.
11Lubricate the crankshaft main bearing
journals again and then fit No 1 bearing cap. Fit
the two securing bolts but do not tighten yet.12Make sure that the mating faces are clean,
then apply sealant (Loctite 518 or equivalent)
to the areas on the rear main bearing cap (see
illustration).
13Fit the rear main bearing cap. Fit the two
securing bolts, but as before do not tighten yet.
14Apply a little grease to either side of the
centre main bearing cap so as to retain the
thrustwashers. Fit the thrustwashers with the
tag located in the groove and the slots facing
outwards (see illustration).
15Fit the centre main bearing cap and the
two securing bolts, then refit the intermediate
main bearing caps. Make sure that the arrows
point towards the front of the engine.
16Lightly tighten all main cap securing bolts
and then fully tighten in a progressive manner
to the specified torque wrench setting.
17Check that the crankshaft rotates freely.
Some stiffness is to be expected with new
components, but there must be no tight spots
or binding.
18Check that the crankshaft endfloat is
within the specified limits by inserting a feeler
blade between the centre crankshaft web and
the thrustwashers.
19Make sure that the rear oil seal is fully
located onto its seating. Coat the rear main
bearing cap wedges with sealing compound,
then press them into position with the rounded
red face towards the cap (see illustration).
20Refit the oil pump and strainer.
21Refit the crankshaft front oil seal housing,
and auxiliary shaft front cover, if applicable,
together with a new gasket and tighten the bolts.Make sure that the bottom face of the housing is
aligned with the bottom face of the block.
22Refit the flywheel or driveplate and the
pistons and connecting rods.
23Refit the timing belt and sprockets.
1Clean the backs of the bearing shells and
the recesses in the connecting rods and big-
end caps.
2Press the bearing shells into the connecting
rods and caps in their correct positions and oil
them liberally. Note that the lugs must be
adjacent to each other (see illustration).
3Lubricate the cylinder bores with engine oil.
4Fit a ring compressor to No 1 piston, then
insert the piston and connecting rod into No 1
cylinder. With No 1 crankpin at its lowest
point, drive the piston carefully into the
cylinder with the wooden handle of a hammer,
and at the same time guide the connecting rod
onto the crankpin. Make sure that the arrow on
the piston crown is facing the front of the
engine (see illustrations).
5Oil the crankpin, then fit the big-end bearing
cap in its previously noted position. Oil the
big-end bearing cap nuts, fit the nuts and
tighten them to the specified torque.
6Check that the crankshaft turns freely.
7Repeat the procedure given in paragraphs 4
to 6 inclusive on the remaining pistons.
8Refit the cylinder head and sump.
37Pistons and connecting rods
- refitting
36Crankshaft and main
bearings - refitting
SOHCengines 2A•15
2A
36.12 Apply sealant to the rear main
bearing cap areas shown darkened36.14 Fitting a thrust washer to the centre
main bearing cap36.19 Fitting a sealing wedge to the rear
main bearing cap
37.2 Big-end bearing shell lugs (arrowed)
are adjacent37.4a Fitting a piston ring compressor37.4b Piston crown markings
Arrow points to front of engine
procarmanuals.com
Page 39 of 255
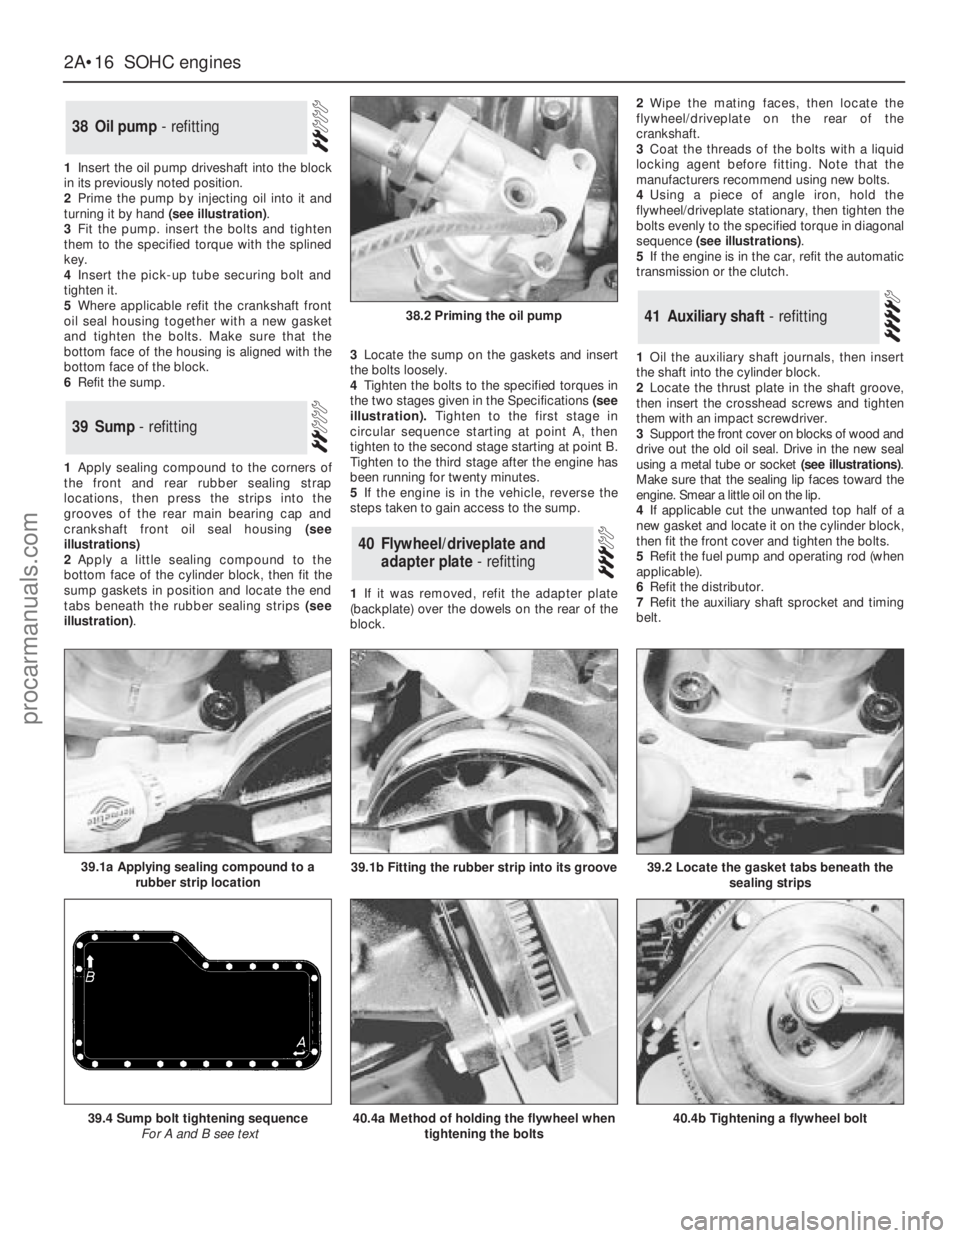
1Insert the oil pump driveshaft into the block
in its previously noted position.
2Prime the pump by injecting oil into it and
turning it by hand (see illustration).
3Fit the pump. insert the bolts and tighten
them to the specified torque with the splined
key.
4Insert the pick-up tube securing bolt and
tighten it.
5Where applicable refit the crankshaft front
oil seal housing together with a new gasket
and tighten the bolts. Make sure that the
bottom face of the housing is aligned with the
bottom face of the block.
6Refit the sump.
1Apply sealing compound to the corners of
the front and rear rubber sealing strap
locations, then press the strips into the
grooves of the rear main bearing cap and
crankshaft front oil seal housing (see
illustrations)
2Apply a little sealing compound to the
bottom face of the cylinder block, then fit the
sump gaskets in position and locate the end
tabs beneath the rubber sealing strips (see
illustration).3Locate the sump on the gaskets and insert
the bolts loosely.
4Tighten the bolts to the specified torques in
the two stages given in the Specifications(see
illustration).Tighten to the first stage in
circular sequence starting at point A, then
tighten to the second stage starting at point B.
Tighten to the third stage after the engine has
been running for twenty minutes.
5If the engine is in the vehicle, reverse the
steps taken to gain access to the sump.
1If it was removed, refit the adapter plate
(backplate) over the dowels on the rear of the
block.2Wipe the mating faces, then locate the
flywheel/driveplate on the rear of the
crankshaft.
3Coat the threads of the bolts with a liquid
locking agent before fitting. Note that the
manufacturers recommend using new bolts.
4Using a piece of angle iron, hold the
flywheel/driveplate stationary, then tighten the
bolts evenly to the specified torque in diagonal
sequence (see illustrations).
5If the engine is in the car, refit the automatic
transmission or the clutch.
1Oil the auxiliary shaft journals, then insert
the shaft into the cylinder block.
2Locate the thrust plate in the shaft groove,
then insert the crosshead screws and tighten
them with an impact screwdriver.
3Support the front cover on blocks of wood and
drive out the old oil seal. Drive in the new seal
using a metal tube or socket (see illustrations).
Make sure that the sealing lip faces toward the
engine. Smear a little oil on the lip.
4If applicable cut the unwanted top half of a
new gasket and locate it on the cylinder block,
then fit the front cover and tighten the bolts.
5Refit the fuel pump and operating rod (when
applicable).
6Refit the distributor.
7Refit the auxiliary shaft sprocket and timing
belt.
41Auxiliary shaft - refitting
40Flywheel/driveplate and
adapter plate - refitting
39Sump - refitting
38Oil pump - refitting
2A•16SOHCengines
38.2 Priming the oil pump
40.4a Method of holding the flywheel when
tightening the bolts39.4 Sump bolt tightening sequence
For A and B see text40.4b Tightening a flywheel bolt
39.2 Locate the gasket tabs beneath the
sealing strips39.1a Applying sealing compound to a
rubber strip location39.1b Fitting the rubber strip into its groove
procarmanuals.com
Page 40 of 255
1Refit the thermostat and housing.
2Refit the timing belt tensioner if it was
removed, but do not tighten the bolts yet.
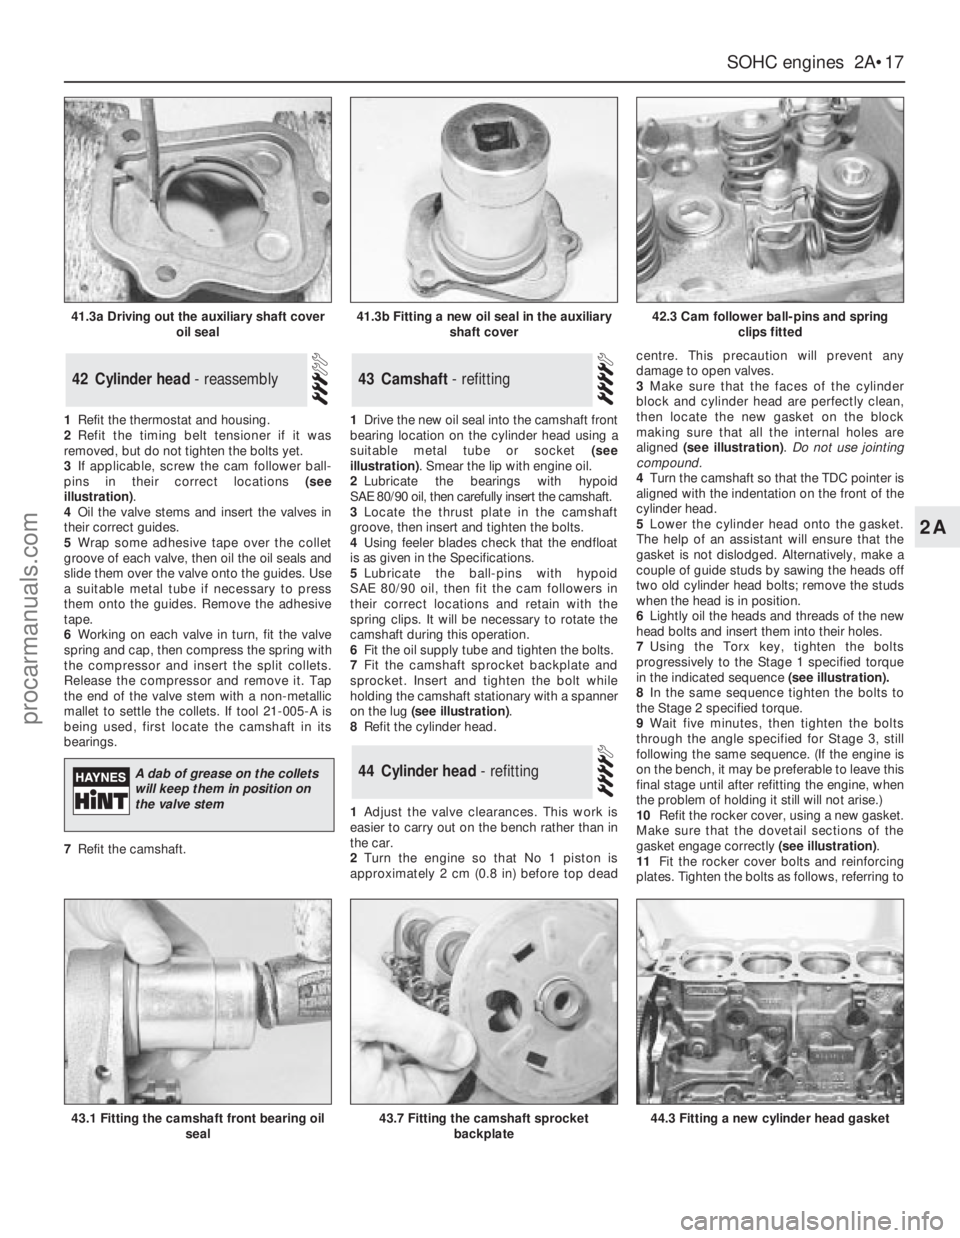
3If applicable, screw the cam follower ball-
pins in their correct locations (see
illustration).
4Oil the valve stems and insert the valves in
their correct guides.
5Wrap some adhesive tape over the collet
groove of each valve, then oil the oil seals and
slide them over the valve onto the guides. Use
a suitable metal tube if necessary to press
them onto the guides. Remove the adhesive
tape.
6Working on each valve in turn, fit the valve
spring and cap, then compress the spring with
the compressor and insert the split collets.
Release the compressor and remove it. Tap
the end of the valve stem with a non-metallic
mallet to settle the collets. If tool 21-005-A is
being used, first locate the camshaft in its
bearings.
7Refit the camshaft.1Drive the new oil seal into the camshaft front
bearing location on the cylinder head using a
suitable metal tube or socket (see
illustration). Smear the lip with engine oil.
2Lubricate the bearings with hypoid
SAE 80/90 oil, then carefully insert the camshaft.
3Locate the thrust plate in the camshaft
groove, then insert and tighten the bolts.
4Using feeler blades check that the endfloat
is as given in the Specifications.
5Lubricate the ball-pins with hypoid
SAE 80/90 oil, then fit the cam followers in
their correct locations and retain with the
spring clips. It will be necessary to rotate the
camshaft during this operation.
6Fit the oil supply tube and tighten the bolts.
7Fit the camshaft sprocket backplate and
sprocket. Insert and tighten the bolt while
holding the camshaft stationary with a spanner
on the lug (see illustration).
8Refit the cylinder head.
1Adjust the valve clearances. This work is
easier to carry out on the bench rather than in
the car.
2Turn the engine so that No 1 piston is
approximately 2 cm (0.8 in) before top deadcentre. This precaution will prevent any
damage to open valves.
3Make sure that the faces of the cylinder
block and cylinder head are perfectly clean,
then locate the new gasket on the block
making sure that all the internal holes are
aligned (see illustration). Do not use jointing
compound.
4Turn the camshaft so that the TDC pointer is
aligned with the indentation on the front of the
cylinder head.
5Lower the cylinder head onto the gasket.
The help of an assistant will ensure that the
gasket is not dislodged. Alternatively, make a
couple of guide studs by sawing the heads off
two old cylinder head bolts; remove the studs
when the head is in position.
6Lightly oil the heads and threads of the new
head bolts and insert them into their holes.
7Using the Torx key, tighten the bolts
progressively to the Stage 1 specified torque
in the indicated sequence(see illustration).
8In the same sequence tighten the bolts to
the Stage 2 specified torque.
9Wait five minutes, then tighten the bolts
through the angle specified for Stage 3, still
following the same sequence. (If the engine is
on the bench, it may be preferable to leave this
final stage until after refitting the engine, when
the problem of holding it still will not arise.)
10Refit the rocker cover, using a new gasket.
Make sure that the dovetail sections of the
gasket engage correctly (see illustration).
11Fit the rocker cover bolts and reinforcing
plates. Tighten the bolts as follows, referring to
44Cylinder head - refitting
43Camshaft - refitting42Cylinder head - reassembly
SOHCengines 2A•17
2A
41.3a Driving out the auxiliary shaft cover
oil seal41.3b Fitting a new oil seal in the auxiliary
shaft cover42.3 Cam follower ball-pins and spring
clips fitted
43.1 Fitting the camshaft front bearing oil
seal43.7 Fitting the camshaft sprocket
backplate44.3 Fitting a new cylinder head gasket
A dab of grease on the collets
will keep them in position on
the valve stem
procarmanuals.com
Page 41 of 255
the Specifications and to illustration 44.11:
Stage 1 - Bolts 1 to 6
Stage 2 - Bolts 7 and 8
Stage 3 - Bolts 9 and 10
Stage 4 - Bolts 7 and 8 (again)
12No further tightening of the cylinder head
bolts is required.
13Refit and tension the timing belt as
described in the next Section.
1Fit the camshaft sprocket backplate and
sprocket. Insert the bolt, hold the camshaft or
sprocket and tighten the bolt to the specified
torque. 2Fit the auxiliary shaft sprocket with the ribs
towards the engine. Fit the sprocket bolt and
tighten it to the specified torque,
counterholding the sprocket with a bar
through one of the holes.
3Fit the crankshaft sprocket, chamfered side
inwards.
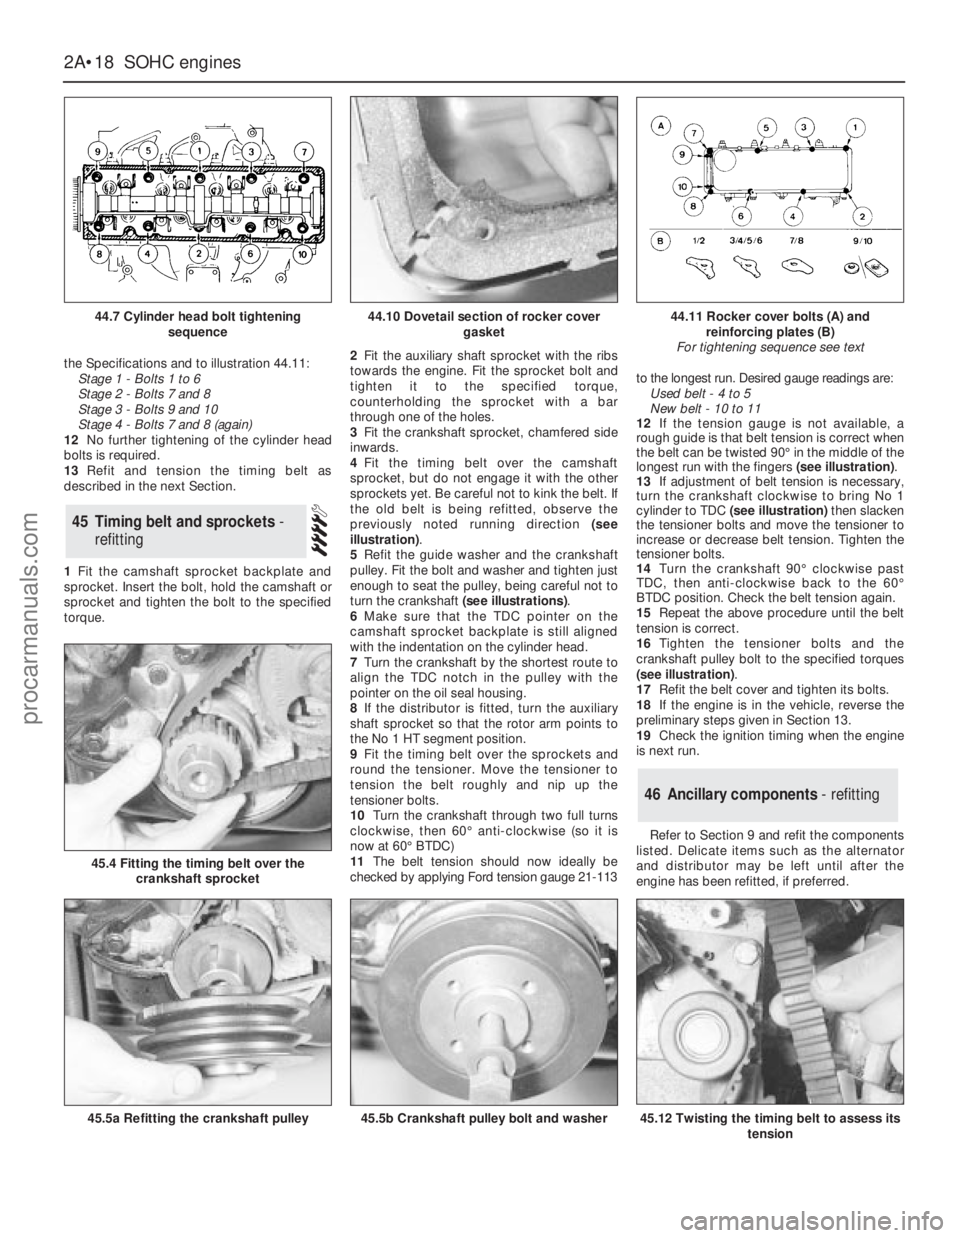
4Fit the timing belt over the camshaft
sprocket, but do not engage it with the other
sprockets yet. Be careful not to kink the belt. If
the old belt is being refitted, observe the
previously noted running direction (see
illustration).
5Refit the guide washer and the crankshaft
pulley. Fit the bolt and washer and tighten just
enough to seat the pulley, being careful not to
turn the crankshaft (see illustrations).
6Make sure that the TDC pointer on the
camshaft sprocket backplate is still aligned
with the indentation on the cylinder head.
7Turn the crankshaft by the shortest route to
align the TDC notch in the pulley with the
pointer on the oil seal housing.
8If the distributor is fitted, turn the auxiliary
shaft sprocket so that the rotor arm points to
the No 1 HT segment position.
9Fit the timing belt over the sprockets and
round the tensioner. Move the tensioner to
tension the belt roughly and nip up the
tensioner bolts.
10Turn the crankshaft through two full turns
clockwise, then 60°anti-clockwise (so it is
now at 60°BTDC)
11The belt tension should now ideally be
checked by applying Ford tension gauge 21-113to the longest run. Desired gauge readings are:
Used belt - 4 to 5
New belt - 10 to 11
12If the tension gauge is not available, a
rough guide is that belt tension is correct when
the belt can be twisted 90°in the middle of the
longest run with the fingers (see illustration).
13If adjustment of belt tension is necessary,
turn the crankshaft clockwise to bring No 1
cylinder to TDC(see illustration)then slacken
the tensioner bolts and move the tensioner to
increase or decrease belt tension. Tighten the
tensioner bolts.
14Turn the crankshaft 90°clockwise past
TDC, then anti-clockwise back to the 60°
BTDC position. Check the belt tension again.
15Repeat the above procedure until the belt
tension is correct.
16Tighten the tensioner bolts and the
crankshaft pulley bolt to the specified torques
(see illustration).
17Refit the belt cover and tighten its bolts.
18If the engine is in the vehicle, reverse the
preliminary steps given in Section 13.
19Check the ignition timing when the engine
is next run.
Refer to Section 9 and refit the components
listed. Delicate items such as the alternator
and distributor may be left until after the
engine has been refitted, if preferred.
46Ancillary components - refitting
45Timing belt and sprockets -
refitting
2A•18SOHCengines
44.7 Cylinder head bolt tightening
sequence
45.4 Fitting the timing belt over the
crankshaft sprocket
45.5a Refitting the crankshaft pulley45.5b Crankshaft pulley bolt and washer45.12 Twisting the timing belt to assess its
tension
44.10 Dovetail section of rocker cover
gasket44.11 Rocker cover bolts (A) and
reinforcing plates (B)
For tightening sequence see text
procarmanuals.com
Page 54 of 255
6Disconnect the breather hose from the
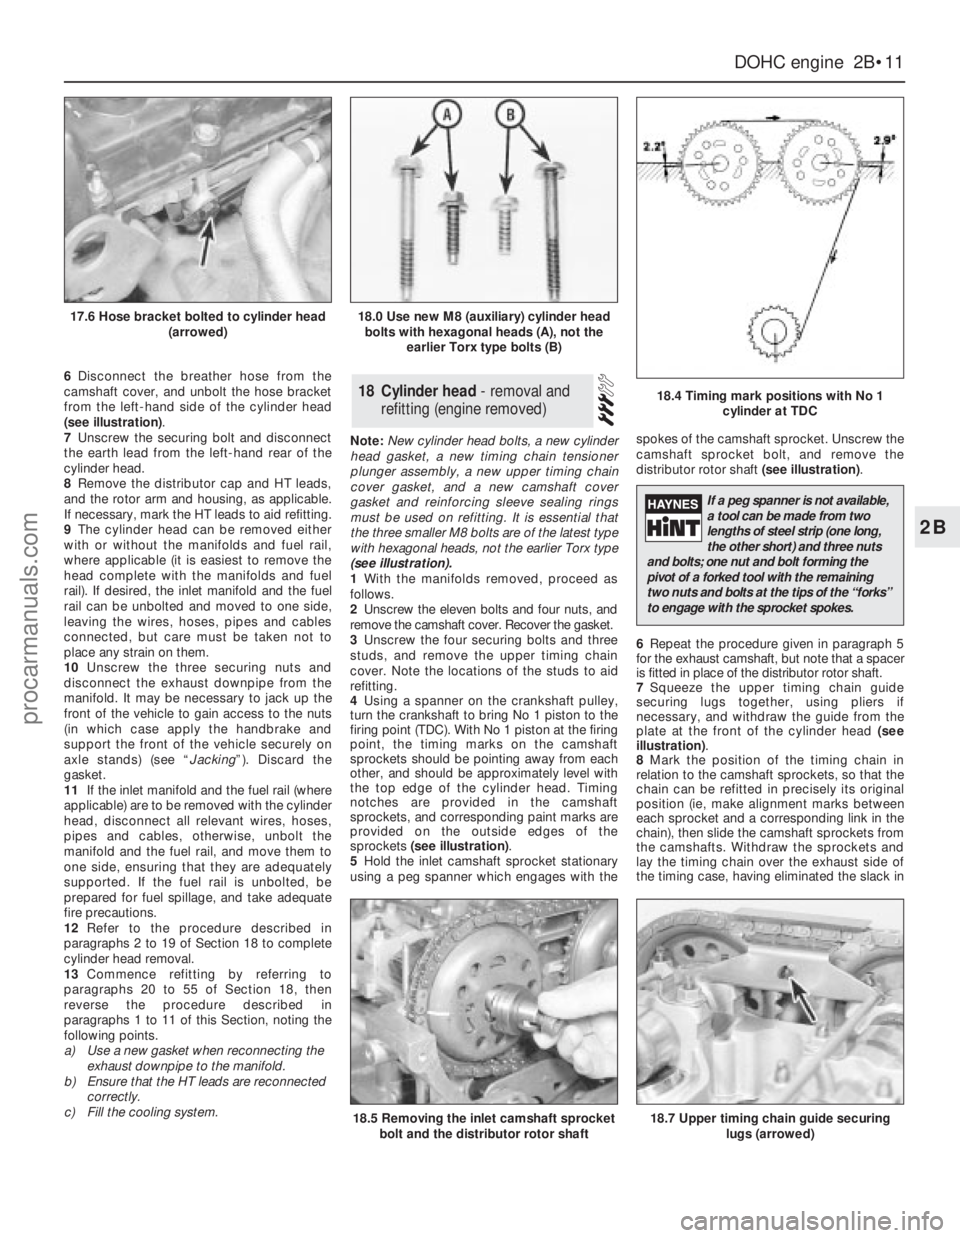
camshaft cover, and unbolt the hose bracket
from the left-hand side of the cylinder head
(see illustration).
7Unscrew the securing bolt and disconnect
the earth lead from the left-hand rear of the
cylinder head.
8Remove the distributor cap and HT leads,
and the rotor arm and housing, as applicable.
If necessary, mark the HT leads to aid refitting.
9The cylinder head can be removed either
with or without the manifolds and fuel rail,
where applicable (it is easiest to remove the
head complete with the manifolds and fuel
rail). If desired, the inlet manifold and the fuel
rail can be unbolted and moved to one side,
leaving the wires, hoses, pipes and cables
connected, but care must be taken not to
place any strain on them.
10Unscrew the three securing nuts and
disconnect the exhaust downpipe from the
manifold. It may be necessary to jack up the
front of the vehicle to gain access to the nuts
(in which case apply the handbrake and
support the front of the vehicle securely on
axle stands) (see “Jacking”). Discard the
gasket.
11If the inlet manifold and the fuel rail (where
applicable) are to be removed with the cylinder
head, disconnect all relevant wires, hoses,
pipes and cables, otherwise, unbolt the
manifold and the fuel rail, and move them to
one side, ensuring that they are adequately
supported. If the fuel rail is unbolted, be
prepared for fuel spillage, and take adequate
fire precautions.
12Refer to the procedure described in
paragraphs 2 to 19 of Section 18 to complete
cylinder head removal.
13Commence refitting by referring to
paragraphs 20 to 55 of Section 18, then
reverse the procedure described in
paragraphs 1 to 11 of this Section, noting the
following points.
a)Use a new gasket when reconnecting the
exhaust downpipe to the manifold.
b)Ensure that the HT leads are reconnected
correctly.
c)Fill the cooling system.Note: New cylinder head bolts, a new cylinder
head gasket, a new timing chain tensioner
plunger assembly, a new upper timing chain
cover gasket, and a new camshaft cover
gasket and reinforcing sleeve sealing rings
must be used on refitting. It is essential that
the three smaller M8 bolts are of the latest type
with hexagonal heads, not the earlier Torx type
(see illustration).
1With the manifolds removed, proceed as
follows.
2Unscrew the eleven bolts and four nuts, and
remove the camshaft cover. Recover the gasket.
3Unscrew the four securing bolts and three
studs, and remove the upper timing chain
cover. Note the locations of the studs to aid
refitting.
4Using a spanner on the crankshaft pulley,
turn the crankshaft to bring No 1 piston to the
firing point (TDC). With No 1 piston at the firing
point, the timing marks on the camshaft
sprockets should be pointing away from each
other, and should be approximately level with
the top edge of the cylinder head. Timing
notches are provided in the camshaft
sprockets, and corresponding paint marks are
provided on the outside edges of the
sprockets (see illustration).
5Hold the inlet camshaft sprocket stationary
using a peg spanner which engages with thespokes of the camshaft sprocket. Unscrew the
camshaft sprocket bolt, and remove the
distributor rotor shaft (see illustration).
6Repeat the procedure given in paragraph 5
for the exhaust camshaft, but note that a spacer
is fitted in place of the distributor rotor shaft.
7Squeeze the upper timing chain guide
securing lugs together, using pliers if
necessary, and withdraw the guide from the
plate at the front of the cylinder head (see
illustration).
8Mark the position of the timing chain in
relation to the camshaft sprockets, so that the
chain can be refitted in precisely its original
position (ie, make alignment marks between
each sprocket and a corresponding link in the
chain), then slide the camshaft sprockets from
the camshafts. Withdraw the sprockets and
lay the timing chain over the exhaust side of
the timing case, having eliminated the slack in18Cylinder head - removal and
refitting (engine removed)
DOHCengine 2B•11
2B
17.6 Hose bracket bolted to cylinder head
(arrowed)18.0 Use new M8 (auxiliary) cylinder head
bolts with hexagonal heads (A), not the
earlier Torx type bolts (B)
18.4 Timing mark positions with No 1
cylinder at TDC
18.5 Removing the inlet camshaft sprocket
bolt and the distributor rotor shaft18.7 Upper timing chain guide securing
lugs (arrowed)
If a peg spanner is not available,
a tool can be made from two
lengths of steel strip (one long,
the other short) and three nuts
and bolts; one nut and bolt forming the
pivot of a forked tool with the remaining
two nuts and bolts at the tips of the “forks”
to engage with the sprocket spokes.
procarmanuals.com
Page 71 of 255
4Remove the auxiliary drivebelts.
5Remove the fan and viscous clutch if fitted).
6Jam the crankshaft, either by engaging 5th
gear and applying the handbrake, or by
removing the starter motor and having an
assistant jam a screwdriver in the starter ring
gear teeth. Unbolt the crankshaft pulley. When
the pulley is secured to a vibration damper,
also remove the damper central bolt.
7Remove the pulley or damper, using a puller
if necessary.
8Disconnect the coolant hoses from the front
of the engine, including the water pump
bypass hose.
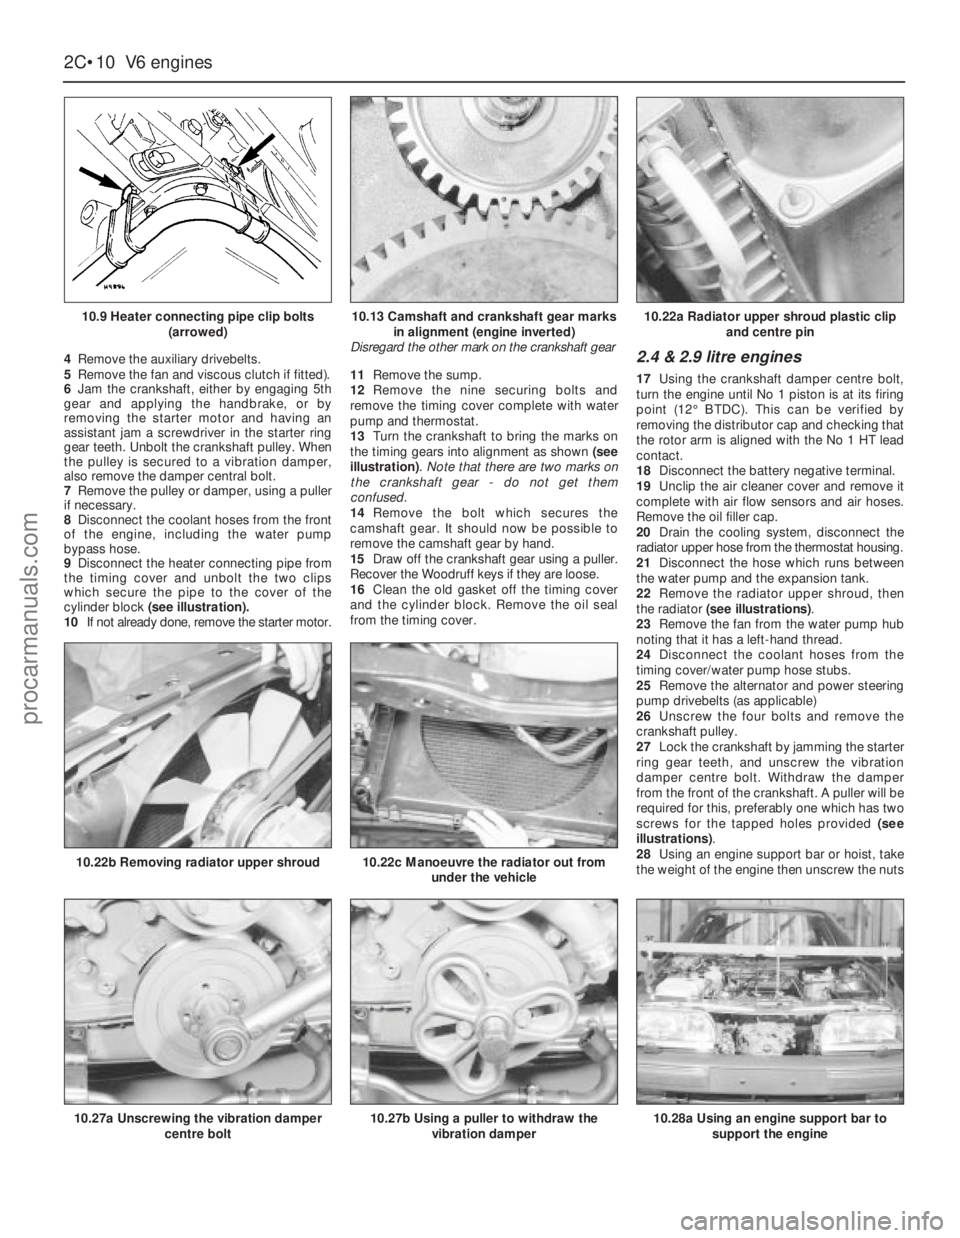
9Disconnect the heater connecting pipe from
the timing cover and unbolt the two clips
which secure the pipe to the cover of the
cylinder block (see illustration).
10If not already done, remove the starter motor.11Remove the sump.
12Remove the nine securing bolts and
remove the timing cover complete with water
pump and thermostat.
13Turn the crankshaft to bring the marks on
the timing gears into alignment as shown (see
illustration). Note that there are two marks on
the crankshaft gear - do not get them
confused.
14Remove the bolt which secures the
camshaft gear. It should now be possible to
remove the camshaft gear by hand.
15Draw off the crankshaft gear using a puller.
Recover the Woodruff keys if they are loose.
16Clean the old gasket off the timing cover
and the cylinder block. Remove the oil seal
from the timing cover.2.4 & 2.9 litre engines
17Using the crankshaft damper centre bolt,
turn the engine until No 1 piston is at its firing
point (12°BTDC). This can be verified by
removing the distributor cap and checking that
the rotor arm is aligned with the No 1 HT lead
contact.
18Disconnect the battery negative terminal.
19Unclip the air cleaner cover and remove it
complete with air flow sensors and air hoses.
Remove the oil filler cap.
20Drain the cooling system, disconnect the
radiator upper hose from the thermostat housing.
21Disconnect the hose which runs between
the water pump and the expansion tank.
22Remove the radiator upper shroud, then
the radiator (see illustrations).
23Remove the fan from the water pump hub
noting that it has a left-hand thread.
24Disconnect the coolant hoses from the
timing cover/water pump hose stubs.
25Remove the alternator and power steering
pump drivebelts (as applicable)
26Unscrew the four bolts and remove the
crankshaft pulley.
27Lock the crankshaft by jamming the starter
ring gear teeth, and unscrew the vibration
damper centre bolt. Withdraw the damper
from the front of the crankshaft. A puller will be
required for this, preferably one which has two
screws for the tapped holes provided (see
illustrations).
28Using an engine support bar or hoist, take
the weight of the engine then unscrew the nuts
2C•10V6 engines
10.9 Heater connecting pipe clip bolts
(arrowed)
10.27a Unscrewing the vibration damper
centre bolt
10.22b Removing radiator upper shroud10.22c Manoeuvre the radiator out from
under the vehicle
10.27b Using a puller to withdraw the
vibration damper10.28a Using an engine support bar to
support the engine
10.13 Camshaft and crankshaft gear marks
in alignment (engine inverted)
Disregard the other mark on the crankshaft gear10.22a Radiator upper shroud plastic clip
and centre pin
procarmanuals.com