air suspension FORD GT 2018 Owners Manual
[x] Cancel search | Manufacturer: FORD, Model Year: 2018, Model line: GT, Model: FORD GT 2018Pages: 325, PDF Size: 6.61 MB
Page 126 of 325
Modes:
•
Normal (N) – Use for normal driving in
dry conditions.
•AdvanceTrac Stability Control is
active and cannot be adjusted.
• Ride height is set to High and
suspension damping is set to
Normal.
• Comfort damping can be selected
with the console switch.
• Launch control is available.
• Transmission automatic shift
calibration is set to Normal.
• Rear wing deploys at speeds above
90 mph (145 km/h) and retracts
when the speed drops below
81 mph (130 km/h)
.
• Air brake activates at speeds above
75 mph (121 km/h) when the brakes
are applied with moderate force.
• Sport (S) – Use for sport driving in dry
conditions.
•AdvanceTrac Stability Control is
active but can be adjusted by use
of the Stability Control button on
the console.
• Ride height is set to High and
suspension damping is set to Sport.
• Comfort damping cannot be
selected.
• Launch control is available.
• Transmission automatic shift
calibration is set to Sport.
• Turbocharger anti-lag calibration
is active.
• Rear wing deploys at speeds above
70 mph (113 km/h)
and retracts
when the speed drops below
45 mph (72 km/h)
.
• Air brake activates at speeds above
75 mph (121 km/h) when the brakes
are applied with moderate force. •
Wet (W) – Use for driving in wet
conditions.
•AdvanceTrac Stability Control is
active and cannot be adjusted.
• Ride height is set to High and
suspension damping is set to
Normal.
• Comfort damping can be selected
with the console switch.
• Launch control is not available.
• Transmission automatic shift
calibration is set to Normal.
• Rear wing deploys at speeds above
90 mph (145 km/h)
and retracts
when the speed drops below
81 mph (130 km/h)
.
• Air brake activates at speeds above
75 mph (121 km/h) when the brakes
are applied with moderate force.
123
Ford GT (CGX), enUSA, Edition date: 201711, First Printing Driving Aids
Page 127 of 325
•
Track (T) – Optimized settings for
track handling performance. The Track
drive mode should only be used in a
track environment, not on the street,
due to the low ride height. This setting
can only be selected while your vehicle
is in park (P) with the engine running,
and you need to confirm the selection.
•AdvanceTrac Stability Control is
active but can be adjusted by use
of the Stability Control button on
the console.
• Ride height is set to Low and
suspension damping is set to Track.
• Comfort damping cannot be
selected due to low ride height.
• Launch control is available.
• Transmission automatic shift
calibration is set to Sport.
• Turbocharger anti-lag calibration
is active.
• Rear wing deploys and remains
deployed while in Track mode.
When you change to another mode,
the wing lowers once you start to
drive your vehicle, not while it is
stopped.
• Air brake activates at speeds above
75 mph (121 km/h) when the brakes
are applied with moderate force. •
V-Max (V) – Optimized settings for
achieving maximum velocity (top
speed). The V-Max mode should only
be used in a controlled track
environment, not on the street, due to
the low ride height. This setting can
only be selected while your vehicle is
in park (P) with the engine running, and
you need to confirm the selection.
•AdvanceTrac Stability Control is
active and cannot be adjusted.
• Ride height is set to Low and
suspension damping is set to Track.
• Comfort damping cannot be
selected due to low ride height.
• Launch control is available.
• Transmission automatic shift
calibration is set to Sport.
• Rear wing does not deploy.
• Air brake activates at speeds above
75 mph (121 km/h) when the brakes
are applied with moderate force.
Note: When you shut down your vehicle in
V-Max or Track mode, the vehicle returns
to the Normal ride height. When you restart
your vehicle in V-Max or Track mode, you
need to re-acknowledge the drive mode
selection in the information display in order
for the drive mode to reactivate. If you do
not make a selection, the vehicle returns to
the previously selected drive mode.
124
Ford GT (CGX), enUSA, Edition date: 201711, First Printing Driving Aids
Page 129 of 325
Front Lift
WARNING
Before using front lift, make sure the
area around your vehicle is free from
obstruction. Failure to follow this
instruction could result in personal injury
or death. Your vehicle has a front lift system to
provide additional front end clearance
when approaching a speed bump,
driveway ramp or another similar surface
where front end clearance could be a
concern.
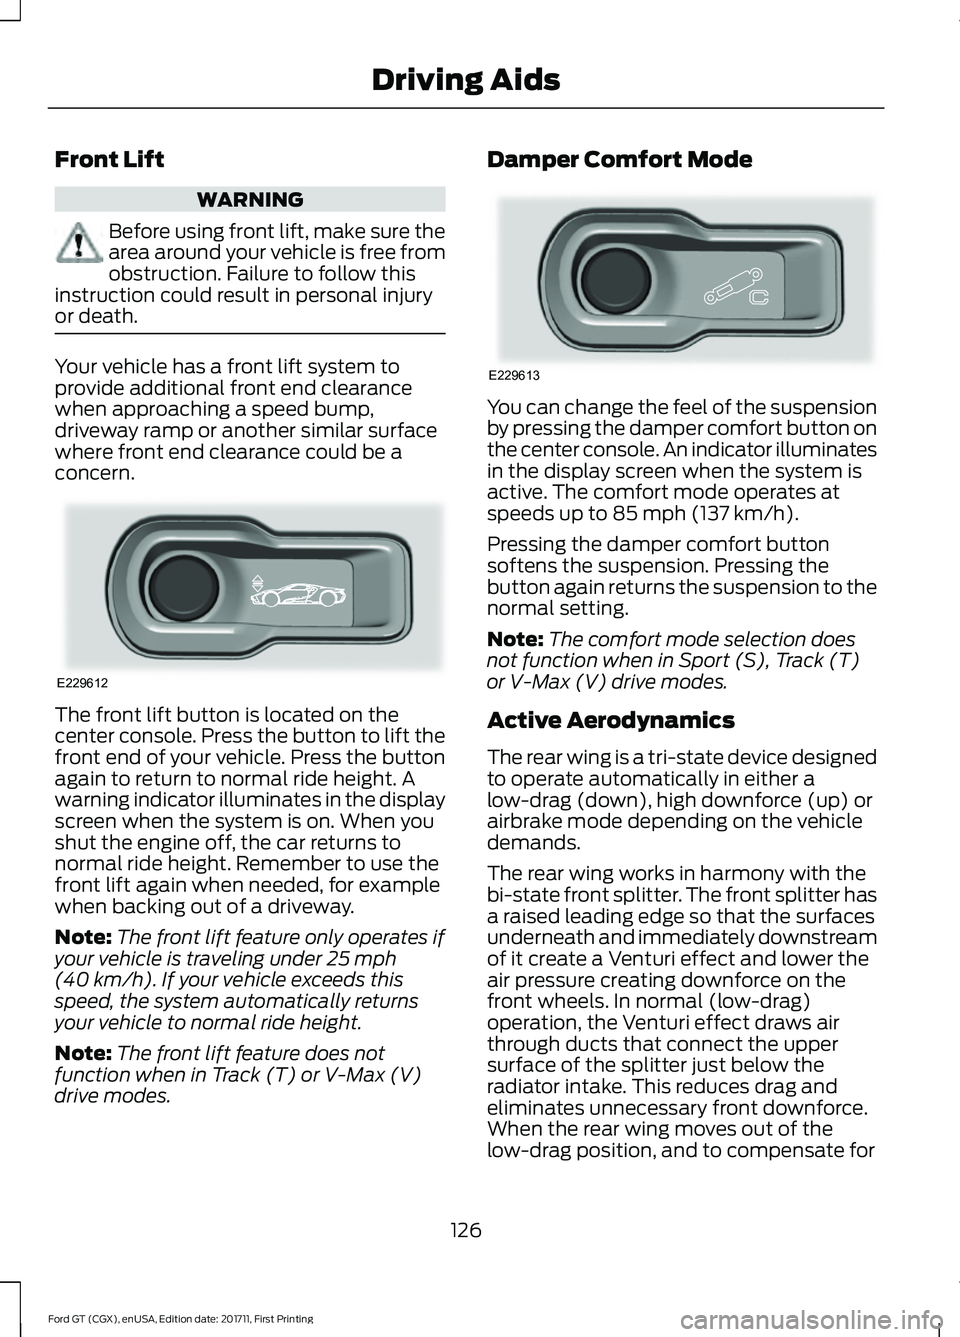
The front lift button is located on the
center console. Press the button to lift the
front end of your vehicle. Press the button
again to return to normal ride height. A
warning indicator illuminates in the display
screen when the system is on. When you
shut the engine off, the car returns to
normal ride height. Remember to use the
front lift again when needed, for example
when backing out of a driveway.
Note:
The front lift feature only operates if
your vehicle is traveling under 25 mph
(40 km/h). If your vehicle exceeds this
speed, the system automatically returns
your vehicle to normal ride height.
Note: The front lift feature does not
function when in Track (T) or V-Max (V)
drive modes. Damper Comfort Mode
You can change the feel of the suspension
by pressing the damper comfort button on
the center console. An indicator illuminates
in the display screen when the system is
active. The comfort mode operates at
speeds up to
85 mph (137 km/h).
Pressing the damper comfort button
softens the suspension. Pressing the
button again returns the suspension to the
normal setting.
Note: The comfort mode selection does
not function when in Sport (S), Track (T)
or V-Max (V) drive modes.
Active Aerodynamics
The rear wing is a tri-state device designed
to operate automatically in either a
low-drag (down), high downforce (up) or
airbrake mode depending on the vehicle
demands.
The rear wing works in harmony with the
bi-state front splitter. The front splitter has
a raised leading edge so that the surfaces
underneath and immediately downstream
of it create a Venturi effect and lower the
air pressure creating downforce on the
front wheels. In normal (low-drag)
operation, the Venturi effect draws air
through ducts that connect the upper
surface of the splitter just below the
radiator intake. This reduces drag and
eliminates unnecessary front downforce.
When the rear wing moves out of the
low-drag position, and to compensate for
126
Ford GT (CGX), enUSA, Edition date: 201711, First Printing Driving AidsE229612 E229613
Page 141 of 325
Jump Starting
1.
Start the engine of the booster vehicle
and rev the engine moderately, or press
the accelerator gently to keep your
engine speed between 2000 and 3000
RPM, as shown in your tachometer.
2. Start the engine of the disabled vehicle.
3. Once the disabled vehicle has been started, run both vehicle engines for an
additional three minutes before
disconnecting the jumper cables.
Removing the Jumper Cables
Remove the jumper cables in the reverse
order that they were connected.
1. Remove the jumper cable from the negative (-) terminal of the booster
vehicle battery.
2. Remove the jumper cable from the negative (A) post of the disabled
vehicle.
3. Remove the jumper cable from the positive (+) terminal of the booster
vehicle battery.
4. Remove the jumper cable from the positive (B) post of the disabled
vehicle.
5. Allow the engine to idle for at least one
minute.
POST-CRASH ALERT SYSTEM
The system flashes the direction indicators
and sounds the horn (intermittently) in the
event of a serious impact that deploys an
airbag (front and side) or the safety belt
pretensioners.
The horn and indicators will turn off when:
• You press the hazard control button.
• You press the panic button on the
remote entry transmitter (if equipped).
• Your vehicle runs out of power. TRANSPORTING THE VEHICLE
If you need to transport your vehicle,
please contact the Ford GT Concierge at
800-210-5795.
You can only transport your vehicle in an
enclosed trailer or on a roll back flatbed
truck. The ramp angle / angle of approach
on Ford GT is 9 degrees. Below are some
ramp lengths required to achieve this angle
depending on trailer / bed entrance height.
Ramp Length
Height
130 inches
20 inches
115 inches
18 inches
105 inches
16 inches
90 inches
14 inches
80 inches
12 inches
Your vehicle has a front end lift feature
that uses the electronically controlled
suspension hydraulics to lift the front of
the car. You can use this feature for
driveway approaches and speed bumps.
If there is power to this system, use it to lift
the front when loading the car onto a trailer
or a roll back. To operate the front lift, use
the switch in the console.
Note: The ground clearance on the car at
standard ride height is only 5 in (12 cm). Use
care when moving or loading the car to
make sure it does not bottom out.
Note: The vehicle doors swing both upward
and outward. At the full open position, the
top edge of the door is 67 in (170 cm) from
the ground and swings outward 26 in
(66 cm). Make sure you have the clearance
you need prior to opening the door.
The full undertrays of the vehicle are
carbon fiber, there are no tie down slots.
Use only over the tire straps to tie the car
down for transport.
138
Ford GT (CGX), enUSA, Edition date: 201711, First Printing Roadside Emergencies
Page 163 of 325
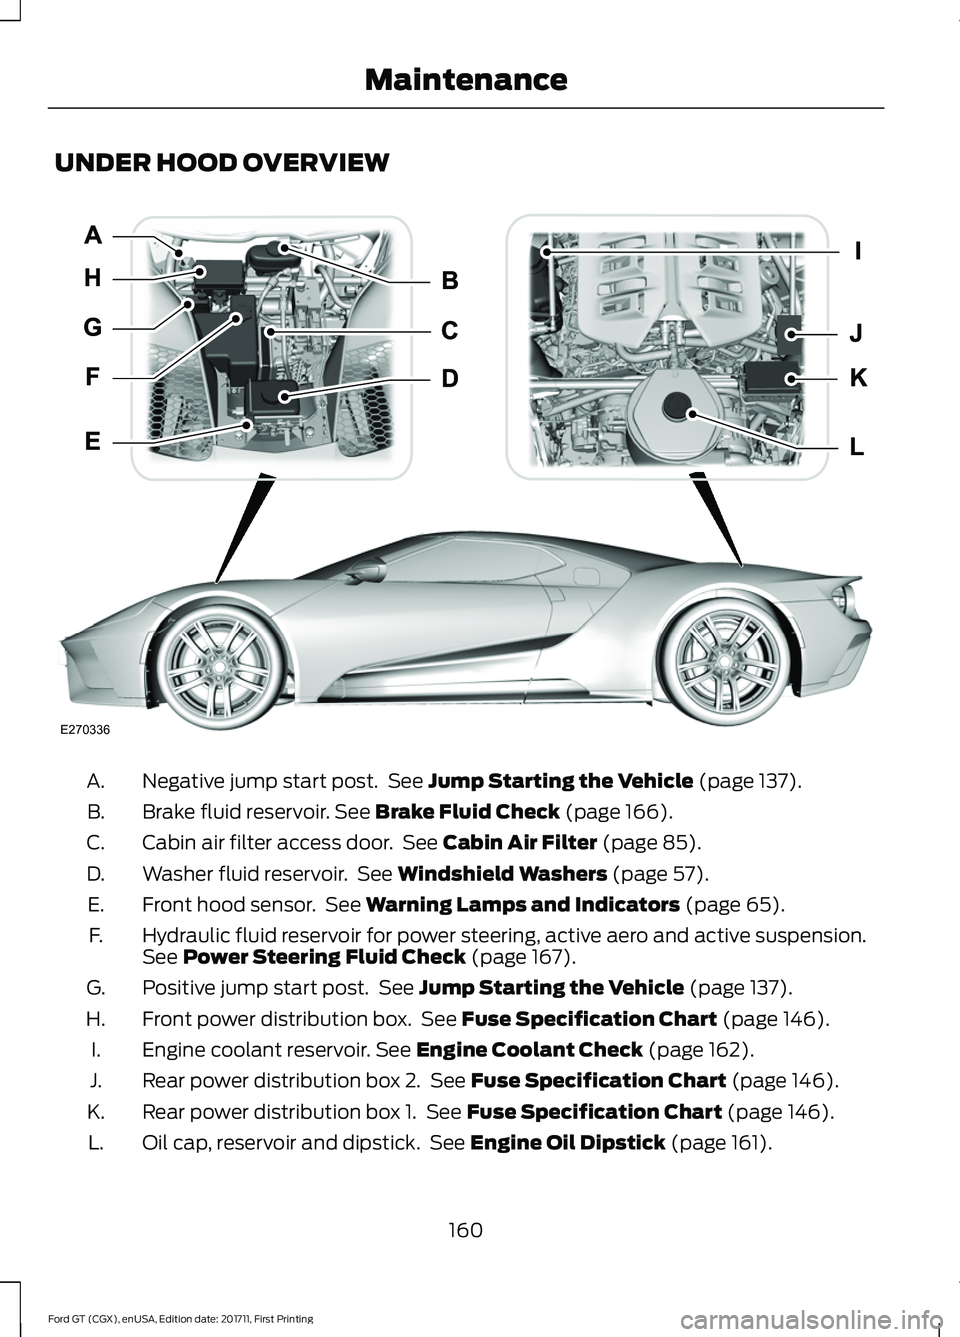
UNDER HOOD OVERVIEW
Negative jump start post. See Jump Starting the Vehicle (page 137).
A.
Brake fluid reservoir.
See Brake Fluid Check (page 166).
B.
Cabin air filter access door. See
Cabin Air Filter (page 85).
C.
Washer fluid reservoir. See
Windshield Washers (page 57).
D.
Front hood sensor. See
Warning Lamps and Indicators (page 65).
E.
Hydraulic fluid reservoir for power steering, active aero and active suspension.
See
Power Steering Fluid Check (page 167).
F.
Positive jump start post. See
Jump Starting the Vehicle (page 137).
G.
Front power distribution box. See
Fuse Specification Chart (page 146).
H.
Engine coolant reservoir.
See Engine Coolant Check (page 162).
I.
Rear power distribution box 2. See
Fuse Specification Chart (page 146).
J.
Rear power distribution box 1. See
Fuse Specification Chart (page 146).
K.
Oil cap, reservoir and dipstick. See
Engine Oil Dipstick (page 161).
L.
160
Ford GT (CGX), enUSA, Edition date: 201711, First Printing MaintenanceE270336
Page 170 of 325
To avoid fluid contamination, the reservoir
cap must remain in place and fully tight,
unless you are adding fluid.
Only use fluid that meets Ford
specifications. See Capacities and
Specifications (page 204).
POWER STEERING FLUID
CHECK
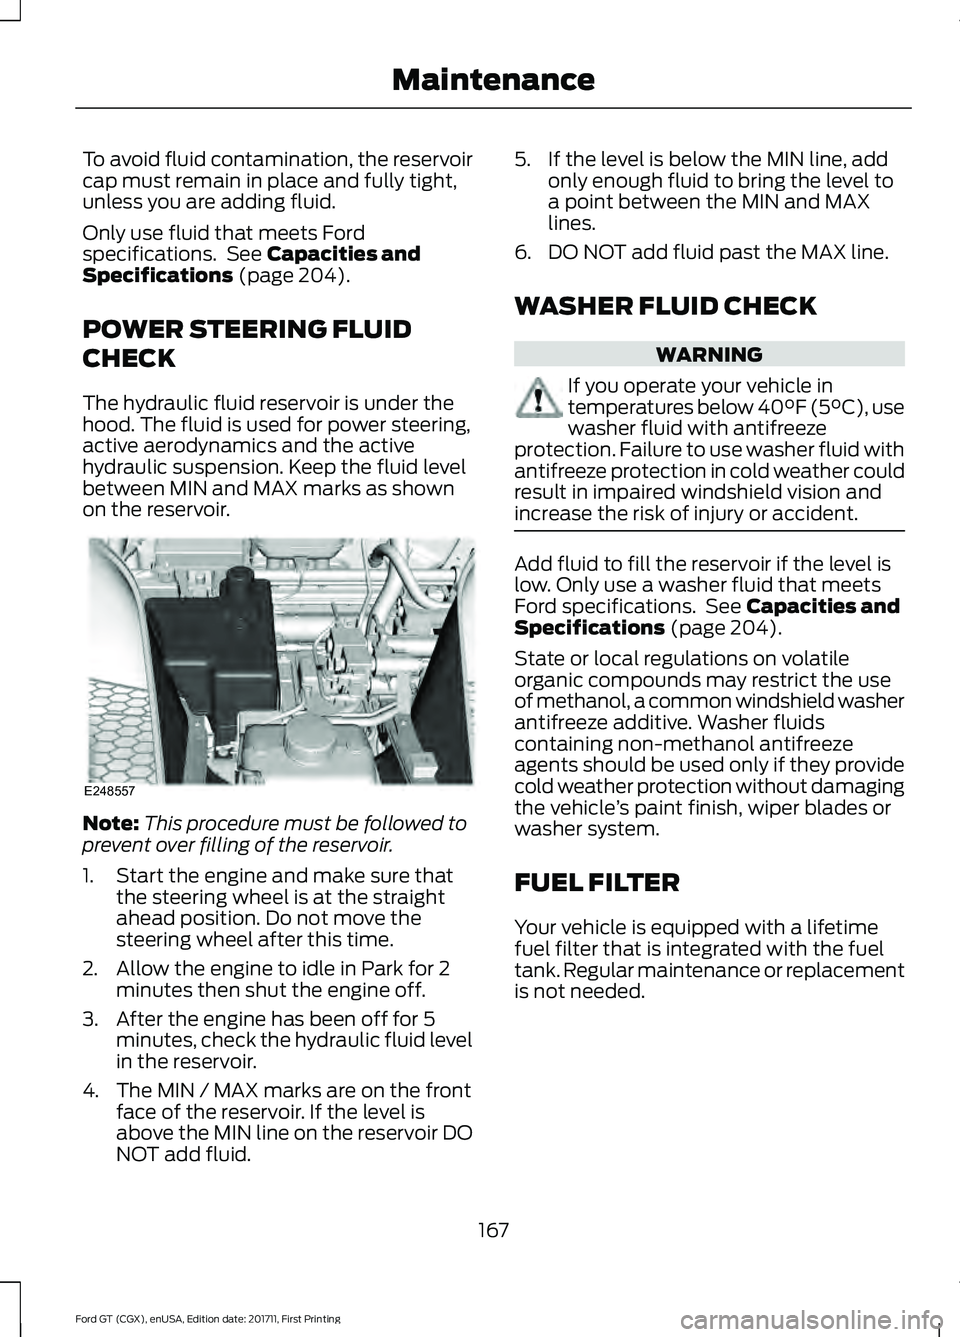
The hydraulic fluid reservoir is under the
hood. The fluid is used for power steering,
active aerodynamics and the active
hydraulic suspension. Keep the fluid level
between MIN and MAX marks as shown
on the reservoir. Note:
This procedure must be followed to
prevent over filling of the reservoir.
1. Start the engine and make sure that the steering wheel is at the straight
ahead position. Do not move the
steering wheel after this time.
2. Allow the engine to idle in Park for 2 minutes then shut the engine off.
3. After the engine has been off for 5 minutes, check the hydraulic fluid level
in the reservoir.
4. The MIN / MAX marks are on the front face of the reservoir. If the level is
above the MIN line on the reservoir DO
NOT add fluid. 5. If the level is below the MIN line, add
only enough fluid to bring the level to
a point between the MIN and MAX
lines.
6. DO NOT add fluid past the MAX line.
WASHER FLUID CHECK WARNING
If you operate your vehicle in
temperatures below 40°F (5°C), use
washer fluid with antifreeze
protection. Failure to use washer fluid with
antifreeze protection in cold weather could
result in impaired windshield vision and
increase the risk of injury or accident. Add fluid to fill the reservoir if the level is
low. Only use a washer fluid that meets
Ford specifications. See
Capacities and
Specifications (page 204).
State or local regulations on volatile
organic compounds may restrict the use
of methanol, a common windshield washer
antifreeze additive. Washer fluids
containing non-methanol antifreeze
agents should be used only if they provide
cold weather protection without damaging
the vehicle ’s paint finish, wiper blades or
washer system.
FUEL FILTER
Your vehicle is equipped with a lifetime
fuel filter that is integrated with the fuel
tank. Regular maintenance or replacement
is not needed.
167
Ford GT (CGX), enUSA, Edition date: 201711, First Printing MaintenanceE248557
Page 199 of 325
WARNINGS
labels, then you should contact
your authorized dealer as soon as
possible. Use of any tire or wheel
not recommended by Ford can
affect the safety and performance
of your vehicle, which could result
in an increased risk of loss of
vehicle control, vehicle rollover,
personal injury and death. The use of
non-recommended tires and
wheels could cause steering,
suspension, axle, transfer case or
power transfer unit failure. If you
have questions regarding tire
replacement, contact your
authorized dealer as soon as
possible. To reduce the risk of serious
injury, when mounting
replacement tires and wheels, you
should not exceed the maximum
pressure indicated on the sidewall
of the tire to set the beads without
additional precautions listed
below. If the beads do not seat at
the maximum pressure indicated,
re-lubricate and try again. When inflating the tire for
mounting pressures up to
20 psi (1.38 bar) greater than the
maximum pressure on the tire
sidewall, the following
precautions must be taken to
protect the person mounting the
tire: •
Make sure that you have the
correct tire and wheel size.
• Lubricate the tire bead and
wheel bead seat area again.
• Stand at a minimum of
12 ft
(3.66 m) away from the wheel
and tire assembly.
• Use both eye and ear
protection. WARNINGS
For a mounting pressure
more than
20 psi (1.38 bar)
greater than the maximum
pressure, a Ford dealer or other
tire service professional should do
the mounting. Always inflate steel carcass
tires with a remote air fill with
the person inflating standing at a
minimum of
12 ft (3.66 m) away
from the wheel and tire assembly. Important: Remember to replace
the wheel valve stems when the
road tires are replaced on your
vehicle.
It is recommended that the two
front tires or two rear tires
generally be replaced as a pair.
The tire pressure sensors mounted
in the wheels (originally installed
on your vehicle) are not designed
to be used in aftermarket wheels.
196
Ford GT (CGX), enUSA, Edition date: 201711, First Printing Wheels and Tires
Page 201 of 325
Wheel misalignment in the front
or the rear can cause uneven and
rapid treadwear of your tires and
should be corrected by an
authorized dealer. Front-wheel
drive vehicles and those with an
independent rear suspension (if
equipped) may require alignment
of all four wheels.
The tires should also be balanced
periodically. An unbalanced tire
and wheel assembly may result in
irregular tire wear.
USING SUMMER TIRES
Your Ford GT was built with Michelin Pilot
Sport Cup 2 tires which are a summer tire.
Summer tires provide superior
performance on wet and dry roads.
Summer tires do not have the Mud and
Snow (M+S or M/S) tire traction rating on
the tire side wall. Since summer tires do
not have the same traction performance
as All-season or Snow tires, we do not
recommend using summer tires when
temperatures drop to about 45°F (7°C) or
below (depending on tire wear and
environmental conditions) or in snow and
ice conditions. Like any tire, summer tire
performance is affected by tire wear and
environmental conditions. If you must drive
in those conditions, we recommend using
Mud and Snow (M+S, M/S), All-season or
Snow tires.
Always store your summer tires indoors at
temperatures above 19°F (-7°C). The
rubber compounds used in these tires lose
flexibility and may develop surface cracks
in the tread area at temperatures below
19°F (-7°C)
. If the tires have been
subjected to 19°F (-7°C) or less, warm
them in a heated space to at least 41°F
(5°C) for at least 24 hours before installing
them on a vehicle, or moving the vehicle with the tires installed, or checking tire
inflation. Do not place tires near heaters
or heating devices used to warm the room
where the tires are stored. Do not apply
heat or blow heated air directly on the tires.
Always inspect the tires after storage
periods and before use.
USING SNOW CHAINS
WARNINGS
If you choose to install snow tires on
your vehicle, they must be the same
size, construction, and load range as
the original tires listed on the tire placard,
and they must be installed on all four
wheels. Mixing tires of different size or
construction on your vehicle can adversely
affect your vehicle's handling and braking,
and may lead to loss of vehicle control. Do not use snow chains or cables on
this vehicle as they may cause
damage to your vehicle which may
lead to loss of vehicle control. Snow chains have not been approved for
use on your vehicle.
TIRE PRESSURE MONITORING
SYSTEM
WARNINGS
The tire pressure monitoring system
is not a substitute for manually
checking tire pressures. You should
periodically check tire pressures using a
pressure gauge. Failure to correctly
maintain tire pressures could increase the
risk of tire failure, loss of control, vehicle
rollover and personal injury. Do not use tire sealants as they may
damage the tire pressure monitoring
system.
198
Ford GT (CGX), enUSA, Edition date: 201711, First Printing Wheels and Tires
Page 212 of 325
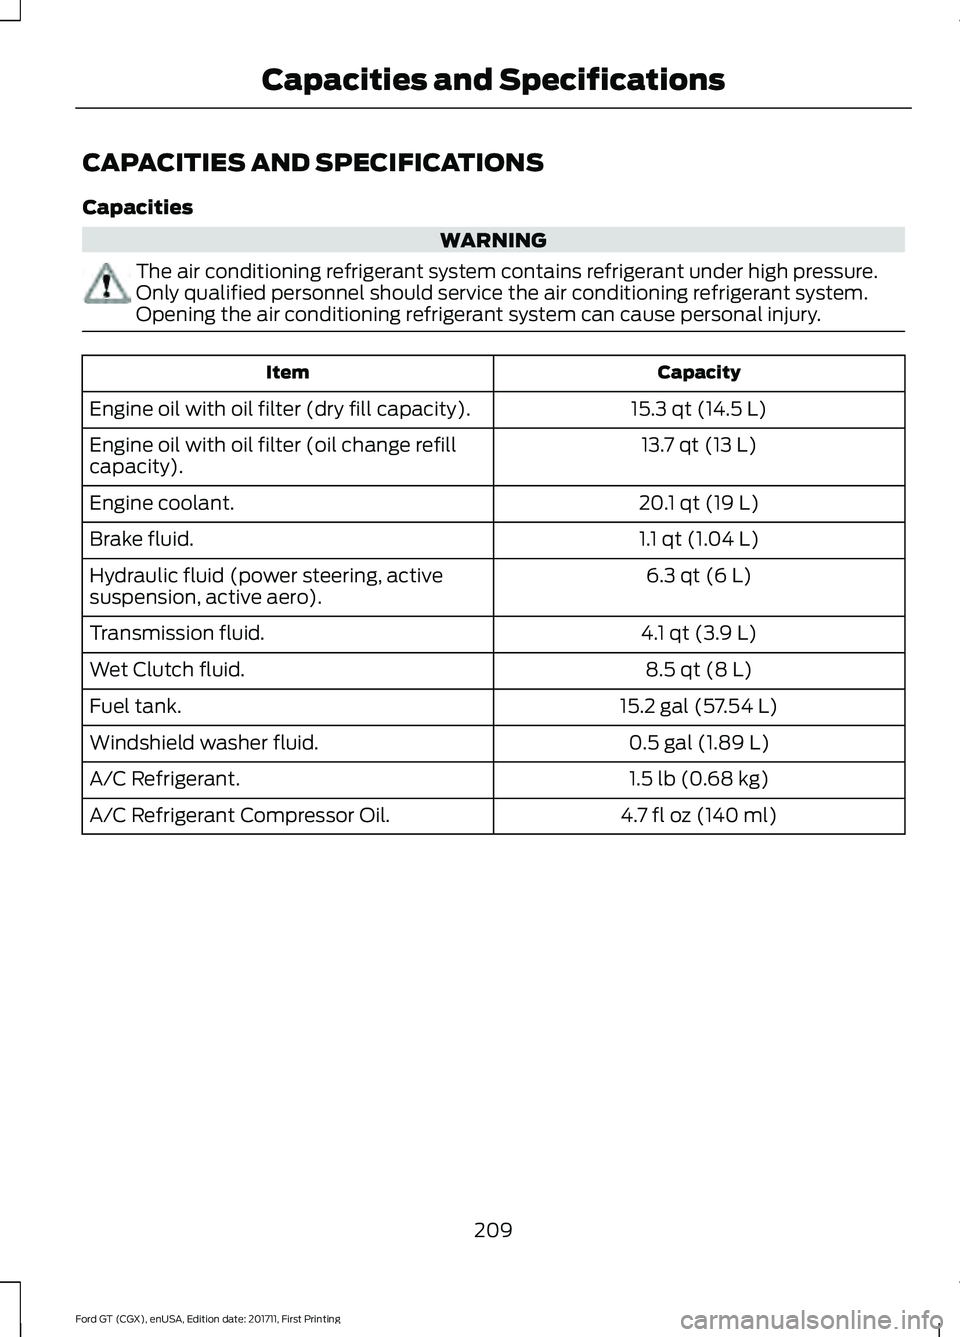
CAPACITIES AND SPECIFICATIONS
Capacities
WARNING
The air conditioning refrigerant system contains refrigerant under high pressure.
Only qualified personnel should service the air conditioning refrigerant system.
Opening the air conditioning refrigerant system can cause personal injury.
Capacity
Item
15.3 qt (14.5 L)
Engine oil with oil filter (dry fill capacity).
13.7 qt (13 L)
Engine oil with oil filter (oil change refill
capacity).
20.1 qt (19 L)
Engine coolant.
1.1 qt (1.04 L)
Brake fluid.
6.3 qt (6 L)
Hydraulic fluid (power steering, active
suspension, active aero).
4.1 qt (3.9 L)
Transmission fluid.
8.5 qt (8 L)
Wet Clutch fluid.
15.2 gal (57.54 L)
Fuel tank.
0.5 gal (1.89 L)
Windshield washer fluid.
1.5 lb (0.68 kg)
A/C Refrigerant.
4.7 fl oz (140 ml)
A/C Refrigerant Compressor Oil.
209
Ford GT (CGX), enUSA, Edition date: 201711, First Printing Capacities and Specifications
Page 278 of 325
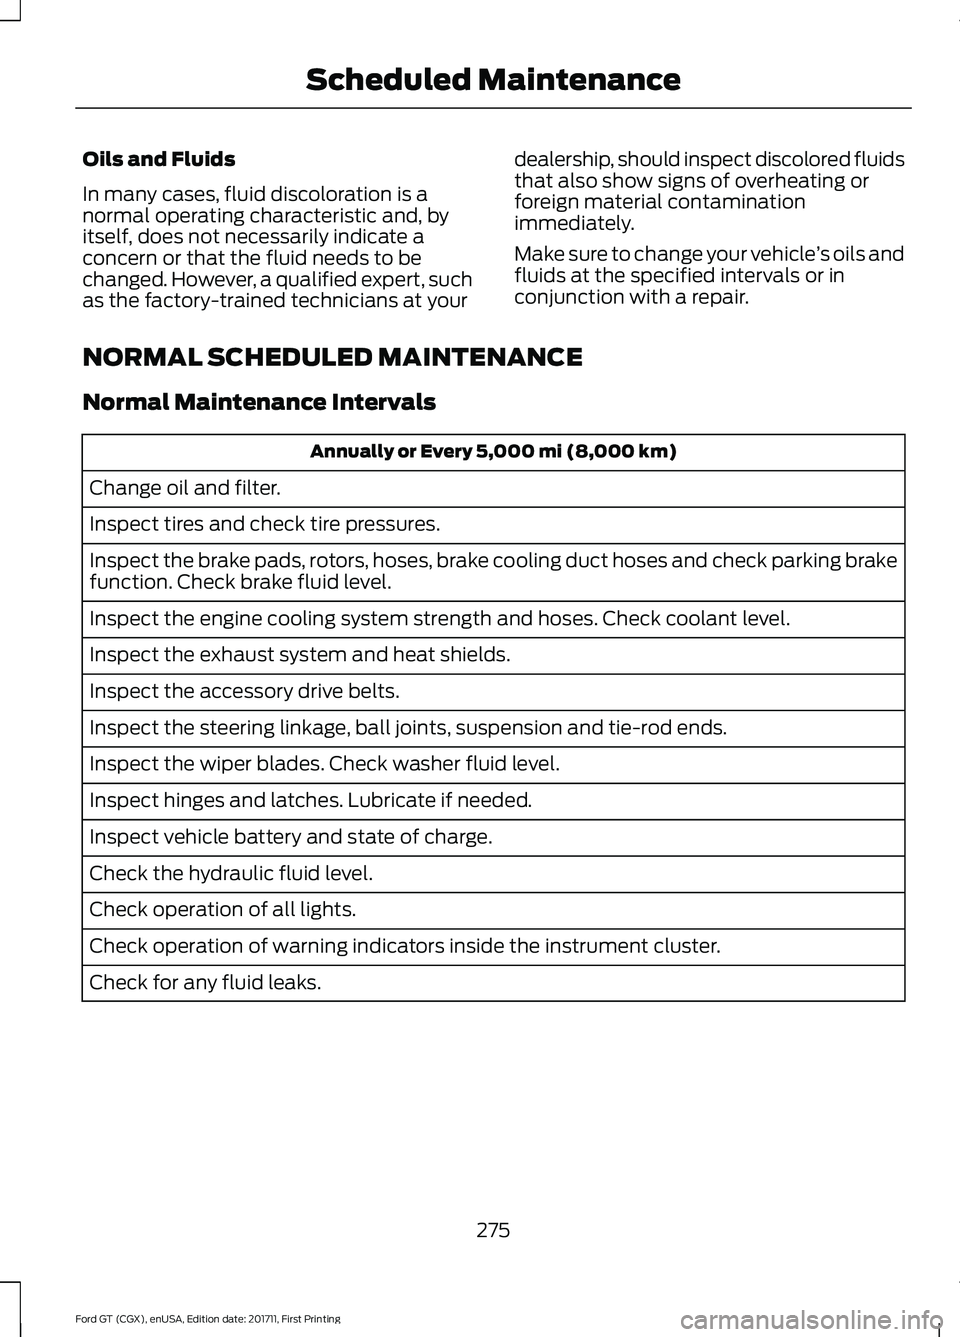
Oils and Fluids
In many cases, fluid discoloration is a
normal operating characteristic and, by
itself, does not necessarily indicate a
concern or that the fluid needs to be
changed. However, a qualified expert, such
as the factory-trained technicians at your
dealership, should inspect discolored fluids
that also show signs of overheating or
foreign material contamination
immediately.
Make sure to change your vehicle
’s oils and
fluids at the specified intervals or in
conjunction with a repair.
NORMAL SCHEDULED MAINTENANCE
Normal Maintenance Intervals Annually or Every 5,000 mi (8,000 km)
Change oil and filter.
Inspect tires and check tire pressures.
Inspect the brake pads, rotors, hoses, brake cooling duct hoses and check parking brake
function. Check brake fluid level.
Inspect the engine cooling system strength and hoses. Check coolant level.
Inspect the exhaust system and heat shields.
Inspect the accessory drive belts.
Inspect the steering linkage, ball joints, suspension and tie-rod ends.
Inspect the wiper blades. Check washer fluid level.
Inspect hinges and latches. Lubricate if needed.
Inspect vehicle battery and state of charge.
Check the hydraulic fluid level.
Check operation of all lights.
Check operation of warning indicators inside the instrument cluster.
Check for any fluid leaks.
275
Ford GT (CGX), enUSA, Edition date: 201711, First Printing Scheduled Maintenance