remote control FORD GT 2019 User Guide
[x] Cancel search | Manufacturer: FORD, Model Year: 2019, Model line: GT, Model: FORD GT 2019Pages: 321, PDF Size: 5.24 MB
Page 52 of 321
PASSIVE ANTI-THEFT
SYSTEM
Note:
The system is not compatible with
non-Ford aftermarket remote start systems.
Use of these systems may result in vehicle
starting problems and a loss of security
protection.
Note: Metallic objects, electronic devices
or a second coded key on the same key
chain may cause vehicle starting problems
if they are too close to the key when starting
your vehicle. Prevent these objects from
touching the coded key while starting your
vehicle. Switch the ignition off, move all
objects on the key chain away from the
coded key and restart your vehicle if a
problem occurs.
Note: Do not leave a duplicate coded key
in your vehicle. Always take your keys and
lock all doors when leaving your vehicle.
SecuriLock
The system helps prevent your vehicle
from starting unless you use a coded key
programmed to your vehicle. Using the
wrong key may prevent your vehicle from
starting. A message may appear in the
information display.
If you are unable to start your vehicle with
a correctly coded key, it is not operating
properly. A message may appear in the
information display.
Automatic Arming
Your vehicle arms immediately after
switching the ignition off.
Automatic Disarming
Switching the ignition on with a coded key
disarms your vehicle. Replacement Keys
Note:
Your vehicle comes equipped with
two intelligent access keys.
The intelligent access key functions as a
programmed key that operates the driver
door lock and activates the intelligent
access with push button start system, as
well as a remote control.
If your programmed transmitters are lost
or stolen and you do not have an extra
coded key, contact the Ford GT concierge
to have your Ford GT transported to your
Certified Ford GT Service Dealership to
erase the key codes from your vehicle and
program new coded keys. See About This
Manual (page 5).
Store an extra programmed key away from
your vehicle in a safe place to help prevent
any inconveniences. See your authorized
dealer to purchase additional spare or
replacement keys.
Programming a Spare Intelligent
Access Key
Note: You can program a maximum of four
intelligent access keys to your vehicle.
You must have two previously
programmed intelligent access keys inside
your vehicle and the new unprogrammed
intelligent access keys readily accessible.
See an authorized dealer to have the spare
key programmed if two previously
programmed keys are not available.
Make sure that your vehicle is off before
beginning this procedure. Make sure that
you close all the doors before beginning
and that they remain closed throughout
the procedure. Perform all steps within 30
seconds of starting the sequence. Stop
and wait for at least one minute before
starting again if you perform any steps out
of sequence.
Read and understand the entire procedure
before you begin.
49
Ford GT (CGX) Canada/United States of America, enUSA, Edition date: 201810, First-Printing Security
Page 53 of 321
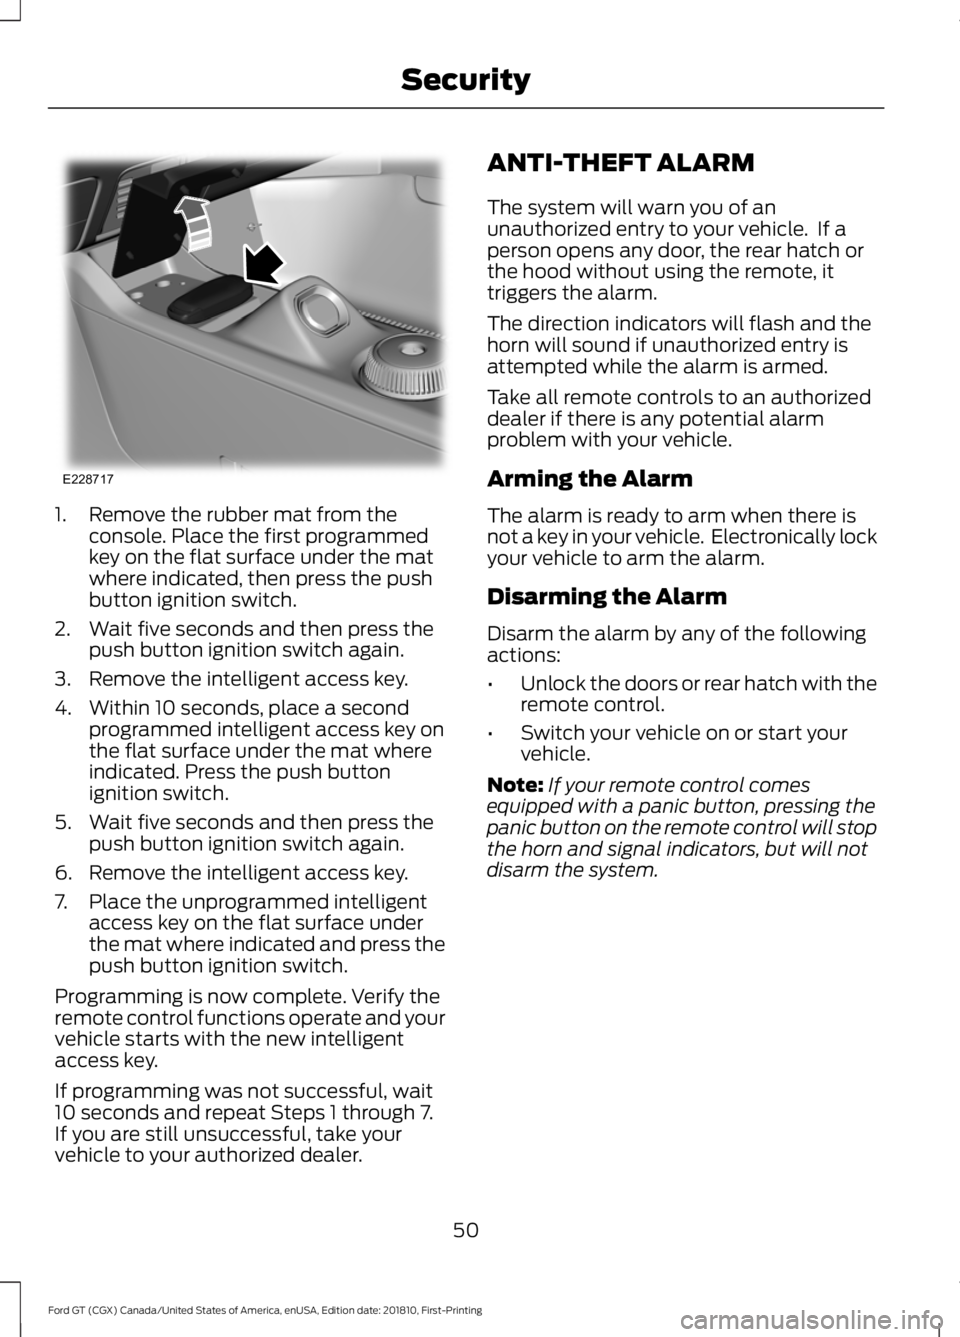
1. Remove the rubber mat from the
console. Place the first programmed
key on the flat surface under the mat
where indicated, then press the push
button ignition switch.
2. Wait five seconds and then press the push button ignition switch again.
3. Remove the intelligent access key.
4. Within 10 seconds, place a second programmed intelligent access key on
the flat surface under the mat where
indicated. Press the push button
ignition switch.
5. Wait five seconds and then press the push button ignition switch again.
6. Remove the intelligent access key.
7. Place the unprogrammed intelligent access key on the flat surface under
the mat where indicated and press the
push button ignition switch.
Programming is now complete. Verify the
remote control functions operate and your
vehicle starts with the new intelligent
access key.
If programming was not successful, wait
10 seconds and repeat Steps 1 through 7.
If you are still unsuccessful, take your
vehicle to your authorized dealer. ANTI-THEFT ALARM
The system will warn you of an
unauthorized entry to your vehicle. If a
person opens any door, the rear hatch or
the hood without using the remote, it
triggers the alarm.
The direction indicators will flash and the
horn will sound if unauthorized entry is
attempted while the alarm is armed.
Take all remote controls to an authorized
dealer if there is any potential alarm
problem with your vehicle.
Arming the Alarm
The alarm is ready to arm when there is
not a key in your vehicle. Electronically lock
your vehicle to arm the alarm.
Disarming the Alarm
Disarm the alarm by any of the following
actions:
•
Unlock the doors or rear hatch with the
remote control.
• Switch your vehicle on or start your
vehicle.
Note: If your remote control comes
equipped with a panic button, pressing the
panic button on the remote control will stop
the horn and signal indicators, but will not
disarm the system.
50
Ford GT (CGX) Canada/United States of America, enUSA, Edition date: 201810, First-Printing SecurityE228717
Page 62 of 321
To switch the system on:
•
For vehicles sold in the United States,
the lighting control must be in the
autolamps position. The lamps turn on
in daylight and turn the headlamps on
when ambient light is low. You can
enable this feature in the information
display. See Information Displays
(page 69).
• For vehicles sold in Canada, daytime
running lamps turn on in both off and
autolamps position. You cannot
disable this feature.
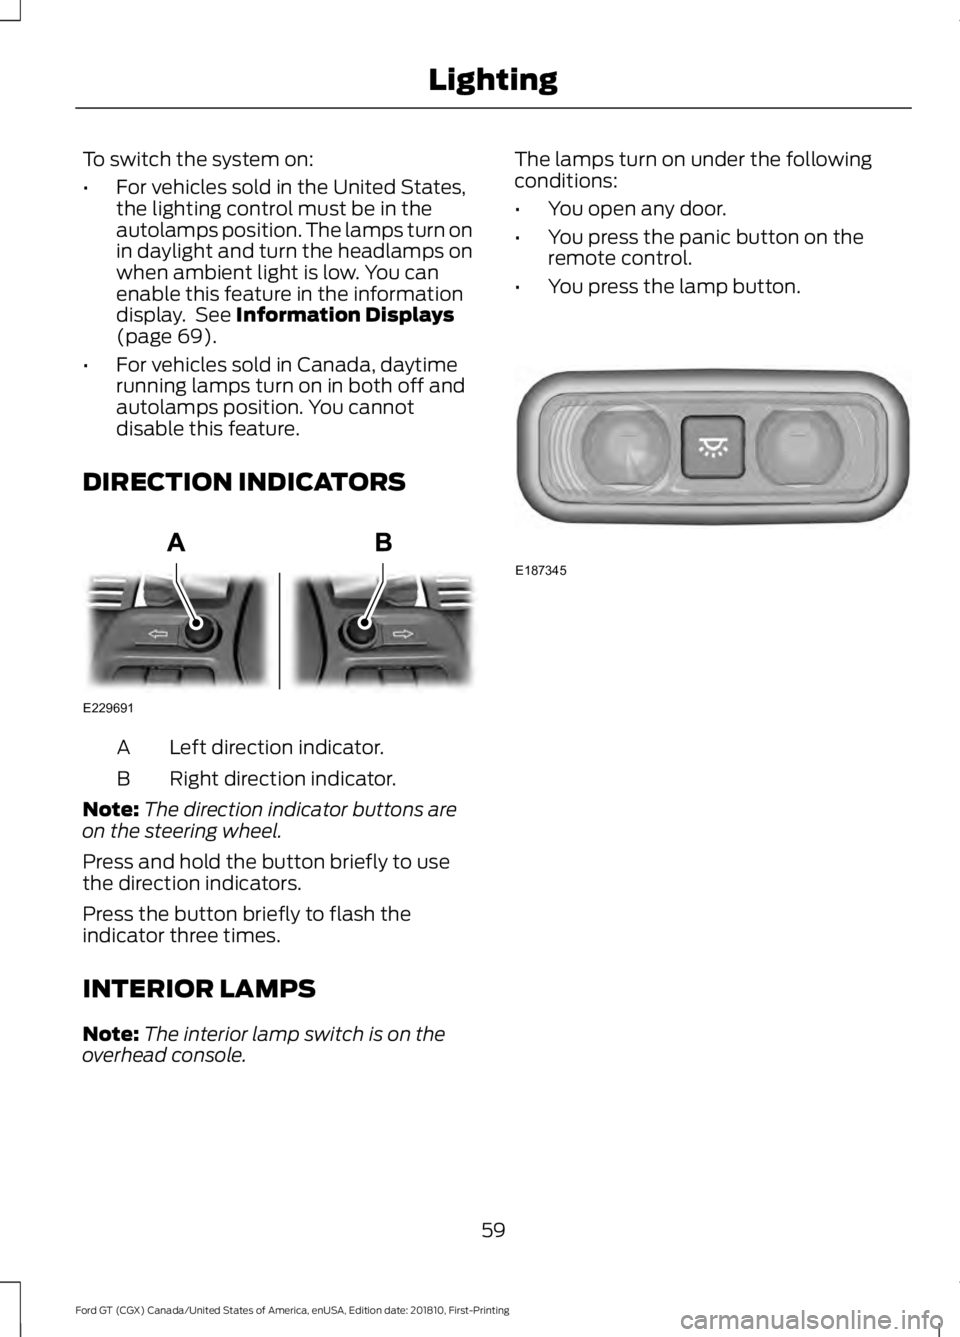
DIRECTION INDICATORS Left direction indicator.
A
Right direction indicator.
B
Note: The direction indicator buttons are
on the steering wheel.
Press and hold the button briefly to use
the direction indicators.
Press the button briefly to flash the
indicator three times.
INTERIOR LAMPS
Note: The interior lamp switch is on the
overhead console. The lamps turn on under the following
conditions:
•
You open any door.
• You press the panic button on the
remote control.
• You press the lamp button. 59
Ford GT (CGX) Canada/United States of America, enUSA, Edition date: 201810, First-Printing LightingE229691 E187345
Page 63 of 321
POWER WINDOWS
WARNING: Do not leave children
unattended in your vehicle and do not
let them play with the power windows.
Failure to follow this instruction could
result in personal injury. WARNING:
When closing the
power windows, verify they are free of
obstruction and make sure that children
and pets are not in the proximity of the
window openings. Note:
You may hear a pulsing noise when
just one of the windows is open. Lower the
opposite window slightly to reduce this
noise.
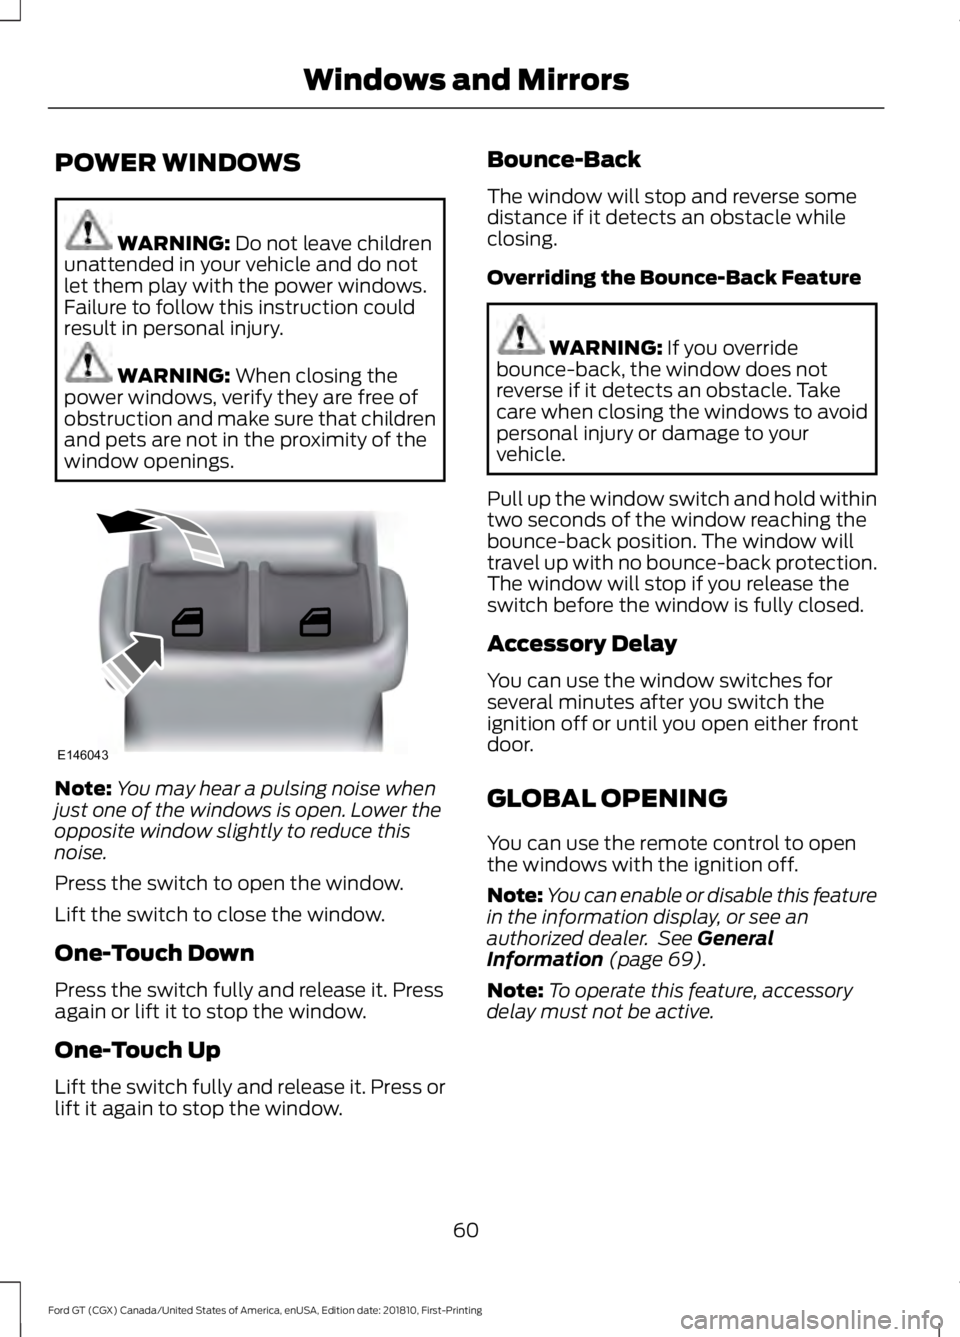
Press the switch to open the window.
Lift the switch to close the window.
One-Touch Down
Press the switch fully and release it. Press
again or lift it to stop the window.
One-Touch Up
Lift the switch fully and release it. Press or
lift it again to stop the window. Bounce-Back
The window will stop and reverse some
distance if it detects an obstacle while
closing.
Overriding the Bounce-Back Feature
WARNING:
If you override
bounce-back, the window does not
reverse if it detects an obstacle. Take
care when closing the windows to avoid
personal injury or damage to your
vehicle.
Pull up the window switch and hold within
two seconds of the window reaching the
bounce-back position. The window will
travel up with no bounce-back protection.
The window will stop if you release the
switch before the window is fully closed.
Accessory Delay
You can use the window switches for
several minutes after you switch the
ignition off or until you open either front
door.
GLOBAL OPENING
You can use the remote control to open
the windows with the ignition off.
Note: You can enable or disable this feature
in the information display, or see an
authorized dealer. See
General
Information (page 69).
Note: To operate this feature, accessory
delay must not be active.
60
Ford GT (CGX) Canada/United States of America, enUSA, Edition date: 201810, First-Printing Windows and MirrorsE146043
Page 64 of 321
Remote Control Front Windows
You can open the windows for a short time
after you unlock your vehicle with the
remote control. After you unlock your
vehicle, press and hold the remote control
unlock button to open the windows.
Release the button once movement starts.
Press the lock or unlock button to stop
movement.
EXTERIOR MIRRORS
Power Exterior Mirrors
WARNING: Do not adjust the
mirrors when your vehicle is moving. This
could result in the loss of control of your
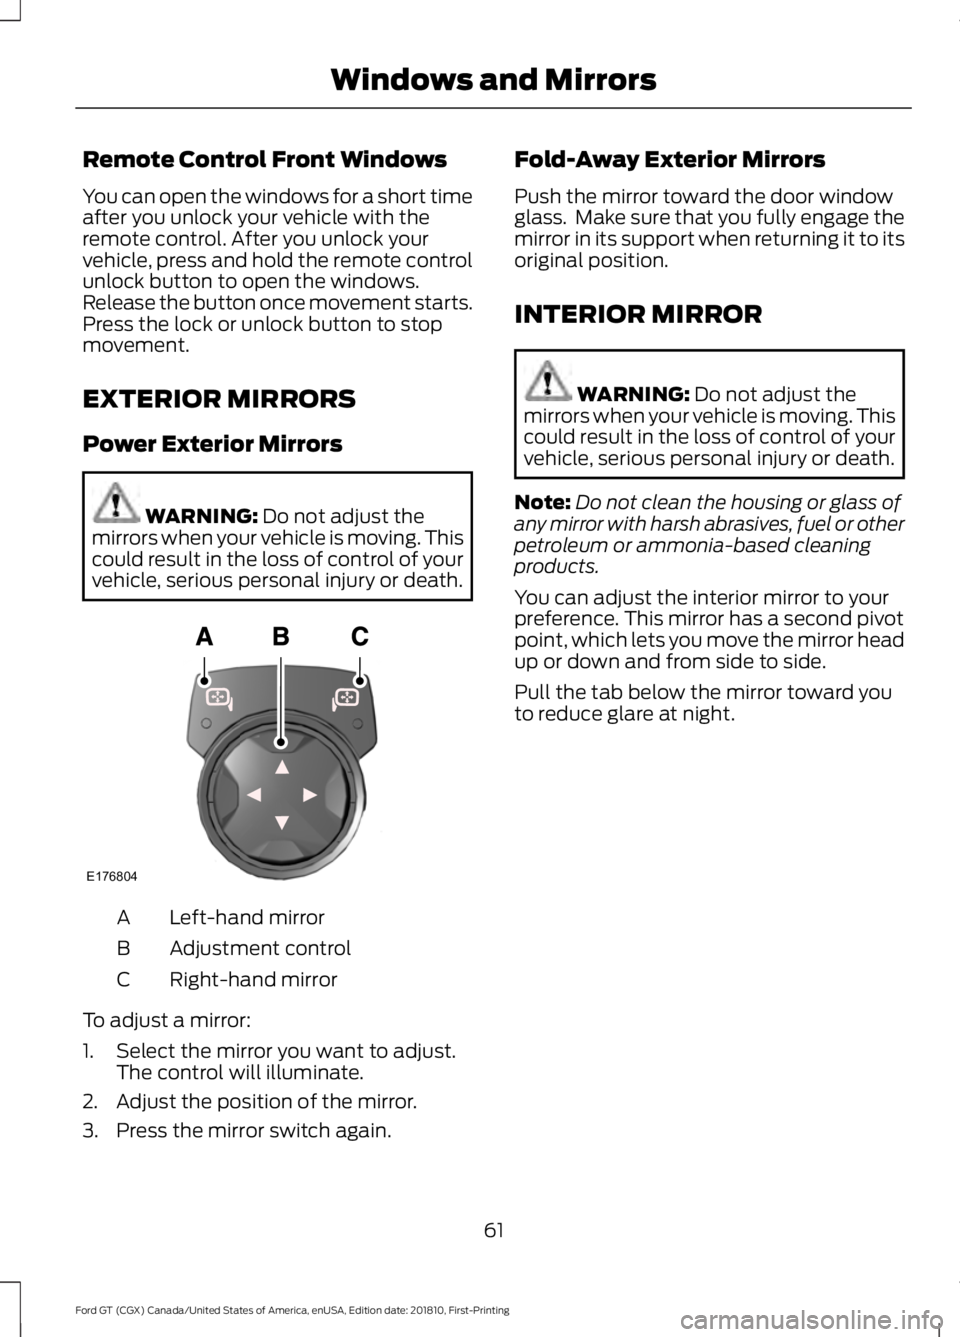
vehicle, serious personal injury or death. Left-hand mirror
A
Adjustment control
B
Right-hand mirror
C
To adjust a mirror:
1. Select the mirror you want to adjust. The control will illuminate.
2. Adjust the position of the mirror.
3. Press the mirror switch again. Fold-Away Exterior Mirrors
Push the mirror toward the door window
glass. Make sure that you fully engage the
mirror in its support when returning it to its
original position.
INTERIOR MIRROR
WARNING:
Do not adjust the
mirrors when your vehicle is moving. This
could result in the loss of control of your
vehicle, serious personal injury or death.
Note: Do not clean the housing or glass of
any mirror with harsh abrasives, fuel or other
petroleum or ammonia-based cleaning
products.
You can adjust the interior mirror to your
preference. This mirror has a second pivot
point, which lets you move the mirror head
up or down and from side to side.
Pull the tab below the mirror toward you
to reduce glare at night.
61
Ford GT (CGX) Canada/United States of America, enUSA, Edition date: 201810, First-Printing Windows and MirrorsE176804
Page 134 of 321
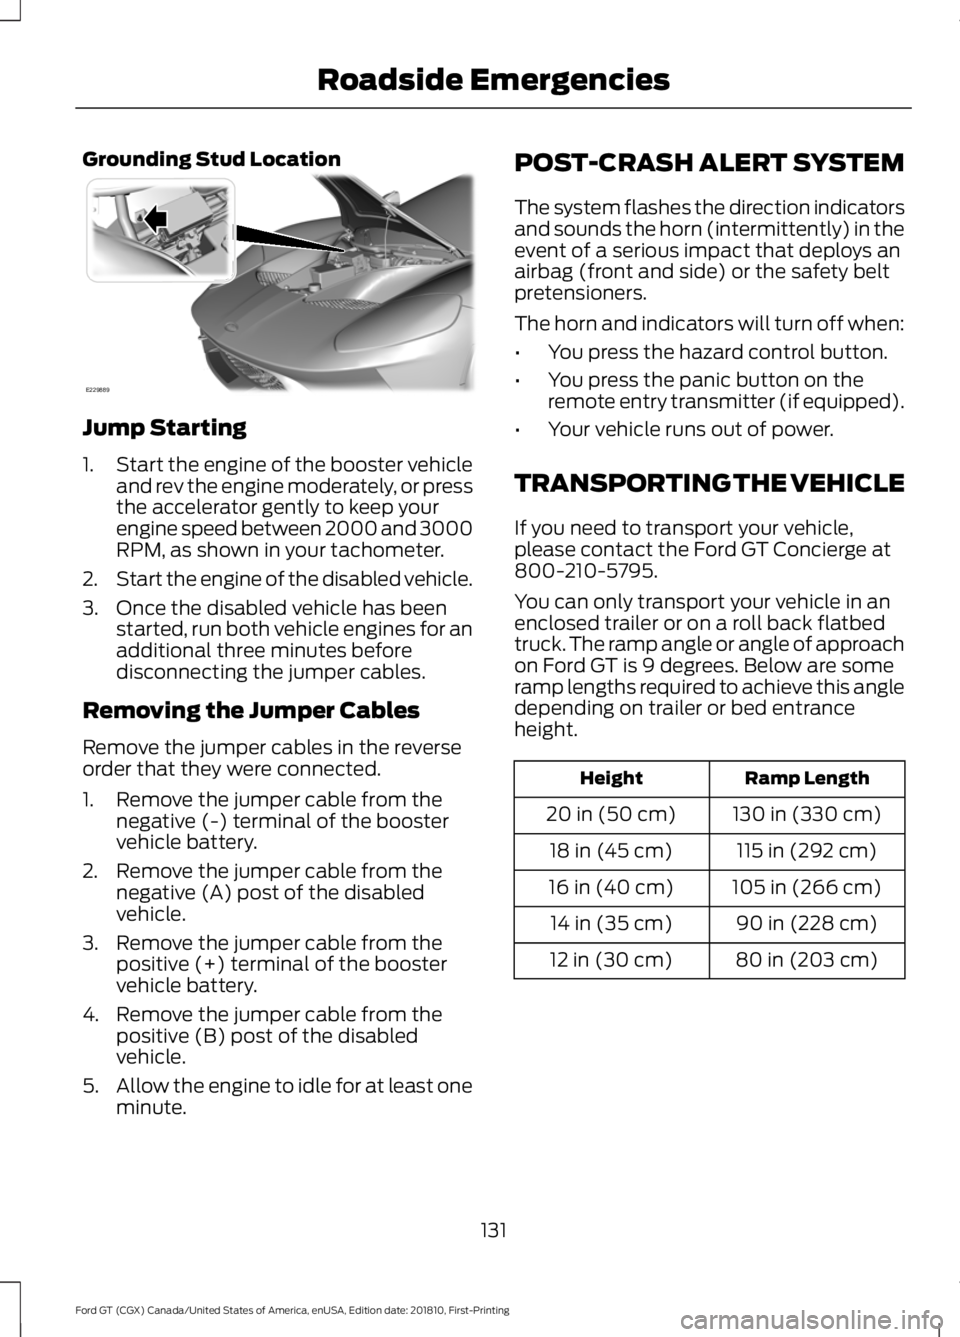
Grounding Stud Location
Jump Starting
1.
Start the engine of the booster vehicle
and rev the engine moderately, or press
the accelerator gently to keep your
engine speed between 2000 and 3000
RPM, as shown in your tachometer.
2. Start the engine of the disabled vehicle.
3. Once the disabled vehicle has been started, run both vehicle engines for an
additional three minutes before
disconnecting the jumper cables.
Removing the Jumper Cables
Remove the jumper cables in the reverse
order that they were connected.
1. Remove the jumper cable from the negative (-) terminal of the booster
vehicle battery.
2. Remove the jumper cable from the negative (A) post of the disabled
vehicle.
3. Remove the jumper cable from the positive (+) terminal of the booster
vehicle battery.
4. Remove the jumper cable from the positive (B) post of the disabled
vehicle.
5. Allow the engine to idle for at least one
minute. POST-CRASH ALERT SYSTEM
The system flashes the direction indicators
and sounds the horn (intermittently) in the
event of a serious impact that deploys an
airbag (front and side) or the safety belt
pretensioners.
The horn and indicators will turn off when:
•
You press the hazard control button.
• You press the panic button on the
remote entry transmitter (if equipped).
• Your vehicle runs out of power.
TRANSPORTING THE VEHICLE
If you need to transport your vehicle,
please contact the Ford GT Concierge at
800-210-5795.
You can only transport your vehicle in an
enclosed trailer or on a roll back flatbed
truck. The ramp angle or angle of approach
on Ford GT is 9 degrees. Below are some
ramp lengths required to achieve this angle
depending on trailer or bed entrance
height. Ramp Length
Height
130 in (330 cm)
20 in (50 cm)
115 in (292 cm)
18 in (45 cm)
105 in (266 cm)
16 in (40 cm)
90 in (228 cm)
14 in (35 cm)
80 in (203 cm)
12 in (30 cm)
131
Ford GT (CGX) Canada/United States of America, enUSA, Edition date: 201810, First-Printing Roadside EmergenciesE229889
Page 154 of 321
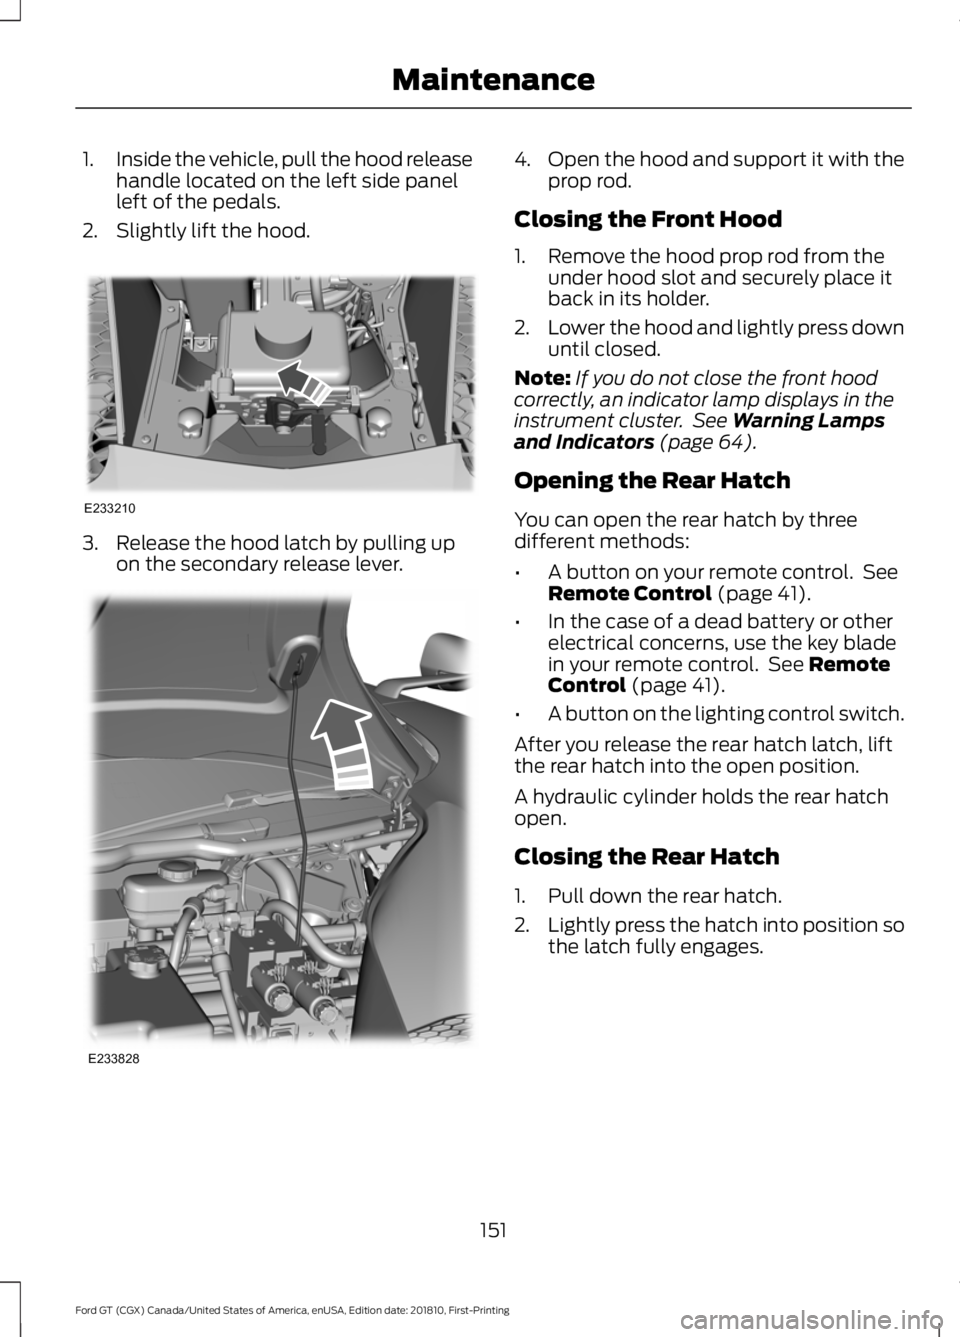
1.
Inside the vehicle, pull the hood release
handle located on the left side panel
left of the pedals.
2. Slightly lift the hood. 3. Release the hood latch by pulling up
on the secondary release lever. 4.
Open the hood and support it with the
prop rod.
Closing the Front Hood
1. Remove the hood prop rod from the under hood slot and securely place it
back in its holder.
2. Lower the hood and lightly press down
until closed.
Note: If you do not close the front hood
correctly, an indicator lamp displays in the
instrument cluster. See Warning Lamps
and Indicators (page 64).
Opening the Rear Hatch
You can open the rear hatch by three
different methods:
• A button on your remote control. See
Remote Control
(page 41).
• In the case of a dead battery or other
electrical concerns, use the key blade
in your remote control. See
Remote
Control (page 41).
• A button on the lighting control switch.
After you release the rear hatch latch, lift
the rear hatch into the open position.
A hydraulic cylinder holds the rear hatch
open.
Closing the Rear Hatch
1. Pull down the rear hatch.
2. Lightly press the hatch into position so
the latch fully engages.
151
Ford GT (CGX) Canada/United States of America, enUSA, Edition date: 201810, First-Printing MaintenanceE233210 E233828
Page 195 of 321
affect the safety and
performance of your vehicle,
which could result in an
increased risk of loss of vehicle
control, vehicle rollover, personal
injury and death.
WARNING: The use of
non-recommended tires and
wheels could cause steering,
suspension, axle, transfer case
or power transfer unit failure. If
you have questions regarding tire
replacement, contact your
authorized dealer as soon as
possible. WARNING:
To reduce the
risk of serious injury, when
mounting replacement tires and
wheels, you should not exceed
the maximum pressure indicated
on the sidewall of the tire to set
the beads without additional
precautions listed below. If the
beads do not seat at the
maximum pressure indicated,
re-lubricate and try again. WARNING: When inflating
the tire for mounting pressures
up to
20 psi (1.38 bar) greater
than the maximum pressure on
the tire sidewall, the following
precautions must be taken to
protect the person mounting the
tire:
• Make sure that you have the
correct tire and wheel size.
• Lubricate the tire bead and
wheel bead seat area again. •
Stand at a minimum of
12 ft
(3.66 m) away from the wheel
and tire assembly.
• Use both eye and ear
protection. WARNING: For a mounting
pressure more than
20 psi
(1.38 bar) greater than the
maximum pressure, a Ford
dealer or other tire service
professional should do the
mounting. WARNING:
Always inflate
steel carcass tires with a remote
air fill with the person inflating
standing at a minimum of
12 ft
(3.66 m) away from the wheel
and tire assembly.
Important: Remember to replace
the wheel valve stems when the
road tires are replaced on your
vehicle.
It is recommended that the two
front tires or two rear tires
generally be replaced as a pair.
The tire pressure sensors mounted
in the wheels (originally installed
on your vehicle) are not designed
to be used in aftermarket wheels.
The use of wheels or tires not
recommended by Ford Motor
Company may affect the
operation of your tire pressure
monitoring system.
192
Ford GT (CGX) Canada/United States of America, enUSA, Edition date: 201810, First-Printing Wheels and Tires
Page 316 of 321
Engine Oil Dipstick.......................................153
Engine Specifications................................200
Entertainment...............................................227 AM/FM Radio...................................................... 228
Apps....................................................................... 230
Bluetooth Stereo or USB................................ 228
Sources................................................................... 227
Supported Media Players, Formats and Metadata Information................................ 230
USB Ports............................................................. 230
Environment......................................................13
EPB See: Electric Parking Brake............................. 106
Event Data Recording See: Data Recording............................................... 7
Exterior Mirrors.................................................61 Fold-Away Exterior Mirrors................................ 61
Power Exterior Mirrors......................................... 61
F
Fastening the Seatbelts..............................26 Seatbelt Locking Modes.................................... 28
Using Seatbelts During Pregnancy................27
Flat Tire See: Changing a Road Wheel........................ 198
Flat Tire Inflation See: Tire Sealant and Inflator Kit.................. 176
Floor Mats........................................................128
Foot Pedals See: Adjusting the Pedals................................. 55
Ford Performance
............................................11
Front Passenger Sensing System............35
Fuel and Refueling
........................................90
Fuel Consumption.........................................94 Calculating Fuel Economy................................ 95
Filling the Fuel Tank............................................ 95
Fuel Filler Funnel Location
..........................91
Fuel Filter.........................................................160
Fuel Quality
......................................................90
Choosing the Right Fuel.................................... 90
Fuel Shutoff
....................................................129
Fuses.................................................................139
Fuse Specification Chart...........................139 Front Power Distribution Box......................... 139
Passenger Compartment Fuse Panel.........145
Rear Power Distribution Box 1......................... 141
Rear Power Distribution Box 2....................... 144G
Gauges...............................................................62
Engine Coolant Temperature Gauge............64
Engine Oil Pressure Gauge............................... 64
Engine Oil Temperature Gauge...................... 64
Fuel Gauge.............................................................. 63
Gauge Mode........................................................... 64
Information Display............................................. 62
Trip Computer....................................................... 63
Gearbox See: Transmission.............................................. 100
General Information on Radio Frequencies..................................................40
Intelligent Access................................................. 40
General Maintenance Information.........271 Protecting Your Investment............................ 271
Road Course Maintenance.............................. 271
Why Maintain Your Vehicle?........................... 271
Why Maintain Your Vehicle at Your Certified Ford GT Service Dealership?...................... 271
Getting Assistance Outside the U.S. and Canada..........................................................136
Getting the Services You Need................133 Away From Home............................................... 133
Global Opening..............................................60 Remote Control Front Windows..................... 61
H
Hazard Flashers
............................................129
Headlamp Adjusting See: Adjusting the Headlamps...................... 163
Heating See: Climate Control........................................... 79
Hill Start Assist.............................................108 Using Hill Start Assist....................................... 108
Hints on Controlling the Interior Climate...........................................................80
Defogging the Side Windows in Cold Weather.............................................................. 80
General Hints........................................................ 80
Quickly Cooling the Interior............................. 80
Quickly Heating the Interior............................. 80
Recommended Settings for Cooling............80
Recommended Settings for Heating...........80
Hints on Driving With Anti-Lock Brakes
............................................................105
313
Ford GT (CGX) Canada/United States of America, enUSA, Edition date: 201810, First-Printing Index
Page 317 of 321
Home Screen.................................................219
Hood Lock See: Opening and Closing the Hood...........150
I
In California (U.S. Only).............................134
Information Display Control.......................53
Information Displays....................................69 General Information........................................... 69
Information Messages..................................72 AdvanceTrac ™...................................................... 72
Alarm........................................................................\
. 72
Battery and Charging System.......................... 73
Doors and Locks.................................................... 73
Engine....................................................................... 73
Fuel........................................................................\
.... 74
Hill Start Assist ..................................................... 74
Hydraulic System.................................................. 74
Keys and Intelligent Access.............................. 75
Maintenance ........................................................... 75
Park Brake............................................................... 76
Remote Start.......................................................... 76
Starting System .................................................... 77
Steering System.................................................... 77
Tire Pressure Monitoring System.................... 77
Transmission.......................................................... 78
Installing Child Restraints
............................18
Child Seats............................................................... 18
Using Lap and Shoulder Belts.......................... 19
Using Tether Straps.............................................. 21
Instrument Cluster.........................................62
Instrument Lighting Dimmer
.....................58
Instrument Panel Overview........................14
Interior Lamps.................................................59
Interior Mirror
....................................................61
Introduction........................................................5
J
Jump Starting the Vehicle.........................130 Connecting the Jumper Cables..................... 130
Jump Starting........................................................ 131
Preparing Your Vehicle..................................... 130
Removing the Jumper Cables......................... 131K
Keyless Starting
..............................................86
Ignition Modes...................................................... 86
Keys and Remote Controls........................40
L
Launch Control
..............................................167
Lighting Control..............................................53
High Beams............................................................. 57
Performance Shift Indicator............................ 54
Lighting
...............................................................57
General Information............................................ 57
Load Carrying..................................................121
Load Limit
.........................................................121
Vehicle Loading - with and without a
Trailer................................................................... 121
Locking and Unlocking.................................45 Activating Intelligent Access ........................... 45
Autolock.................................................................. 46
Battery Saver.......................................................... 47
Illuminated Entry.................................................. 47
Illuminated Exit...................................................... 47
Power Door Locks................................................ 45
Remote Control.................................................... 45
Smart Unlocks for Intelligent Access Keys...................................................................... 46
Lug Nuts See: Changing a Road Wheel........................ 198
M
Maintenance..................................................150 General Information.......................................... 150
Manual Seats
...................................................82
Map Pockets....................................................85
Message Center See: Information Displays................................. 69
Mirrors See: Windows and Mirrors............................... 60
Mobile Communications Equipment........11
Motorcraft Parts
...........................................201
N
Navigation......................................................236 cityseeker.............................................................. 243
314
Ford GT (CGX) Canada/United States of America, enUSA, Edition date: 201810, First-Printing Index