tow FORD GT 2019 Owners Manual
[x] Cancel search | Manufacturer: FORD, Model Year: 2019, Model line: GT, Model: FORD GT 2019Pages: 321, PDF Size: 5.24 MB
Page 6 of 321
Using Stability Control
...............................110
Parking Aids
Rear View Camera ........................................
112
Cruise Control
Principle of Operation .................................
114
Using Cruise Control ....................................
114
Driving Aids
Steering ............................................................
115
Drive Mode Control ......................................
115
Load Carrying
Rear Under Hatch Storage ........................
121
Load Limit ........................................................
121
Towing
Towing a Trailer ............................................
126
Towing the Vehicle on Four Wheels ......
126
Driving Hints
Breaking-In .....................................................
127
Driving Through Water ...............................
127
Floor Mats .......................................................
128
Roadside Emergencies
Roadside Assistance ..................................
129
Hazard Flashers ...........................................
129
Fuel Shutoff ...................................................
129
Jump Starting the Vehicle ........................
130
Post-Crash Alert System ...........................
131
Transporting the Vehicle ............................
131
Towing Points ................................................
132
Customer Assistance
Getting the Services You Need ...............
133
In California (U.S. Only) ............................
134
The Better Business Bureau (BBB) Auto Line Program (U.S. Only) .....................
134Utilizing the Mediation/Arbitration
Program (Canada Only) .......................
135
Getting Assistance Outside the U.S. and Canada ........................................................
136
Ordering Additional Owner's Literature ........................................................................\
.
137
Reporting Safety Defects (U.S. Only) ........................................................................\
.
137
Reporting Safety Defects (Canada Only) ........................................................................\
.
138
Fuses
Fuse Specification Chart ..........................
139
Changing a Fuse ..........................................
148
Maintenance
General Information ...................................
150
Opening and Closing the Hood ..............
150
Under Hood Overview ................................
152
Engine Oil Dipstick ......................................
153
Engine Oil Check ..........................................
153
Engine Coolant Check ...............................
154
Automatic Transmission Fluid Check ........................................................................\
.
158
Brake Fluid Check ........................................
158
Power Steering Fluid Check ....................
159
Washer Fluid Check ....................................
159
Fuel Filter ........................................................
160
Changing the 12V Battery ........................
160
Checking the Wiper Blades ......................
162
Changing the Wiper Blades .....................
162
Adjusting the Headlamps ........................
163
Changing a Bulb ..........................................
164
Changing the Engine Air Filter ................
164
Track Use
Track Use ........................................................
165
Launch Control
About Launch Control ...............................
167
Using Launch Control .................................
167
3
Ford GT (CGX) Canada/United States of America, enUSA, Edition date: 201810, First-Printing Table of Contents
Page 16 of 321
PROTECTING THE
ENVIRONMENT
You should play your part in protecting the
environment. Correct vehicle usage and
the authorized disposal of waste, cleaning
and lubrication materials are significant
steps toward this aim.
For details about Ford Motor
Company's sustainability progress and
initiatives visit:
Web Address
www.sustainability.ford.com
13
Ford GT (CGX) Canada/United States of America, enUSA, Edition date: 201810, First-Printing Environment
Page 24 of 321
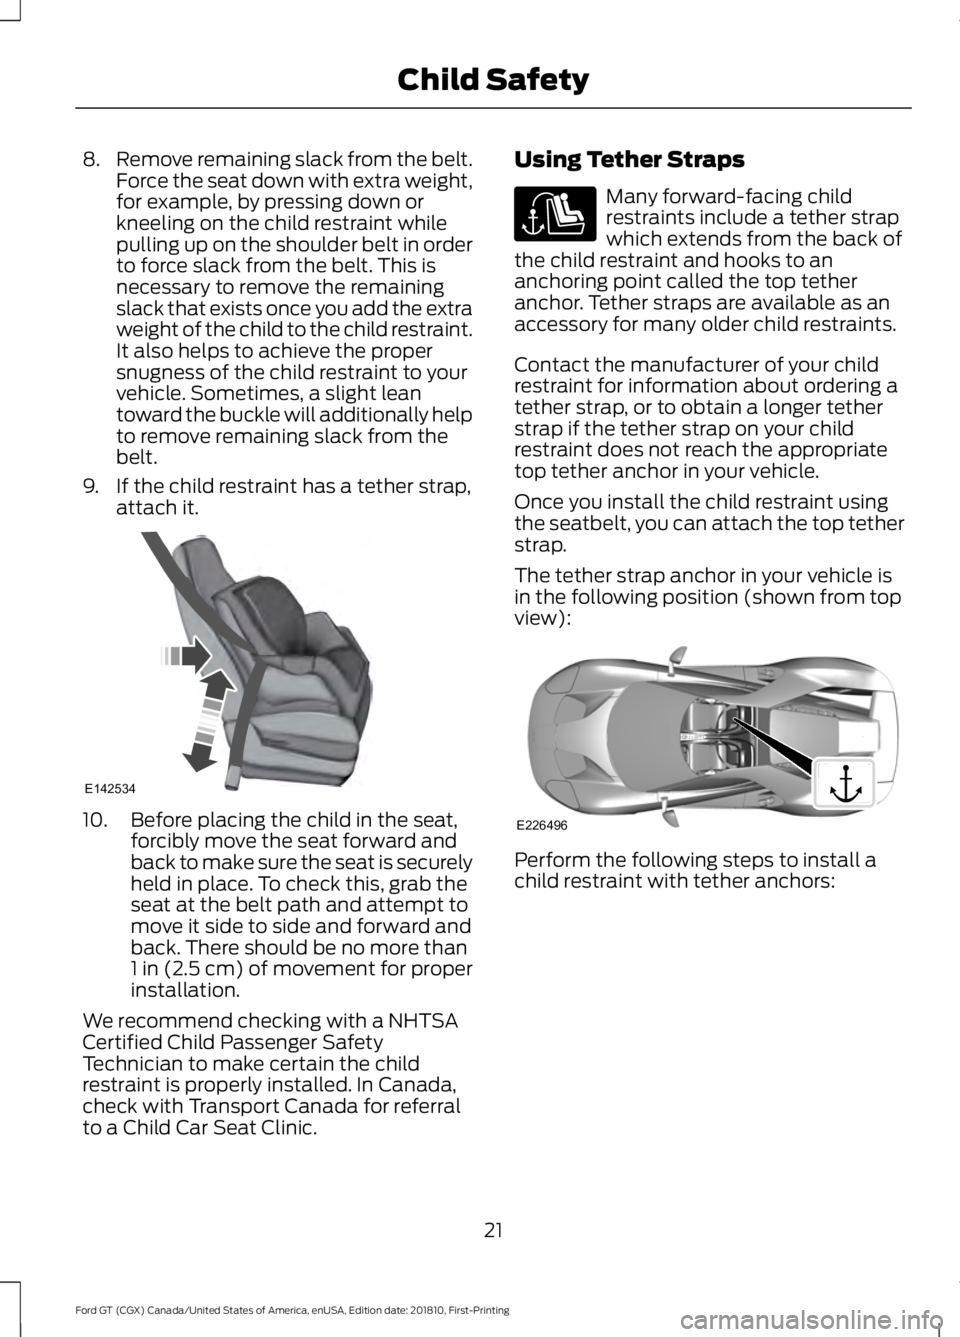
8.
Remove remaining slack from the belt.
Force the seat down with extra weight,
for example, by pressing down or
kneeling on the child restraint while
pulling up on the shoulder belt in order
to force slack from the belt. This is
necessary to remove the remaining
slack that exists once you add the extra
weight of the child to the child restraint.
It also helps to achieve the proper
snugness of the child restraint to your
vehicle. Sometimes, a slight lean
toward the buckle will additionally help
to remove remaining slack from the
belt.
9. If the child restraint has a tether strap, attach it. 10. Before placing the child in the seat,
forcibly move the seat forward and
back to make sure the seat is securely
held in place. To check this, grab the
seat at the belt path and attempt to
move it side to side and forward and
back. There should be no more than
1 in (2.5 cm) of movement for proper
installation.
We recommend checking with a NHTSA
Certified Child Passenger Safety
Technician to make certain the child
restraint is properly installed. In Canada,
check with Transport Canada for referral
to a Child Car Seat Clinic. Using Tether Straps Many forward-facing child
restraints include a tether strap
which extends from the back of
the child restraint and hooks to an
anchoring point called the top tether
anchor. Tether straps are available as an
accessory for many older child restraints.
Contact the manufacturer of your child
restraint for information about ordering a
tether strap, or to obtain a longer tether
strap if the tether strap on your child
restraint does not reach the appropriate
top tether anchor in your vehicle.
Once you install the child restraint using
the seatbelt, you can attach the top tether
strap.
The tether strap anchor in your vehicle is
in the following position (shown from top
view): Perform the following steps to install a
child restraint with tether anchors:
21
Ford GT (CGX) Canada/United States of America, enUSA, Edition date: 201810, First-Printing Child SafetyE142534 E226496
Page 28 of 321
WARNING: Never let a passenger
hold a child on his or her lap while the
vehicle is moving. The passenger cannot
protect the child from injury in a crash. WARNING:
Do not use pillows,
books or towels to boost your child's
height. WARNING:
Always restrain an
unoccupied child seat or booster seat.
They may become projectiles in a crash
or sudden stop, which may increase the
risk of serious injury. WARNING:
Do not put the
seatbelt under your child's arm or behind
its back. WARNING:
Do not leave children
or pets unattended in your vehicle.
Failure to follow this instruction could
result in personal injury or death.
Recommendations for attaching child safety restraints for children Use any attachment method as indicated
below by X
Combined weight of
child and child restraint
Restraint Type
Seatbelt only
Seatbelt and top
tether anchor
X
Up to 65 lb (29.5 kg)
Forward facing child
restraint
X
Over
65 lb (29.5 kg)
Forward facing child
restraint
Note: The child restraint must rest tightly
against the vehicle seat upon which it is
installed.
25
Ford GT (CGX) Canada/United States of America, enUSA, Edition date: 201810, First-Printing Child Safety
Page 31 of 321
Pregnant women should always wear their
seatbelt. Position the lap belt portion of a
combination lap and shoulder belt low
across the hips below the belly and worn
as tight as comfort allows. Position the
shoulder belt to cross the middle of the
shoulder and the center of the chest.
Seatbelt Locking Modes
WARNING: If your vehicle is
involved in a crash, have the seatbelts
and associated components inspected
as soon as possible. Failure to follow this
instruction could result in personal injury
or death.
All safety restraints in the vehicle are
combination lap and shoulder belts and
have vehicle sensitive locking mode. In
addition, the front outboard passenger
seatbelts have the automatic locking
mode.
Vehicle Sensitive Mode
This is the normal retractor mode, which
allows free shoulder belt length
adjustment to your movements and
locking in response to vehicle movement.
For example, if the driver brakes suddenly
or turns a corner sharply, or the vehicle
receives an impact of about
5 mph
(8 km/h) or more, the combination
seatbelts lock to help reduce forward
movement of the driver and passenger.
In addition, the retractor is designed to lock
if you pull the webbing out too quickly. If
the seatbelt retractor locks, slowly lower
the height adjuster to allow the seatbelt
to retract. If the retractor does not unlock,
pull the seatbelt out slowly then feed a
small length of webbing back toward the
stowed position. Automatic Locking Mode
In this mode, the shoulder belt
automatically pre-locks. The belt still
retracts to remove any slack in the
shoulder belt. The automatic locking mode
is not available on the driver seatbelt.
When to Use the Automatic Locking
Mode
Use this mode any time a child safety seat,
except a booster, is installed in the
passenger front seating position. See
Child Safety
(page 17).
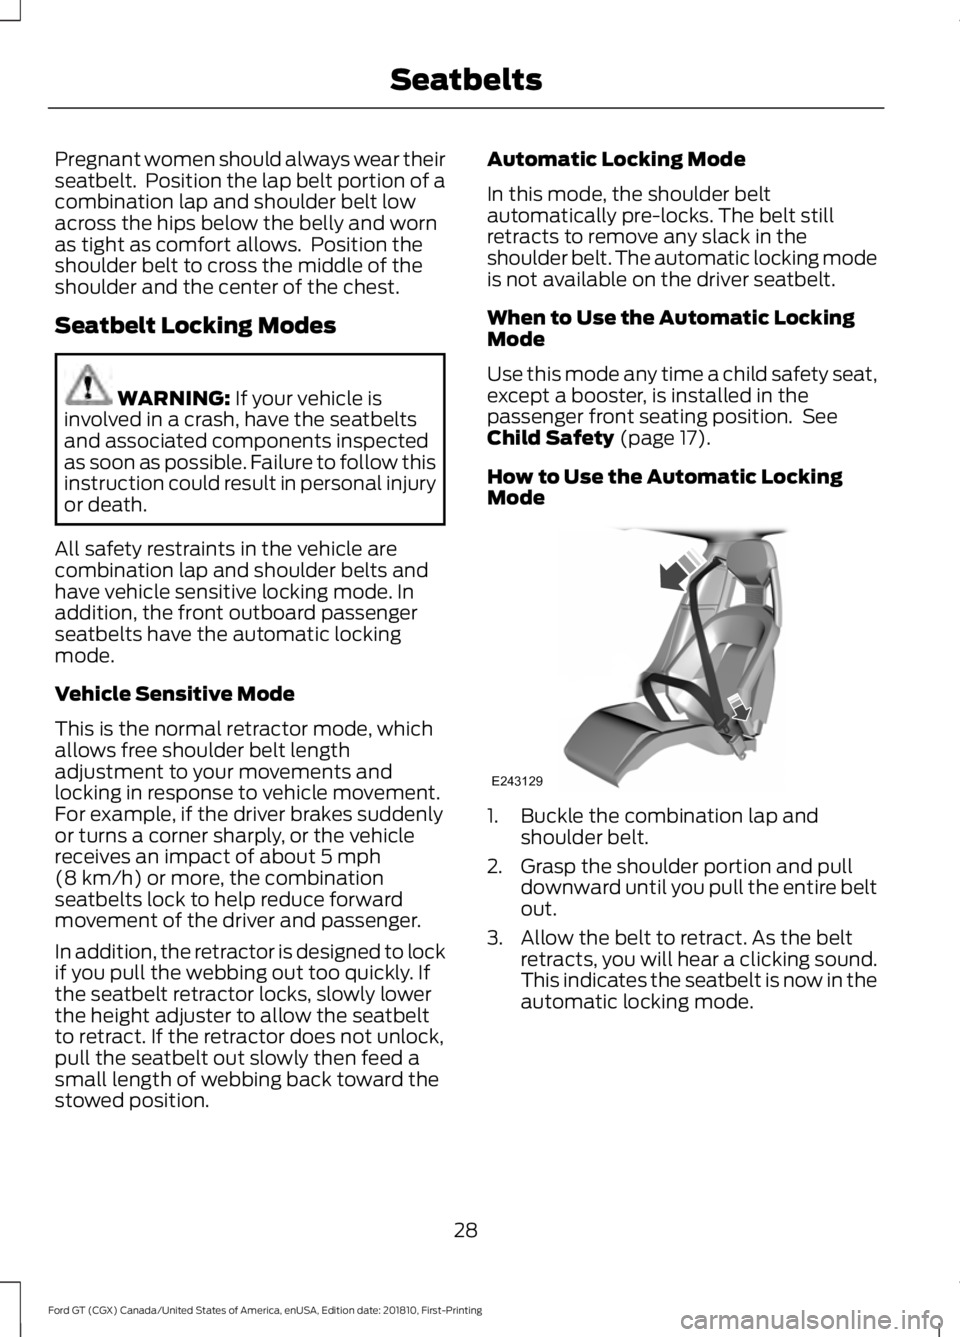
How to Use the Automatic Locking
Mode 1. Buckle the combination lap and
shoulder belt.
2. Grasp the shoulder portion and pull downward until you pull the entire belt
out.
3. Allow the belt to retract. As the belt retracts, you will hear a clicking sound.
This indicates the seatbelt is now in the
automatic locking mode.
28
Ford GT (CGX) Canada/United States of America, enUSA, Edition date: 201810, First-Printing SeatbeltsE243129
Page 41 of 321
The design and development of the side
airbag system included recommended
testing procedures that were developed
by a group of automotive safety experts
known as the Side Airbag Technical
Working Group. These recommended
testing procedures help reduce the risk of
injuries related to the deployment of side
airbags.
DRIVER AND PASSENGER
KNEE AIRBAGS
WARNING: To reduce risk of injury,
do not obstruct or place objects in the
deployment path of the knee airbag.
The knee airbags are under or within the
instrument panel. During a crash, the
restraints control module may activate the
driver and passenger knee airbags based
on crash severity and occupant conditions.
Under certain crash and occupant
conditions, the driver and passenger knee
airbag may deploy, but the driver front
airbag may not activate. As with front and
side airbags, it is important to be properly
seated and restrained to reduce the risk of
death or serious injury. Make sure the knee airbags are
operating properly. See
Crash
Sensors and Airbag Indicator
(page
38). CRASH SENSORS AND
AIRBAG INDICATOR WARNING:
Modifying or adding
equipment to the front end of your
vehicle (including hood, bumper system,
frame, front end body structure, tow
hooks and hood pins) may affect the
performance of the airbag system,
increasing the risk of injury. Do not
modify or add equipment to the front
end of your vehicle.
Your vehicle has a collection of crash and
occupant sensors which provide
information to the restraints control
module. The restraints control module
deploys (activates) the front seatbelt
pretensioners, driver airbag, passenger
airbag, knee airbag(s) and side airbags.
Based on the type of crash, the restraints
control module deploys the appropriate
safety devices.
The restraints control module monitors
the readiness of the safety devices and the
crash and occupant sensors. The readiness
of the safety system is indicated by a
warning indicator light in the instrument
cluster or by a backup tone if the warning
light is not working. Routine maintenance
of the airbag is not required.
A difficulty with the system is indicated by
one or more of the following: The readiness light does not
illuminate immediately after you
switch the ignition on.
• The readiness light either flashes or
stays lit.
• The system has five tones that repeat
periodically until the problem, the light
or both are repaired.
38
Ford GT (CGX) Canada/United States of America, enUSA, Edition date: 201810, First-Printing Supplementary Restraints SystemE67017 E67017
Page 43 of 321
GENERAL INFORMATION ON
RADIO FREQUENCIES
This device complies with Part 15 of the
FCC Rules and with Industry Canada
license-exempt RSS standard(s).
Operation is subject to the following two
conditions: (1) This device may not cause
harmful interference, and (2) This device
must accept any interference received,
including interference that may cause
undesired operation.
Note:
Changes or modifications not
expressively approved by the party
responsible for compliance could void the
user's authority to operate the equipment.
The term IC before the radio certification
number only signifies that Industry Canada
technical specifications were met.
The typical operating range for your
transmitter is approximately
33 ft (10 m).
One of the following could cause a
decrease in operating range:
• weather conditions
• nearby radio towers
• structures around the vehicle
• other vehicles parked next to your
vehicle
Other short-distance radio transmitters,
such as amateur radios, medical
equipment, wireless headphones, remote
controls and alarm systems may operate
on the same frequency as your remote
control. If other transmitters are operating
on those frequencies, you may not be able
to use your remote control. Using your
remote control near some types of
electronic equipment, such as USB devices,
computers or cell phones can interfere with
remote operation. Operating your remote
control near metal or metallic-finished
purses, bags or clothing can interfere with
remote operation. Note:
Make sure to lock your vehicle before
leaving it unattended.
Note: If you are in range, the remote control
will operate if you press any button
unintentionally.
Intelligent Access
The system uses a radio frequency signal
to communicate with your vehicle and
authorize your vehicle to unlock when one
of the following conditions are met:
• You push the exterior door release
panel within
3 ft (1 m) proximity of an
intelligent access key.
• You press a button on the transmitter.
If excessive radio frequency interference
is present in the area or if the transmitter
battery is low, you may need to
mechanically unlock your door. You can
use the mechanical key blade in your
intelligent access key to open the engine
cover to access a pull strap to manually
unlock the driver door in this situation. See
Remote Control
(page 41).
40
Ford GT (CGX) Canada/United States of America, enUSA, Edition date: 201810, First-Printing Keys and Remote Controls
Page 58 of 321
ADJUSTING THE PEDALS
WARNING: Never use the pedal
adjustment controls when your feet are
on the accelerator or brake pedal when
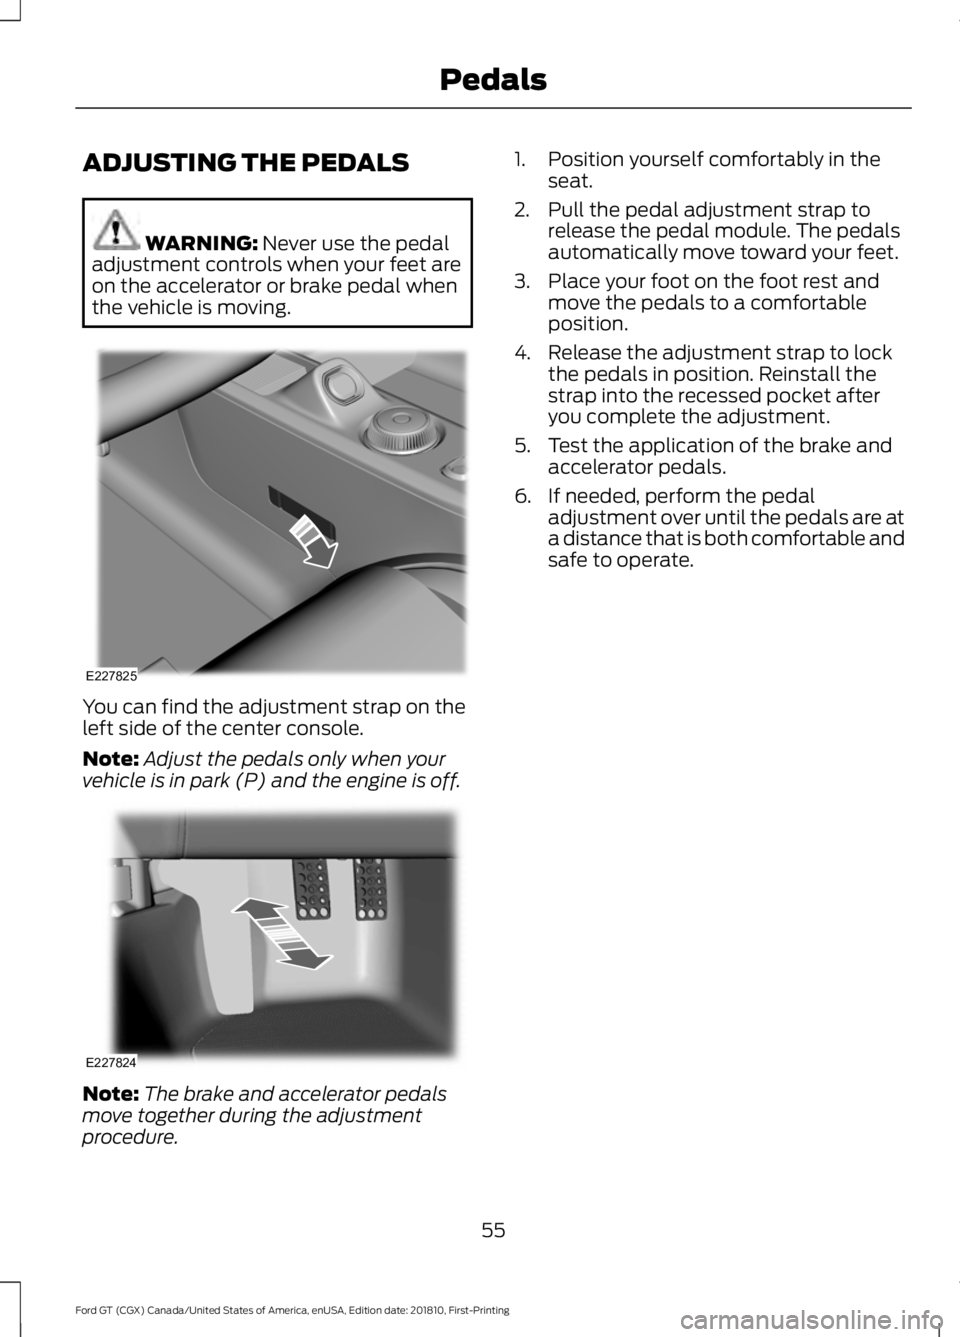
the vehicle is moving. You can find the adjustment strap on the
left side of the center console.
Note:
Adjust the pedals only when your
vehicle is in park (P) and the engine is off. Note:
The brake and accelerator pedals
move together during the adjustment
procedure. 1. Position yourself comfortably in the
seat.
2. Pull the pedal adjustment strap to release the pedal module. The pedals
automatically move toward your feet.
3. Place your foot on the foot rest and move the pedals to a comfortable
position.
4. Release the adjustment strap to lock the pedals in position. Reinstall the
strap into the recessed pocket after
you complete the adjustment.
5. Test the application of the brake and accelerator pedals.
6. If needed, perform the pedal adjustment over until the pedals are at
a distance that is both comfortable and
safe to operate.
55
Ford GT (CGX) Canada/United States of America, enUSA, Edition date: 201810, First-Printing PedalsE227825 E227824
Page 64 of 321
Remote Control Front Windows
You can open the windows for a short time
after you unlock your vehicle with the
remote control. After you unlock your
vehicle, press and hold the remote control
unlock button to open the windows.
Release the button once movement starts.
Press the lock or unlock button to stop
movement.
EXTERIOR MIRRORS
Power Exterior Mirrors
WARNING: Do not adjust the
mirrors when your vehicle is moving. This
could result in the loss of control of your
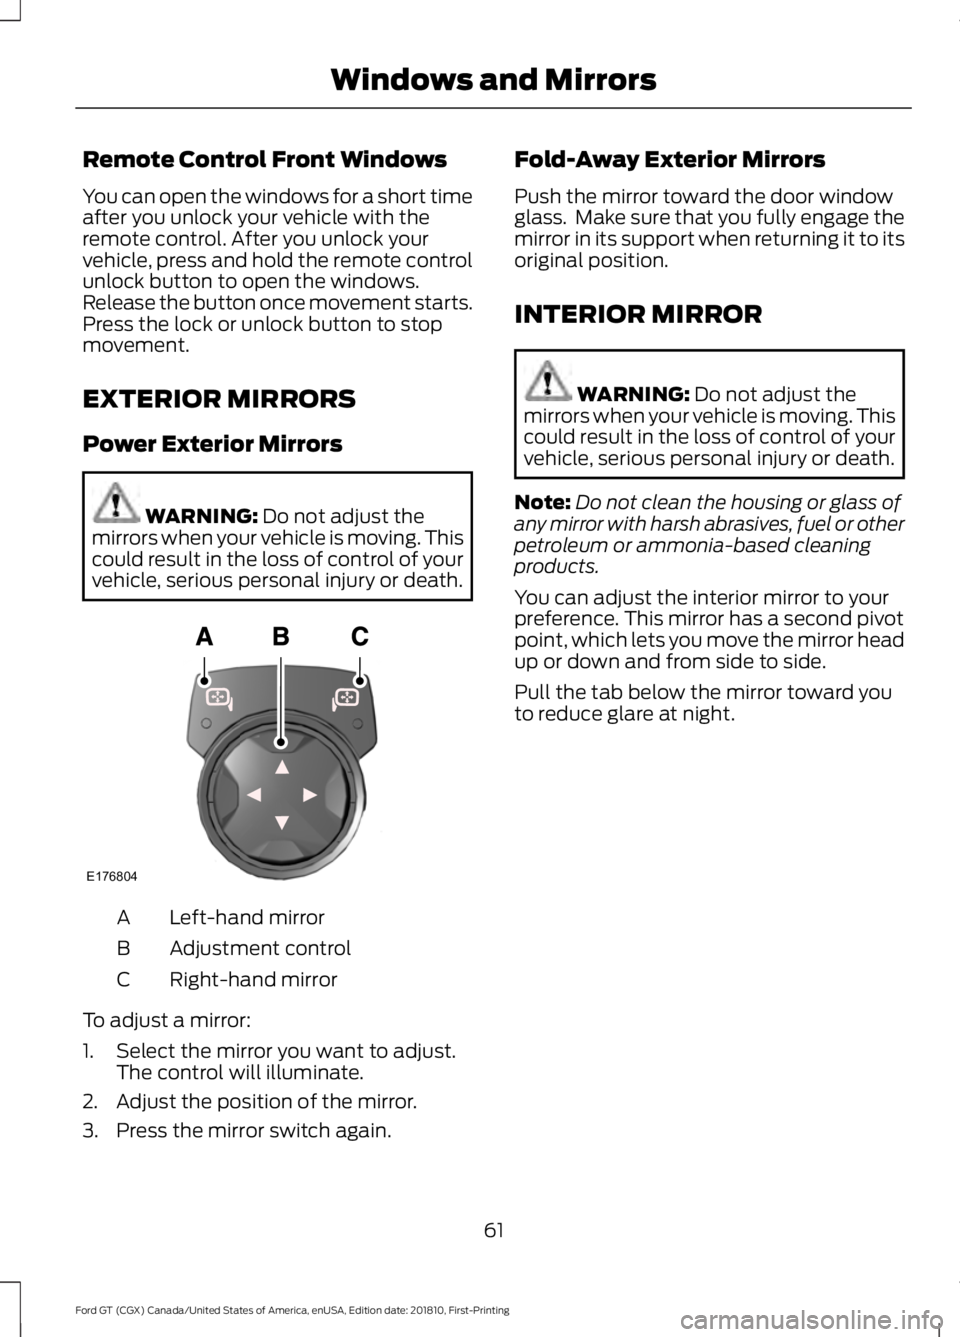
vehicle, serious personal injury or death. Left-hand mirror
A
Adjustment control
B
Right-hand mirror
C
To adjust a mirror:
1. Select the mirror you want to adjust. The control will illuminate.
2. Adjust the position of the mirror.
3. Press the mirror switch again. Fold-Away Exterior Mirrors
Push the mirror toward the door window
glass. Make sure that you fully engage the
mirror in its support when returning it to its
original position.
INTERIOR MIRROR
WARNING:
Do not adjust the
mirrors when your vehicle is moving. This
could result in the loss of control of your
vehicle, serious personal injury or death.
Note: Do not clean the housing or glass of
any mirror with harsh abrasives, fuel or other
petroleum or ammonia-based cleaning
products.
You can adjust the interior mirror to your
preference. This mirror has a second pivot
point, which lets you move the mirror head
up or down and from side to side.
Pull the tab below the mirror toward you
to reduce glare at night.
61
Ford GT (CGX) Canada/United States of America, enUSA, Edition date: 201810, First-Printing Windows and MirrorsE176804
Page 66 of 321
Normal and Wet Mode:
•
Gear.
Sport Mode:
• Speedometer.
Track Mode:
• Engine Coolant Temperature.
• Engine Oil Temperature.
• Transmission Temperature.
• Fuel Level.
V-Max Mode:
• Engine Coolant Temperature.
• Engine Oil Temperature.
• Engine Oil Pressure.
• Turbo Boost Pressure.
Trip Computer
The trip computer functions only operate
when the engine is running. See General
Information (page 69).
Fuel Gauge
Note: The fuel gauge may vary slightly
when your vehicle is moving or on a slope.
Switch the ignition on. The fuel gauge will
indicate approximately how much fuel is
left in the fuel tank. The arrow adjacent to
the fuel pump symbol indicates on which
side of your vehicle the fuel filler door is
located. The gauge is divided into four segments
and moves towards the right when you
refuel your vehicle. If the gauge remains in
the far left segment after adding fuel, this
indicates your vehicle needs service soon.
After refueling, some variability in gauge
position is normal:
•
It may take a short time for the gauge
to reach full after leaving the gas
station. This is normal and depends
upon the slope of pavement at the gas
station.
• The fuel amount dispensed into the
tank is a little less or more than the
gauge indicated. This is normal and
depends upon the slope of pavement
at the gas station.
• If the gas station nozzle shuts off
before the tank is full, try a different
gas pump nozzle.
Low Fuel Reminder
A low fuel reminder triggers when the
distance to empty value reaches
50 mi
(80 km) to empty, with additional
warnings at 25 mi (40 km), 10 mi (20 km)
and 0 mi (0 km) to empty if the message
is cleared each time.
In Track Mode, the distance to empty
warnings appear at 10% and 0% to empty
if the message is cleared each time.
After extended periods of performance
driving, your distance to empty value may
display low even after refueling. Drive your
vehicle under normal operating conditions
to recalibrate the distance to empty or
reset your trip computer.
Variations
Note: The low fuel warning and distance-to-empty warning can appear at different fuel
gauge positions depending on fuel economy conditions. This variation is normal.
63
Ford GT (CGX) Canada/United States of America, enUSA, Edition date: 201810, First-Printing Instrument Cluster