ECU FORD GT 2020 User Guide
[x] Cancel search | Manufacturer: FORD, Model Year: 2020, Model line: GT, Model: FORD GT 2020Pages: 316, PDF Size: 6.25 MB
Page 57 of 316
PASSIVE ANTI-THEFT
SYSTEM
Note:
The system is not compatible with
non-Ford aftermarket remote start systems.
Use of these systems may result in vehicle
starting problems and a loss of security
protection.
Note: Metallic objects, electronic devices
or a second coded key on the same key
chain may cause vehicle starting problems
if they are too close to the key when starting
your vehicle. Prevent these objects from
touching the coded key while starting your
vehicle. Switch the ignition off, move all
objects on the key chain away from the
coded key and restart your vehicle if a
problem occurs.
Note: Do not leave a duplicate coded key
in your vehicle. Always take your keys and
lock all doors when leaving your vehicle.
SecuriLock
The system helps prevent your vehicle
from starting unless you use a coded key
programmed to your vehicle. Using the
wrong key may prevent your vehicle from
starting. A message may appear in the
information display.
If you are unable to start your vehicle with
a correctly coded key, it is not operating
properly. A message may appear in the
information display.
Automatic Arming
Your vehicle arms immediately after
switching the ignition off.
Automatic Disarming
Switching the ignition on with a coded key
disarms your vehicle. Replacement Keys
Note:
Your vehicle comes equipped with
two intelligent access keys.
The intelligent access key functions as a
programmed key that operates the driver
door lock and activates the intelligent
access with push button start system, as
well as a remote control.
If your programmed transmitters are lost
or stolen and you do not have an extra
coded key, contact the Ford GT concierge
to have your Ford GT transported to your
Certified Ford GT Service Dealership to
erase the key codes from your vehicle and
program new coded keys. See About This
Manual (page 5).
Store an extra programmed key away from
your vehicle in a safe place to help prevent
any inconveniences. See your authorized
dealer to purchase additional spare or
replacement keys.
Programming a Spare Intelligent
Access Key
Note: You can program a maximum of four
intelligent access keys to your vehicle.
You must have two previously
programmed intelligent access keys inside
your vehicle and the new unprogrammed
intelligent access keys readily accessible.
See an authorized dealer to have the spare
key programmed if two previously
programmed keys are not available.
Make sure that your vehicle is off before
beginning this procedure. Make sure that
you close all the doors before beginning
and that they remain closed throughout
the procedure. Perform all steps within 30
seconds of starting the sequence. Stop
and wait for at least one minute before
starting again if you perform any steps out
of sequence.
Read and understand the entire procedure
before you begin.
54
Ford GT (CGX) Canada/United States of America, enUSA, Edition date: 201908, First-Printing Security
Page 58 of 316
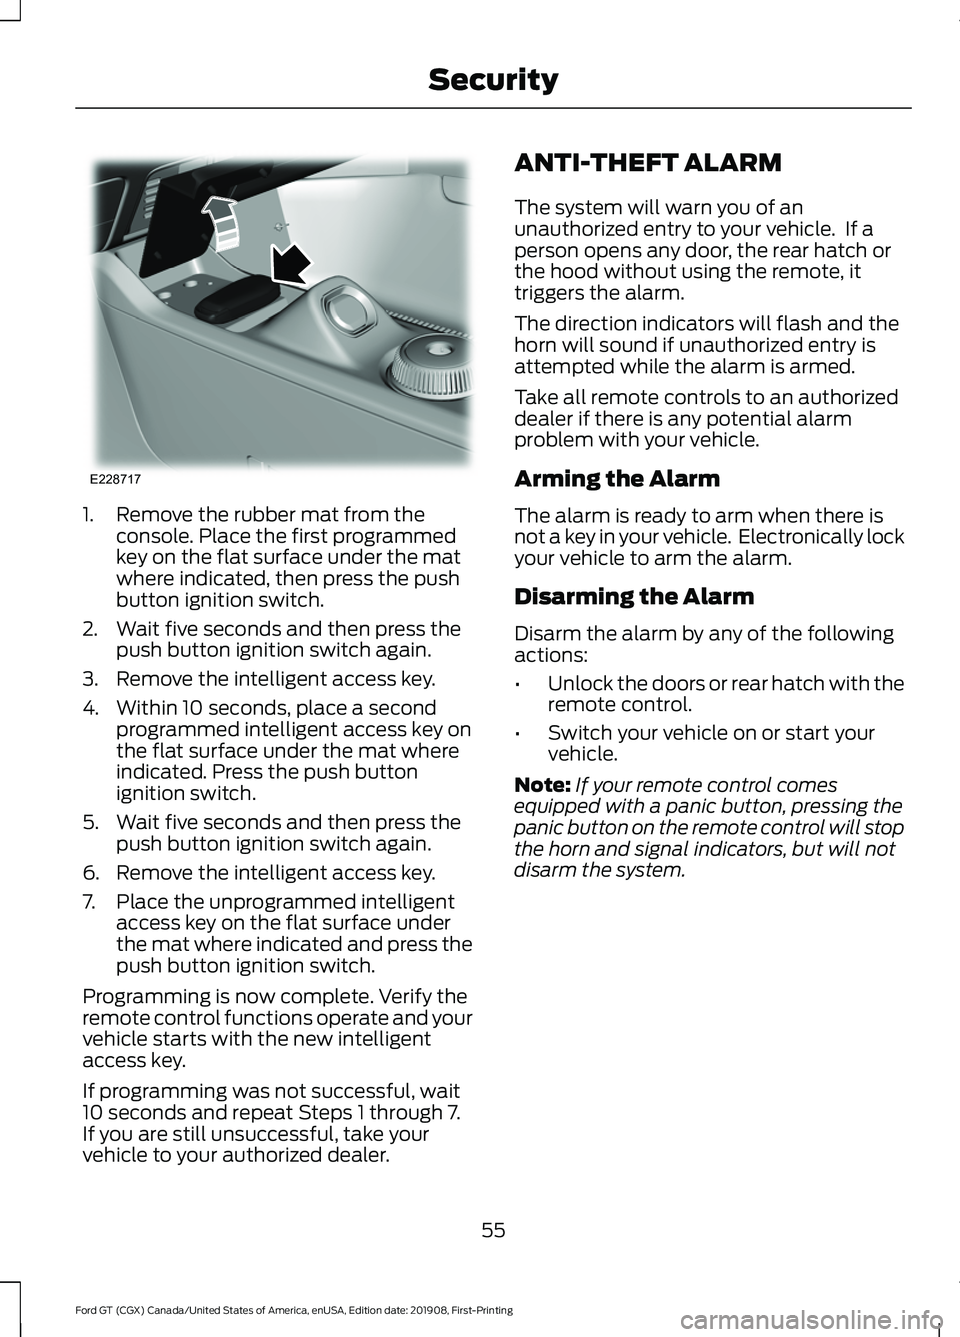
1. Remove the rubber mat from the
console. Place the first programmed
key on the flat surface under the mat
where indicated, then press the push
button ignition switch.
2. Wait five seconds and then press the push button ignition switch again.
3. Remove the intelligent access key.
4. Within 10 seconds, place a second programmed intelligent access key on
the flat surface under the mat where
indicated. Press the push button
ignition switch.
5. Wait five seconds and then press the push button ignition switch again.
6. Remove the intelligent access key.
7. Place the unprogrammed intelligent access key on the flat surface under
the mat where indicated and press the
push button ignition switch.
Programming is now complete. Verify the
remote control functions operate and your
vehicle starts with the new intelligent
access key.
If programming was not successful, wait
10 seconds and repeat Steps 1 through 7.
If you are still unsuccessful, take your
vehicle to your authorized dealer. ANTI-THEFT ALARM
The system will warn you of an
unauthorized entry to your vehicle. If a
person opens any door, the rear hatch or
the hood without using the remote, it
triggers the alarm.
The direction indicators will flash and the
horn will sound if unauthorized entry is
attempted while the alarm is armed.
Take all remote controls to an authorized
dealer if there is any potential alarm
problem with your vehicle.
Arming the Alarm
The alarm is ready to arm when there is
not a key in your vehicle. Electronically lock
your vehicle to arm the alarm.
Disarming the Alarm
Disarm the alarm by any of the following
actions:
•
Unlock the doors or rear hatch with the
remote control.
• Switch your vehicle on or start your
vehicle.
Note: If your remote control comes
equipped with a panic button, pressing the
panic button on the remote control will stop
the horn and signal indicators, but will not
disarm the system.
55
Ford GT (CGX) Canada/United States of America, enUSA, Edition date: 201908, First-Printing SecurityE228717
Page 137 of 316
•
Check that the exterior lights work.
• Turn the steering wheel to check that
the steering power assist works.
FLOOR MATS WARNING: Use a floor mat
designed to fit the footwell of your
vehicle that does not obstruct the pedal
area. Failure to follow this instruction
could result in the loss of control of your
vehicle, personal injury or death. WARNING:
Pedals that cannot
move freely can cause loss of vehicle
control and increase the risk of serious
personal injury. WARNING:
Secure the floor mat
to both retention devices so that it
cannot slip out of position and interfere
with the pedals. Failure to follow this
instruction could result in the loss of
control of your vehicle, personal injury or
death. WARNING:
Do not place
additional floor mats or any other
covering on top of the original floor mats.
This could result in the floor mat
interfering with the operation of the
pedals. Failure to follow this instruction
could result in the loss of control of your
vehicle, personal injury or death. WARNING:
Always make sure
that objects cannot fall into the driver
foot well while your vehicle is moving.
Objects that are loose can become
trapped under the pedals causing a loss
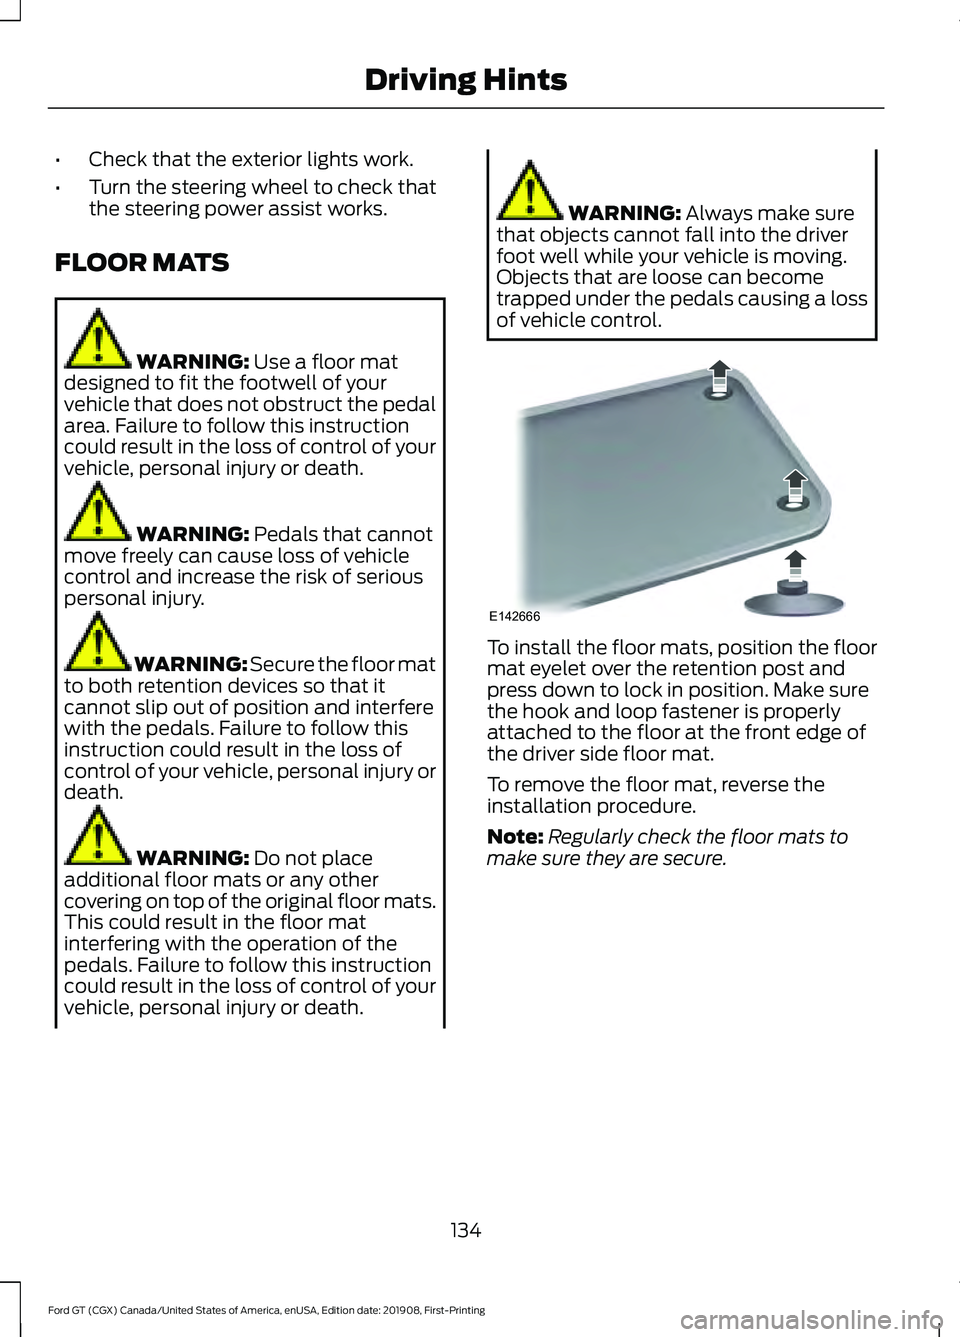
of vehicle control. To install the floor mats, position the floor
mat eyelet over the retention post and
press down to lock in position. Make sure
the hook and loop fastener is properly
attached to the floor at the front edge of
the driver side floor mat.
To remove the floor mat, reverse the
installation procedure.
Note:
Regularly check the floor mats to
make sure they are secure.
134
Ford GT (CGX) Canada/United States of America, enUSA, Edition date: 201908, First-Printing Driving HintsE142666
Page 143 of 316
remedies provided by certain state laws.
This dispute handling procedure is not
required prior to enforcing state created
rights or other rights which are independent
of the Magnuson-Moss Warranty Act or
state replacement or repurchase laws.
IN CALIFORNIA (U.S. ONLY)
California Civil Code Section 1793.2(d)
requires that, if a manufacturer or its
representative is unable to repair a motor
vehicle to conform to the vehicle
’s
applicable express warranty after a
reasonable number of attempts, the
manufacturer shall be required to either
replace the vehicle with one substantially
identical or repurchase the vehicle and
reimburse the buyer in an amount equal to
the actual price paid or payable by the
consumer (less a reasonable allowance
for consumer use). The consumer has the
right to choose whether to receive a refund
or replacement vehicle.
California Civil Code Section 1793.22(b)
presumes that the manufacturer has had
a reasonable number of attempts to
conform the vehicle to its applicable
express warranties if, within the first 18
months of ownership of a new vehicle or
the first 18,000 mi (29,000 km), whichever
occurs first:
1. Two or more repair attempts are made
on the same non-conformity likely to
cause death or serious bodily injury OR
2. Four or more repair attempts are made
on the same nonconformity (a defect
or condition that substantially impairs
the use, value or safety of the vehicle)
OR
3. The vehicle is out of service for repair of nonconformities for a total of more
than 30 calendar days (not necessarily
all at one time). In the case of 1 or 2 above, the consumer
must also notify the manufacturer of the
need for the repair of the nonconformity
at the following address:
Ford Motor Company
16800 Executive Plaza Drive
Mail Drop 3NE-B
Dearborn, MI 48126
You are required to submit your warranty
dispute to BBB AUTO LINE before asserting
in court any rights or remedies conferred
by California Civil Code Section 1793.22(b).
You are also required to use BBB AUTO
LINE before exercising rights or seeking
remedies created by the Federal
Magnuson-Moss Warranty Act, 15 U.S.C.
sec. 2301 et seq. If you choose to seek
redress by pursuing rights and remedies
not created by California Civil Code Section
1793.22(b) or the Magnuson-Moss
Warranty Act, resort to BBB AUTO LINE is
not required by those statutes.
THE BETTER BUSINESS
BUREAU (BBB) AUTO LINE
PROGRAM (U.S. ONLY)
Your satisfaction is important to Ford
Motor Company and to your dealer. If a
warranty concern has not been resolved
using the three-step procedure outlined
earlier in this chapter in the Getting the
Services you need section, you may be
eligible to participate in the BBB AUTO
LINE program.
The BBB AUTO LINE program consists of
two parts – mediation and arbitration.
During mediation, a representative of the
BBB will contact both you and Ford Motor
Company to explore options for settlement
of the claim. If an agreement is not reached
during mediation or you do not want to
participate in mediation, and if your claim
is eligible, you may participate in the
140
Ford GT (CGX) Canada/United States of America, enUSA, Edition date: 201908, First-Printing Customer Assistance
Page 147 of 316
1200 New Jersey Avenue,
Southeast
Washington, D.C. 20590
You can also obtain other
information about motor vehicle
safety from ht
tp:/ /
www .s a f er c ar .g o v .
REPORTING SAFETY DEFECTS
(CANADA ONLY)
If you believe that your vehicle has a defect
which could cause a crash or could cause
injury or death, you should immediately
inform Transport Canada and Ford of
Canada. Transport Canada Contact Information
http://www.tc.gc.ca/eng/motorvehiclesafety/reporting-defects-motor-
vehicles.html (English)
Website
http://www.tc.gc.ca/fra/securiteautomobile/signaler-defauts-vehicules-
automobiles.html (French)
Website
1-800-333-0510
Phone Ford of Canada Contact Information
www.ford.ca
Website
1-800-565-3673
Phone
144
Ford GT (CGX) Canada/United States of America, enUSA, Edition date: 201908, First-Printing Customer Assistance
Page 161 of 316
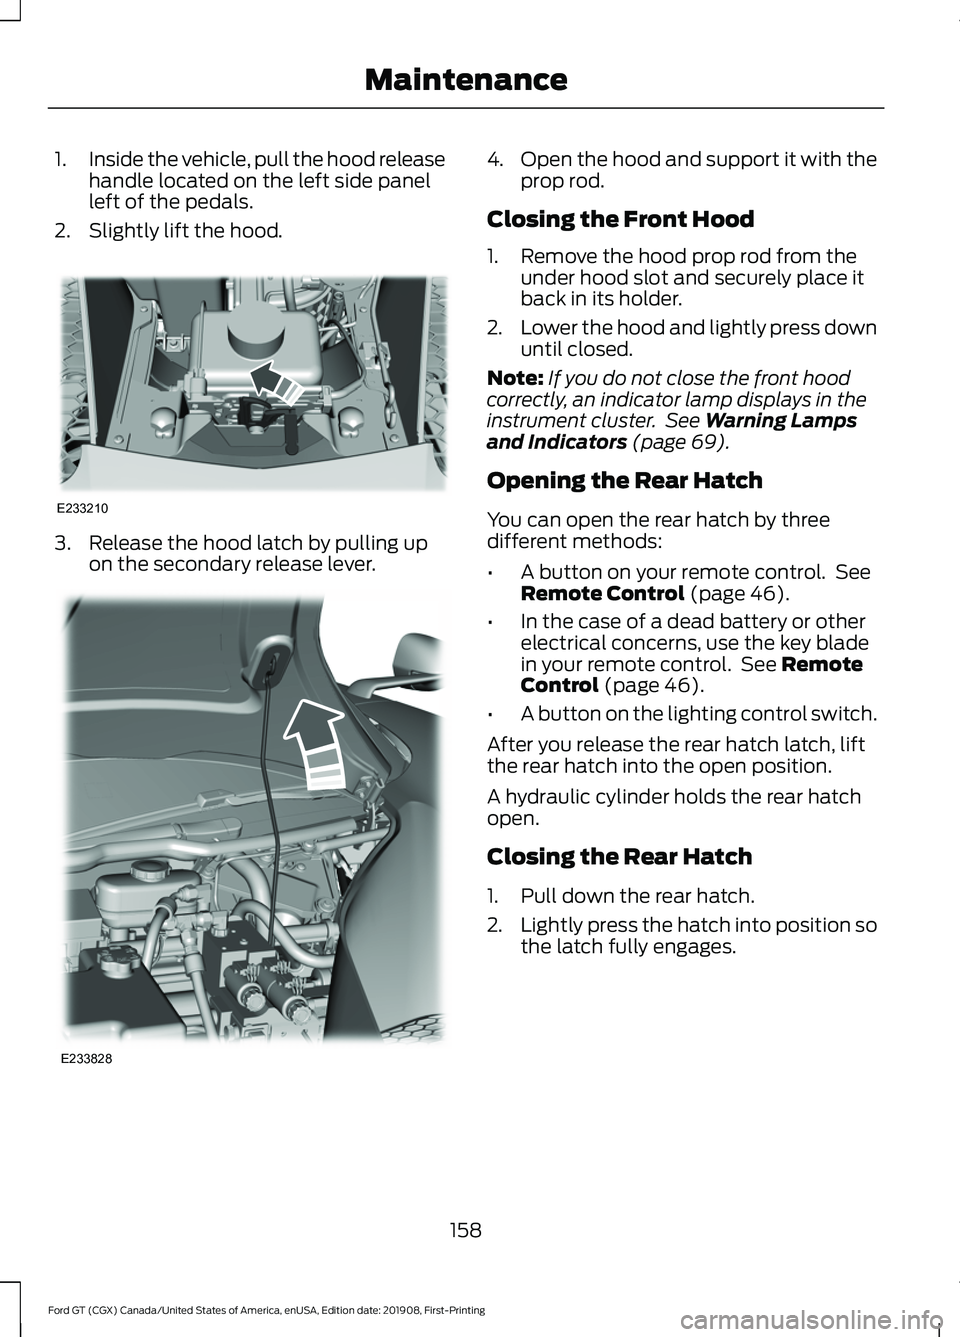
1.
Inside the vehicle, pull the hood release
handle located on the left side panel
left of the pedals.
2. Slightly lift the hood. 3. Release the hood latch by pulling up
on the secondary release lever. 4.
Open the hood and support it with the
prop rod.
Closing the Front Hood
1. Remove the hood prop rod from the under hood slot and securely place it
back in its holder.
2. Lower the hood and lightly press down
until closed.
Note: If you do not close the front hood
correctly, an indicator lamp displays in the
instrument cluster. See Warning Lamps
and Indicators (page 69).
Opening the Rear Hatch
You can open the rear hatch by three
different methods:
• A button on your remote control. See
Remote Control
(page 46).
• In the case of a dead battery or other
electrical concerns, use the key blade
in your remote control. See
Remote
Control (page 46).
• A button on the lighting control switch.
After you release the rear hatch latch, lift
the rear hatch into the open position.
A hydraulic cylinder holds the rear hatch
open.
Closing the Rear Hatch
1. Pull down the rear hatch.
2. Lightly press the hatch into position so
the latch fully engages.
158
Ford GT (CGX) Canada/United States of America, enUSA, Edition date: 201908, First-Printing MaintenanceE233210 E233828
Page 187 of 316
General Information
WARNING: Failure to follow
these guidelines could result in an
increased risk of loss of vehicle control,
injury or death.
Note: Do not use the kit if you have severely
damaged a tire. Only seal punctures located
within the tire tread with the kit.
Do not attempt to repair punctures larger
than
0.2362 in (6 mm) or damage to the
tire's sidewall. The tire may not completely
seal.
Loss of air pressure may adversely affect
tire performance. For this reason:
Note: Do not drive the vehicle above
50 mph (80 km/h)
.
Note: Do not drive further than
120 mi
(200 km). Drive only to the closest
authorized Ford dealer or tire repair shop to
have your tire inspected.
• Drive carefully and avoid abrupt
steering maneuvers.
• Periodically monitor tire inflation
pressure in the affected tire; if the tire
is losing pressure, have the vehicle
towed on a flat bed.
• Read the information in the Tips for
Use of the Kit section to make sure safe
operation of the kit and your vehicle.
Tips for Use of the Kit
To ensure safe operation of the kit:
• Read all instructions and cautions fully.
• Before operating the kit, make sure
your vehicle is safely off the road and
away from moving traffic. Switch on
the hazard lights. •
Always set the parking brake to ensure
the vehicle does not move
unexpectedly.
• Do not remove any foreign objects,
such as nails or screws, from the tire.
• When using the kit, leave the engine
running (only if the vehicle is outdoors
or in a well-ventilated area) so the
compressor does not drain the
vehicle's battery.
• Do not allow the compressor to
operate continuously for more than 15
minutes. This will help prevent the
compressor from overheating.
• Never leave the kit unattended during
operation.
• Sealant compound contains latex.
Those with latex sensitivities should
use appropriate precautions to avoid
an allergic reaction.
• Keep the kit away from children.
• Only use the kit when the ambient
temperature is between -22°F (-30°C)
and 158°F (70°C).
• Only use the sealing compound before
the use-by date. The use-by date is on
a label on the sealant canister, which
you can see through the rectangular
viewing window on the bottom of the
compressor. Check the use-by date
regularly and replace the canister after
four years of non-use.
• Do not store the kit unsecured inside
the passenger compartment of the
vehicle as it may cause injury during a
sudden stop or crash. Always store the
kit in its original location.
• After sealant use, an authorized Ford
dealer must replace the tire pressure
monitoring system sensor and valve
stem on the wheel.
• Operating the kit could cause an
electrical disturbance in radio
operation.
184
Ford GT (CGX) Canada/United States of America, enUSA, Edition date: 201908, First-Printing Wheels and Tires
Page 188 of 316
* When inflation only is required
for a tire or other objects, the
selector must be in the Air
position.
What to do When a Tire Is
Punctured
You can repair a tire puncture within the
tire's tread area in two stages with the kit.
• In the first stage, inflate the tire with a
sealing compound and air. After you
inflate the tire, you will need to drive
the vehicle a short distance (about 4 mi
(6 km) to distribute the sealant in the
tire.
• In the second stage, check the tire
pressure and adjust, if necessary, to the
vehicle's specified tire inflation
pressure.
First Stage: Inflating the Tire with
Sealing Compound and Air WARNING: Do not stand directly
over the kit while inflating the tire. If you
notice any unusual bulges or
deformations in the tire's sidewall during
inflation, stop and call roadside
assistance. WARNING:
If the tire does not
inflate to the recommended tire pressure
within 15 minutes, stop and call roadside
assistance. WARNING:
Do not run the
engine when operating the air
compressor unless the vehicle is
outdoors or in a well-ventilated area.
Preparation: Park the vehicle in a safe, level
and secure area, away from moving traffic. Switch the hazard lights on. Apply the
parking brake and switch the engine off.
Inspect the flat tire for visible damage.
Sealant compound contains latex. Use
appropriate precautions to avoid any
allergic reactions.
Do not remove any foreign object that has
pierced the tire. If a puncture is located in
the tire sidewall, stop and call roadside
assistance.
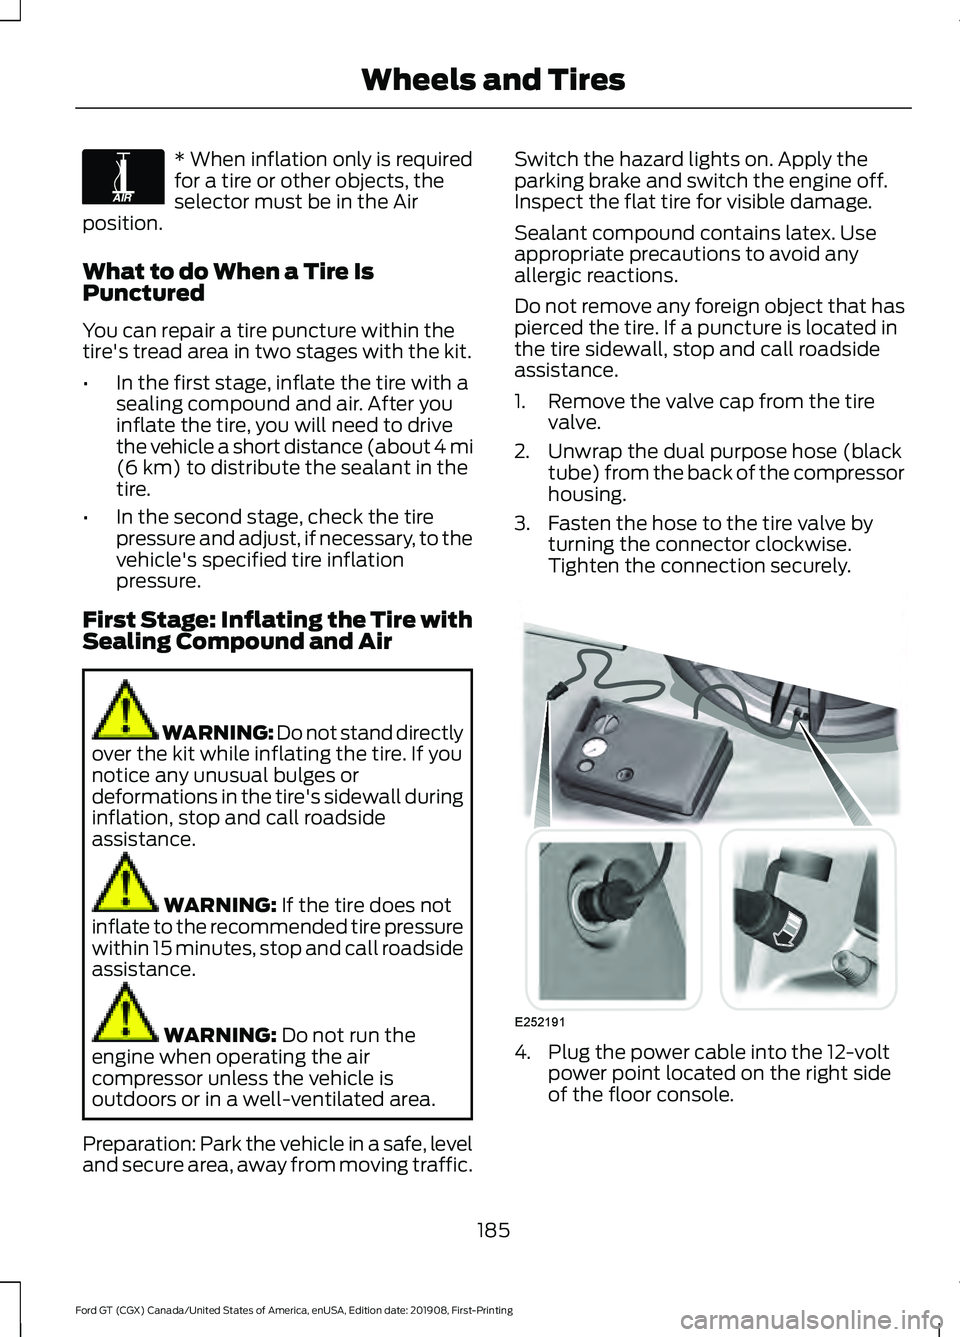
1. Remove the valve cap from the tire
valve.
2. Unwrap the dual purpose hose (black tube) from the back of the compressor
housing.
3. Fasten the hose to the tire valve by turning the connector clockwise.
Tighten the connection securely. 4. Plug the power cable into the 12-volt
power point located on the right side
of the floor console.
185
Ford GT (CGX) Canada/United States of America, enUSA, Edition date: 201908, First-Printing Wheels and TiresE175978 E252191
Page 209 of 316
TECHNICAL SPECIFICATIONS
Wheel Lug Nut Torque Specifications
WARNING: When you install a wheel, always remove any corrosion, dirt or
foreign materials present on the mounting surfaces of the wheel or the surface of the
wheel hub, brake drum or brake disc that contacts the wheel. Make sure to secure any
fasteners that attach the rotor to the hub so they do not interfere with the mounting
surfaces of the wheel. Installing wheels without correct metal-to-metal contact at the
wheel mounting surfaces can cause the wheel nuts to loosen and the wheel to come
off while your vehicle is in motion, resulting in loss of vehicle control, personal injury or
death. Ib-ft (Nm)
*
Bolt size
150 lb.ft (204 Nm)
M14 X 1.5
* Torque specifications are for nut and bolt threads free of dirt and rust. Use only Ford
recommended replacement fasteners.
Retighten the lug nuts to the specified torque within 100 miles (160 kilometers) after any
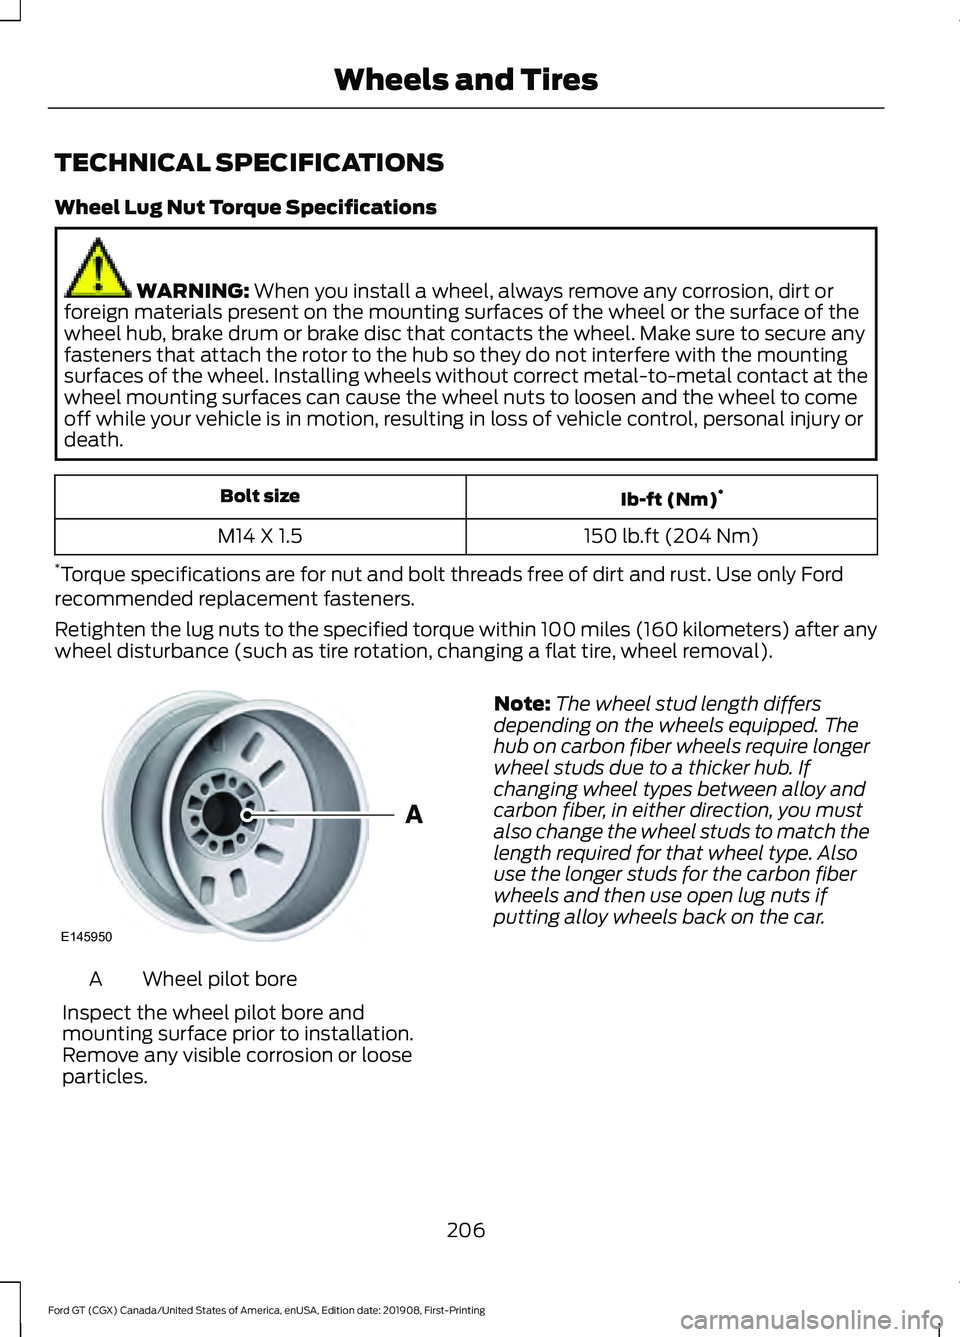
wheel disturbance (such as tire rotation, changing a flat tire, wheel removal). Wheel pilot bore
A
Inspect the wheel pilot bore and
mounting surface prior to installation.
Remove any visible corrosion or loose
particles. Note:
The wheel stud length differs
depending on the wheels equipped. The
hub on carbon fiber wheels require longer
wheel studs due to a thicker hub. If
changing wheel types between alloy and
carbon fiber, in either direction, you must
also change the wheel studs to match the
length required for that wheel type. Also
use the longer studs for the carbon fiber
wheels and then use open lug nuts if
putting alloy wheels back on the car.
206
Ford GT (CGX) Canada/United States of America, enUSA, Edition date: 201908, First-Printing Wheels and TiresE145950
Page 223 of 316
Automatic crash notification
system off.
Cell phone network signal
strength.
Feature Bar Select to use the radio, a USB, a
media player or a Bluetooth
device. See Entertainment
(page 228). Select to adjust climate settings
Select to make calls and access
the phonebook on your cell
phone. See
Phone (page 238).
Select to use the navigation
system.
See Navigation (page
240). Select to search for and use
compatible apps on your iOS or
Android device. See Apps (page
245
). Select to adjust system settings.
See
Settings (page 247).
Cleaning the Touchscreen
See
Cleaning the Interior (page 178).
Updating the System
Updating the System Using a USB Drive
Downloading an Update
1. Go to the SYNC update page on the local Ford website.
2. Download the update.
Note: The website notifies you if an update
is available.
3. Insert a USB drive into your computer. Note:
The USB drive needs to be empty and
meet the minimum requirements detailed
on the website.
4. Follow the instructions provided to download the update to the USB drive.
Installing an Update
Note: You can use the system when an
installation is in progress.
1. Disconnect all other USB devices from
the USB ports.
2. Connect the USB drive with the update
to a USB port.
Note: Installation starts automatically
within 10 minutes.
Updating the System Using a Wi-Fi
Network Connection
Connecting to a Wi-Fi Network Select the settings option on the
feature bar.
1. Select
Automatic Updates.
2. Select
System Wi-Fi.
3. Switch
System Wi-Fi on.
4. Select
Available Wi-Fi Networks.
5. Select an available Wi-Fi network.
Note: Enter the network password to
connect to a secure network.
Switching Automatic System Updates
On Select the settings option on the
feature bar.
1. Select
Automatic Updates.
2. Switch
Automatic System Updates
on.
The system is now set to check for and
receive system updates when it is
connected to a Wi-Fi network.
220
Ford GT (CGX) Canada/United States of America, enUSA, Edition date: 201908, First-Printing SYNC™ 3 E100027 E283811 E280315 E280315 E280315