remote control FORD GT 2020 User Guide
[x] Cancel search | Manufacturer: FORD, Model Year: 2020, Model line: GT, Model: FORD GT 2020Pages: 316, PDF Size: 6.25 MB
Page 57 of 316
PASSIVE ANTI-THEFT
SYSTEM
Note:
The system is not compatible with
non-Ford aftermarket remote start systems.
Use of these systems may result in vehicle
starting problems and a loss of security
protection.
Note: Metallic objects, electronic devices
or a second coded key on the same key
chain may cause vehicle starting problems
if they are too close to the key when starting
your vehicle. Prevent these objects from
touching the coded key while starting your
vehicle. Switch the ignition off, move all
objects on the key chain away from the
coded key and restart your vehicle if a
problem occurs.
Note: Do not leave a duplicate coded key
in your vehicle. Always take your keys and
lock all doors when leaving your vehicle.
SecuriLock
The system helps prevent your vehicle
from starting unless you use a coded key
programmed to your vehicle. Using the
wrong key may prevent your vehicle from
starting. A message may appear in the
information display.
If you are unable to start your vehicle with
a correctly coded key, it is not operating
properly. A message may appear in the
information display.
Automatic Arming
Your vehicle arms immediately after
switching the ignition off.
Automatic Disarming
Switching the ignition on with a coded key
disarms your vehicle. Replacement Keys
Note:
Your vehicle comes equipped with
two intelligent access keys.
The intelligent access key functions as a
programmed key that operates the driver
door lock and activates the intelligent
access with push button start system, as
well as a remote control.
If your programmed transmitters are lost
or stolen and you do not have an extra
coded key, contact the Ford GT concierge
to have your Ford GT transported to your
Certified Ford GT Service Dealership to
erase the key codes from your vehicle and
program new coded keys. See About This
Manual (page 5).
Store an extra programmed key away from
your vehicle in a safe place to help prevent
any inconveniences. See your authorized
dealer to purchase additional spare or
replacement keys.
Programming a Spare Intelligent
Access Key
Note: You can program a maximum of four
intelligent access keys to your vehicle.
You must have two previously
programmed intelligent access keys inside
your vehicle and the new unprogrammed
intelligent access keys readily accessible.
See an authorized dealer to have the spare
key programmed if two previously
programmed keys are not available.
Make sure that your vehicle is off before
beginning this procedure. Make sure that
you close all the doors before beginning
and that they remain closed throughout
the procedure. Perform all steps within 30
seconds of starting the sequence. Stop
and wait for at least one minute before
starting again if you perform any steps out
of sequence.
Read and understand the entire procedure
before you begin.
54
Ford GT (CGX) Canada/United States of America, enUSA, Edition date: 201908, First-Printing Security
Page 58 of 316
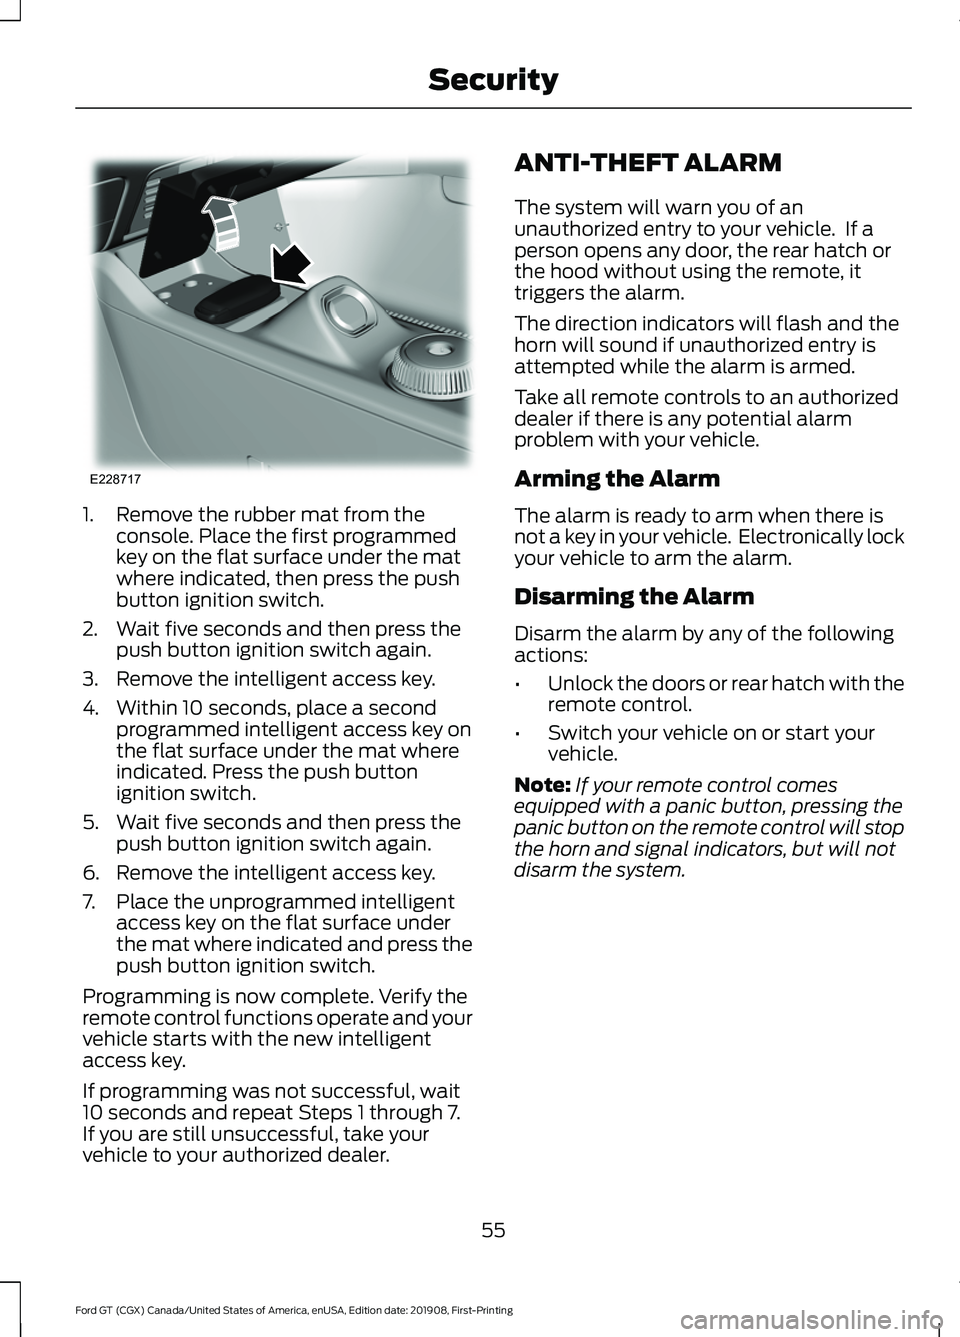
1. Remove the rubber mat from the
console. Place the first programmed
key on the flat surface under the mat
where indicated, then press the push
button ignition switch.
2. Wait five seconds and then press the push button ignition switch again.
3. Remove the intelligent access key.
4. Within 10 seconds, place a second programmed intelligent access key on
the flat surface under the mat where
indicated. Press the push button
ignition switch.
5. Wait five seconds and then press the push button ignition switch again.
6. Remove the intelligent access key.
7. Place the unprogrammed intelligent access key on the flat surface under
the mat where indicated and press the
push button ignition switch.
Programming is now complete. Verify the
remote control functions operate and your
vehicle starts with the new intelligent
access key.
If programming was not successful, wait
10 seconds and repeat Steps 1 through 7.
If you are still unsuccessful, take your
vehicle to your authorized dealer. ANTI-THEFT ALARM
The system will warn you of an
unauthorized entry to your vehicle. If a
person opens any door, the rear hatch or
the hood without using the remote, it
triggers the alarm.
The direction indicators will flash and the
horn will sound if unauthorized entry is
attempted while the alarm is armed.
Take all remote controls to an authorized
dealer if there is any potential alarm
problem with your vehicle.
Arming the Alarm
The alarm is ready to arm when there is
not a key in your vehicle. Electronically lock
your vehicle to arm the alarm.
Disarming the Alarm
Disarm the alarm by any of the following
actions:
•
Unlock the doors or rear hatch with the
remote control.
• Switch your vehicle on or start your
vehicle.
Note: If your remote control comes
equipped with a panic button, pressing the
panic button on the remote control will stop
the horn and signal indicators, but will not
disarm the system.
55
Ford GT (CGX) Canada/United States of America, enUSA, Edition date: 201908, First-Printing SecurityE228717
Page 67 of 316
To switch the system on:
•
For vehicles sold in the United States,
the lighting control must be in the
autolamps position. The lamps turn on
in daylight and turn the headlamps on
when ambient light is low. You can
enable this feature in the information
display. See Information Displays
(page 74).
• For vehicle sold in Canada, the daytime
running lamps system activates the
rear lamps and turns on in both the off
and autolamps position. You cannot
disable this feature.
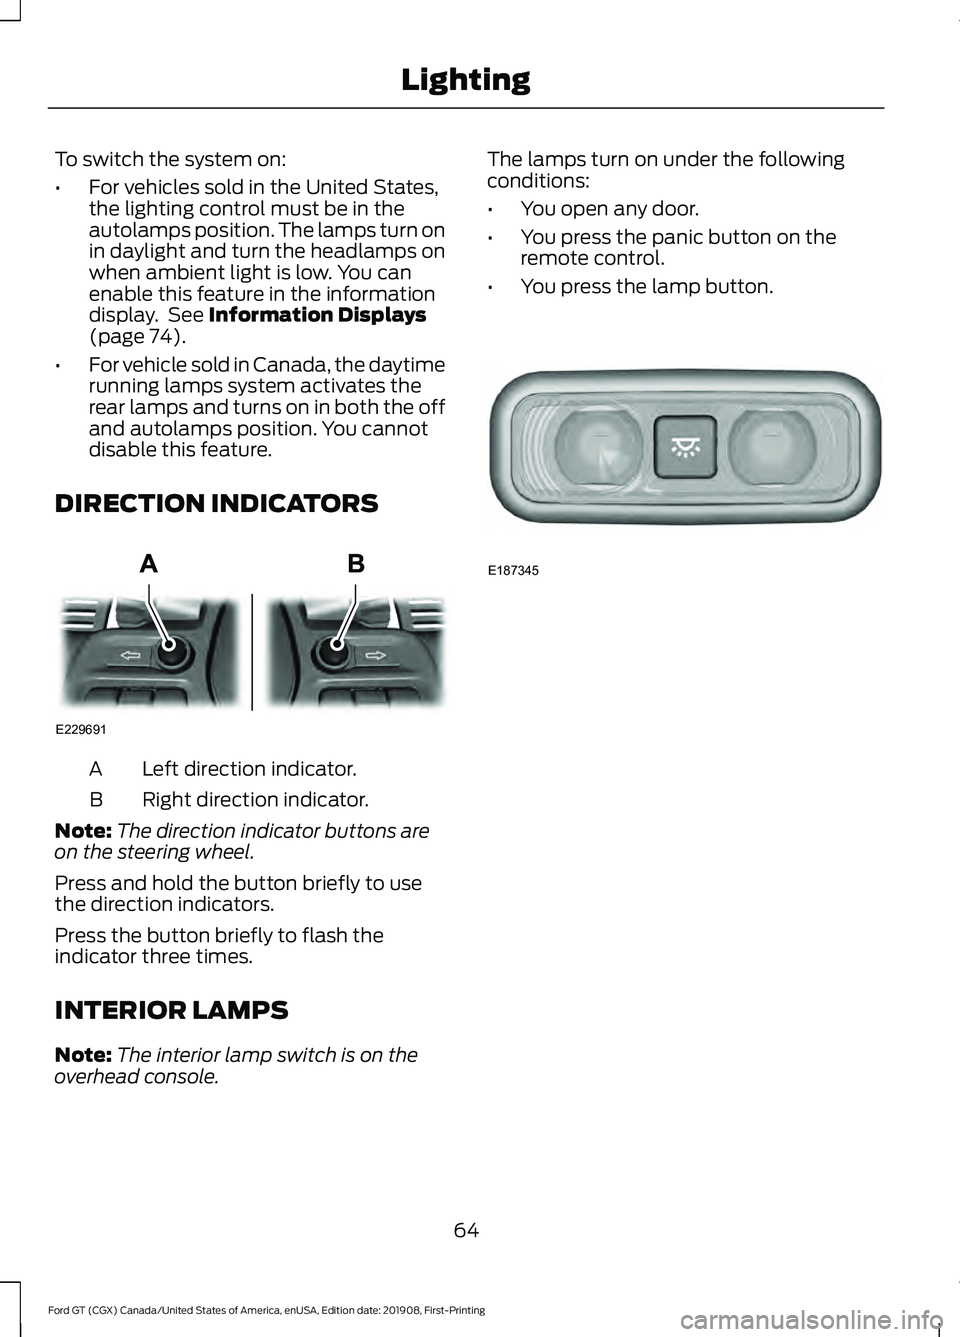
DIRECTION INDICATORS Left direction indicator.
A
Right direction indicator.
B
Note: The direction indicator buttons are
on the steering wheel.
Press and hold the button briefly to use
the direction indicators.
Press the button briefly to flash the
indicator three times.
INTERIOR LAMPS
Note: The interior lamp switch is on the
overhead console. The lamps turn on under the following
conditions:
•
You open any door.
• You press the panic button on the
remote control.
• You press the lamp button. 64
Ford GT (CGX) Canada/United States of America, enUSA, Edition date: 201908, First-Printing LightingE229691 E187345
Page 68 of 316
POWER WINDOWS
WARNING: Do not leave children
unattended in your vehicle and do not
let them play with the power windows.
Failure to follow this instruction could
result in personal injury. WARNING: When closing the
power windows, verify they are free of
obstruction and make sure that children
and pets are not in the proximity of the
window openings. Note:
You may hear a pulsing noise when
just one of the windows is open. Lower the
opposite window slightly to reduce this
noise.
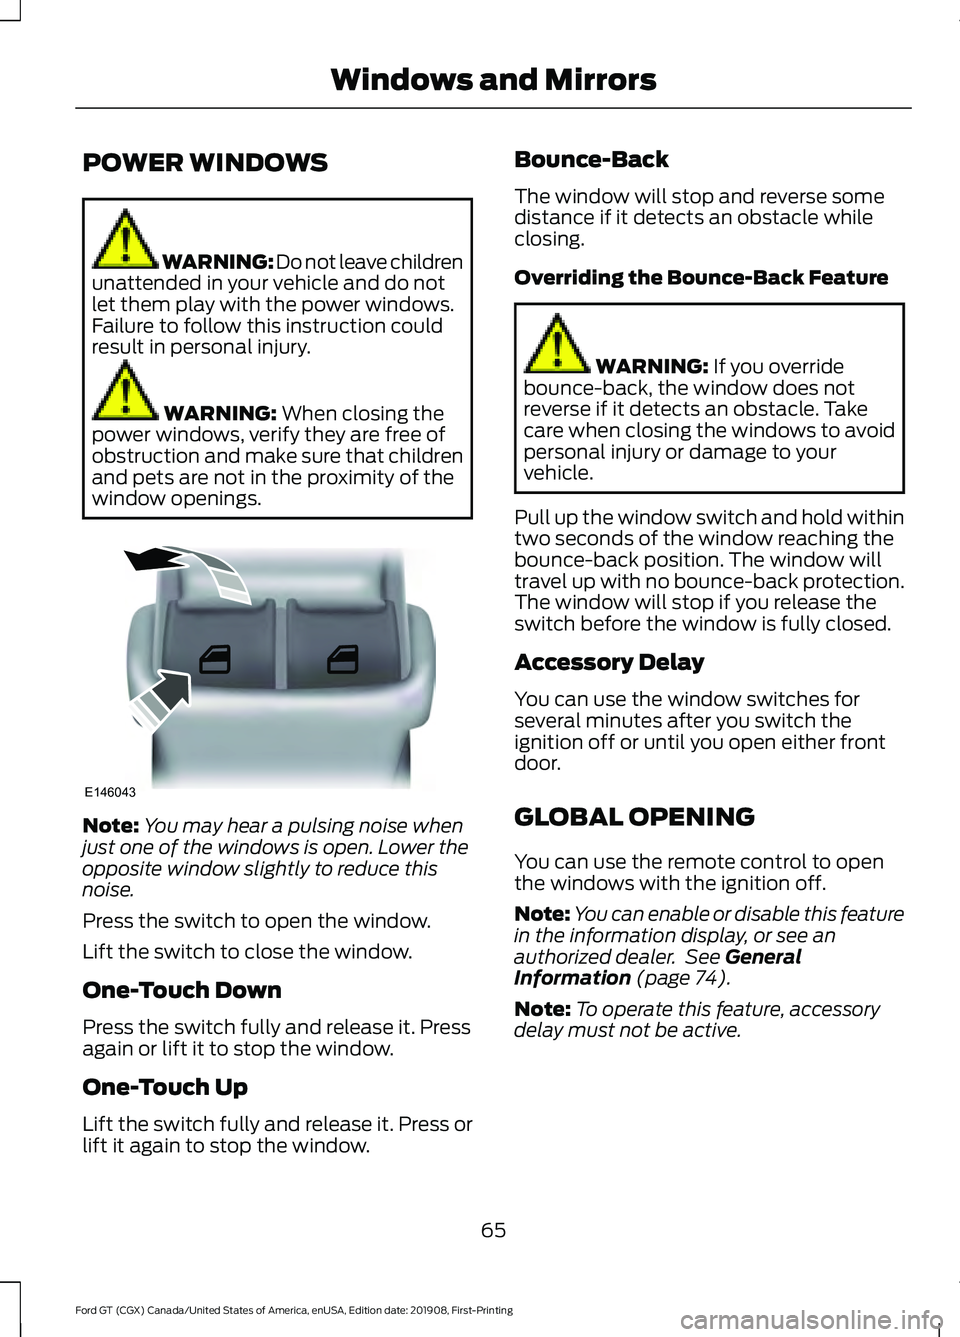
Press the switch to open the window.
Lift the switch to close the window.
One-Touch Down
Press the switch fully and release it. Press
again or lift it to stop the window.
One-Touch Up
Lift the switch fully and release it. Press or
lift it again to stop the window. Bounce-Back
The window will stop and reverse some
distance if it detects an obstacle while
closing.
Overriding the Bounce-Back Feature
WARNING:
If you override
bounce-back, the window does not
reverse if it detects an obstacle. Take
care when closing the windows to avoid
personal injury or damage to your
vehicle.
Pull up the window switch and hold within
two seconds of the window reaching the
bounce-back position. The window will
travel up with no bounce-back protection.
The window will stop if you release the
switch before the window is fully closed.
Accessory Delay
You can use the window switches for
several minutes after you switch the
ignition off or until you open either front
door.
GLOBAL OPENING
You can use the remote control to open
the windows with the ignition off.
Note: You can enable or disable this feature
in the information display, or see an
authorized dealer. See
General
Information (page 74).
Note: To operate this feature, accessory
delay must not be active.
65
Ford GT (CGX) Canada/United States of America, enUSA, Edition date: 201908, First-Printing Windows and MirrorsE146043
Page 69 of 316
Remote Control Front Windows
You can open the windows for a short time
after you unlock your vehicle with the
remote control. After you unlock your
vehicle, press and hold the remote control
unlock button to open the windows.
Release the button once movement starts.
Press the lock or unlock button to stop
movement.
EXTERIOR MIRRORS
Power Exterior Mirrors
WARNING: Do not adjust the
mirrors when your vehicle is moving. This
could result in the loss of control of your
vehicle, serious personal injury or death.
Note: Do not clean the housing or glass of
any mirror with harsh abrasives, fuel or other
petroleum or ammonia-based cleaning
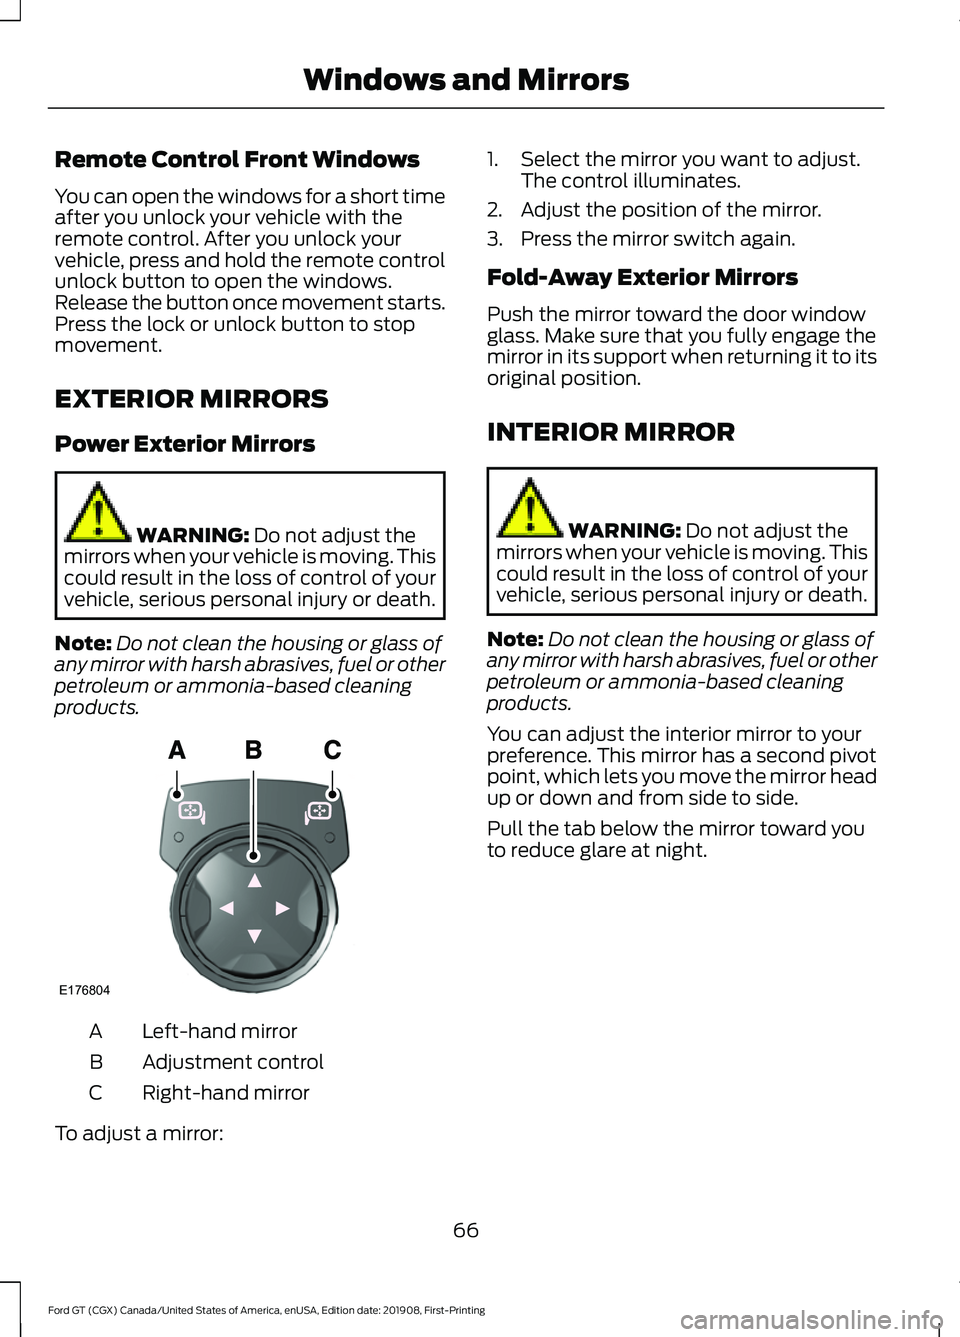
products. Left-hand mirror
A
Adjustment control
B
Right-hand mirror
C
To adjust a mirror: 1. Select the mirror you want to adjust.
The control illuminates.
2. Adjust the position of the mirror.
3. Press the mirror switch again.
Fold-Away Exterior Mirrors
Push the mirror toward the door window
glass. Make sure that you fully engage the
mirror in its support when returning it to its
original position.
INTERIOR MIRROR WARNING: Do not adjust the
mirrors when your vehicle is moving. This
could result in the loss of control of your
vehicle, serious personal injury or death.
Note: Do not clean the housing or glass of
any mirror with harsh abrasives, fuel or other
petroleum or ammonia-based cleaning
products.
You can adjust the interior mirror to your
preference. This mirror has a second pivot
point, which lets you move the mirror head
up or down and from side to side.
Pull the tab below the mirror toward you
to reduce glare at night.
66
Ford GT (CGX) Canada/United States of America, enUSA, Edition date: 201908, First-Printing Windows and MirrorsE176804
Page 140 of 316

Grounding Stud Location
Jump Starting
1.
Start the engine of the booster vehicle
and rev the engine moderately, or press
the accelerator gently to keep your
engine speed between 2000 and 3000
RPM, as shown in your tachometer.
2. Start the engine of the disabled vehicle.
3. Once the disabled vehicle has been started, run both vehicle engines for an
additional three minutes before
disconnecting the jumper cables.
Removing the Jumper Cables
Remove the jumper cables in the reverse
order that they were connected.
1. Remove the jumper cable from the negative (-) terminal of the booster
vehicle battery.
2. Remove the jumper cable from the negative (A) post of the disabled
vehicle.
3. Remove the jumper cable from the positive (+) terminal of the booster
vehicle battery.
4. Remove the jumper cable from the positive (B) post of the disabled
vehicle.
5. Allow the engine to idle for at least one
minute. POST-CRASH ALERT SYSTEM
The system flashes the direction indicators
and sounds the horn (intermittently) in the
event of a serious impact that deploys an
airbag (front and side) or the safety belt
pretensioners.
The horn and indicators will turn off when:
•
You press the hazard control button.
• You press the panic button on the
remote entry transmitter (if equipped).
• Your vehicle runs out of power.
TRANSPORTING THE VEHICLE
If you need to transport your vehicle,
please contact the Ford GT Concierge at
800-210-5795.
You can only transport your vehicle in an
enclosed trailer or on a roll back flatbed
truck. The ramp angle or angle of approach
on Ford GT is 9 degrees. Below are some
ramp lengths required to achieve this angle
depending on trailer or bed entrance
height. Ramp Length
Height
11 ft (330 cm)
20 in (50 cm)
10 ft (292 cm)
18 in (45 cm)
9 ft (266 cm)
16 in (40 cm)
7 ft (228 cm)
14 in (35 cm)
7 ft (203 cm)
12 in (30 cm)
137
Ford GT (CGX) Canada/United States of America, enUSA, Edition date: 201908, First-Printing Roadside EmergenciesE229889
Page 161 of 316
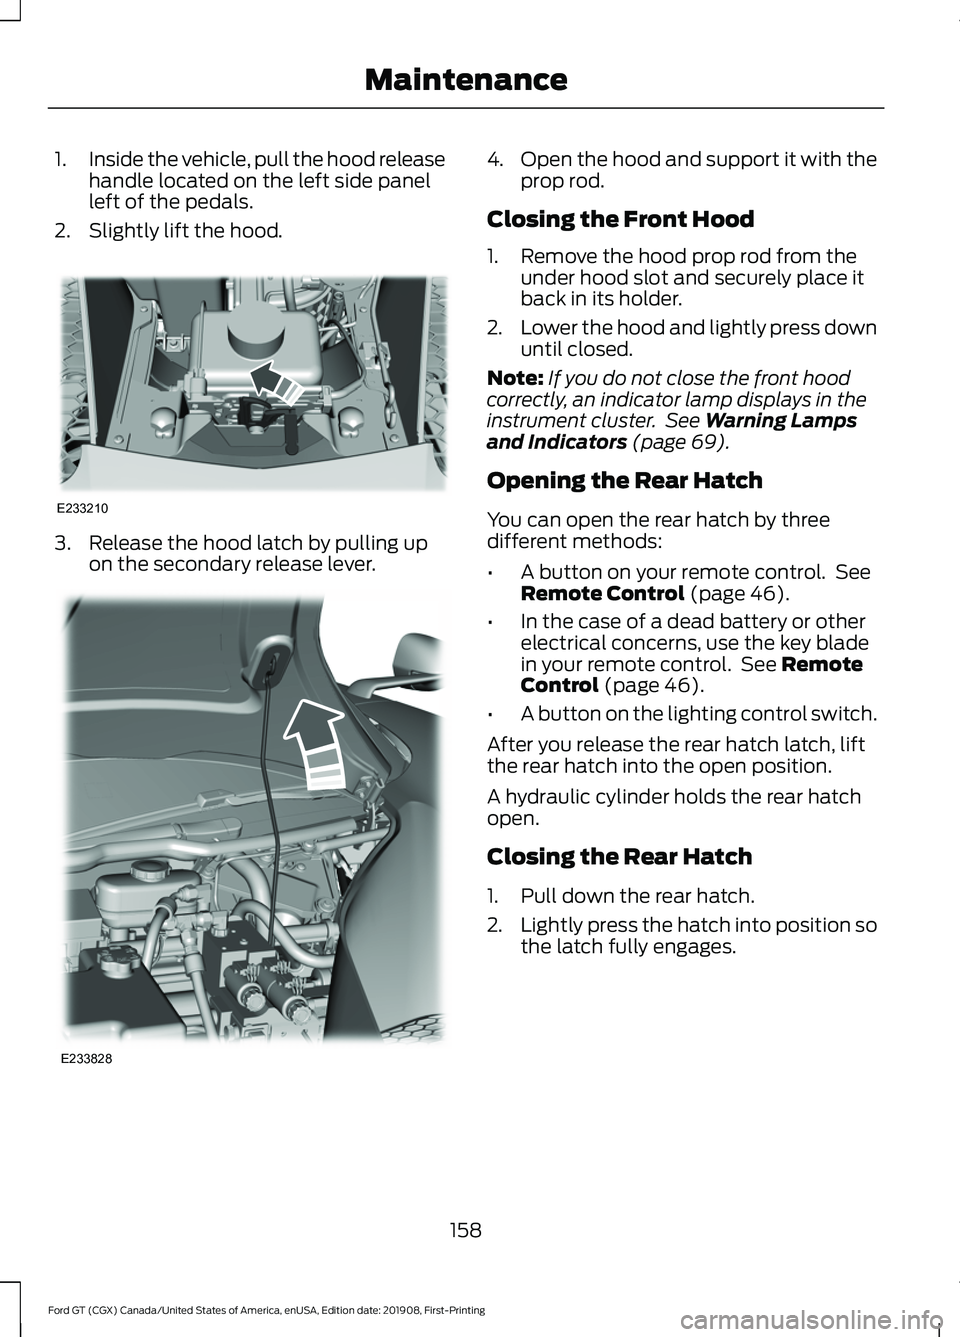
1.
Inside the vehicle, pull the hood release
handle located on the left side panel
left of the pedals.
2. Slightly lift the hood. 3. Release the hood latch by pulling up
on the secondary release lever. 4.
Open the hood and support it with the
prop rod.
Closing the Front Hood
1. Remove the hood prop rod from the under hood slot and securely place it
back in its holder.
2. Lower the hood and lightly press down
until closed.
Note: If you do not close the front hood
correctly, an indicator lamp displays in the
instrument cluster. See Warning Lamps
and Indicators (page 69).
Opening the Rear Hatch
You can open the rear hatch by three
different methods:
• A button on your remote control. See
Remote Control
(page 46).
• In the case of a dead battery or other
electrical concerns, use the key blade
in your remote control. See
Remote
Control (page 46).
• A button on the lighting control switch.
After you release the rear hatch latch, lift
the rear hatch into the open position.
A hydraulic cylinder holds the rear hatch
open.
Closing the Rear Hatch
1. Pull down the rear hatch.
2. Lightly press the hatch into position so
the latch fully engages.
158
Ford GT (CGX) Canada/United States of America, enUSA, Edition date: 201908, First-Printing MaintenanceE233210 E233828
Page 202 of 316
the B-Pillar or edge of the
driver's door. If this information
is not found on these labels, then
you should contact your
authorized dealer as soon as
possible. Use of any tire or wheel
not recommended by Ford can
affect the safety and
performance of your vehicle,
which could result in an
increased risk of loss of vehicle
control, vehicle rollover, personal
injury and death.
WARNING: The use of
non-recommended tires and
wheels could cause steering,
suspension, axle, transfer case
or power transfer unit failure. If
you have questions regarding tire
replacement, contact your
authorized dealer as soon as
possible. WARNING:
To reduce the
risk of serious injury, when
mounting replacement tires and
wheels, you should not exceed
the maximum pressure indicated
on the sidewall of the tire to set
the beads without additional
precautions listed below. If the
beads do not seat at the
maximum pressure indicated,
re-lubricate and try again. WARNING:
When
inflating the tire for mounting
pressures up to 20 psi (1.38 bar)
greater than the maximum
pressure on the tire sidewall, the
following precautions must be
taken to protect the person
mounting the tire:
• Make sure that you have the
correct tire and wheel size.
• Lubricate the tire bead and
wheel bead seat area again.
• Stand at a minimum of
12 ft
(3.66 m) away from the wheel
and tire assembly.
• Use both eye and ear
protection. WARNING:
For a
mounting pressure more than
20 psi (1.38 bar)
greater than the
maximum pressure, a Ford
dealer or other tire service
professional should do the
mounting. WARNING: Always inflate
steel carcass tires with a remote
air fill with the person inflating
standing at a minimum of
12 ft
(3.66 m) away from the wheel
and tire assembly.
199
Ford GT (CGX) Canada/United States of America, enUSA, Edition date: 201908, First-Printing Wheels and Tires
Page 262 of 316
Possible Cause and Resolution
Symptom
I cannot see SYNC when I
search for Wi-Fi networks on
my cell phone or other
device. –
System limitation.
•SYNC does not provide a Wi-Fi hotspot at this time.
– Weak network signal
•Move your vehicle closer to the Wi-Fi hotspot or to
a place where the network signal is not obstructed.
– Wi-Fi hotspot in high demand or has a slow Internet
connection.
•Use a more reliable Wi-Fi hotspot.
Software downloads take
too long.
–No software update available.
– Wi-Fi network requires a subscription or acceptance
of terms and conditions.
•Test the connection using another device. If the
network requires a subscription or acceptance of
terms and conditions, contact the network service
provider.
The system seems to
connect to a Wi-Fi network
and the signal strength is
excellent but the software
does not update.
Personal Profiles (If Equipped) Possible Cause and Solution
Symptom
You have not set up Personal Profiles.
I cannot create a profile. You entered an invalid profile.
You did not select a memory button when prompted.
You did not have the ignition on or in park (P), or you
shifted out park (P) when creating a profile.
Personal Profiles has been switched off.
You did not select the lock button on the remote control.
I cannot link a remote
control. The remote control selected was already associated with
another profile and the system declined to overwrite.
The system performed a profile recall when linking a
remote control.
You did not have the ignition on or in park (P), or you
shifted out park (P) when creating a profile.
259
Ford GT (CGX) Canada/United States of America, enUSA, Edition date: 201908, First-Printing SYNC™ 3
Page 263 of 316
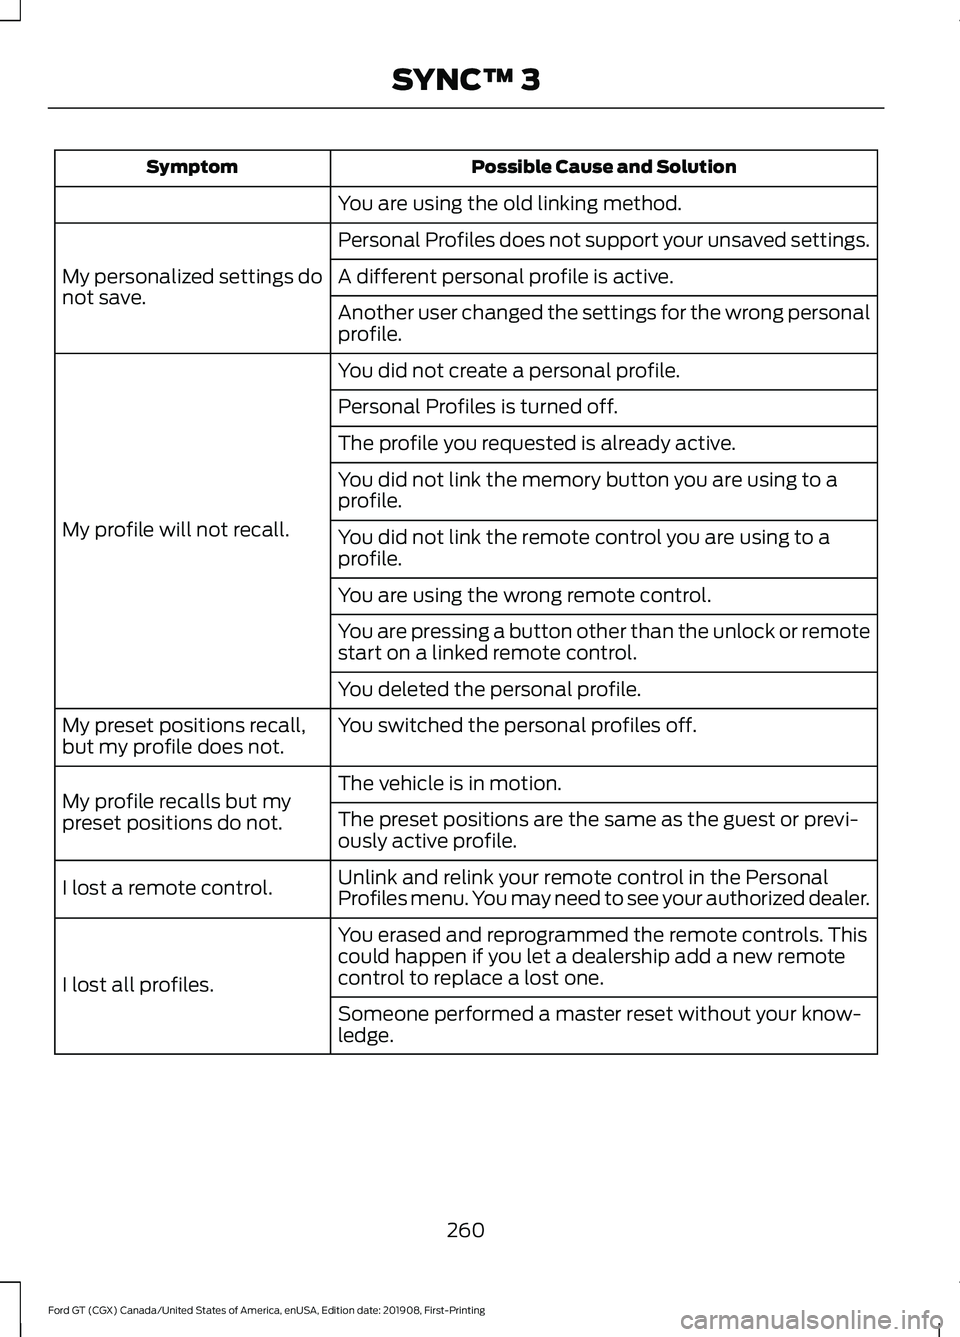
Possible Cause and Solution
Symptom
You are using the old linking method.
Personal Profiles does not support your unsaved settings.
My personalized settings do
not save. A different personal profile is active.
Another user changed the settings for the wrong personal
profile.
You did not create a personal profile.
My profile will not recall. Personal Profiles is turned off.
The profile you requested is already active.
You did not link the memory button you are using to a
profile.
You did not link the remote control you are using to a
profile.
You are using the wrong remote control.
You are pressing a button other than the unlock or remote
start on a linked remote control.
You deleted the personal profile.
You switched the personal profiles off.
My preset positions recall,
but my profile does not.
The vehicle is in motion.
My profile recalls but my
preset positions do not. The preset positions are the same as the guest or previ-
ously active profile.
Unlink and relink your remote control in the Personal
Profiles menu. You may need to see your authorized dealer.
I lost a remote control.
You erased and reprogrammed the remote controls. This
could happen if you let a dealership add a new remote
control to replace a lost one.
I lost all profiles.
Someone performed a master reset without your know-
ledge.
260
Ford GT (CGX) Canada/United States of America, enUSA, Edition date: 201908, First-Printing SYNC™ 3