tow FORD GT 2020 Owner's Manual
[x] Cancel search | Manufacturer: FORD, Model Year: 2020, Model line: GT, Model: FORD GT 2020Pages: 316, PDF Size: 6.25 MB
Page 167 of 316
How Fail-Safe Cooling Works
If the engine begins to overheat, the
coolant temperature gauge moves toward
the red zone:
A warning lamp illuminates and
a message may appear in the
information display.
If the engine reaches a preset
over-temperature condition, the engine
automatically switches to alternating
cylinder operation. Each disabled cylinder
acts as an air pump and cools the engine.
When this occurs, your vehicle still
operates, however:
• Engine power is limited.
• The air conditioning system turns off.
Continued operation increases the engine
temperature, causing the engine to
completely shut down. Your steering and
braking effort increases in this situation.
When the engine temperature cools, you
can re-start the engine. Have your vehicle
checked as soon as possible to minimize
engine damage.
When Fail-Safe Mode Is Activated WARNING: Fail-safe mode is for
use during emergencies only. Operate
your vehicle in fail-safe mode only as
long as necessary to bring your vehicle
to rest in a safe location and seek
immediate repairs. When in fail-safe
mode, your vehicle will have limited
power, will not be able to maintain high-speed operation, and may
completely shut down without warning,
potentially losing engine power, power
steering assist, and power brake assist,
which may increase the possibility of a
crash resulting in serious injury.
WARNING:
Never remove the
coolant reservoir cap when the engine is
running or hot.
Your vehicle has limited engine power
when in the fail-safe mode, drive your
vehicle with caution. Your vehicle does not
maintain high-speed operation and the
engine may operate poorly.
Remember that the engine is capable of
automatically shutting down to prevent
engine damage. In this situation:
1. Pull off the road as soon as safely possible and switch the engine off.
2. Contact the Ford GT Concierge to obtain assistance.
See About This
Manual (page 5).
3. If this is not possible, wait a short period for the engine to cool.
4. Check the coolant level. If the coolant level is at or below the minimum mark,
add prediluted coolant immediately.
5. When the engine temperature cools, you can re-start the engine. Have your
vehicle checked as soon as possible to
minimize engine damage.
Note: Driving your vehicle without repair
increases the chance of engine damage.
164
Ford GT (CGX) Canada/United States of America, enUSA, Edition date: 201908, First-Printing Maintenance
Page 168 of 316
Engine Coolant Temperature
Management
WARNING: To reduce the risk
of crash and injury, be prepared that the
vehicle speed may reduce and the
vehicle may not be able to accelerate
with full power until the coolant
temperature reduces.
At this time, you may notice the coolant
temperature gauge moves toward the red
zone and a message may appear in the
information display.
You may notice a reduction in vehicle
speed caused by reduced engine power in
order to manage the engine coolant
temperature. Your vehicle may enter this
mode if certain high-temperature and
high-load conditions take place. The
amount of speed reduction depends on
vehicle loading, grade and ambient
temperature. If this occurs, there is no need
to pull off the road. You can continue to
drive your vehicle.
The air conditioning may automatically
turn on and off during severe operating
conditions to protect the engine from
overheating. When the coolant
temperature decreases to the normal
operating temperature, the air conditioning
turns on.
If the coolant temperature gauge moves
fully into the red zone, or if the coolant
temperature warning or service engine
soon messages appear in your information
display, do the following:
1. Pull off the road as soon as safely possible and shift the transmission into
park
(P). 2. Leave the engine running until the
coolant temperature gauge needle
returns to the normal position. After
several minutes, if the temperature
does not drop, follow the remaining
steps.
3. Switch the engine off and wait for it to
cool. Check the coolant level.
4. If the coolant level is at or below the minimum mark, add prediluted coolant
immediately.
5. If the coolant level is normal, restart the engine and continue.
AUTOMATIC TRANSMISSION
FLUID CHECK
If required, have an authorized dealer check
and change the transmission fluid at the
correct service interval. See
Scheduled
Maintenance (page 263).
The automatic transmission does not have
a transmission fluid dipstick.
Refer to your scheduled maintenance
information for scheduled intervals for fluid
checks and changes. Your transmission
does not consume fluid. However, if the
transmission slips, shifts slowly or if you
notice a sign of leaking fluid, contact an
authorized dealer.
Do not use supplemental transmission
fluid additives, treatments or cleaning
agents. The use of these materials may
affect transmission operation and result
in damage to internal transmission
components.
165
Ford GT (CGX) Canada/United States of America, enUSA, Edition date: 201908, First-Printing Maintenance
Page 179 of 316
Note:
Do not spray cleaning products on
the brake discs. Any resulting damage is not
covered by your vehicle warranty.
Note: Always follow the instructions
included in this manual when cleaning your
vehicle and do not use abrasive cleaning
products.
Standard Paint Finish
If your vehicle has a matte paint finish, see
Matte Paint Finish in this chapter.
Wash your vehicle regularly with cool or
lukewarm water and a neutral pH
shampoo, we recommend Motorcraft®™
Detail Wash.
• Never use strong household detergents
or soap, for example dish washing or
laundry liquid. These products can
discolor and spot painted surfaces.
• Never wash your vehicle when it is hot
to the touch, or during strong or direct
sunlight.
• Dry your vehicle with a chamois or soft
terry cloth towel to eliminate water
spotting.
• Immediately remove fuel spillages, bird
droppings, insect deposits and road tar.
These may cause damage to your
vehicle ’s paintwork or trim over time.
We recommend Motorcraft® Bug and
Tar Remover.
Matte Paint Finish
(If Equipped)
Prepare the following before washing your
vehicle:
• Use a no shine, matte car wash soap
that does not contain fillers or silicone.
• Use high quality, soft lamb's wool mitts
and wash each mitt thoroughly after
each car wash. •
Wash your vehicle's painted surfaces
in the shade with two buckets of water,
one for soap and the other for clean
water.
• Add a plastic grit guard to the bottom
of the soap bucket so that dirt settles
at the bottom of the bucket and does
not contaminate the wash mitt.
To wash your vehicle:
1. Rinse your vehicle to remove as much dirt and debris as possible.
2. Wet the wash mitt in the soap bucket and apply the soapy water to your
vehicle in a gentle back-and-forth
motion.
Note: Do not rub the wash mitt in circles or
rub the paint surface aggressively. Rubbing
too hard in circles leaves permanent swirl
marks in the paint finish.
3. Rinse the wash mitt in clean water before inserting the mitt back into the
soap bucket to prevent dirt from
contaminating the soapy water.
4. Rinse the vehicle with clean water and
dry it with a clean, damp cloth.
Note: Do not use automotive waxes, detail
sprays or abrasive polishes or glazes on your
vehicle. Improper use of cleaning products
can cause damage to your vehicle not
covered by your vehicle warranty.
Immediately remove fuel spillages, bird
droppings, insect deposits and road tar.
Use a wet microfiber towel and an
alcohol-based window cleaner, a matte
paint finish cleaner or a 50/50 mix of
alcohol and deionized water.
Note: Always soak a microfiber towel or
wash mitt with water before cleaning. Using
a dry towel or mitt on a matte paint finish
creates a permanent glossy spot in the paint
finish.
176
Ford GT (CGX) Canada/United States of America, enUSA, Edition date: 201908, First-Printing Vehicle Care
Page 181 of 316
CLEANING THE WINDOWS AND
WIPER BLADES
Dirty windshield and wipers will result in
poor windshield wiper operation. Keep the
windshield and wiper blades clean to
maintain windshield wiper performance.
To clean exterior glass surfaces and wiper
blades:
•
Clean the exterior surface of the
windshield with a non-abrasive glass
cleaner.
• For windshields contaminated with
tree sap, chemicals, wax or bugs, clean
the outside surface of the windshield
with Motorcraft Bug and Tar Remover.
• Clean the wiper blades with isopropyl
rubbing alcohol or windshield washer
concentrate.
The interior glass surface of the windshield
and engine cover glass, and both the inner
and outer surface of the bulkhead glass,
have a laminate coating that requires
special care.
To clean interior glass surfaces:
• When cleaning the inside of the
windshield, avoid getting any glass
cleaner on the instrument panel or door
panels. Wipe any excess cleaner off
these surfaces immediately.
• Use a microfiber towel and plain water,
or a mixture of one-half water and
one-half white vinegar, to clean the
interior glass surfaces.
Note: Never use alcohol or ammonia based
cleaners, aerosol sprays or abrasive
compounds to clean the interior glass
surfaces of your vehicle. Using improper
cleaning products can cause damage to
your vehicle. CLEANING THE INTERIOR WARNING: Do not use cleaning
solvents, bleach or dye on the vehicle's
seatbelts, as these actions may weaken
the belt webbing.
Clean safety belts with water applied with
a soft sponge. Let them dry naturally, away
from artificial heat.
Wipe carbon fiber surfaces with a clean,
damp and soft cloth to remove dust. Then
use a clean, dry and soft cloth to dry these
areas.
Cleaning Alcantara Microfiber
Cloth
Note: Some models have Alcantara
microfiber cloth fabric on the seats,
headliner, instrument panel and door panels.
Use a soft brush, a clean, dry cloth or
vacuum cleaner to remove dust and loose
dirt from Alcantara cloth surfaces. Gently
wipe the cloth surfaces with a clean, damp
cotton cloth.
Note: Alcantara microfiber cloth fabric are
made of polyester microfiber with
micro-porous polyurethane. Using
commercially available fabric cleaners can
cause permanent damage.
Note: Do not use commercially available
leather and vinyl cleaning products on
Alcantara cloth fabric.
Depending on the type of stain, use water,
lemon juice or pure ethyl alcohol when
cleaning. For cleaning Alcantara microfiber
cloth, refer to the following chart:
178
Ford GT (CGX) Canada/United States of America, enUSA, Edition date: 201908, First-Printing Vehicle Care
Page 187 of 316
General Information
WARNING: Failure to follow
these guidelines could result in an
increased risk of loss of vehicle control,
injury or death.
Note: Do not use the kit if you have severely
damaged a tire. Only seal punctures located
within the tire tread with the kit.
Do not attempt to repair punctures larger
than
0.2362 in (6 mm) or damage to the
tire's sidewall. The tire may not completely
seal.
Loss of air pressure may adversely affect
tire performance. For this reason:
Note: Do not drive the vehicle above
50 mph (80 km/h)
.
Note: Do not drive further than
120 mi
(200 km). Drive only to the closest
authorized Ford dealer or tire repair shop to
have your tire inspected.
• Drive carefully and avoid abrupt
steering maneuvers.
• Periodically monitor tire inflation
pressure in the affected tire; if the tire
is losing pressure, have the vehicle
towed on a flat bed.
• Read the information in the Tips for
Use of the Kit section to make sure safe
operation of the kit and your vehicle.
Tips for Use of the Kit
To ensure safe operation of the kit:
• Read all instructions and cautions fully.
• Before operating the kit, make sure
your vehicle is safely off the road and
away from moving traffic. Switch on
the hazard lights. •
Always set the parking brake to ensure
the vehicle does not move
unexpectedly.
• Do not remove any foreign objects,
such as nails or screws, from the tire.
• When using the kit, leave the engine
running (only if the vehicle is outdoors
or in a well-ventilated area) so the
compressor does not drain the
vehicle's battery.
• Do not allow the compressor to
operate continuously for more than 15
minutes. This will help prevent the
compressor from overheating.
• Never leave the kit unattended during
operation.
• Sealant compound contains latex.
Those with latex sensitivities should
use appropriate precautions to avoid
an allergic reaction.
• Keep the kit away from children.
• Only use the kit when the ambient
temperature is between -22°F (-30°C)
and 158°F (70°C).
• Only use the sealing compound before
the use-by date. The use-by date is on
a label on the sealant canister, which
you can see through the rectangular
viewing window on the bottom of the
compressor. Check the use-by date
regularly and replace the canister after
four years of non-use.
• Do not store the kit unsecured inside
the passenger compartment of the
vehicle as it may cause injury during a
sudden stop or crash. Always store the
kit in its original location.
• After sealant use, an authorized Ford
dealer must replace the tire pressure
monitoring system sensor and valve
stem on the wheel.
• Operating the kit could cause an
electrical disturbance in radio
operation.
184
Ford GT (CGX) Canada/United States of America, enUSA, Edition date: 201908, First-Printing Wheels and Tires
Page 189 of 316
5. Remove the warning sticker found on
the casing/housing and place it on the
top of the instrument panel or the
center of the dash.
6. Start the vehicle and leave the engine running so the compressor does not
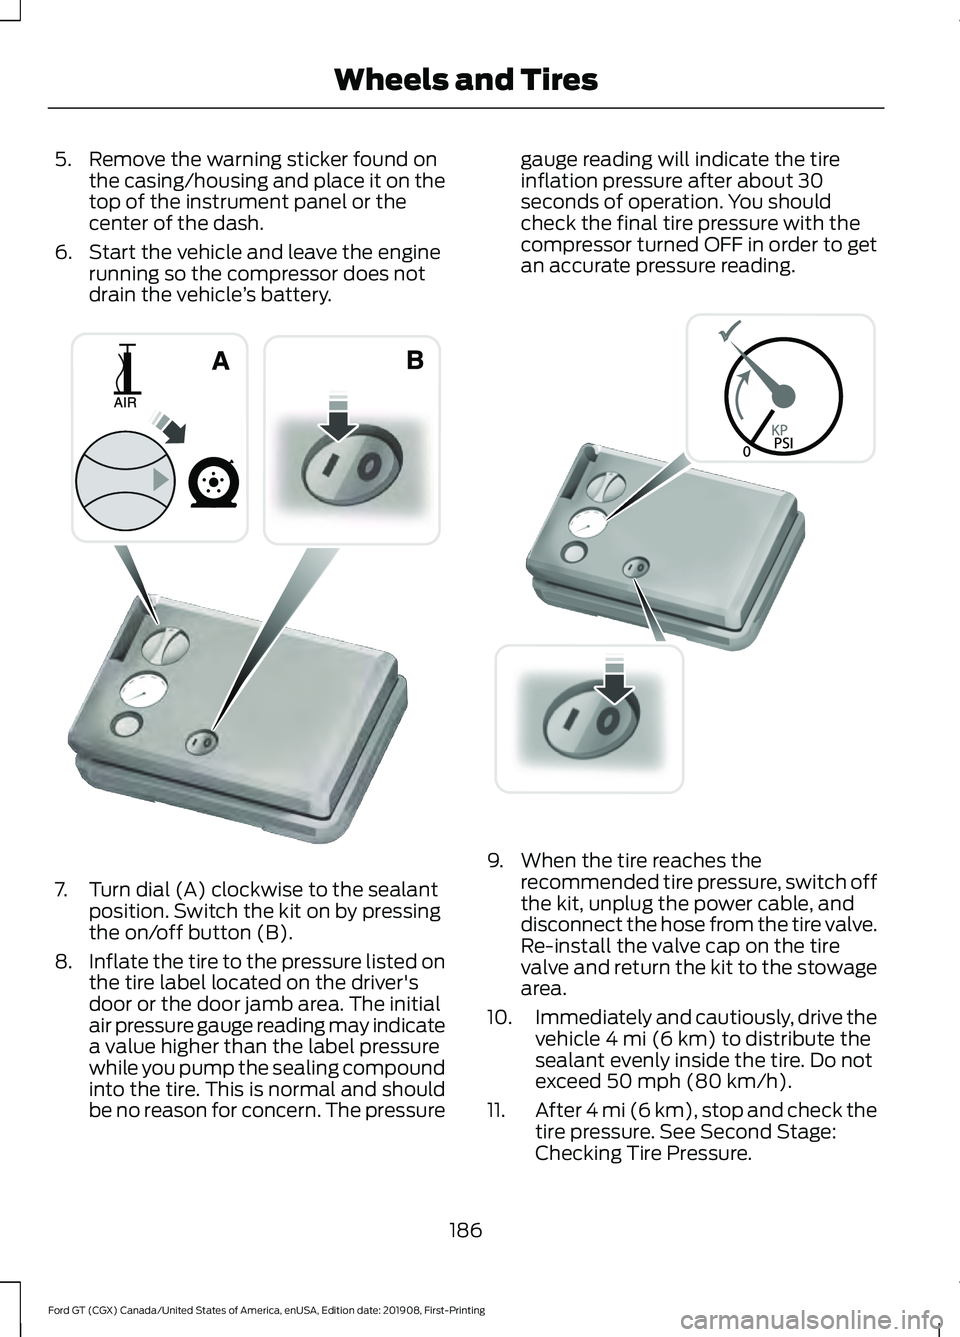
drain the vehicle ’s battery. 7. Turn dial (A) clockwise to the sealant
position. Switch the kit on by pressing
the on/off button (B).
8. Inflate the tire to the pressure listed on
the tire label located on the driver's
door or the door jamb area. The initial
air pressure gauge reading may indicate
a value higher than the label pressure
while you pump the sealing compound
into the tire. This is normal and should
be no reason for concern. The pressure gauge reading will indicate the tire
inflation pressure after about 30
seconds of operation. You should
check the final tire pressure with the
compressor turned OFF in order to get
an accurate pressure reading.
9. When the tire reaches the
recommended tire pressure, switch off
the kit, unplug the power cable, and
disconnect the hose from the tire valve.
Re-install the valve cap on the tire
valve and return the kit to the stowage
area.
10. Immediately and cautiously, drive the
vehicle 4 mi (6 km) to distribute the
sealant evenly inside the tire. Do not
exceed
50 mph (80 km/h).
11. After 4 mi (6 km), stop and check the
tire pressure. See Second Stage:
Checking Tire Pressure.
186
Ford GT (CGX) Canada/United States of America, enUSA, Edition date: 201908, First-Printing Wheels and TiresE175981 E175982
Page 190 of 316
Note:
If you experience any unusual
vibration, ride disturbance or noise while
driving, reduce your speed until you can
safely pull off to the side of the road to call
for roadside assistance. Note: Do not
proceed to the second stage of this
operation.
Second Stage: Checking Tire
Pressure WARNING: The power plug may
get hot after use and should be handled
carefully when unplugging.
If you are proceeding from the First Stage:
Re-inflating the Tire with Sealing
Compound and Air section and have
injected sealant in the tire and the pressure
is below
20 psi (137 kPa), continue to the
next step.
Check the air pressure of your tires as
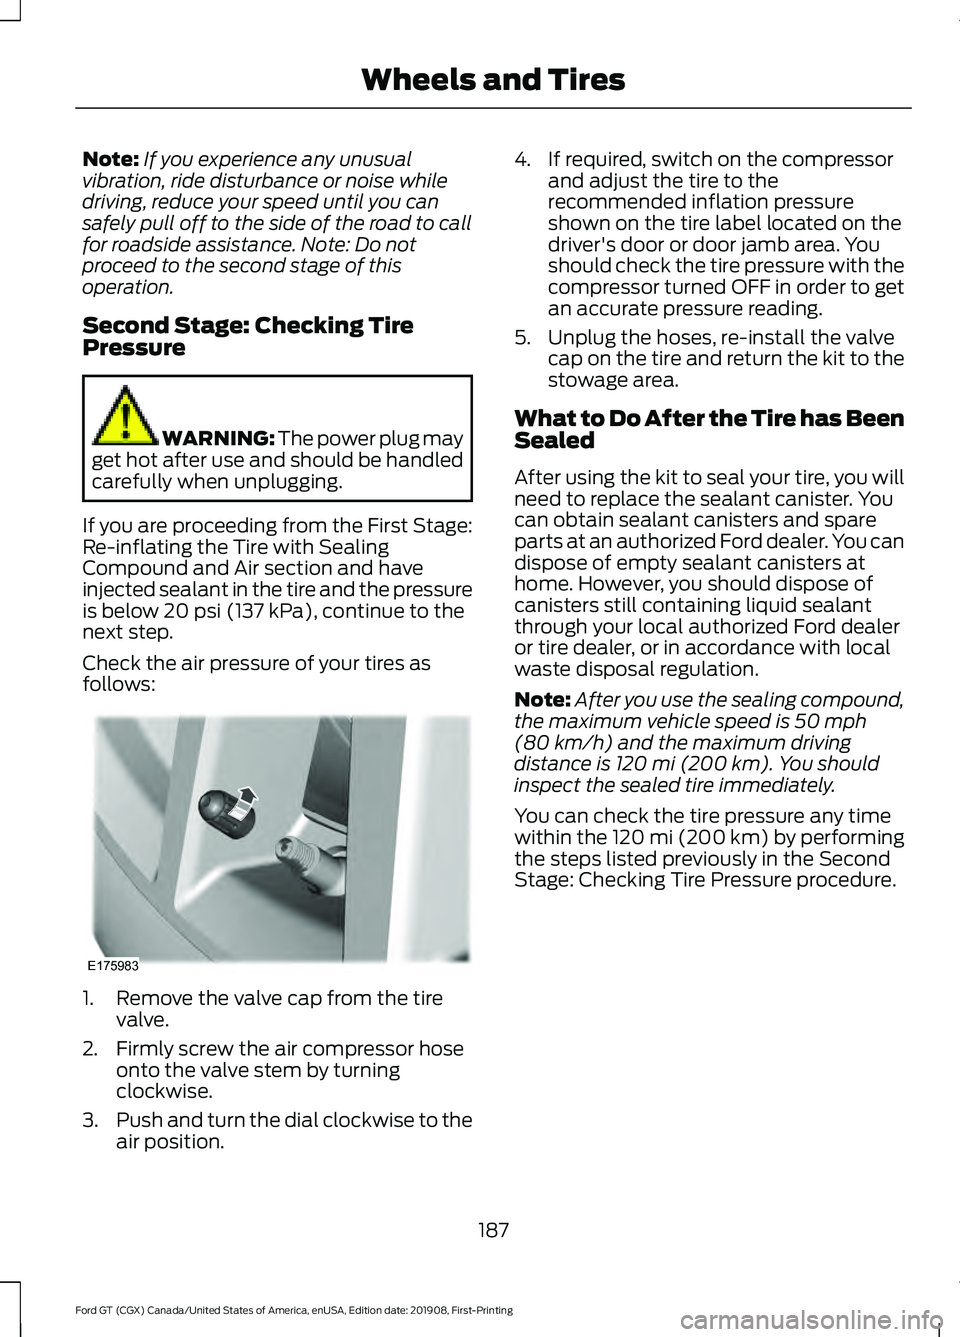
follows: 1. Remove the valve cap from the tire
valve.
2. Firmly screw the air compressor hose onto the valve stem by turning
clockwise.
3. Push and turn the dial clockwise to the
air position. 4. If required, switch on the compressor
and adjust the tire to the
recommended inflation pressure
shown on the tire label located on the
driver's door or door jamb area. You
should check the tire pressure with the
compressor turned OFF in order to get
an accurate pressure reading.
5. Unplug the hoses, re-install the valve cap on the tire and return the kit to the
stowage area.
What to Do After the Tire has Been
Sealed
After using the kit to seal your tire, you will
need to replace the sealant canister. You
can obtain sealant canisters and spare
parts at an authorized Ford dealer. You can
dispose of empty sealant canisters at
home. However, you should dispose of
canisters still containing liquid sealant
through your local authorized Ford dealer
or tire dealer, or in accordance with local
waste disposal regulation.
Note: After you use the sealing compound,
the maximum vehicle speed is
50 mph
(80 km/h) and the maximum driving
distance is 120 mi (200 km). You should
inspect the sealed tire immediately.
You can check the tire pressure any time
within the 120 mi (200 km) by performing
the steps listed previously in the Second
Stage: Checking Tire Pressure procedure.
187
Ford GT (CGX) Canada/United States of America, enUSA, Edition date: 201908, First-Printing Wheels and TiresE175983
Page 192 of 316
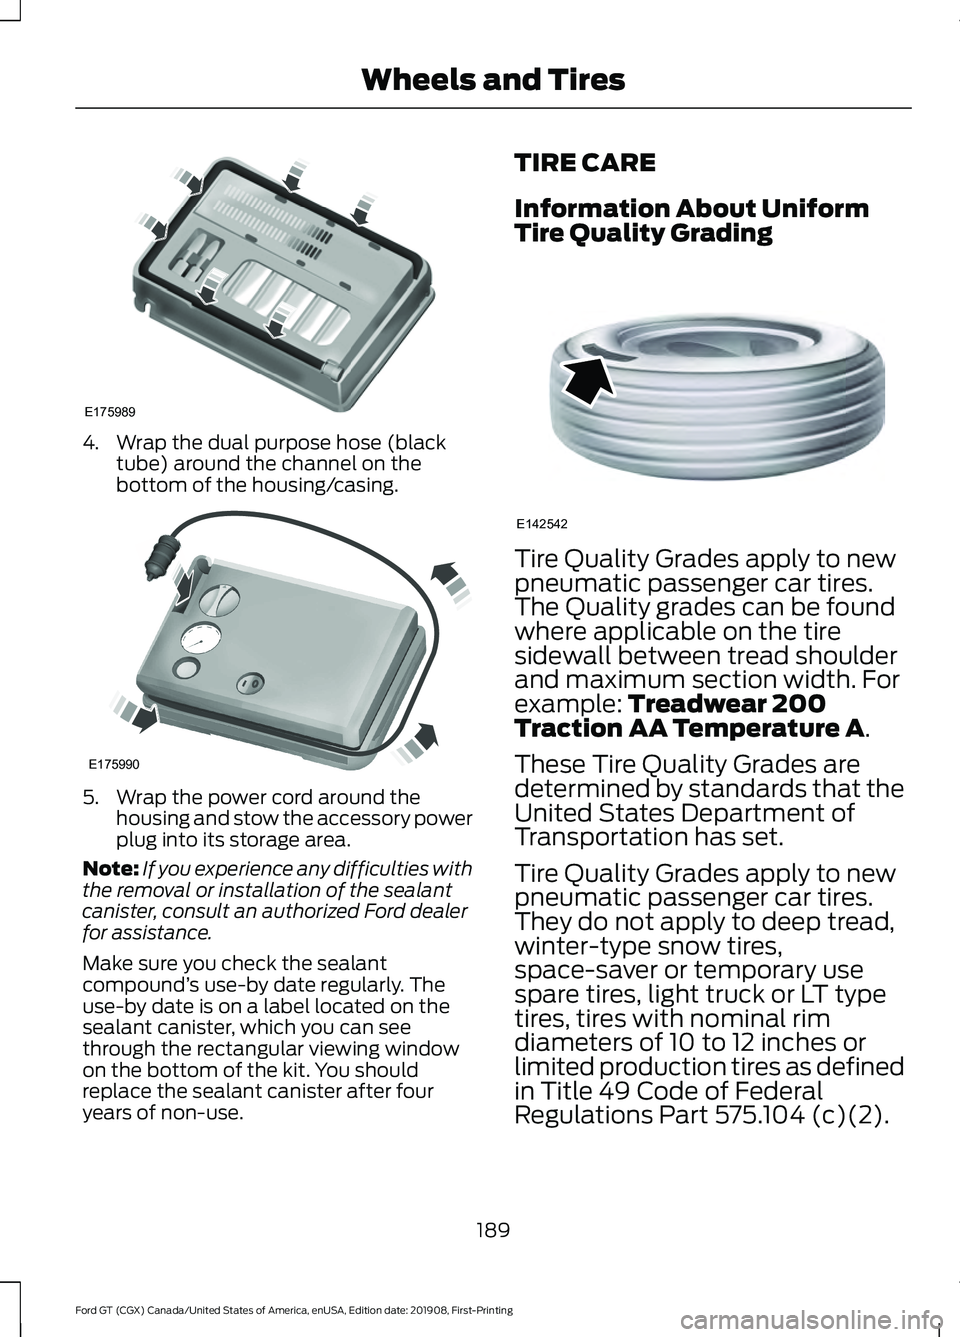
4. Wrap the dual purpose hose (black
tube) around the channel on the
bottom of the housing/casing. 5. Wrap the power cord around the
housing and stow the accessory power
plug into its storage area.
Note: If you experience any difficulties with
the removal or installation of the sealant
canister, consult an authorized Ford dealer
for assistance.
Make sure you check the sealant
compound ’s use-by date regularly. The
use-by date is on a label located on the
sealant canister, which you can see
through the rectangular viewing window
on the bottom of the kit. You should
replace the sealant canister after four
years of non-use. TIRE CARE
Information About Uniform
Tire Quality Grading
Tire Quality Grades apply to new
pneumatic passenger car tires.
The Quality grades can be found
where applicable on the tire
sidewall between tread shoulder
and maximum section width. For
example: Treadwear 200
Traction AA Temperature A.
These Tire Quality Grades are
determined by standards that the
United States Department of
Transportation has set.
Tire Quality Grades apply to new
pneumatic passenger car tires.
They do not apply to deep tread,
winter-type snow tires,
space-saver or temporary use
spare tires, light truck or LT type
tires, tires with nominal rim
diameters of 10 to 12 inches or
limited production tires as defined
in Title 49 Code of Federal
Regulations Part 575.104 (c)(2).
189
Ford GT (CGX) Canada/United States of America, enUSA, Edition date: 201908, First-Printing Wheels and TiresE175989 E175990 E142542
Page 234 of 316
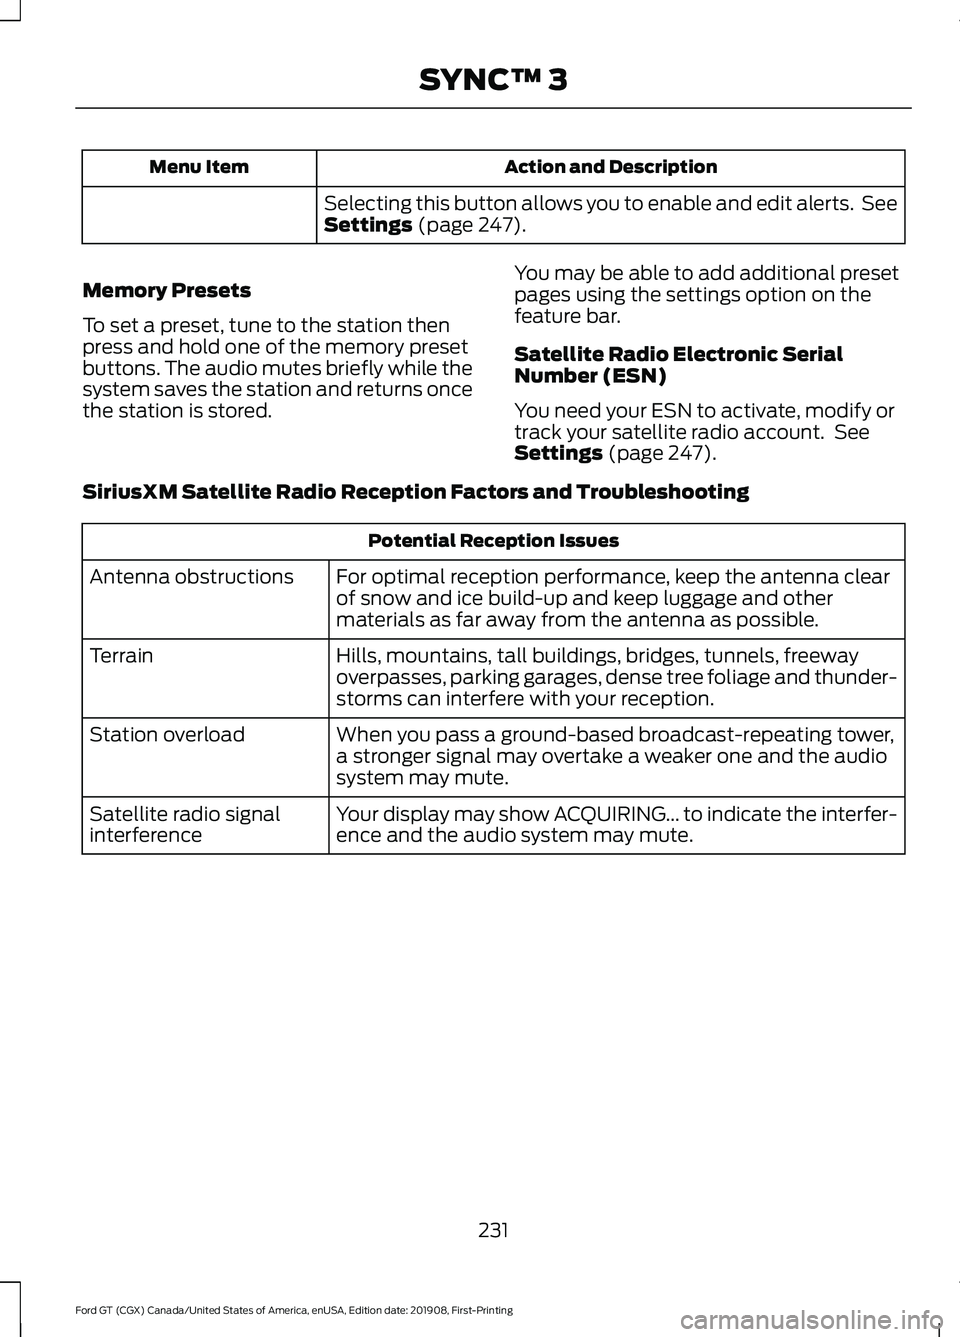
Action and Description
Menu Item
Selecting this button allows you to enable and edit alerts. See
Settings (page 247).
Memory Presets
To set a preset, tune to the station then
press and hold one of the memory preset
buttons. The audio mutes briefly while the
system saves the station and returns once
the station is stored. You may be able to add additional preset
pages using the settings option on the
feature bar.
Satellite Radio Electronic Serial
Number (ESN)
You need your ESN to activate, modify or
track your satellite radio account. See
Settings
(page 247).
SiriusXM Satellite Radio Reception Factors and Troubleshooting Potential Reception Issues
For optimal reception performance, keep the antenna clear
of snow and ice build-up and keep luggage and other
materials as far away from the antenna as possible.
Antenna obstructions
Hills, mountains, tall buildings, bridges, tunnels, freeway
overpasses, parking garages, dense tree foliage and thunder-
storms can interfere with your reception.
Terrain
When you pass a ground-based broadcast-repeating tower,
a stronger signal may overtake a weaker one and the audio
system may mute.
Station overload
Your display may show ACQUIRING... to indicate the interfer-
ence and the audio system may mute.
Satellite radio signal
interference
231
Ford GT (CGX) Canada/United States of America, enUSA, Edition date: 201908, First-Printing SYNC™ 3
Page 235 of 316
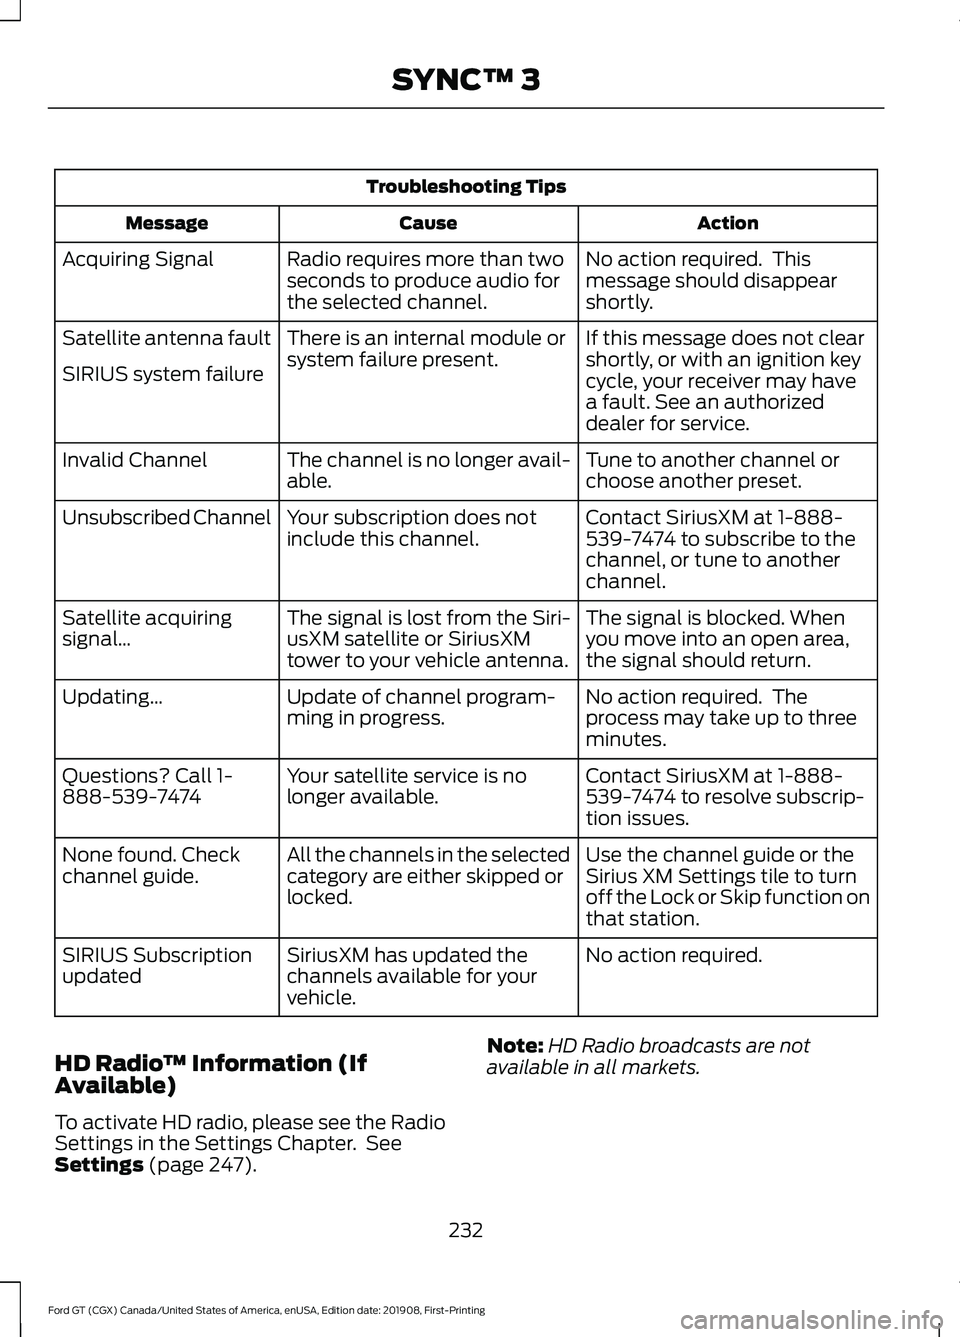
Troubleshooting Tips
Action
Cause
Message
No action required. This
message should disappear
shortly.
Radio requires more than two
seconds to produce audio for
the selected channel.
Acquiring Signal
If this message does not clear
shortly, or with an ignition key
cycle, your receiver may have
a fault. See an authorized
dealer for service.
There is an internal module or
system failure present.
Satellite antenna fault
SIRIUS system failure
Tune to another channel or
choose another preset.
The channel is no longer avail-
able.
Invalid Channel
Contact SiriusXM at 1-888-
539-7474 to subscribe to the
channel, or tune to another
channel.
Your subscription does not
include this channel.
Unsubscribed Channel
The signal is blocked. When
you move into an open area,
the signal should return.
The signal is lost from the Siri-
usXM satellite or SiriusXM
tower to your vehicle antenna.
Satellite acquiring
signal…
No action required. The
process may take up to three
minutes.
Update of channel program-
ming in progress.
Updating…
Contact SiriusXM at 1-888-
539-7474 to resolve subscrip-
tion issues.
Your satellite service is no
longer available.
Questions? Call 1-
888-539-7474
Use the channel guide or the
Sirius XM Settings tile to turn
off the Lock or Skip function on
that station.
All the channels in the selected
category are either skipped or
locked.
None found. Check
channel guide.
No action required.
SiriusXM has updated the
channels available for your
vehicle.
SIRIUS Subscription
updated
HD Radio ™ Information (If
Available)
To activate HD radio, please see the Radio
Settings in the Settings Chapter. See
Settings (page 247). Note:
HD Radio broadcasts are not
available in all markets.
232
Ford GT (CGX) Canada/United States of America, enUSA, Edition date: 201908, First-Printing SYNC™ 3