instrument panel FORD KUGA 2010 1.G Owners Manual
[x] Cancel search | Manufacturer: FORD, Model Year: 2010, Model line: KUGA, Model: FORD KUGA 2010 1.GPages: 226, PDF Size: 8.07 MB
Page 10 of 226
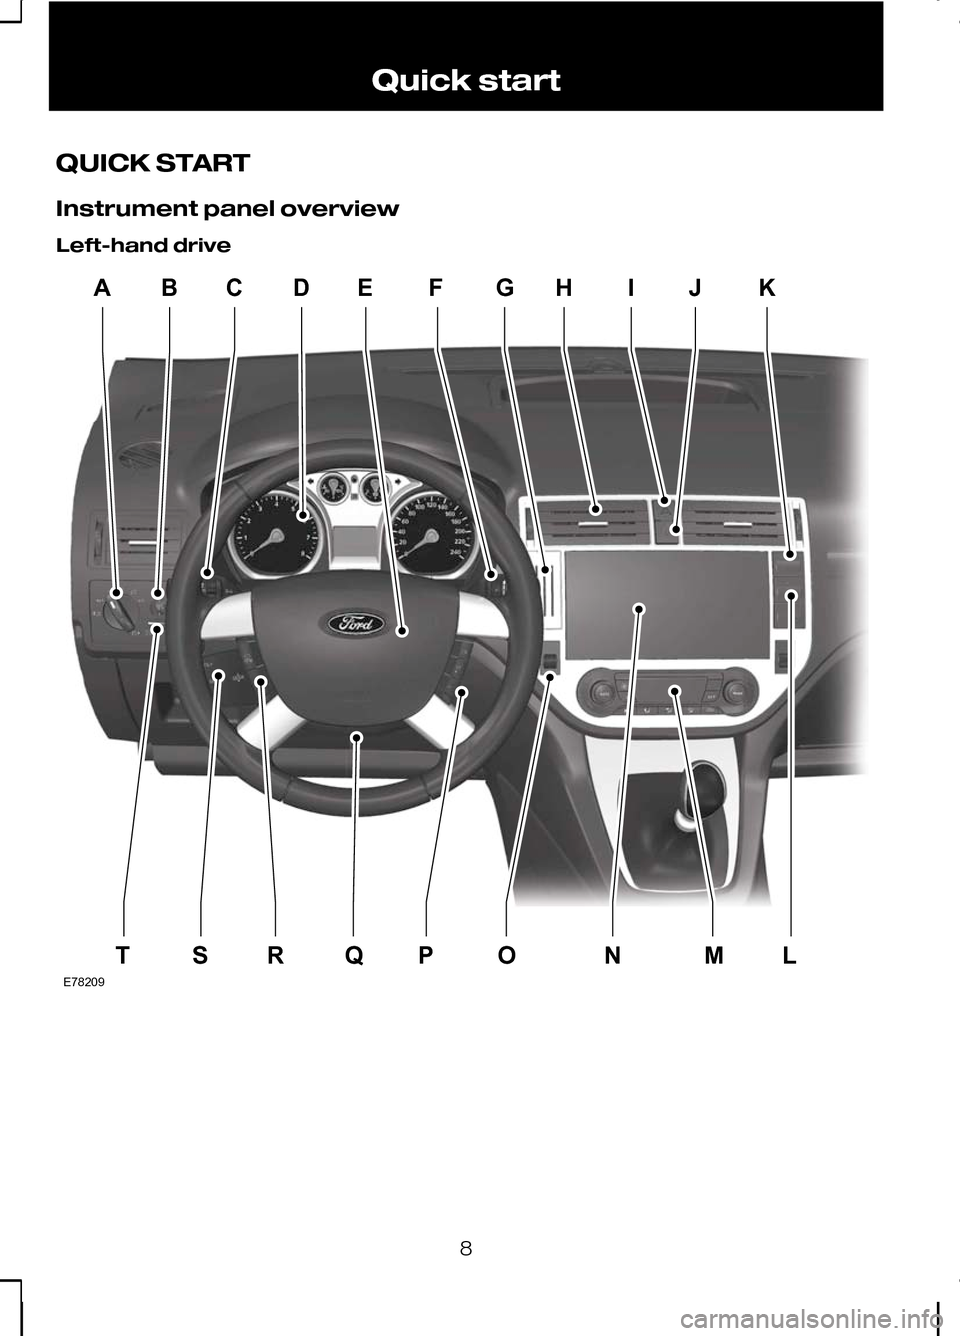
QUICK START
Instrument panel overview
Left-hand drive
8Quick startCDABEFGHIJKTSRQPONMLE78209
Page 27 of 226
Deactivating the seat belt
reminder
See your dealer.
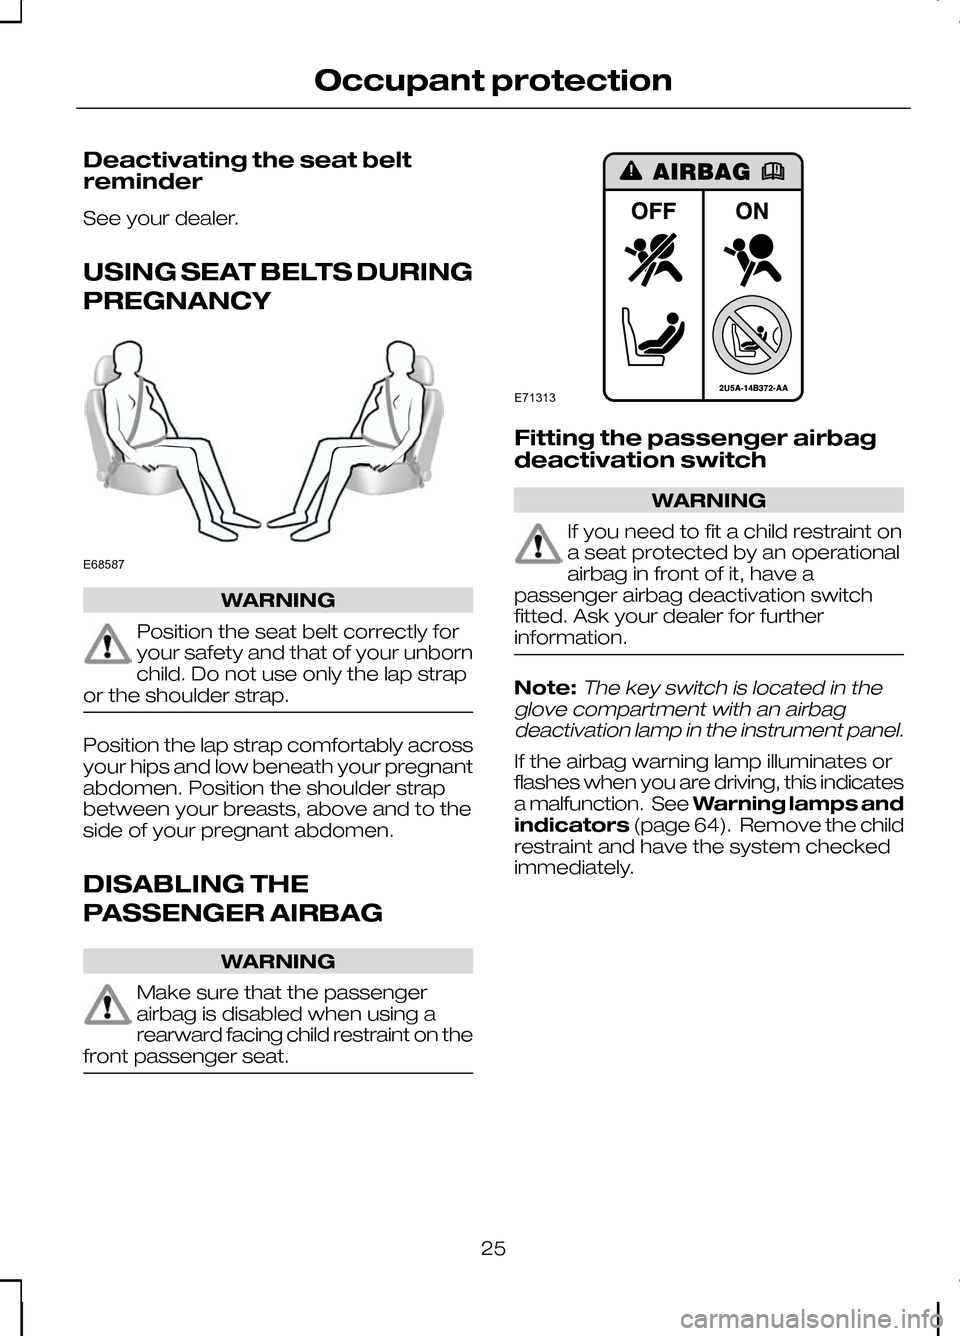
USING SEAT BELTS DURING
PREGNANCY
WARNING
Position the seat belt correctly for
your safety and that of your unborn
child. Do not use only the lap strap
or the shoulder strap. Position the lap strap comfortably across
your hips and low beneath your pregnant
abdomen. Position the shoulder strap
between your breasts, above and to the
side of your pregnant abdomen.
DISABLING THE
PASSENGER AIRBAG
WARNING
Make sure that the passenger
airbag is disabled when using a
rearward facing child restraint on the
front passenger seat. Fitting the passenger airbag
deactivation switch
WARNING
If you need to fit a child restraint on
a seat protected by an operational
airbag in front of it, have a
passenger airbag deactivation switch
fitted. Ask your dealer for further
information. Note:The key switch is located in the
glove compartment with an airbag deactivation lamp in the instrument panel.
If the airbag warning lamp illuminates or
flashes when you are driving, this indicates
a malfunction. See Warning lamps and
indicators (page 64). Remove the child
restraint and have the system checked
immediately.
25
Occupant protectionE68587 E71313
Page 85 of 226
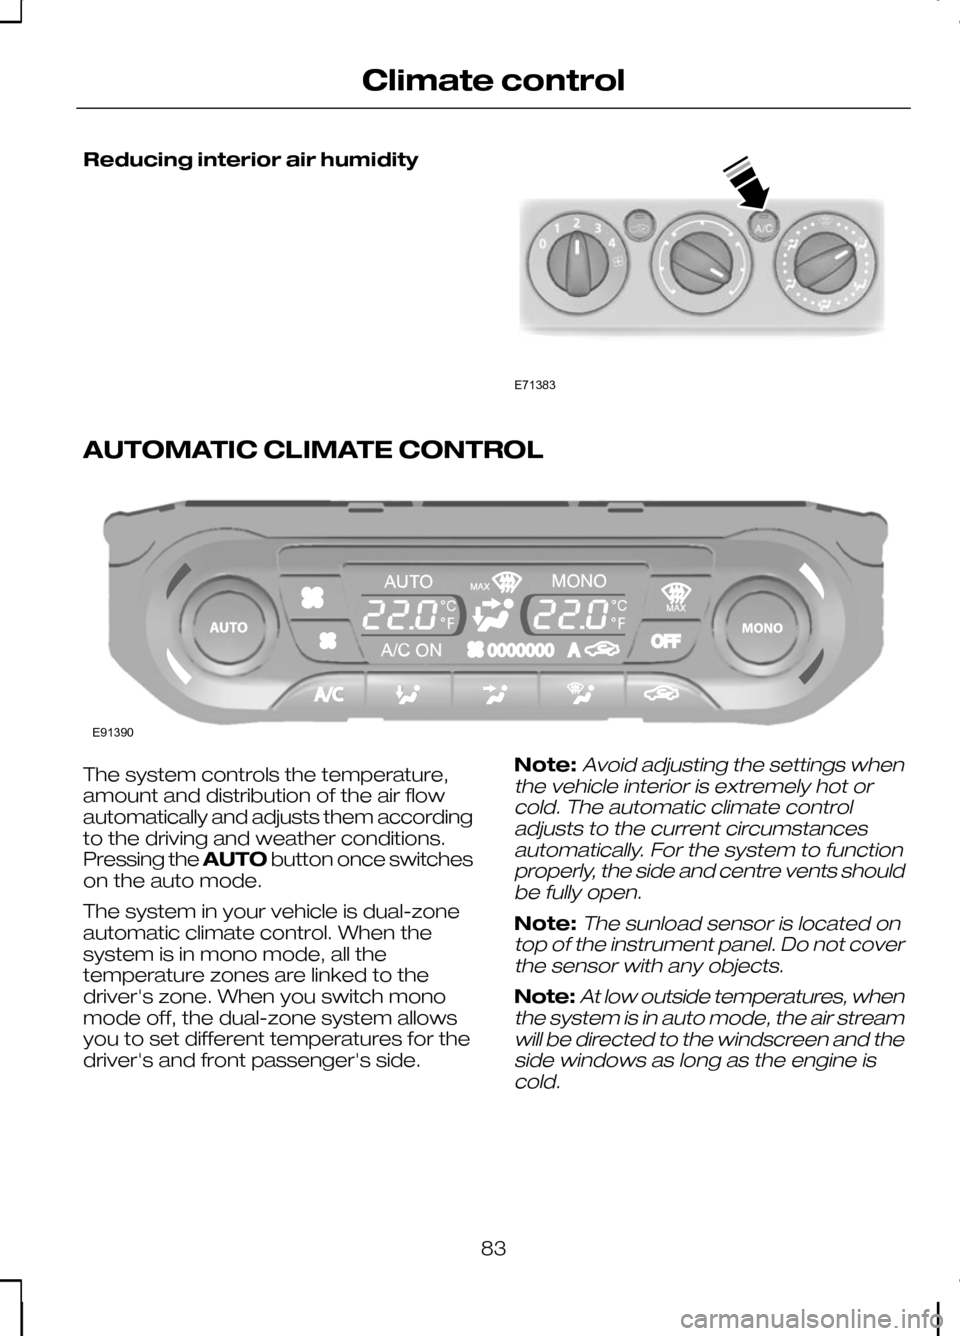
Reducing interior air humidity
AUTOMATIC CLIMATE CONTROL
The system controls the temperature,
amount and distribution of the air flow
automatically and adjusts them according
to the driving and weather conditions.
Pressing the
AUTObutton once switches
on the auto mode.
The system in your vehicle is dual-zone
automatic climate control. When the
system is in mono mode, all the
temperature zones are linked to the
driver's zone. When you switch mono
mode off, the dual-zone system allows
you to set different temperatures for the
driver's and front passenger's side. Note:Avoid adjusting the settings when
the vehicle interior is extremely hot or cold. The automatic climate controladjusts to the current circumstancesautomatically. For the system to functionproperly, the side and centre vents shouldbe fully open.
Note:The sunload sensor is located on
top of the instrument panel. Do not cover the sensor with any objects.
Note:At low outside temperatures, when
the system is in auto mode, the air stream will be directed to the windscreen and theside windows as long as the engine iscold.
83
Climate controlE71383 E91390
Page 97 of 226
The heated front seats are operated by
rotary controls in the instrument panel.
For item location: See
Quick start(page
8).
The maximum temperature is reached
after five or six minutes. It is regulated
thermostatically.
The seat heating will operate only when
the ignition is on.
95
Seats
Page 111 of 226
Reverse
WARNING
Select reverse only when your
vehicle is stationary and the engine
is at idle speed.
Neutral
In this position, power is not transmitted
to the drive wheels but the transmission
is not locked. You can start the engine
with the selector lever in this position.
Drive
Select drive to shift automatically through
the forward gears.
The transmission will select the
appropriate gear for optimum
performance based on ambient
temperature, road gradient, vehicle load
and driver input.
Manual shifting - Vehicles with
a 5 speed transmission
WARNING
Do not hold the selector lever
permanently in – or +.
CAUTION
The transmission will automatically
downshift when the engine speed is
too low and upshift when too high.
Note:A shift will occur only when the
vehicle speed and the engine speed are appropriate.
Note:In Select mode the current gear
(1, 2, 3, 4 or 5) will be displayed on the instrument panel.
Move the selector lever to position S.
Push the selector lever forwards to shift
down and pull it backwards to shift up. Gears may be skipped by moving the
selector lever repeatedly at short intervals.
Manual mode also provides a kickdown
function. See
Kickdown.
Sport mode and manual shifting
- Vehicles with a 6 speed
transmission
Note:
A shift will occur only when the
vehicle speed and the engine speed are appropriate.
Note:In Sport mode the transmission
operates as normal but gears are selected more quickly and at higherengine speeds.
Note:In Sport modeSwill be displayed
on the instrument panel.
Sport Mode
Activate Sportmode by moving the
selector lever to position S.Sport mode
will remain active until either you shift
manually up or down the gears or return
the selector lever to position D.
Manual shifting WARNING
Do not hold the selector lever
permanently in – or +.
CAUTION
The transmission will automatically
downshift when the engine speed is
too low and upshift when too high.
Push the selector lever forwards to shift
down and pull it backwards to shift up.
Gears may be skipped by moving the
selector lever repeatedly at short intervals.
Manual mode also provides a kickdown
function. See
Kickdown.
109
Transmission
Page 117 of 226
PRINCIPLE OF OPERATION
WARNING
The parking aid does not relieve you
of your responsibility to drive with
due care and attention.
CAUTIONS
Vehicles fitted with a trailer tow
module not approved by us may not
correctly detect obstacles.
The sensors may not detect objects
in heavy rain or other conditions that
cause disruptive reflections.
The sensors may not detect objects
with surfaces that absorb ultrasonic
waves.
The parking aid does not detect
obstacles moving away from the
vehicle. They will only be detected
shortly after they start to move towards
the vehicle again. Take particular care when reversing
with a tow ball arm or rear fitted
accessories e.g. a bicycle carrier, as
the rear parking aid will only indicate the
distance from the bumper to the obstacle. If you use a high pressure spray to
wash your vehicle, only spray the
sensors briefly from a distance not
less than 20 centimetres (8 inches). Note:On vehicles fitted with a tow ball
arm, the parking aid is deactivated automatically when any trailer lamps (orlighting boards) are connected to the13-pin socket via a trailer tow module wehave approved.
Note:Keep the sensors free from dirt,
ice and snow. Do not clean with sharp objects.
Note:The parking aid may emit false
tones if it detects a signal using the same frequency as the sensors or if the vehicleis fully laden.
Note:The outer sensors may detect the
side walls of a garage. If the distance between the outer sensor and the sidewall remains constant for three seconds,the tone will switch off. As you continue,the inner sensors will detect rearwardobjects.
USING THE PARKING AID
Switching the parking aid on
and off
Note:
The parking aid switches off
automatically when you start the engine or when you exceed 16 km/h (10 mph).
Note:The front and rear sensors are
always activated or deactivated together.
The parking aid is per default off. To
switch the parking aid on, press the switch
in the instrument panel or select reverse
gear.
The light in the switch illuminates when
the parking aid is activated.
To turn it off, press the switch again.
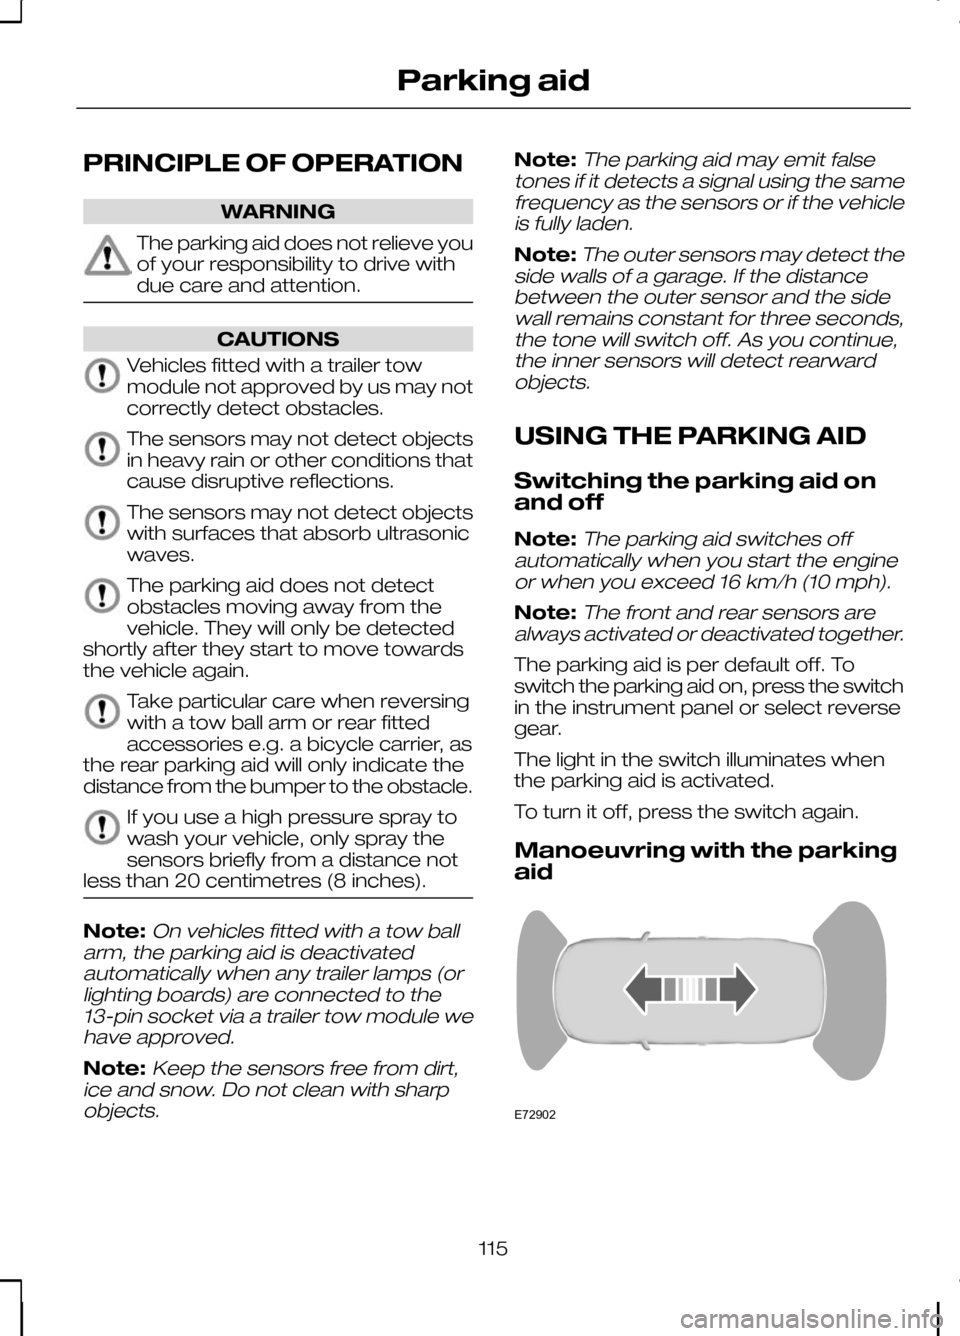
Manoeuvring with the parking
aid 115
Parking aidE72902
Page 136 of 226
FUSE BOX LOCATIONS
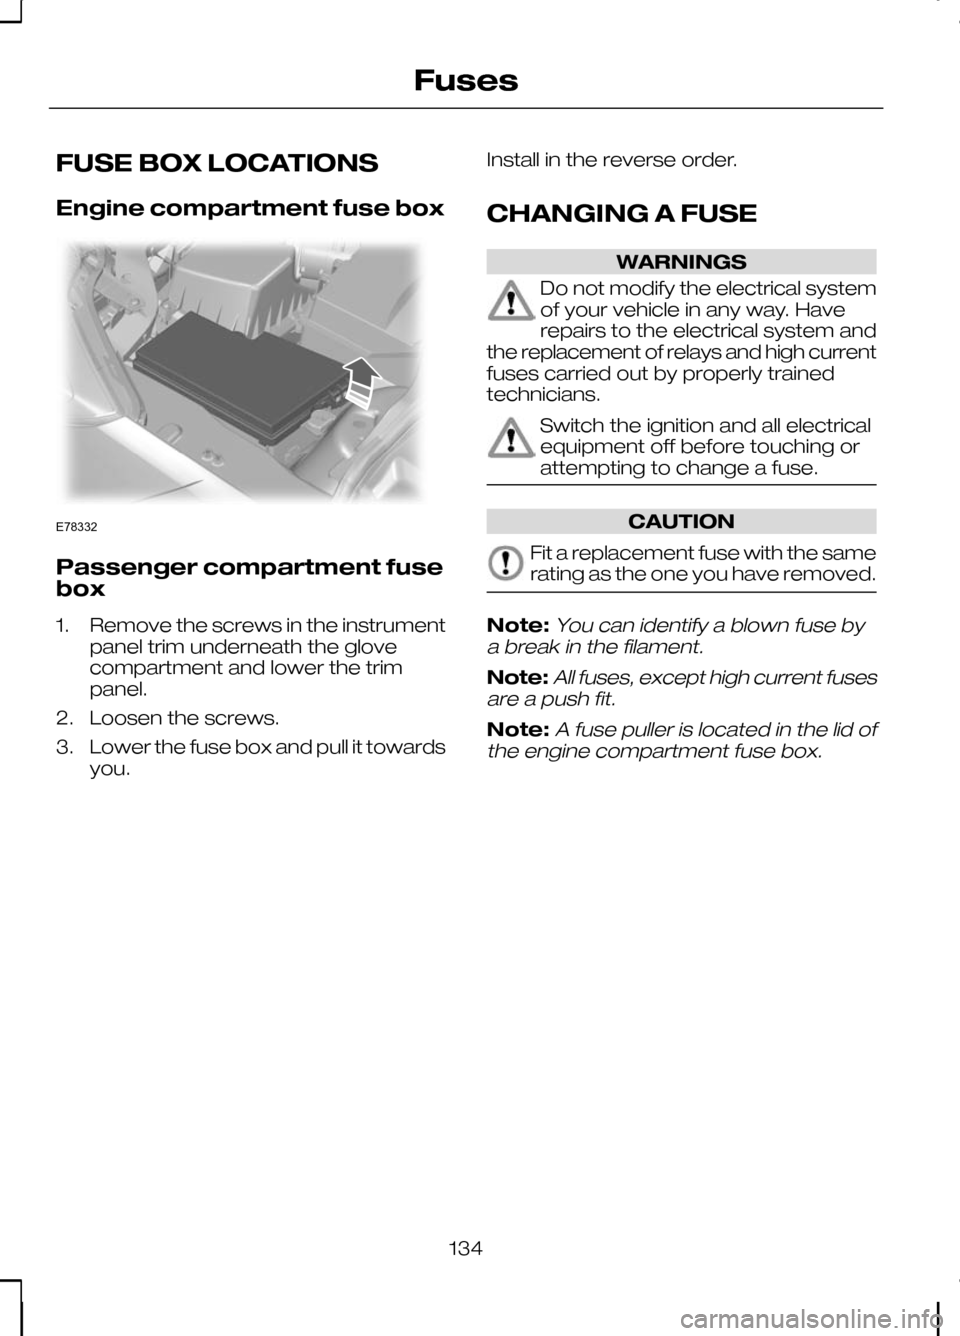
Engine compartment fuse box
Passenger compartment fuse
box
1. Remove the screws in the instrument
panel trim underneath the glove
compartment and lower the trim
panel.
2. Loosen the screws.
3. Lower the fuse box and pull it towards you. Install in the reverse order.
CHANGING A FUSE WARNINGS
Do not modify the electrical system
of your vehicle in any way. Have
repairs to the electrical system and
the replacement of relays and high current
fuses carried out by properly trained
technicians. Switch the ignition and all electrical
equipment off before touching or
attempting to change a fuse.
CAUTION
Fit a replacement fuse with the same
rating as the one you have removed.
Note:You can identify a blown fuse by
a break in the filament.
Note:All fuses, except high current fuses
are a push fit.
Note:A fuse puller is located in the lid of
the engine compartment fuse box.
134
FusesE78332
Page 165 of 226
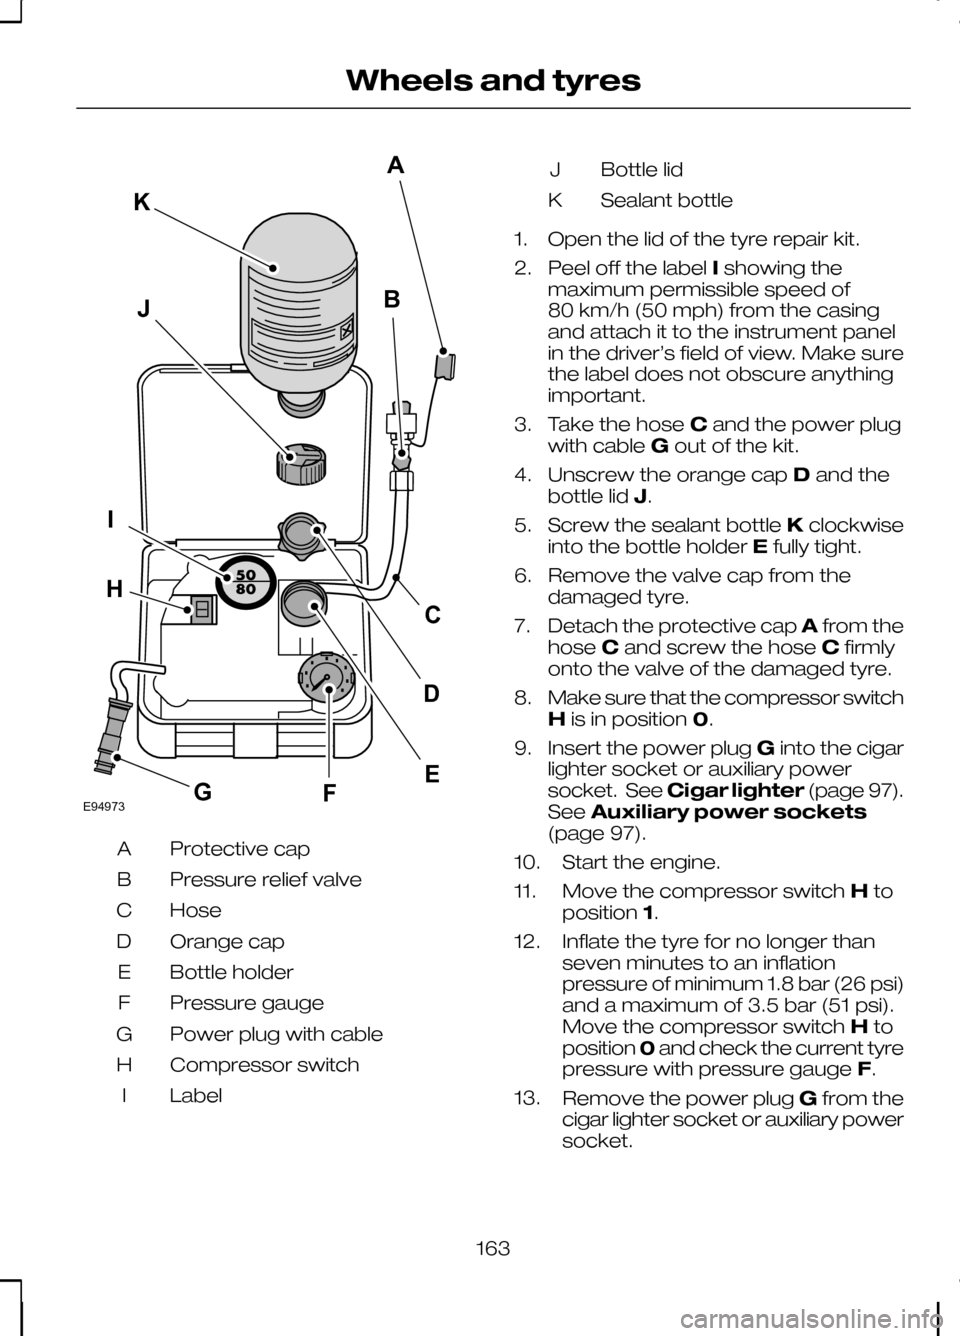
Protective cap
A
Pressure relief valve
B
Hose
C
Orange cap
D
Bottle holder
E
Pressure gauge
F
Power plug with cable
G
Compressor switch
H
Label
I Bottle lid
J
Sealant bottle
K
1. Open the lid of the tyre repair kit.
2. Peel off the label Ishowing the
maximum permissible speed of
80 km/h (50 mph) from the casing
and attach it to the instrument panel
in the driver’s field of view. Make sure
the label does not obscure anything
important.
3. Take the hose Cand the power plug
with cable Gout of the kit.
4. Unscrew the orange cap Dand the
bottle lid J.
5. Screw the sealant bottle Kclockwise
into the bottle holder Efully tight.
6. Remove the valve cap from the damaged tyre.
7. Detach the protective cap Afrom the
hose Cand screw the hose Cfirmly
onto the valve of the damaged tyre.
8. Make sure that the compressor switch
His in position 0.
9. Insert the power plug Ginto the cigar
lighter socket or auxiliary power
socket. See Cigar lighter (page 97).
See Auxiliary power sockets
(page 97).
10. Start the engine.
11. Move the compressor switch Hto
position 1.
12. Inflate the tyre for no longer than seven minutes to an inflation
pressure of minimum 1.8 bar (26 psi)
and a maximum of 3.5 bar (51 psi).
Move the compressor switch Hto
position 0and check the current tyre
pressure with pressure gauge F.
13. Remove the power plug Gfrom the
cigar lighter socket or auxiliary power
socket.
163
Wheels and tyresE94973BJIFECKAGHD
Page 172 of 226
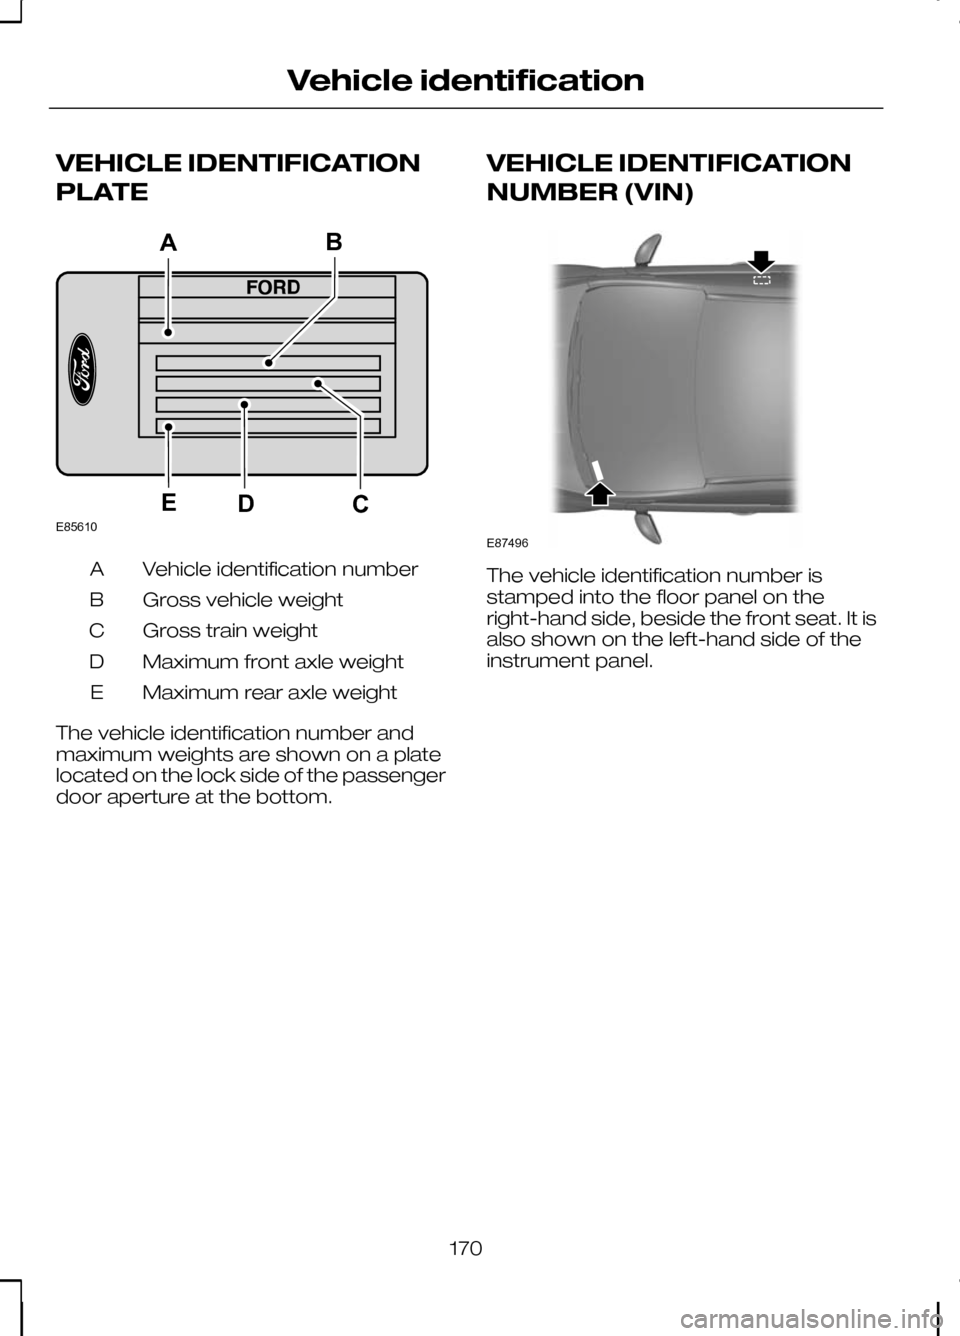
VEHICLE IDENTIFICATION
PLATE
Vehicle identification number
A
Gross vehicle weight
B
Gross train weight
C
Maximum front axle weight
D
Maximum rear axle weight
E
The vehicle identification number and
maximum weights are shown on a plate
located on the lock side of the passenger
door aperture at the bottom. VEHICLE IDENTIFICATION
NUMBER (VIN) The vehicle identification number is
stamped into the floor panel on the
right-hand side, beside the front seat. It is
also shown on the left-hand side of the
instrument panel.
170
Vehicle identificationE85610CBEDA E87496
Page 222 of 226
Personalised settings..............................71
Chime deactivation......................................73
Clock setting..................................................71
ESP.................................................................. 71
Help screen and navigation information................................................ 72
Language setting.........................................72
Navigation information.................................72
Steering........................................................... 71
Units of measure..........................................73
Power steering fluid check..................149 Topping up...................................................149
Programming the remote control........27
Q
Quick start..................................................8 Adjusting the steering wheel.......................12
Airbag.............................................................. 15
Autolamps...................................................... 14
Automatic climate control...........................14
Autowipers..................................................... 14
Direction indicators.......................................14
Instrument panel overview...........................8
Keyless entry.................................................12
Keyless starting.............................................12
Locking and unlocking..................................11
Manual climate control.................................13
Manual transmission.....................................15
Towing the vehicle on four wheels.............15
R
Rear fog lamps........................................47
Rear seats................................................94 Creating a level load floor...........................94
Folding the seatbacks down......................94
Folding the seatbacks up...........................94
Rear under floor storage......................123
Rear view camera..................................117 Principle of operation..................................117
Rear window wiper and washers.........42 Intermittent wipe..........................................42
Rear window washer...................................43
Reverse gear wipe.......................................42
Refuelling................................................106 Remote control battery
See: Changing the remote control
battery........................................................ 27
Remote control programming See: Programming the remote control.....27
Removing a headlamp............................51
Repairing minor paint damage............153
Road Safety...........................................208 Safety information......................................208
Roof racks and load carriers...............124 Cycle carrier................................................125
Installing the crossbars..............................124
Roof rack......................................................124
Run flat tyres..........................................165 Principle of operation.................................165
Replacing run flat tyres..............................165
What to do if a run flat tyre has a
puncture.................................................. 165
Running-in...............................................131 Brakes and clutch.......................................131
Engine........................................................... 131
Tyres.............................................................. 131
S
Safety precautions................................104
Seat belt height adjustment..................24
Seat belt reminder..................................24 Deactivating the seat belt reminder..........25
Seats.........................................................90
Sitting in the correct position.................90
Snow chains See: Using snow chains............................166
Speed control See: Cruise control.....................................120
Stability control........................................113 Principle of operation..................................113
Stability control See: Using stability control.........................113
Starting the engine.................................101 General information....................................101
Status after a collision...........................133
Steering wheel.........................................39
Storage compartments.........................98 Front storage compartment......................98
Storage area under the rear seats............98
Sun blinds.................................................96 Panoramic roof.............................................96
220
Index