check engine FORD MONDEO 2014 4.G Repair Manual
[x] Cancel search | Manufacturer: FORD, Model Year: 2014, Model line: MONDEO, Model: FORD MONDEO 2014 4.GPages: 446, PDF Size: 29.09 MB
Page 245 of 446
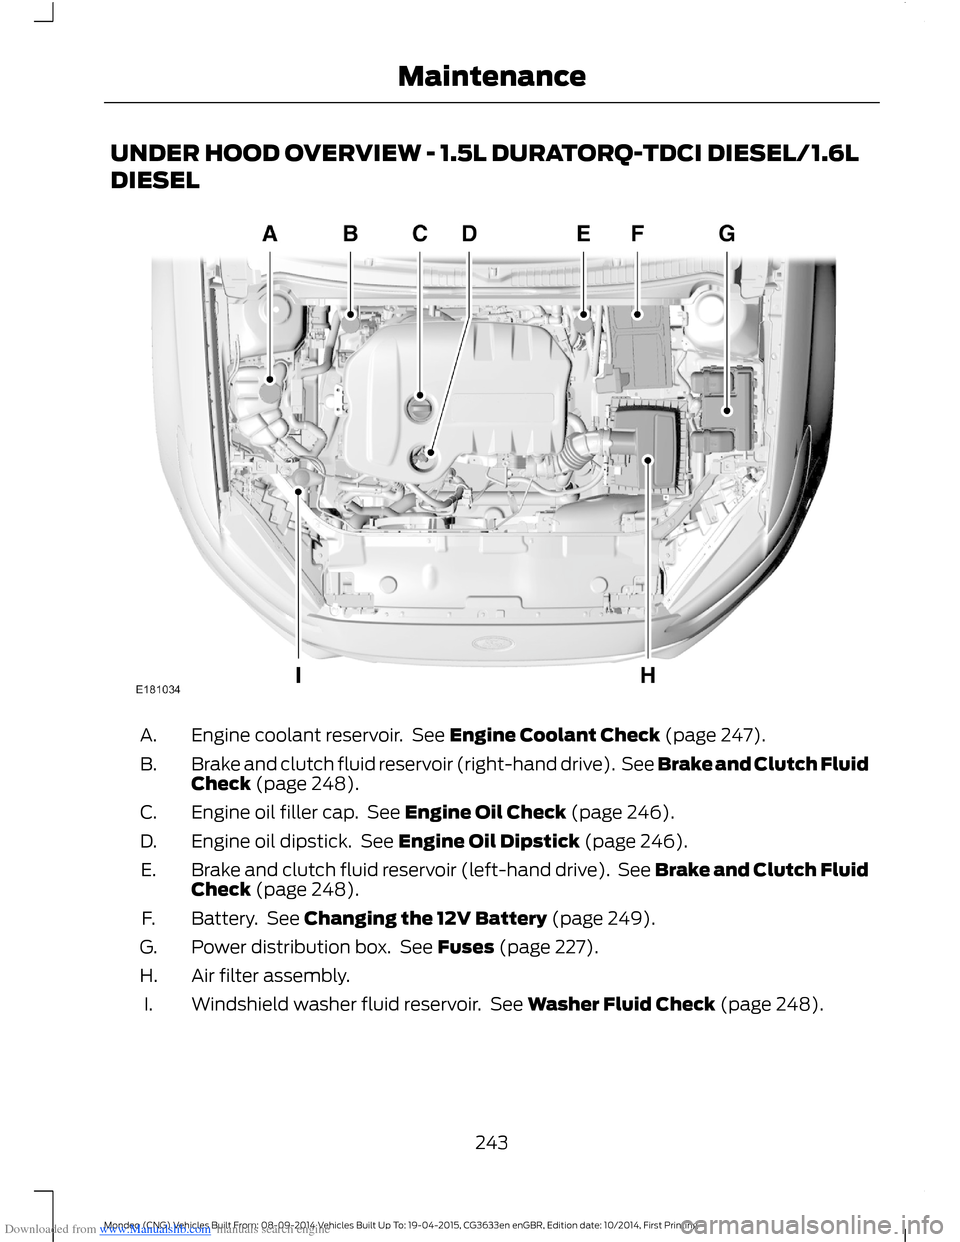
Downloaded from www.Manualslib.com manuals search engine UNDER HOOD OVERVIEW - 1.5L DURATORQ-TDCI DIESEL/1.6L
DIESEL
Engine coolant reservoir. See Engine Coolant Check (page 247).A.
Brake and clutch fluid reservoir (right-hand drive). See Brake and Clutch FluidCheck (page 248).B.
Engine oil filler cap. See Engine Oil Check (page 246).C.
Engine oil dipstick. See Engine Oil Dipstick (page 246).D.
Brake and clutch fluid reservoir (left-hand drive). See Brake and Clutch FluidCheck (page 248).E.
Battery. See Changing the 12V Battery (page 249).F.
Power distribution box. See Fuses (page 227).G.
Air filter assembly.H.
Windshield washer fluid reservoir. See Washer Fluid Check (page 248).I.
243Mondeo (CNG) Vehicles Built From: 08-09-2014 Vehicles Built Up To: 19-04-2015, CG3633en enGBR, Edition date: 10/2014, First PrintingMaintenance
Page 246 of 446
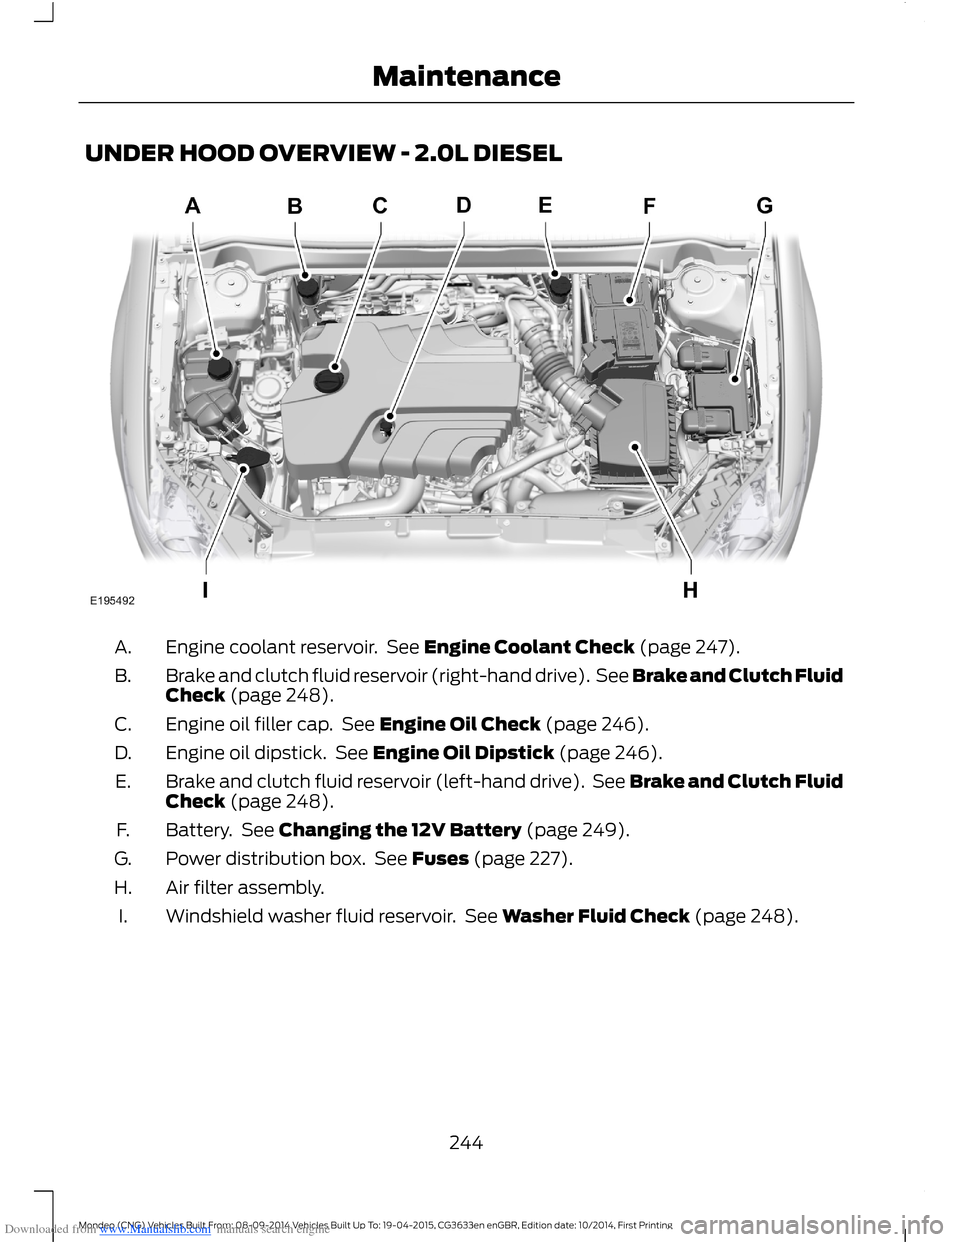
Downloaded from www.Manualslib.com manuals search engine UNDER HOOD OVERVIEW - 2.0L DIESEL
Engine coolant reservoir. See Engine Coolant Check (page 247).A.
Brake and clutch fluid reservoir (right-hand drive). See Brake and Clutch FluidCheck (page 248).B.
Engine oil filler cap. See Engine Oil Check (page 246).C.
Engine oil dipstick. See Engine Oil Dipstick (page 246).D.
Brake and clutch fluid reservoir (left-hand drive). See Brake and Clutch FluidCheck (page 248).E.
Battery. See Changing the 12V Battery (page 249).F.
Power distribution box. See Fuses (page 227).G.
Air filter assembly.H.
Windshield washer fluid reservoir. See Washer Fluid Check (page 248).I.
244Mondeo (CNG) Vehicles Built From: 08-09-2014 Vehicles Built Up To: 19-04-2015, CG3633en enGBR, Edition date: 10/2014, First PrintingMaintenance
Page 248 of 446
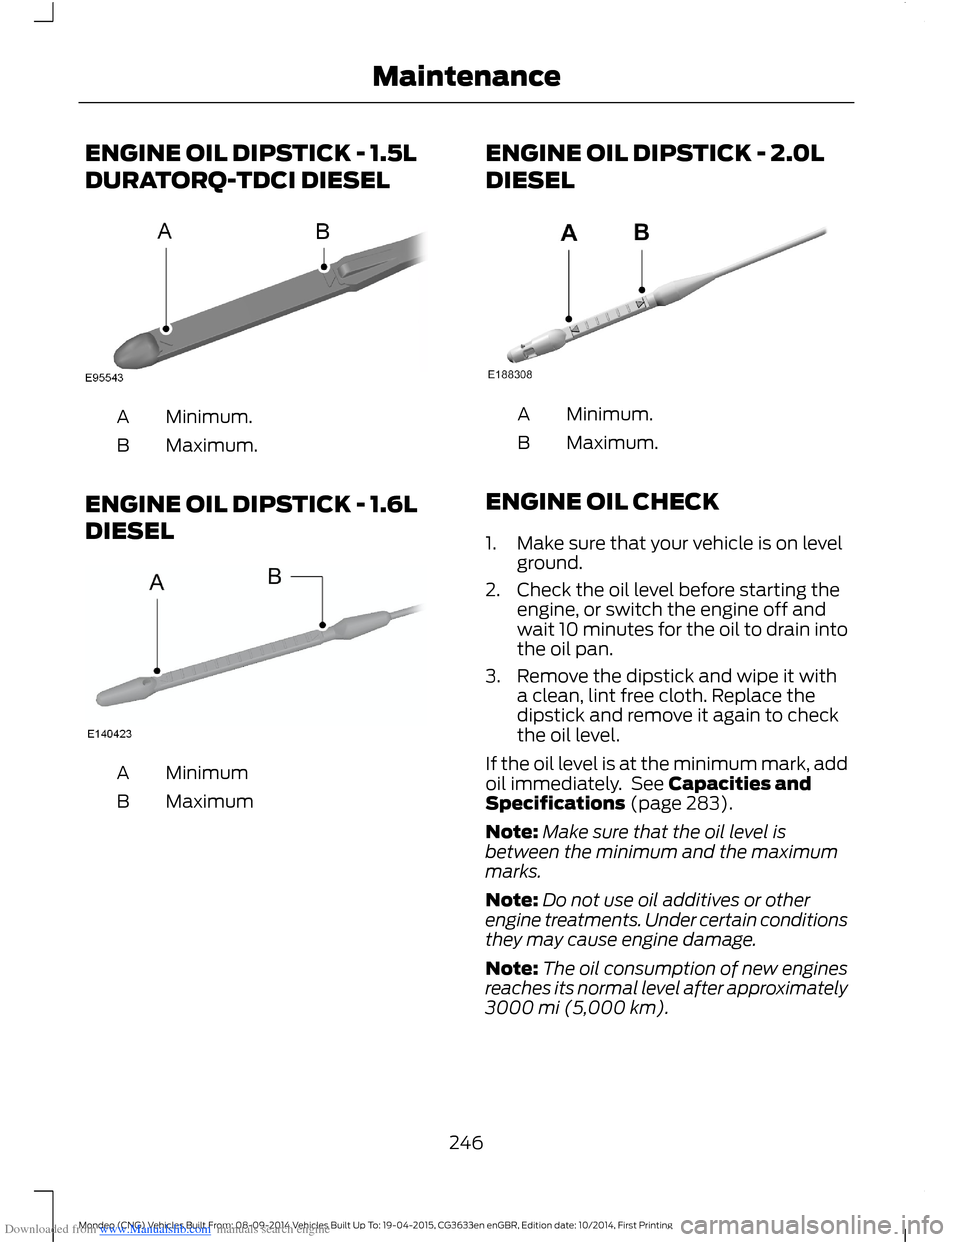
Downloaded from www.Manualslib.com manuals search engine ENGINE OIL DIPSTICK - 1.5L
DURATORQ-TDCI DIESEL
Minimum.A
Maximum.B
ENGINE OIL DIPSTICK - 1.6L
DIESEL
MinimumA
MaximumB
ENGINE OIL DIPSTICK - 2.0L
DIESEL
Minimum.A
Maximum.B
ENGINE OIL CHECK
1.Make sure that your vehicle is on levelground.
2.Check the oil level before starting theengine, or switch the engine off andwait 10 minutes for the oil to drain intothe oil pan.
3.Remove the dipstick and wipe it witha clean, lint free cloth. Replace thedipstick and remove it again to checkthe oil level.
If the oil level is at the minimum mark, addoil immediately. See Capacities andSpecifications (page 283).
Note:Make sure that the oil level isbetween the minimum and the maximummarks.
Note:Do not use oil additives or otherengine treatments. Under certain conditionsthey may cause engine damage.
Note:The oil consumption of new enginesreaches its normal level after approximately3000 mi (5,000 km).
246Mondeo (CNG) Vehicles Built From: 08-09-2014 Vehicles Built Up To: 19-04-2015, CG3633en enGBR, Edition date: 10/2014, First PrintingMaintenance
Page 249 of 446
Downloaded from www.Manualslib.com manuals search engine Adding Engine Oil
WARNINGS
Only add oil when the engine is cold.If the engine is hot, wait 10 minutesfor the engine to cool down.
Do not remove the filler cap whenthe engine is running.
1.Remove the engine oil filler cap. SeeMaintenance (page 237).
2.Add engine oil that meets Fordspecifications. See Capacities andSpecifications (page 283).
3.Replace the engine oil filler cap. Turnit until you feel a strong resistance.
Note:Do not add oil further than themaximum mark. Oil levels above themaximum mark may cause engine damage.
Note:Soak up any spillage with anabsorbent cloth immediately.
ENGINE COOLANT CHECK
WARNINGS
Never remove the coolant reservoircap while the engine is running or hot.
Only add coolant when the engine iscold. If the engine is hot, wait 10minutes for the engine to cool down.
Do not allow the fluid to touch yourskin or eyes. If this happens, rinse theaffected areas immediately withplenty of water and contact your physician.
Undiluted coolant is flammable andmay ignite if spilt on a hot exhaust.
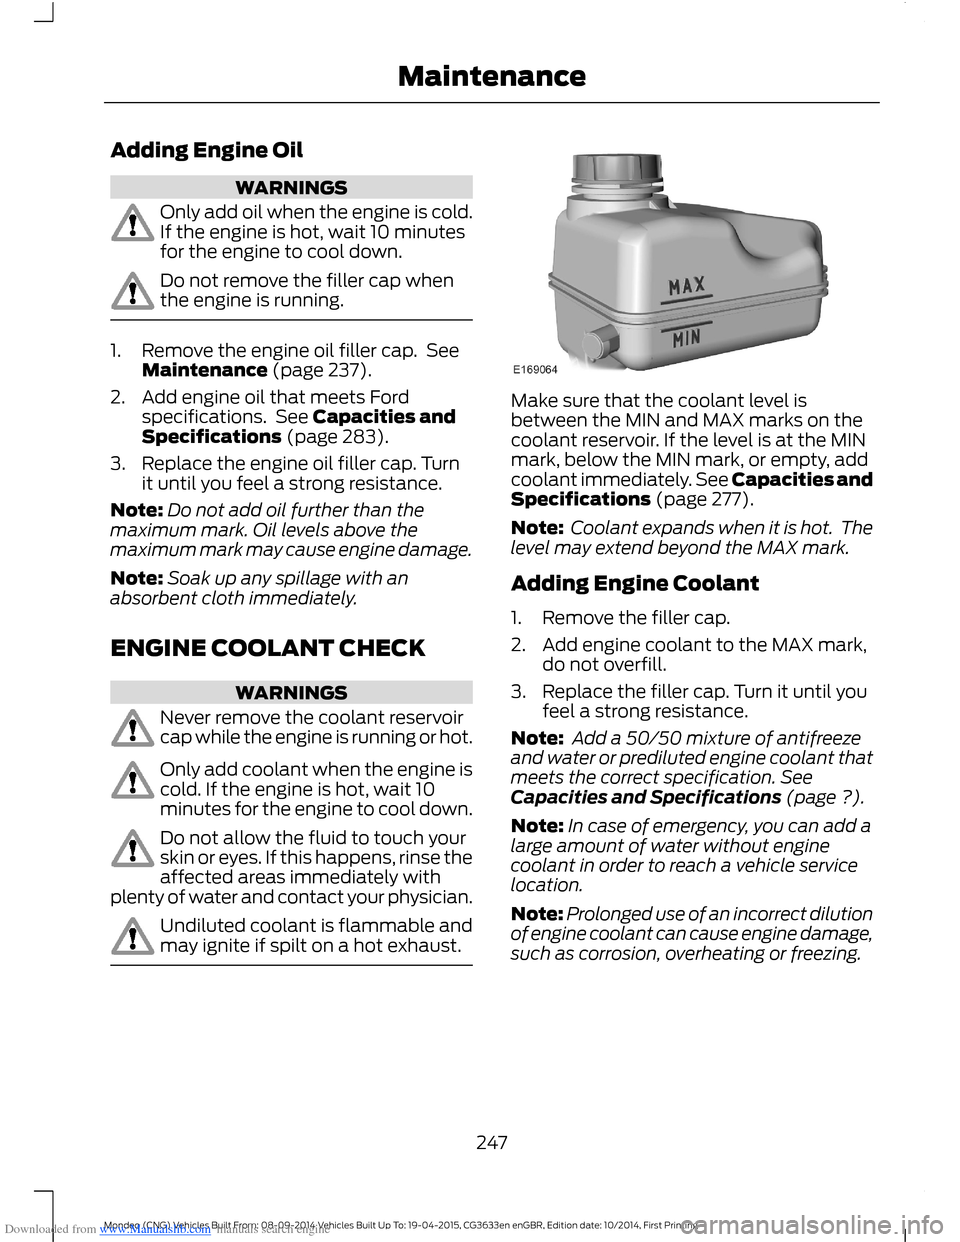
Make sure that the coolant level isbetween the MIN and MAX marks on thecoolant reservoir. If the level is at the MINmark, below the MIN mark, or empty, addcoolant immediately. See Capacities andSpecifications (page 277).
Note: Coolant expands when it is hot. Thelevel may extend beyond the MAX mark.
Adding Engine Coolant
1.Remove the filler cap.
2.Add engine coolant to the MAX mark,do not overfill.
3.Replace the filler cap. Turn it until youfeel a strong resistance.
Note: Add a 50/50 mixture of antifreezeand water or prediluted engine coolant thatmeets the correct specification. SeeCapacities and Specifications (page ?).
Note:In case of emergency, you can add alarge amount of water without enginecoolant in order to reach a vehicle servicelocation.
Note:Prolonged use of an incorrect dilutionof engine coolant can cause engine damage,such as corrosion, overheating or freezing.
247Mondeo (CNG) Vehicles Built From: 08-09-2014 Vehicles Built Up To: 19-04-2015, CG3633en enGBR, Edition date: 10/2014, First PrintingMaintenance
Page 250 of 446
Downloaded from www.Manualslib.com manuals search engine AUTOMATIC TRANSMISSION
FLUID CHECK
The automatic transmission does not havea transmission fluid dipstick.
Have an authorized dealer check andchange the transmission fluid at thecorrect service interval. Your transmissiondoes not consume fluid. However, if thetransmission slips, shifts slowly or if younotice a sign of leaking fluid, contact anauthorized dealer.
Do not use supplemental transmissionfluid additives, treatments or cleaningagents. The use of these materials mayaffect transmission operation and resultin damage to internal transmissioncomponents.
BRAKE AND CLUTCH FLUID
CHECK
WARNINGS
Do not use any fluid other than therecommended brake fluid as this willreduce brake efficiency. Use ofincorrect fluid could result in the loss ofvehicle control, serious personal injury ordeath.
Only use brake fluid from a sealedcontainer. Contamination with dirt,water, petroleum products or othermaterials may result in brake systemdamage or failure. Failure to adhere to thiswarning could result in the loss of vehiclecontrol, serious personal injury or death.
Do not allow the fluid to touch yourskin or eyes. This could cause seriouspersonal injury. Rinse the affectedareas immediately with plenty of waterand consult a physician.
WARNINGS
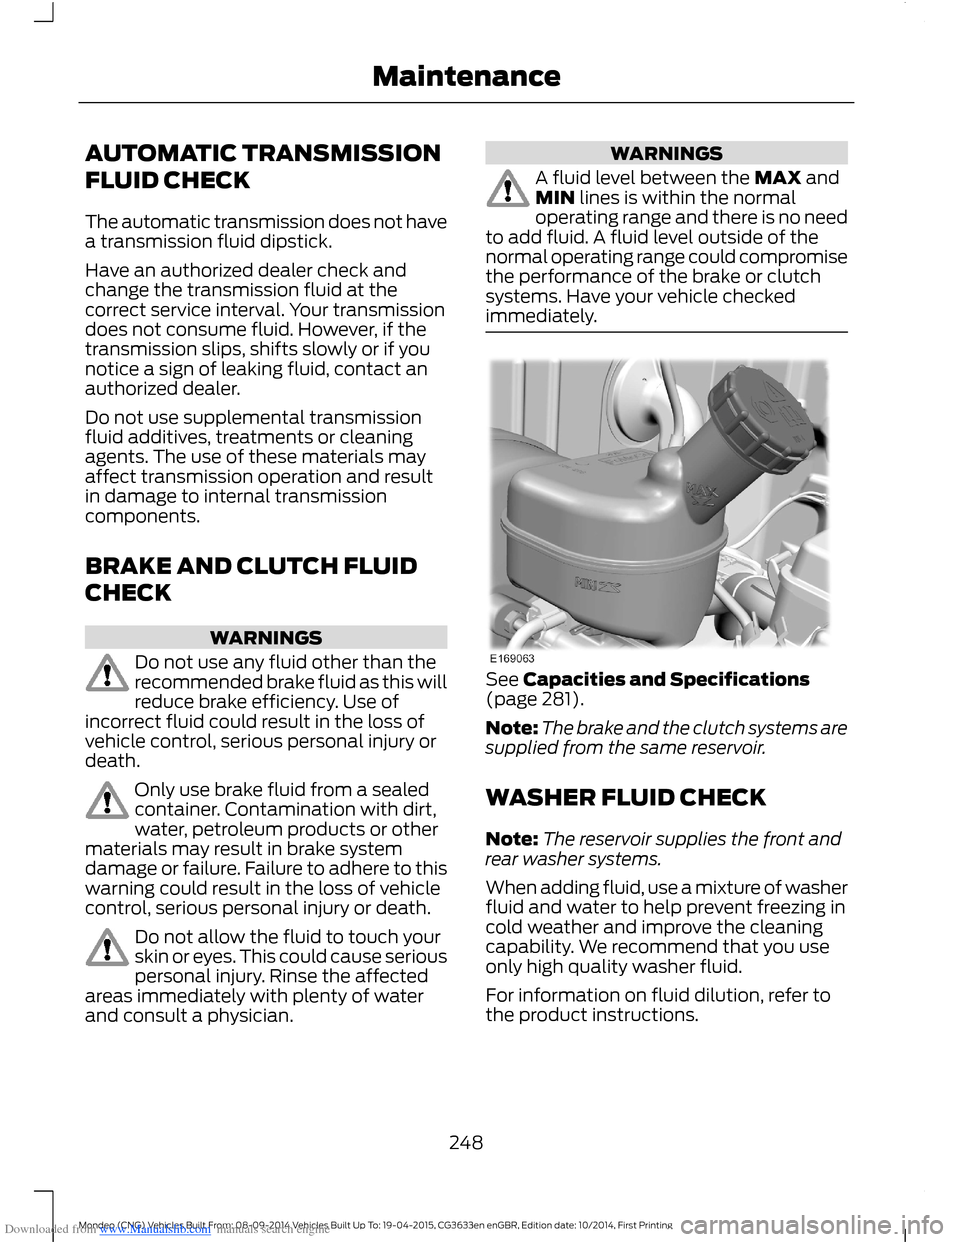
A fluid level between the MAX andMIN lines is within the normaloperating range and there is no needto add fluid. A fluid level outside of thenormal operating range could compromisethe performance of the brake or clutchsystems. Have your vehicle checkedimmediately.
See Capacities and Specifications(page 281).
Note:The brake and the clutch systems aresupplied from the same reservoir.
WASHER FLUID CHECK
Note:The reservoir supplies the front andrear washer systems.
When adding fluid, use a mixture of washerfluid and water to help prevent freezing incold weather and improve the cleaningcapability. We recommend that you useonly high quality washer fluid.
For information on fluid dilution, refer tothe product instructions.
248Mondeo (CNG) Vehicles Built From: 08-09-2014 Vehicles Built Up To: 19-04-2015, CG3633en enGBR, Edition date: 10/2014, First PrintingMaintenance
Page 251 of 446
Downloaded from www.Manualslib.com manuals search engine CHANGING THE 12V BATTERY
WARNING
For vehicles with Start-Stop thebattery requirement is different. Youmust replace the battery with one ofexactly the same specification.
The battery is located in the enginecompartment. See Maintenance (page237).
Make sure that you dispose ofold batteries in anenvironmentally friendly way.
Seek advice from your local authorityabout recycling old batteries.
CHECKING THE WIPER
BLADES
Run the tip of your fingers over the edge ofthe blade to check for roughness.
Clean the wiper blades with washer fluidor water applied with a soft sponge orcloth.
CHANGING THE WIPER
BLADES
The wiper arms can be manually movedwhen the ignition is off. This allows for easeof blade replacement and cleaning underthe blades.
Replace wiper blades at least once peryear for optimum performance.
Poor wiper quality can be improved bycleaning the wiper blades and thewindshield.
Changing the Front Wiper Blades
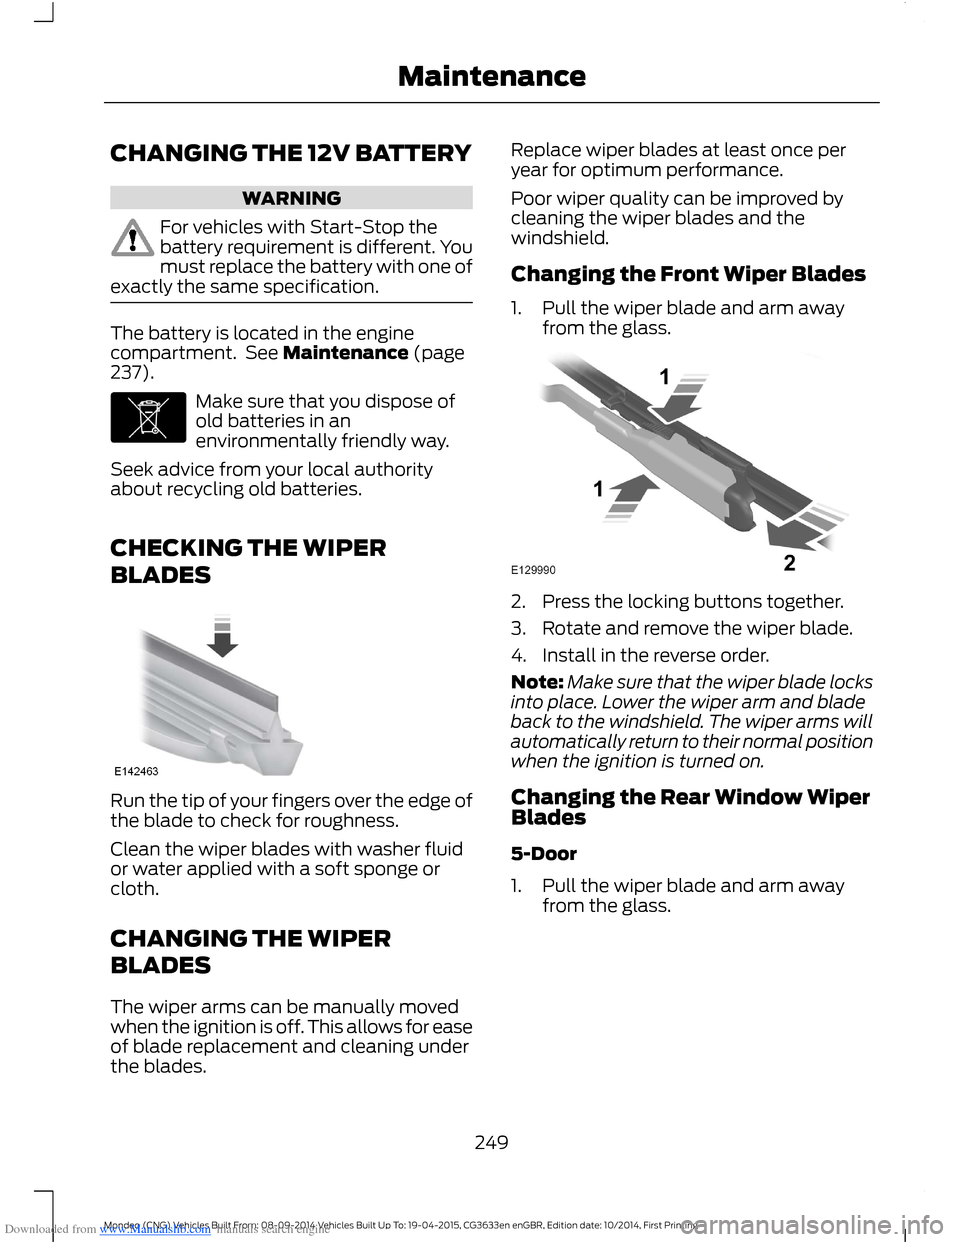
1.Pull the wiper blade and arm awayfrom the glass.
2.Press the locking buttons together.
3.Rotate and remove the wiper blade.
4.Install in the reverse order.
Note:Make sure that the wiper blade locksinto place. Lower the wiper arm and bladeback to the windshield. The wiper arms willautomatically return to their normal positionwhen the ignition is turned on.
Changing the Rear Window WiperBlades
5-Door
1.Pull the wiper blade and arm awayfrom the glass.
249Mondeo (CNG) Vehicles Built From: 08-09-2014 Vehicles Built Up To: 19-04-2015, CG3633en enGBR, Edition date: 10/2014, First PrintingMaintenance
Page 259 of 446
Downloaded from www.Manualslib.com manuals search engine CLEANING THE EXTERIOR
Note:If you use a car wash with a waxingcycle, make sure that you remove the waxfrom the windshield and the wiper blades.
Note:Prior to using a car wash facilitycheck the suitability of it for your vehicle.
Note:Some car washes use water at highpressure. Due to this, water droplets mayenter inside your vehicle and could alsodamage certain parts of your vehicle.
Note:Remove the aerial before using anautomatic car wash.
Note:Switch the heater blower off toprevent contamination of the fresh air filter.
We recommend that you wash your vehiclewith a sponge and lukewarm watercontaining a car shampoo.
Cleaning the Headlamps
Note:Do not scrape the headlamp lensesor use abrasives, alcoholic solvents orchemical solvents to clean them.
Note:Do not wipe the headlamps whenthey are dry.
Cleaning the Rear Window
Note:Do not scrape the inside of the rearwindow or use abrasives or chemicalsolvents to clean it.
Use a clean, lint free cloth or a dampchamois leather to clean the inside of therear window.
Cleaning the Chrome Trim
Note:Do not use abrasives or chemicalsolvents. Use soapy water.
Note:Do not apply cleaning product to hotsurfaces and do not leave cleaning producton chrome surfaces for a period of timeexceeding that which is recommended.
Note:Industrial-strength (heavy-duty)cleaners, or cleaning chemicals, may causedamage over a period of time.
Body Paintwork Preservation
WARNINGS
Do not polish your vehicle in strongsunshine.
Do not allow polish to touch plasticsurfaces. It could be difficult toremove.
Do not apply polish to the windshieldor rear window. This could cause thewipers to become noisy and theymay not clear the window properly.
We recommend that you wax thepaintwork once or twice a year.
CLEANING THE WINDOWS AND
WIPER BLADES
Car wash chemicals and environmentalfallout can result in windshield and wiperblade contamination. Dirty windshield andwipers will result in poor windshield wiperoperation. Keep the windshield and wiperblades clean to maintain windshield wiperperformance.
To clean the windshield and wiper blades:
•Clean the windshield with anon-abrasive glass cleaner.
•For windshields contaminated withtree sap, chemicals, wax or bugs, cleanthe entire windshield using steel wool(no greater than 0000 grade) in acircular motion and rinse with water.
•Clean the wiper blades with isopropylrubbing alcohol or windshield washerconcentrate.
257Mondeo (CNG) Vehicles Built From: 08-09-2014 Vehicles Built Up To: 19-04-2015, CG3633en enGBR, Edition date: 10/2014, First PrintingVehicle Care
Page 262 of 446
Downloaded from www.Manualslib.com manuals search engine GENERAL INFORMATION
A decal with tire pressure data is locatedin the driver’s door opening.
Check and set the tire pressure at theambient temperature in which you areintending to drive your vehicle and whenthe tires are cold.
Note:Check your tire pressures regularly tooptimize fuel economy.
Note:Use only approved wheel and tiresizes. Using other sizes could damage yourvehicle and will make the National TypeApproval invalid.
Note:If you change the diameter of the tiresfrom that fitted at the factory, thespeedometer may not display the correctspeed. Take your vehicle to an authorizeddealer to have the engine managementsystem reprogrammed.
Note:If you intend to change the size of thewheels from that fitted at the factory, checkthe suitability with an authorized dealer.
TEMPORARY MOBILITY KIT
Your vehicle may not have a spare wheeland tire. In these cases it will be suppliedwith a temporary mobility kit which willonly repair one damaged tire.
The kit is located in the spare wheel well.
General Information
WARNINGS
Depending on the type and extent oftire damage, some tires can only bepartially sealed or not sealed at all.Loss of tire pressure can affect vehiclehandling, leading to loss of vehicle control.
Do not use the temporary mobilitykit on a previously damaged tire. Forexample, when a tire has been drivenunder inflated.
WARNINGS
Do not use the temporary mobilitykit on run flat tires.
Do not use the temporary mobilitykit to repair the sidewall of adamaged tire.
The temporary mobility kit seals most tirepunctures with a diameter of up to ¼ in (6mm) to temporarily restore mobility.
You must observe the following rules whenusing the temporary mobility kit:
•Drive with caution and avoid makingsudden steering or driving manoeuvresespecially if your vehicle is heavilyloaded or towing a trailer.
•Only continue your journey to the nextvehicle or tire dealer or drive amaximum distance of 125 mi (200 km).
•Do not exceed a maximum speed of50 mph (80 km/h).
•Keep the temporary mobility kit out ofthe reach of children.
•Only use the temporary mobility kitwhen the ambient temperature isbetween -30° and 70° C (-22° and158° F).
Using the Temporary Mobility Kit
WARNINGS
Park your vehicle so that you do notobstruct the flow of traffic or placeyourself in any danger and set up awarning triangle.
Compressed air can act as anexplosive or propellant.
Never leave the temporary mobilitykit unattended while in use.
Do not keep the compressoroperating for longer than 10 minutes.
260Mondeo (CNG) Vehicles Built From: 08-09-2014 Vehicles Built Up To: 19-04-2015, CG3633en enGBR, Edition date: 10/2014, First PrintingWheels and Tires
Page 263 of 446
Downloaded from www.Manualslib.com manuals search engine WARNINGS
You must only use the temporarymobility kit for the vehicle with whichit was supplied.
Before you use the temporary mobility kit:
•Apply the parking brake.
•Do not attempt to remove foreignmaterial that is penetrating the tire, forexample, nails or screws.
•Leave the engine running while thetemporary mobility kit is in use. If yourvehicle is in an enclosed or poorlyventilated area use the temporarymobility kit with the engine switchedoff.
•You must replace the sealant bottlewith a new one before the expiry datewhich is printed on the top of sealantbottle.
•Inform all vehicle users that a tire hasbeen repaired using the temporarymobility kit. Make them aware of thespecial driving conditions that apply.
Inflating the Tire
WARNINGS
Check the sidewall of the tire prior tousing the temporary mobility kit. Ifthere are any cracks, bumps orsimilar damage do not attempt to inflatethe tire.
Do not stand directly beside the tirewhile the compressor is operating.
Watch the sidewall of the tire. If anycracks, bumps or similar damageappears, switch off the compressorimmediately and deflate the tire using thepressure relief valve B.
WARNINGS
The sealant contains natural rubberlatex. Avoid contact with skin orclothing. If this happens, rinse theaffected areas immediately with plenty ofwater and contact a physician.
If the tire inflation pressure does notreach the recommended pressurewithin 10 minutes, the tire may havesuffered excessive damage, making atemporary repair impossible. Do notcontinue driving with this tire.
Screwing the sealant bottle onto thebottle holder will pierce the seal ofthe sealant bottle. Do not unscrewthe sealant bottle from the bottle holderprior to completing a temporary repair asthe sealant will escape.
If you experience heavy vibrations,unsteady steering behavior or noiseswhile driving, reduce your speed anddrive with caution to a place where it issafe for you to stop your vehicle. Recheckthe tire and its pressure. If the tire pressureis less than 45 psi (3 bar) or if there are anycracks, bumps or similar damage visible,do not continue driving with this tire.
261Mondeo (CNG) Vehicles Built From: 08-09-2014 Vehicles Built Up To: 19-04-2015, CG3633en enGBR, Edition date: 10/2014, First PrintingWheels and Tires
Page 264 of 446
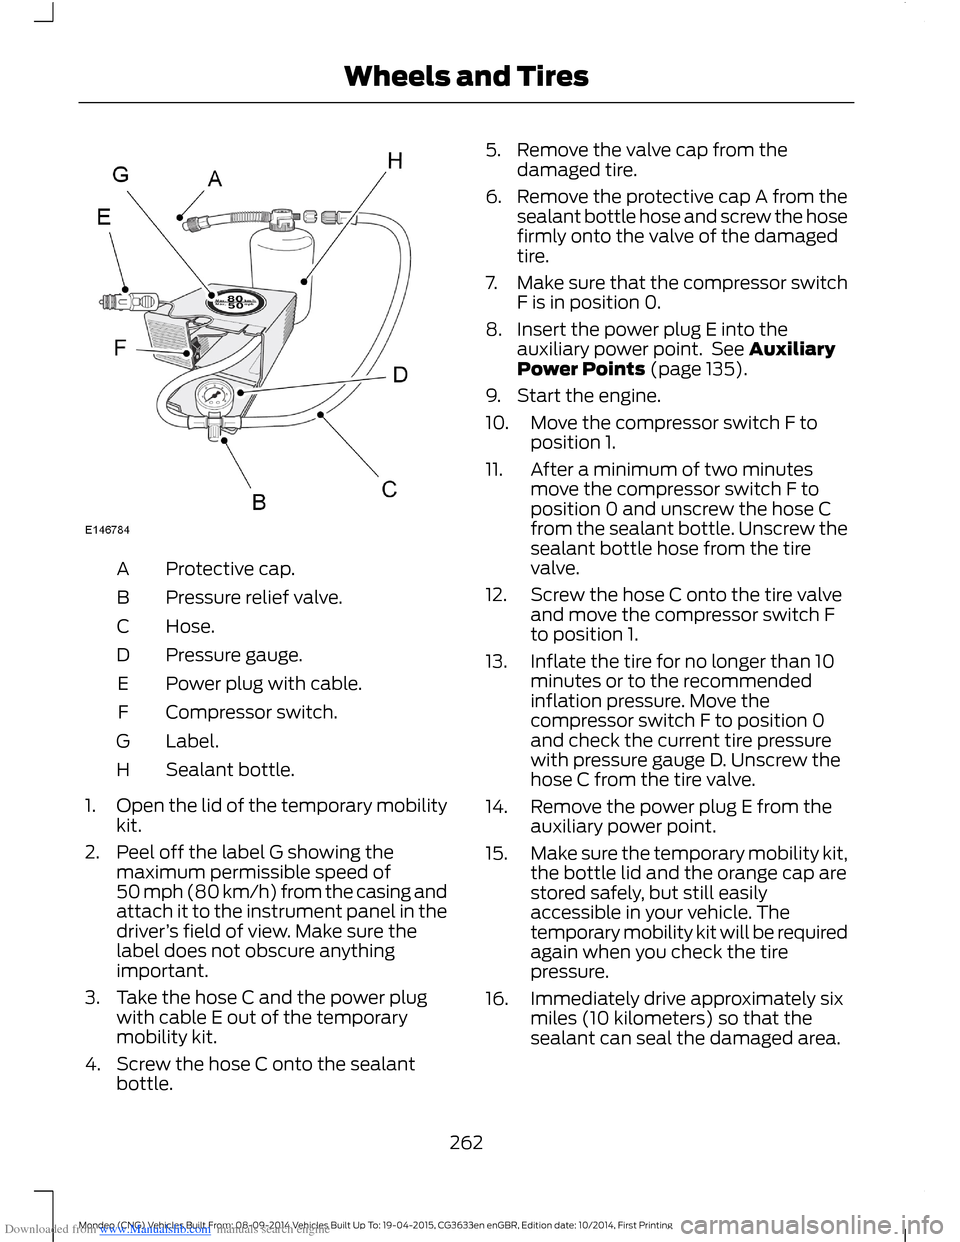
Downloaded from www.Manualslib.com manuals search engine Protective cap.A
Pressure relief valve.B
Hose.C
Pressure gauge.D
Power plug with cable.E
Compressor switch.F
Label.G
Sealant bottle.H
1.Open the lid of the temporary mobilitykit.
2.Peel off the label G showing themaximum permissible speed of50 mph (80 km/h) from the casing andattach it to the instrument panel in thedriver’s field of view. Make sure thelabel does not obscure anythingimportant.
3.Take the hose C and the power plugwith cable E out of the temporarymobility kit.
4.Screw the hose C onto the sealantbottle.
5.Remove the valve cap from thedamaged tire.
6.Remove the protective cap A from thesealant bottle hose and screw the hosefirmly onto the valve of the damagedtire.
7.Make sure that the compressor switchF is in position 0.
8.Insert the power plug E into theauxiliary power point. See AuxiliaryPower Points (page 135).
9.Start the engine.
10.Move the compressor switch F toposition 1.
11.After a minimum of two minutesmove the compressor switch F toposition 0 and unscrew the hose Cfrom the sealant bottle. Unscrew thesealant bottle hose from the tirevalve.
12.Screw the hose C onto the tire valveand move the compressor switch Fto position 1.
13.Inflate the tire for no longer than 10minutes or to the recommendedinflation pressure. Move thecompressor switch F to position 0and check the current tire pressurewith pressure gauge D. Unscrew thehose C from the tire valve.
14.Remove the power plug E from theauxiliary power point.
15.Make sure the temporary mobility kit,the bottle lid and the orange cap arestored safely, but still easilyaccessible in your vehicle. Thetemporary mobility kit will be requiredagain when you check the tirepressure.
16.Immediately drive approximately sixmiles (10 kilometers) so that thesealant can seal the damaged area.
262Mondeo (CNG) Vehicles Built From: 08-09-2014 Vehicles Built Up To: 19-04-2015, CG3633en enGBR, Edition date: 10/2014, First PrintingWheels and Tires