instrument panel FORD POLICE INTERCEPTOR 2021 Owners Manual
[x] Cancel search | Manufacturer: FORD, Model Year: 2021, Model line: POLICE INTERCEPTOR, Model: FORD POLICE INTERCEPTOR 2021Pages: 412, PDF Size: 7.51 MB
Page 4 of 412
Introduction
About This Manual
..........................................7
Symbols Glossary ............................................
7
Perchlorate .........................................................
9
Ford Credit ..........................................................
9
Replacement Parts Recommendation ........................................................................\
...
10
Special Notices ...............................................
10
Mobile Communications Equipment ........................................................................\
.....
11
Export Unique Options .................................
12
Data Privacy
Data Privacy .....................................................
13
Service Data .....................................................
14
Event Data ........................................................
14
Settings Data ...................................................
15
Mobile Device Data ........................................
15
Emergency Call System Data ....................
16
Environment
Protecting the Environment .......................
17
At a Glance
Instrument Panel ...........................................
18
Child Safety
General Information .....................................
20
Installing Child Restraints ..........................
22
Booster Seats .................................................
28
Child Restraint Positioning ........................
30
Child Safety Locks .........................................
32
Seatbelts
Principle of Operation ..................................
33
Fastening the Seatbelts .............................
34
Seatbelt Height Adjustment .....................
36
Seatbelt Warning Lamp and Indicator Chime ............................................................
36
Seatbelt Reminder ........................................
37Child Restraint and Seatbelt
Maintenance ...............................................
38
Seatbelt Extensions .....................................
39
Personal Safety System ™
Personal Safety System ™........................
40
Supplementary Restraints System
Principle of Operation ..................................
41
Driver and Passenger Airbags ...................
42
Front Passenger Sensing System ...........
43
Side Airbags ....................................................
45
Driver and Passenger Knee Airbags .......
46
Safety Canopy ™...........................................
46
Crash Sensors and Airbag Indicator .......
47
Airbag Disposal ..............................................
53
Pedestrian Protection - Hybrid Electric Vehicle (HEV)
Pedestrian Alert System ............................
54
Keys and Remote Controls
General Information on Radio Frequencies .................................................
55
Remote Control .............................................
55
Replacing a Lost Key or Remote Control ........................................................................\
...
57
Doors and Locks
Locking and Unlocking ................................
58
Liftgate
Manual Liftgate ...............................................
61
Security
Anti-Theft Alarm ...........................................
63
Steering Wheel
Adjusting the Steering Wheel ..................
65
1
Explorer (CTW) Police, Canada/United States of America, Police, enUSA, Edition date: 202007, Second-Printing Table of Contents
Page 8 of 412
Cleaning the Engine
..................................240
Cleaning the Windows and Wiper Blades ........................................................................\
.
241
Cleaning the Interior ...................................
241
Cleaning the Instrument Panel and Instrument Cluster Lens ......................
242
Repairing Minor Paint Damage ..............
242
Cleaning the Wheels .................................
242
Vehicle Storage ............................................
243
Wheels and Tires
General Information ..................................
246
Tire Care .........................................................
247
Using Snow Chains .....................................
261
Tire Pressure Monitoring System ..........
263
Changing a Road Wheel ..........................
268
Technical Specifications ..........................
274
Capacities and Specifications
Engine Specifications - 3.0L ...................
275
Engine Specifications - 3.3L ....................
275
Engine Specifications - 3.3L, Hybrid Electric Vehicle (HEV) ..........................
276
Motorcraft Parts - 3.0L ..............................
277
Motorcraft Parts - 3.3L ..............................
278
Vehicle Identification Number ...............
279
Capacities and Specifications - 3.0L ........................................................................\
279
Capacities and Specifications - 3.3L ........................................................................\
286
Capacities and Specifications - 3.3L, Hybrid Electric Vehicle (HEV) ............
294
Bulb Specification Chart ..........................
301
Audio System
General Information ..................................
303
Audio Unit .....................................................
303
USB Port ........................................................
306SYNC™
General Information
..................................
307
Using Voice Recognition ..........................
308
Using SYNC™ With Your Phone ............
310
SYNC™ Applications and Services .......
311
Using SYNC™ With Your Media Player ........................................................................\
.
314
SYNC™ Troubleshooting ..........................
315
Ford Protect
Ford Protect ..................................................
324
Scheduled Maintenance
General Maintenance Information .......
326
Normal Scheduled Maintenance .........
329
Special Operating Conditions Scheduled Maintenance .............................................
332
Decommissioning the Vehicle
Decommissioning Requirements .........
336
Customer Information
Radio Frequency Certification Labels ........................................................................\
337
Appendices
Electromagnetic Compatibility .............
369
End User License Agreement .................
372
5
Explorer (CTW) Police, Canada/United States of America, Police, enUSA, Edition date: 202007, Second-Printing Table of Contents
Page 21 of 412
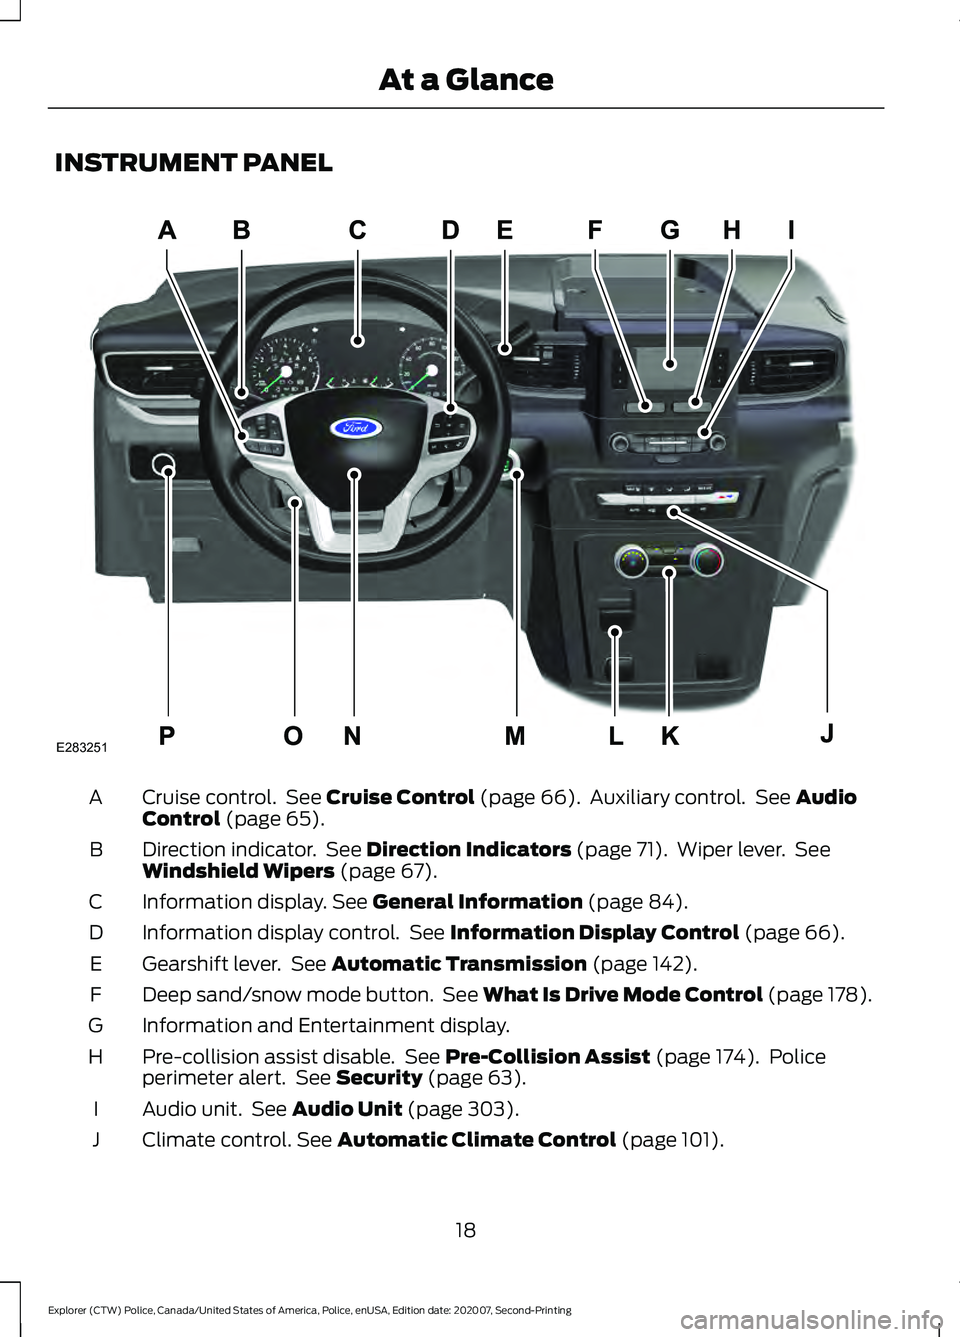
INSTRUMENT PANEL
Cruise control. See Cruise Control (page 66). Auxiliary control. See Audio
Control (page 65).
A
Direction indicator. See
Direction Indicators (page 71). Wiper lever. See
Windshield Wipers (page 67).
B
Information display.
See General Information (page 84).
C
Information display control. See
Information Display Control (page 66).
D
Gearshift lever. See
Automatic Transmission (page 142).
E
Deep sand/snow mode button. See What Is Drive Mode Control (page 178).
F
Information and Entertainment display.
G
Pre-collision assist disable. See
Pre-Collision Assist (page 174). Police
perimeter alert. See Security (page 63).
H
Audio unit. See
Audio Unit (page 303).
I
Climate control.
See Automatic Climate Control (page 101).
J
18
Explorer (CTW) Police, Canada/United States of America, Police, enUSA, Edition date: 202007, Second-Printing At a GlanceE283251
Page 49 of 412
The system consists of the following:
•
A label or embossed side panel
indicating that your vehicle has side
airbags.
• Side airbags inside the driver and front
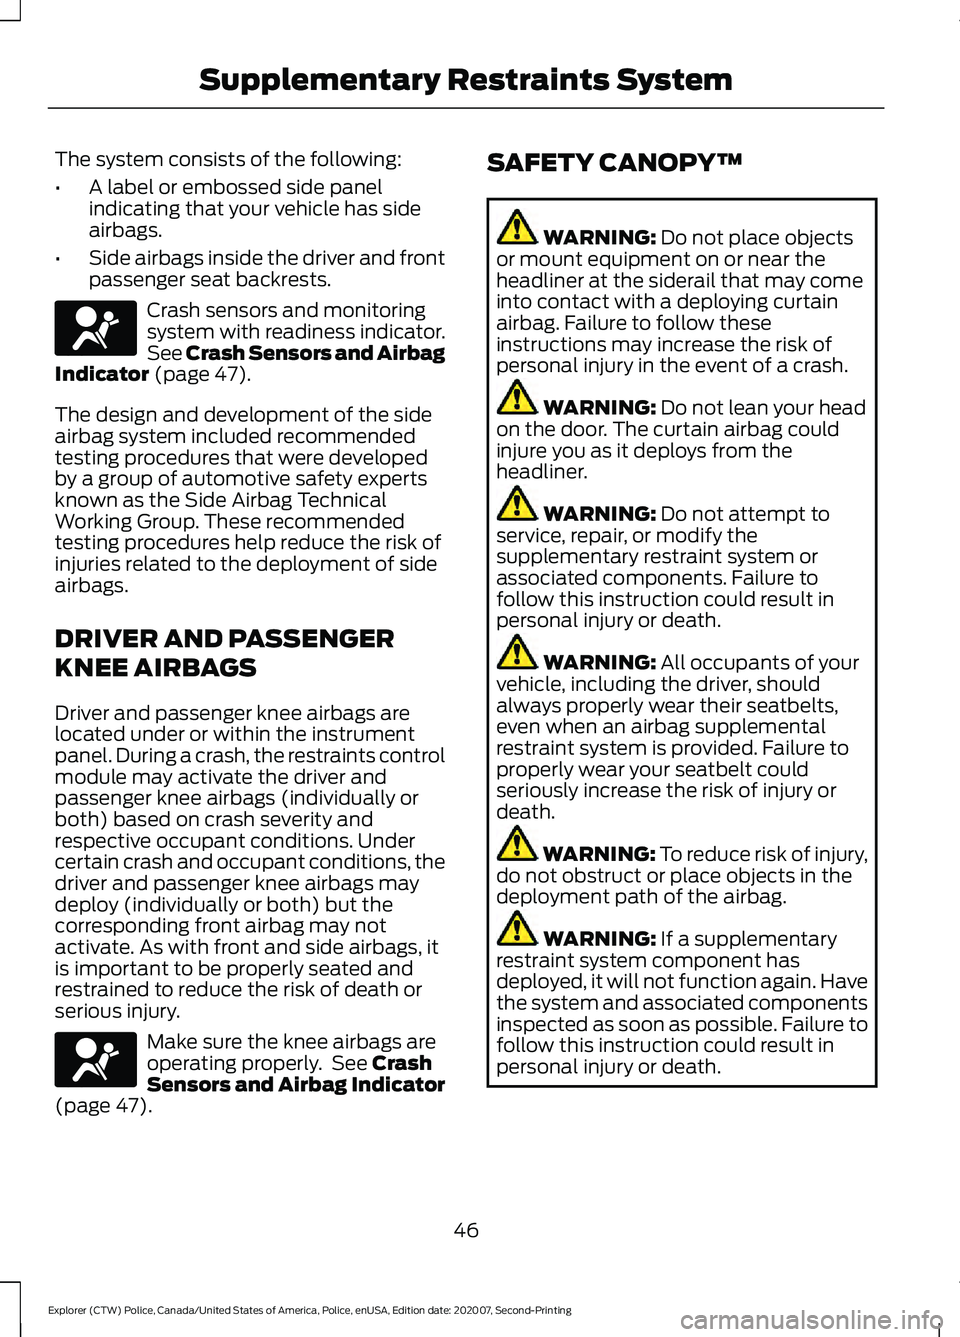
passenger seat backrests. Crash sensors and monitoring
system with readiness indicator.
See Crash Sensors and Airbag
Indicator (page 47).
The design and development of the side
airbag system included recommended
testing procedures that were developed
by a group of automotive safety experts
known as the Side Airbag Technical
Working Group. These recommended
testing procedures help reduce the risk of
injuries related to the deployment of side
airbags.
DRIVER AND PASSENGER
KNEE AIRBAGS
Driver and passenger knee airbags are
located under or within the instrument
panel. During a crash, the restraints control
module may activate the driver and
passenger knee airbags (individually or
both) based on crash severity and
respective occupant conditions. Under
certain crash and occupant conditions, the
driver and passenger knee airbags may
deploy (individually or both) but the
corresponding front airbag may not
activate. As with front and side airbags, it
is important to be properly seated and
restrained to reduce the risk of death or
serious injury. Make sure the knee airbags are
operating properly. See
Crash
Sensors and Airbag Indicator
(page
47). SAFETY CANOPY™ WARNING:
Do not place objects
or mount equipment on or near the
headliner at the siderail that may come
into contact with a deploying curtain
airbag. Failure to follow these
instructions may increase the risk of
personal injury in the event of a crash. WARNING:
Do not lean your head
on the door. The curtain airbag could
injure you as it deploys from the
headliner. WARNING:
Do not attempt to
service, repair, or modify the
supplementary restraint system or
associated components. Failure to
follow this instruction could result in
personal injury or death. WARNING:
All occupants of your
vehicle, including the driver, should
always properly wear their seatbelts,
even when an airbag supplemental
restraint system is provided. Failure to
properly wear your seatbelt could
seriously increase the risk of injury or
death. WARNING:
To reduce risk of injury,
do not obstruct or place objects in the
deployment path of the airbag. WARNING:
If a supplementary
restraint system component has
deployed, it will not function again. Have
the system and associated components
inspected as soon as possible. Failure to
follow this instruction could result in
personal injury or death.
46
Explorer (CTW) Police, Canada/United States of America, Police, enUSA, Edition date: 202007, Second-Printing Supplementary Restraints SystemE67017 E67017
Page 54 of 412
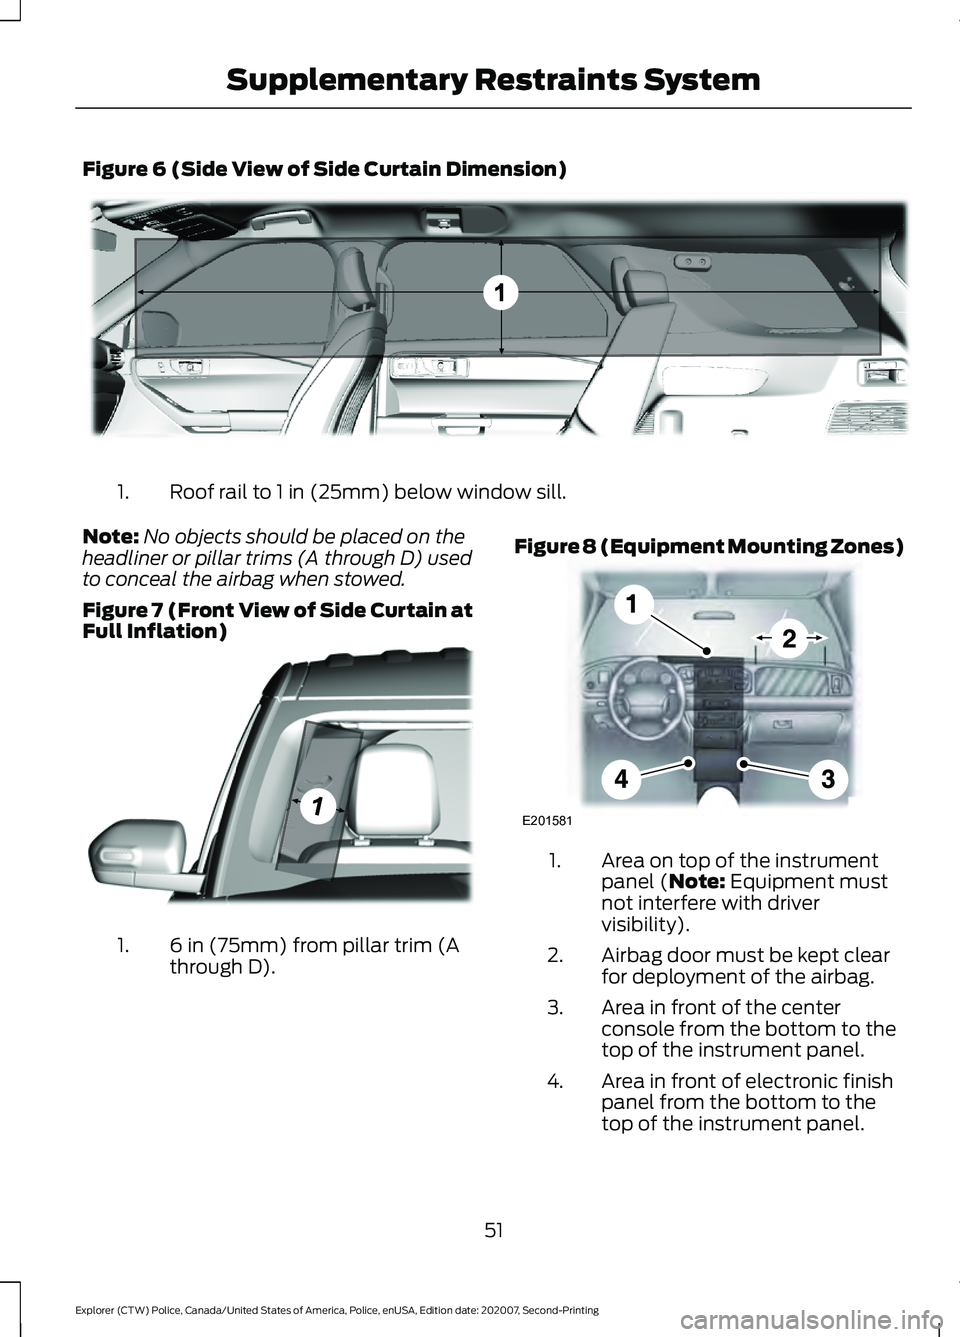
Figure 6 (Side View of Side Curtain Dimension)
Roof rail to 1 in (25mm) below window sill.
1.
Note: No objects should be placed on the
headliner or pillar trims (A through D) used
to conceal the airbag when stowed.
Figure 7 (Front View of Side Curtain at
Full Inflation) 6 in (75mm) from pillar trim (A
through D).
1. Figure 8 (Equipment Mounting Zones) Area on top of the instrument
panel (Note: Equipment must
not interfere with driver
visibility).
1.
Airbag door must be kept clear
for deployment of the airbag.
2.
Area in front of the center
console from the bottom to the
top of the instrument panel.
3.
Area in front of electronic finish
panel from the bottom to the
top of the instrument panel.
4.
51
Explorer (CTW) Police, Canada/United States of America, Police, enUSA, Edition date: 202007, Second-Printing Supplementary Restraints SystemE301094 E301077 E201581
Page 55 of 412
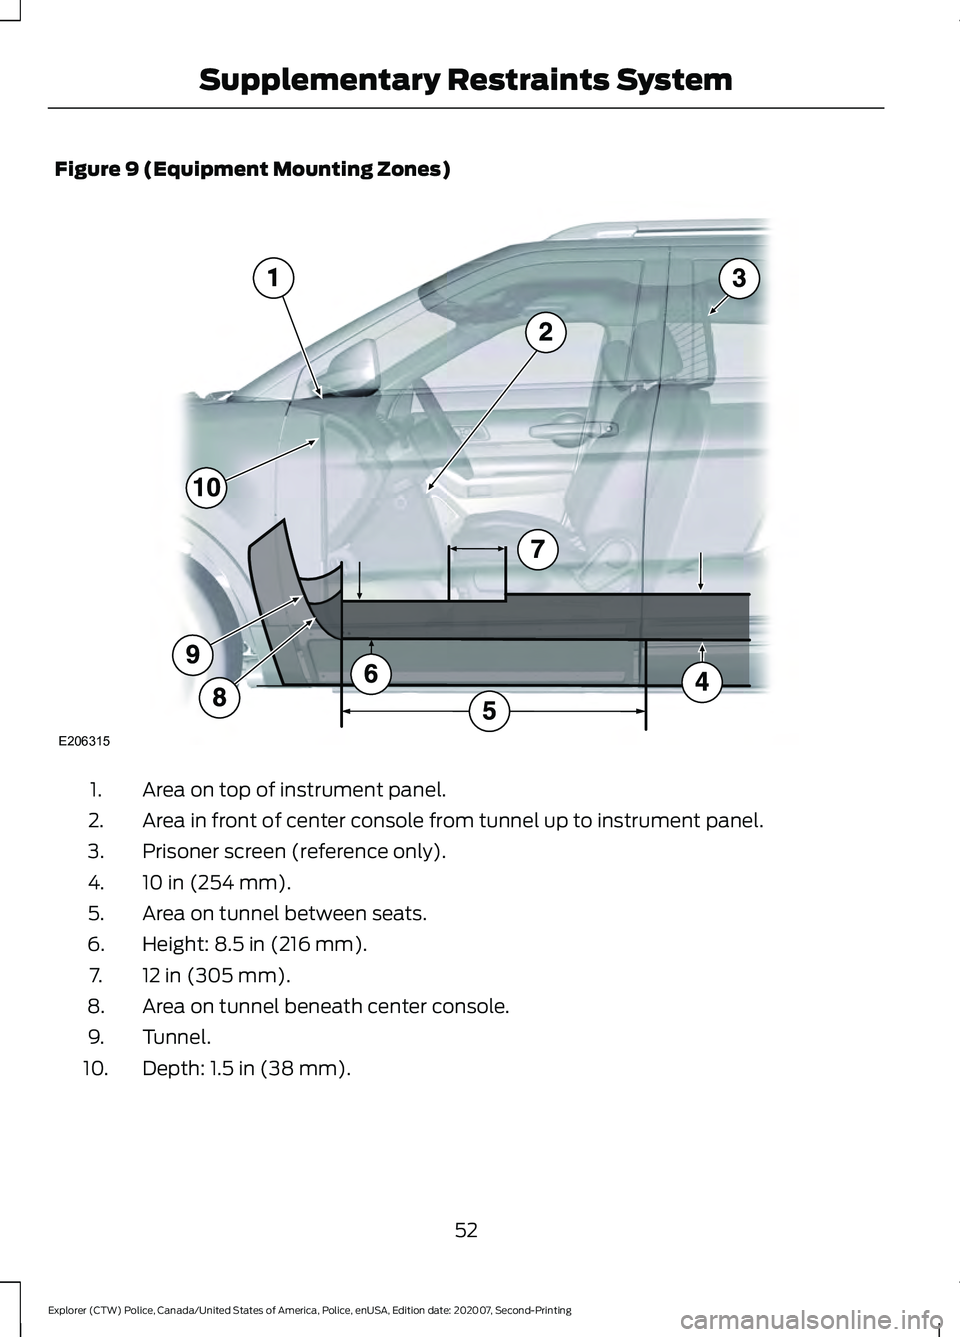
Figure 9 (Equipment Mounting Zones)
Area on top of instrument panel.
1.
Area in front of center console from tunnel up to instrument panel.
2.
Prisoner screen (reference only).
3.
10 in (254 mm).
4.
Area on tunnel between seats.
5.
Height: 8.5 in (216 mm).
6.
12 in (305 mm).
7.
Area on tunnel beneath center console.
8.
Tunnel.
9.
Depth: 1.5 in (38 mm).
10.
52
Explorer (CTW) Police, Canada/United States of America, Police, enUSA, Edition date: 202007, Second-Printing Supplementary Restraints SystemE206315
Page 56 of 412
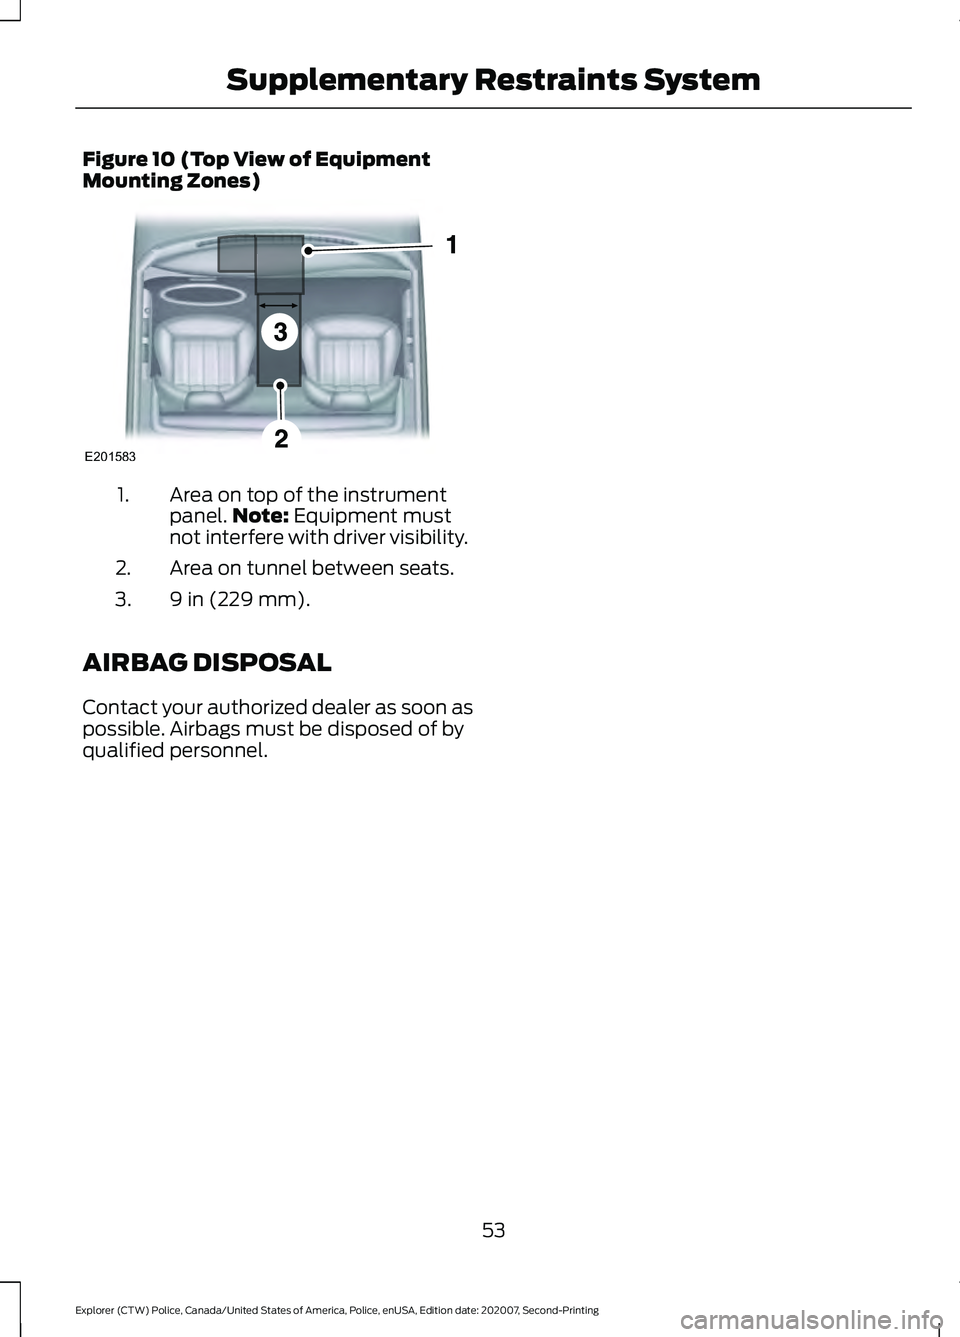
Figure 10 (Top View of Equipment
Mounting Zones)
Area on top of the instrument
panel.
Note: Equipment must
not interfere with driver visibility.
1.
Area on tunnel between seats.
2.
9 in (229 mm).
3.
AIRBAG DISPOSAL
Contact your authorized dealer as soon as
possible. Airbags must be disposed of by
qualified personnel.
53
Explorer (CTW) Police, Canada/United States of America, Police, enUSA, Edition date: 202007, Second-Printing Supplementary Restraints SystemE201583
Page 67 of 412
While the vehicle is running and in Park (P),
press and release the button located on
the center of the instrument panel.
Activating the feature will turn on the
Police Perimeter Alert System display in
the instrument cluster.
Note:
When the feature is active an icon
will display on the instrument cluster.
Police Perimeter Alert Settings
Note: When the Police Idle feature is active,
windows will not automatically roll up.
Note: When window or door locking is
active, corresponding icons will display in
the instrument cluster.
Note: When Low mode is active, window
or door locking setting is not available.
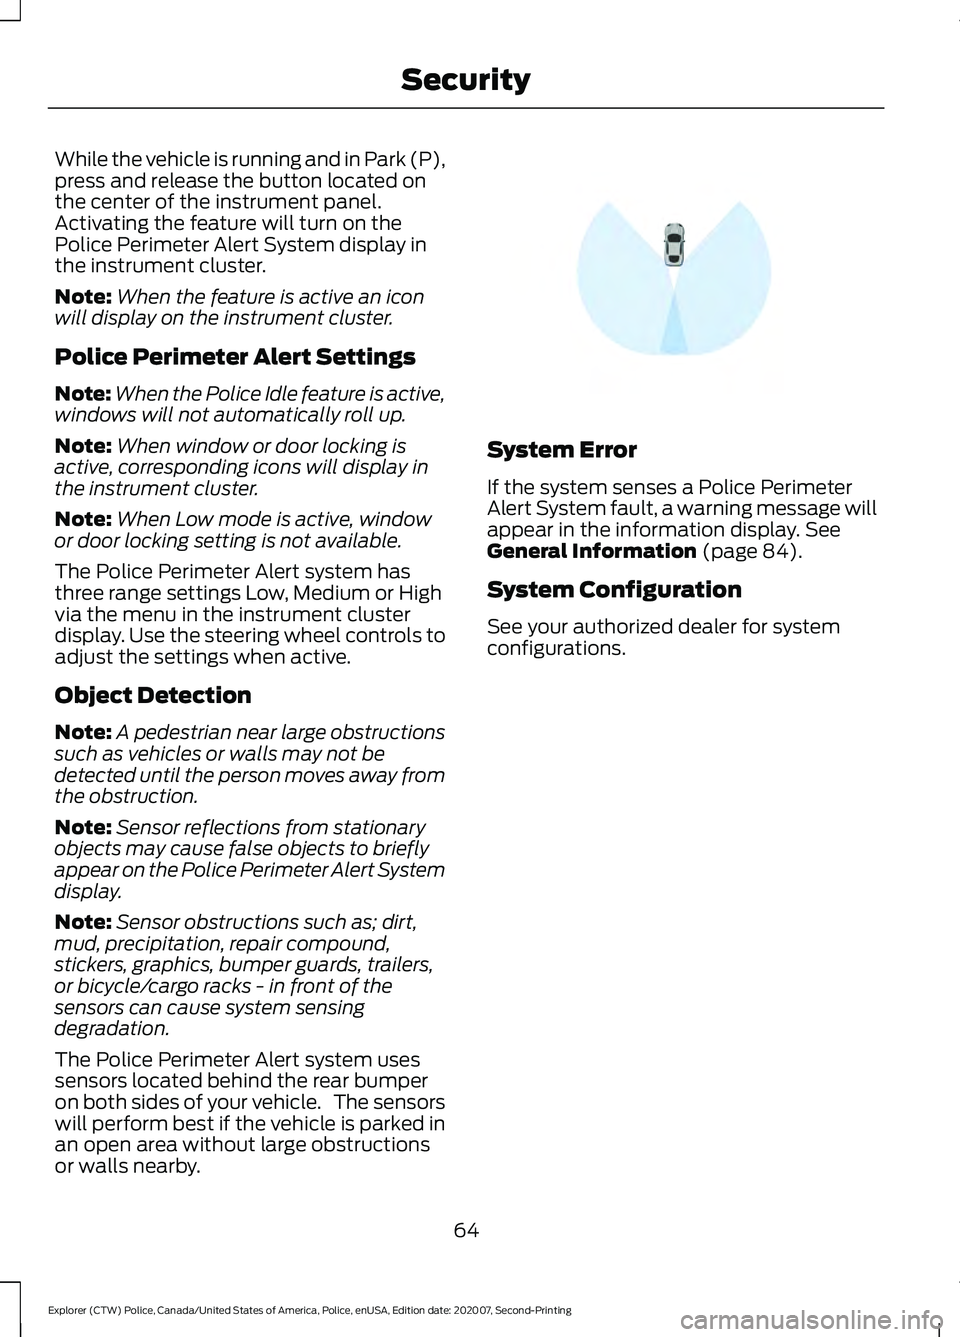
The Police Perimeter Alert system has
three range settings Low, Medium or High
via the menu in the instrument cluster
display. Use the steering wheel controls to
adjust the settings when active.
Object Detection
Note: A pedestrian near large obstructions
such as vehicles or walls may not be
detected until the person moves away from
the obstruction.
Note: Sensor reflections from stationary
objects may cause false objects to briefly
appear on the Police Perimeter Alert System
display.
Note: Sensor obstructions such as; dirt,
mud, precipitation, repair compound,
stickers, graphics, bumper guards, trailers,
or bicycle/cargo racks - in front of the
sensors can cause system sensing
degradation.
The Police Perimeter Alert system uses
sensors located behind the rear bumper
on both sides of your vehicle. The sensors
will perform best if the vehicle is parked in
an open area without large obstructions
or walls nearby. System Error
If the system senses a Police Perimeter
Alert System fault, a warning message will
appear in the information display. See
General Information (page 84).
System Configuration
See your authorized dealer for system
configurations.
64
Explorer (CTW) Police, Canada/United States of America, Police, enUSA, Edition date: 202007, Second-Printing SecurityE298030
Page 72 of 412
GENERAL INFORMATION
Condensation in Lamp Assemblies
Exterior lamps have vents to
accommodate normal changes in air
pressure.
Condensation can be a natural by-product
of this design. When moist air enters the
lamp assembly through the vents, there is
a possibility that condensation can occur
when the temperature is cold. When
normal condensation occurs, a fine mist
can form on the interior of the lens. The
fine mist eventually clears and exits
through the vents during normal operation.
Clearing time may take as long as 48 hours
under dry weather conditions.
Examples of acceptable condensation are:
•
The presence of a fine mist (no streaks,
drip marks or large droplets).
• A fine mist covers less than 50% of the
lens.
Examples of unacceptable condensation
are:
• A water puddle inside the lamp.
• Streaks, drip marks or large droplets
present on the interior of the lens.
If you see any unacceptable condensation,
have your vehicle checked by an authorized
dealer.
Dark Car Feature (If Equipped)
The Dark Car feature may disable the
following features:
• Welcome/farewell strategy.
• Courtesy lighting.
• Daytime running lamps.
Note: In markets where daytime running
lamps are mandated by law, the Dark Car
feature does not disable the daytime
running lamps. Switching the Backlighting Off
The Dark Car feature allows you to switch
the cabin backlighting off, this state can
be reached by:
1.
Switch the lighting control to the lamps
off position.
2. Use the instrument lighting dimmer switch to lower the brightness to off.
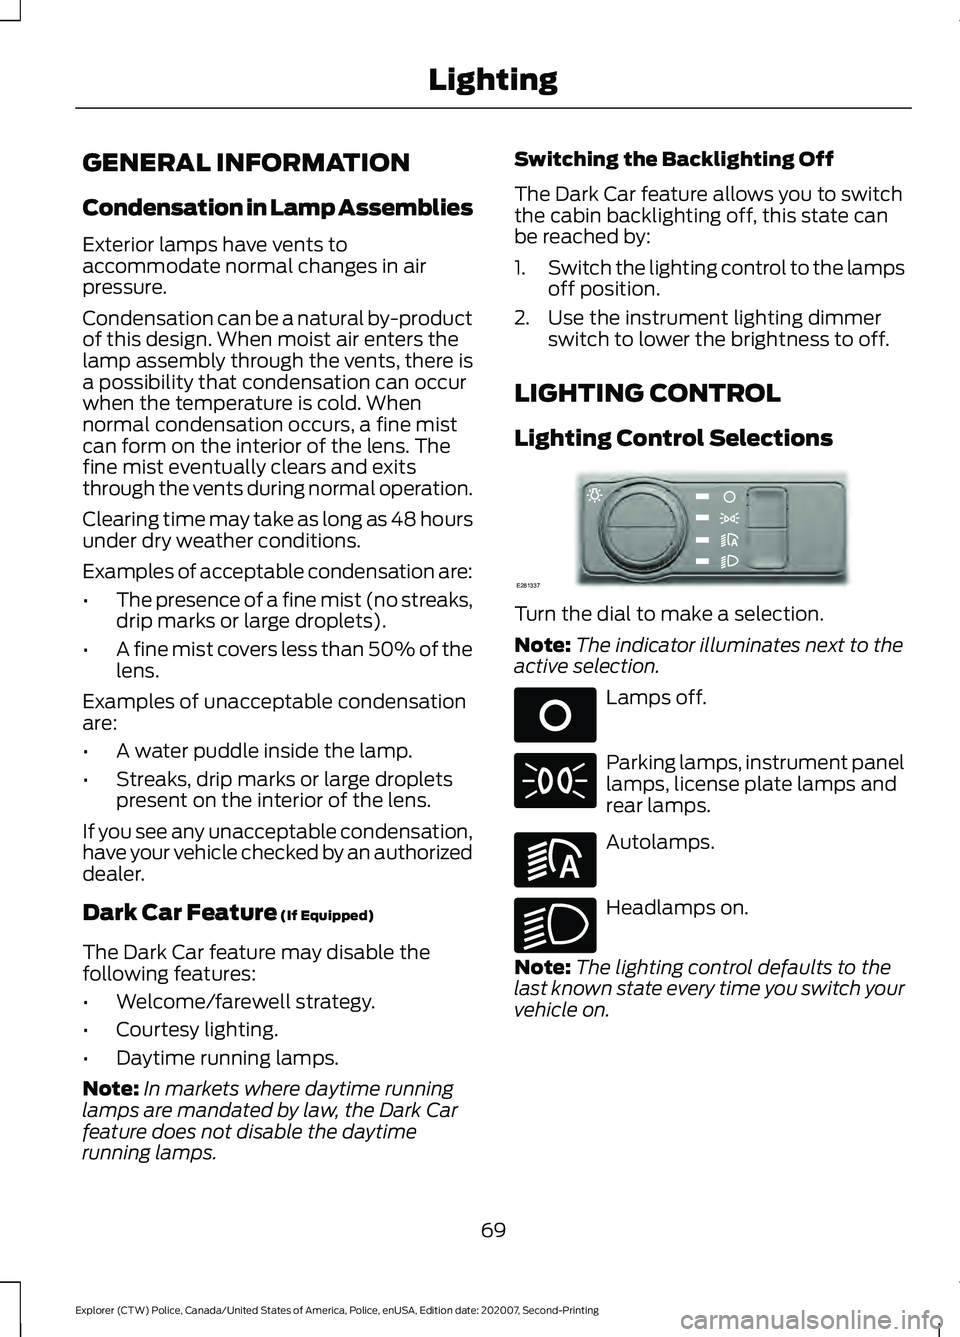
LIGHTING CONTROL
Lighting Control Selections Turn the dial to make a selection.
Note:
The indicator illuminates next to the
active selection. Lamps off.
Parking lamps, instrument panel
lamps, license plate lamps and
rear lamps.
Autolamps.
Headlamps on.
Note: The lighting control defaults to the
last known state every time you switch your
vehicle on.
69
Explorer (CTW) Police, Canada/United States of America, Police, enUSA, Edition date: 202007, Second-Printing LightingE281337 E265031 E281240 E270968
Page 104 of 412
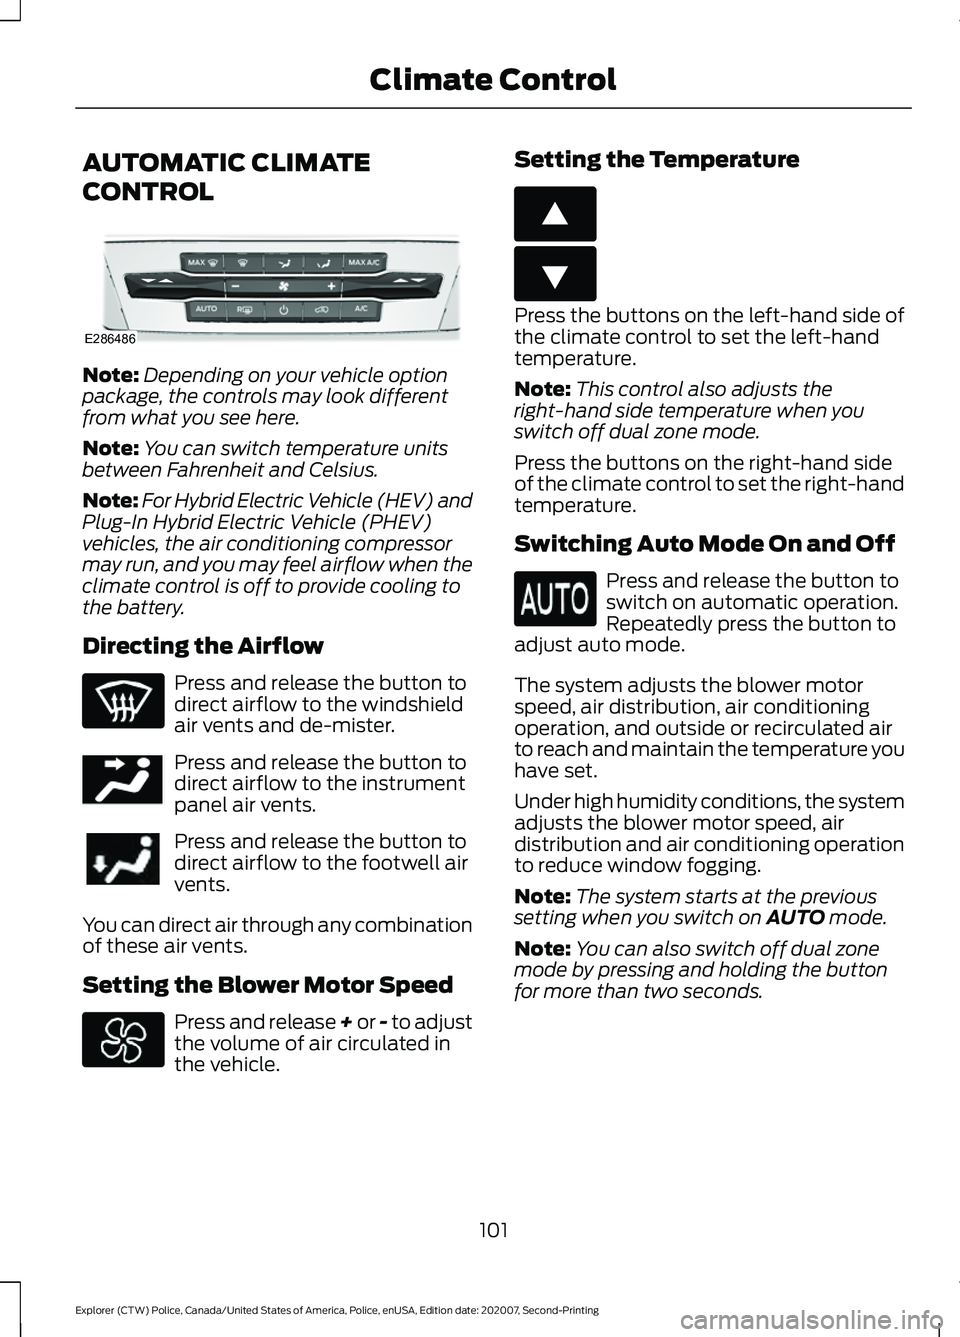
AUTOMATIC CLIMATE
CONTROL
Note:
Depending on your vehicle option
package, the controls may look different
from what you see here.
Note: You can switch temperature units
between Fahrenheit and Celsius.
Note: For Hybrid Electric Vehicle (HEV) and
Plug-In Hybrid Electric Vehicle (PHEV)
vehicles, the air conditioning compressor
may run, and you may feel airflow when the
climate control is off to provide cooling to
the battery.
Directing the Airflow Press and release the button to
direct airflow to the windshield
air vents and de-mister.
Press and release the button to
direct airflow to the instrument
panel air vents.
Press and release the button to
direct airflow to the footwell air
vents.
You can direct air through any combination
of these air vents.
Setting the Blower Motor Speed Press and release + or - to adjust
the volume of air circulated in
the vehicle. Setting the Temperature Press the buttons on the left-hand side of
the climate control to set the left-hand
temperature.
Note:
This control also adjusts the
right-hand side temperature when you
switch off dual zone mode.
Press the buttons on the right-hand side
of the climate control to set the right-hand
temperature.
Switching Auto Mode On and Off Press and release the button to
switch on automatic operation.
Repeatedly press the button to
adjust auto mode.
The system adjusts the blower motor
speed, air distribution, air conditioning
operation, and outside or recirculated air
to reach and maintain the temperature you
have set.
Under high humidity conditions, the system
adjusts the blower motor speed, air
distribution and air conditioning operation
to reduce window fogging.
Note: The system starts at the previous
setting when you switch on AUTO mode.
Note: You can also switch off dual zone
mode by pressing and holding the button
for more than two seconds.
101
Explorer (CTW) Police, Canada/United States of America, Police, enUSA, Edition date: 202007, Second-Printing Climate ControlE286486 E244097 E266187 E266186