display FORD POLICE INTERCEPTOR UTILITY 2014 1.G Workshop Manual
[x] Cancel search | Manufacturer: FORD, Model Year: 2014, Model line: POLICE INTERCEPTOR UTILITY, Model: FORD POLICE INTERCEPTOR UTILITY 2014 1.GPages: 406, PDF Size: 6.86 MB
Page 344 of 406
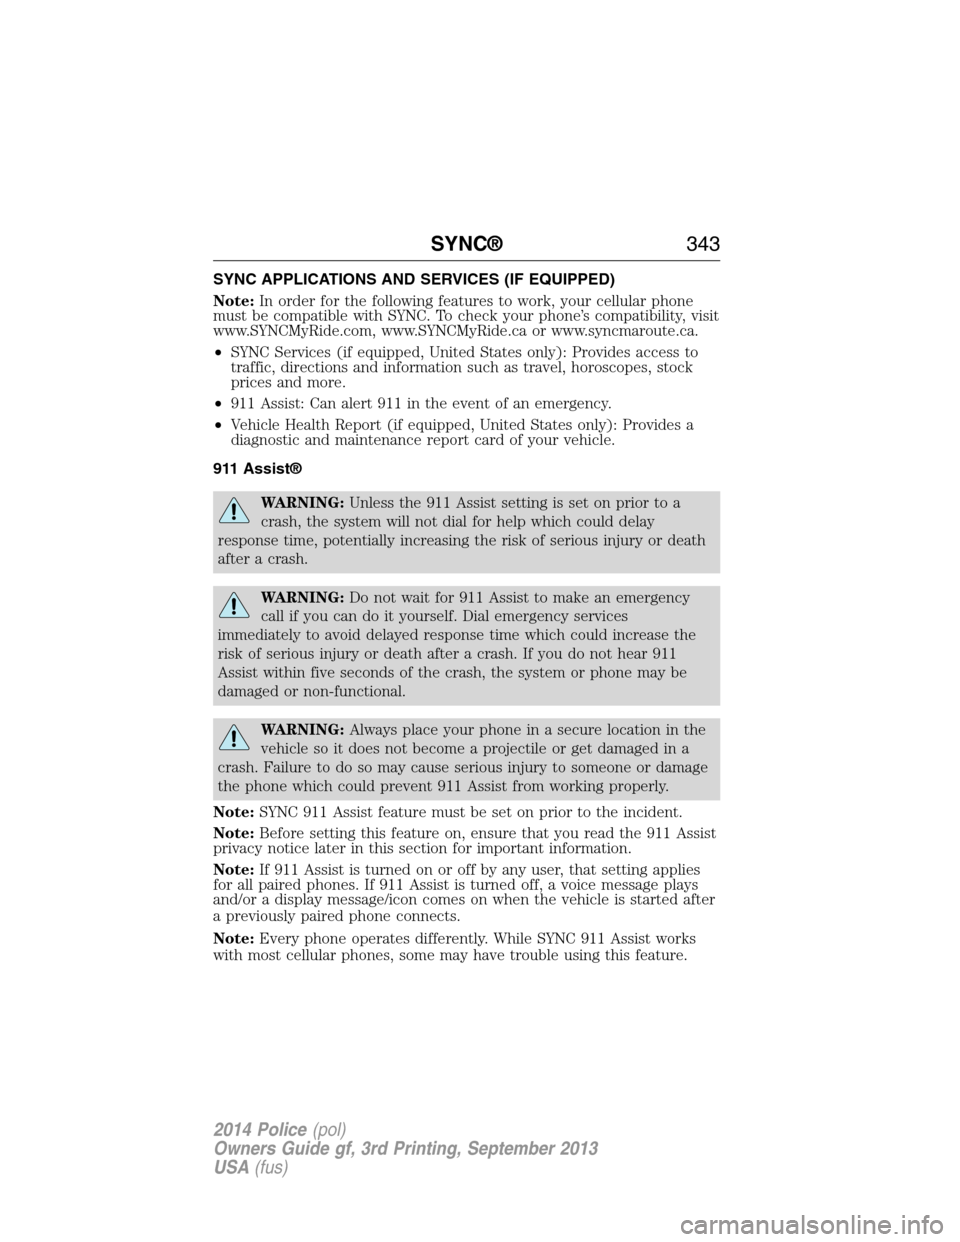
SYNC APPLICATIONS AND SERVICES (IF EQUIPPED)
Note:In order for the following features to work, your cellular phone
must be compatible with SYNC. To check your phone’s compatibility, visit
www.SYNCMyRide.com, www.SYNCMyRide.ca or www.syncmaroute.ca.
•SYNC Services (if equipped, United States only): Provides access to
traffic, directions and information such as travel, horoscopes, stock
prices and more.
•911 Assist: Can alert 911 in the event of an emergency.
•Vehicle Health Report (if equipped, United States only): Provides a
diagnostic and maintenance report card of your vehicle.
911 Assist®
WARNING:Unless the 911 Assist setting is set on prior to a
crash, the system will not dial for help which could delay
response time, potentially increasing the risk of serious injury or death
after a crash.
WARNING:Do not wait for 911 Assist to make an emergency
call if you can do it yourself. Dial emergency services
immediately to avoid delayed response time which could increase the
risk of serious injury or death after a crash. If you do not hear 911
Assist within five seconds of the crash, the system or phone may be
damaged or non-functional.
WARNING:Always place your phone in a secure location in the
vehicle so it does not become a projectile or get damaged in a
crash. Failure to do so may cause serious injury to someone or damage
the phone which could prevent 911 Assist from working properly.
Note:SYNC 911 Assist feature must be set on prior to the incident.
Note:Before setting this feature on, ensure that you read the 911 Assist
privacy notice later in this section for important information.
Note:If 911 Assist is turned on or off by any user, that setting applies
for all paired phones. If 911 Assist is turned off, a voice message plays
and/or a display message/icon comes on when the vehicle is started after
a previously paired phone connects.
Note:Every phone operates differently. While SYNC 911 Assist works
with most cellular phones, some may have trouble using this feature.
SYNC®343
2014 Police(pol)
Owners Guide gf, 3rd Printing, September 2013
USA(fus)
Page 345 of 406
![FORD POLICE INTERCEPTOR UTILITY 2014 1.G Workshop Manual If a crash deploys an airbag (excludes knee airbags and rear inflatable
safety belts [if equipped]) or activates the fuel pump shut-off, your
SYNC equipped vehicle may be able to contact emergency ser FORD POLICE INTERCEPTOR UTILITY 2014 1.G Workshop Manual If a crash deploys an airbag (excludes knee airbags and rear inflatable
safety belts [if equipped]) or activates the fuel pump shut-off, your
SYNC equipped vehicle may be able to contact emergency ser](/img/11/5325/w960_5325-344.png)
If a crash deploys an airbag (excludes knee airbags and rear inflatable
safety belts [if equipped]) or activates the fuel pump shut-off, your
SYNC equipped vehicle may be able to contact emergency services by
dialing 911 through a paired and connected Bluetooth-enabled phone.
For more information about 911 Assist, visit www.SYNCMyRide.com,
www.SYNCMyRide.ca or www.syncmaroute.ca.
•For information on airbag deployment, see theSupplementary
Restraints Systemchapter.
•For information on the fuel pump shut-off, see theRoadside
Emergencieschapter.
Setting 911 Assist On
Perform the following:
1. Press the phone button to enter the Phone Menu.
2. Scroll until 911 Assist is selected.
3. Press OK to confirm and enter the 911 Assist menu.
4. Scroll to select between On and Off selections.
5. Press OK when the desired option appears in the radio display. Set
On or Set Off appears in the display as confirmation.
Off selections include: Off with reminder and Off without reminder. Off
with reminder provides a display and voice reminder at phone
connection at vehicle start. Off without reminder provides a display
reminder only without a voice reminder at phone connection.
To make sure that 911 Assist works properly:
•SYNC must be powered and working properly at the time of the
incident and throughout feature activation and use.
•SYNC 911 Assist feature must be set on prior to the incident.
•A Bluetooth-enabled and compatible phone has to be paired and
connected to SYNC.
•A connected Bluetooth-enabled phone must have the ability to make
and maintain an outgoing call at the time of the incident.
•A connected Bluetooth-enabled phone must have adequate network
coverage, battery power and signal strength.
•The vehicle must have battery power and be located in the United
States, Canada or in a territory in which 911 is the emergency
number.
344SYNC®
2014 Police(pol)
Owners Guide gf, 3rd Printing, September 2013
USA(fus)
Page 350 of 406
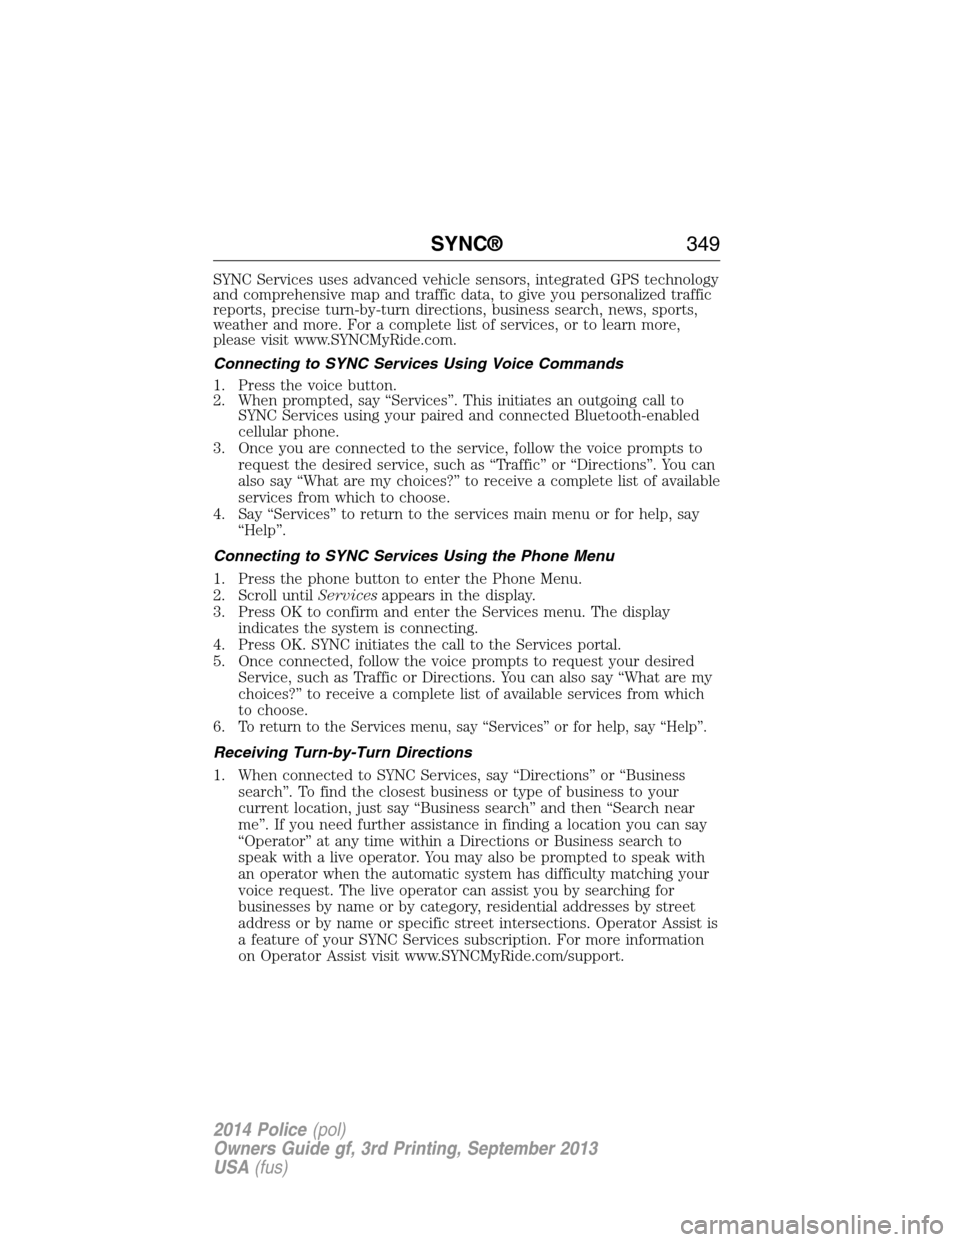
SYNC Services uses advanced vehicle sensors, integrated GPS technology
and comprehensive map and traffic data, to give you personalized traffic
reports, precise turn-by-turn directions, business search, news, sports,
weather and more. For a complete list of services, or to learn more,
please visit www.SYNCMyRide.com.
Connecting to SYNC Services Using Voice Commands
1. Press the voice button.
2. When prompted, say “Services”. This initiates an outgoing call to
SYNC Services using your paired and connected Bluetooth-enabled
cellular phone.
3. Once you are connected to the service, follow the voice prompts to
request the desired service, such as “Traffic” or “Directions”. You can
also say “What are my choices?” to receive a complete list of available
services from which to choose.
4. Say “Services” to return to the services main menu or for help, say
“Help”.
Connecting to SYNC Services Using the Phone Menu
1. Press the phone button to enter the Phone Menu.
2. Scroll untilServicesappears in the display.
3. Press OK to confirm and enter the Services menu. The display
indicates the system is connecting.
4. Press OK. SYNC initiates the call to the Services portal.
5. Once connected, follow the voice prompts to request your desired
Service, such as Traffic or Directions. You can also say “What are my
choices?” to receive a complete list of available services from which
to choose.
6.
To return to the Services menu, say “Services” or for help, say “Help”.
Receiving Turn-by-Turn Directions
1. When connected to SYNC Services, say “Directions” or “Business
search”. To find the closest business or type of business to your
current location, just say “Business search” and then “Search near
me”. If you need further assistance in finding a location you can say
“Operator” at any time within a Directions or Business search to
speak with a live operator. You may also be prompted to speak with
an operator when the automatic system has difficulty matching your
voice request. The live operator can assist you by searching for
businesses by name or by category, residential addresses by street
address or by name or specific street intersections. Operator Assist is
a feature of your SYNC Services subscription. For more information
on Operator Assist visit www.SYNCMyRide.com/support.
SYNC®349
2014 Police(pol)
Owners Guide gf, 3rd Printing, September 2013
USA(fus)
Page 353 of 406
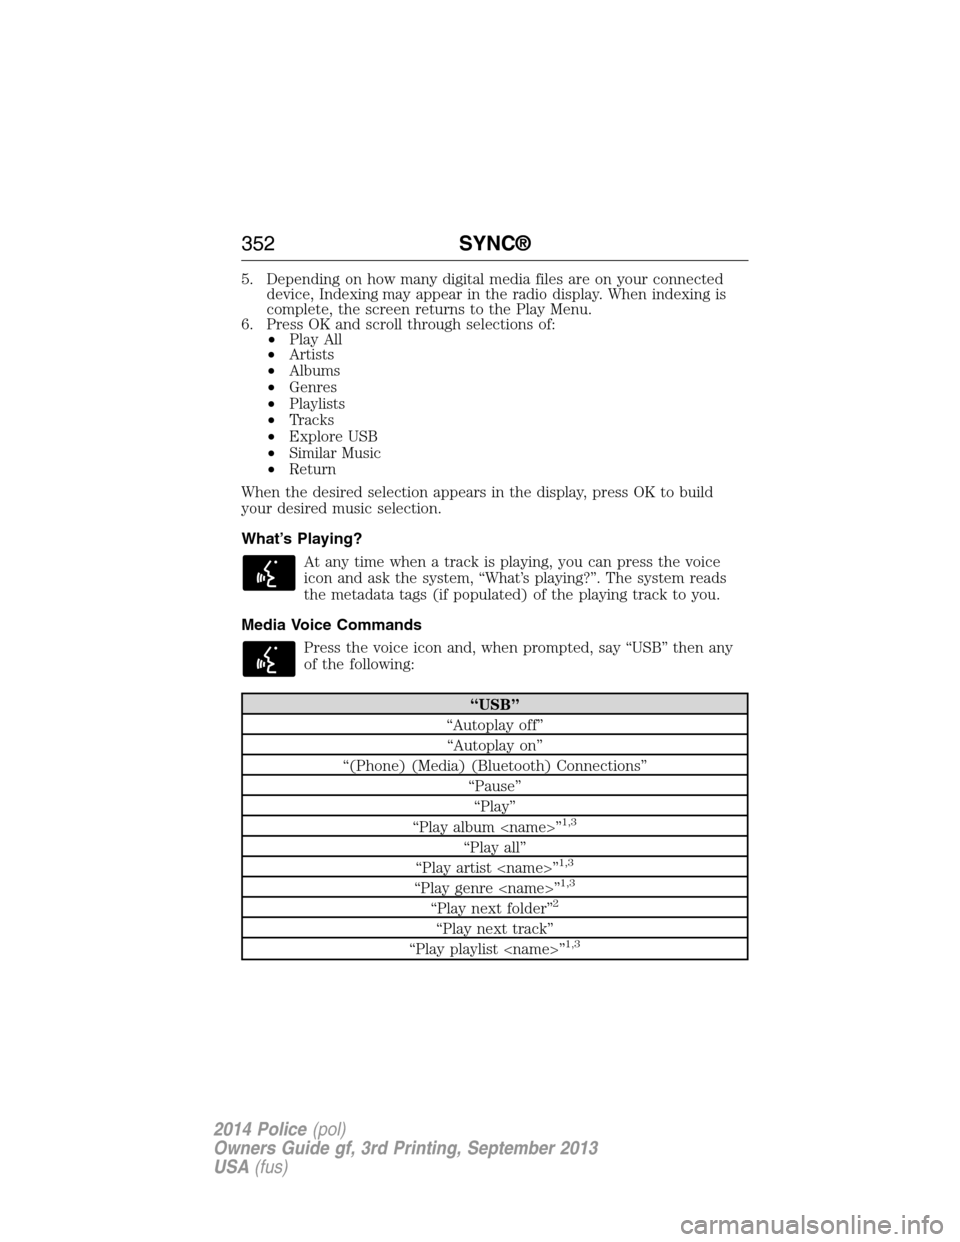
5. Depending on how many digital media files are on your connected
device, Indexing may appear in the radio display. When indexing is
complete, the screen returns to the Play Menu.
6. Press OK and scroll through selections of:
•Play All
•Artists
•Albums
•Genres
•Playlists
•Tracks
•Explore USB
•Similar Music
•Return
When the desired selection appears in the display, press OK to build
your desired music selection.
What’s Playing?
At any time when a track is playing, you can press the voice
icon and ask the system, “What’s playing?”. The system reads
the metadata tags (if populated) of the playing track to you.
Media Voice Commands
Press the voice icon and, when prompted, say “USB” then any
of the following:
“USB”
“Autoplay off”
“Autoplay on”
“(Phone) (Media) (Bluetooth) Connections”
“Pause”
“Play”
“Play album
1,3
“Play all”
“Play artist
“Play genre
“Play next folder”2
“Play next track”
“Play playlist
352SYNC®
2014 Police(pol)
Owners Guide gf, 3rd Printing, September 2013
USA(fus)
Page 359 of 406
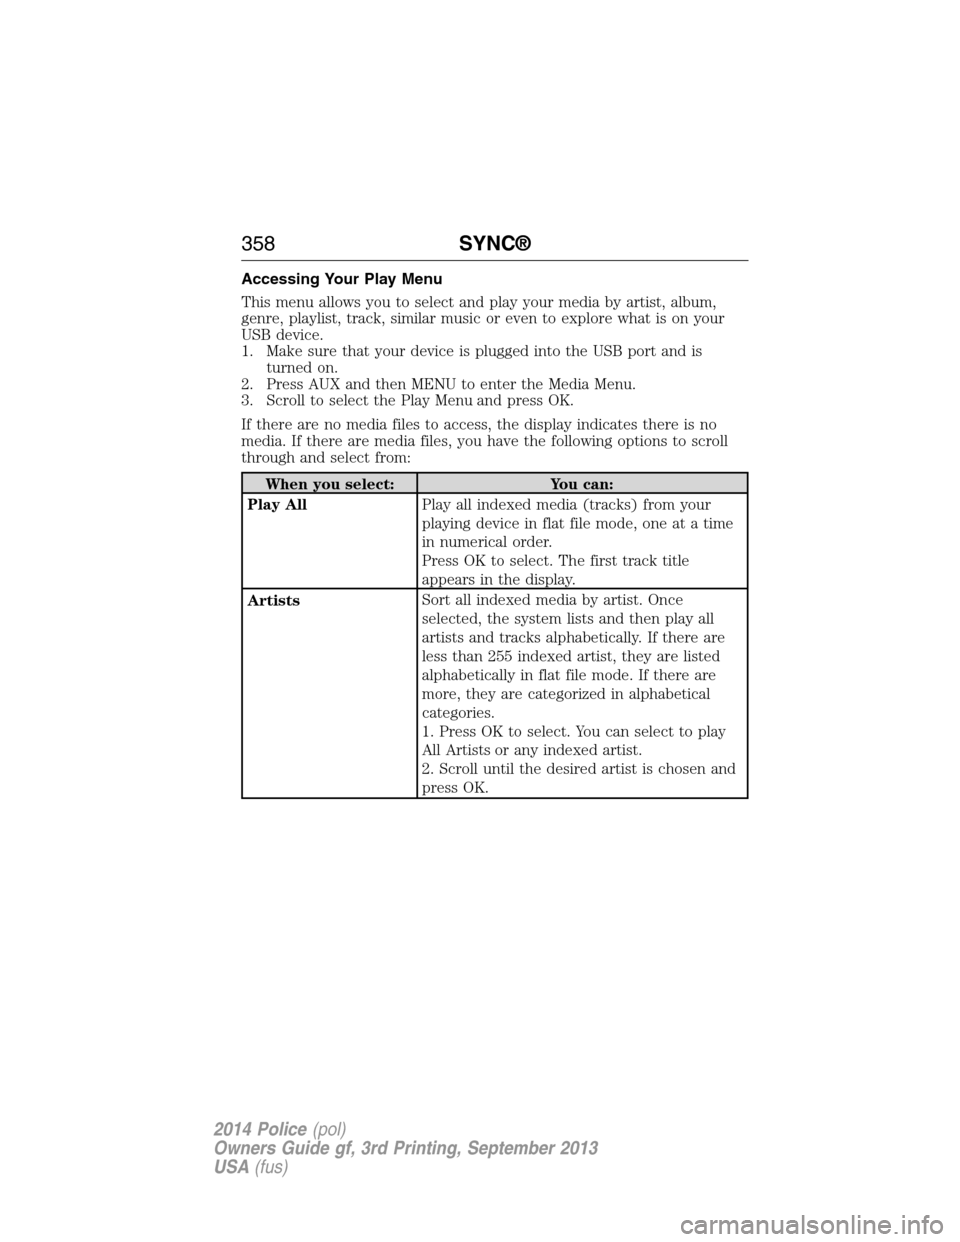
Accessing Your Play Menu
This menu allows you to select and play your media by artist, album,
genre, playlist, track, similar music or even to explore what is on your
USB device.
1. Make sure that your device is plugged into the USB port and is
turned on.
2. Press AUX and then MENU to enter the Media Menu.
3. Scroll to select the Play Menu and press OK.
If there are no media files to access, the display indicates there is no
media. If there are media files, you have the following options to scroll
through and select from:
When you select: You can:
Play AllPlay all indexed media (tracks) from your
playing device in flat file mode, one at a time
in numerical order.
Press OK to select. The first track title
appears in the display.
ArtistsSort all indexed media by artist. Once
selected, the system lists and then play all
artists and tracks alphabetically. If there are
less than 255 indexed artist, they are listed
alphabetically in flat file mode. If there are
more, they are categorized in alphabetical
categories.
1. Press OK to select. You can select to play
All Artists or any indexed artist.
2. Scroll until the desired artist is chosen and
press OK.
358SYNC®
2014 Police(pol)
Owners Guide gf, 3rd Printing, September 2013
USA(fus)
Page 362 of 406
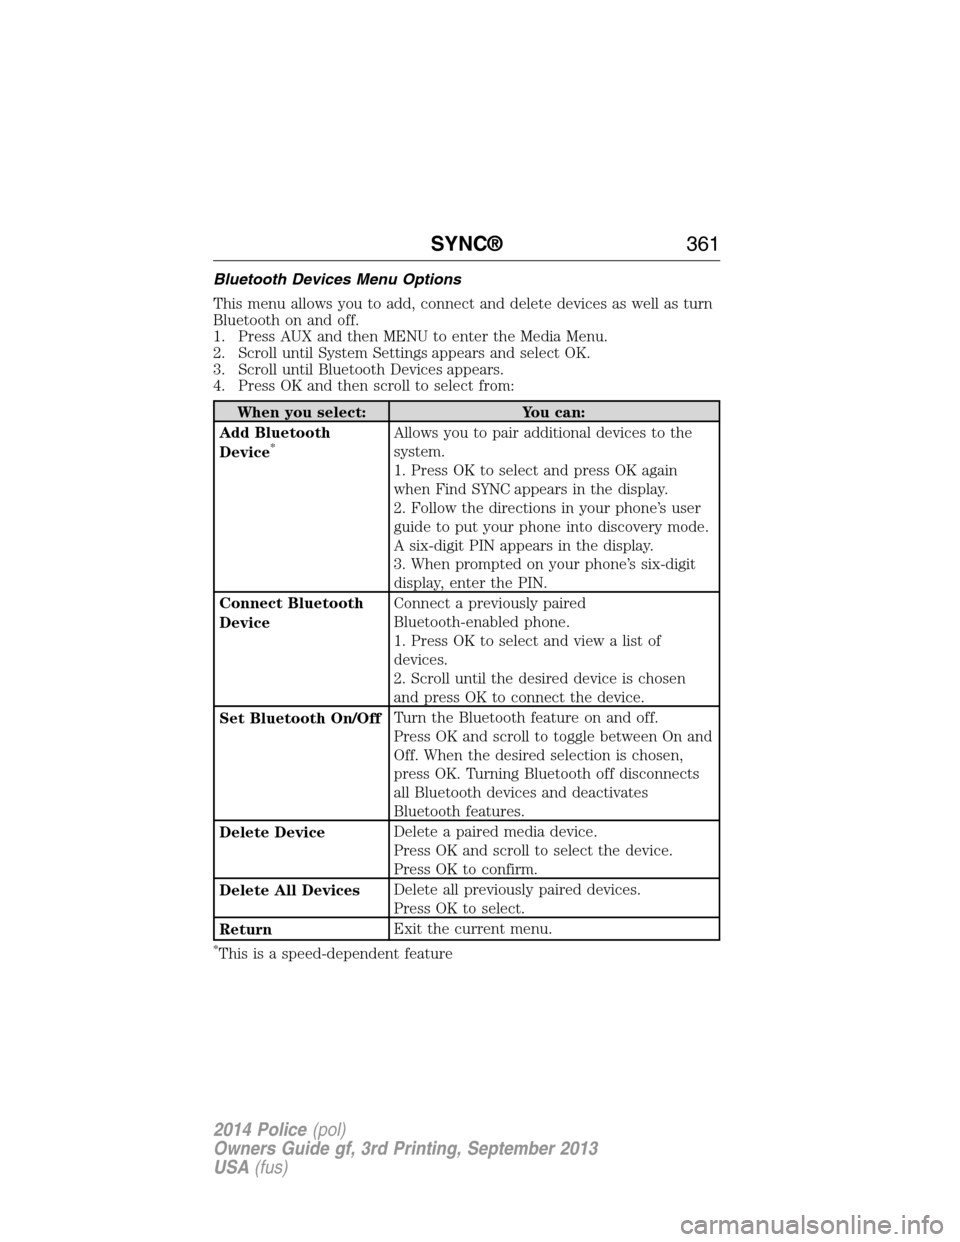
Bluetooth Devices Menu Options
This menu allows you to add, connect and delete devices as well as turn
Bluetooth on and off.
1. Press AUX and then MENU to enter the Media Menu.
2. Scroll until System Settings appears and select OK.
3. Scroll until Bluetooth Devices appears.
4. Press OK and then scroll to select from:
When you select: You can:
Add Bluetooth
Device
*Allows you to pair additional devices to the
system.
1. Press OK to select and press OK again
when Find SYNC appears in the display.
2. Follow the directions in your phone’s user
guide to put your phone into discovery mode.
A six-digit PIN appears in the display.
3. When prompted on your phone’s six-digit
display, enter the PIN.
Connect Bluetooth
DeviceConnect a previously paired
Bluetooth-enabled phone.
1. Press OK to select and view a list of
devices.
2. Scroll until the desired device is chosen
and press OK to connect the device.
Set Bluetooth On/OffTurn the Bluetooth feature on and off.
Press OK and scroll to toggle between On and
Off. When the desired selection is chosen,
press OK. Turning Bluetooth off disconnects
all Bluetooth devices and deactivates
Bluetooth features.
Delete DeviceDelete a paired media device.
Press OK and scroll to select the device.
Press OK to confirm.
Delete All DevicesDelete all previously paired devices.
Press OK to select.
ReturnExit the current menu.
*This is a speed-dependent feature
SYNC®361
2014 Police(pol)
Owners Guide gf, 3rd Printing, September 2013
USA(fus)
Page 363 of 406
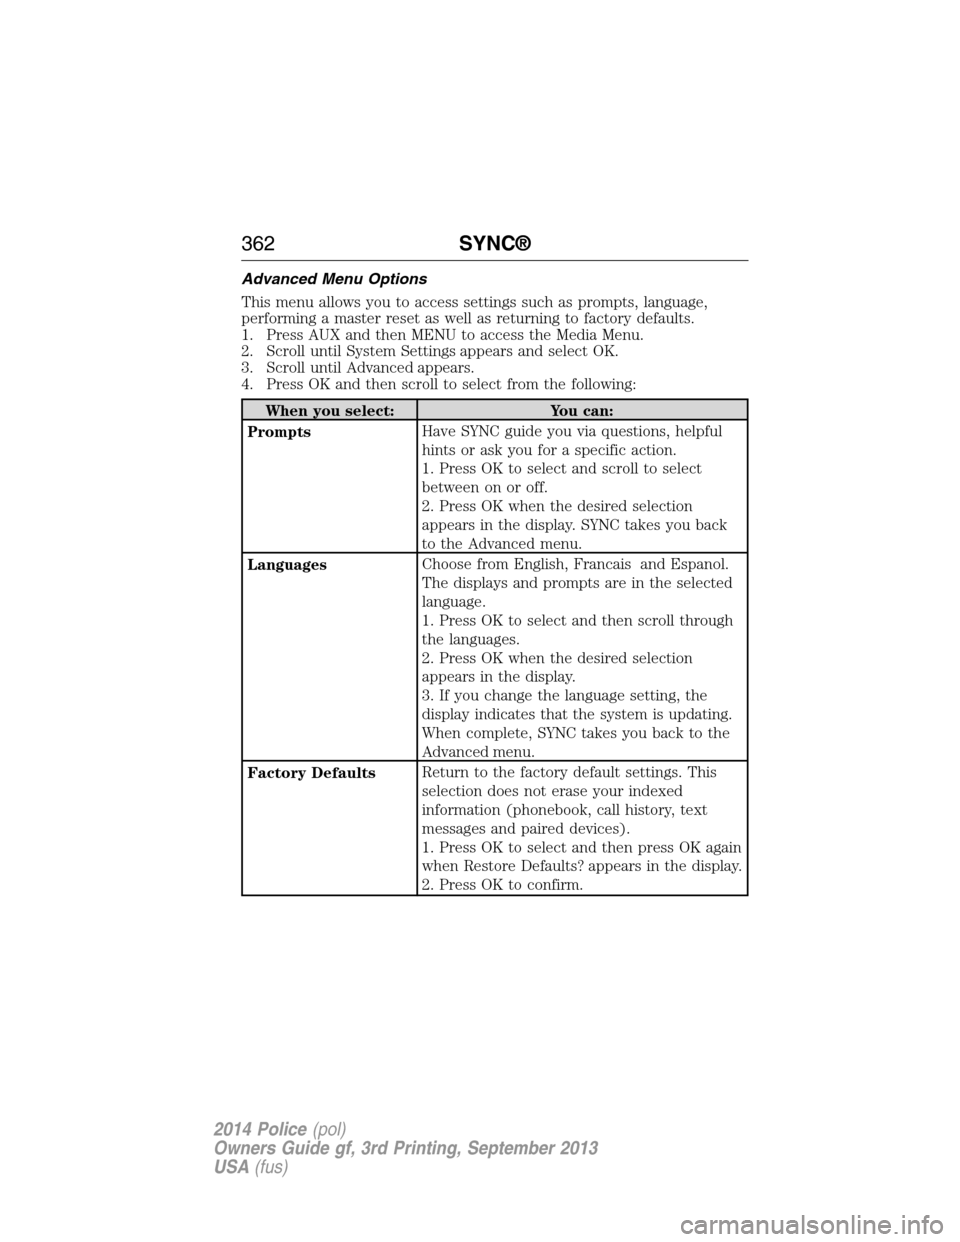
Advanced Menu Options
This menu allows you to access settings such as prompts, language,
performing a master reset as well as returning to factory defaults.
1. Press AUX and then MENU to access the Media Menu.
2. Scroll until System Settings appears and select OK.
3. Scroll until Advanced appears.
4. Press OK and then scroll to select from the following:
When you select: You can:
PromptsHave SYNC guide you via questions, helpful
hints or ask you for a specific action.
1. Press OK to select and scroll to select
between on or off.
2. Press OK when the desired selection
appears in the display. SYNC takes you back
to the Advanced menu.
LanguagesChoose from English, Francais and Espanol.
The displays and prompts are in the selected
language.
1. Press OK to select and then scroll through
the languages.
2. Press OK when the desired selection
appears in the display.
3. If you change the language setting, the
display indicates that the system is updating.
When complete, SYNC takes you back to the
Advanced menu.
Factory DefaultsReturn to the factory default settings. This
selection does not erase your indexed
information (phonebook, call history, text
messages and paired devices).
1. Press OK to select and then press OK again
when Restore Defaults? appears in the display.
2. Press OK to confirm.
362SYNC®
2014 Police(pol)
Owners Guide gf, 3rd Printing, September 2013
USA(fus)
Page 382 of 406
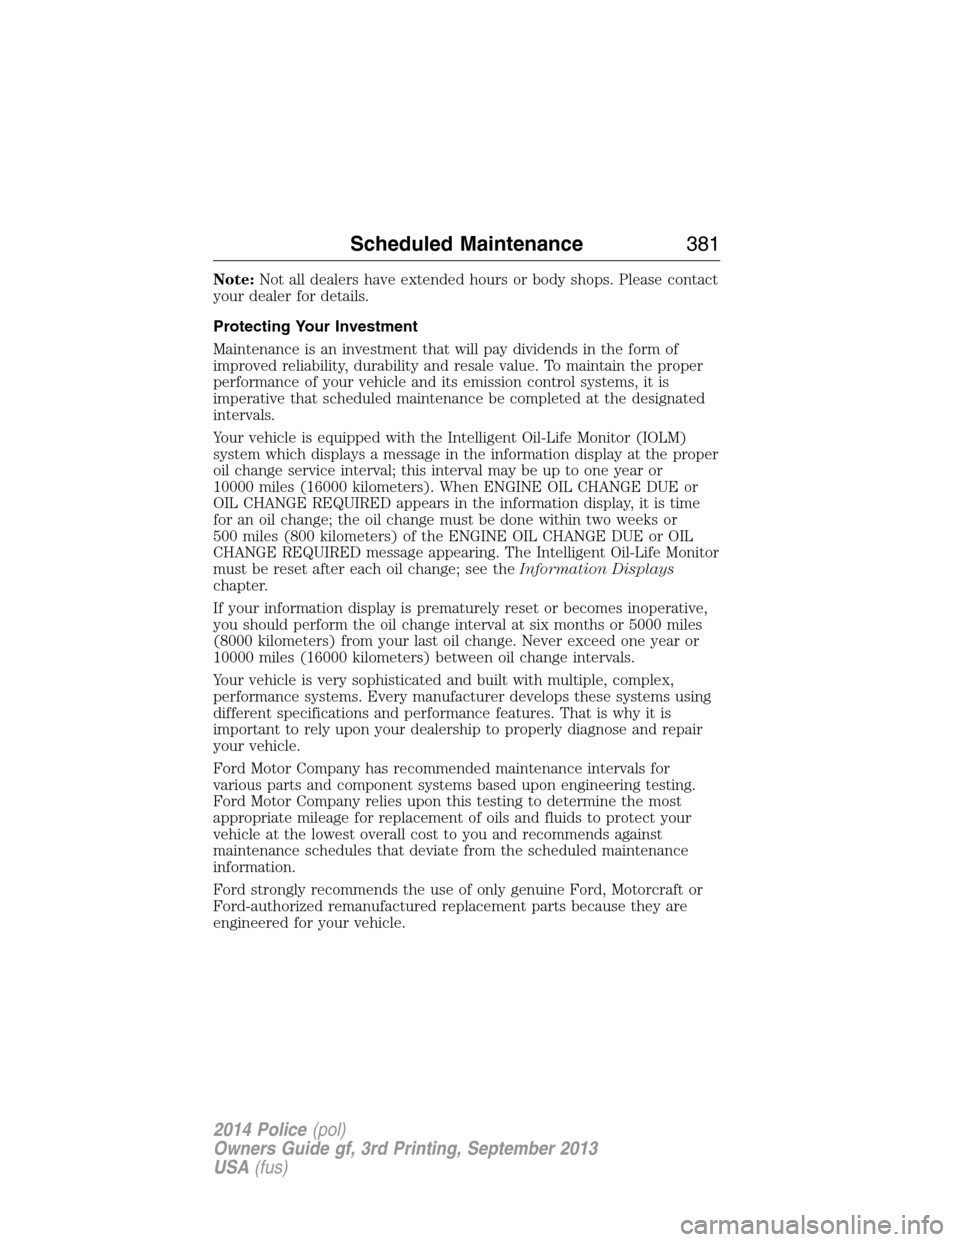
Note:Not all dealers have extended hours or body shops. Please contact
your dealer for details.
Protecting Your Investment
Maintenance is an investment that will pay dividends in the form of
improved reliability, durability and resale value. To maintain the proper
performance of your vehicle and its emission control systems, it is
imperative that scheduled maintenance be completed at the designated
intervals.
Your vehicle is equipped with the Intelligent Oil-Life Monitor (IOLM)
system which displays a message in the information display at the proper
oil change service interval; this interval may be up to one year or
10000 miles (16000 kilometers). When ENGINE OIL CHANGE DUE or
OIL CHANGE REQUIRED appears in the information display, it is time
for an oil change; the oil change must be done within two weeks or
500 miles (800 kilometers) of the ENGINE OIL CHANGE DUE or OIL
CHANGE REQUIRED message appearing. The Intelligent Oil-Life Monitor
must be reset after each oil change; see theInformation Displays
chapter.
If your information display is prematurely reset or becomes inoperative,
you should perform the oil change interval at six months or 5000 miles
(8000 kilometers) from your last oil change. Never exceed one year or
10000 miles (16000 kilometers) between oil change intervals.
Your vehicle is very sophisticated and built with multiple, complex,
performance systems. Every manufacturer develops these systems using
different specifications and performance features. That is why it is
important to rely upon your dealership to properly diagnose and repair
your vehicle.
Ford Motor Company has recommended maintenance intervals for
various parts and component systems based upon engineering testing.
Ford Motor Company relies upon this testing to determine the most
appropriate mileage for replacement of oils and fluids to protect your
vehicle at the lowest overall cost to you and recommends against
maintenance schedules that deviate from the scheduled maintenance
information.
Ford strongly recommends the use of only genuine Ford, Motorcraft or
Ford-authorized remanufactured replacement parts because they are
engineered for your vehicle.
Scheduled Maintenance381
2014 Police(pol)
Owners Guide gf, 3rd Printing, September 2013
USA(fus)
Page 386 of 406
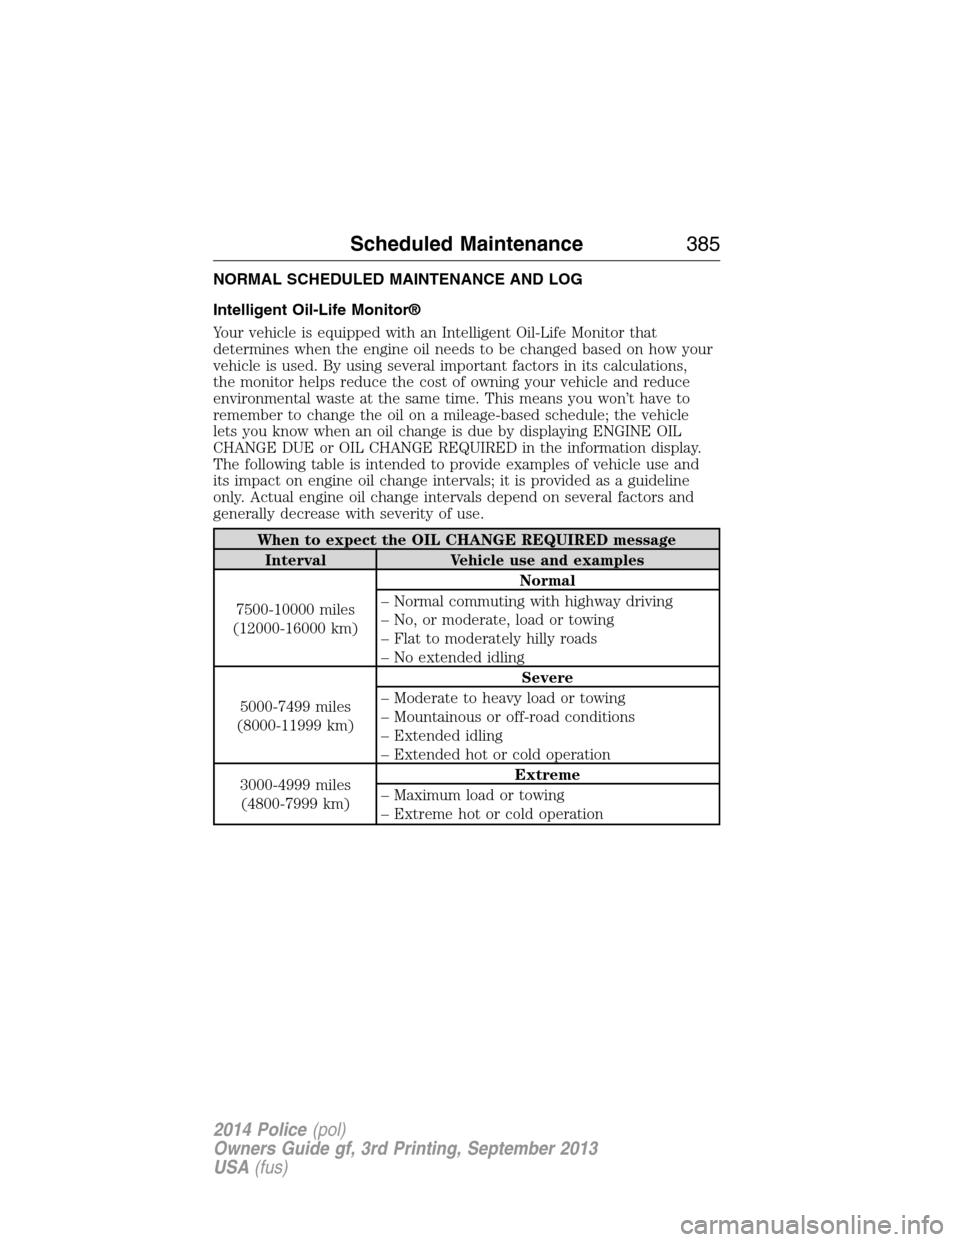
NORMAL SCHEDULED MAINTENANCE AND LOG
Intelligent Oil-Life Monitor®
Your vehicle is equipped with an Intelligent Oil-Life Monitor that
determines when the engine oil needs to be changed based on how your
vehicle is used. By using several important factors in its calculations,
the monitor helps reduce the cost of owning your vehicle and reduce
environmental waste at the same time. This means you won’t have to
remember to change the oil on a mileage-based schedule; the vehicle
lets you know when an oil change is due by displaying ENGINE OIL
CHANGE DUE or OIL CHANGE REQUIRED in the information display.
The following table is intended to provide examples of vehicle use and
its impact on engine oil change intervals; it is provided as a guideline
only. Actual engine oil change intervals depend on several factors and
generally decrease with severity of use.
When to expect the OIL CHANGE REQUIRED message
Interval Vehicle use and examples
7500-10000 miles
(12000-16000 km)Normal
– Normal commuting with highway driving
– No, or moderate, load or towing
– Flat to moderately hilly roads
– No extended idling
5000-7499 miles
(8000-11999 km)Severe
– Moderate to heavy load or towing
– Mountainous or off-road conditions
– Extended idling
– Extended hot or cold operation
3000-4999 miles
(4800-7999 km)Extreme
– Maximum load or towing
– Extreme hot or cold operation
Scheduled Maintenance385
2014 Police(pol)
Owners Guide gf, 3rd Printing, September 2013
USA(fus)
Page 387 of 406
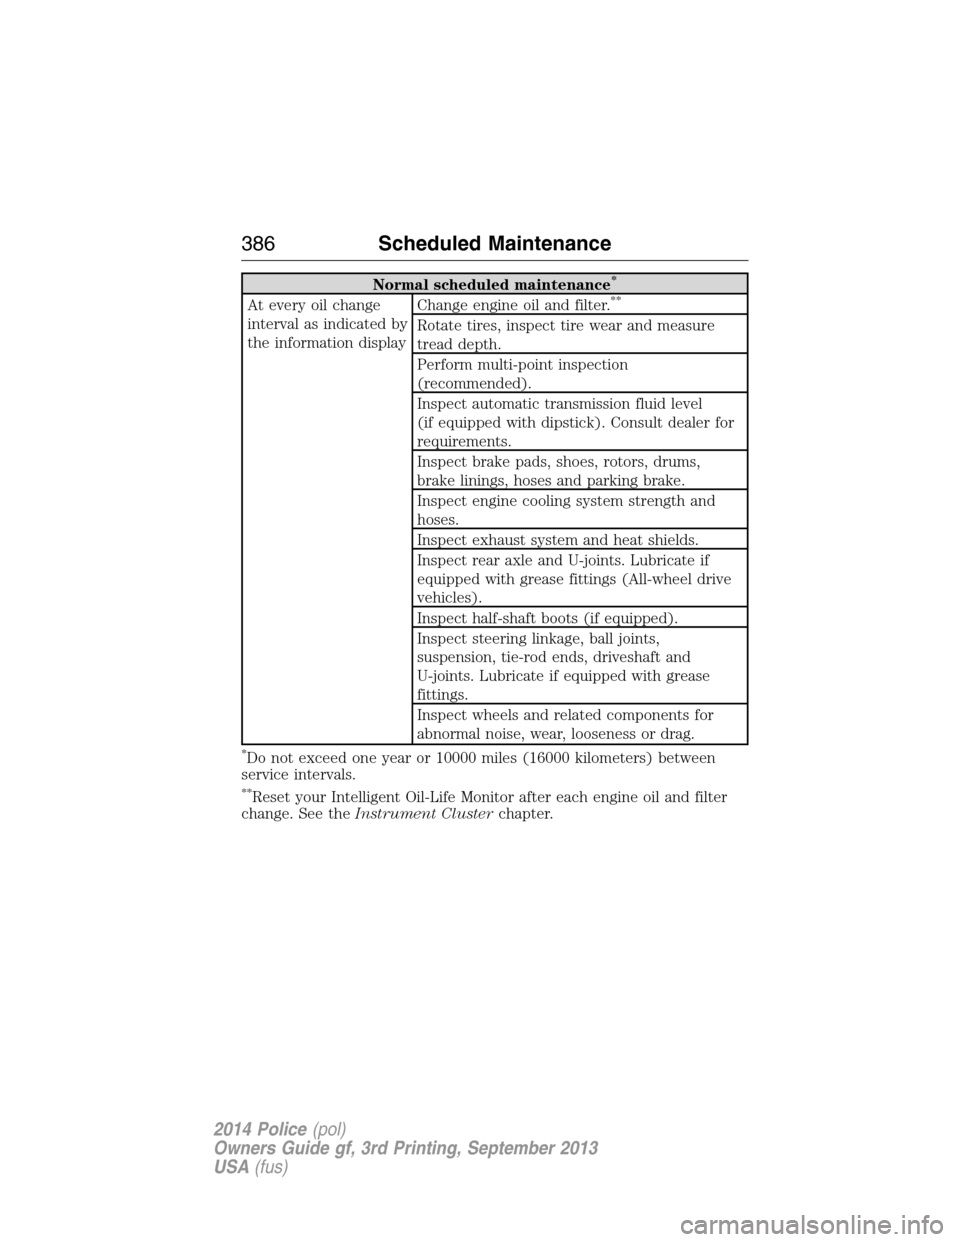
Normal scheduled maintenance*
At every oil change
interval as indicated by
the information displayChange engine oil and filter.**
Rotate tires, inspect tire wear and measure
tread depth.
Perform multi-point inspection
(recommended).
Inspect automatic transmission fluid level
(if equipped with dipstick). Consult dealer for
requirements.
Inspect brake pads, shoes, rotors, drums,
brake linings, hoses and parking brake.
Inspect engine cooling system strength and
hoses.
Inspect exhaust system and heat shields.
Inspect rear axle and U-joints. Lubricate if
equipped with grease fittings (All-wheel drive
vehicles).
Inspect half-shaft boots (if equipped).
Inspect steering linkage, ball joints,
suspension, tie-rod ends, driveshaft and
U-joints. Lubricate if equipped with grease
fittings.
Inspect wheels and related components for
abnormal noise, wear, looseness or drag.
*Do not exceed one year or 10000 miles (16000 kilometers) between
service intervals.
**Reset your Intelligent Oil-Life Monitor after each engine oil and filter
change. See theInstrument Clusterchapter.
386Scheduled Maintenance
2014 Police(pol)
Owners Guide gf, 3rd Printing, September 2013
USA(fus)