display FORD POLICE INTERCEPTOR UTILITY 2016 1.G Repair Manual
[x] Cancel search | Manufacturer: FORD, Model Year: 2016, Model line: POLICE INTERCEPTOR UTILITY, Model: FORD POLICE INTERCEPTOR UTILITY 2016 1.GPages: 350, PDF Size: 3.58 MB
Page 274 of 350
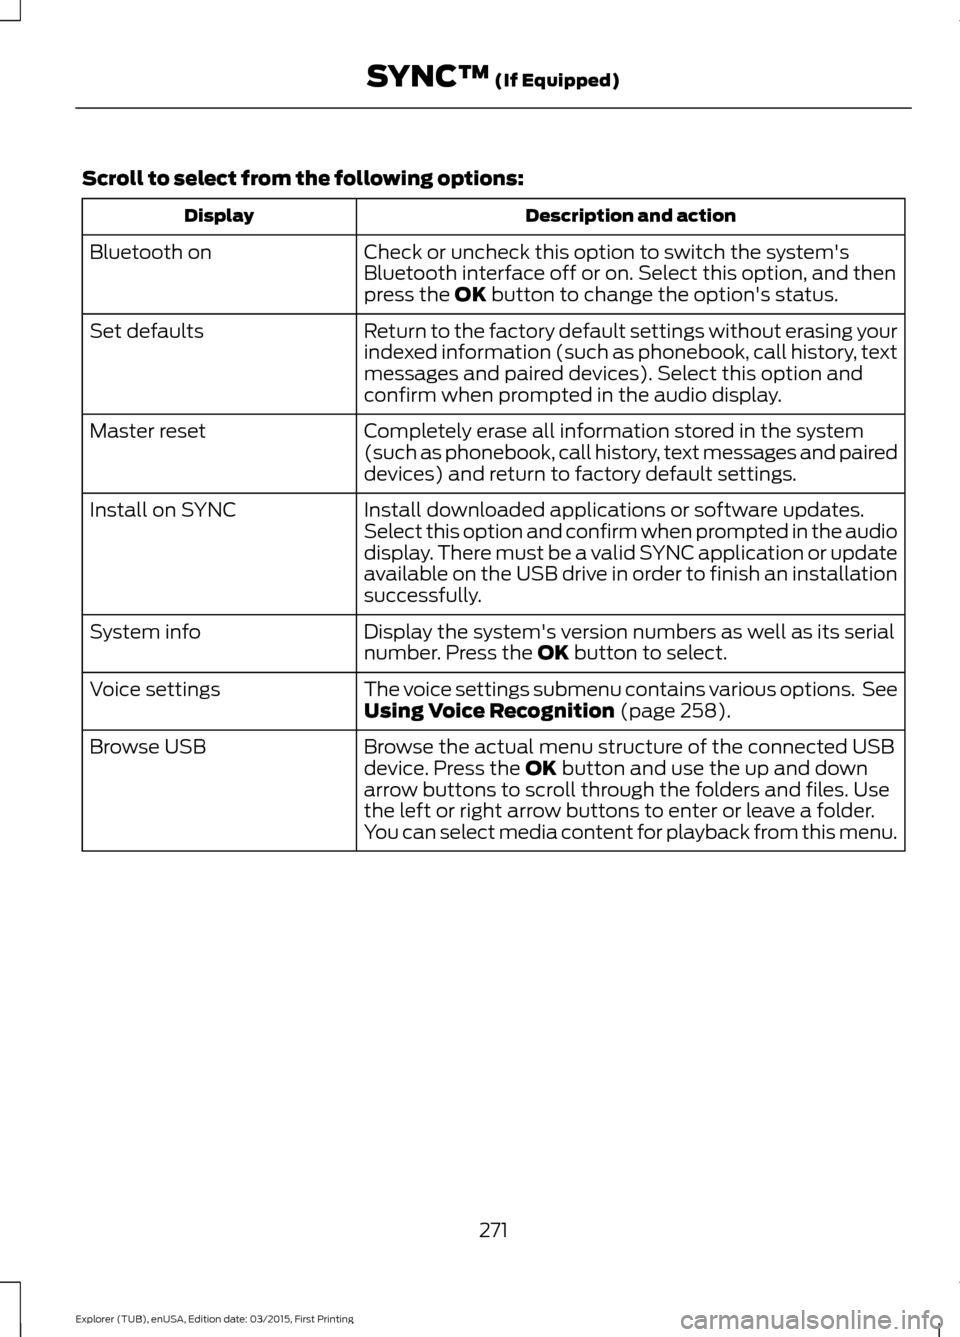
Scroll to select from the following options:
Description and action
Display
Check or uncheck this option to switch the system's
Bluetooth interface off or on. Select this option, and then
press the OK button to change the option's status.
Bluetooth on
Return to the factory default settings without erasing your
indexed information (such as phonebook, call history, text
messages and paired devices). Select this option and
confirm when prompted in the audio display.
Set defaults
Completely erase all information stored in the system
(such as phonebook, call history, text messages and paired
devices) and return to factory default settings.
Master reset
Install downloaded applications or software updates.
Select this option and confirm when prompted in the audio
display. There must be a valid SYNC application or update
available on the USB drive in order to finish an installation
successfully.
Install on SYNC
Display the system's version numbers as well as its serial
number. Press the
OK button to select.
System info
The voice settings submenu contains various options. See
Using Voice Recognition
(page 258).
Voice settings
Browse the actual menu structure of the connected USB
device. Press the
OK button and use the up and down
arrow buttons to scroll through the folders and files. Use
the left or right arrow buttons to enter or leave a folder.
You can select media content for playback from this menu.
Browse USB
271
Explorer (TUB), enUSA, Edition date: 03/2015, First Printing SYNC™
(If Equipped)
Page 275 of 350
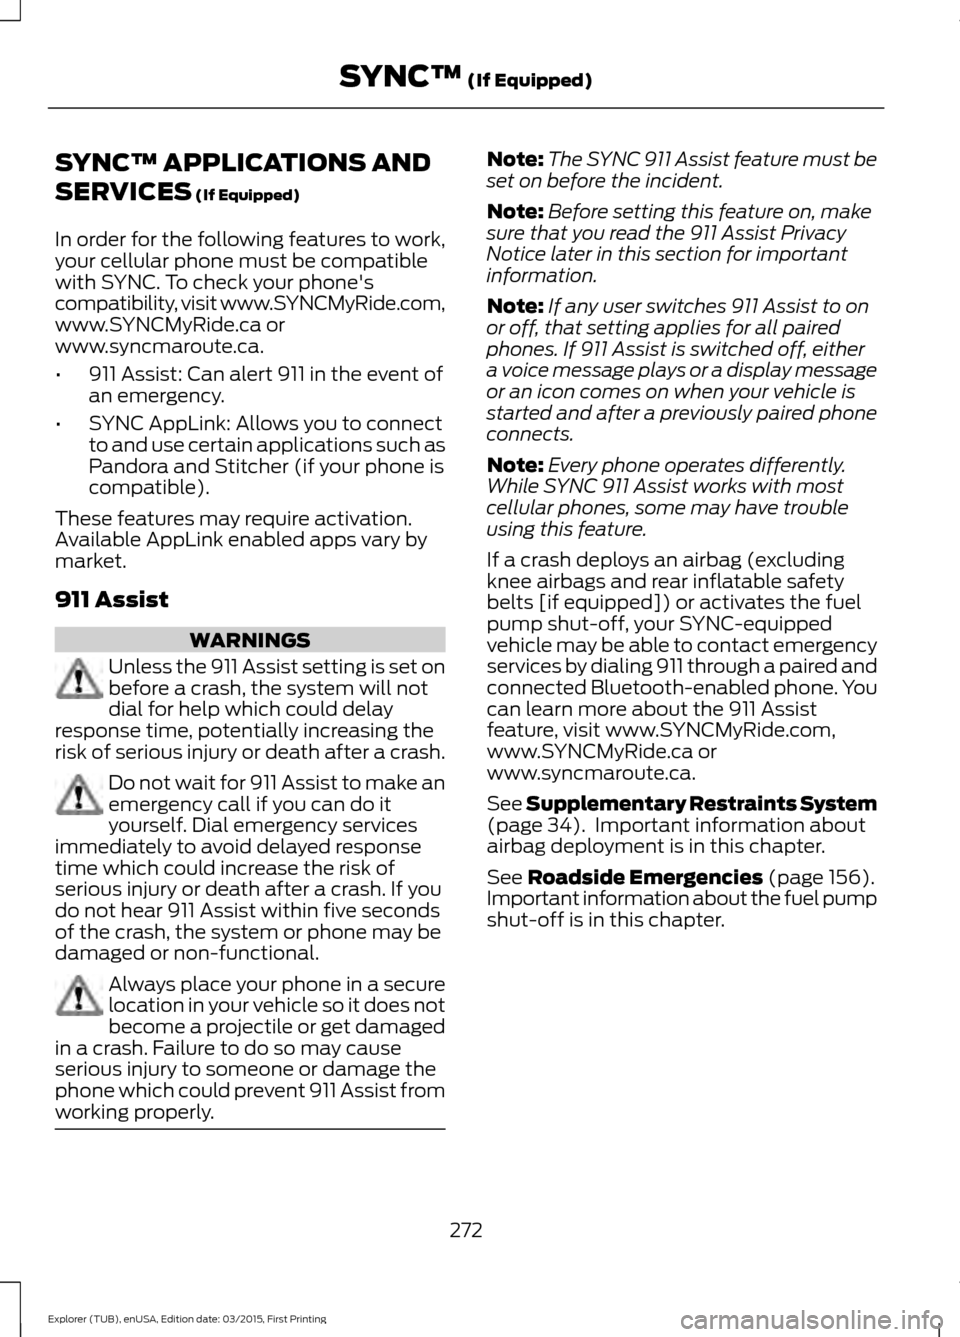
SYNC™ APPLICATIONS AND
SERVICES (If Equipped)
In order for the following features to work,
your cellular phone must be compatible
with SYNC. To check your phone's
compatibility, visit www.SYNCMyRide.com,
www.SYNCMyRide.ca or
www.syncmaroute.ca.
• 911 Assist: Can alert 911 in the event of
an emergency.
• SYNC AppLink: Allows you to connect
to and use certain applications such as
Pandora and Stitcher (if your phone is
compatible).
These features may require activation.
Available AppLink enabled apps vary by
market.
911 Assist WARNINGS
Unless the 911 Assist setting is set on
before a crash, the system will not
dial for help which could delay
response time, potentially increasing the
risk of serious injury or death after a crash. Do not wait for 911 Assist to make an
emergency call if you can do it
yourself. Dial emergency services
immediately to avoid delayed response
time which could increase the risk of
serious injury or death after a crash. If you
do not hear 911 Assist within five seconds
of the crash, the system or phone may be
damaged or non-functional. Always place your phone in a secure
location in your vehicle so it does not
become a projectile or get damaged
in a crash. Failure to do so may cause
serious injury to someone or damage the
phone which could prevent 911 Assist from
working properly. Note:
The SYNC 911 Assist feature must be
set on before the incident.
Note: Before setting this feature on, make
sure that you read the 911 Assist Privacy
Notice later in this section for important
information.
Note: If any user switches 911 Assist to on
or off, that setting applies for all paired
phones. If 911 Assist is switched off, either
a voice message plays or a display message
or an icon comes on when your vehicle is
started and after a previously paired phone
connects.
Note: Every phone operates differently.
While SYNC 911 Assist works with most
cellular phones, some may have trouble
using this feature.
If a crash deploys an airbag (excluding
knee airbags and rear inflatable safety
belts [if equipped]) or activates the fuel
pump shut-off, your SYNC-equipped
vehicle may be able to contact emergency
services by dialing 911 through a paired and
connected Bluetooth-enabled phone. You
can learn more about the 911 Assist
feature, visit www.SYNCMyRide.com,
www.SYNCMyRide.ca or
www.syncmaroute.ca.
See
Supplementary Restraints System
(page 34). Important information about
airbag deployment is in this chapter.
See
Roadside Emergencies (page 156).
Important information about the fuel pump
shut-off is in this chapter.
272
Explorer (TUB), enUSA, Edition date: 03/2015, First Printing SYNC™
(If Equipped)
Page 276 of 350
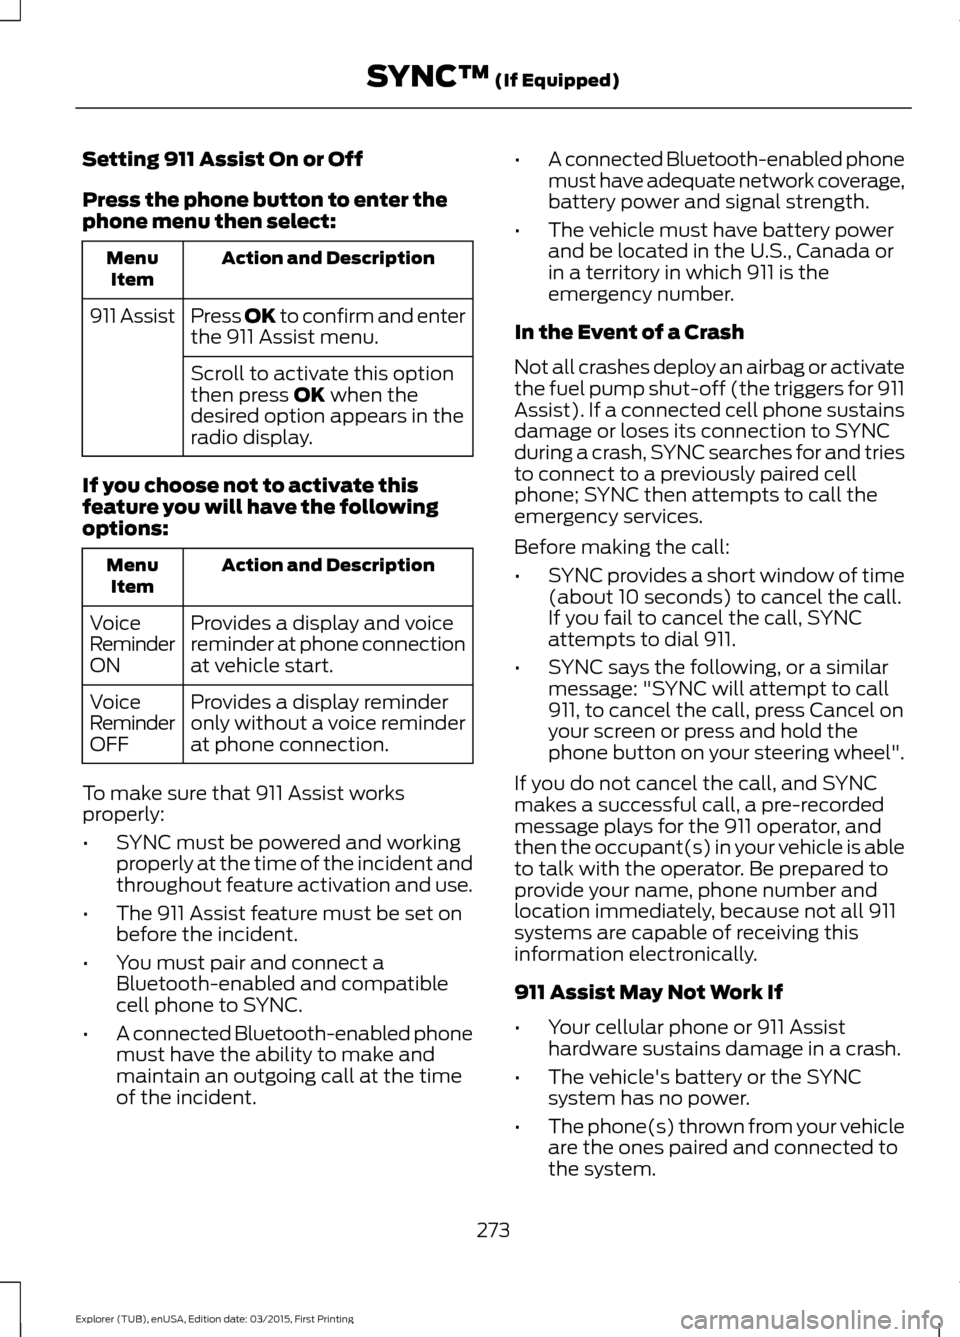
Setting 911 Assist On or Off
Press the phone button to enter the
phone menu then select:
Action and Description
Menu
Item
Press OK to confirm and enter
the 911 Assist menu.
911 Assist
Scroll to activate this option
then press OK when the
desired option appears in the
radio display.
If you choose not to activate this
feature you will have the following
options: Action and Description
Menu
Item
Provides a display and voice
reminder at phone connection
at vehicle start.
Voice
Reminder
ON
Provides a display reminder
only without a voice reminder
at phone connection.
Voice
Reminder
OFF
To make sure that 911 Assist works
properly:
• SYNC must be powered and working
properly at the time of the incident and
throughout feature activation and use.
• The 911 Assist feature must be set on
before the incident.
• You must pair and connect a
Bluetooth-enabled and compatible
cell phone to SYNC.
• A connected Bluetooth-enabled phone
must have the ability to make and
maintain an outgoing call at the time
of the incident. •
A connected Bluetooth-enabled phone
must have adequate network coverage,
battery power and signal strength.
• The vehicle must have battery power
and be located in the U.S., Canada or
in a territory in which 911 is the
emergency number.
In the Event of a Crash
Not all crashes deploy an airbag or activate
the fuel pump shut-off (the triggers for 911
Assist). If a connected cell phone sustains
damage or loses its connection to SYNC
during a crash, SYNC searches for and tries
to connect to a previously paired cell
phone; SYNC then attempts to call the
emergency services.
Before making the call:
• SYNC provides a short window of time
(about 10 seconds) to cancel the call.
If you fail to cancel the call, SYNC
attempts to dial 911.
• SYNC says the following, or a similar
message: "SYNC will attempt to call
911, to cancel the call, press Cancel on
your screen or press and hold the
phone button on your steering wheel".
If you do not cancel the call, and SYNC
makes a successful call, a pre-recorded
message plays for the 911 operator, and
then the occupant(s) in your vehicle is able
to talk with the operator. Be prepared to
provide your name, phone number and
location immediately, because not all 911
systems are capable of receiving this
information electronically.
911 Assist May Not Work If
• Your cellular phone or 911 Assist
hardware sustains damage in a crash.
• The vehicle's battery or the SYNC
system has no power.
• The phone(s) thrown from your vehicle
are the ones paired and connected to
the system.
273
Explorer (TUB), enUSA, Edition date: 03/2015, First Printing SYNC™
(If Equipped)
Page 279 of 350
•
To allow your vehicle to provide
location information, including: GPS
and speed.
• To allow the app to send push
notifications using the vehicle display
and voice capabilities while running in
a background state. Push notifications
may be particularly useful for news or location based apps.
Note: You only need to grant permissions
the first time you use an app with SYNC.
Note: Ford is not responsible or liable for
any damages or loss of privacy relating to
usage of an app, or dissemination of any
vehicle data that you approve Ford to
provide to an app.
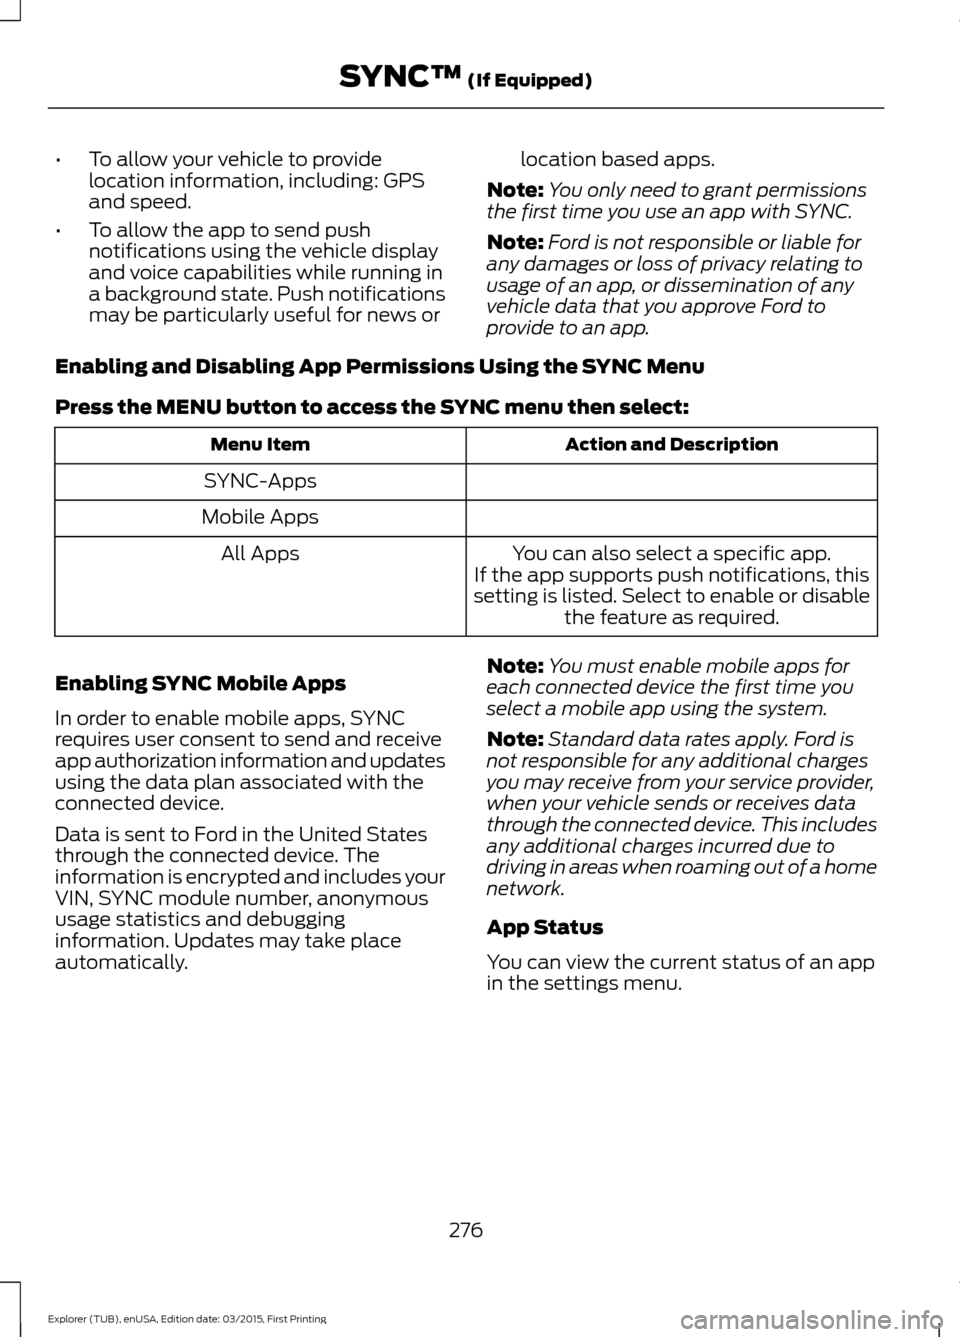
Enabling and Disabling App Permissions Using the SYNC Menu
Press the MENU button to access the SYNC menu then select: Action and Description
Menu Item
SYNC-Apps
Mobile Apps You can also select a specific app.
If the app supports push notifications, this
setting is listed. Select to enable or disable the feature as required.
All Apps
Enabling SYNC Mobile Apps
In order to enable mobile apps, SYNC
requires user consent to send and receive
app authorization information and updates
using the data plan associated with the
connected device.
Data is sent to Ford in the United States
through the connected device. The
information is encrypted and includes your
VIN, SYNC module number, anonymous
usage statistics and debugging
information. Updates may take place
automatically. Note:
You must enable mobile apps for
each connected device the first time you
select a mobile app using the system.
Note: Standard data rates apply. Ford is
not responsible for any additional charges
you may receive from your service provider,
when your vehicle sends or receives data
through the connected device. This includes
any additional charges incurred due to
driving in areas when roaming out of a home
network.
App Status
You can view the current status of an app
in the settings menu.
276
Explorer (TUB), enUSA, Edition date: 03/2015, First Printing SYNC™
(If Equipped)
Page 281 of 350
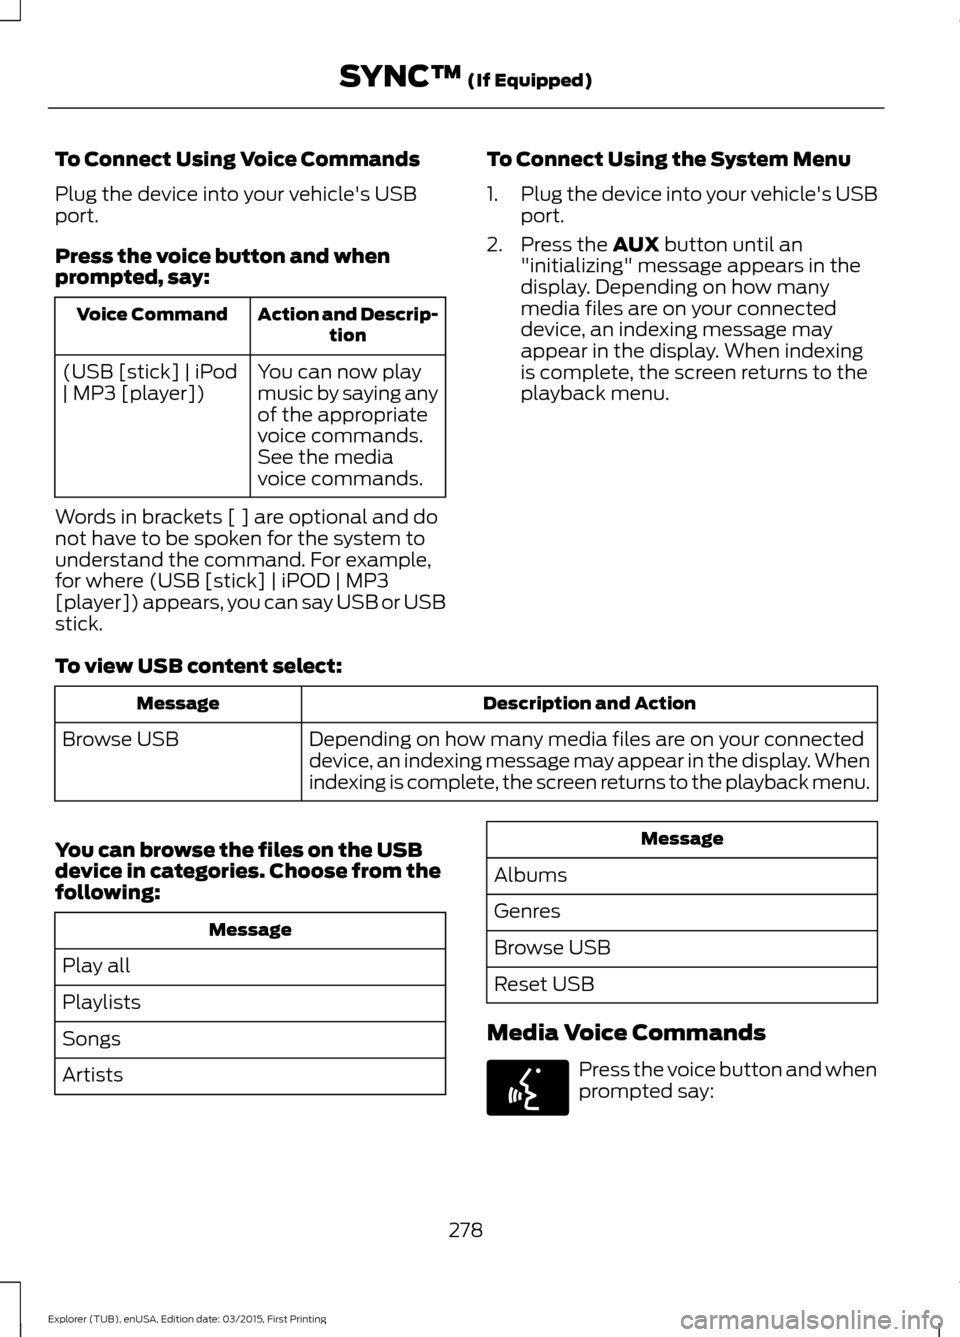
To Connect Using Voice Commands
Plug the device into your vehicle's USB
port.
Press the voice button and when
prompted, say:
Action and Descrip-
tion
Voice Command
You can now play
music by saying any
of the appropriate
voice commands.
See the media
voice commands.
(USB [stick] | iPod
| MP3 [player])
Words in brackets [ ] are optional and do
not have to be spoken for the system to
understand the command. For example,
for where (USB [stick] | iPOD | MP3
[player]) appears, you can say USB or USB
stick. To Connect Using the System Menu
1.
Plug the device into your vehicle's USB
port.
2. Press the AUX button until an
"initializing" message appears in the
display. Depending on how many
media files are on your connected
device, an indexing message may
appear in the display. When indexing
is complete, the screen returns to the
playback menu.
To view USB content select: Description and Action
Message
Depending on how many media files are on your connected
device, an indexing message may appear in the display. When
indexing is complete, the screen returns to the playback menu.
Browse USB
You can browse the files on the USB
device in categories. Choose from the
following: Message
Play all
Playlists
Songs
Artists Message
Albums
Genres
Browse USB
Reset USB
Media Voice Commands Press the voice button and when
prompted say:
278
Explorer (TUB), enUSA, Edition date: 03/2015, First Printing SYNC™
(If Equipped)E142599
Page 283 of 350
![FORD POLICE INTERCEPTOR UTILITY 2016 1.G Repair Manual Description and Action
Command
Plays the current playlist in a random order.
(Not all devices support this command.)
shuffle [all] [on]
shuffle off At any time during playback, you can press
the voice FORD POLICE INTERCEPTOR UTILITY 2016 1.G Repair Manual Description and Action
Command
Plays the current playlist in a random order.
(Not all devices support this command.)
shuffle [all] [on]
shuffle off At any time during playback, you can press
the voice](/img/11/5328/w960_5328-282.png)
Description and Action
Command
Plays the current playlist in a random order.
(Not all devices support this command.)
shuffle [all] [on]
shuffle off At any time during playback, you can press
the voice button and ask the system what is
playing. The system reads the metadata tags
(if populated) of the current track.
((who's | who is) this | who plays this |
(what's | what is) playing [now] | (what | which) (song | track | artist) is this |
(who's | who is) playing | (what's | what is) this)
___ is a dynamic listing, meaning that it
could be the name of anything, such as a
group, artist or song. For example you
could say "Play artist The Beatles".
Examples of USB Commands
SYNC provides the user with many intuitive
ways to find and play a song using voice.
For example, if we have a song called
"Penny Lane" from the album "Magical
Mystery Tour" we can say the following to
play this song:
• Play song "Penny Lane".
• Play "Penny Lane". If we wanted to play the entire album, we
can say:
•
Play album "Magical Mystery Tour".
• Play "Magical Mystery Tour".
Bluetooth Audio
The system is also capable of playing
music from your cellular phone through
Bluetooth.
To switch the Bluetooth audio on, use the
MEDIA button (next to the audio display)
or Source button, or press the voice button
and when prompted say: Voice Command
Bluetooth audio
Then any of the following: Voice Command
pause
play
next [track | title | song | file | podcast | chapter | episode]
previous [track | title | song | file | podcast | chapter | episode]
280
Explorer (TUB), enUSA, Edition date: 03/2015, First Printing SYNC™
(If Equipped)
Page 284 of 350
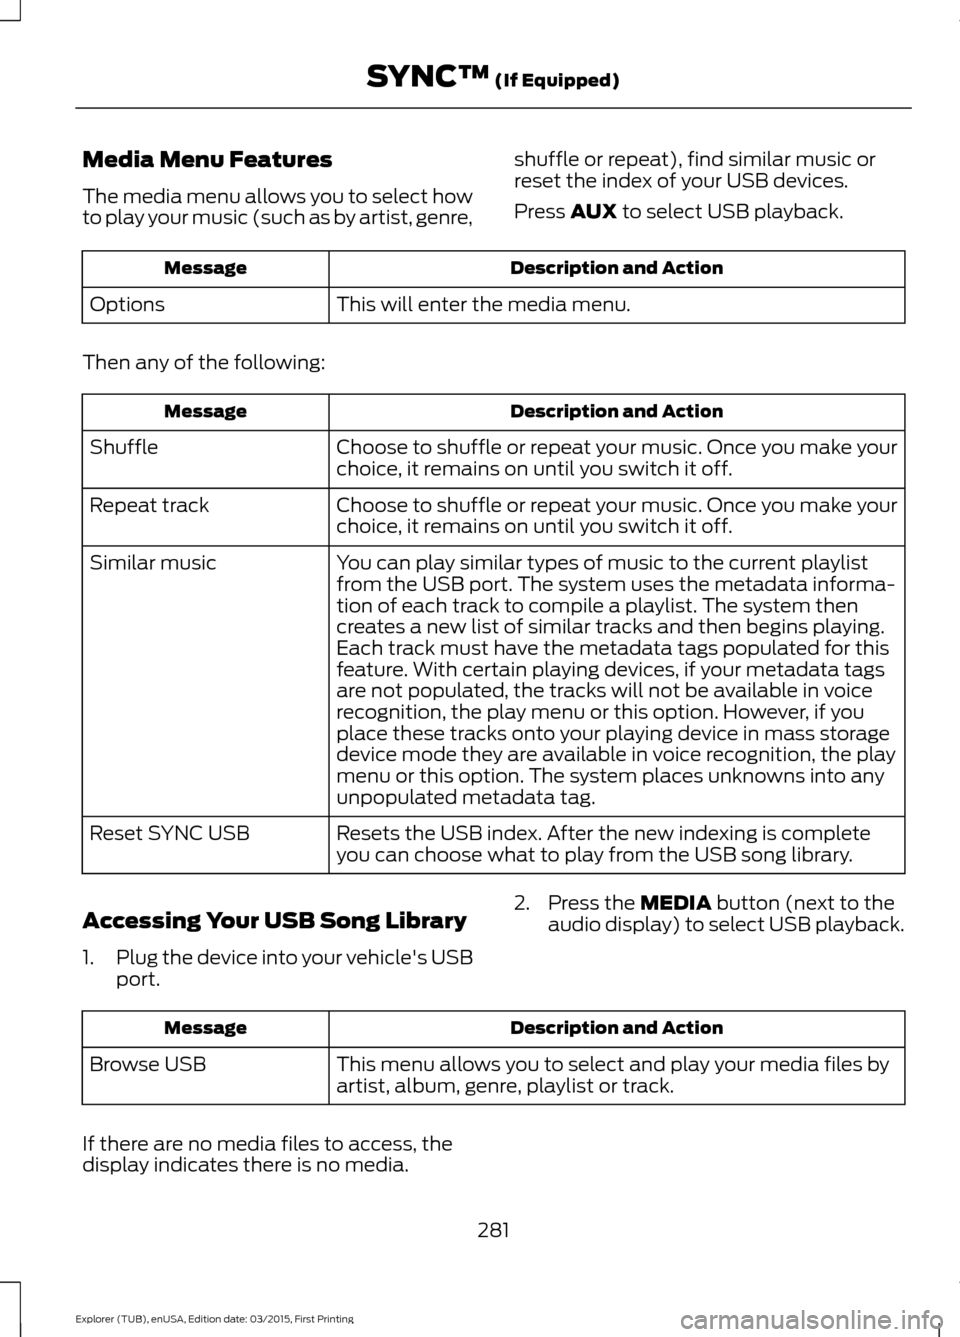
Media Menu Features
The media menu allows you to select how
to play your music (such as by artist, genre,
shuffle or repeat), find similar music or
reset the index of your USB devices.
Press AUX to select USB playback. Description and Action
Message
This will enter the media menu.
Options
Then any of the following: Description and Action
Message
Choose to shuffle or repeat your music. Once you make your
choice, it remains on until you switch it off.
Shuffle
Choose to shuffle or repeat your music. Once you make your
choice, it remains on until you switch it off.
Repeat track
You can play similar types of music to the current playlist
from the USB port. The system uses the metadata informa-
tion of each track to compile a playlist. The system then
creates a new list of similar tracks and then begins playing.
Each track must have the metadata tags populated for this
feature. With certain playing devices, if your metadata tags
Similar music
are not populated, the tracks will not be available in voice
recognition, the play menu or this option. However, if you
place these tracks onto your playing device in mass storage
device mode they are available in voice recognition, the play
menu or this option. The system places unknowns into any
unpopulated metadata tag.
Resets the USB index. After the new indexing is complete
you can choose what to play from the USB song library.
Reset SYNC USB
Accessing Your USB Song Library
1. Plug the device into your vehicle's USB
port. 2. Press the
MEDIA button (next to the
audio display) to select USB playback. Description and Action
Message
This menu allows you to select and play your media files by
artist, album, genre, playlist or track.
Browse USB
If there are no media files to access, the
display indicates there is no media. 281
Explorer (TUB), enUSA, Edition date: 03/2015, First Printing SYNC™
(If Equipped)
Page 285 of 350
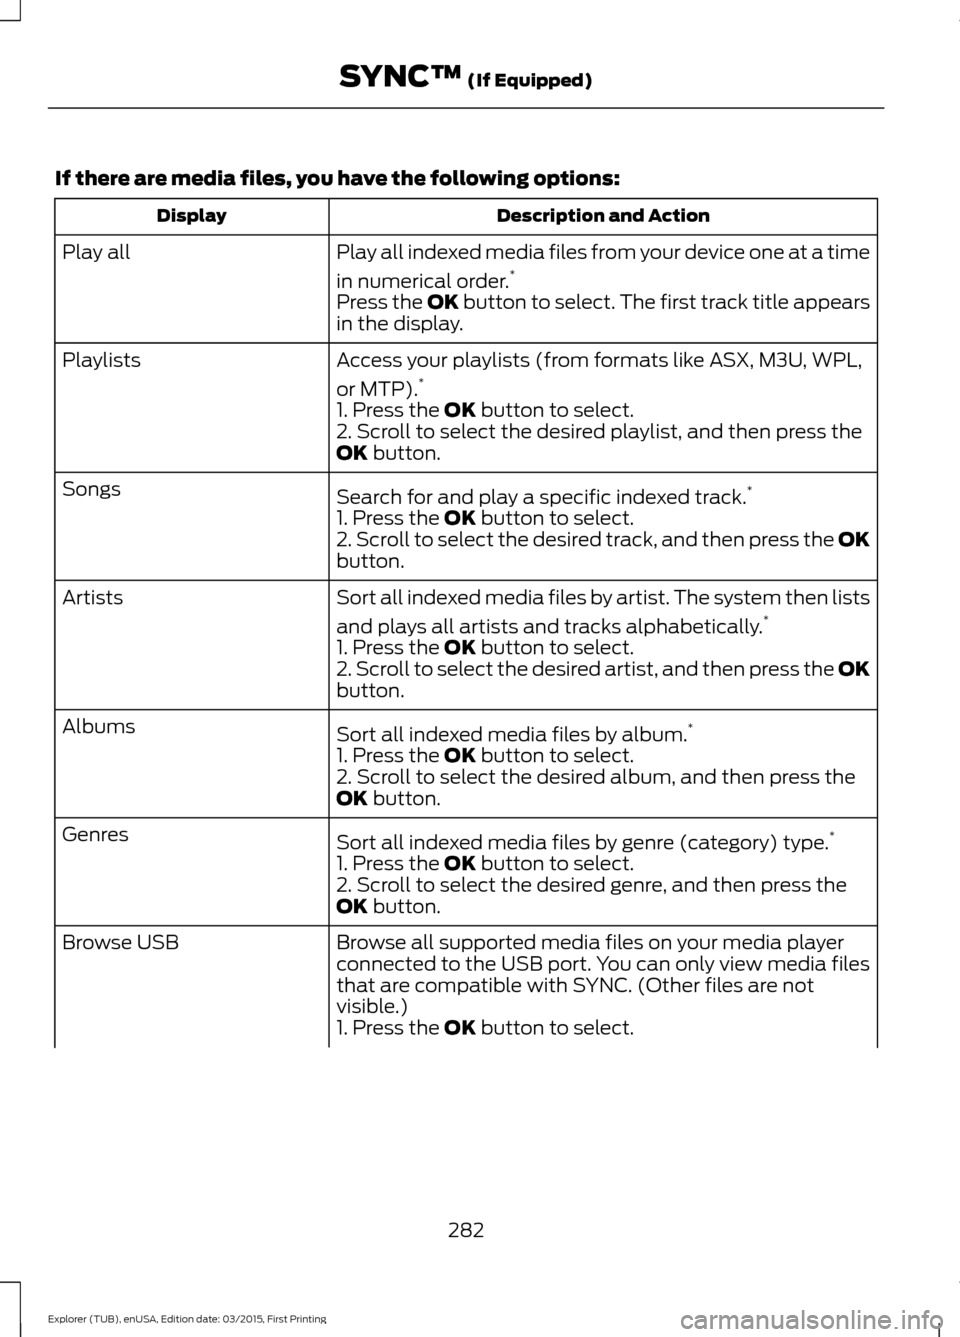
If there are media files, you have the following options:
Description and Action
Display
Play all indexed media files from your device one at a time
in numerical order.*
Play all
Press the OK button to select. The first track title appears
in the display.
Access your playlists (from formats like ASX, M3U, WPL,
or MTP).*
Playlists
1. Press the OK button to select.
2. Scroll to select the desired playlist, and then press the
OK
button.
Search for and play a specific indexed track. *
Songs
1. Press the
OK button to select.
2. Scroll to select the desired track, and then press the OK
button.
Sort all indexed media files by artist. The system then lists
and plays all artists and tracks alphabetically. *
Artists
1. Press the
OK button to select.
2. Scroll to select the desired artist, and then press the OK
button.
Sort all indexed media files by album. *
Albums
1. Press the
OK button to select.
2. Scroll to select the desired album, and then press the
OK
button.
Sort all indexed media files by genre (category) type. *
Genres
1. Press the
OK button to select.
2. Scroll to select the desired genre, and then press the
OK
button.
Browse all supported media files on your media player
connected to the USB port. You can only view media files
that are compatible with SYNC. (Other files are not
visible.)
Browse USB
1. Press the
OK button to select.
282
Explorer (TUB), enUSA, Edition date: 03/2015, First Printing SYNC™
(If Equipped)
Page 286 of 350
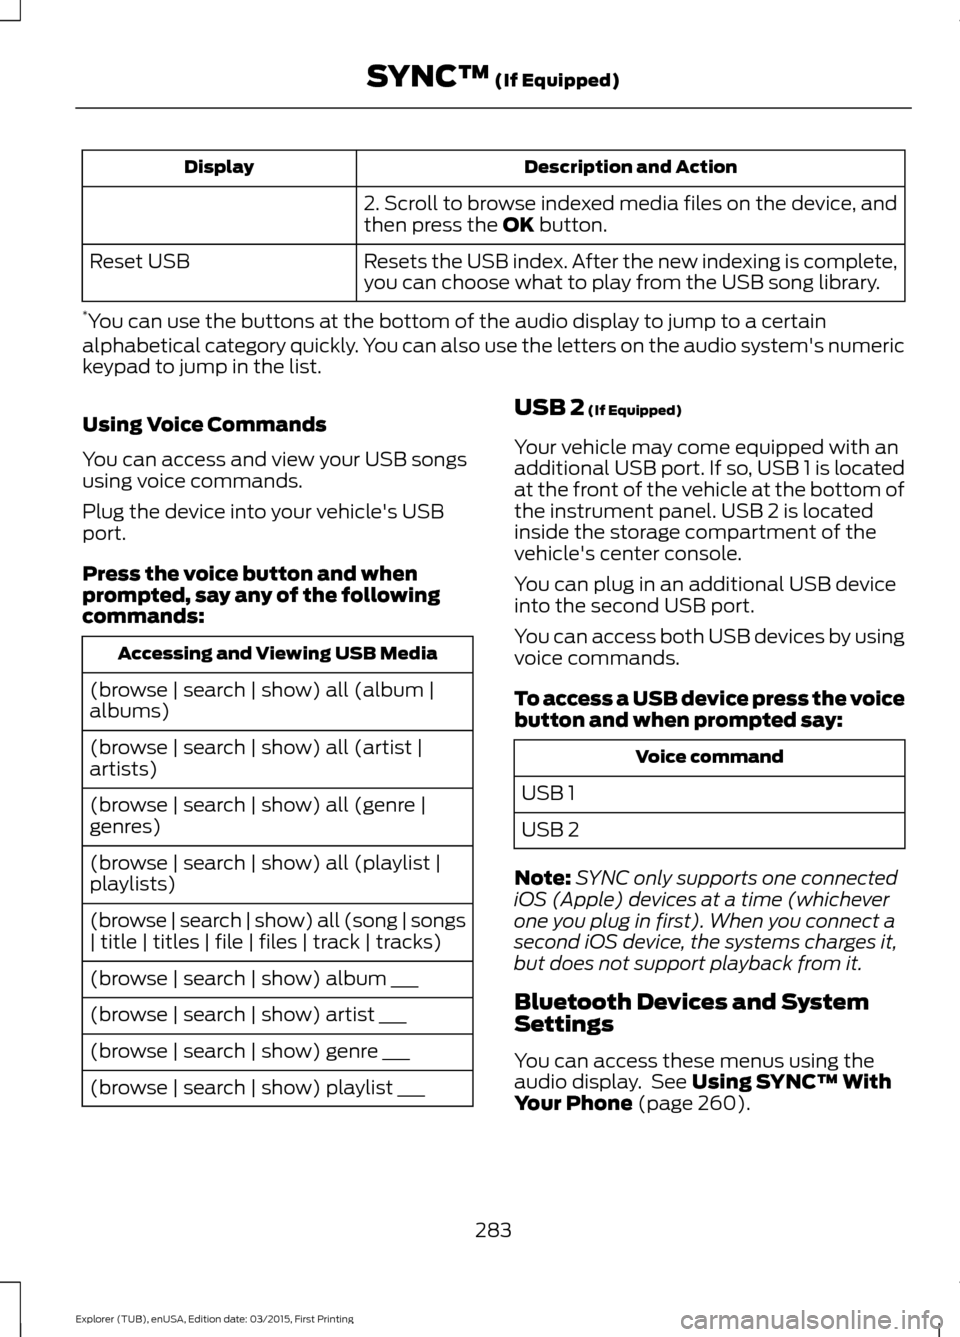
Description and Action
Display
2. Scroll to browse indexed media files on the device, and
then press the OK button.
Resets the USB index. After the new indexing is complete,
you can choose what to play from the USB song library.
Reset USB
* You can use the buttons at the bottom of the audio display to jump to a certain
alphabetical category quickly. You can also use the letters on the audio system's numeric
keypad to jump in the list.
Using Voice Commands
You can access and view your USB songs
using voice commands.
Plug the device into your vehicle's USB
port.
Press the voice button and when
prompted, say any of the following
commands: Accessing and Viewing USB Media
(browse | search | show) all (album |
albums)
(browse | search | show) all (artist |
artists)
(browse | search | show) all (genre |
genres)
(browse | search | show) all (playlist |
playlists)
(browse | search | show) all (song | songs
| title | titles | file | files | track | tracks)
(browse | search | show) album ___
(browse | search | show) artist ___
(browse | search | show) genre ___
(browse | search | show) playlist ___ USB 2
(If Equipped)
Your vehicle may come equipped with an
additional USB port. If so, USB 1 is located
at the front of the vehicle at the bottom of
the instrument panel. USB 2 is located
inside the storage compartment of the
vehicle's center console.
You can plug in an additional USB device
into the second USB port.
You can access both USB devices by using
voice commands.
To access a USB device press the voice
button and when prompted say: Voice command
USB 1
USB 2
Note: SYNC only supports one connected
iOS (Apple) devices at a time (whichever
one you plug in first). When you connect a
second iOS device, the systems charges it,
but does not support playback from it.
Bluetooth Devices and System
Settings
You can access these menus using the
audio display. See
Using SYNC™ With
Your Phone (page 260).
283
Explorer (TUB), enUSA, Edition date: 03/2015, First Printing SYNC™
(If Equipped)
Page 299 of 350
GENERAL MAINTENANCE
INFORMATION
Why Maintain Your Vehicle?
Carefully following the maintenance
schedule helps protect against major repair
expenses resulting from neglect or
inadequate maintenance and may help to
increase the value of your vehicle when
you sell or trade it. Keep all receipts for
completed maintenance with your vehicle.
We have established regular maintenance
intervals for your vehicle based upon
rigorous testing. It is important that you
have your vehicle serviced at the proper
times. These intervals serve two purposes;
one is to maintain the reliability of your
vehicle and the second is to keep your cost
of owning your vehicle down.
It is your responsibility to have all
scheduled maintenance performed and to
make sure that the materials used meet
the specifications identified in this owner's
manual.
Failure to perform scheduled maintenance
invalidates warranty coverage on parts
affected by the lack of maintenance.
Why Maintain Your Vehicle at Your
Dealership?
Factory-Trained Technicians
Service technicians participate in extensive
factory-sponsored certification training to
help them become experts on the
operation of your vehicle. Ask your
dealership about the training and
certification their technicians have
received.
Genuine Ford and Motorcraft®
Replacement Parts
Dealerships stock Ford, Motorcraft and
Ford-authorized branded re-manufactured
replacement parts. These parts meet or
exceed our specifications. Parts installed
at your dealership carry a nationwide
24-month or unlimited mile (kilometer)
parts and labor limited warranty.
If you do not use Ford authorized parts they
may not meet our specifications and
depending on the part, it could affect
emissions compliance.
Convenience
Many dealerships have extended evening
and Saturday hours to make your service
visit more convenient and they offer one
stop shopping. They can perform any
services that are required on your vehicle,
from general maintenance to collision
repairs.
Note:
Not all dealers have extended hours
or body shops. Please contact your dealer
for details.
Protecting Your Investment
Maintenance is an investment that pays
dividends in the form of improved
reliability, durability and resale value. To
maintain the proper performance of your
vehicle and its emission control systems,
make sure you have scheduled
maintenance performed at the designated
intervals.
Your vehicle is equipped with the
Intelligent Oil-Life Monitor system, which
displays a message in the information
display at the proper oil change interval.
This interval may be up to one year or
10000 miles (16000 kilometers).
296
Explorer (TUB), enUSA, Edition date: 03/2015, First Printing Scheduled Maintenance