FORD RANGER 1999 2.G Owners Manual
Manufacturer: FORD, Model Year: 1999, Model line: RANGER, Model: FORD RANGER 1999 2.GPages: 216, PDF Size: 1.47 MB
Page 141 of 216
CHANGING THE TIRES
If you get a flat tire while driving, do not apply the brake heavily.
Instead, gradually decrease your speed. Hold the steering wheel firmly
and slowly move to a safe place on the side of the road.
Temporary spare tire information
Your vehicle may have a temporary or conventional spare tire. The
temporary spare tire for your vehicle is labeled as such. It is smaller than
a regular tire and is designed for emergency use only. Replace this tire
with a full-size tire as soon as possible.
It is not recommended that the vehicle be operated in 4WD modes with
a temporary spare. If 4WD operation is necessary, do not operate above
speeds of 16 km/h (10 mph) or for distances above 80 km (50 miles).
If you use the temporary spare tire continuously or do not follow
these precautions, the tire could fail, causing you to lose control
of the vehicle, possibly injuring yourself or others.
When driving with the temporary spare tiredo not:
²exceed 80 km/h (50 mph) under any circumstances
²load the vehicle beyond maximum vehicle load rating listed on the
Safety Compliance Label
²tow a trailer
²use tire chains
²drive through an automatic car wash, because of the vehicle's reduced
ground clearance
²try to repair the temporary spare tire or remove it from its wheel
²use the wheel for any other type of vehicle
Conventional spare tire information
If you have the conventional spare tire, you can use it as a spare or a
regular tire. The spare is identical to the other tires on your vehicle,
although the wheel may not match.
Roadside emergencies
141
Page 142 of 216
Location of the spare tire and tools
The spare tire and tools for your vehicle are stowed in the following
locations:
Tool Location
Spare tire Under the vehicle, just forward of the rear
bumper
Jack, jack handle,
wheel nut wrenchRegular Cab: behind seats and underneath the
jack and tools cover
SuperCab: stowed in the passenger side rear cab
compartment or behind the jump seat in a
separate tool bag
Four-door models: stowed behind the front seats,
between jump seats and underneath jack and tool
covers.
Key, spare tire lock
(if equipped)In the glove box
Removing the spare tire
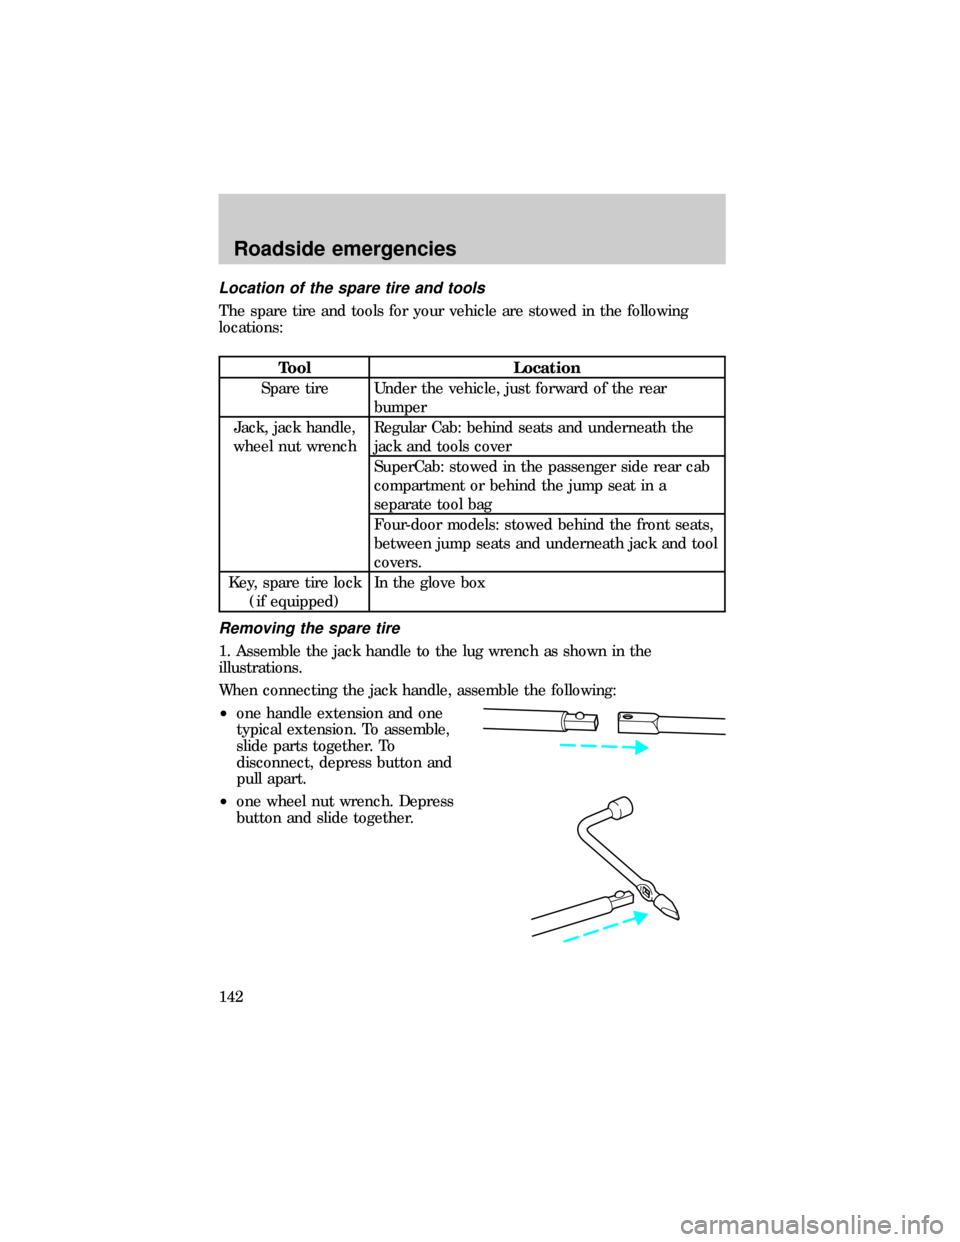
1. Assemble the jack handle to the lug wrench as shown in the
illustrations.
When connecting the jack handle, assemble the following:
²one handle extension and one
typical extension. To assemble,
slide parts together. To
disconnect, depress button and
pull apart.
²one wheel nut wrench. Depress
button and slide together.
Roadside emergencies
142
Page 143 of 216
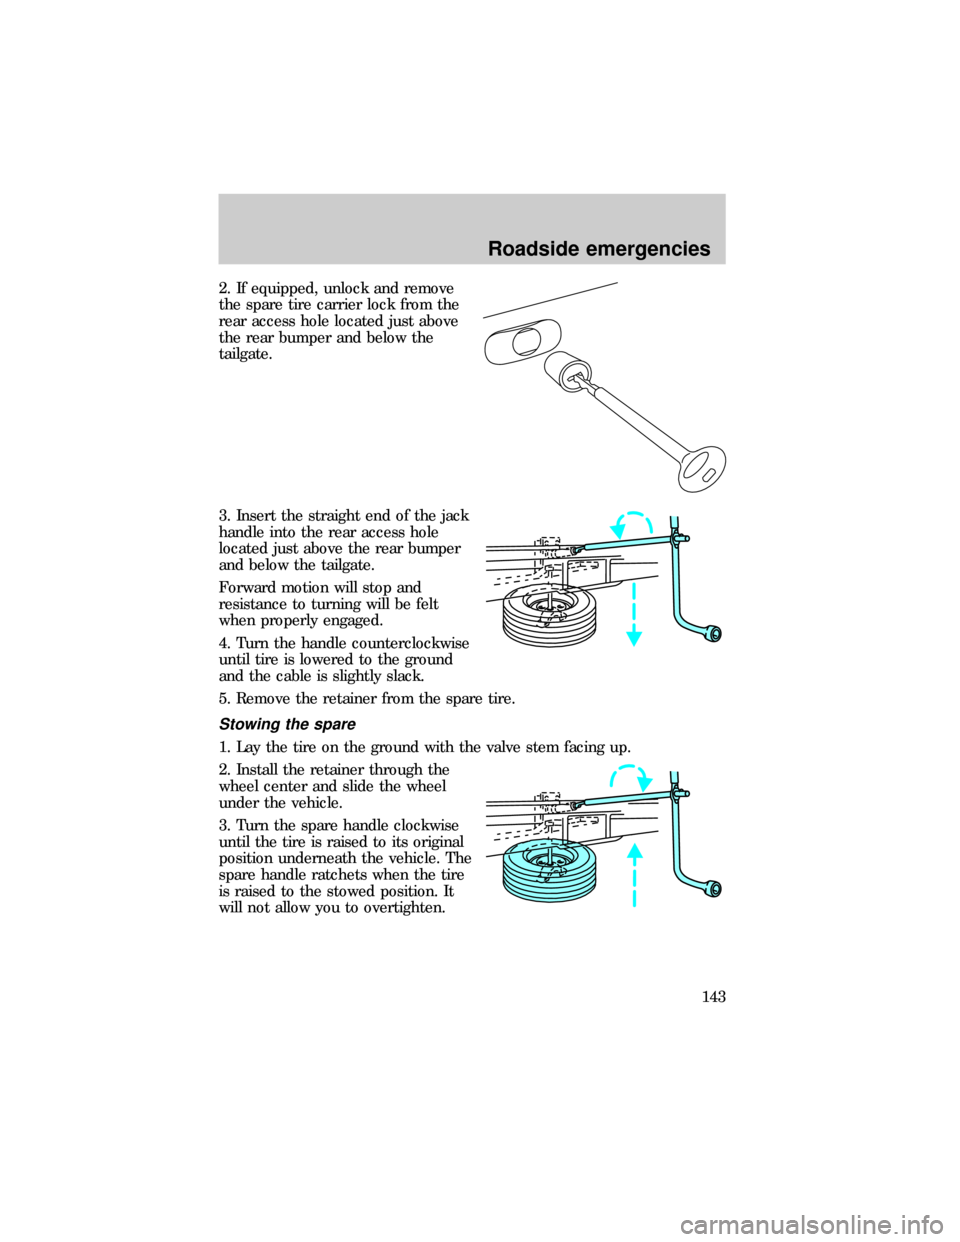
2. If equipped, unlock and remove
the spare tire carrier lock from the
rear access hole located just above
the rear bumper and below the
tailgate.
3. Insert the straight end of the jack
handle into the rear access hole
located just above the rear bumper
and below the tailgate.
Forward motion will stop and
resistance to turning will be felt
when properly engaged.
4. Turn the handle counterclockwise
until tire is lowered to the ground
and the cable is slightly slack.
5. Remove the retainer from the spare tire.
Stowing the spare
1. Lay the tire on the ground with the valve stem facing up.
2. Install the retainer through the
wheel center and slide the wheel
under the vehicle.
3. Turn the spare handle clockwise
until the tire is raised to its original
position underneath the vehicle. The
spare handle ratchets when the tire
is raised to the stowed position. It
will not allow you to overtighten.
Roadside emergencies
143
Page 144 of 216
4. If your vehicle is equipped with P265/75 R15 AT tires, do not stow a
flat or inflated full size spare tire in the spare tire carrier. The flat full
size tire should be stowed and tied down in the pickup box bed until it
can be repaired.
5. If removed, install the spare tire carrier lock on the access hole in the
bumper.
Tire change procedure
To prevent the vehicle from moving when you change a tire, be
sure the parking brake is set, then block (in both directions) the
wheel that is diagonally opposite (other side and end of the vehicle) to
the tire being changed.
If the vehicle slips off the jack, you or someone else could be
seriously injured.
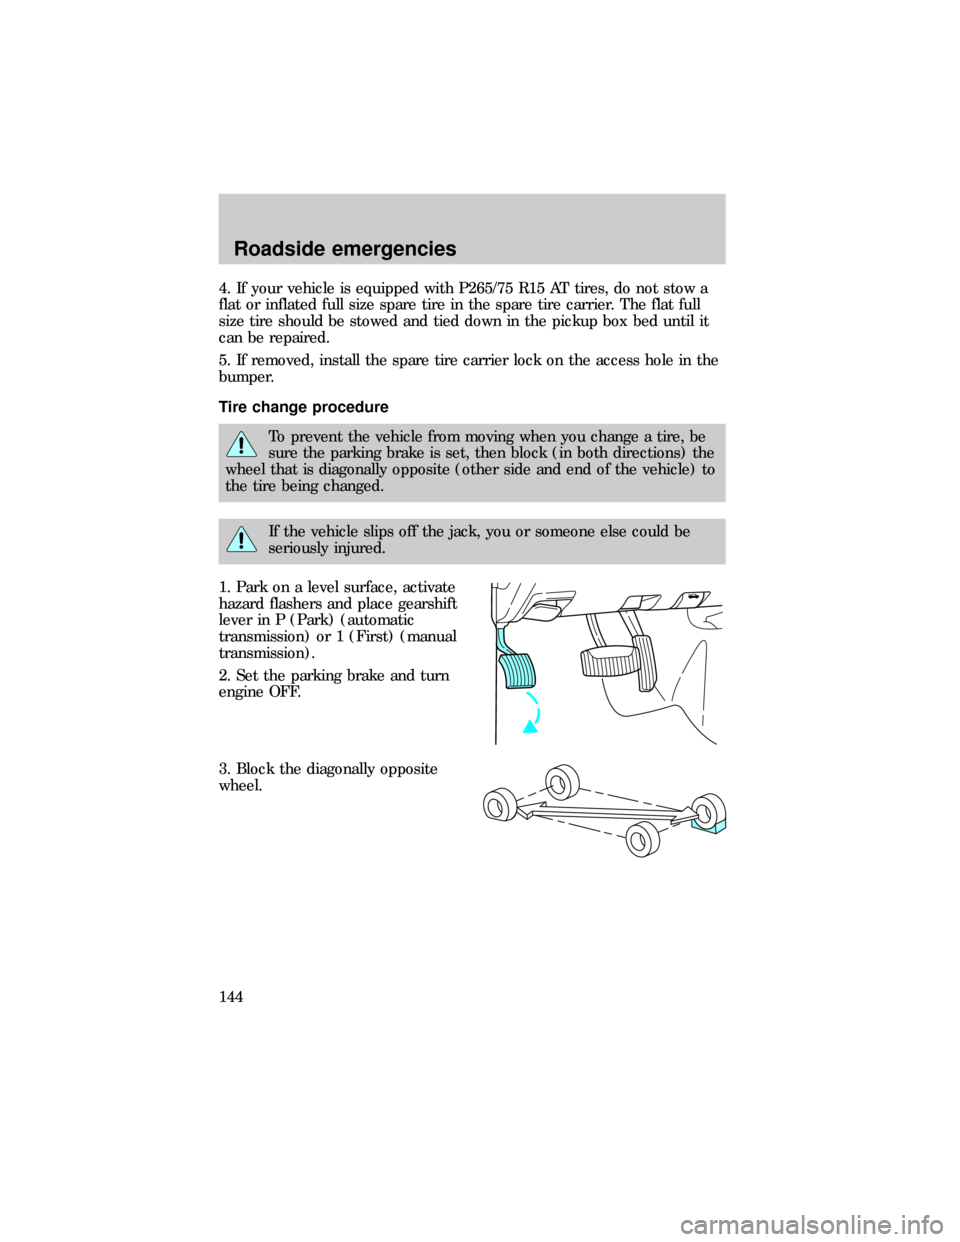
1. Park on a level surface, activate
hazard flashers and place gearshift
lever in P (Park) (automatic
transmission) or 1 (First) (manual
transmission).
2. Set the parking brake and turn
engine OFF.
3. Block the diagonally opposite
wheel.
Roadside emergencies
144
Page 145 of 216
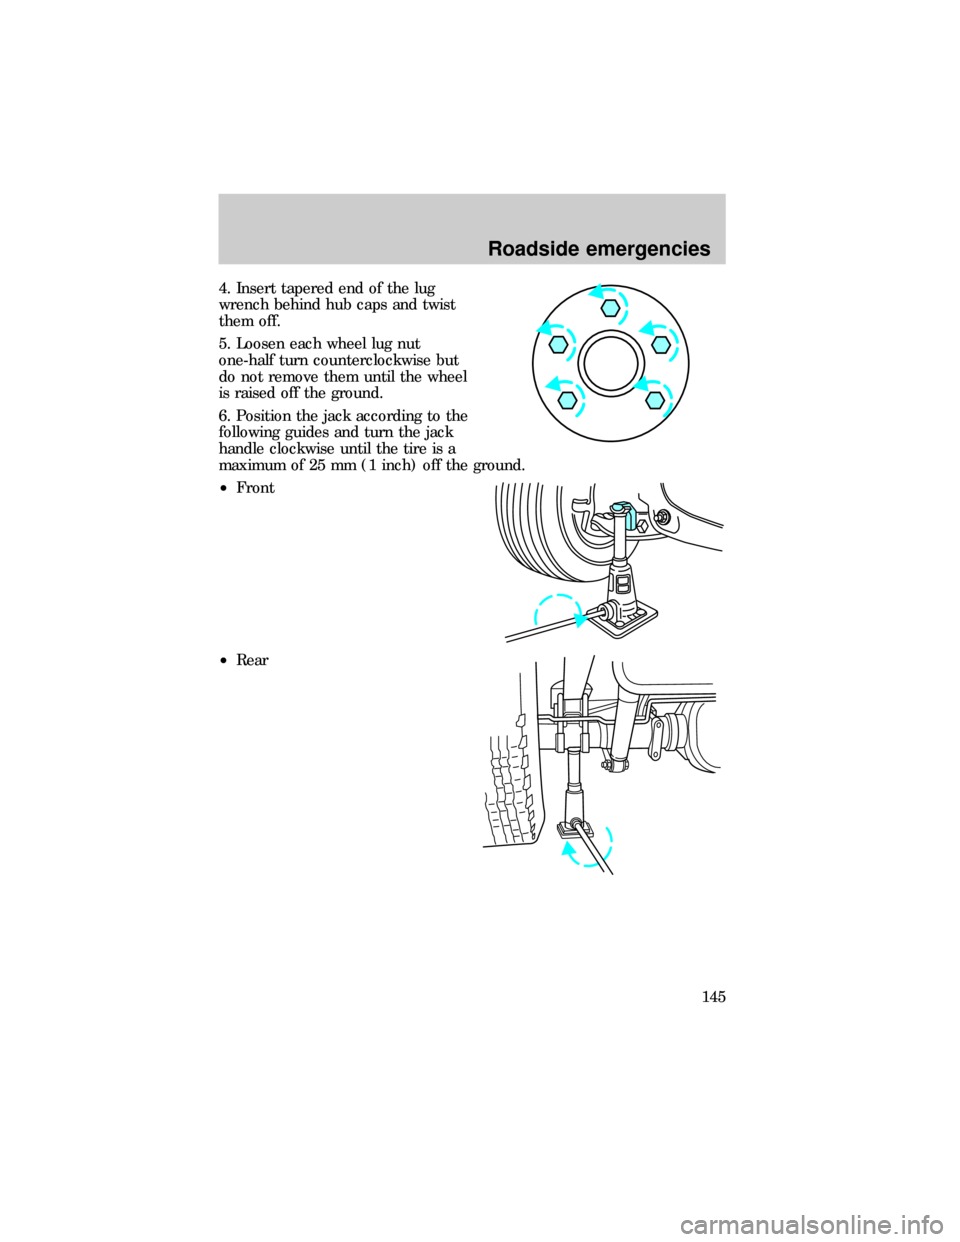
4. Insert tapered end of the lug
wrench behind hub caps and twist
them off.
5. Loosen each wheel lug nut
one-half turn counterclockwise but
do not remove them until the wheel
is raised off the ground.
6. Position the jack according to the
following guides and turn the jack
handle clockwise until the tire is a
maximum of 25 mm (1 inch) off the ground.
²Front
²Rear
Roadside emergencies
145
Page 146 of 216
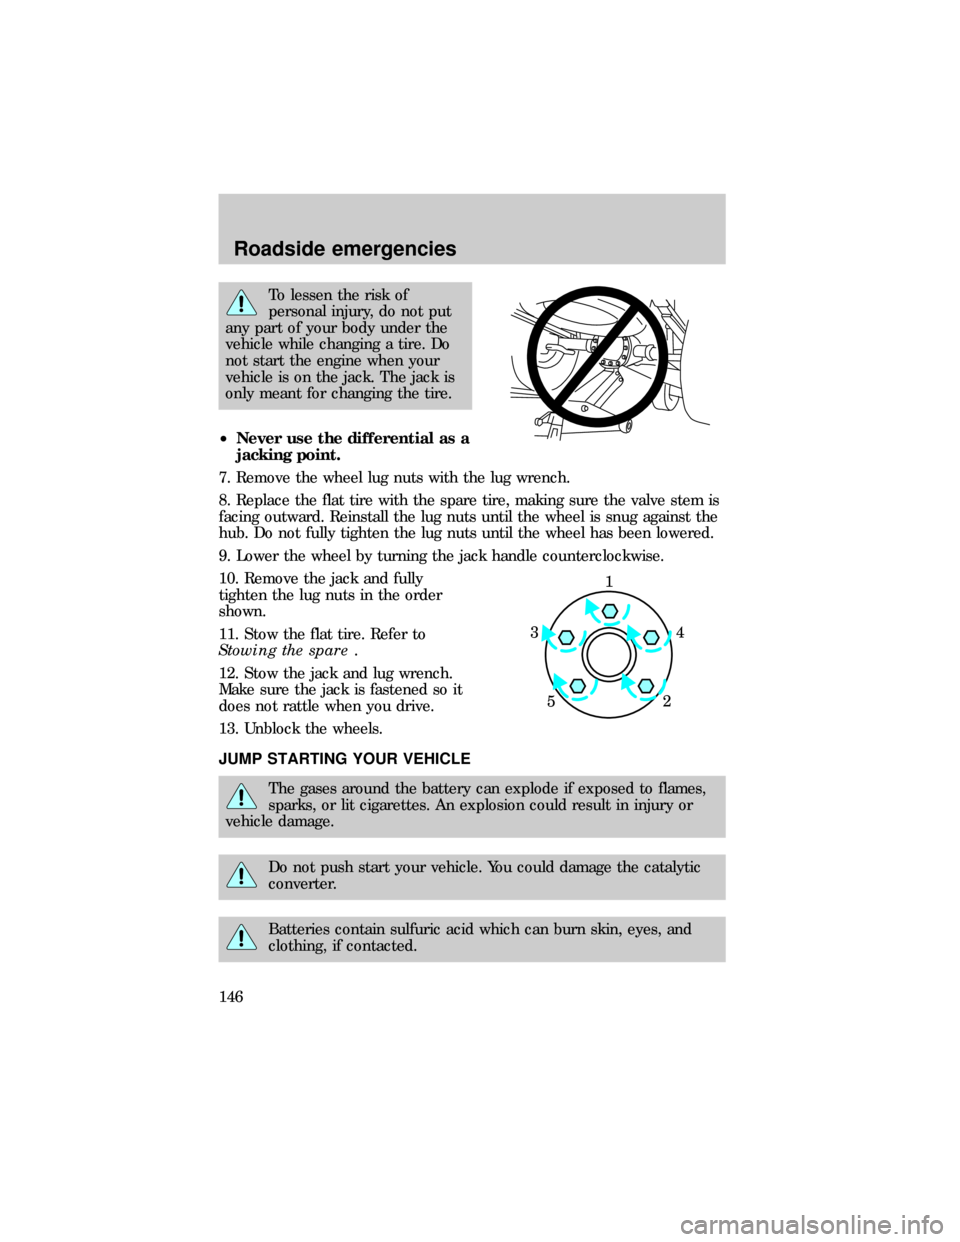
To lessen the risk of
personal injury, do not put
any part of your body under the
vehicle while changing a tire. Do
not start the engine when your
vehicle is on the jack. The jack is
only meant for changing the tire.
²Never use the differential as a
jacking point.
7. Remove the wheel lug nuts with the lug wrench.
8. Replace the flat tire with the spare tire, making sure the valve stem is
facing outward. Reinstall the lug nuts until the wheel is snug against the
hub. Do not fully tighten the lug nuts until the wheel has been lowered.
9. Lower the wheel by turning the jack handle counterclockwise.
10. Remove the jack and fully
tighten the lug nuts in the order
shown.
11. Stow the flat tire. Refer to
Stowing the spare.
12. Stow the jack and lug wrench.
Make sure the jack is fastened so it
does not rattle when you drive.
13. Unblock the wheels.
JUMP STARTING YOUR VEHICLE
The gases around the battery can explode if exposed to flames,
sparks, or lit cigarettes. An explosion could result in injury or
vehicle damage.
Do not push start your vehicle. You could damage the catalytic
converter.
Batteries contain sulfuric acid which can burn skin, eyes, and
clothing, if contacted.
1
4 3
52
Roadside emergencies
146
Page 147 of 216
Do not attempt to push start your vehicle. Automatic
transmissions do not have push-start capability.
Preparing your vehicle
1.Use only a 12±volt supply to start your vehicle.
2. Do not disconnect the battery of the disabled vehicle as this could
damage the vehicle's electrical system.
3. Park the booster vehicle close to the hood of the disabled vehicle
making sure the two vehiclesdo nottouch. Set the parking brake on
both vehicles and stay clear of the engine cooling fan and other moving
parts.
4. Check all battery terminals and remove any excessive corrosion before
you attach the battery cables. Ensure that vent caps are tight and level.
5. Turn the heater fan on in both vehicles to protect any electrical
surges. Turn all other accessories off.
Connecting the jumper cables
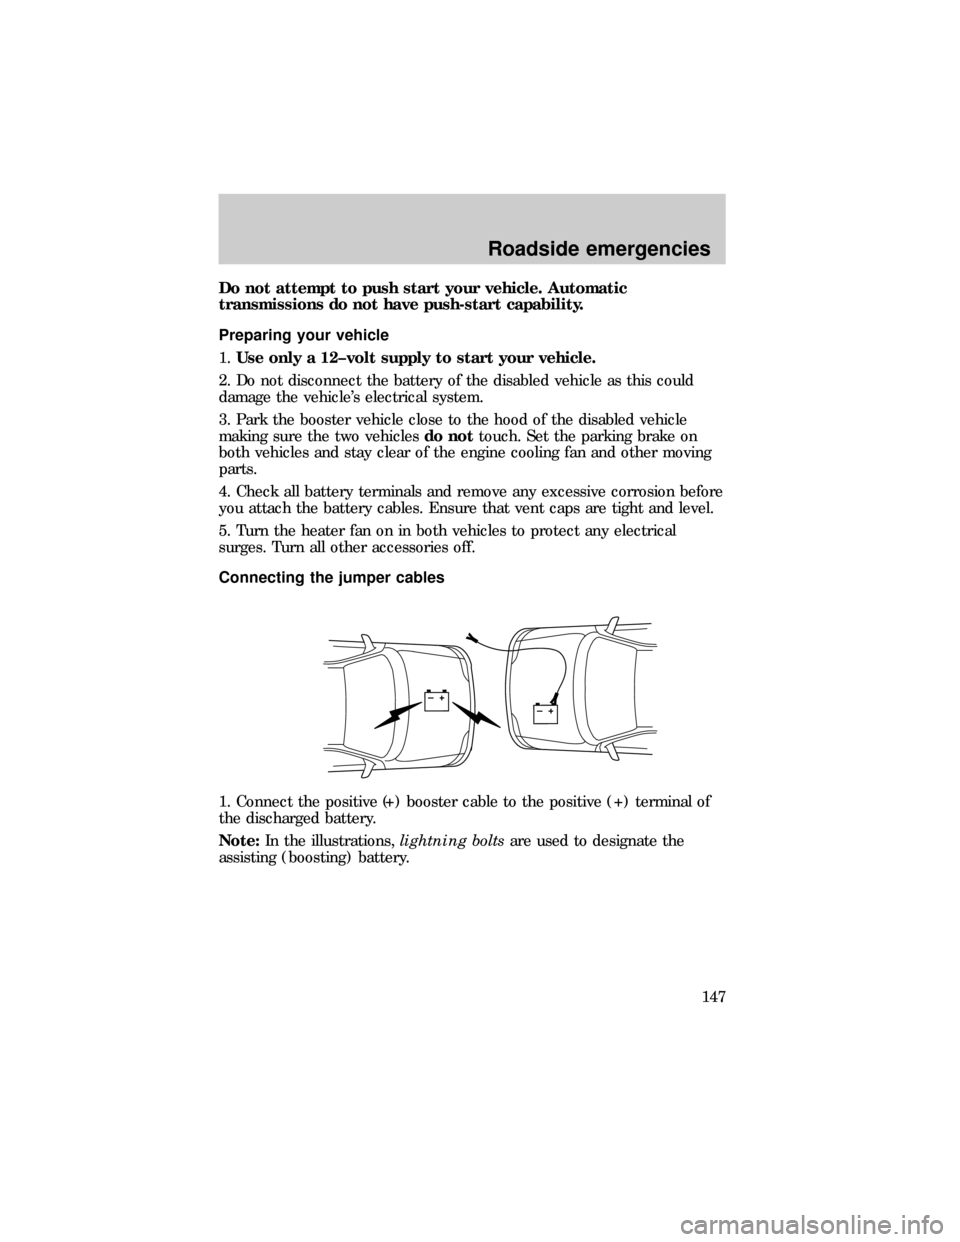
1. Connect the positive (+) booster cable to the positive (+) terminal of
the discharged battery.
Note:In the illustrations,lightning boltsare used to designate the
assisting (boosting) battery.
+–+–
Roadside emergencies
147
Page 148 of 216
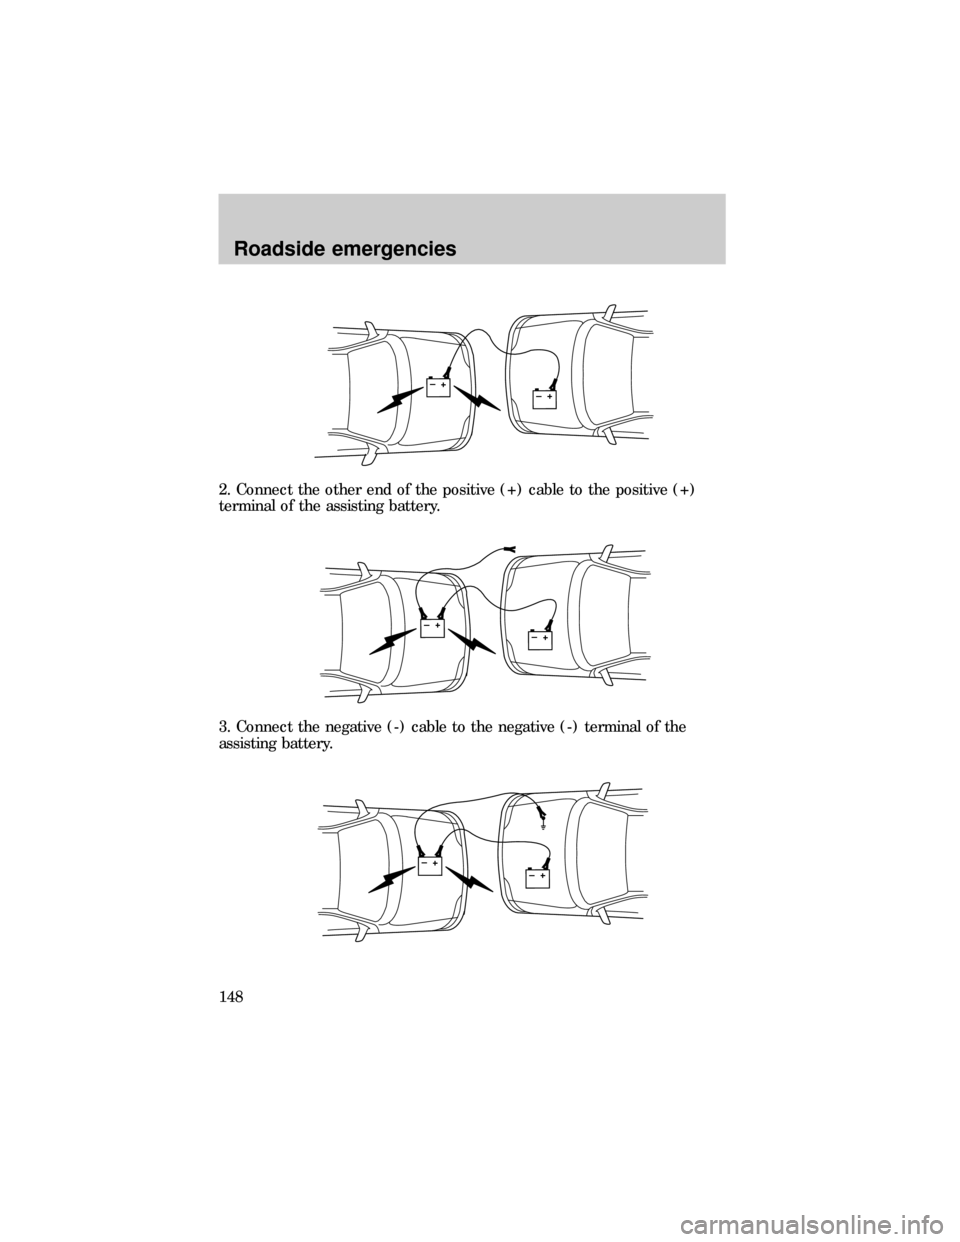
2. Connect the other end of the positive (+) cable to the positive (+)
terminal of the assisting battery.
3. Connect the negative (-) cable to the negative (-) terminal of the
assisting battery.
+–+–
+–+–
+–+–
Roadside emergencies
148
Page 149 of 216
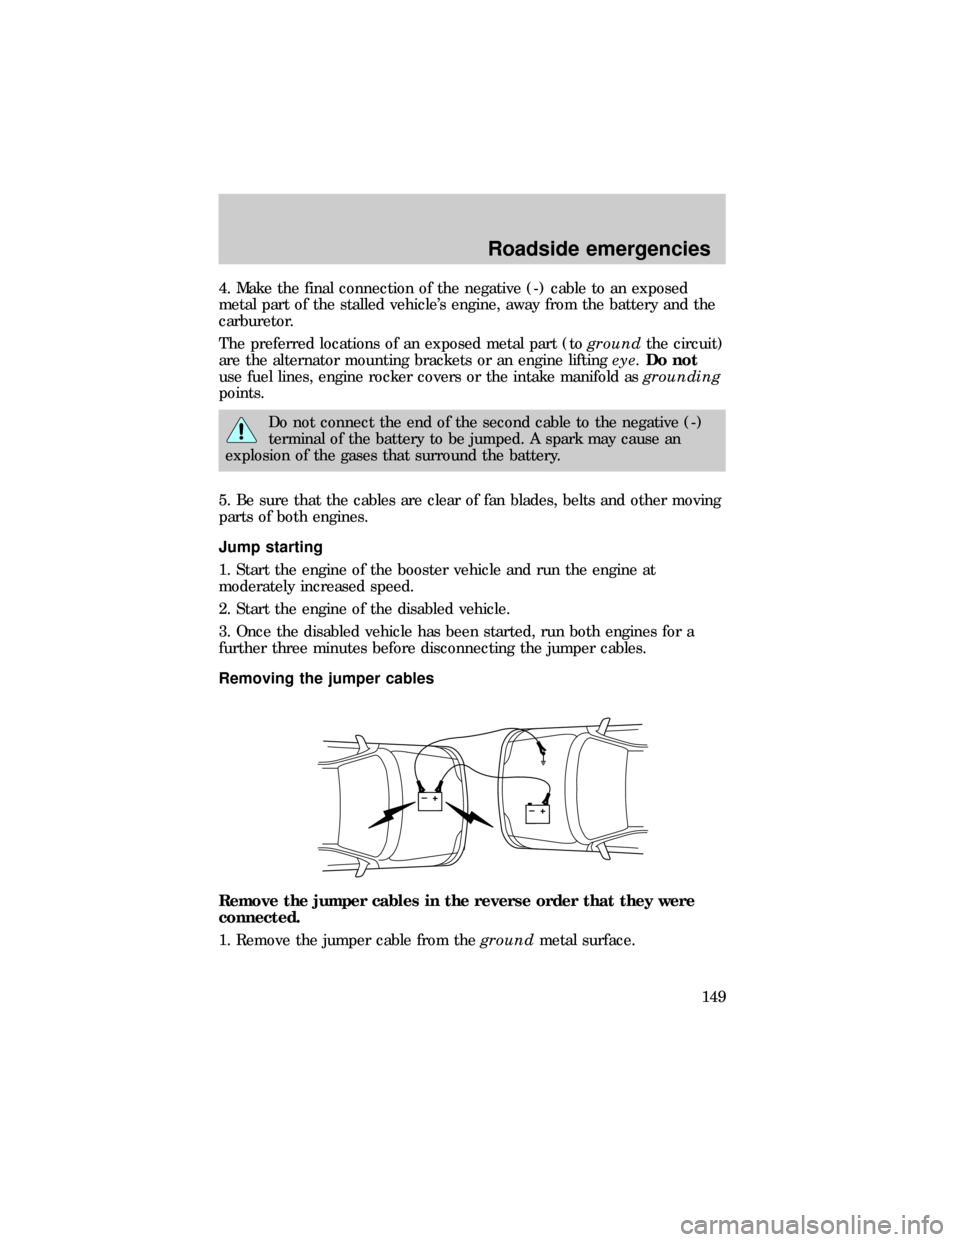
4. Make the final connection of the negative (-) cable to an exposed
metal part of the stalled vehicle's engine, away from the battery and the
carburetor.
The preferred locations of an exposed metal part (togroundthe circuit)
are the alternator mounting brackets or an engine liftingeye.Do not
use fuel lines, engine rocker covers or the intake manifold asgrounding
points.
Do not connect the end of the second cable to the negative (-)
terminal of the battery to be jumped. A spark may cause an
explosion of the gases that surround the battery.
5. Be sure that the cables are clear of fan blades, belts and other moving
parts of both engines.
Jump starting
1. Start the engine of the booster vehicle and run the engine at
moderately increased speed.
2. Start the engine of the disabled vehicle.
3. Once the disabled vehicle has been started, run both engines for a
further three minutes before disconnecting the jumper cables.
Removing the jumper cables
Remove the jumper cables in the reverse order that they were
connected.
1. Remove the jumper cable from thegroundmetal surface.
+–+–
Roadside emergencies
149
Page 150 of 216
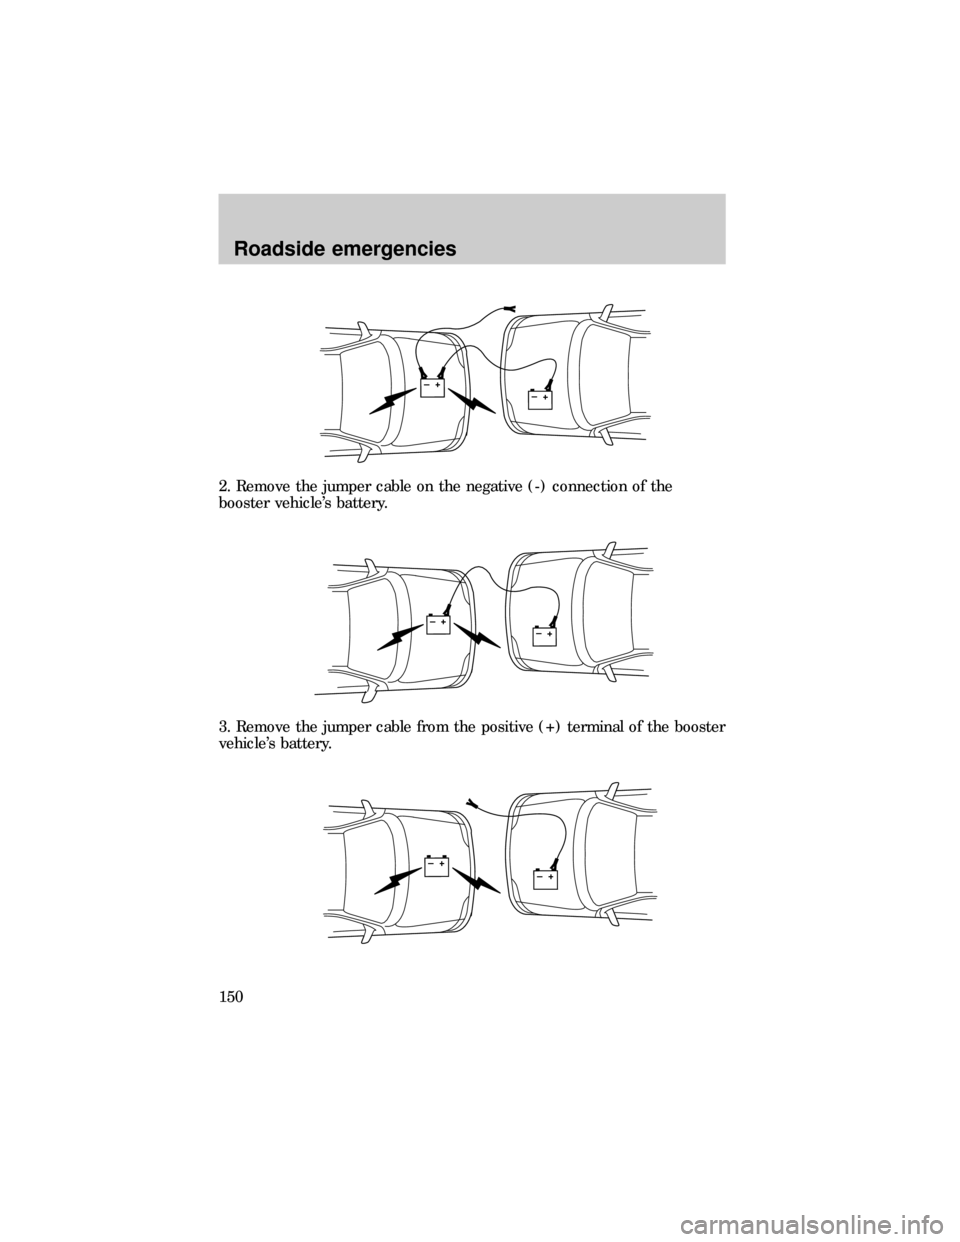
2. Remove the jumper cable on the negative (-) connection of the
booster vehicle's battery.
3. Remove the jumper cable from the positive (+) terminal of the booster
vehicle's battery.
+–+–
+–+–
+–+–
Roadside emergencies
150