hub FORD RANGER 1999 2.G Owners Manual
[x] Cancel search | Manufacturer: FORD, Model Year: 1999, Model line: RANGER, Model: FORD RANGER 1999 2.GPages: 216, PDF Size: 1.47 MB
Page 53 of 216

²The player's internal temperature is above 75ÉC (167ÉF). Allow the
player to cool down before operating.
²A disc with format and dimensions not within industry standards is
inserted.
Cleaning compact discs
Inspect all discs for contamination before playing. If necessary, clean
discs only with an approved CD cleaner and wipe the center out to the
edge. Do not use circular motion.
CD and CD player care
²Handle discs by their edges only. Never touch the playing surface.
²Do not insert more than one disc at a time.
²Do not expose discs to direct sunlight or heat sources for extended
periods of time.
²After playing, store the disc in its case.
Cleaning cassette player (if equipped)
Clean the tape player head with a cassette cleaning cartridge after ten to
twelve hours of play in order to maintain the best sound and operation.
Cassette and cassette player care
²Use only cassettes that are 90 minutes long or less.
²Do not expose tapes to direct sunlight, high humidity, extreme heat or
extreme cold. Allow tapes that may have been exposed to extreme
temperatures to reach a moderate temperature before playing.
²Tighten very loose tapes by inserting a finger or pencil into the hole
and turning the hub.
²Remove loose labels before inserting tapes.
²Do not leave tapes in the cassette player for a long time when not
being played.
Controls and features
53
Page 116 of 216

Using the electronic shift 4WD system (if equipped)
Positions of the electronic shift system
2WD (2WD High)± Power to rear axle only.
4X4 HIGH (4WD High)± Power delivered to front and rear axles for
increased traction.
4X4 LOW (4WD Low)± Power to front and rear axles at low speeds.
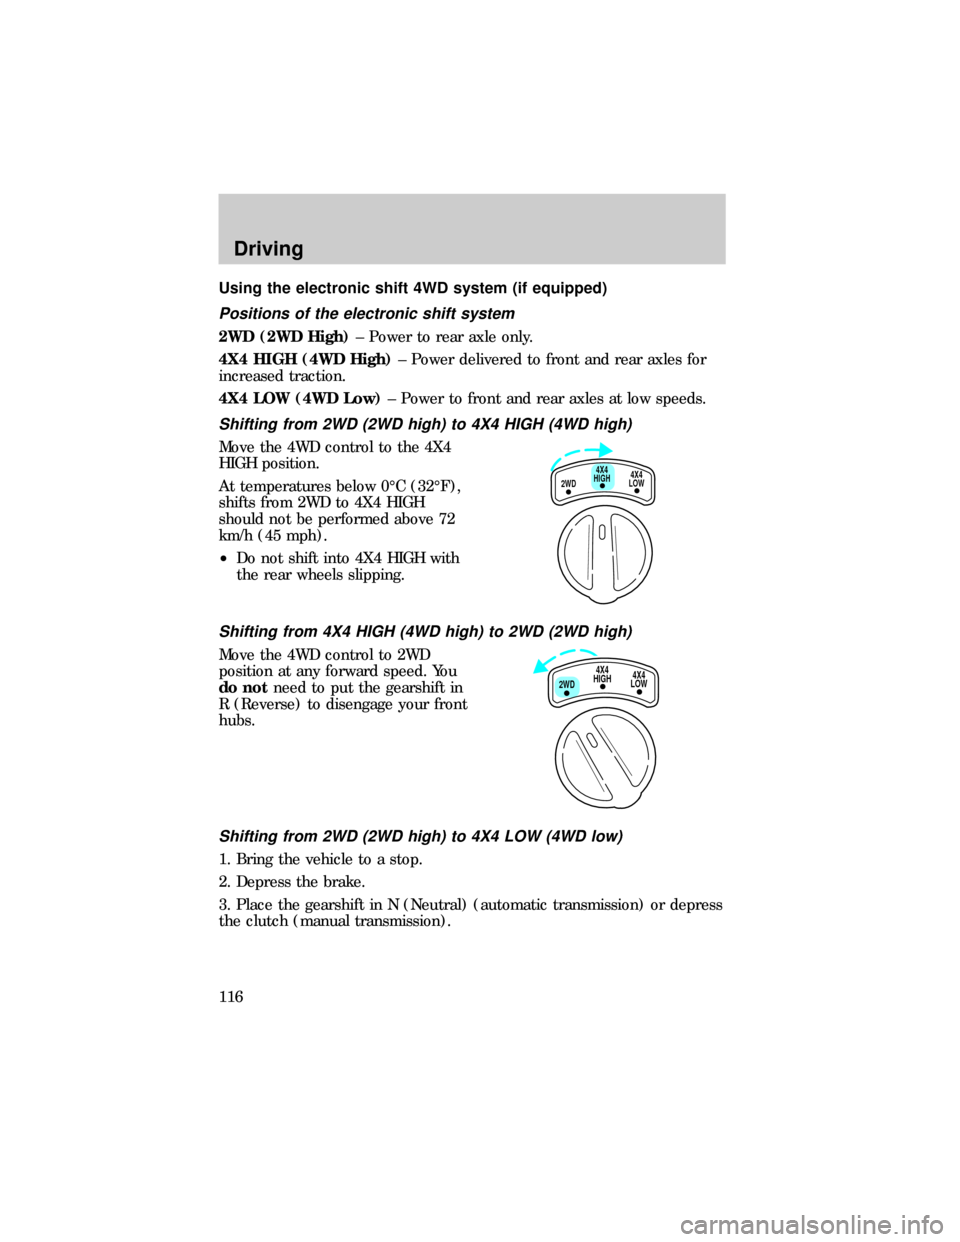
Shifting from 2WD (2WD high) to 4X4 HIGH (4WD high)
Move the 4WD control to the 4X4
HIGH position.
At temperatures below 0ÉC (32ÉF),
shifts from 2WD to 4X4 HIGH
should not be performed above 72
km/h (45 mph).
²Do not shift into 4X4 HIGH with
the rear wheels slipping.
Shifting from 4X4 HIGH (4WD high) to 2WD (2WD high)
Move the 4WD control to 2WD
position at any forward speed. You
do notneed to put the gearshift in
R (Reverse) to disengage your front
hubs.
Shifting from 2WD (2WD high) to 4X4 LOW (4WD low)
1. Bring the vehicle to a stop.
2. Depress the brake.
3. Place the gearshift in N (Neutral) (automatic transmission) or depress
the clutch (manual transmission).
4X4
HIGH
2WD4X4
LOW
4X4
HIGH
2WD4X4
LOW
Driving
116
Page 119 of 216

Sand
When driving over sand, try to keep all four wheels on the most solid
area of the trail. Do not reduce the tire pressures but shift to a lower
gear and drive steadily through the terrain. Apply the accelerator slowly
and avoid spinning the wheels.
Mud and water
If you must drive through high water, drive slowly. Traction or brake
capability may be limited.
When driving through water, determine the depth; avoid water higher
than the bottom of the hubs (if possible) and proceed slowly. If the
ignition system gets wet, the vehicle may stall.
Once through water, always try the brakes. Wet brakes do not stop the
vehicle as effectively as dry brakes. Drying can be improved by moving
your vehicle slowly while applying light pressure on the brake pedal.
After driving through mud, clean off residue stuck to rotating driveshafts,
halfshafts and tires. Excess mud stuck on tires and rotating driveshafts
causes an imbalance that could damage drive components.
If the transmission, transfer case or front axle are submerged in water,
their fluids should be checked and changed, if necessary.
Water intrusion into the transmission may damage the
transmission.
Replace rear axle lubricant any time the axle has been submerged in
water. The rear axle does not normally require a lubricant change for the
life of the vehicle. Rear axle lubricant quantities are not to be checked or
changed unless a leak is suspected or repair is required.
Driving on hilly or sloping terrain
When driving on a hill, avoid driving crosswise or turning on steep
slopes. You could lose traction and slip sideways. Drive straight up,
straight down or avoid the hill completely. Know the conditions on the
other side of a hill before driving over the crest.
When climbing a steep hill, start in a lower gear rather than downshifting
to a lower gear from a higher gear once the ascent has started. This
reduces strain on the engine and the possibility of stalling.
When descending a steep hill, avoid sudden braking. Shift to a lower gear
when added engine braking is desired.
Driving
119
Page 121 of 216

DRIVING THROUGH WATER
Do not drive quickly through standing water, especially if the depth is
unknown. Traction or brake capability may be limited and if the ignition
system gets wet, your engine may stall. Water may also enter your
engine's air intake and severely damage your engine.
If driving through deep or standing water is unavoidable, proceed very
slowly. Never drive through water that is higher than the bottom of the
hubs.
Once through the water, always try the brakes. Wet brakes do not stop
the vehicle as effectively as dry brakes. Drying can be improved by
moving your vehicle slowly while applying light pressure on the brake
pedal.
Driving through deep water where the transmission is submerged
may allow water into the transmission and cause internal
transmission damage.
VEHICLE LOADING
Before loading a vehicle, familiarize yourself with the following terms:
²Base Curb Weight: Weight of the vehicle including any standard
equipment, fluids, lubricants, etc. It does not include passengers or
aftermarket equipment.
²Payload: Combined maximum allowable weight of cargo, passengers
and optional equipment. The payload equals the gross vehicle weight
rating minus base curb weight.
²GVW (Gross Vehicle Weight): Base curb weight plus payload
weight. The GVW is not a limit or a specification.
²GVWR (Gross Vehicle Weight Rating): Maximum total weight of
the base vehicle, passengers, optional equipment and cargo. The
GVWR is specific to each vehicle and is listed on the Safety
Compliance Label on the driver's door pillar.
²GAWR (Gross Axle Weight Rating): Carrying capacity for each
axle system. The GAWR is specific to each vehicle and is listed on the
Safety Compliance Label on the driver's door pillar.
Driving
121
Page 138 of 216

Fuse/Relay
LocationFuse Amp
RatingDescription
27 15A Electric Shift, Backup Lamps, Daytime
Running Lamps (DRL), Transmission Control
Switch, Pulse Vacuum Hub Lock
28 7.5A Generic Electronic Module (GEM), Radio
29 15A Radio
30 10A RABS Test Connector
31 Ð Not Used
32 Ð Not Used
33 15A Headlamps, Daytime Running Lamps (DRL)
Module, Instrument Cluster
34 Ð Not Used
35 15A Park Lamp/Trailer Tow Relay
36 Ð Not Used
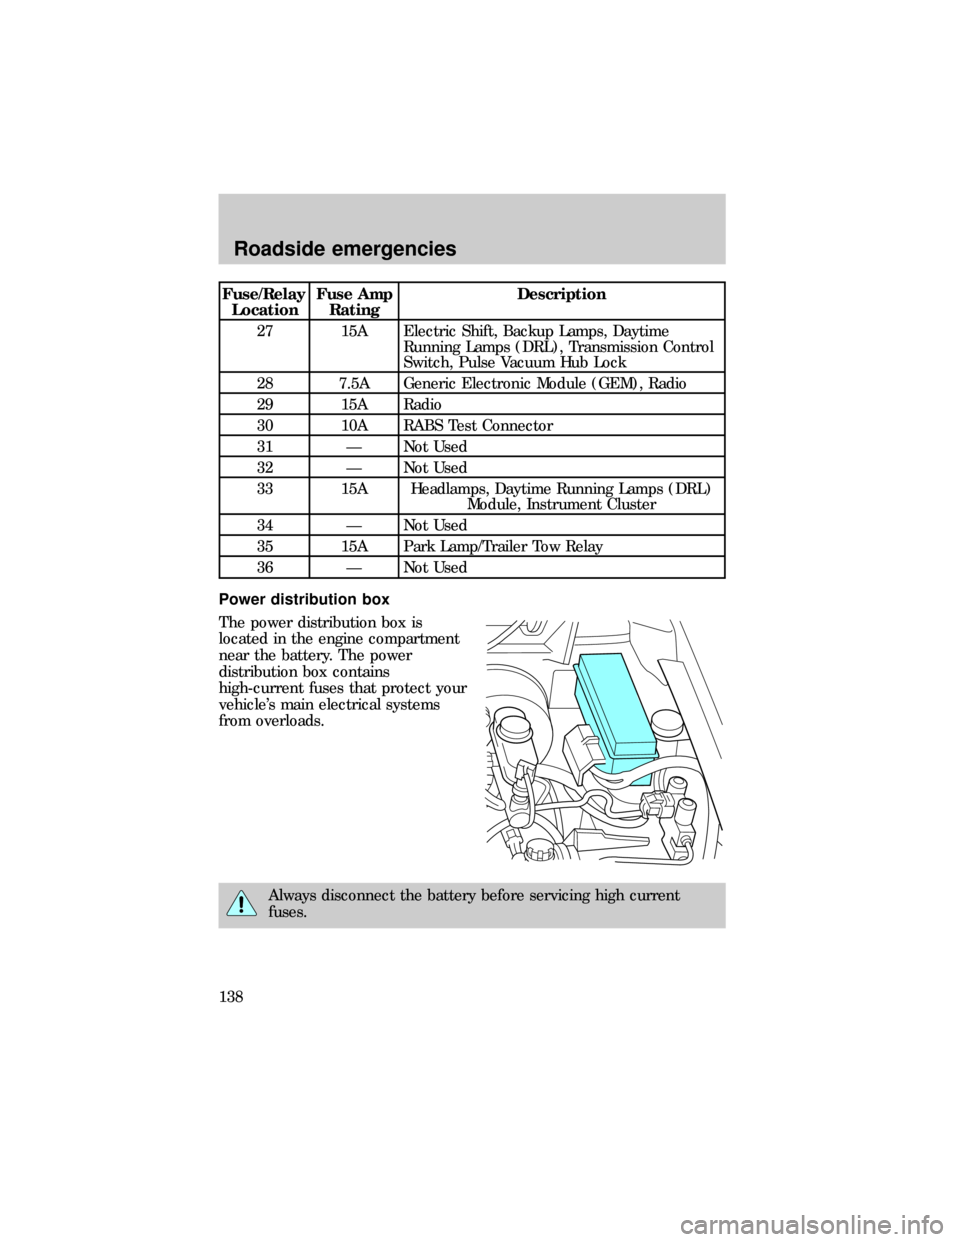
Power distribution box
The power distribution box is
located in the engine compartment
near the battery. The power
distribution box contains
high-current fuses that protect your
vehicle's main electrical systems
from overloads.
Always disconnect the battery before servicing high current
fuses.
Roadside emergencies
138
Page 145 of 216

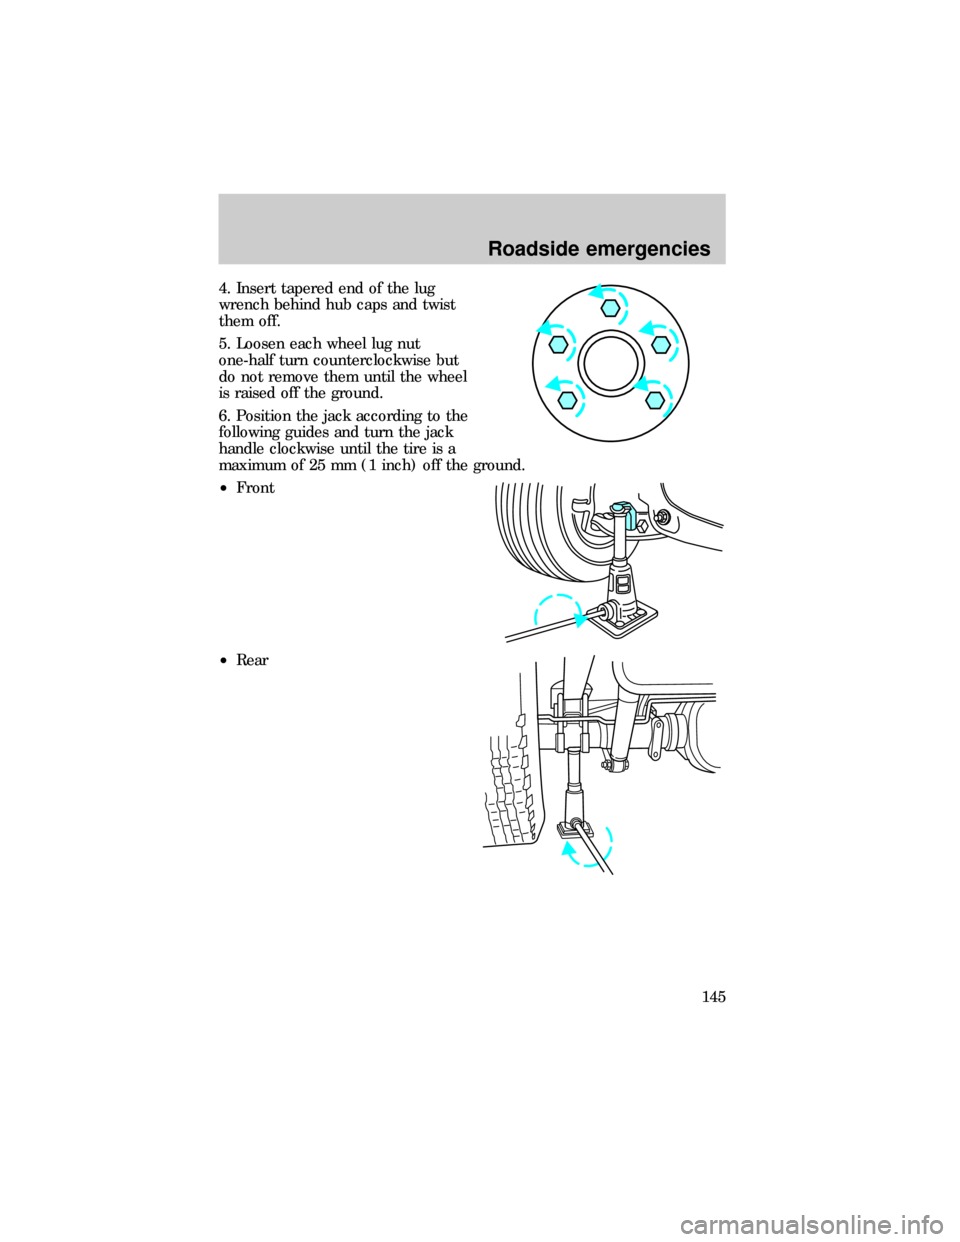
4. Insert tapered end of the lug
wrench behind hub caps and twist
them off.
5. Loosen each wheel lug nut
one-half turn counterclockwise but
do not remove them until the wheel
is raised off the ground.
6. Position the jack according to the
following guides and turn the jack
handle clockwise until the tire is a
maximum of 25 mm (1 inch) off the ground.
²Front
²Rear
Roadside emergencies
145
Page 146 of 216

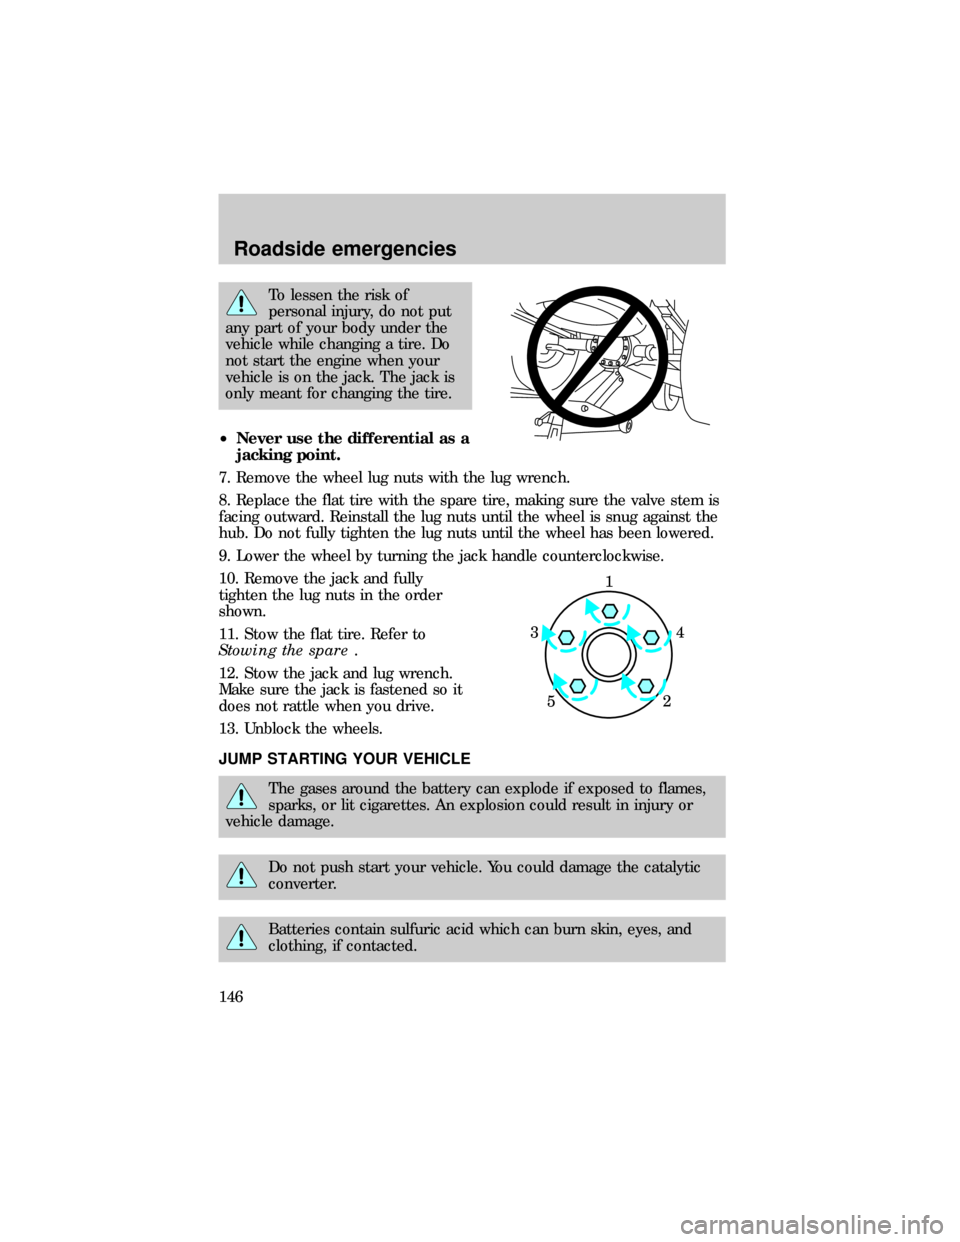
To lessen the risk of
personal injury, do not put
any part of your body under the
vehicle while changing a tire. Do
not start the engine when your
vehicle is on the jack. The jack is
only meant for changing the tire.
²Never use the differential as a
jacking point.
7. Remove the wheel lug nuts with the lug wrench.
8. Replace the flat tire with the spare tire, making sure the valve stem is
facing outward. Reinstall the lug nuts until the wheel is snug against the
hub. Do not fully tighten the lug nuts until the wheel has been lowered.
9. Lower the wheel by turning the jack handle counterclockwise.
10. Remove the jack and fully
tighten the lug nuts in the order
shown.
11. Stow the flat tire. Refer to
Stowing the spare.
12. Stow the jack and lug wrench.
Make sure the jack is fastened so it
does not rattle when you drive.
13. Unblock the wheels.
JUMP STARTING YOUR VEHICLE
The gases around the battery can explode if exposed to flames,
sparks, or lit cigarettes. An explosion could result in injury or
vehicle damage.
Do not push start your vehicle. You could damage the catalytic
converter.
Batteries contain sulfuric acid which can burn skin, eyes, and
clothing, if contacted.
1
4 3
52
Roadside emergencies
146